Configure Transparent Proxy
Table of Contents
Configure Transparent Proxy
| Where Can I Use This? | What Do I Need? |
|---|---|
|
|
With transparent proxy, the client browser is not aware of the proxy. Transparent
proxy supports inline mode deployment and does not support web cache communication
protocol (WCCP). Transparent proxy is transparent to the user without requiring
additional authentication.
PAN-OS
This is how you configure transparent proxy on the firewall or on
Panorama.
- (VM Series only) If you have not already done so, activate the license for web proxy.This step is required for the PA-1400, PA-3400, and VM Series. The following steps are for the VM series; for the PA-1400 and PA-3400, follow the steps to activate subscription licenses.
- Log in to the Customer Service Portal (CSP).Edit the deployment profile.Select Web Proxy (Promotional Offer).
![]() Click Update Deployment Profile.On the firewall, retrieve the license keys from the server.If the license key retrieval is not successful, restart the firewall and repeat this step before proceeding.Set up zones and interfaces.As a best practice, use Layer 3 (L3) for all interfaces and configure a separate zone for each interface within the same virtual routers and the same virtual systems.
Click Update Deployment Profile.On the firewall, retrieve the license keys from the server.If the license key retrieval is not successful, restart the firewall and repeat this step before proceeding.Set up zones and interfaces.As a best practice, use Layer 3 (L3) for all interfaces and configure a separate zone for each interface within the same virtual routers and the same virtual systems.- Configure an interface for the client.Configure an interface for the outgoing traffic to the internet.Configure a loopback interface for the proxy.All incoming traffic is routed through this interface to the proxy. Be sure to carefully copy the IP address for this interface and save it in a secure location because you must enter it as the Proxy IP address when you configure the web proxy.Set up the DNS proxy for Transparent Proxy.
- Configure a DNS proxy object for the proxy connection.Configure a DNS Server profile with both primary and secondary DNS servers.You must configure both a primary and a secondary DNS server for web proxy.Specify the loopback interface for the proxy connection.To enable decryption for MITM detection, create a self-signed root CA certificate or import a certificate signed by your enterprise certificate authority (CA). For more information, refer to the best practices for administrative access.Set up the Transparent Proxy.
- On the firewall, select then Edit the Proxy Enablement settings.Select Transparent Proxy as the Proxy Type then click OK to confirm the changes.If the only available option is None, verify that you have an active license for the web proxy feature.
![]() Edit the Transparent Proxy Configuration.
Edit the Transparent Proxy Configuration.![]() Specify the Connect Timeout to define (in seconds) how long the proxy waits for a TCP response from the web server. If there is no response after the specified amount of time has elapsed, the proxy closes the connection.Select the Upstream Interface.The upstream interface must be a loopback interface that is not associated with any other subnets.Specify the IP address of the loopback interface as the Proxy IP.Enter the IP address of the interface you configured in an earlier step.Specify the DNS Proxy object you created in an earlier step.Specify the loopback interface as the Upstream Interface.Click OK to confirm the changes.Configure the destination network address translation (DNAT) policy.You must configure the DNAT policy rule exactly as described in the following steps for the firewall to successfully use the web proxy to route traffic. Be sure to configure the DNAT policy rule so that it precedes the source network address translation (SNAT) policy rule.
Specify the Connect Timeout to define (in seconds) how long the proxy waits for a TCP response from the web server. If there is no response after the specified amount of time has elapsed, the proxy closes the connection.Select the Upstream Interface.The upstream interface must be a loopback interface that is not associated with any other subnets.Specify the IP address of the loopback interface as the Proxy IP.Enter the IP address of the interface you configured in an earlier step.Specify the DNS Proxy object you created in an earlier step.Specify the loopback interface as the Upstream Interface.Click OK to confirm the changes.Configure the destination network address translation (DNAT) policy.You must configure the DNAT policy rule exactly as described in the following steps for the firewall to successfully use the web proxy to route traffic. Be sure to configure the DNAT policy rule so that it precedes the source network address translation (SNAT) policy rule.- Select and Add a NAT policy rule.Enter a unique Name and verify that Group Rules by Tag is None then select the NAT Type.
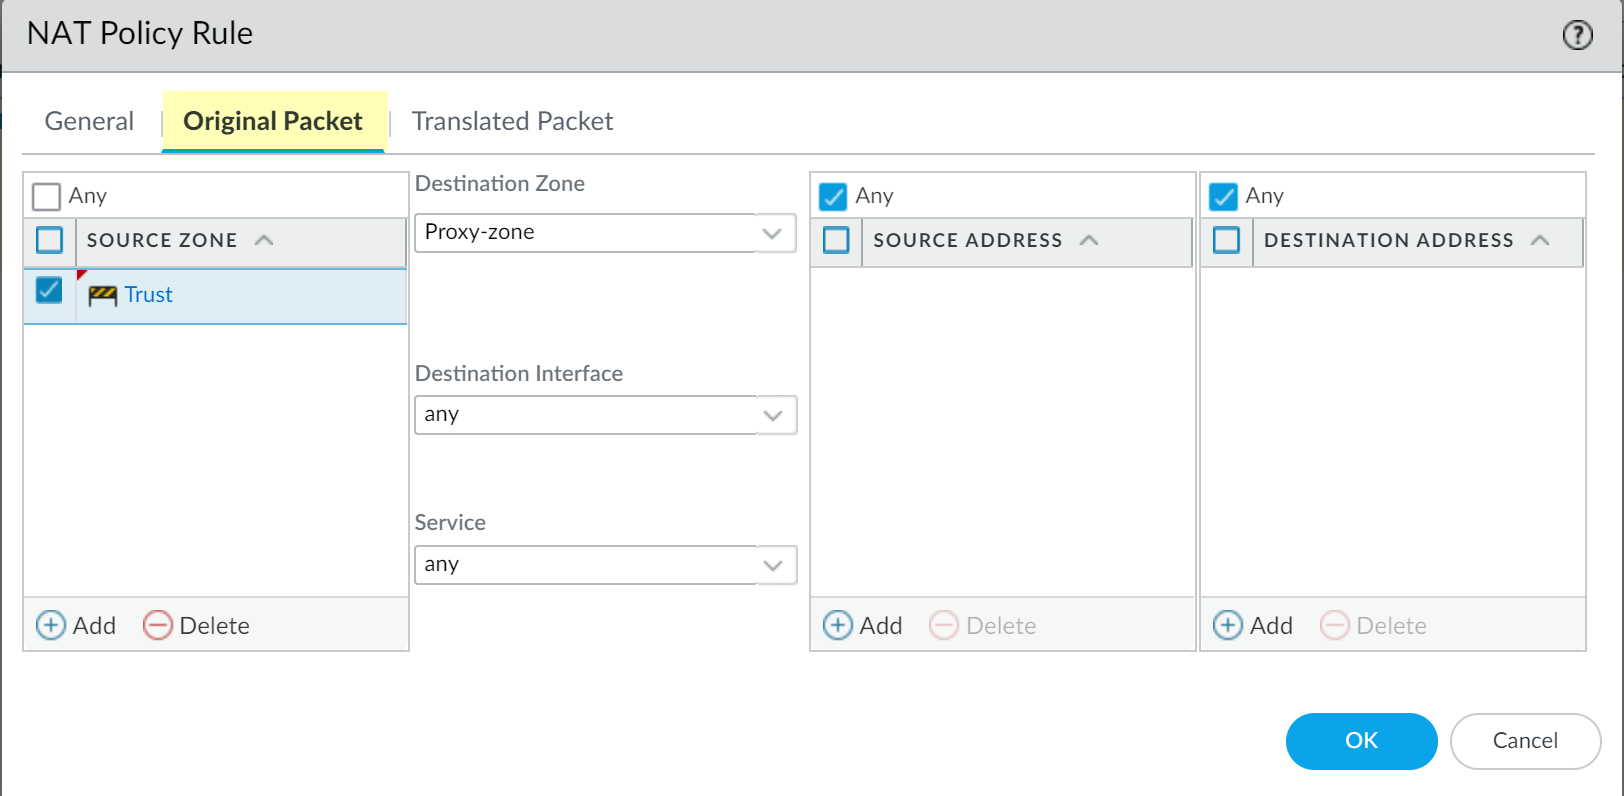
![]() Select Original Packet and Add a trusted zone as the Source Zone and the Destination Zone as the interface that contains the web proxy.
Select Original Packet and Add a trusted zone as the Source Zone and the Destination Zone as the interface that contains the web proxy.![]() Select Translated Packet and verify that Translation Type for Source Address Translation is None.
Select Translated Packet and verify that Translation Type for Source Address Translation is None.![]() Select Dynamic IP (with session distribution) as the Translation Type for the Destination Address Translation.Enter the IP address of the web proxy as the Translated Address.Enter the same IP address as the Proxy IP address specified in an earlier step.Enter 8080 as the Translated Port.Select a Session Distribution Method (for example, Round Robin).The session distribution method is not applicable for web proxy.Click OK and Commit the changes.Configure a security policy to allow and route the proxy traffic.
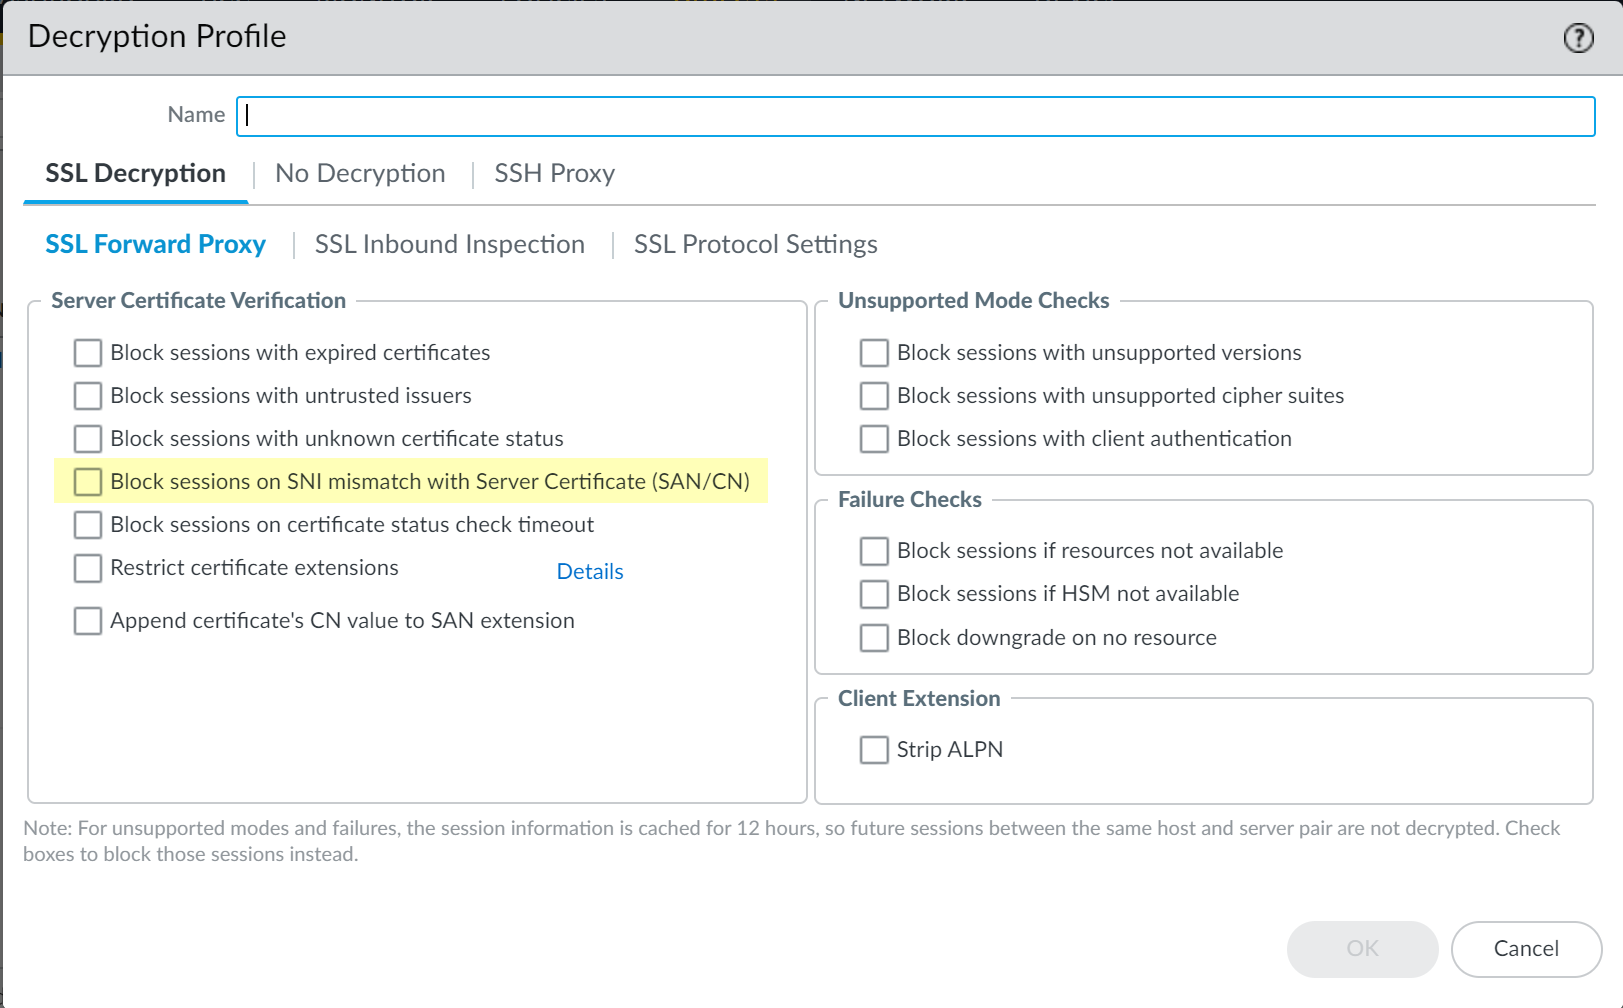
Select Dynamic IP (with session distribution) as the Translation Type for the Destination Address Translation.Enter the IP address of the web proxy as the Translated Address.Enter the same IP address as the Proxy IP address specified in an earlier step.Enter 8080 as the Translated Port.Select a Session Distribution Method (for example, Round Robin).The session distribution method is not applicable for web proxy.Click OK and Commit the changes.Configure a security policy to allow and route the proxy traffic.- Configure a source network address translation (SNAT) policy rule after the DNAT rule.Configure a decryption policy to decrypt traffic.Select the zone that contains the proxy interface as the source zone.(Optional but recommended) Select and select Block sessions on SNI mismatch with Server Certificate (SAN/CN) to automatically deny any sessions where the Server Name Indication (SNI) does not match the server certificate.
![]() Configure policy rules to allow access to the DNS proxy servers for both the client and the proxy.Configure a policy rule to allow traffic from the client to the proxy.Configure a policy rule to allow traffic from the proxy to the internet.If this is your initial transparent web proxy configuration, make a change in your proxy configuration () and in your interface configuration (), then Commit your changes to ensure the transparent web proxy configuration is correctly populated on the firewall.
Configure policy rules to allow access to the DNS proxy servers for both the client and the proxy.Configure a policy rule to allow traffic from the client to the proxy.Configure a policy rule to allow traffic from the proxy to the internet.If this is your initial transparent web proxy configuration, make a change in your proxy configuration () and in your interface configuration (), then Commit your changes to ensure the transparent web proxy configuration is correctly populated on the firewall.Strata Cloud Manager
This is how you configure a transparent proxy on cloud-managed firewalls.- (VM Series only) If you have not already done so, activate the license for web proxy.This step is required for the PA-1400, PA-3400, and VM Series. The following steps are for the VM series; for the PA-1400 and PA-3400, follow the steps to activate subscription licenses.
- Log in to the Customer Service Portal (CSP).Edit the deployment profile.Select Web Proxy (Promotional Offer).
![]() Click Update Deployment Profile.On the firewall, retrieve the license keys from the server.If the license key retrieval is not successful, restart the firewall and repeat this step before proceeding.Set up the necessary interfaces and zones.Do not edit the proxy zone.As a best practice, use Layer 3 (L3) for all interfaces and configure a separate zone for each interface within the same virtual routers and the same virtual systems.
Click Update Deployment Profile.On the firewall, retrieve the license keys from the server.If the license key retrieval is not successful, restart the firewall and repeat this step before proceeding.Set up the necessary interfaces and zones.Do not edit the proxy zone.As a best practice, use Layer 3 (L3) for all interfaces and configure a separate zone for each interface within the same virtual routers and the same virtual systems.- Configure an interface for the client.Configure an interface for the outgoing traffic to the internet.Set up the Transparent Proxy.
- In Strata Cloud Manager, select .Select the folder, snippet, or device for which you want to configure Transparent Proxy.Select Device SettingsProxyProxy SettingsCustomize.
![]() Select Transparent Proxy as the Mode.
Select Transparent Proxy as the Mode.![]() Specify the Client Facing Interface.This is the interface for client traffic that you configured in an earlier step.Specify an Outbound Zone for outgoing traffic to the internet.You can Create New if you don't already have an outbound zone configured.Specify the IP addresses for the primary and secondary DNS servers that you want to connect to and the interface for the DNS proxy connection.After you push your configuration, Strata Cloud Manager will automatically create a DNS Proxy Object with these specifications on your devices. You can view the object on the devices themselves but not in Strata Cloud Manager.(Optional) Specify the Connect Timeout to define (in seconds) how long the proxy waits for a response from the web server. If there is no response after the specified amount of time has elapsed, the proxy closes the connection. The default is 5 seconds.(Optional) Specify the Web Traffic Service Port if you'd like web traffic to use special ports. The default ports are 80 and 443.(Optional) Use the default loopback interface (loopback.999) or enter a different one.The loopback interface must follow the format loopback.x, with x being any integer value.After you push your configuration, Strata Cloud Manager will automatically create a loopback interface with these specifications on your devices. You can view the interface on the devices themselves but not in Strata Cloud Manager.(Optional) Choose Whether to nat outbound traffic and enter an Outbound Interface.This creates a source NAT rule. Select this if your network cannot directly reach the internet.Save.Configure Transparent Proxy Policy Rules.These are a set of rules that determine what traffic passes through the proxy. After you push your configuration, these rules create Destination NAT rules on your devices, which apply NAT to the traffic that passes through the loopback interface configured earlier.In Strata Cloud Manager, however, Transparent Proxy Policy rules are visible only in web proxy configuration, not under NAT elsewhere in the app.
Specify the Client Facing Interface.This is the interface for client traffic that you configured in an earlier step.Specify an Outbound Zone for outgoing traffic to the internet.You can Create New if you don't already have an outbound zone configured.Specify the IP addresses for the primary and secondary DNS servers that you want to connect to and the interface for the DNS proxy connection.After you push your configuration, Strata Cloud Manager will automatically create a DNS Proxy Object with these specifications on your devices. You can view the object on the devices themselves but not in Strata Cloud Manager.(Optional) Specify the Connect Timeout to define (in seconds) how long the proxy waits for a response from the web server. If there is no response after the specified amount of time has elapsed, the proxy closes the connection. The default is 5 seconds.(Optional) Specify the Web Traffic Service Port if you'd like web traffic to use special ports. The default ports are 80 and 443.(Optional) Use the default loopback interface (loopback.999) or enter a different one.The loopback interface must follow the format loopback.x, with x being any integer value.After you push your configuration, Strata Cloud Manager will automatically create a loopback interface with these specifications on your devices. You can view the interface on the devices themselves but not in Strata Cloud Manager.(Optional) Choose Whether to nat outbound traffic and enter an Outbound Interface.This creates a source NAT rule. Select this if your network cannot directly reach the internet.Save.Configure Transparent Proxy Policy Rules.These are a set of rules that determine what traffic passes through the proxy. After you push your configuration, these rules create Destination NAT rules on your devices, which apply NAT to the traffic that passes through the loopback interface configured earlier.In Strata Cloud Manager, however, Transparent Proxy Policy rules are visible only in web proxy configuration, not under NAT elsewhere in the app.- Select Add Rule.
![]() Name the rule.(Optional) Add tags to label your rule.Specify a source address or leave it as Any.Specify a destination address or leave it as Any.(Optional) Specify a destination interface.(Optional) Select a Service.Save.
Name the rule.(Optional) Add tags to label your rule.Specify a source address or leave it as Any.Specify a destination address or leave it as Any.(Optional) Specify a destination interface.(Optional) Select a Service.Save.![]() Push your configuration and verify on your firewalls.
Push your configuration and verify on your firewalls.- To verify, log in to the firewall and select .You should see information corresponding to the transparent proxy that you just configured.
![]()