Upgrade Firewalls When Panorama Is Not Internet-Connected
Table of Contents
Upgrade Firewalls When Panorama Is Not Internet-Connected
Upgrade firewall software to PAN-OS® 11.0 and install
content updates using Panorama™ when Panorama is not connected to
the internet.
For a list of software and content updates
you can install on firewalls, see Supported
Updates.
The new Skip Software Version Upgrade feature
enables you to skip up to three releases when deploying upgrades
from Panorama appliances on PAN-OS 11.0 to firewalls on PAN-OS 10.1
or later versions.
Before you can upgrade firewalls from Panorama, you must:
- Make sure Panorama is running the same or a later PAN-OS version than you are upgrading to. You must upgrade Panorama and its Log Collectors to 11.0 before upgrading the managed firewalls to this version. In addition, when upgrading Log Collectors to 11.0, you must upgrade all Log Collectors at the same time due to changes in the logging infrastructure.
- Ensure that firewalls are connected to a reliable power source. A loss of power during an upgrade can make a firewall unusable.
- Decide whether to stay in Legacy mode if the Panorama virtual appliance is in Legacy mode on upgrade to PAN-OS 11.0. Legacy mode is not supported for a new Panorama virtual appliance deployment running PAN-OS 9.1 or later release. If you upgrade the Panorama virtual appliance from PAN-OS 9.0 or earlier release to PAN-OS 11.0, Palo Alto Networks recommends reviewing the Setup Prerequisites for the Panorama Virtual Appliance and changing to Panorama mode or Management Only mode based on your needs.If you want to keep the Panorama virtual appliance in Legacy mode, increase CPUs and memory allocated to the Panorama virtual appliance to a minimum 16 CPUs and 32GB memory to successfully upgrade to PAN-OS 11.0. See the Setup Prerequisites for the Panorama Virtual Appliance for more information.
- (Recommended for multi-vsys managed firewalls) Transition all vsys of a multi-vsys managed firewall to Panorama.This is recommended to avoid commit issues on the multi-vsys managed firewall and allows you to take advantage of optimized shared object pushes from Panorama.This applies to multi-vsys firewalls upgraded from PAN-OS 10.1 to PAN-OS 11.0 using Skip Software Version Upgrade only.
- (Multi-vsys managed firewalls) Delete or rename any locally configured Shared object that has an identical name to an object in the Panorama Shared configuration. Otherwise, configuration pushes from Panorama fail after the upgrade and display the error <object-name> is already in use.This applies to multi-vsys firewalls upgraded from PAN-OS 10.1 to PAN-OS 11.0 using Skip Software Version Upgrade only.
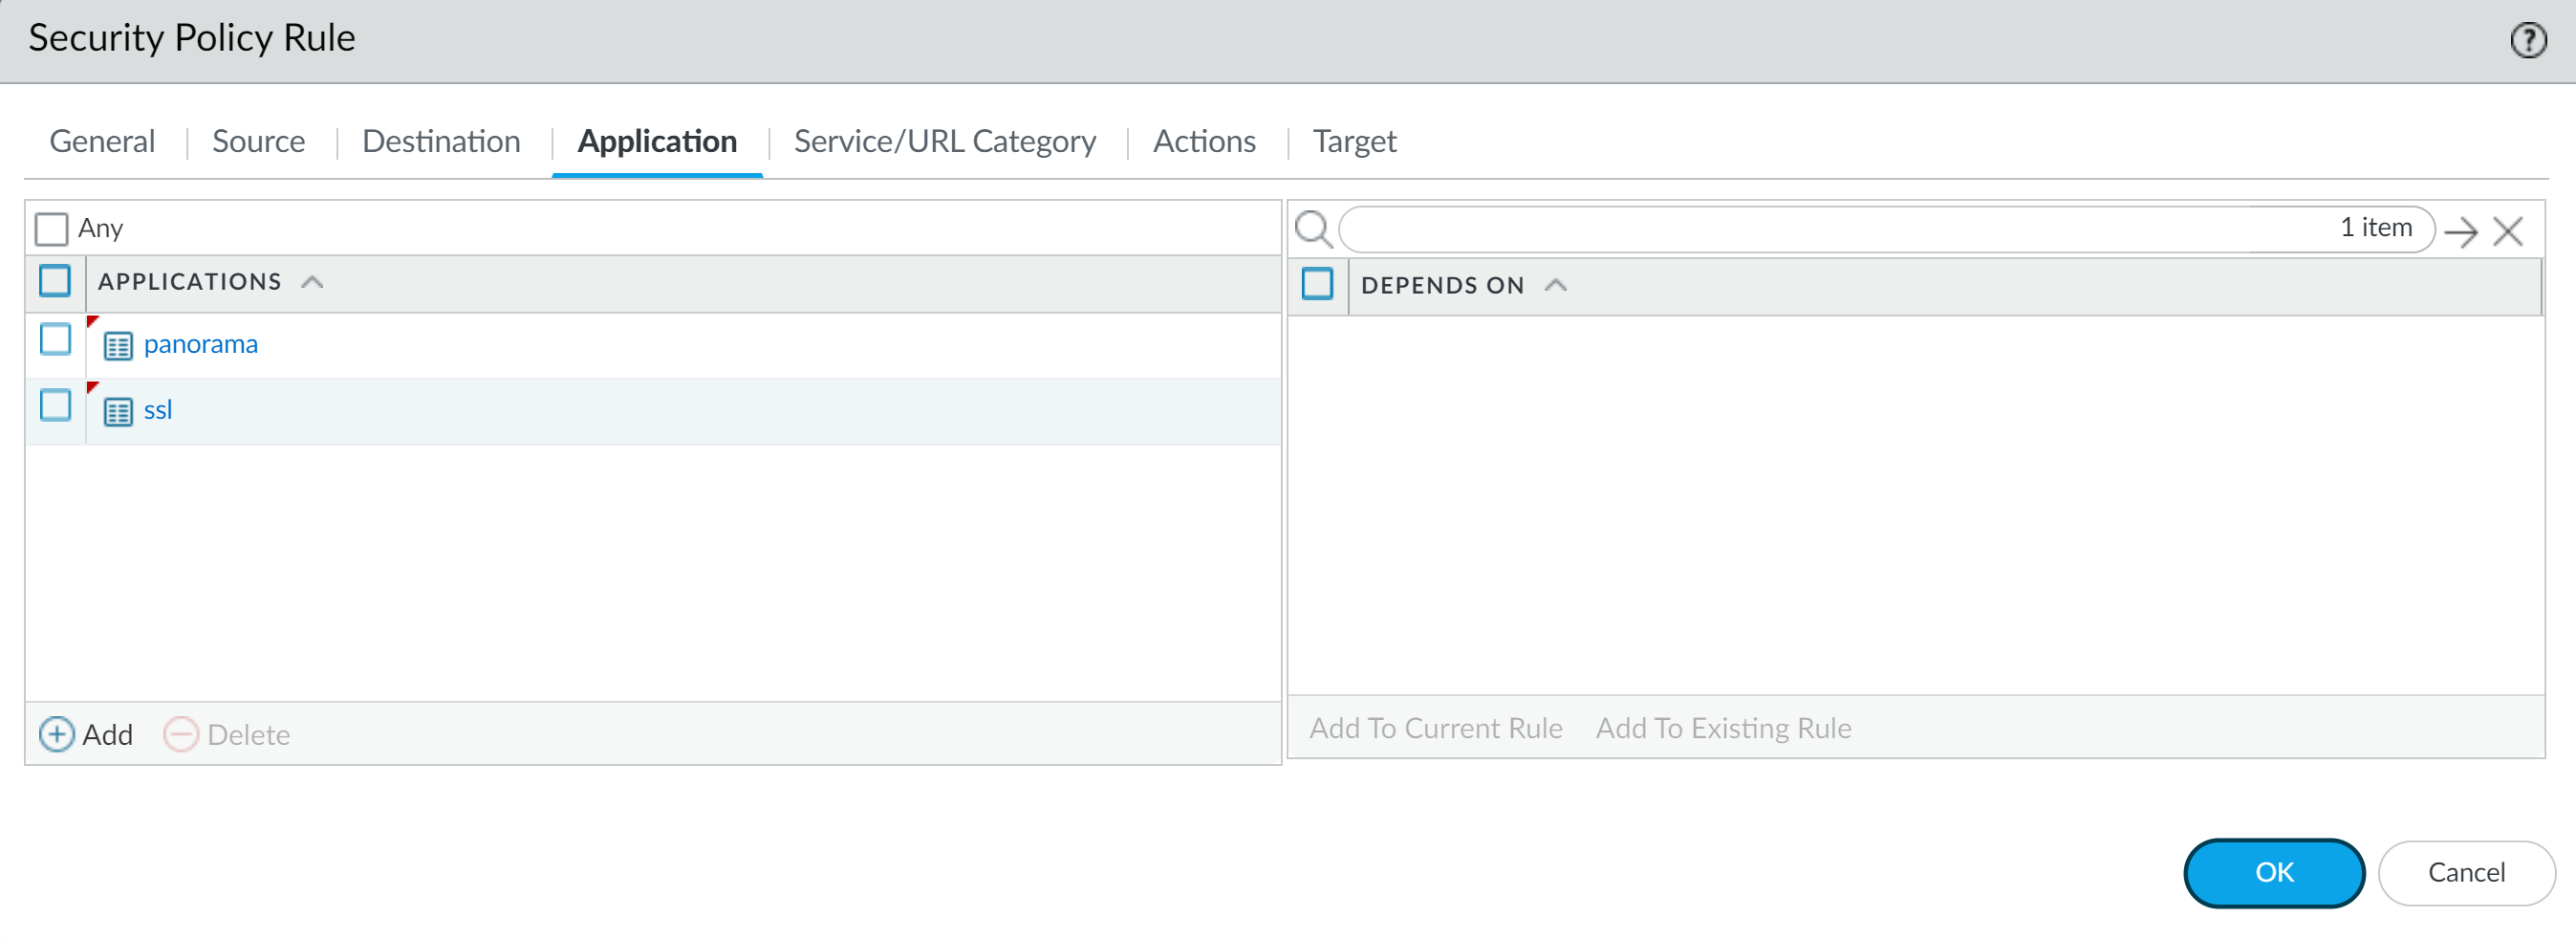
- Log in to the Panorama web interface.Modified your Security policy rule to allow ssl application traffic.This applies to firewalls upgraded from PAN-OS 10.1 to PAN-OS 11.0 using Skip Software Version upgrade only.This is required to prevent managed devices disconnecting from Panorama after upgrade to PAN-OS 11.0 if traffic between Panorama and managed devices is controlled using the panorama App-ID. Managed devices will disconnect from Panorama if the ssl application is not allowed before you upgrade.PAN-OS 11.0 uses TLS version 1.3 to encrypt the service certificate and handshake messages between Panorama and managed firewalls. As a result, the App-ID for traffic from managed firewalls to Panorama is reclassified from panorama to ssl. To continue communication between Panorama and managed devices, you must modify the Security policy rule controlling traffic between Panorama and managed devices to also allow the ssl application.Skip this step if the Security policy rule controlling traffic between Panorama and managed devices allows Any application or if you already modified your Security policy rule controlling traffic between Panorama and managed devices.
- Select .Select Device Group containing the Security policy rule controlling traffic between Panorama and managed firewalls.Select the Security policy rule.Select Application and Add the ssl.Do not delete the panorama application. This will cause all managed firewalls to disconnect from Panorama after you push the changes.
![]() Click OK.Select and Commit and Push your configuration changes.Save a backup of the current configuration file on each managed firewall you plan to upgrade.Although the firewall automatically creates a configuration backup, it is a best practice to create and externally store a backup before you upgrade.
Click OK.Select and Commit and Push your configuration changes.Save a backup of the current configuration file on each managed firewall you plan to upgrade.Although the firewall automatically creates a configuration backup, it is a best practice to create and externally store a backup before you upgrade.- Export Panorama and devices config bundle () to generate and export the latest configuration backup of Panorama and of each managed appliance.Save the exported file to a location external to the firewall. You can use this backup to restore the configuration if you have problems with the upgrade.Determine which content updates you need to install. Refer to Release Notes for the minimum content release version you must install for a PAN-OS® release.Palo Alto Networks highly recommends that Panorama, Log Collectors, and all managed firewalls run the same content release version.For each content update, determine whether you need updates and take note of which content updates you need to download in the following step.Ensure that Panorama is running the same but not a later content release version than is running on managed firewalls and Log Collectors.Determine the software upgrade path for the firewalls that you intend to update to Panorama 11.0.Log in to Panorama, select , and note the current Software Version for the firewalls you intend to upgrade.Review PAN-OS Upgrade Checklist, the known issues and changes to default behavior in the Release Notes and Upgrade/Downgrade Considerations for each release through which you pass as part of your upgrade path.(Optional) Upgrade your managed firewalls to PAN-OS 10.1.The skip software version upgrade feature supports managed firewalls running PAN-OS 10.1 or later releases. If your managed firewalls are on PAN-OS 10.0 or an earlier release, first upgrade to PAN-OS 10.1 or a later release.Perform a validation check of the release.In this step, you’re able to view the intermediate software and content images required to upgrade to 11.0.
- Select .View the intermediate software and content versions you need to download.Download the content and software updates to a host that can connect and upload the files to Panorama or a configured SCP server either over SCP or HTTPS.By default, you can upload a maximum of two software or content updates of each type to a Panorama appliance and if you download a third update of the same type, Panorama will delete the update for the earliest version of that type. If you need to upload more than two software updates or content updates of a single type, use the set max-num-images count <number> CLI command to increase the maximum number of images that Panorama can store.
- Use a host with internet access to log in to the Palo Alto Networks Customer Support web site.Download content updates:
- Click Dynamic Updates in the Resources section.
- Download the latest content release version (or, at a minimum, the same or a later version than you will install or is running on the Panorama management server) and save the file to the host; repeat for each content type you need to update.
Download software updates:- Return to the main page of the Palo Alto Networks Customer Support web site and click Software Updates in the Resources section.
- Review the Download column to determine which versions you need to install. The filename of the update packages indicates the model. For example, to upgrade a PA-220 and PA-5260 firewall to PAN-OS 11.0.0, download the PanOS_220-11.0.0, PanOS_3000-11.0.0, and PanOS_5200-11.0.0 images.You can quickly locate specific PAN-OS images by selecting PAN-OS for the PA-<series/model> from the Filter By drop-down.
Click the appropriate filename and save the file to the host.Download the intermediate software versions and latest content version.On PAN-OS 11.0, you are able to download multiple intermediate releases using the multi-image download capability.- Select the firewalls you want to upgrade ().Select a download source and click Download.Install content updates on managed firewalls.You must install content updates before software updates.Install the Applications or Applications and Threats update first and then install any other updates (Antivirus, WildFire®, or URL Filtering) as needed, one at a time, and in any sequence.
- Select .Click Upload, select the update Type, Browse to the appropriate content update file, and click OK.Click Install From File, select the update Type, and select the File Name of the content update you just uploaded.Select the firewalls on which to install the update.Click OK to start the installation.Repeat these steps for each content update.(Firewalls serving as GlobalProtect™ portals only) Upload and activate a GlobalProtect agent/app software update on firewalls.You activate the update on firewalls so that users can download it to their endpoints (client systems).
- Use a host with internet access to log in to the Palo Alto Networks Customer Support website.Download the appropriate GlobalProtect agent/app software update.On Panorama, select .Click Upload, Browse to the appropriate GlobalProtect agent/app software update on the host to which you downloaded the file, and click OK.Click Activate From File and select the File Name of the GlobalProtect agent/app update you just uploaded.You can activate only one version of agent/app software at a time. If you activate a new version but some agents require a previous version, you will have to reactivate the earlier version again for those agents to download the previous update.Select the firewalls on which to activate the update.Click OK to activate.Install PAN-OS 11.0.To avoid downtime when updating the software on high availability (HA) firewalls, update one HA peer at a time.For active/active firewalls, it doesn’t matter which peer you update first.For active/passive firewalls, you must update the passive peer first, suspend the active peer (fail over), update the active peer, and then return the active peer to a functional state (fail back).(SD-WAN only) To preserve an accurate status for your SD-WAN links, you must upgrade your hub firewalls to PAN-OS 11.0 before you upgrade your branch firewalls. Upgrading branch firewalls before hub firewalls may result in incorrect monitoring data () and for SD-WAN links to erroneously display as down.
- Perform the steps that apply to your firewall configuration to install the PAN-OS software update you just uploaded.
- Non-HA firewalls—Click Install in the Action column, select all the firewalls you are upgrading, select Reboot device after install, and click OK.
- Active/active HA firewalls:
- Confirm that the preemption setting is disabled on the first peer that you intend to upgrade ( > Election Settings). If enabled, then edit Election Settings and disable (clear) the Preemptive setting and Commit your change. You need only disable this setting on one firewall in each HA pair but ensure that the commit is successful before you proceed.
- Click Install, disable (clear) Group HA Peers, select either HA peer, select Reboot device after install, and click OK. Wait for the firewall to finish rebooting before you proceed.
- Click Install, disable (clear) Group HA Peers, select the HA peer that you didn’t update in the previous step, Reboot device after install, and click OK.
- Active/passive
HA firewalls—In this example, the active firewall is named fw1
and the passive firewall is named fw2:
- Confirm that the preemption setting is disabled on the first peer that you intend to upgrade ( > Election Settings). If enabled, then edit Election Settings and disable (clear) the Preemptive setting and Commit your change. You need only disable this setting on one firewall in each HA pair but ensure that the commit is successful before you proceed.
- Click Install in the Action column for the appropriate update, disable (clear) Group HA Peers, select fw2, Reboot device after install, and click OK. Wait for fw2 to finish rebooting before you proceed.
- After fw2 finishes rebooting, verify on fw1 (Dashboard > High Availability) that fw2 is still the passive peer (the Local firewall state is active and the Peer—fw2—is passive).
- Access fw1 and Suspend local device ().
- Access fw2 (Dashboard > High Availability) and verify that the Local firewall state is active and the Peer is suspended.
- Access Panorama, select , click Install in the Action column for the appropriate release, disable (clear) Group HA Peers, select fw1, Reboot device after install, and click OK. Wait for fw1 to finish rebooting before you proceed.
- Access fw1 (), click Make local device functional, and then wait two minutes before you proceed.
- On fw1 (Dashboard> High Availability), verify that the Local firewall state is passive and the Peer (fw2) is active.
(FIPS-CC mode only) Upgrade Panorama and Managed Devices in FIPS-CC Mode.Upgrading a managed firewall in FIPS-CC mode requires you to reset the secure connection status if you added the Dedicated Log Collector to Panorama management while the managed firewall was running a PAN-OS 11.0 release.You do not need to re-onboard the managed firewall added to Panorama management while the managed firewall was running a PAN-OS 10.0 or earlier release.Verify the software and content versions that are installed on each managed firewall.- Select .Locate the firewall and review the values in the Software Version, Apps and Threat, Antivirus, URL Filtering, and GlobalProtect Client columns.If you disabled preemption on one of your HA firewalls before you upgraded, then edit the Election Settings () and re-enable the Preemptive setting for that firewall.On the Panorama web interface, push the entire Panorama managed configuration to your managed firewalls.This step is required to enable selective commit and push of device group and template stack configuration changes from Panorama to your managed firewalls.This is required to successfully push configuration changes to multi-vsys firewalls managed by Panorama after successful upgrade to PAN-OS 11.0. For more information, see the change to default behavior for shared configuration objects for multi-vsys firewalls managed by Panorama.
- Select .Push.Regenerate or re-import all certificates to adhere to OpenSSL Security Level 2.On upgrade to PAN-OS 11.0, it is required that all certificates meet the following minimum requirements:
- RSA 2048 bits or greater, or ECDSA 256 bits or greater
- Digest of SHA256 or greater
See the PAN-OS Administrator's Guide or Panorama Administrator's Guide for more information on regenerating or re-importing your certificates.View the software upgrade history of the firewall.- Log into the Panorama interface.Go to and click Device History.