Manage the Master Key from Panorama
Table of Contents
10.0 (EoL)
Expand all | Collapse all
-
- Determine Panorama Log Storage Requirements
-
- Setup Prerequisites for the Panorama Virtual Appliance
- Perform Initial Configuration of the Panorama Virtual Appliance
- Set Up The Panorama Virtual Appliance as a Log Collector
- Set Up the Panorama Virtual Appliance with Local Log Collector
- Set up a Panorama Virtual Appliance in Panorama Mode
- Set up a Panorama Virtual Appliance in Management Only Mode
-
- Preserve Existing Logs When Adding Storage on Panorama Virtual Appliance in Legacy Mode
- Add a Virtual Disk to Panorama on an ESXi Server
- Add a Virtual Disk to Panorama on vCloud Air
- Add a Virtual Disk to Panorama on Alibaba Cloud
- Add a Virtual Disk to Panorama on AWS
- Add a Virtual Disk to Panorama on Azure
- Add a Virtual Disk to Panorama on Google Cloud Platform
- Add a Virtual Disk to Panorama on Hyper-V
- Add a Virtual Disk to Panorama on KVM
- Add a Virtual Disk to Panorama on Oracle Cloud Infrastructure (OCI)
- Mount the Panorama ESXi Server to an NFS Datastore
-
- Increase CPUs and Memory for Panorama on an ESXi Server
- Increase CPUs and Memory for Panorama on vCloud Air
- Increase CPUs and Memory for Panorama on Alibaba Cloud
- Increase CPUs and Memory for Panorama on AWS
- Increase CPUs and Memory for Panorama on Azure
- Increase CPUs and Memory for Panorama on Google Cloud Platform
- Increase CPUs and Memory for Panorama on Hyper-V
- Increase CPUs and Memory for Panorama on KVM
- Increase CPUs and Memory for Panorama on Oracle Cloud Infrastructure (OCI)
- Complete the Panorama Virtual Appliance Setup
-
- Convert Your Evaluation Panorama to a Production Panorama with Local Log Collector
- Convert Your Evaluation Panorama to a Production Panorama without Local Log Collector
- Convert Your Evaluation Panorama to VM-Flex Licensing with Local Log Collector
- Convert Your Evaluation Panorama to VM-Flex Licensing without Local Log Collector
- Convert Your Production Panorama to an ELA Panorama
-
- Register Panorama
- Activate a Panorama Support License
- Activate/Retrieve a Firewall Management License when the Panorama Virtual Appliance is Internet-connected
- Activate/Retrieve a Firewall Management License when the Panorama Virtual Appliance is not Internet-connected
- Activate/Retrieve a Firewall Management License on the M-Series Appliance
- Install the Panorama Device Certificate
-
- Panorama, Log Collector, Firewall, and WildFire Version Compatibility
- Install Updates for Panorama in an HA Configuration
- Install Updates for Panorama with an Internet Connection
- Install Updates for Panorama When Not Internet-Connected
- Install Updates Automatically for Panorama without an Internet Connection
- Migrate Panorama Logs to the New Log Format
-
- Migrate from a Panorama Virtual Appliance to an M-Series Appliance
- Migrate a Panorama Virtual Appliance to a Different Hypervisor
- Migrate from an M-Series Appliance to a Panorama Virtual Appliance
- Migrate from an M-100 Appliance to an M-500 Appliance
- Migrate from an M-100 or M-500 Appliance to an M-200 or M-600 Appliance
-
- Configure an Admin Role Profile
- Configure an Access Domain
-
- Configure a Panorama Administrator Account
- Configure Local or External Authentication for Panorama Administrators
- Configure a Panorama Administrator with Certificate-Based Authentication for the Web Interface
- Configure an Administrator with SSH Key-Based Authentication for the CLI
- Configure RADIUS Authentication for Panorama Administrators
- Configure TACACS+ Authentication for Panorama Administrators
- Configure SAML Authentication for Panorama Administrators
-
- Add a Firewall as a Managed Device
-
- Add a Device Group
- Create a Device Group Hierarchy
- Create Objects for Use in Shared or Device Group Policy
- Revert to Inherited Object Values
- Manage Unused Shared Objects
- Manage Precedence of Inherited Objects
- Move or Clone a Policy Rule or Object to a Different Device Group
- Push a Policy Rule to a Subset of Firewalls
- Manage the Rule Hierarchy
- Manage the Master Key from Panorama
- Redistribute Data to Managed Firewalls
-
- Add Standalone WildFire Appliances to Manage with Panorama
- Remove a WildFire Appliance from Panorama Management
-
-
- Configure a Cluster and Add Nodes on Panorama
- Configure General Cluster Settings on Panorama
- Remove a Cluster from Panorama Management
- Configure Appliance-to-Appliance Encryption Using Predefined Certificates Centrally on Panorama
- Configure Appliance-to-Appliance Encryption Using Custom Certificates Centrally on Panorama
- View WildFire Cluster Status Using Panorama
- Upgrade a Cluster Centrally on Panorama with an Internet Connection
- Upgrade a Cluster Centrally on Panorama without an Internet Connection
-
-
- Manage Licenses on Firewalls Using Panorama
-
- Supported Updates
- Schedule a Content Update Using Panorama
- Upgrade Log Collectors When Panorama Is Internet-Connected
- Upgrade Log Collectors When Panorama Is Not Internet-Connected
- Upgrade Firewalls When Panorama Is Internet-Connected
- Upgrade Firewalls When Panorama Is Not Internet-Connected
- Upgrade a ZTP Firewall
- Revert Content Updates from Panorama
-
- Preview, Validate, or Commit Configuration Changes
- Enable Automated Commit Recovery
- Compare Changes in Panorama Configurations
- Manage Locks for Restricting Configuration Changes
- Add Custom Logos to Panorama
- Use the Panorama Task Manager
- Reboot or Shut Down Panorama
- Configure Panorama Password Profiles and Complexity
-
-
- Verify Panorama Port Usage
- Resolve Zero Log Storage for a Collector Group
- Replace a Failed Disk on an M-Series Appliance
- Replace the Virtual Disk on an ESXi Server
- Replace the Virtual Disk on vCloud Air
- Migrate Logs to a New M-Series Appliance in Log Collector Mode
- Migrate Logs to a New M-Series Appliance in Panorama Mode
- Migrate Logs to a New M-Series Appliance Model in Panorama Mode in High Availability
- Migrate Logs to the Same M-Series Appliance Model in Panorama Mode in High Availability
- Migrate Log Collectors after Failure/RMA of Non-HA Panorama
- Regenerate Metadata for M-Series Appliance RAID Pairs
- View Log Query Jobs
- Troubleshoot Commit Failures
- Troubleshoot Registration or Serial Number Errors
- Troubleshoot Reporting Errors
- Troubleshoot Device Management License Errors
- Troubleshoot Automatically Reverted Firewall Configurations
- Complete Content Update When Panorama HA Peer is Down
- View Task Success or Failure Status
- Downgrade from Panorama 10.0
End-of-Life (EoL)
Manage the Master Key from Panorama
Deploy new, or renew expiring master keys, to firewalls,
log collectors, and WF-500 appliances from the Panorama™ management
server.
Panorama, firewalls, Log Collectors, and WF-500
appliances use a master key to encrypt sensitive elements in the
configuration and they have a default master key they use to encrypt
passwords and configuration elements.
As part of a standard
security practice, you should replace the default master key and
change the key on each individual firewall, Log Collector, WildFire
appliance, and Panorama before it expires. You must deploy the same
master key to all of your managed devices and you must configure
the master key on Panorama to successfully push the configuration
from Panorama to your managed devices. To ensure a uniform key deployment,
deploy a new master key or renew an expiring master key on multiple
firewalls, Log Collectors, and WF-500 appliances directly from Panorama. See Configure the Master Key for
more information on configuring a master key.
To update the
master key for managed firewalls from Panorama, the configuration pushed
from Panorama and the local firewall configuration must not contain
any cross references to each other in their configuration objects.
In this procedure, you must contact Palo Alto Networks Support to push the
Panorama configuration back to managed firewalls for which you localized the
configuration and ensure you have a complete list of all local overrides on your
managed firewalls. Failure to preserve important local firewall configurations
or restore any local overrides or references can result in network
disruptions.
Palo Alto Networks recommends updating
the master key from Panorama during a planned maintenance window
and with the help of Palo Alto Networks Support to
avoid network disruptions for your organization.
If your managed
firewalls contain both local and Panorama pushed configuration that
reference one another, you are required to either localize the configuration
to the firewall. This removes any local overrides of a Panorama
pushed configuration which may lead to network disruptions if not
restored correctly.
For managed firewalls in a high availability
(HA) configuration, you are required to disable HA as well.
When a master key expires, you must enter
the current master key in order to configure a new master key.
Be
sure to keep track of the master key you deploy to your managed
firewalls, Log Collectors, and WildFire appliances because master
keys cannot be recovered. you must reset to factory default if you
cannot provide the current master key when it expires.
- Log in to the Panorama Web Interface.
- (Best Practice) Select Commit and Commit
and Push any pending configuration changes. Panorama must re-encrypt data using the new master key. To ensure all configuration elements are encrypted with the new master key, you should commit all pending changes before deploying the new master key.
- Configure the firewall, Log Collector, and WildFire appliance
master key to automatically renew with the same master key after
the lifetime of the key expires.Automatically renewing the master key allows you to keep your configuration encrypted in the event the key expires before a maintenance window but this is not a replacement for deploying a new master key after the key lifetime expires. Consider the number of days until your next available maintenance window when configuring the master key to automatically renew when the lifetime of the key expires.
- Select DeviceMaster Key and Diagnostics and select the template containing the managed firewall, Log Collector, or WildFire master key configuration settings.
- Edit the Master Key setting.
- Configure Panorama to Auto Renew with Same Master Key for a specified number of days or hours.
- Localize the managed firewall configuration.This step is required only if the managed firewall has a local and Panorama pushed configuration that reference each other or local overrides of a Panorama pushed configuration.Skip this step if your managed firewall configuration is entirely pushed from Panorama, or if the managed firewall configuration contains both a local and Panorama pushed configuration contains no references to each other or local overrides.
- Log in to the firewall web interface.
- Locate and document all local overrides of the Panorama
pushed configuration.This step is required when you restore configuration objects pushed from Panorama to the managed firewall configuration. Localizing the managed firewall configuration removes all local overrides and converts them into local configuration objects. When you restore the managed firewall configuration, these objects may be overridden with a Panorama pushed configuration objects of the same name and not have the firewall specific values.
- Select DeviceSetupManagement and edit the Panorama Settings.
- Disable Panorama Policy and Objects and Import
Panorama Policy and Objects before disabling.Import Panorama Policy and Objects before disabling to import the Panorama pushed policy and device group objects to the local firewall configuration. Otherwise, the firewall deletes these Panorama pushed policy and device settings from the managed firewall.
- Click OK.
- Disable Device and Network Templates and Import
Device and Network Templates before disabling.Import Device and Network Templates before disabling to import the Panorama pushed device and template objects to the local firewall configuration. Otherwise, the firewall deletes these Panorama pushed device and template settings from the managed firewall.
- Click OK.
- Commit.
- Deploy
the master key to managed firewalls.
- (HA only) Disable Config Sync for
managed firewalls.This step is required before deploying a new master key to a firewall HA pair
- Select DeviceHigh AvailabilityGeneral and select the Template containing the managed firewall HA configuration.
- Edit the HA Pair Settings Setup.
- Disable (clear) Enable Config Sync and click OK.
- Commit and Commit and Push your configuration changes.
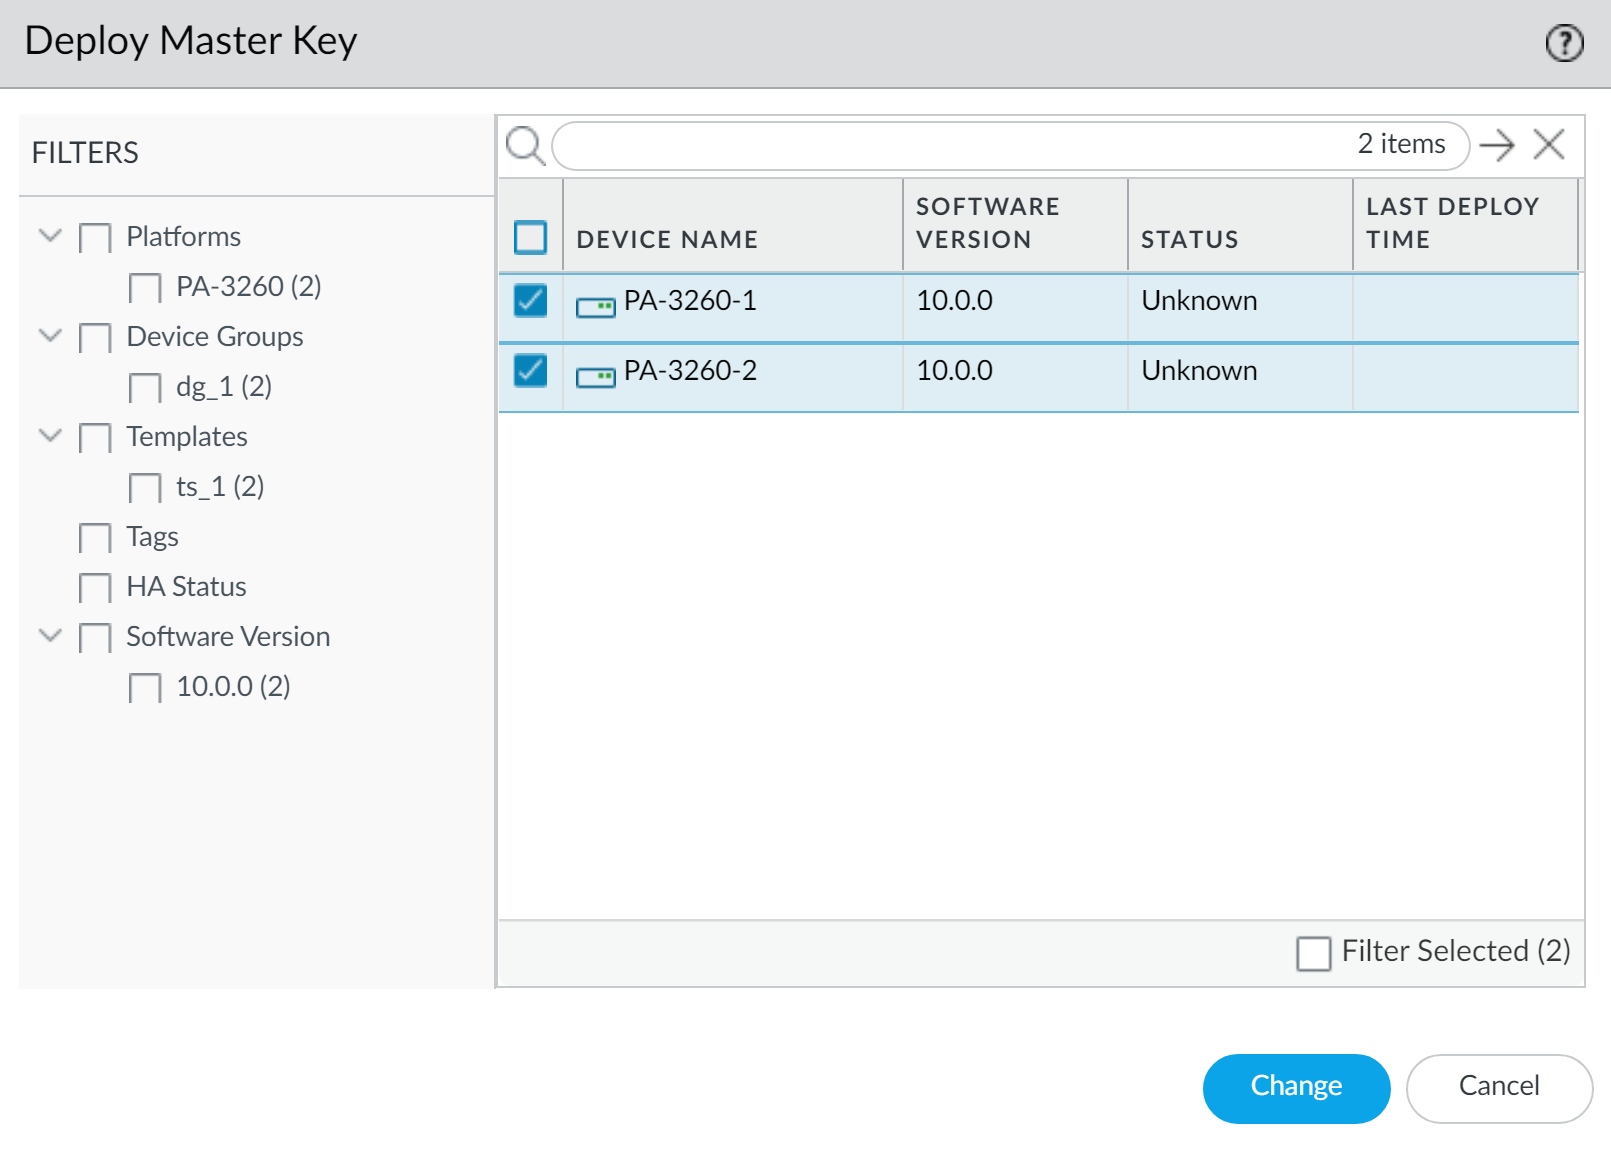
- Select PanoramaManaged DevicesSummary and Deploy Master Key.
- Select
all devices and Change the master key.
![]()
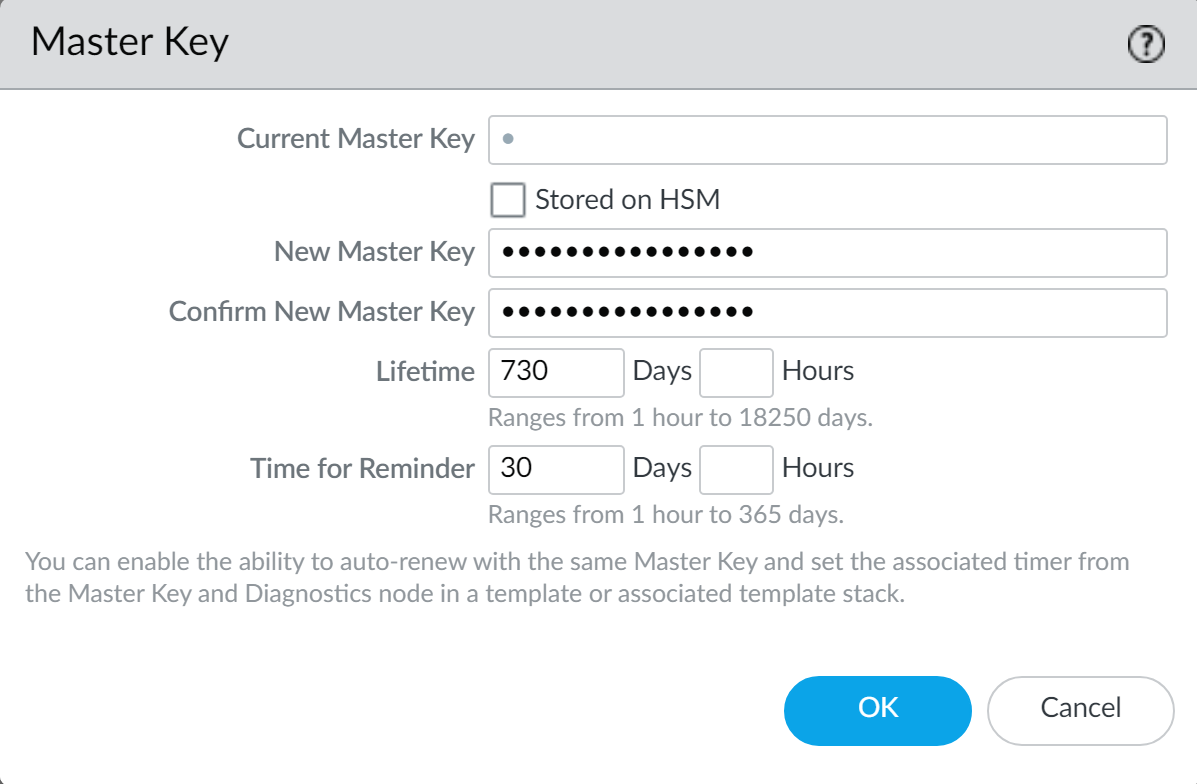
- Configure the master key:
- If renewing a master key, enter the Current Master Key. If you are replacing the default master key with a new master key, do not specify a Current Master Key.
- Specify the New Master Key and Confirm Master Key.
- Configure the master key Lifetime and Time for Reminder.
- Click OK.
![]()
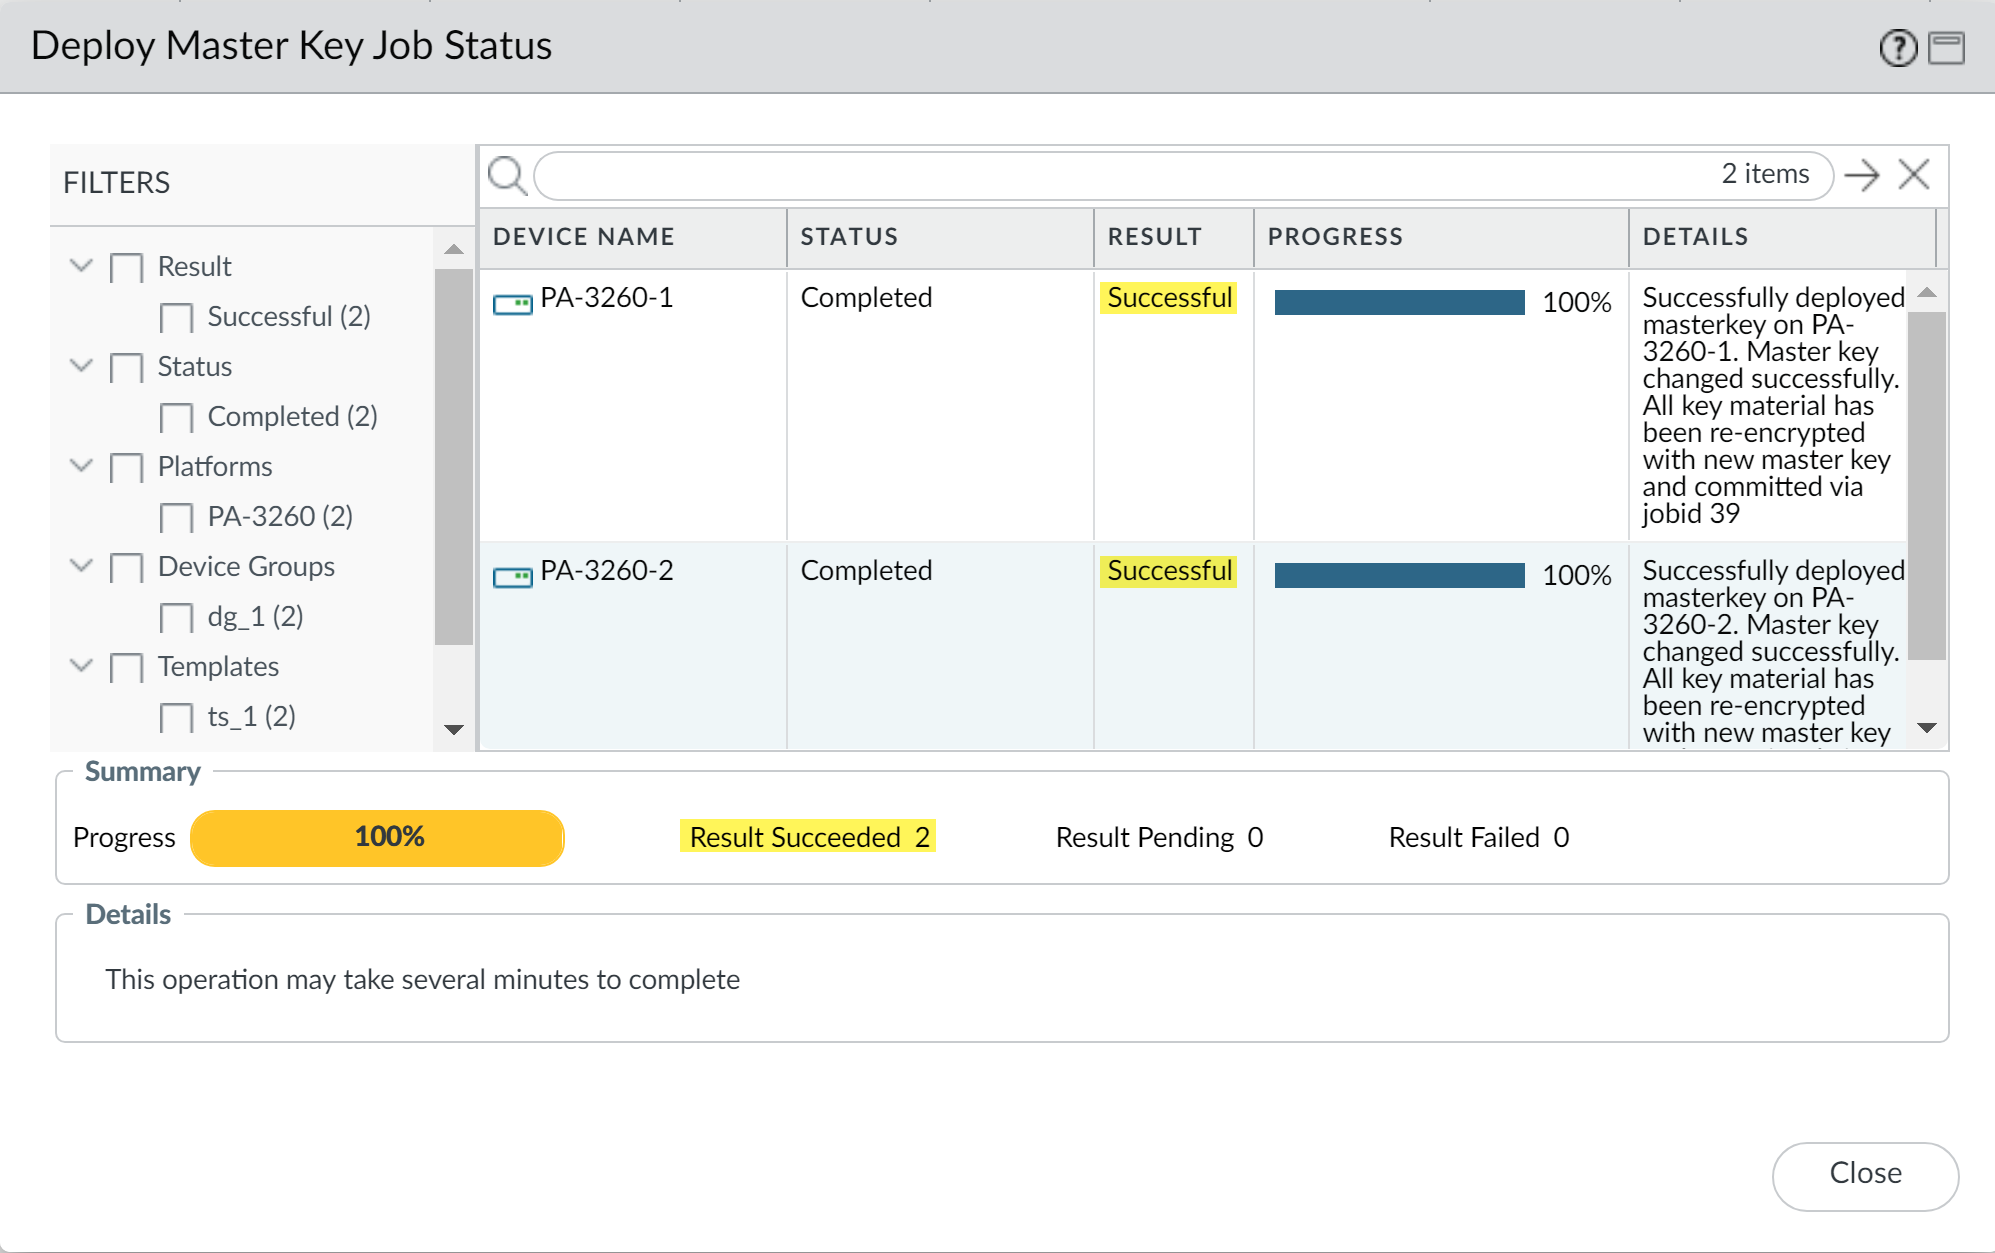
- Verify
that the master key was deployed successfully to all selected devices.A System log generates when you deploy a new master key from Panorama.
![]()
- (HA only) Disable Config Sync for
managed firewalls.
- Deploy the master key to Log Collectors.The master key configured for your Log Collectors must be identical to the master key configured for Panorama and managed devices.
- Select PanoramaManaged Collectors and Deploy Master Key.
- Select all devices and Change the master key.
- Configure the master key:
- If renewing a master key, enter the Current Master Key. If you are replacing the default master key with a new master key, do not specify a Current Master Key.
- Specify the New Master Key and Confirm Master Key.
- Configure the master key Lifetime and Time for Reminder.
- Click OK.
- Verify that the master key was deployed successfully
to all selected devices.A System log generates when you deploy a new master key from Panorama.
- Deploy
the master key to managed WildFire appliances.The master key configured for your WildFire appliances must be identical to the master key configured for Panorama and managed devices.
- Select PanoramaManaged WildFire Appliances and Deploy Master Key.
- Select all devices and Change the master key.
- Configure the master key:
- If renewing a master key, enter the Current Master Key. If you are replacing the default master key with a new master key, do not specify a Current Master Key.
- Specify the New Master Key and Confirm Master Key.
- Configure the master key Lifetime and Time for Reminder.
- Click OK.
- Verify that the master key was deployed successfully
to all selected devices.A System log generates when you deploy a new master key from Panorama.
- Configure the master key on Panorama.The master key configured for Panorama must be identical to the master key configured for managed firewalls, Log Collectors, and WildFire appliances.
- (HA only) Disable the HA configuration
for Panorama.This step is required to successfully change the master for both Panorama HA peers. You are unable to commit configuration changes on the secondary HA peer when Panorama is in an HA configuration.
- Select PanoramaHigh AvailabilityGeneral and edit the HA Setup.
- Disable (uncheck) Enable HA and click OK.
- Commit and Commit to Panorama.
- Select PanoramaMaster Key and Diagnostics and
configure the master key.
- If renewing a master key, enter the Current Master Key. If you are replacing the default master key with a new master key, do not specify a Current Master Key.
- Configure the New Master Key and Confirm Master Key.
- Configure the master key Lifetime and Time for Reminder.
- Click OK.
- (Optional) Configure the Panorama master
key to automatically renew.Configure this setting to automatically renew the master key deployed on Panorama. Otherwise, the master key expires per the configured master key lifetime and you must deploy a new master key.
- Select PanoramaMaster Key and Diagnostic and edit the Master Key setting.
- Configure the Auto Renew With Same Master Key setting.
- Click OK.
- Select CommitCommit to Panorama and Commit your changes.
- (HA only) Repeat this step to configure an
identical master key on the secondary HA peer. You must manually configure an identical master key on the primary and secondary HA peers when Panorama is in an HA configuration. The master key is not synchronized between the primary and secondary HA peers.
- (HA only) Disable the HA configuration
for Panorama.
- (HA Panorama only) Reconfigure the Panorama
HA configuration.Repeat this step for both the primary and secondary Panorama HA peers.
- Select PanoramaHigh AvailabilityGeneral and edit the HA Setup.
- Enable (check) Enable HA and click OK.
- Commit and Commit to Panorama.
- (HA Firewalls only) Enable config sync for managed
firewalls.
- Select DeviceHigh AvailabilityGeneral and select the Template containing the managed firewall HA configuration.
- Edit the HA Pair Settings Setup.
- Enable (check) Enable Config Sync and click OK.
- Commit and Commit and Push your configuration changes.
- Enable Panorama to push configuration objects to the
managed firewall.
- Log in to the firewall web interface.
- Select DeviceSetupManagement and edit the Panorama Settings.
- Enable Panorama Policy and Objects and click OK.
- Enable Device and Network Templates and click OK.
- Click OK.
- Commit.
- Push the Panorama configuration back to managed firewalls
for which you localized the configuration. Perform this step with Palo Alto Networks Support and ensure you have a complete list of all local overrides on your managed firewalls. Failure to preserve important local firewall configurations or restore any local overrides or references can result in network disruptions.
- Log in to the Panorama Web Interface.
- Select CommitPush to Devices and Edit Selections.
- Check (enable) Include Device and Network
Templates and Force Template Values.This is required to convert the localized Panorama configuration on the managed firewall back to a Panorama pushed configuration.
- Select Device Groups or Templates to select the managed firewall that required localizing the Panorama pushed configuration.
- Click OK.
- Push to the selected managed firewalls.
- Log in to the firewall web interface of the impacted managed firewalls to modify the local firewall configuration as needed.


