Prisma Access
Onboard a ZTNA Connector Using Hyper-V
Table of Contents
Expand All
|
Collapse All
Prisma Access Docs
-
- 6.1 Preferred and Innovation
- 6.0 Preferred and Innovation
- 5.2 Preferred and Innovation
- 5.1 Preferred and Innovation
- 5.0 Preferred and Innovation
- 4.2 Preferred
- 4.1 Preferred
- 4.0 Preferred
- 3.2 Preferred and Innovation
- 3.1 Preferred and Innovation
- 3.0 Preferred and Innovation
- 2.2 Preferred
-
-
- 4.0 & Later
- Prisma Access China
-
-
Onboard a ZTNA Connector Using Hyper-V
Onboard a ZTNA Connector using Microsoft Hyper-V.
To onboard a ZTNA Connector using a Microsoft Hyper-V virtual machine (VM), complete
the following steps.
Before you start, make sure that you have the following prerequisites:
- Download the ZTNA Connector Hyper-V image from the Customer Support Portal (CSP) under UpdatesSoftware UpdatesPrisma Access ZTNA Connector for Hyper-V.
- Make sure that you have a Hyper-V VM that meets the minimum hosting environments for ZTNA Connector.
- Create a Connector Group and a Connector for the Hyper-V VM.Select ConfigurationZTNA ConnectorConnectors, and find the connector you created for the Hyper-V VM, Copy Token in the Status area, and copy the Key and Secret values.
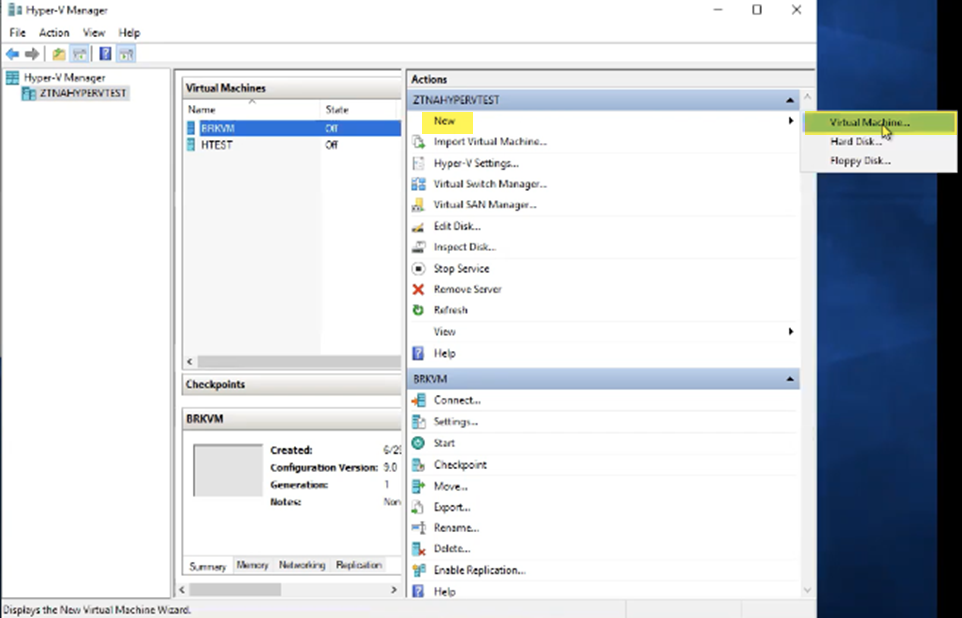
![]() Upload the vhd image you downloaded from the CSP to the Hyper-V VM.Make sure that the location you choose is reachable from the Hyper-V VM.One (vhd) file is required for each Hyper-V VM.Go to Hyper-V Manager and create a new virtual machine by selecting ActionsNewVirtual Machine.This workflow shows the steps you perform to deploy Hyper-V VMs in a Microsoft server. The Hyper-V UI might look different in your environment.
Upload the vhd image you downloaded from the CSP to the Hyper-V VM.Make sure that the location you choose is reachable from the Hyper-V VM.One (vhd) file is required for each Hyper-V VM.Go to Hyper-V Manager and create a new virtual machine by selecting ActionsNewVirtual Machine.This workflow shows the steps you perform to deploy Hyper-V VMs in a Microsoft server. The Hyper-V UI might look different in your environment.![]() Go to the Next screen and enter a unique name for the VM and go to the Next page.(Optional) To change the location of the VM, select Store the virtual machine in a different location and select the location.
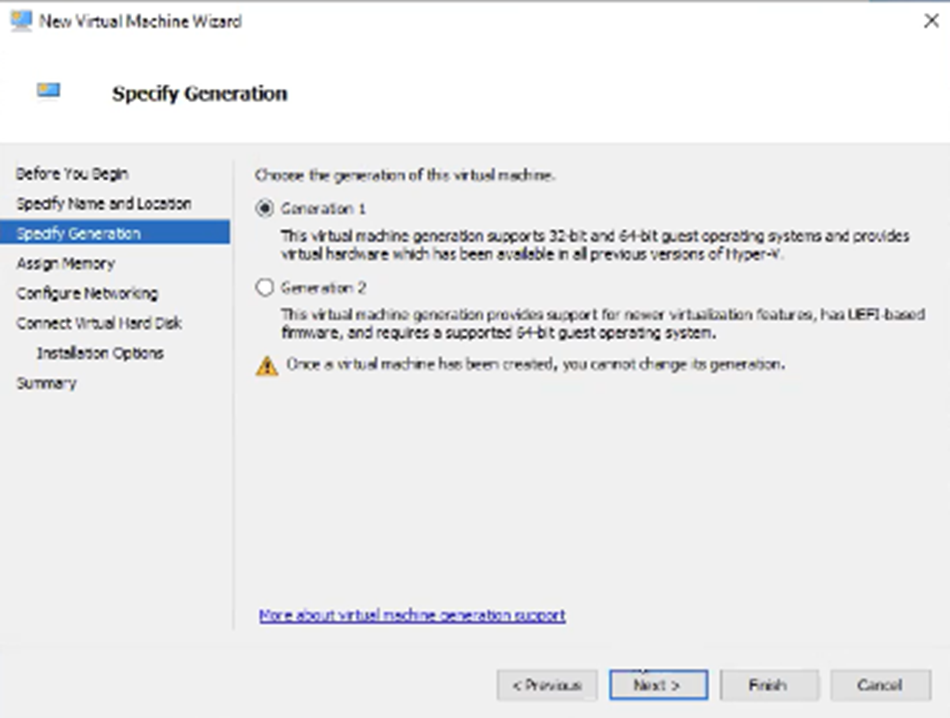
Go to the Next screen and enter a unique name for the VM and go to the Next page.(Optional) To change the location of the VM, select Store the virtual machine in a different location and select the location.![]() Select Generation 1 as the VM generation and go to the Next page.This is the generation that the ZTNA Connector vhd file supports.
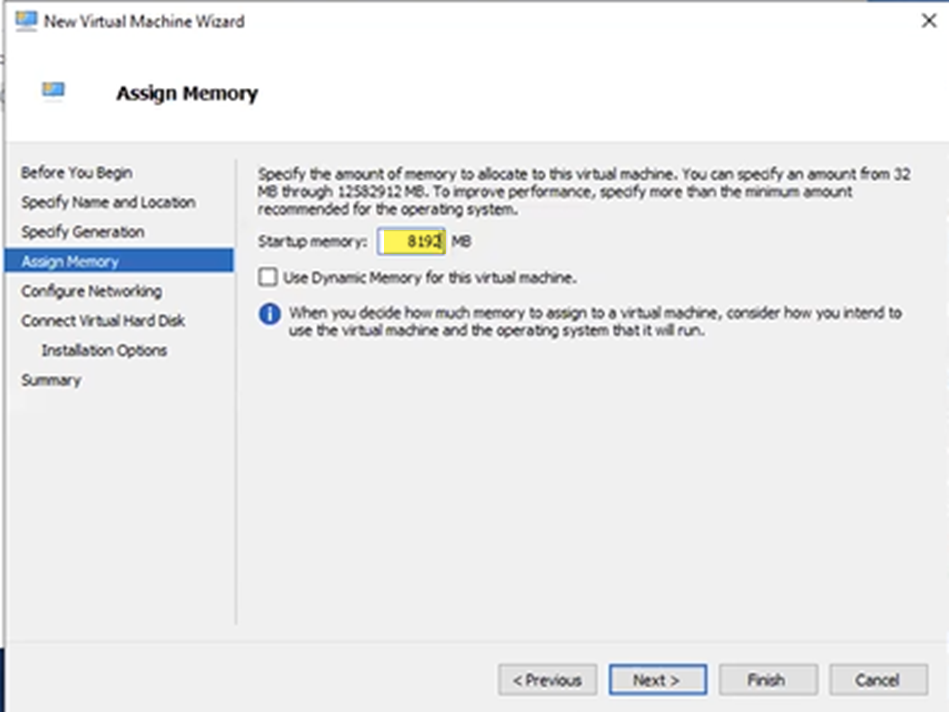
Select Generation 1 as the VM generation and go to the Next page.This is the generation that the ZTNA Connector vhd file supports.![]() Assign memory to the VM.Allocate a minimum memory of 8192 MB (8 GB), which meets the minimum requirements for a Hyper-V VM and go to the Next page.
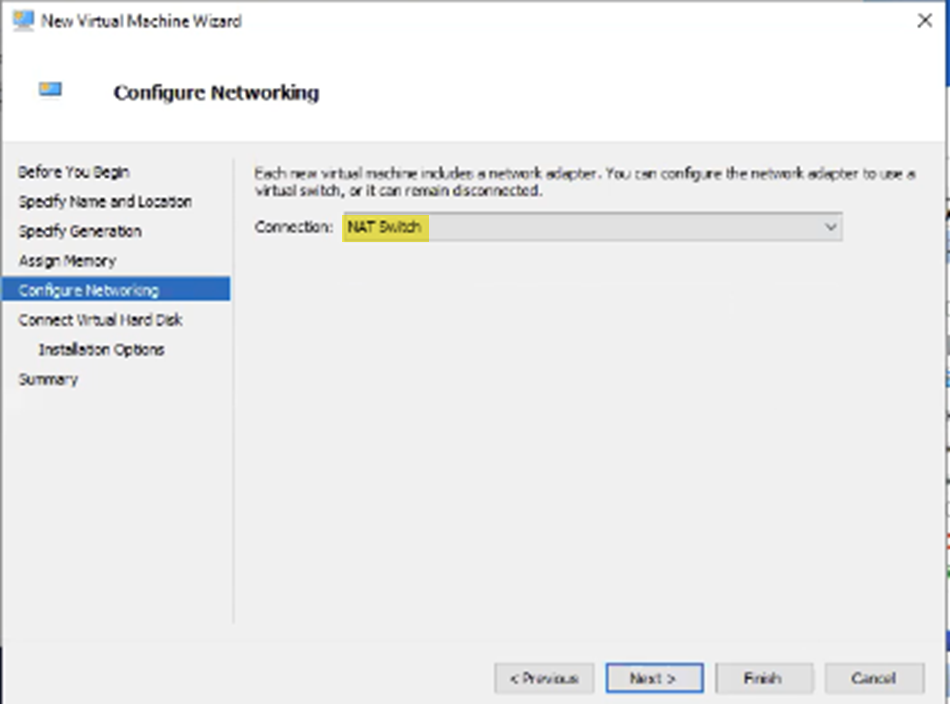
Assign memory to the VM.Allocate a minimum memory of 8192 MB (8 GB), which meets the minimum requirements for a Hyper-V VM and go to the Next page.![]() Configure networking for your VM; then, go to the Next page.The networking you use depends on your configuration. This example uses a NAT Switch for the networking.
Configure networking for your VM; then, go to the Next page.The networking you use depends on your configuration. This example uses a NAT Switch for the networking.![]() Connect the virtual hard disk.
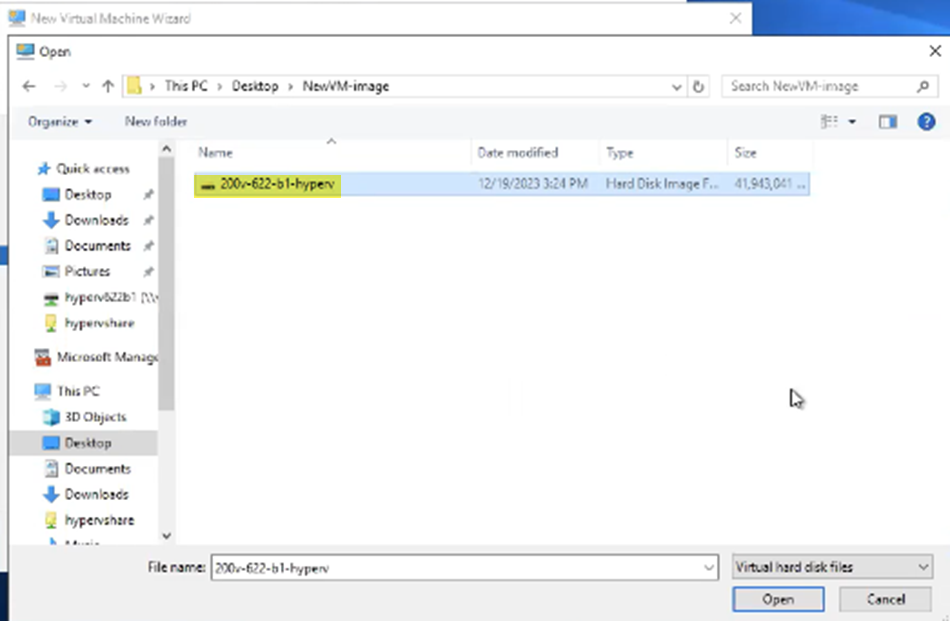
Connect the virtual hard disk.- Select Use an existing virtual hard disk and Browse for the vhd file you downloadedSelect the vhd file you downloaded the Open it; then, go to the Next page.
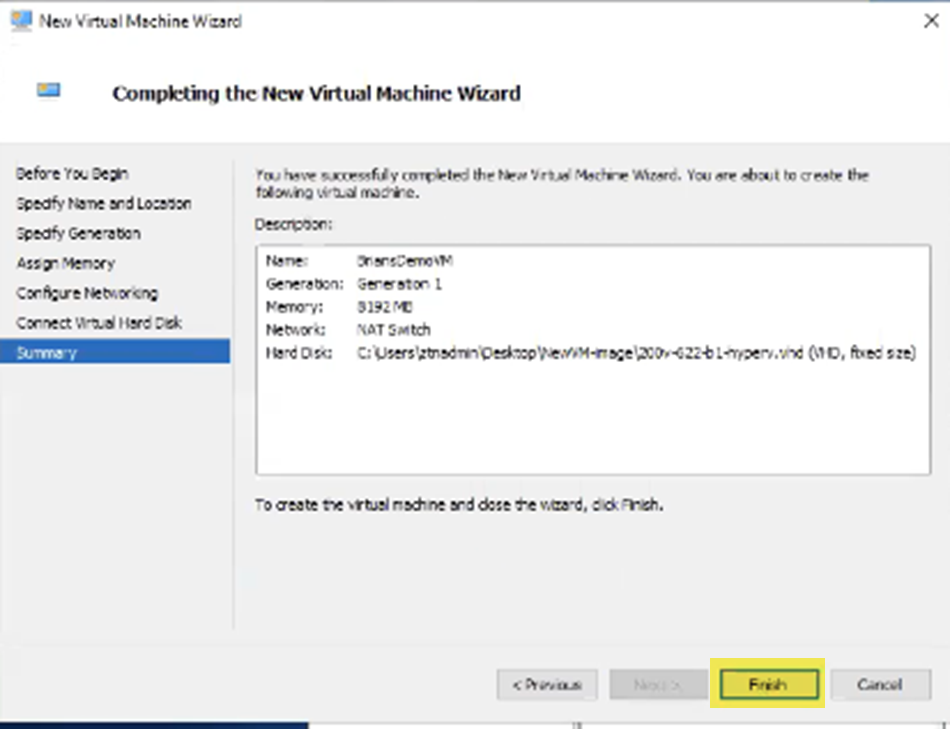
![]() Finish the new VM wizard.
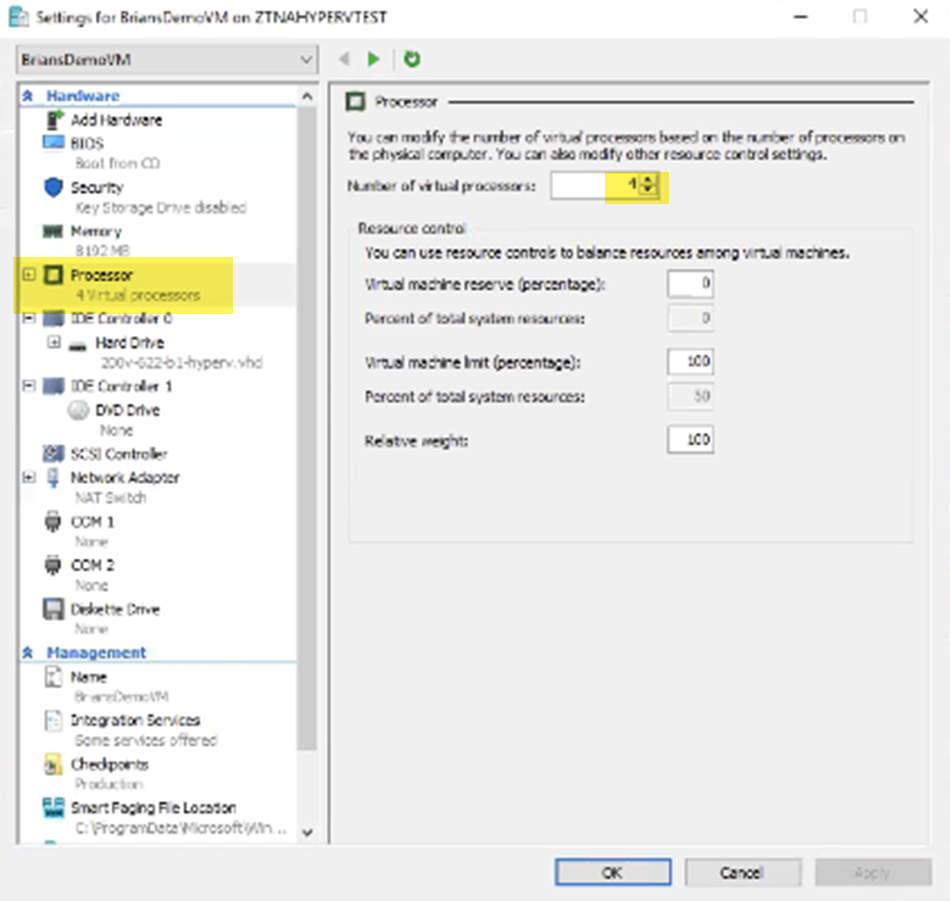
Finish the new VM wizard.![]() Hyper-V creates the VM.Make sure that your VM has at least four processors by going to the Processor area and making sure that you select at least 4 virtual processors.
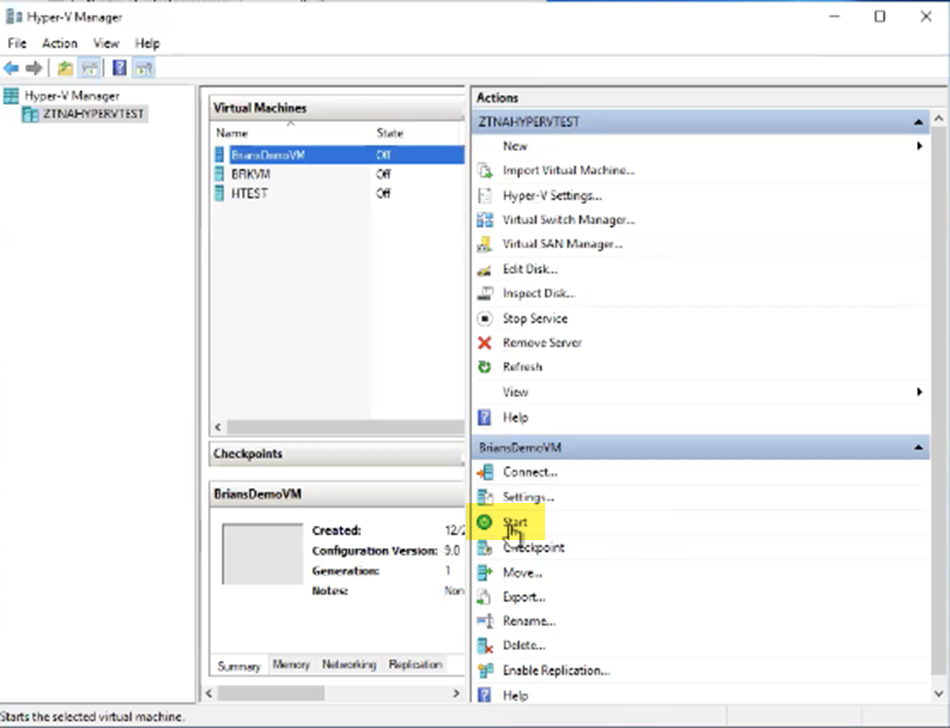
Hyper-V creates the VM.Make sure that your VM has at least four processors by going to the Processor area and making sure that you select at least 4 virtual processors.![]() Start the VM.
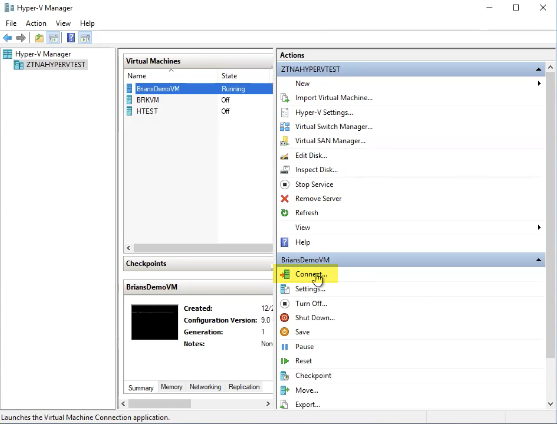
Start the VM.![]() Connect to the serial console.
Connect to the serial console.![]() Wait for the interactive CLI install program initializes, then Configure the ION model, key, and secret.
Wait for the interactive CLI install program initializes, then Configure the ION model, key, and secret.- Select 1 (an ION Model of ion 200v) from the choices that display.Select an ION model: 1) ion 200v 2) ion 3102v 3) ion 3104v 4) ion 3108v 5) ion 7108v 6) ion 7116v 7) ion 7132v 8) ion 9100v Choose a Number or (Q)uit: 1 CPU: Passed (needed 4) Memory: Passed (needed 8.0G) Disk: Could not verify (needs 40.0G) Network: Passed (needed 1) Select an item to modify, or submit config: 1) Model : ion 200v 2) ION Key : 3) Secret Key : 4) Controller 1 : Controller - DHCP 5) Port 1 : Disabled/Unused 6) Port 2 : Disabled/Unused 7) Port 3 : Disabled/Unused 8) Port 4 : Disabled/Unused 9) Port 5 : Disabled/Unused 10) Port 6 : Disabled/Unused 11) Port 7 : Disabled/Unused 12) Port 8 : Disabled/Unused 13) Port 9 : Disabled/Unused 14) Submit and restartInput the Key from the connector by selecting option 2 and entering the key you saved from the ZTNA Connector UI.Choose a Number or (Q)uit: 2 Enter ION Key[None]: xxxxxxxxxx-yyyyyyyy-zzz-1234-1234-abcdefghijkl Select an item to modify, or submit config: 1) Model : ion 200v 2) ION Key : xxxxxxxxx-yyyyyyyy-zzz-1234-1234-abcdefghijkl 3) Secret Key : 4) Controller 1 : Controller - DHCP 5) Port 1 : Disabled/Unused 6) Port 2 : Disabled/Unused 7) Port 3 : Disabled/Unused 8) Port 4 : Disabled/Unused 9) Port 5 : Disabled/Unused 10) Port 6 : Disabled/Unused 11) Port 7 : Disabled/Unused 12) Port 8 : Disabled/Unused 13) Port 9 : Disabled/Unused 14) Submit and restartEnter the ZTNA Connector secret by selecting option 3 and entering the secret you saved from the ZTNA Connector UI.Choose a Number or (Q)uit: 3 Enter ION secret[None]: abcde12345 Select an item to modify, or submit config: 1) Model : ion 200v 2) ION Key : xxxxxxxxx-yyyyyyyy-zzz-1234-1234-abcdefghijkl 3) Secret Key : abcde12345 4) Controller 1 : Controller - DHCP 5) Port 1 : Disabled/Unused 6) Port 2 : Disabled/Unused 7) Port 3 : Disabled/Unused 8) Port 4 : Disabled/Unused 9) Port 5 : Disabled/Unused 10) Port 6 : Disabled/Unused 11) Port 7 : Disabled/Unused 12) Port 8 : Disabled/Unused 13) Port 9 : Disabled/Unused 14) Submit and restartConfigure WAN port options.
- Select option 5 (Port 1).Choose a Number or (Q)uit: 5 Port 1: 1) Role : Disable 2) Cancel Port changes 3) Apply and returnSelect option 1 (Public/WAN).Choose a Number or (Q)uit: 1 Select Port Role: 1) Internet facing port (PublicWAN) 2) Private WAN port (PrivateWAN) 3) Bypass Port Pair 1 (WAN Port) 4) Bypass Port Pair 1 (LAN Port) 5) Bypass Port Pair 2 (WAN Port) 6) Bypass Port Pair 2 (LAN Port) 7) Bypass Port Pair 3 (WAN Port) 8) Bypass Port Pair 3 (LAN Port) 9) Bypass Port Pair 4 (WAN Port) 10) Bypass Port Pair 4 (LAN Port) 11) Disabled/Unused(Optional) If you need to set a static IP address, choose option 2 and set the IP address, gateway, and DNS server parameters; otherwise, select 1.Choose a Number or (Q)uit: 1 Port 1: 1) Role : PublicWAN 2) Config via : DHCP 3) Cancel Port changes 4) Apply and returnSelect option 4 to return to the main menu.Choose a Number or (Q)uit: 4 Select an item to modify, or submit config: 1) Model : ion 200v 2) ION Key : xxxxxxxxx-yyyyyyyy-zzz-1234-1234-abcdefghijkl 3) Secret Key : abcde12345 4) Controller 1 : Controller - DHCP 5) Port 1 : PublicWAN - DHCP 6) Port 2 : Disabled/Unused 7) Port 3 : Disabled/Unused 8) Port 4 : Disabled/Unused 9) Port 5 : Disabled/Unused 10) Port 6 : Disabled/Unused 11) Port 7 : Disabled/Unused 12) Port 8 : Disabled/Unused 13) Port 9 : Disabled/Unused 14) Submit and restart Select an item to modify, or submit config: 1) Model : ion 200v 2) ION Key : xxxxxxxxx-yyyyyyyy-zzz-1234-1234-abcdefghijkl 3) Secret Key : abcde12345 4) Controller 1 : Controller - DHCP 5) Port 1 : PublicWAN - DHCP 6) Port 2 : Disabled/Unused 7) Port 3 : Disabled/Unused 8) Port 4 : Disabled/Unused 9) Port 5 : Disabled/Unused 10) Port 6 : Disabled/Unused 11) Port 7 : Disabled/Unused 12) Port 8 : Disabled/Unused 13) Port 9 : Disabled/Unused 14) Submit and restartConfigure LAN port options.
- Select option 6 (Port 2).Choose a Number or (Q)uit: 6 Port 2: 1) Role : Disable 2) Cancel Port changes 3) Apply and returnSelect option 2 (PrivateWAN).Choose a Number or (Q)uit: 2 Select Port Role: 1) Internet facing port (PublicWAN) 2) Private WAN port (PrivateWAN) 3) Bypass Port Pair 1 (WAN Port) 4) Bypass Port Pair 1 (LAN Port) 5) Bypass Port Pair 2 (WAN Port) 6) Bypass Port Pair 2 (LAN Port) 7) Bypass Port Pair 3 (WAN Port) 8) Bypass Port Pair 3 (LAN Port) 9) Bypass Port Pair 4 (WAN Port) 10) Bypass Port Pair 4 (LAN Port) 11) Disabled/Unused(Optional) If you need to set a static IP address, choose option 2 and set the IP address, gateway, and DNS server parameters; otherwise, select 1.Choose a Number or (Q)uit: 2 Port 2: 1) Role : PrivateWAN 2) Config via : DHCP 3) Cancel Port changes 4) Apply and returnSelect option 4 to return to the main menu.Choose a Number or (Q)uit: 4 Select an item to modify, or submit config: 1) Model : ion 200v 2) ION Key : xxxxxxxxx-yyyyyyyy-zzz-1234-1234-abcdefghijkl 3) Secret Key : abcde12345 4) Controller 1 : Controller - DHCP 5) Port 1 : PublicWAN - DHCP 6) Port 2 : PrivateWAN - DHCP 7) Port 3 : Disabled/Unused 8) Port 4 : Disabled/Unused 9) Port 5 : Disabled/Unused 10) Port 6 : Disabled/Unused 11) Port 7 : Disabled/Unused 12) Port 8 : Disabled/Unused 13) Port 9 : Disabled/Unused 14) Submit and restartSave and reboot the connector.Choose a Number or (Q)uit: 14 WARNING! After this configuration is submitted, all hardware will be signed, logged, and permanently tied to the ION Key/Secret Key in the Prisma SDWAN Cloud Controller. WHAT THIS MEANS is that hardware cannot be added/removed (disks, network cards) after this 'SUBMIT' function. If any hardware changes are required beyond this 'SUBMIT', the ION will need to be re-deployed with a new ION Key and Secret Key. If there is a need to add or remove hardware, please answer 'N' below and shut down the ION and make the changes now. Submit these changes now?[N]: y Building configuration... [VFF:CFG] ZeroTouch Config Starting - config file parser [VFF:CFG] Attempting to load/parse as Config/INI file. [VFF:CFG] Successfully Loaded config style file. [VFF:CFG] Controller 1 successfully set to CONTROLLER/DHCP. [VFF:CFG] Port 1 successfully set to PUBLICWAN/DHCP. [VFF:CFG] Port 2 successfully set to PRIVATEWAN/DHCP. [VFF:CFG] WARN: Port 3 had no config section. Defaulting to Disable. [VFF:CFG] WARN: Port 4 had no config section. Defaulting to Disable. [VFF:CFG] WARN: Port 5 had no config section. Defaulting to Disable. [VFF:CFG] WARN: Port 6 had no config section. Defaulting to Disable. [VFF:CFG] WARN: Port 7 had no config section. Defaulting to Disable. [VFF:CFG] WARN: Port 8 had no config section. Defaulting to Disable. [VFF:CFG] WARN: Port 9 had no config section. Defaulting to Disable. [VFF:CFG] Success with Config/INI file parser. [VFF:KVM] Menu config end, continuing normal boot... Reboot-reason: manufacture


