Prisma Access
Configure Mobile Users using Cloud Identity Engine (Recommended)
Table of Contents
Configure Mobile Users using Cloud Identity Engine (Recommended)
How to configure mobile users using Cloud Identity Engine.
| Where Can I Use This? | What Do I Need? |
|---|---|
|
|
Cloud Identity Engine (Directory Sync) gives
Prisma Access read-only access to your Active Directory information, so that you can
easily set up and manage security and decryption policies for users and groups. Cloud
Identity Engine works with both on-premises Active Directory and Microsoft Entra ID
(formerly Azure Active Directory).
Prisma Access retrieves user and group information from your organization’s cloud
directory or Active Directory (AD), to enforce user- and group-based policy. Optionally,
Prisma Access retrieves user behavior-based risk signals from some cloud directory
vendors, such as Microsoft Entra ID, to enforce automated security actions. In
addition to simplifying user and group information retrieval, integrating the Cloud
Identity Engine with Prisma Access can free up the bandwidth and load on your cloud
directory or AD. To set up Cloud Identity Engine with Prisma Access, start by going to
the hub to activate Cloud Identity Engine and add it to Prisma Access. Then go to Prisma
Access to validate that Prisma Access is able to access directory data.
Configure Mobile Users using Cloud Identity Engine (Recommended) (Strata Cloud Manager)
Configure the Cloud Ideneity Engine in Strata Cloud Manager.
You first configure SAML in Microsoft Entra ID (formerly Azure Active Directory (Azure AD), then
import the metadata XML file (the file
that contains SAML registration information) from Microsoft Entra ID and upload it to a
SAML Identity Provider you create in Prisma Access. You
then create an Authentication Profile that references the IdP
server profile, add the authentication profile into the Explicit Proxy or
GlobalProtect configuration, and commit and push your changes.
If you are a GlobalProtect mobile user, upgrade your GlobalProtect app to a minimum
version of 6.0.
- Open the Cloud Identity Engine app associated with your tenant.If you use the Hub to log in to Cloud Identity Engine, make sure that you select the correct tenant.Download the SP Metadata in the Cloud Identity Engine app.
- Go to .
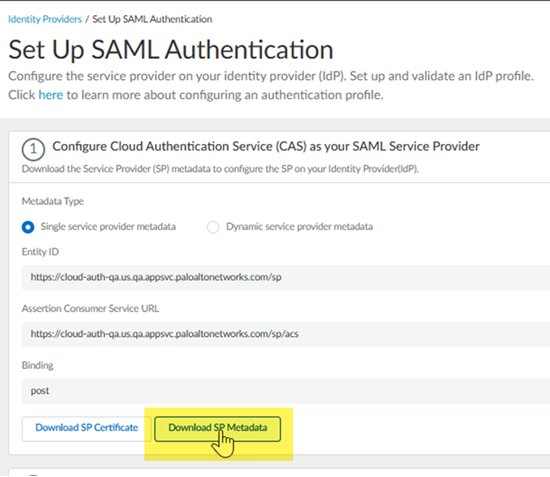
![]() Set Up a SAML 2.0 authentication type.
Set Up a SAML 2.0 authentication type.![]() Download SP Metadata.
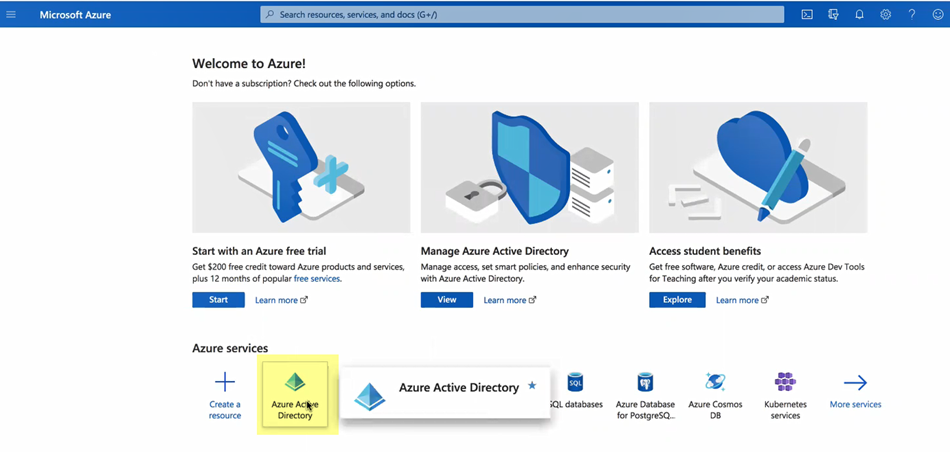
Download SP Metadata.![]() Log in to the Azure Portal and select Microsoft Entra ID.Make sure you complete all the necessary steps in the Azure portal.
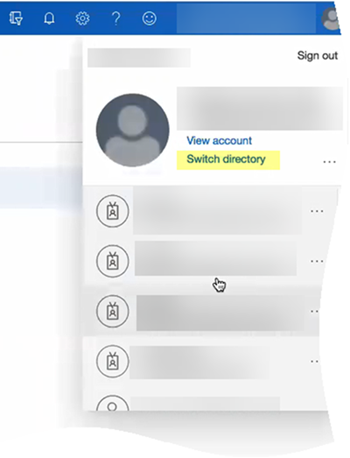
Log in to the Azure Portal and select Microsoft Entra ID.Make sure you complete all the necessary steps in the Azure portal.![]() If you have more than one directory, Switch directory to select the directory you want to use with the Cloud Identity Engine.
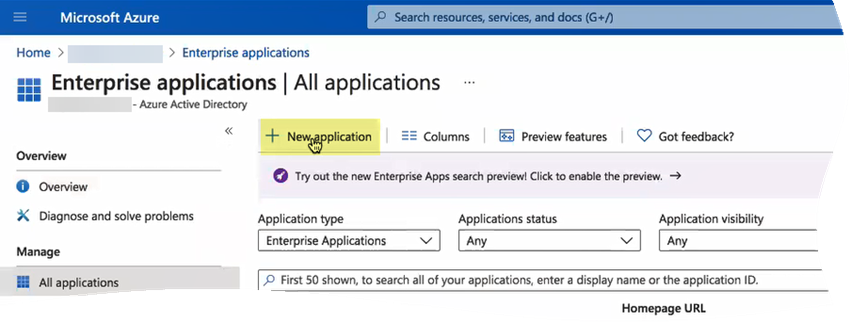
If you have more than one directory, Switch directory to select the directory you want to use with the Cloud Identity Engine.![]() Select Enterprise applications and click New application.
Select Enterprise applications and click New application.![]() Search for Palo Alto Networks Cloud Identity Engine - Cloud Authentication Service and create the Microsoft Entra ID single-sign on integration.Customize the app name if required while creating the application.After the application loads, select Users and groups, then Add user/group to Assign them to this application.Select the users and groups you want to have use the Azure IdP in the Cloud Identity Engine for authentication.Be sure to assign the account you are using so you can test the configuration when it is complete. You may need to refresh the page after adding accounts to successfully complete the test.Set up single sign-on then select SAML.Upload Metadata File by browsing to the metadata file that you downloaded from the Cloud Identity Engine app in step 2.c and click Add.After the metadata uploads, enter your regional endpoint as the Sign-on URL using the following format: https://<RegionUrl>.paloaltonetworks.com/sp/acs (where <RegionUrl> is your regional endpoint).This list shows the Cloud Identity Engine region-based URLs to use.Alternatively, copy the reply URL to the sign on URL.Save your configuration.Download the Federation Metadata XML under SAML Certificates.Add Azure as an authentication type in the Cloud Identity Engine app.
Search for Palo Alto Networks Cloud Identity Engine - Cloud Authentication Service and create the Microsoft Entra ID single-sign on integration.Customize the app name if required while creating the application.After the application loads, select Users and groups, then Add user/group to Assign them to this application.Select the users and groups you want to have use the Azure IdP in the Cloud Identity Engine for authentication.Be sure to assign the account you are using so you can test the configuration when it is complete. You may need to refresh the page after adding accounts to successfully complete the test.Set up single sign-on then select SAML.Upload Metadata File by browsing to the metadata file that you downloaded from the Cloud Identity Engine app in step 2.c and click Add.After the metadata uploads, enter your regional endpoint as the Sign-on URL using the following format: https://<RegionUrl>.paloaltonetworks.com/sp/acs (where <RegionUrl> is your regional endpoint).This list shows the Cloud Identity Engine region-based URLs to use.Alternatively, copy the reply URL to the sign on URL.Save your configuration.Download the Federation Metadata XML under SAML Certificates.Add Azure as an authentication type in the Cloud Identity Engine app.- In Cloud Identity Engine app, select .Set Up a SAML 2.0 authentication type.Enter a Profile Name.Select Azure as your IDP Vendor.Upload Metadata from step 2.l to Add Metadata.
![]() Click to Upload.Test SAML Setup to verify the profile configuration.Select the SAML attributes you want Prisma Access to use for authentication and Submit the IdP profile.Add an authentication profile.
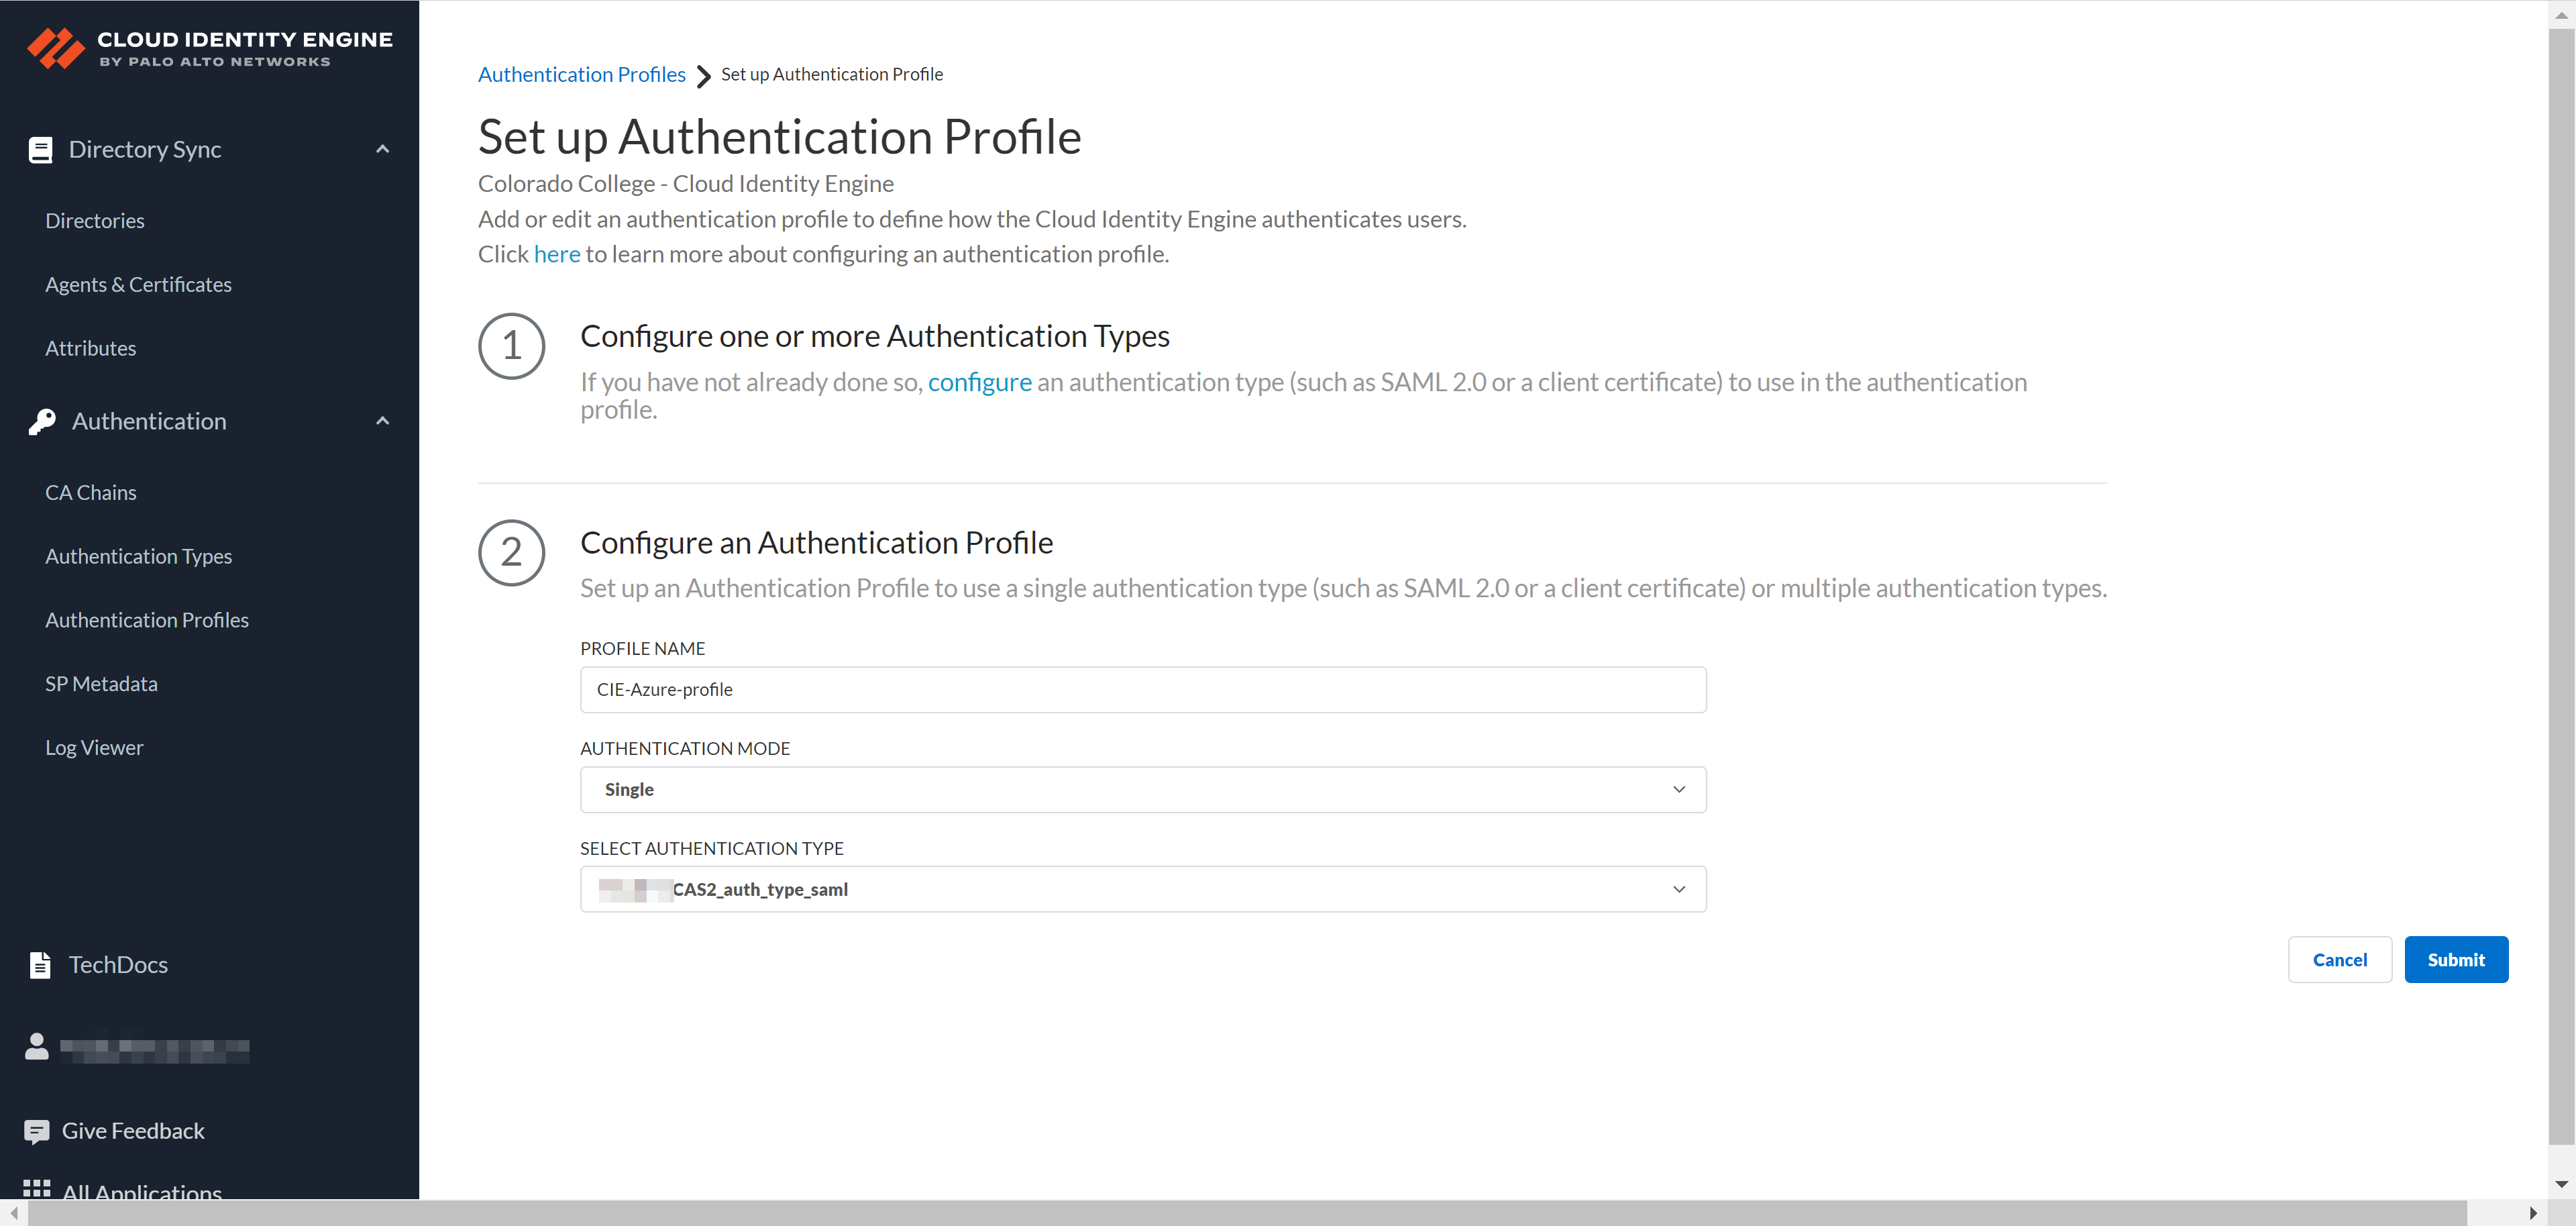
Click to Upload.Test SAML Setup to verify the profile configuration.Select the SAML attributes you want Prisma Access to use for authentication and Submit the IdP profile.Add an authentication profile.- Select .Enter a PROFILE NAME.Select an Authentication Mode.Select the Authentication Type from step 3 and Submit.
![]() Add the authentication profile from Cloud Identity Engine to Prisma Access.
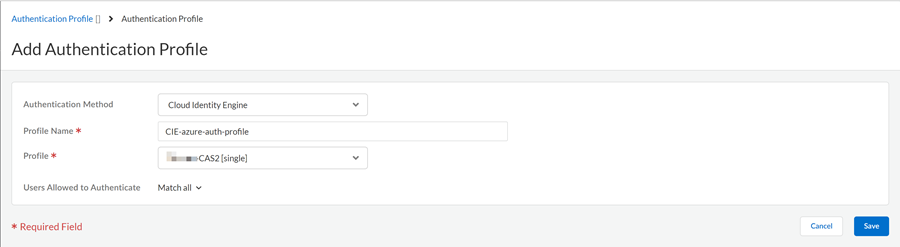
Add the authentication profile from Cloud Identity Engine to Prisma Access.- In Prisma Access, select .Ensure to set the scope to GlobalProtect or Explicit Proxy mobile users.Add Profile.Select Cloud Identity Engine as your Authentication Method.Enter a Profile Name.Select the Profile you added in the Cloud Identity Engine app from step 4.Save the changes.
![]() Attach the authentication to mobile users.
Attach the authentication to mobile users.- For GlobalProtect mobile users
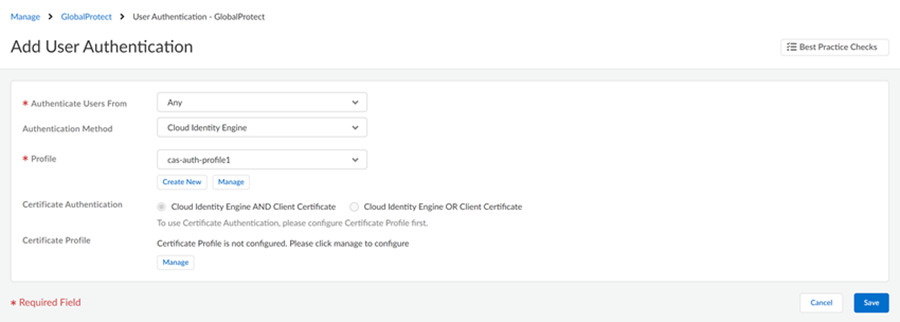
- Select .Select all required fields and the Profile you added to Prisma Access in step 5.Save the changes.
![]() Move the authentication to the top of the list to prioritize it.
Move the authentication to the top of the list to prioritize it.-
For explicit proxy mobile users
- Select .Edit the User Authentication settings.Create New profile.Select the Cloud Identity Engine authentication method.Enter a profile name.Select the Profile you added to Prisma Access in step 5.Save the changes.Move the authentication to the top of the list to prioritize it.(For GlobalProtect mobile users only) Edit the default browser settings for the GlobalProtect app.
- Select the Default app settings.Go to .Select the Use Default Browser for SAML Authentication.Save the changes.Push the changes.(Optional) Verify the user authentication.
-
For GlobalProtect mobile users
- Log in to a Windows machine and connect to the GlobalProtect app.The default browser takes you to SAML authentication.Enter the credentials and sign in.View Settings in the GlobalProtect app to see the connection details.Log in to Prisma Access and select .You can see that the authentication is successful.
-
For explicit proxy mobile users
- Copy the PAC file URL to the endpoint.Go to to view the PAC file URL.Log in to a Windows machine.Edit the Proxy Settings and paste the PAC file URL to the Script Address.Access a URL that requires authentication.Enter the credentials.In Prisma Access, view the user mapping information by running the show user ip-user-mapping all command.(Optional) In Strata Cloud Manager, select .View details about mobile users connected for a time range you select.
Configure Mobile Users using Cloud Identity Engine (Recommended) (Panorama)
The Cloud Identity Engine provides both user identification and user authentication for mobile users in a Prisma Access—GlobalProtect deployment. Using the Cloud Identity Engine for user authentication and username-to-user group mapping allows you to write security policy based on users and groups, not IP addresses, and helps secure your assets by enforcing behavior-based security actions. By continually syncing the information from your directories, the Cloud Identity Engine ensures that your user information is accurate and up to date and policy enforcement continues based on the mappings even if the SAML identity provider (IdP) is temporarily unavailable.Configure GlobalProtect Mobile Users using Cloud Identity Engine (Recommended) (Panorama)
Use the Cloud Authentication (CAS) component of the Cloud Identity Engine to authenticate Prisma Access mobile users in a Mobile Users—GlobalProtect deployment.This functionality is only available for Panorama Managed Prisma Access 3.0 Innovation and later Innovation deployments.The Cloud Identity Engine has two components to provide authentication and enforcement of user- and group-based policy:- The Cloud Authentication Service component allows you to authenticate mobile users in a Prisma Access—GlobalProtect deployment. You configure a SAML identity IdP during configuration of the Cloud Identity Engine to use with the Cloud Authentication Service.
- The Directory Sync component provides username-to-user group mapping for the authenticated user. You can use this mapping to enforce user- and group-based policy in Prisma Access.
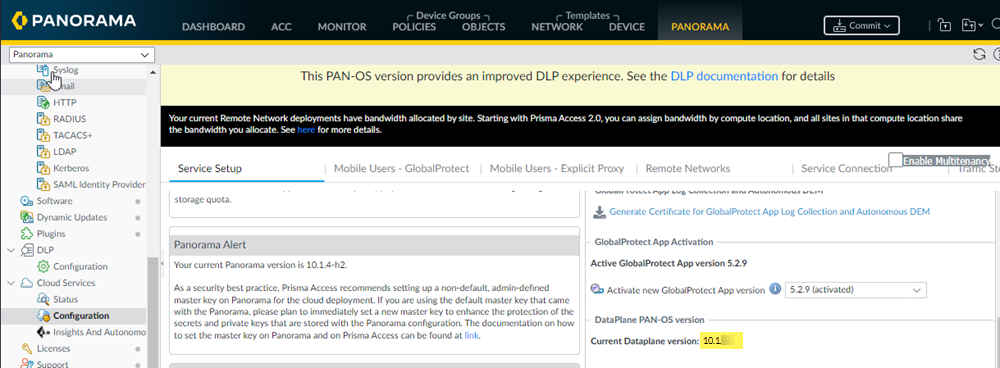
To configure the Cloud Authentication Service to authenticate GlobalProtect mobile users, you must have the following minimum required product and software versions:- A minimum Prisma Access version of 3.0 Innovation or a later Innovation version, which requires a dataplane version of 10.1.To verify your dataplane version, select and view the Current Dataplane version in the DataPlane PAN-OS version area.If your dataplane is running 10.1, you are running the Prisma Access 3.0 Innovation or later Innovation release and can use the Cloud Identity Engine to authenticate GlobalProtect mobile users. If your dataplane is running 10.0, you are running a Prisma Access Preferred release and you cannot authenticate mobile users with the Cloud Identity Engine.
![]()
- A minimum GlobalProtect app version of 6.0.
- A SAML IdP provider that is supported with the Cloud Identity Engine.Prisma Access supports all IdP providers that are supported by the Cloud Identity Engine, including Azure, Okta, PingOne, PingFederate, and Google.
- A minimum Panorama version of 10.1.
To configure authentication for a mobile users using the Cloud Authentication Engine, complete the following steps.- Install the device certificate on the Panorama that manages Prisma Access.You must generate a one-time password (OTP) and retrieve the device certificate to successfully authenticate Panorama with the Cloud Identity Engine.
- Log into the Customer Support Portal to generate the One Time Password (OTP).Select and Generate OTP.For the Device Type, select Generate OTP for Panorama and Generate OTP.Select the Panorama Device serial number.Generate OTP and copy the OTP. and copy the OTP.From the Panorama that manages Prisma Access, select and Get certificate.
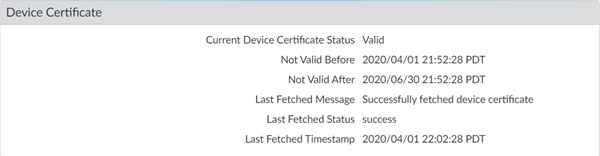
![]() When you have successfully installed the certificate, the Current Device Certificate Status () displays as Valid.
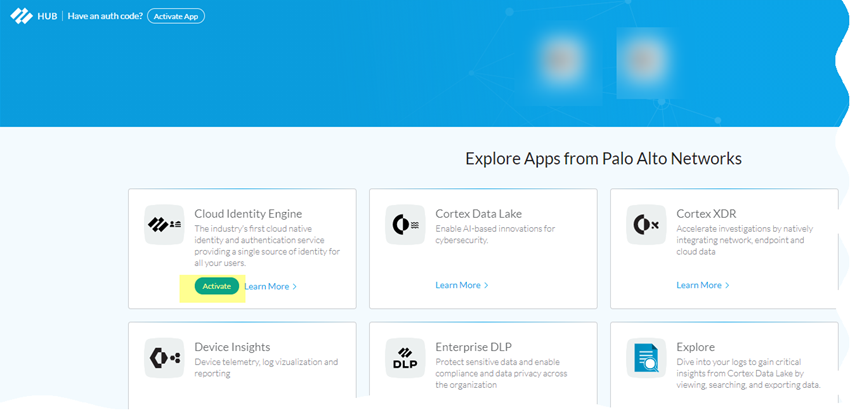
When you have successfully installed the certificate, the Current Device Certificate Status () displays as Valid.![]() Activate the Cloud Identity Engine if you have not yet done so to create your first instance.
Activate the Cloud Identity Engine if you have not yet done so to create your first instance.- Log in to the hub.Activate the Cloud Identity Engine.If the Activate button is not available, ensure that your role has the necessary privileges.
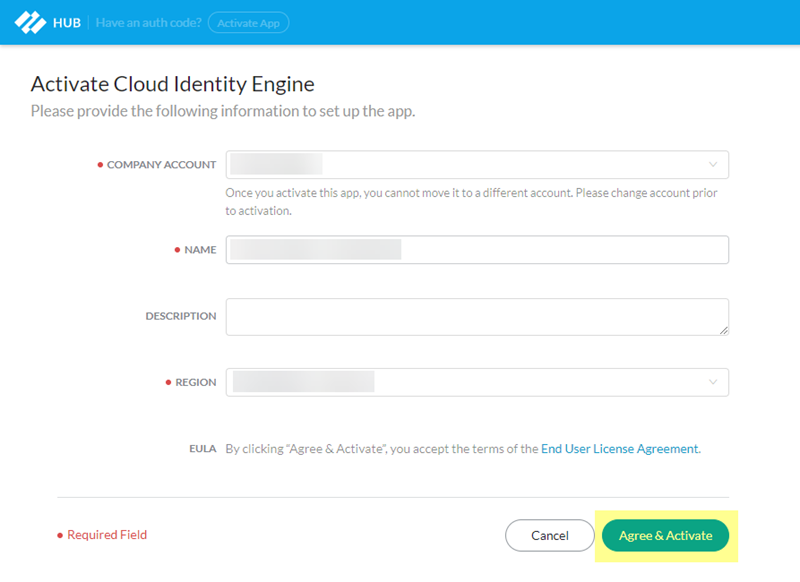
![]() Enter the information for your Cloud Identity Engine instance.
Enter the information for your Cloud Identity Engine instance.![]()
- Select the Company Account for the instance.
- Specify a Name to identify the instance.
- (Optional) Enter a Description to provide more information about the Cloud Identity Engine instance (for example, details about the instance’s purpose).
- Select a Region.Make a note of the region you selected; you use that region when you activate the Cloud Identity Engine in a later step.
- Agree to the EULA.
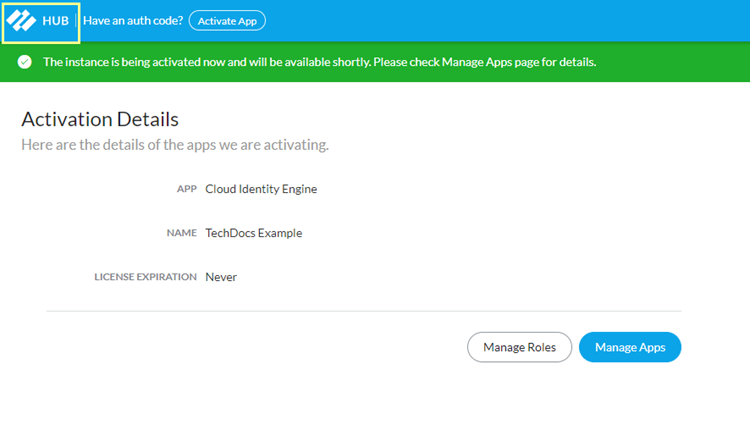
Agree & Activate the instance.On the Activation Details page, select the hub in the upper left.![]() The Cloud Identity Engine displays.
The Cloud Identity Engine displays.![]() (Optional) If you require a separate instance for Explicit Proxy, configure a Cloud Identity Engine Instance.If you want to isolate your Explicit Proxy directory data, or allow different Palo Alto Networks cloud applications and services to access different sets of directory data, you can create a Cloud Identity Engine instance specifically for Explicit Proxy.When you select a Region, select the same region you used when you activated the Cloud Identity Engine.From the Cloud Identity Engine app, configure a SAML IdP in the Cloud Identity Engine.The Cloud Identity Engine Getting Started guide has the procedures you need to configure a SAML IdP in the Cloud Identity Engine:Use the following values in the when configuring Explicit Proxy authentication in your IdP:
(Optional) If you require a separate instance for Explicit Proxy, configure a Cloud Identity Engine Instance.If you want to isolate your Explicit Proxy directory data, or allow different Palo Alto Networks cloud applications and services to access different sets of directory data, you can create a Cloud Identity Engine instance specifically for Explicit Proxy.When you select a Region, select the same region you used when you activated the Cloud Identity Engine.From the Cloud Identity Engine app, configure a SAML IdP in the Cloud Identity Engine.The Cloud Identity Engine Getting Started guide has the procedures you need to configure a SAML IdP in the Cloud Identity Engine:Use the following values in the when configuring Explicit Proxy authentication in your IdP:- Single sign on URL: global.acs.prismaaccess.com
- SAML Assertion Consumer Service URL: https://global.acs.prismaaccess.com/saml/acs
- Entity ID URL: https://global.acs.prismaaccess.com/saml/metadata
Configure an authentication profile to use with the Cloud Authentication Service.Be sure that you are in the Mobile_User_Template. By setting up an authentication profile in Panorama, you can redirect GlobalProtect mobile users to the IdP you configure for authentication.Change the pre-deployed settings on mobile users’ Windows, macOS, Linux, Android, and iOS endpoints to use the default system browser for SAML authentication.You must set the pre-deployed settings on the client endpoints before you can enable the default system browser for SAML authentication. GlobalProtect retrieves these entries only once, when the GlobalProtect app initializes.If there is no pre-deployed value specified on the end users’ Windows or macOS endpoints when using the default system browser for SAML authentication, the Use Default Browser for SAML Authentication option is set to Yes in the portal configuration, and users upgrade the app from release 5.0.x or release 5.1.x to release 5.2.0 for the first time, the app will open an embedded browser instead of the default system browser. After users connect to the GlobalProtect app and the Use Default Browser for SAML Authentication option is set to Yes in the portal configuration, the app will open the default system browser on Windows and macOS endpoints at the next login.If the default browser value is set to Yes in the pre-deployed setting of the client machine and the Use Default Browser for SAML Authentication option is set to No in the portal configuration, end users will not have the best user experience. The app will open the default system browser for SAML authentication for the first time. Because the default browser values differ between the client machine and the portal, the app detects a mismatch and opens an embedded browser at the next login.The Use Default Browser for SAML Authentication option of the GlobalProtect portal and the pre-deployed settings in the client machine must have the same value to provide the best user experience.- On Windows endpoints, you can use the System Center Configuration Manager (SCCM) to pre-deploy the GlobalProtect app 5.2 and set the DEFAULTBROWSER value to yes from the Windows Installer (Msiexec) using the following syntax:msiexec.exe /i GlobalProtect.msi DEFAULTBROWSER=YESOn macOS endpoints, set the default-browser value to yes in the macOS plist (/Library/Preferences/com.paloaltonetworks.GlobalProtect.settings.plist) for the GlobalProtect app using the following syntax:sudo defaults write /Library/Preferences/com.paloaltonetworks.GlobalProtect.settings.plist ’{"Palo Alto Networks" ={GlobalProtect={Settings={default-browser=yes;};};};}’You must specify the plist key to launch the default system browser for SAML authentication after GlobalProtect app 5.2 is installed.After you add the plist key, you must restart the GlobalProtect app in order for the plist key to take effect. After you restart the GlobalProtect app, the default system browser for SAML authentication launches. To restart the GlobalProtect app:
- Launch the Finder.
- Open the Applications folder by selecting Applications from the Finder sidebar.If you do not see Applications in the Finder sidebar, select from the Finder menu bar.
- Open the Utilities folder.
- Launch Terminal.
- Execute the following commands:
username>$ launchctl unload -S Aqua /Library/LaunchAgents/com.paloaltonetworks.gp.pangpa.plist
username>$ launchctl unload -S Aqua /Library/LaunchAgents/com.paloaltonetworks.gp.pangps.plist
username>$ launchctl load -S Aqua /Library/LaunchAgents/com.paloaltonetworks.gp.pangpa.plist
username>$ launchctl load -S Aqua /Library/LaunchAgents/com.paloaltonetworks.gp.pangps.plist
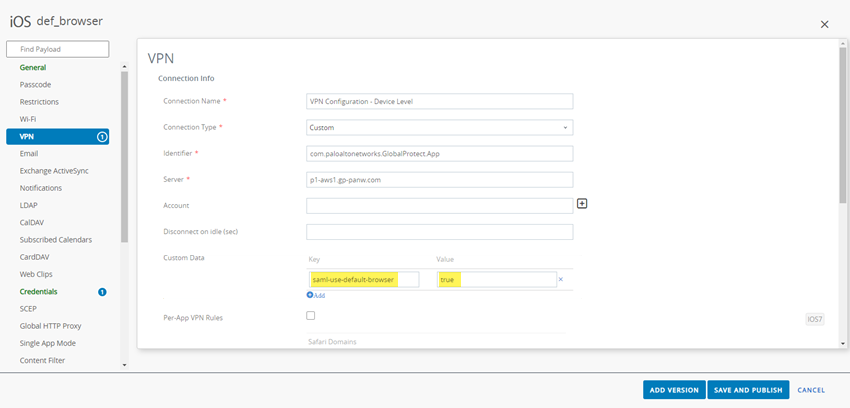
On Linux endpoints, set the default-browser value to yes in the /opt/paloaltonetworks/globalprotect/pangps.xml pre-deployment configuration file under <Settings>. After you add the default-browser value, follow the pre-deployment instructionsbefore you reboot the Linux endpoint in order for the change to take effect.On Android and iOS endpoints, create a VPN profile by using the supported mobile device management system (MDM) such as Airwatch.- Log in to Airwatch as an administrator.
- Select an existing VPN profile () in the list.
- Select VPN to add a VPN profile.On Android endpoints, enter the Custom Data Key (use_default_browser_for_saml). Enter the Custom Data Value (true).On iOS endpoints, enter the Custom Data Key (saml-use-default-browser). Enter the Custom Data Value (true).
![]()
- Click Save and Publish to save your changes.
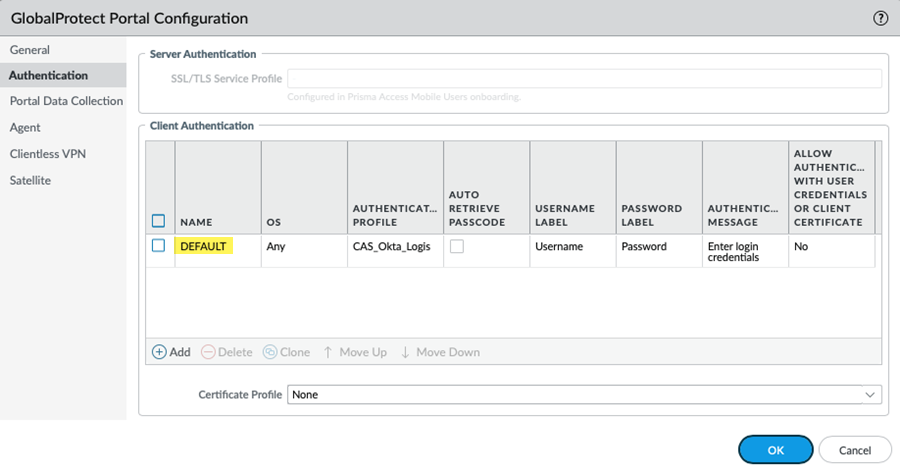
Configure the Prisma Access portal to use Cloud Identity Engine authentication.- In the Mobile_User_Template, select .Select the Default GlobalProtect portal configuration.
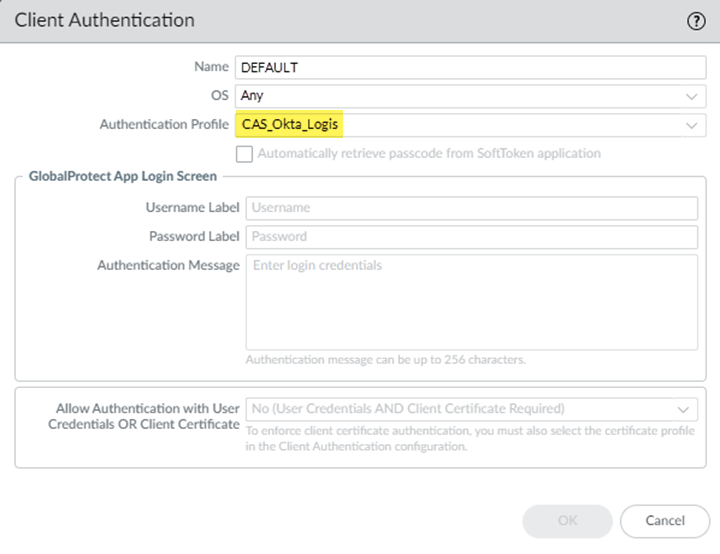
![]() Select the Authentication Profile you created for Cloud Identity Engine authentication and click OK.
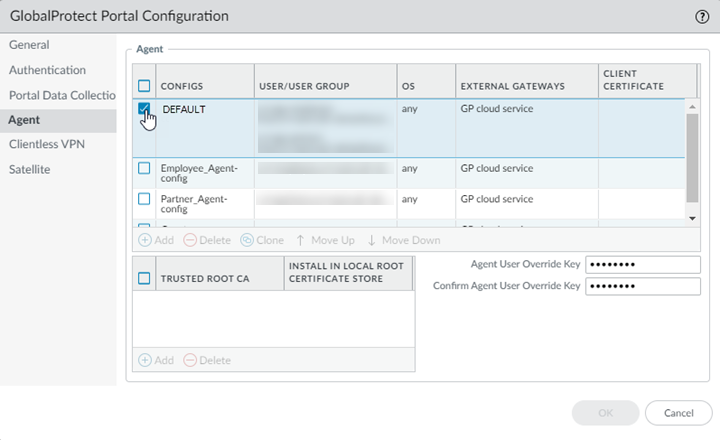
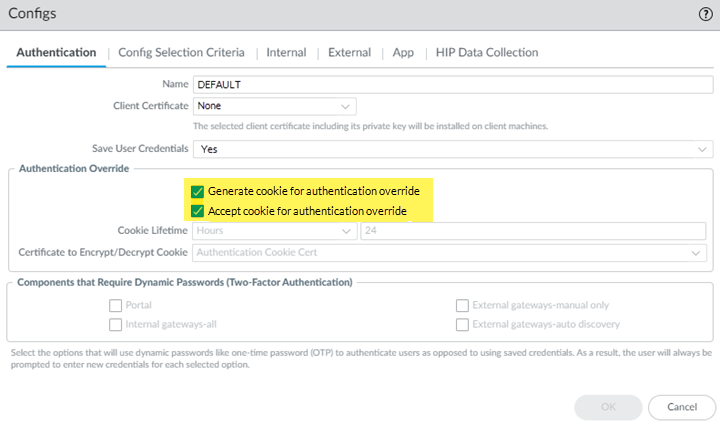
Select the Authentication Profile you created for Cloud Identity Engine authentication and click OK.![]() Select Agent, then select the Default agent.
Select Agent, then select the Default agent.![]() (Optional) If you have on-premises GlobalProtect gateways and want the Prisma Access gateway to generate a cookie to override authentication for on-premises gateways, select Generate cookie for authentication override.(Optional) If you want Prisma Access to accept cookies from on-premises gateways that allows them to override authentication for Prisma Access, select Accept cookie for authentication override.Click OK.
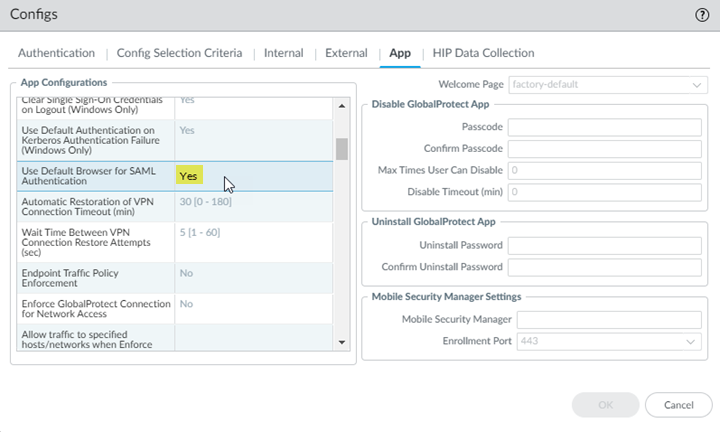
(Optional) If you have on-premises GlobalProtect gateways and want the Prisma Access gateway to generate a cookie to override authentication for on-premises gateways, select Generate cookie for authentication override.(Optional) If you want Prisma Access to accept cookies from on-premises gateways that allows them to override authentication for Prisma Access, select Accept cookie for authentication override.Click OK.![]() In the App settings, make sure that Use Default Browser for SAML Authentication is set to Yes.Selecting this portal setting ensures that mobile users can leverage the same login for GlobalProtect with their saved user credentials on the default system browser such as Chrome, Firefox, or Safari.Click OK.
In the App settings, make sure that Use Default Browser for SAML Authentication is set to Yes.Selecting this portal setting ensures that mobile users can leverage the same login for GlobalProtect with their saved user credentials on the default system browser such as Chrome, Firefox, or Safari.Click OK.![]() Configure the Prisma Access gateway to use Cloud Identity Engine authentication.
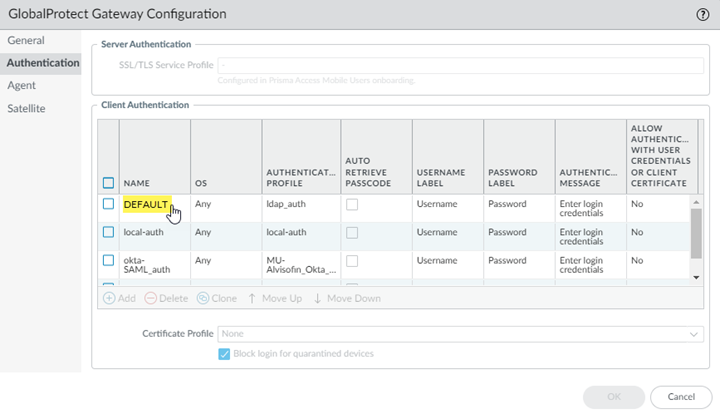
Configure the Prisma Access gateway to use Cloud Identity Engine authentication.- In the Mobile_User_Template, select .Select Authentication.Select the Default authentication profile.
![]() Select the Authentication Profile you created for Cloud Identity Engine authentication and click OK.
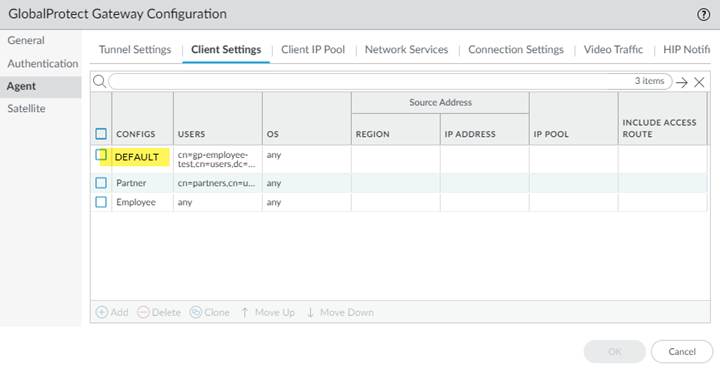
Select the Authentication Profile you created for Cloud Identity Engine authentication and click OK.![]() Select , then select the Default configuration.
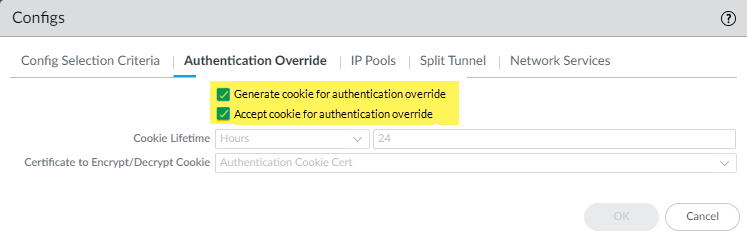
Select , then select the Default configuration.![]() (Optional) Select Generate cookie for authentication override and Accept cookie for authentication override.When you use the Cloud Identity Engine for authentication, Palo Alto Networks recommends that you allow authentication cookie overrides on gateways, since you have already configured authentication on the portal. If you do not configure cookie overrides on the gateway, two authentication pages display on the mobile user’s default browser when they log in to a gateway—one page for portal authentication and one page for gateway authentication.Click OK.
(Optional) Select Generate cookie for authentication override and Accept cookie for authentication override.When you use the Cloud Identity Engine for authentication, Palo Alto Networks recommends that you allow authentication cookie overrides on gateways, since you have already configured authentication on the portal. If you do not configure cookie overrides on the gateway, two authentication pages display on the mobile user’s default browser when they log in to a gateway—one page for portal authentication and one page for gateway authentication.Click OK.![]() Complete the Cloud Identity Engine configuration in Panorama.
Complete the Cloud Identity Engine configuration in Panorama.- Select and Edit the Authentication Settings, then select the Authentication Profile you created in Step 5.Select and Add or Edit a device group.Select the Cloud Identity Engine and Add the Cloud Identity Engine instance you want to associate with Panorama; then, click OK.Commit and Push your changes.