Prisma SD-WAN
Add a New User on Prisma SD-WAN
Table of Contents
Expand All
|
Collapse All
Prisma SD-WAN Docs
-
-
- Prisma SD-WAN Controller
-
- CloudBlade Integrations
- CloudBlades Integration with Prisma Access
-
-
-
-
- 6.5
- 6.4
- 6.3
- 6.1
- 5.6
- Prisma SD-WAN Controller
- Prisma SD-WAN On-Premises Controller
- Prisma SD-WAN CloudBlades
- Prisma Access CloudBlade Cloud Managed
- Prisma Access CloudBlade Panorama Managed
Add a New User on Prisma SD-WAN
Let us learn more about adding a new user on Prisma SD-WAN.
| Where Can I Use This? | What Do I Need? |
|---|---|
|
|
Before you can assign a role to a user for the first time, you must add user access. Adding a role to a
service account is optional. If you already added users or service accounts and want
to add additional roles, you can also assign a batch of predefined roles. (Review
additional information about roles and permissions).
- Log in to Strata Cloud Manager, select SettingsIdentity & AccessAccess ManagementAdd Identity. You are directed to Add New Identity.Select Identity Type- User and Identity Address- email-id on the Identity Information, click Next.For Assign Roles, in Apps & Servicesselect a specific app or service, such as Prisma SD-WAN and for Roles Select one Role or multiple. For example, you can select Multitenant Superuser for a user who needs access to all functions for all tenants in a multitenant hierarchy. For more information, read about roles and permissions.
![]() Optional Add Another apps, service, or role and repeat as necessary.Submit your changes.
Optional Add Another apps, service, or role and repeat as necessary.Submit your changes.Old Topic
Add a new user with system role as per the requirements of your enterprise. An IAM administrator assigns roles to users responsible for administering the network in your enterprise.Use the following links to add users based on your web interface.- Migrated to OneAppIf your Prisma SD-WAN tenant has migrated to Strata Cloud Manager (SCM), your users are now a part of the Tenant Service group (TSG). As part of the migration, you now manage, add, and edit users through the Strata Cloud Manager Identity and Access settings.However, you will continue to see the migrated users in Strata Cloud Manager under ConfigurationPrisma SD-WANSystemAuth Token.You cannot add or edit users here, you can only modify the IP session lock for users for API access.Using the stand-alone Prisma SD-WAN web interface (Non-TSG Tenants)
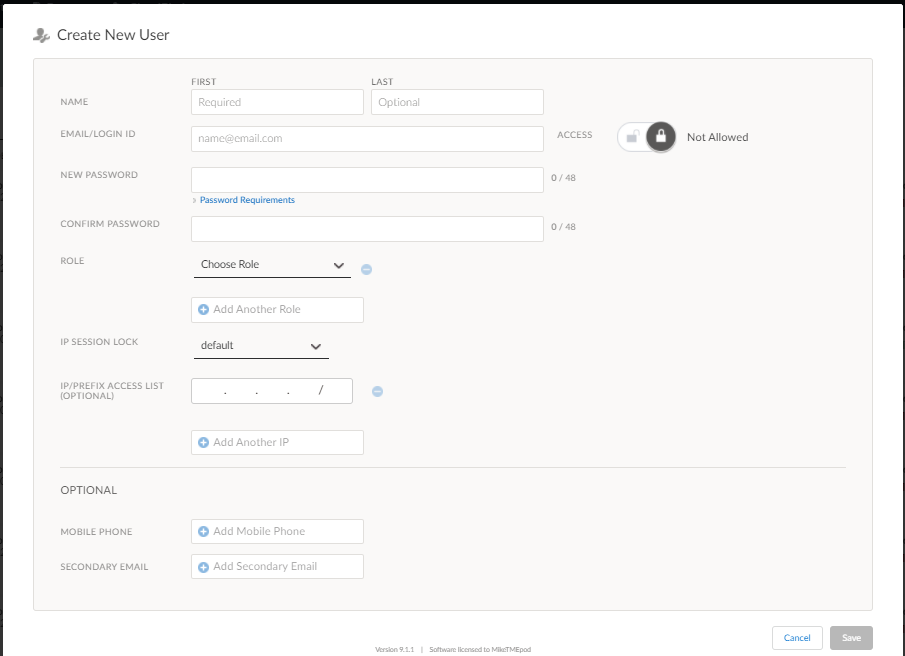
- Select System SettingsIdentity & Access ManagementRolesPredefined Roles.For Create New User, enter the First Name and optionally the Last Name of the user.Toggle Access to allow the user to access the Prisma SD-WAN web interface.By default, access is disabled.Add the Email/Login ID.Enter a New Password and confirm the password for the user.Choose a Role for the user.Assign one or more roles to the user. Select from the available system or custom roles. Or create custom roles.Select the IP Session Lock.IP Session Lock checks the client source IP address from where a login request originates. By default it is enabled.
- If IP session lock is enabled, the auth tokens generated from this user is locked to the user's IP address.
- If auth tokens are generated and IP session lock for a user is left as Default or Enabled, the auth token is usable only from the source IP address from which it was generated.
- If auth tokens from this user is only used on machines that they are generated on, and the source IP address used to connect to the API remains the same, then you can choose the Enabled or Default.
- If the auth tokens are intended to be used on different systems and/or systems that may connect to the API from different IP Addresses, choose Disabled.
(Optional) Enter the IP/Prefix Access List.IP/Prefix Access List enables the login for the entered IP addresses. Add multiple IP addresses by selecting Add Another IP to the list.(Optional) Add Mobile Phone and Secondary Email to the user profile.![]() Save to add the user details.
Save to add the user details.Related CLIs
- config banner
- debug log agent eal file log
- debug logging facility
- debug logs dump
- debug logs follow
- debug logs tail
- debug process
- debug reboot
- debug service link logging
- debug time sync
- file export
- file remove
- file space available
- file tailf log
- file view log
- inspect certificate
- inspect cgnx infra role
- inspect connection
- inspect process status
- inspect switch mac address table
- dump auth config
- dump auth status
- dump banner config
- dump device accessconfig
- dump device conntrack count
- dump device date
- dump device info
- dump device status
- dump radius config
- dump radius statistics
- dump radius status
- dump sensor type
- dump sensor type summary
- dump time config
- dump time log
- dump time status
- dump troubleshoot message
- clear switch mac address entries
- clear device account login


