Table of Contents

Okta
Configure Okta as a SCIM provider to automate user provisioning and group
synchronization with Strata Cloud Manager.
SCIM-based integration with Okta enables automated user provisioning, group
synchronization, and streamlined identity lifecycle management for Strata Cloud Manager. This integration uses OAuth 2.0 Client Credentials for
authentication between Okta and the Strata Cloud Manager SCIM endpoint, with a
dedicated service account providing the required API access.
- Enable SCIM authorization source in Strata Cloud Manager.This step configures Strata Cloud Manager to accept identity and access management changes through a SCIM provider. After enabling SCIM, all user provisioning and role assignments must be performed through the connected SCIM provider.
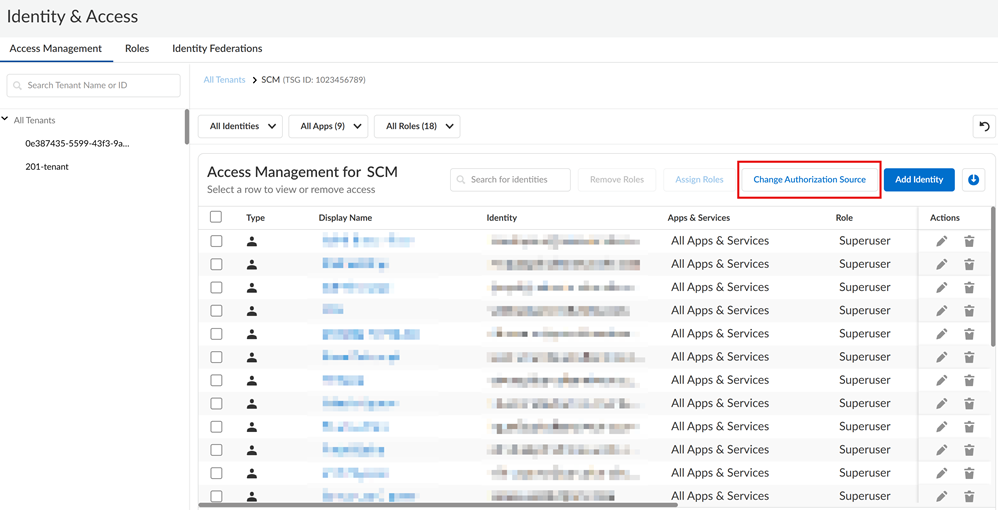
- Use one of the various ways to access Common Services > Identity & Access.Select .
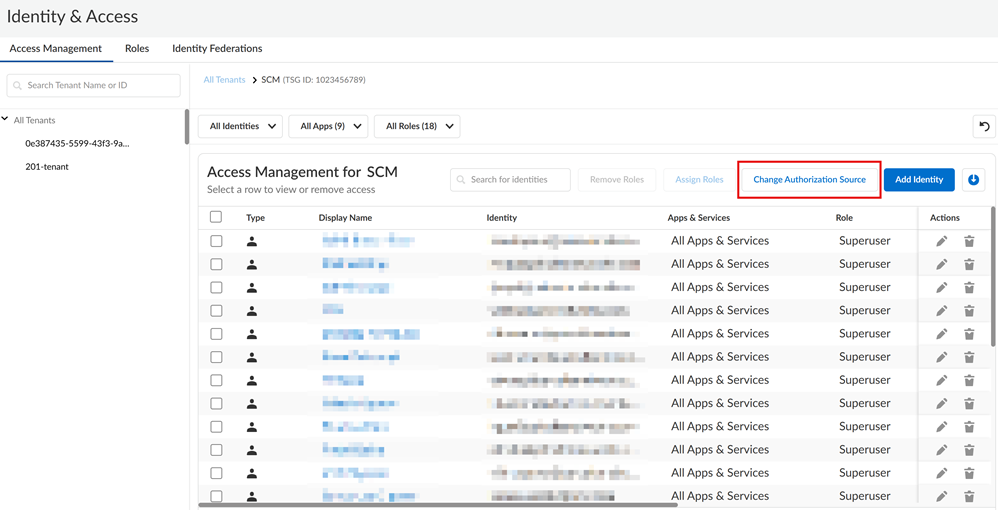
![]() Click Change Authorization Source.
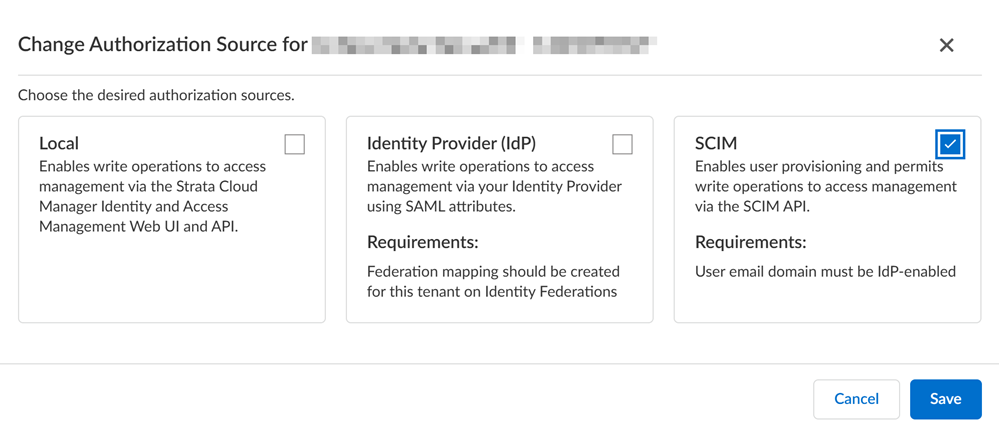
Click Change Authorization Source.![]() Enable SCIM and then click Save to apply your changes.
Enable SCIM and then click Save to apply your changes.![]() After SCIM integration is enabled, all access management changes are permitted only through the configured third-party identity provider using the SCIM protocol.Create a service account in Strata Cloud Manager.Create a service account that provides the OAuth 2.0 credentials Okta uses to authenticate with the Strata Cloud Manager SCIM endpoint. The service account must have the IAM Administrator role to perform SCIM operations.
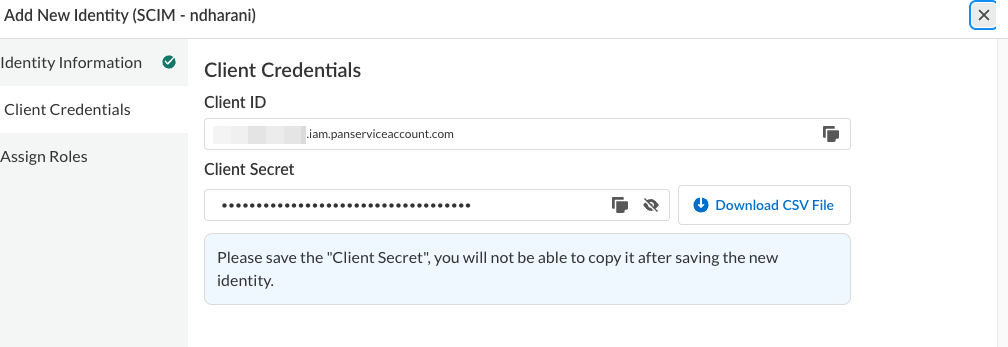
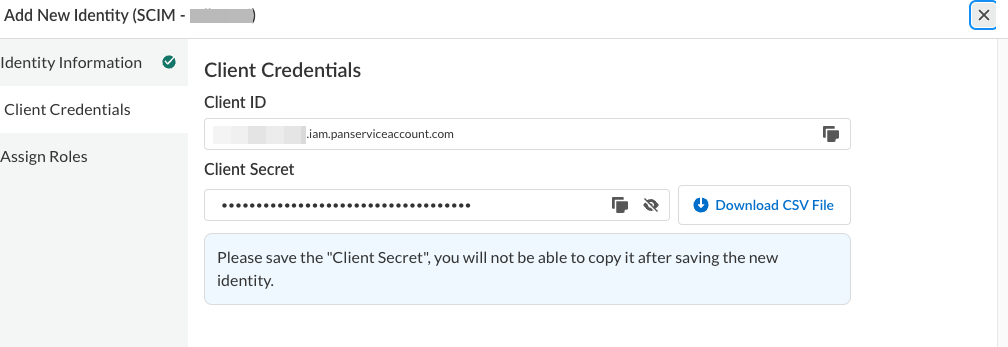
After SCIM integration is enabled, all access management changes are permitted only through the configured third-party identity provider using the SCIM protocol.Create a service account in Strata Cloud Manager.Create a service account that provides the OAuth 2.0 credentials Okta uses to authenticate with the Strata Cloud Manager SCIM endpoint. The service account must have the IAM Administrator role to perform SCIM operations.- Create a Service Account with the IAM Administrator role inside the TSG.
![]() Record the Client ID and Client Secret.You need these credentials when configuring the SCIM connection in Okta.The Client Secret is shown only once during creation. Store it securely. The service account is used solely for API authentication — users cannot log in to Strata Cloud Manager with these credentials.Create and configure an Okta application.Create a Secure Web Authentication (SWA) application in Okta and enable SCIM provisioning for it. This application serves as the integration point between Okta and the Strata Cloud Manager SCIM endpoint.
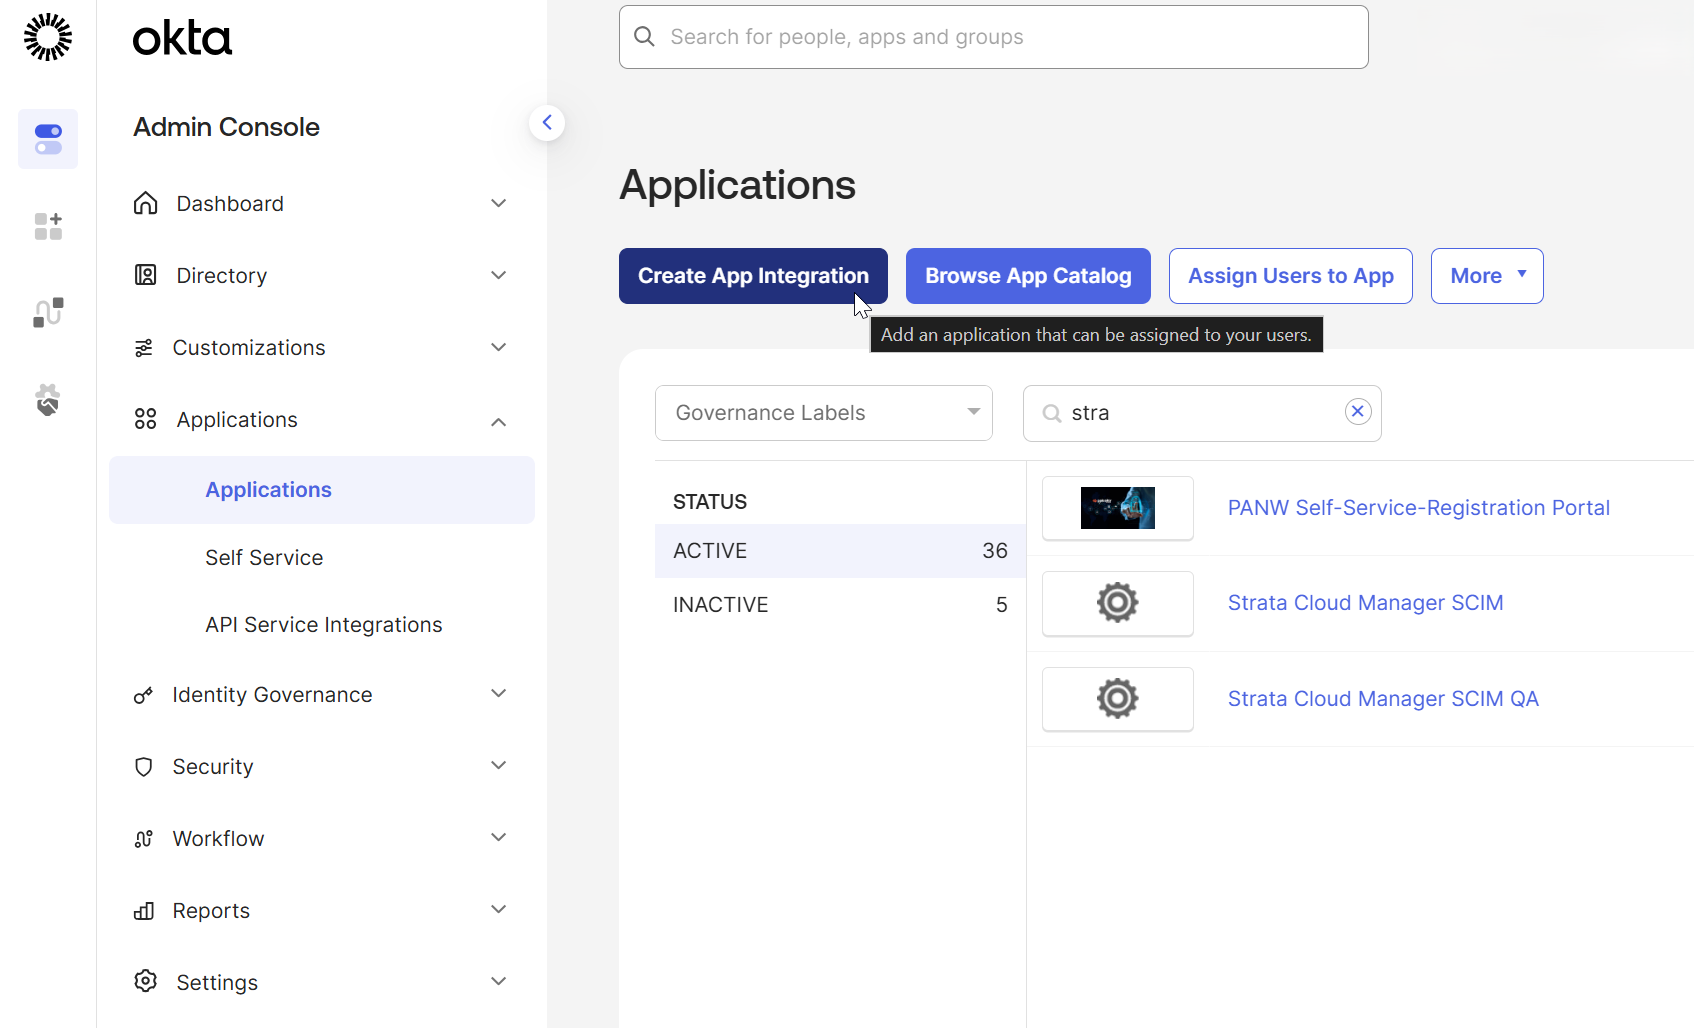
Record the Client ID and Client Secret.You need these credentials when configuring the SCIM connection in Okta.The Client Secret is shown only once during creation. Store it securely. The service account is used solely for API authentication — users cannot log in to Strata Cloud Manager with these credentials.Create and configure an Okta application.Create a Secure Web Authentication (SWA) application in Okta and enable SCIM provisioning for it. This application serves as the integration point between Okta and the Strata Cloud Manager SCIM endpoint.- Log in to the Okta Admin Console.Select .
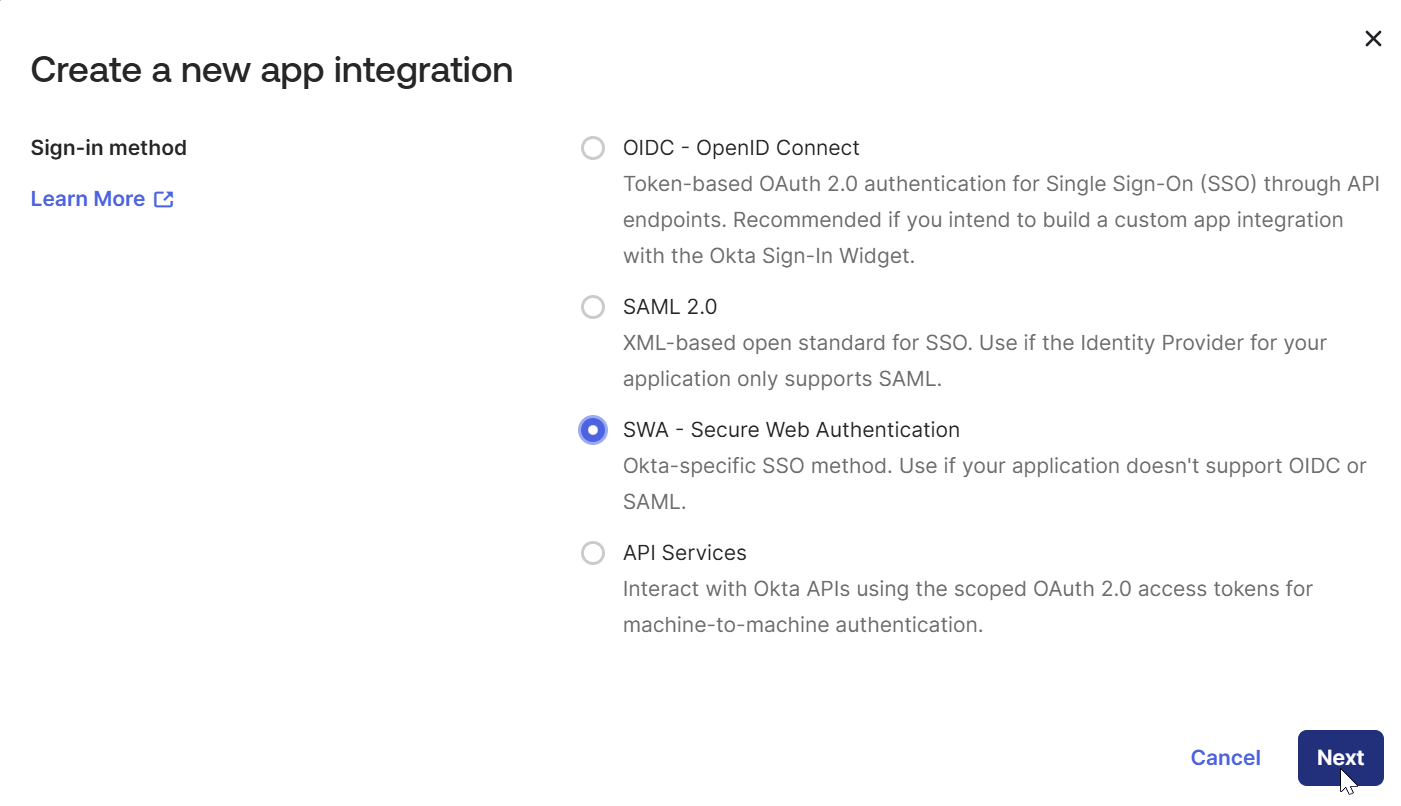
![]() Choose SWA - Secure Web Authentication as the sign-in method and click Next.
Choose SWA - Secure Web Authentication as the sign-in method and click Next.![]() Configure the application settings:
Configure the application settings:- App Name — Specify an application name (for example, SCM SCIM Integration).
- App's login page URL — Specify any URL in the application URL field.
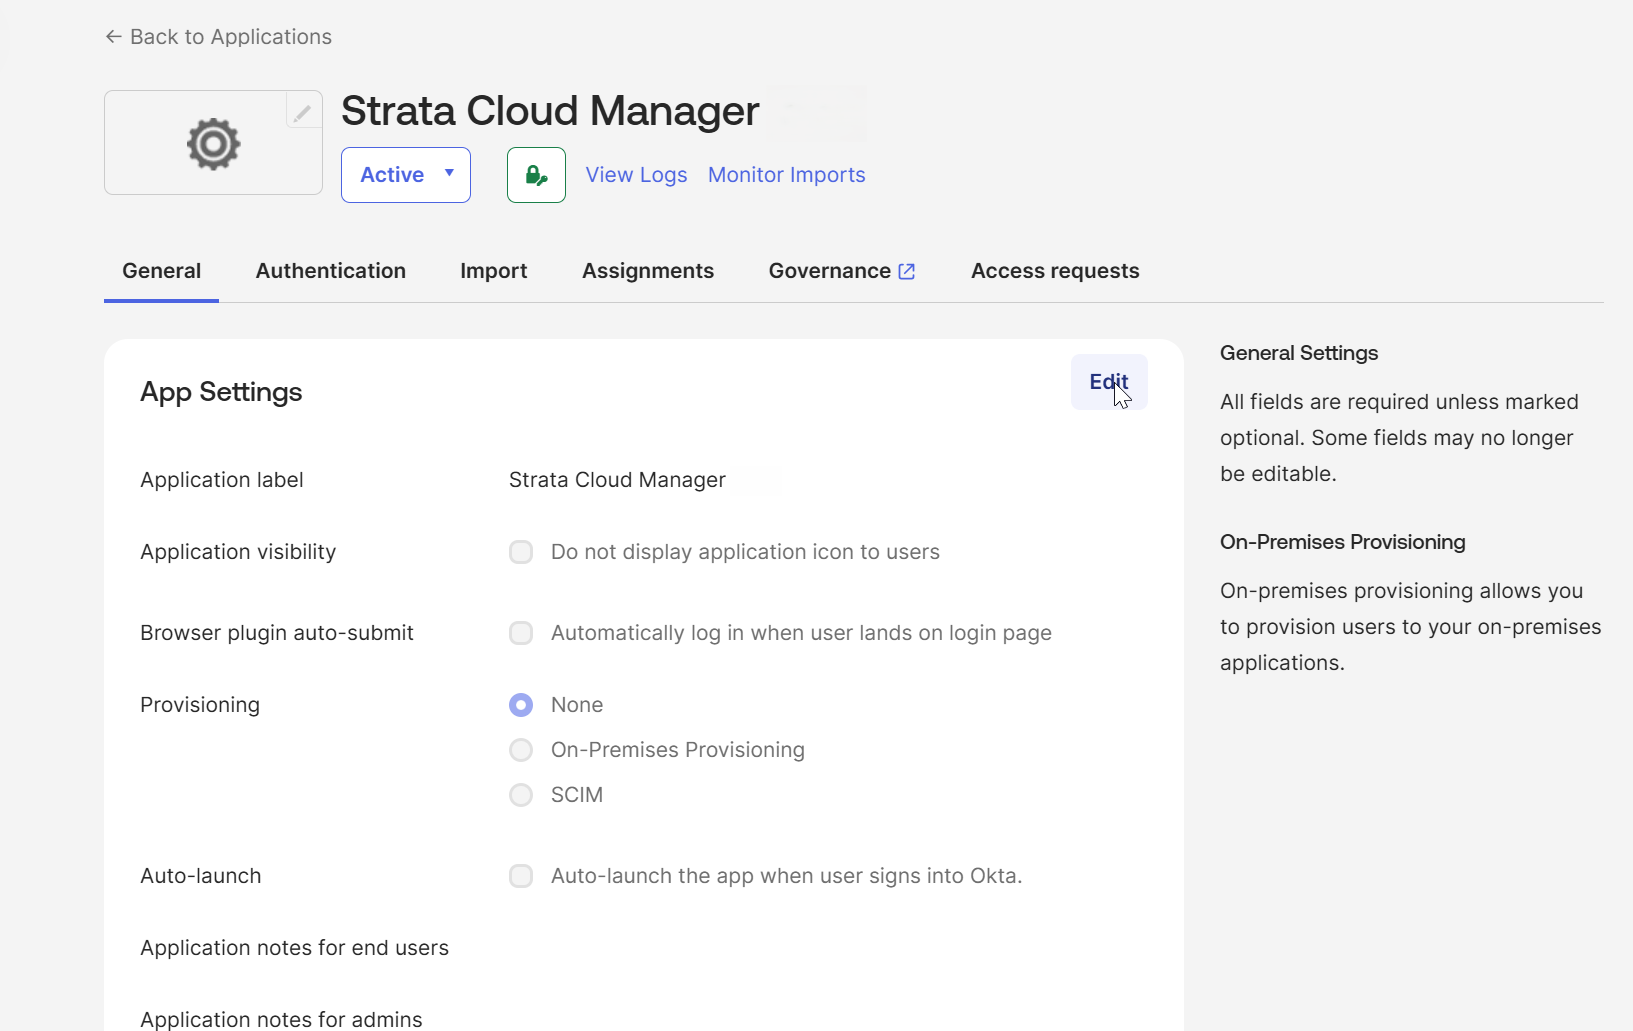
The application URL is not used for SCIM provisioning. SCIM is an API-based integration, not a UI integration. You can enter any valid URL string.Enable SCIM provisioning.In the application General tab, click Edit in the app settings. Enable SCIM provisioning, and click Save.![]() After saving, a Provisioning tab appears in the application settings.Configure the SCIM connection in Okta.Configure the SCIM connector settings and authenticate using the OAuth 2.0 credentials from the Strata Cloud Manager service account.
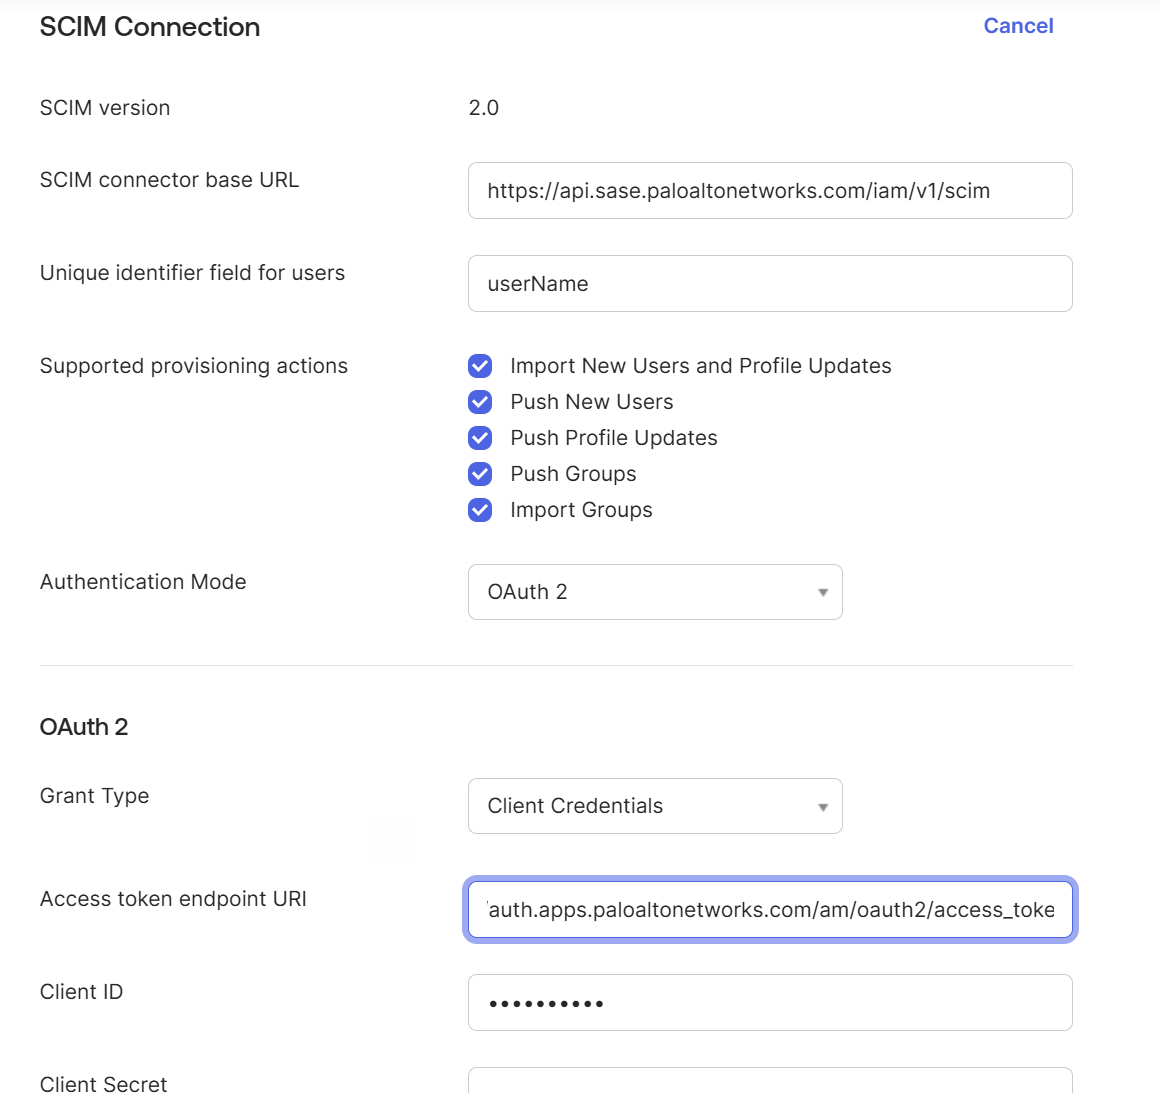
After saving, a Provisioning tab appears in the application settings.Configure the SCIM connection in Okta.Configure the SCIM connector settings and authenticate using the OAuth 2.0 credentials from the Strata Cloud Manager service account.- In the application, select .Configure the SCIM connection settings:
- SCIM connector base URL — Enter the base URL of the SCIM endpoint that Okta uses to provision users and groups to your application. Set the value to https://api.sase.paloaltonetworks.com/iam/v1/scim.
- Unique identifier field for users — Specify the SCIM user attribute that uniquely identifies each user. Set this value to userName.
- Supported provisioning actions — Select Import New Users, Push New Users, Push Profile Updates, Push Groups, and Import Groups.
- Authentication Mode — Select OAuth 2 (Client Credentials) to authenticate Okta with the SCIM server using the OAuth 2.0 Client Credentials grant.
![]() Configure the OAuth 2.0 authentication settings:
Configure the OAuth 2.0 authentication settings:- Access token endpoint — Specify the OAuth 2.0 token endpoint that Okta uses to obtain an access token. Set this value to https://auth.apps.paloaltonetworks.com/am/oauth2/access_token.
- Client ID — Specify the Client ID generated for the service account that you created in Step 2.
- Client Secret — Specify the Client Secret generated for the service account that you created in Step 2.
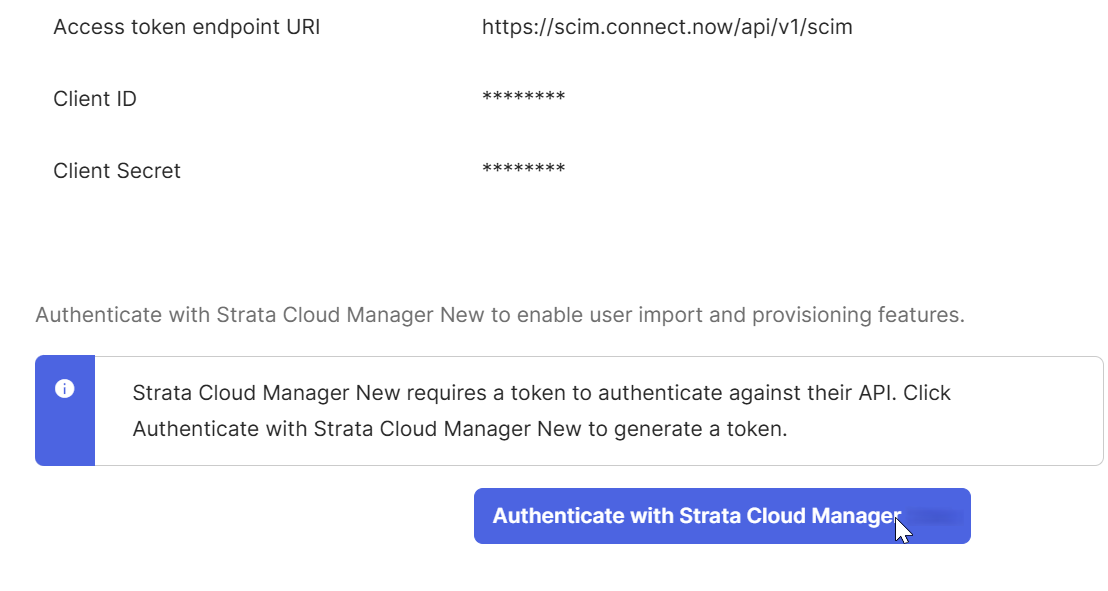
![]() Authenticate with Strata Cloud Manager to verify that Okta can authenticate and connect to the SCIM endpoint.
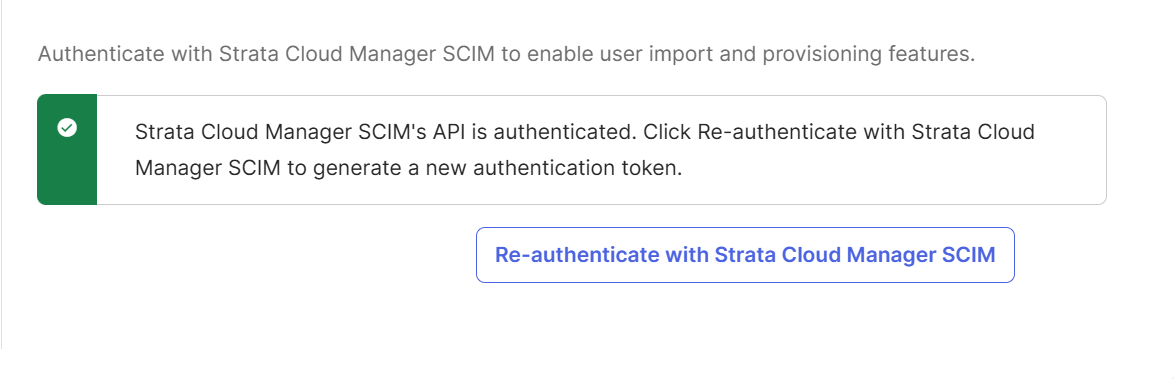
Authenticate with Strata Cloud Manager to verify that Okta can authenticate and connect to the SCIM endpoint.![]() A success message confirms that the OAuth 2.0 authentication and SCIM endpoint connectivity are working correctly.Under , click Edit and enable Create Users, then click Save.You must enable Create Users to avoid provisioning errors when pushing groups that contain users not yet provisioned in Strata Cloud Manager.Provision groups from Okta to Strata Cloud Manager.Import existing Strata Cloud Manager roles into Okta, create an Okta user group, and push the group to Strata Cloud Manager by linking it to a predefined Strata Cloud Manager role.
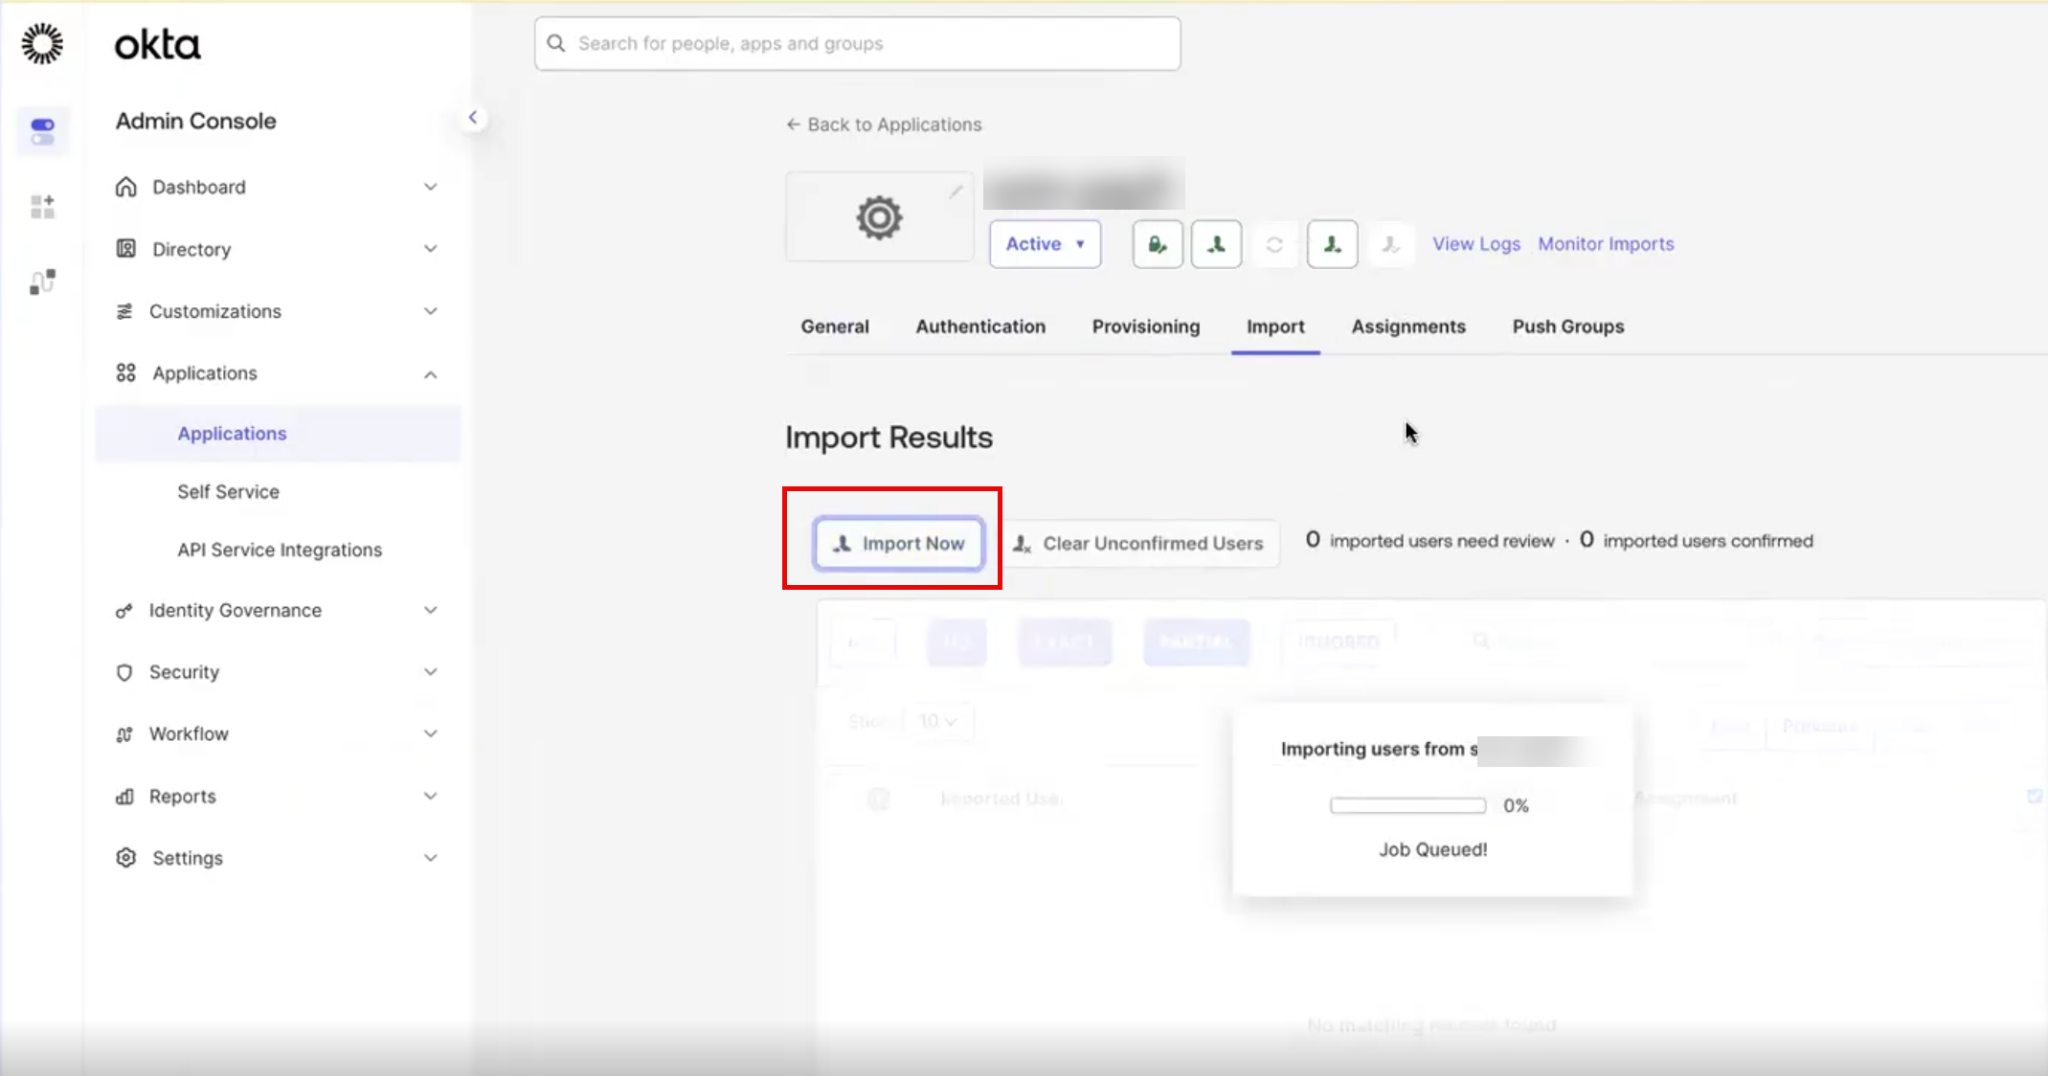
A success message confirms that the OAuth 2.0 authentication and SCIM endpoint connectivity are working correctly.Under , click Edit and enable Create Users, then click Save.You must enable Create Users to avoid provisioning errors when pushing groups that contain users not yet provisioned in Strata Cloud Manager.Provision groups from Okta to Strata Cloud Manager.Import existing Strata Cloud Manager roles into Okta, create an Okta user group, and push the group to Strata Cloud Manager by linking it to a predefined Strata Cloud Manager role.- In the application, select to retrieve the predefined access policies (roles) from Strata Cloud Manager into Okta.You must import groups from Strata Cloud Manager before assigning or pushing any groups. Importing retrieves the predefined Strata Cloud Manager roles so they are available for linking in the Push Groups step.Create an Okta group.Navigate to and click Add Group. Enter a group name and click Save. Select the newly added group and add the users you want to provision to this group.
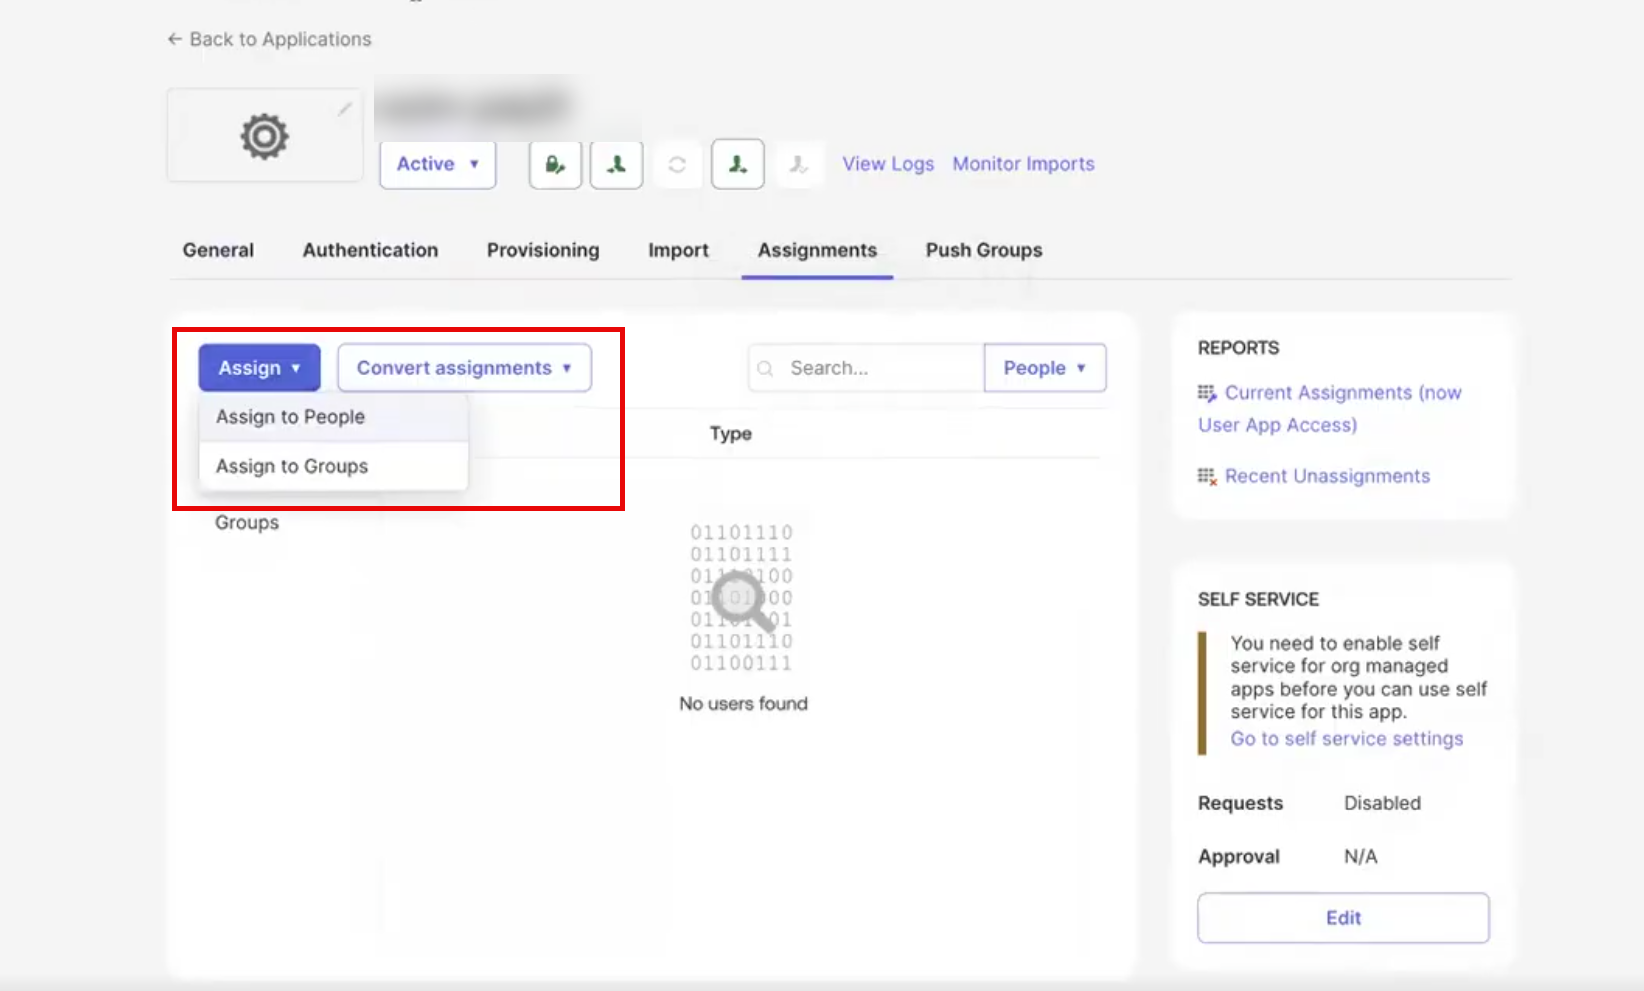
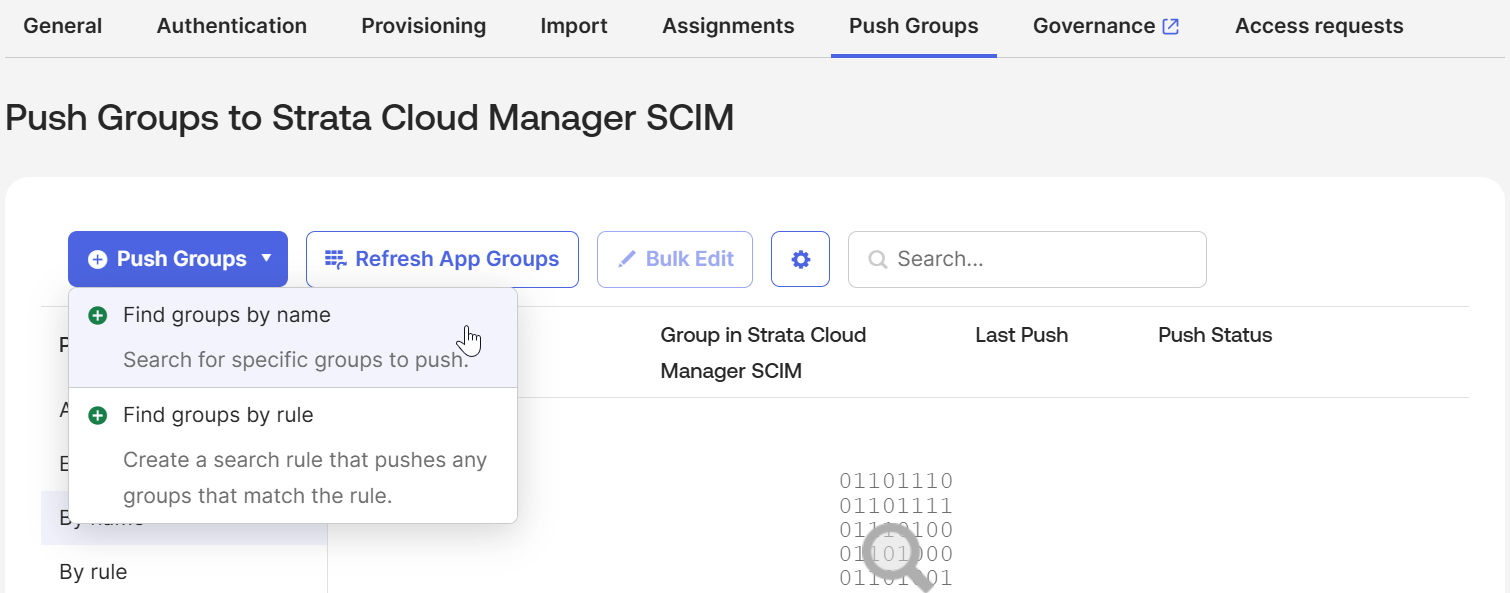
![]() Assign the group to the application.In the application Assignments tab, click . Search for and select the group you created, then click Save and Go Back > Done.Push the group to Strata Cloud Manager.Select the Push Groups tab and click . Search for the Okta group you created. Click the drop-down arrow next to Create Group and select Link Group. From the list of imported Strata Cloud Manager roles, choose the target role you want to map this Okta group to. Click Save.
Assign the group to the application.In the application Assignments tab, click . Search for and select the group you created, then click Save and Go Back > Done.Push the group to Strata Cloud Manager.Select the Push Groups tab and click . Search for the Okta group you created. Click the drop-down arrow next to Create Group and select Link Group. From the list of imported Strata Cloud Manager roles, choose the target role you want to map this Okta group to. Click Save.![]() Always select Link Group instead of Create Group during push group configuration. Selecting Create Group causes recurring synchronization errors because Strata Cloud Manager does not support group creation through SCIM — only linking to existing predefined roles.Verify that the push group status shows Active.
Always select Link Group instead of Create Group during push group configuration. Selecting Create Group causes recurring synchronization errors because Strata Cloud Manager does not support group creation through SCIM — only linking to existing predefined roles.Verify that the push group status shows Active.![]() An Active status confirms that Okta successfully linked the group and is synchronizing membership with Strata Cloud Manager.Verify user and group provisioning.Confirm that users and groups provisioned through Okta appear correctly in Strata Cloud Manager with the expected role assignments.
An Active status confirms that Okta successfully linked the group and is synchronizing membership with Strata Cloud Manager.Verify user and group provisioning.Confirm that users and groups provisioned through Okta appear correctly in Strata Cloud Manager with the expected role assignments.- Log in to Strata Cloud Manager.Select .Search for the users provisioned from Okta and verify that they appear with the correct role assignments.
![]() Identity and access changes may take a few minutes to propagate. If provisioned users don't appear immediately, wait and refresh the page.Add users to a provisioned group.Add new users to an Okta group that is already linked and pushed to Strata Cloud Manager. Users added to a linked group are automatically provisioned to the corresponding Strata Cloud Manager role without any additional push action.
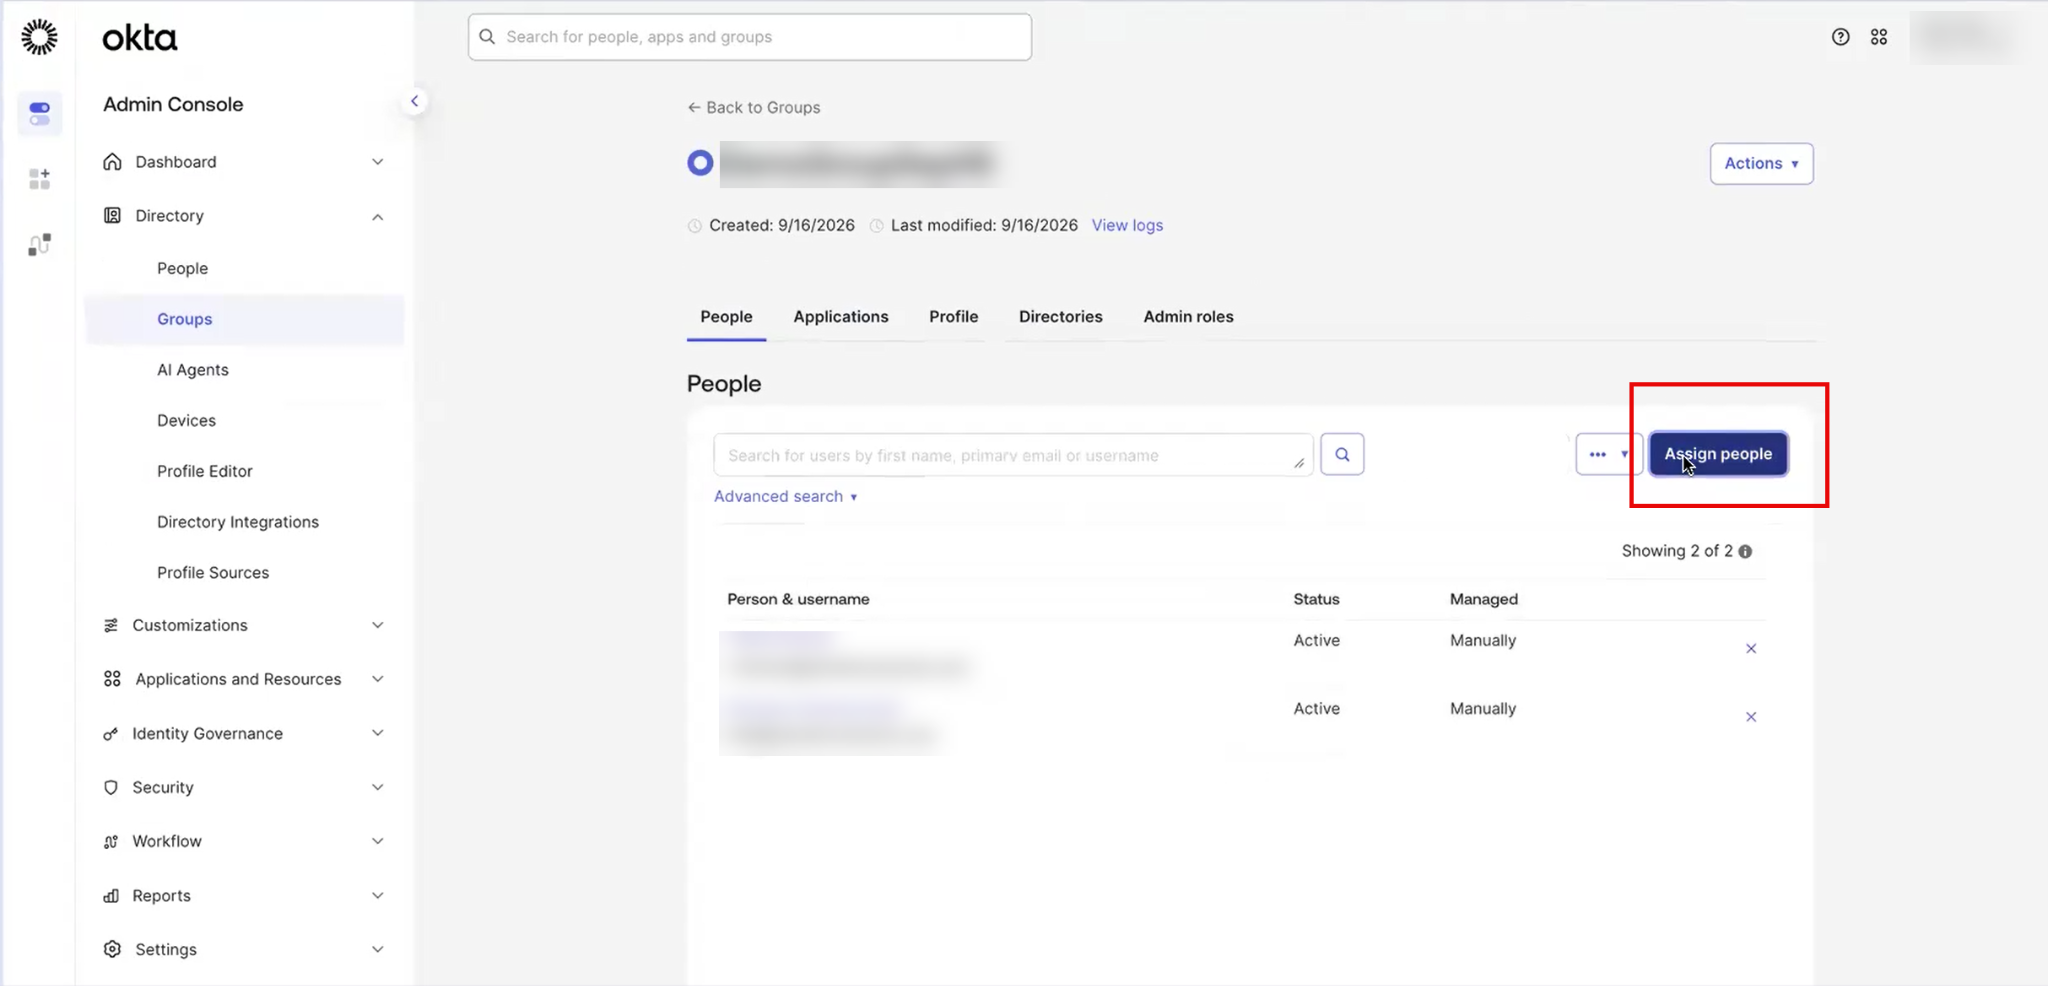
Identity and access changes may take a few minutes to propagate. If provisioned users don't appear immediately, wait and refresh the page.Add users to a provisioned group.Add new users to an Okta group that is already linked and pushed to Strata Cloud Manager. Users added to a linked group are automatically provisioned to the corresponding Strata Cloud Manager role without any additional push action.- In the Okta Admin Console, navigate to .Select the group that is linked to the Strata Cloud Manager role.Click Assign People.
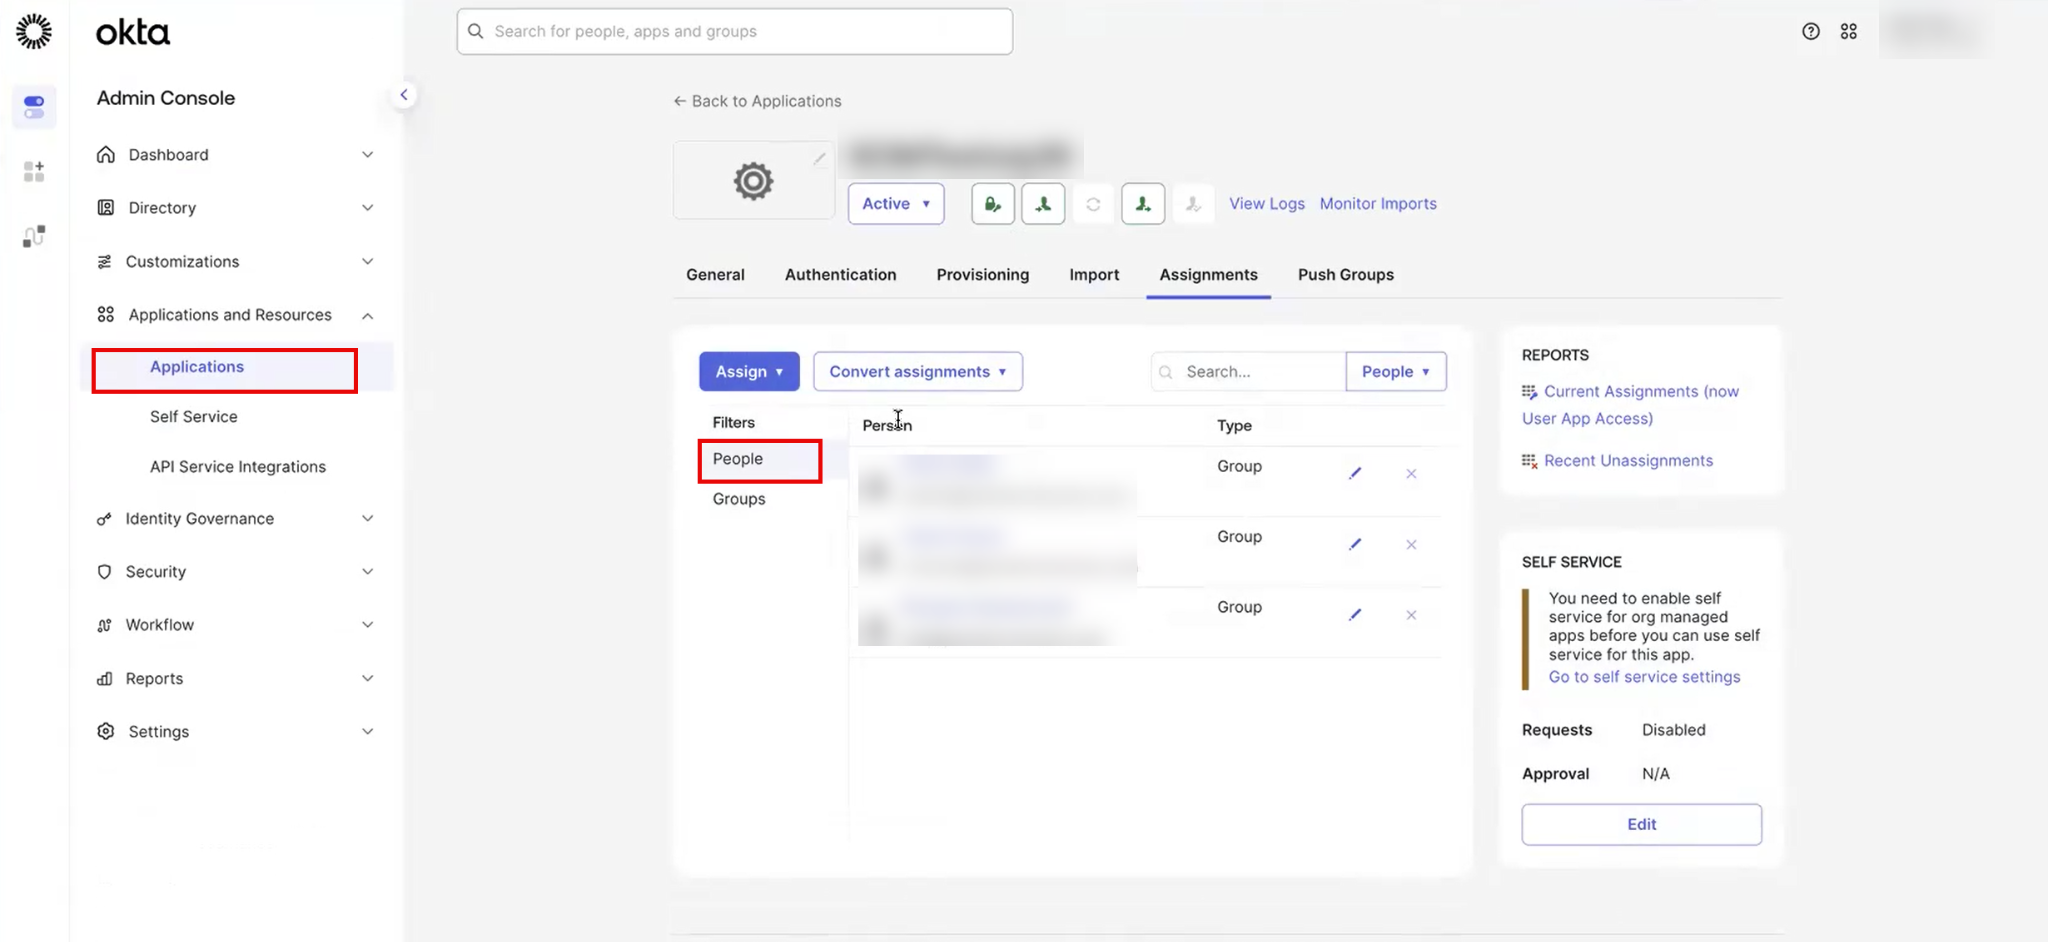
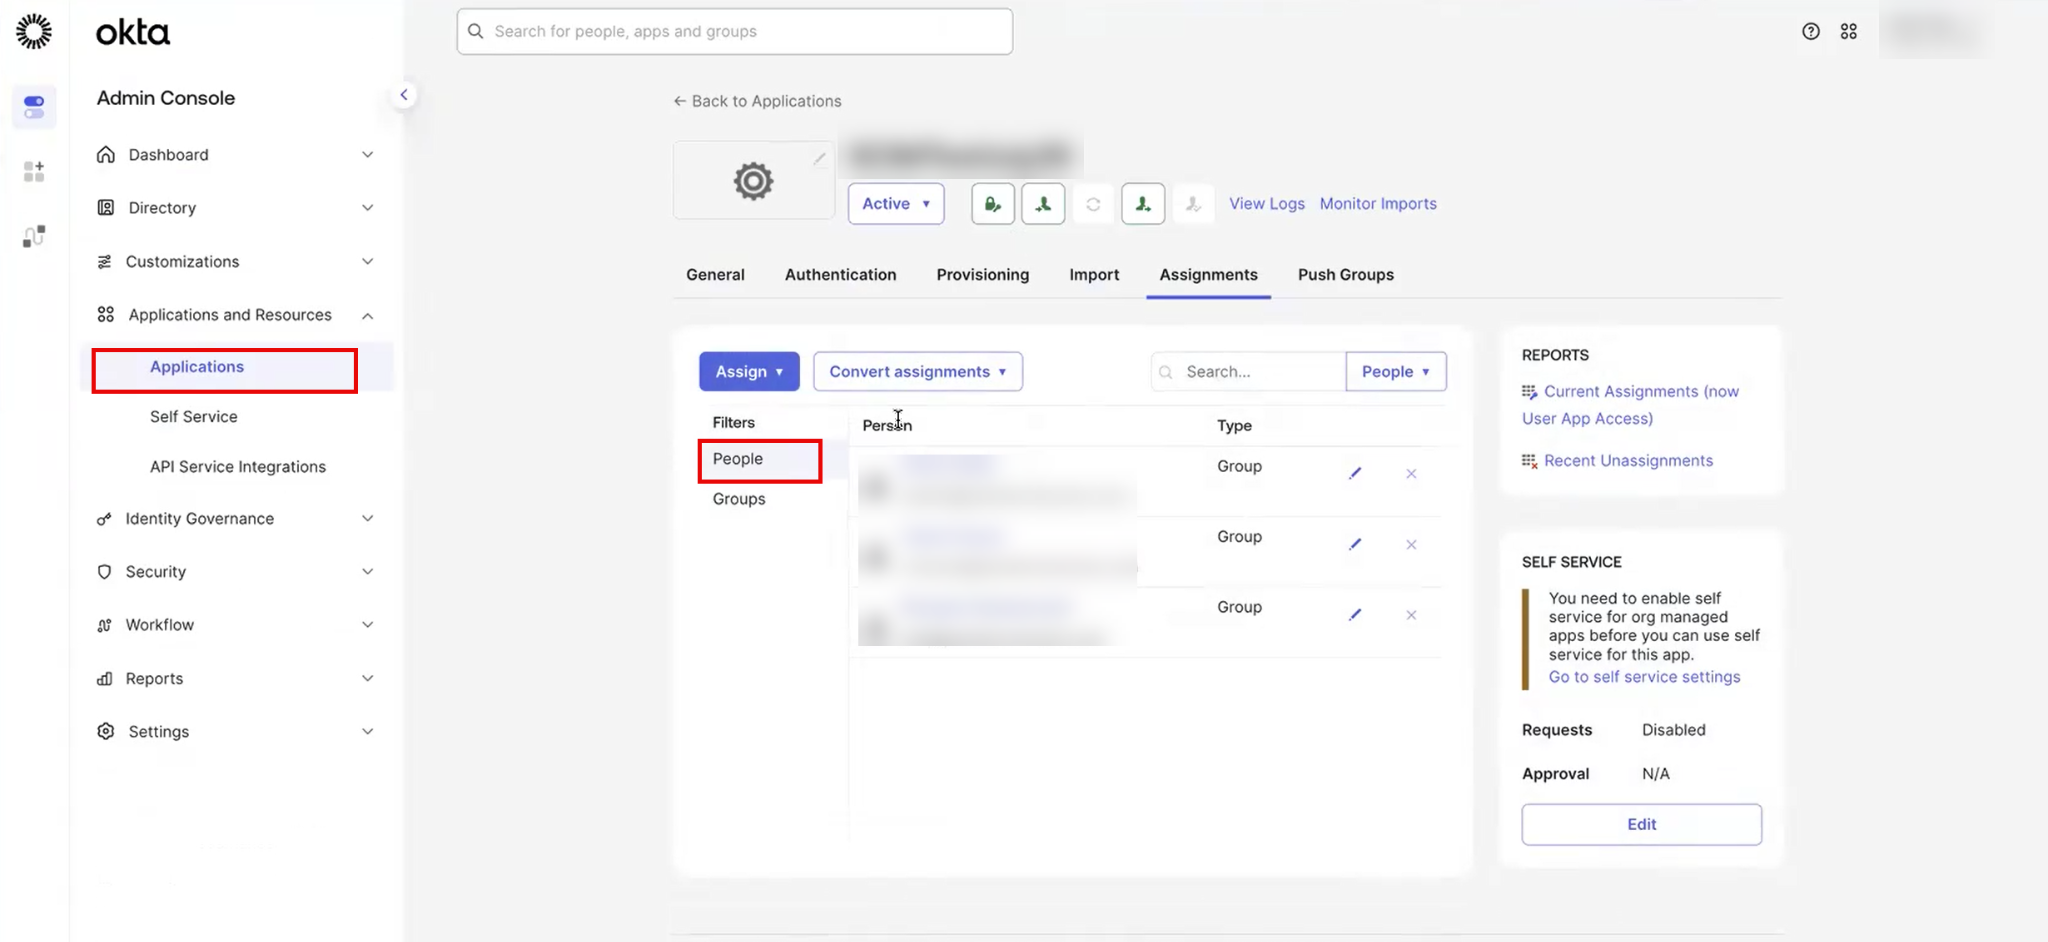
![]() Search for and select the users you want to add, then click Done.Navigate to , select your Strata Cloud Manager SCIM application, then select the People tab and verify that the newly added users appear.
Search for and select the users you want to add, then click Done.Navigate to , select your Strata Cloud Manager SCIM application, then select the People tab and verify that the newly added users appear.![]() Log in to Strata Cloud Manager and navigate to .Verify that the newly added users appear with the expected role assignment.
Log in to Strata Cloud Manager and navigate to .Verify that the newly added users appear with the expected role assignment.![]() Adding users to a linked group automatically synchronizes them to Strata Cloud Manager. You don't need to perform a manual push.Remove users from a provisioned group.Remove users from an Okta group that is linked to a Strata Cloud Manager role. Unlike adding users, removing users requires a manual push to synchronize the change to Strata Cloud Manager.
Adding users to a linked group automatically synchronizes them to Strata Cloud Manager. You don't need to perform a manual push.Remove users from a provisioned group.Remove users from an Okta group that is linked to a Strata Cloud Manager role. Unlike adding users, removing users requires a manual push to synchronize the change to Strata Cloud Manager.- In the Okta Admin Console, navigate to .Select the group that is linked to the Strata Cloud Manager role.Click the X next to the user you want to remove from the group.
![]() Navigate to , select your Strata Cloud Manager SCIM application, then select the People tab and verify that the user no longer appears.
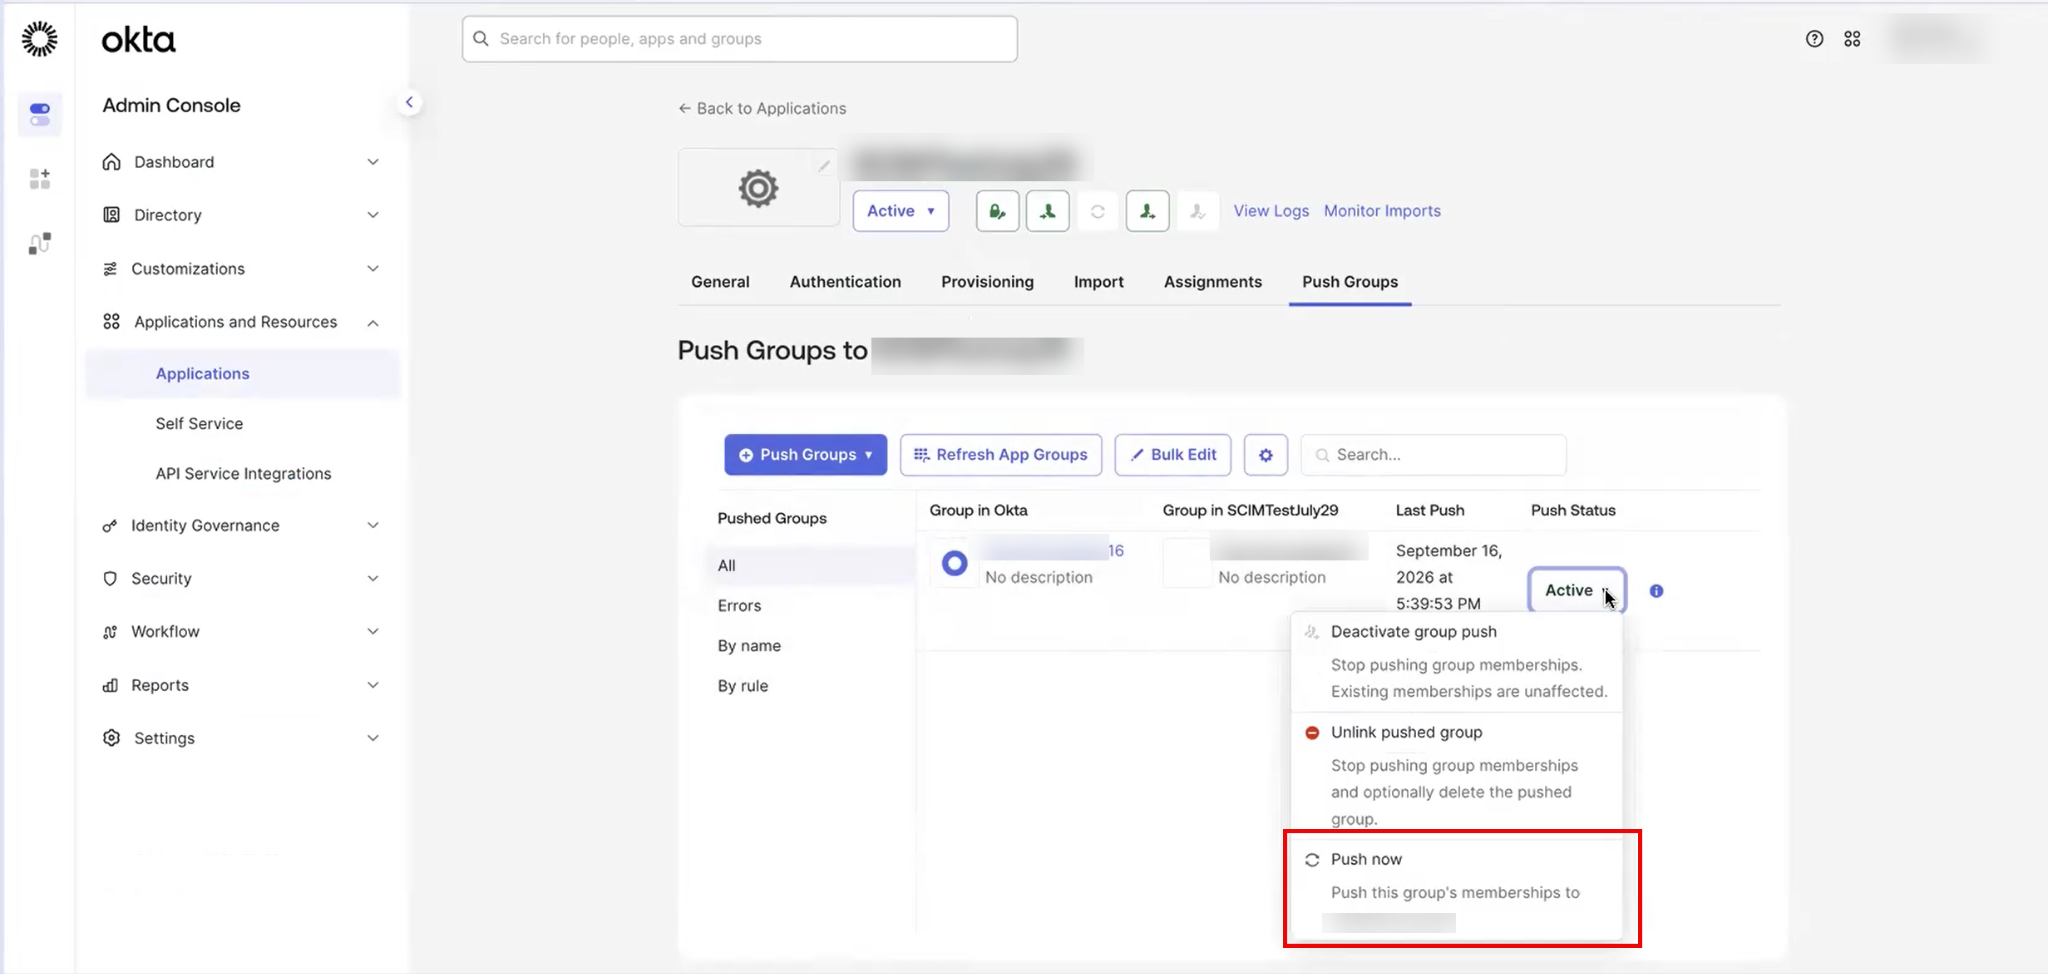
Navigate to , select your Strata Cloud Manager SCIM application, then select the People tab and verify that the user no longer appears.![]() Select the Push Groups tab.Click the arrow next to the Active status for the linked group and select Push Now.
Select the Push Groups tab.Click the arrow next to the Active status for the linked group and select Push Now.![]() Wait for the push group status to return to Active.Log in to Strata Cloud Manager and navigate to .Verify that the removed user no longer appears in the Strata Cloud Manager tenant.Removing a user from the Okta group does not automatically remove them from Strata Cloud Manager. You must manually push the group to synchronize the removal. If you skip the Push Now step, the user retains access in Strata Cloud Manager.Remove and unlink a group from Strata Cloud Manager.Remove a group assignment from the Okta application and unlink it from the Strata Cloud Manager role. This process removes all users in the group from the Strata Cloud Manager tenant and disconnects the group mapping.
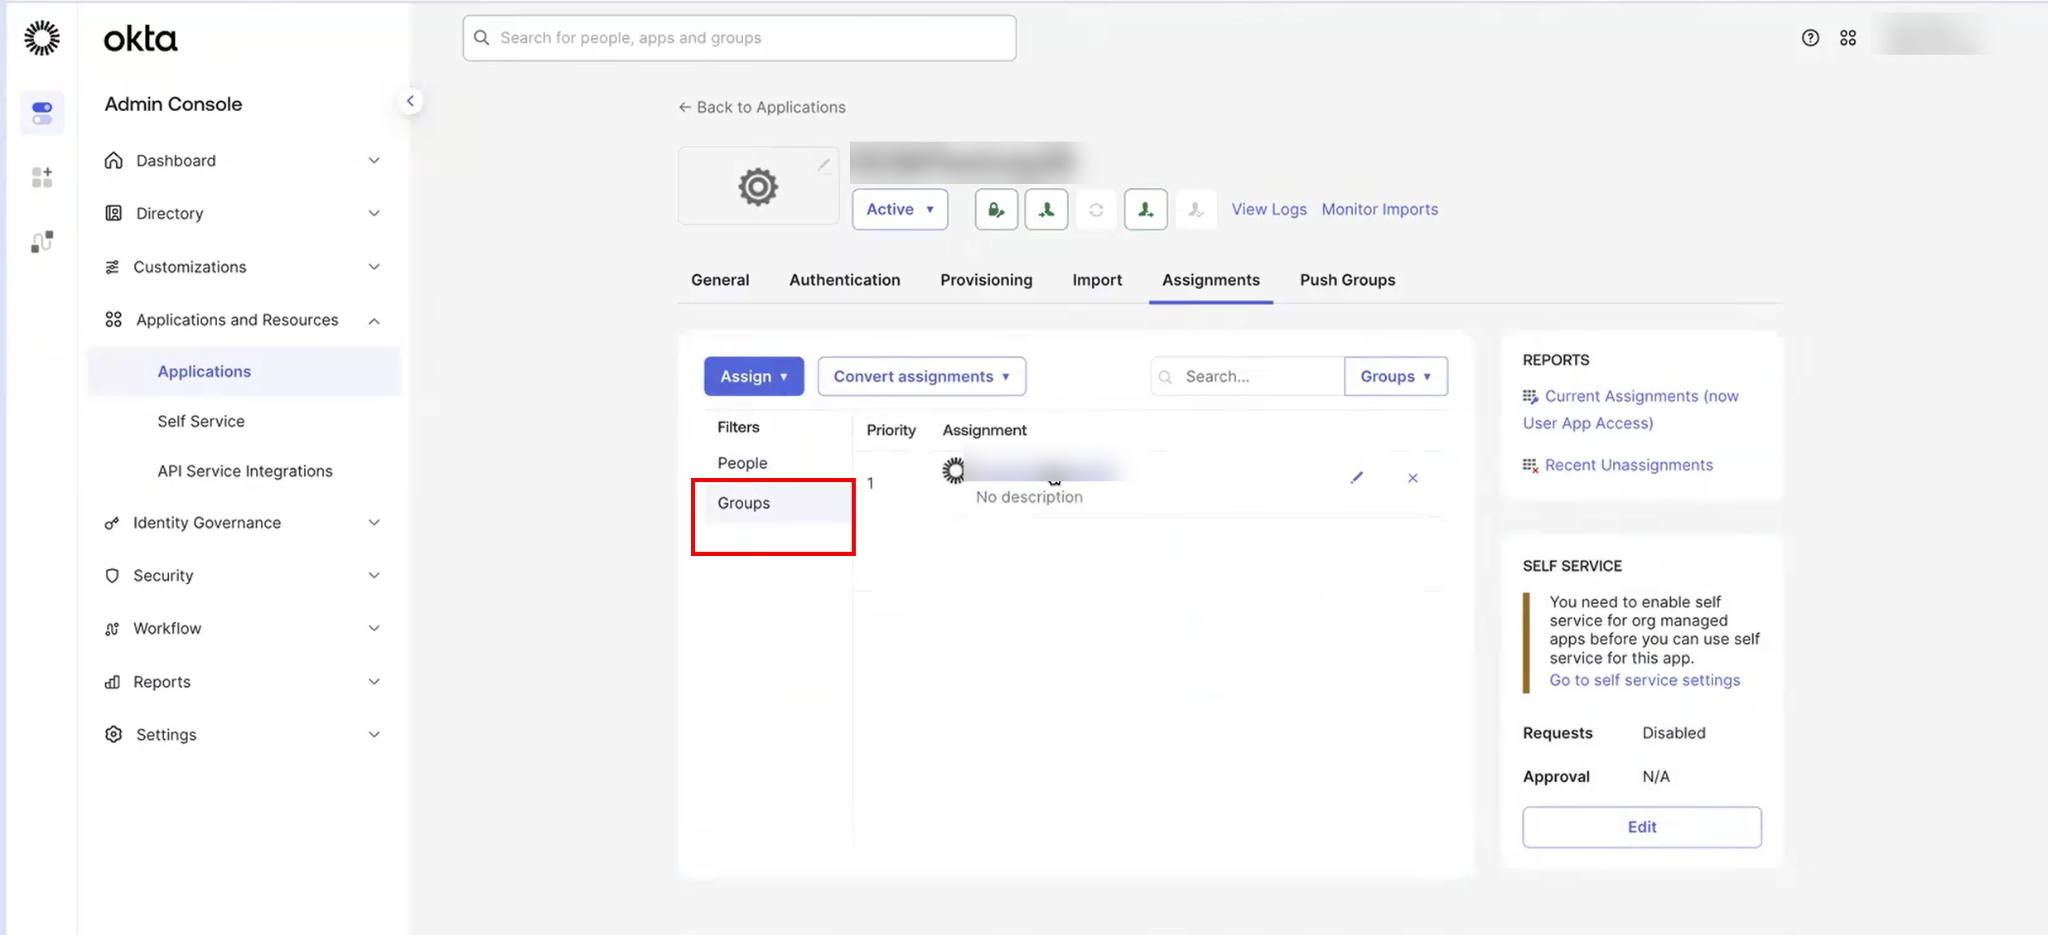
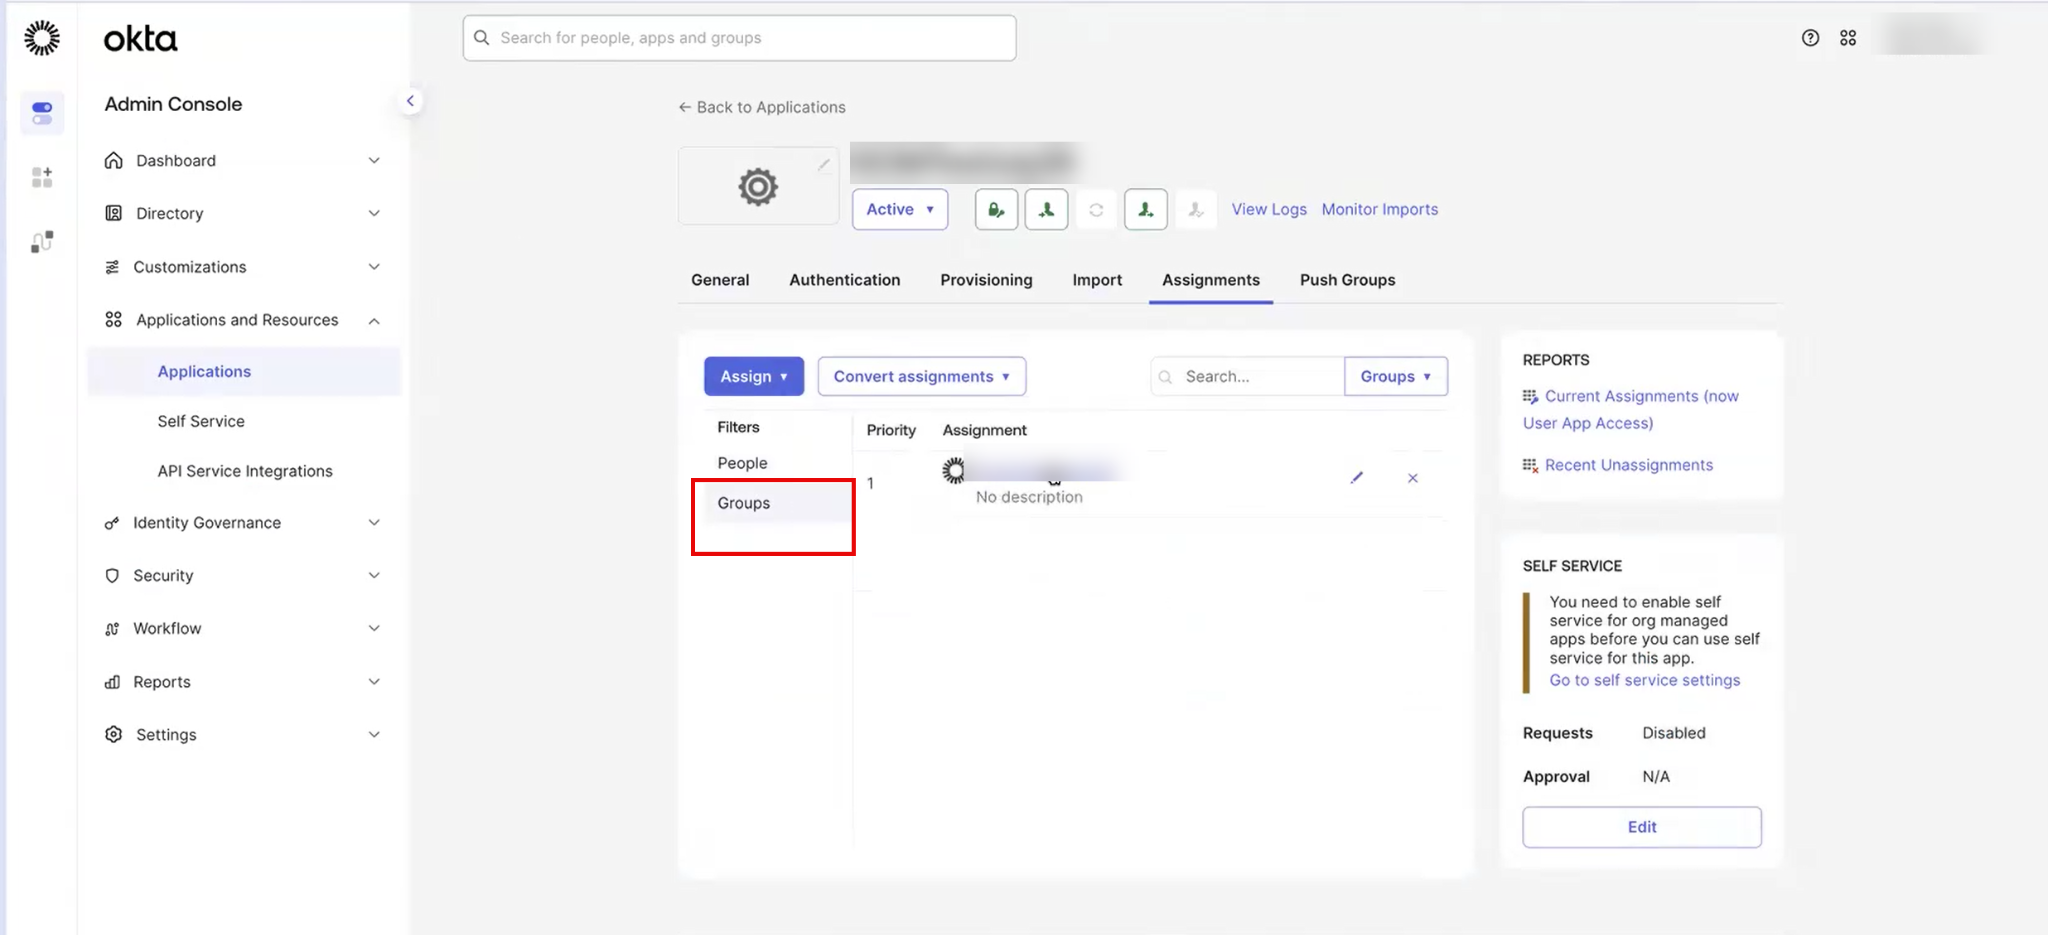
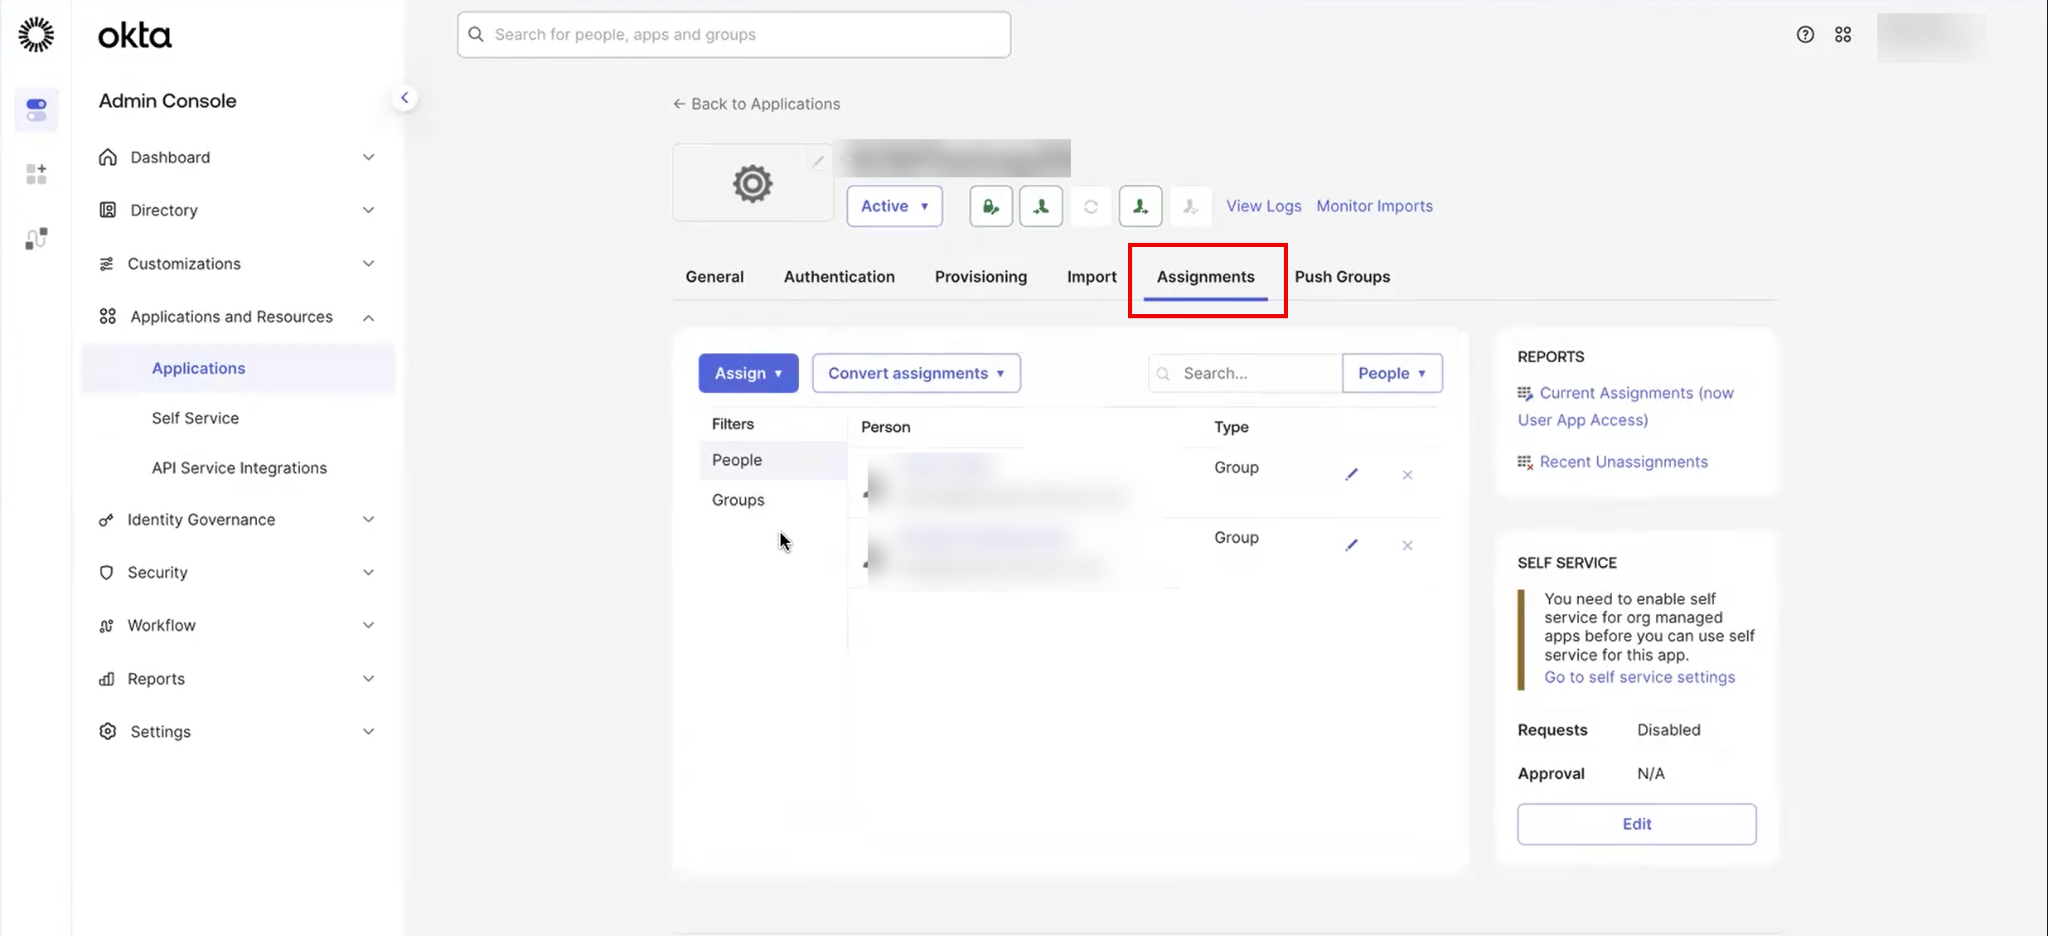
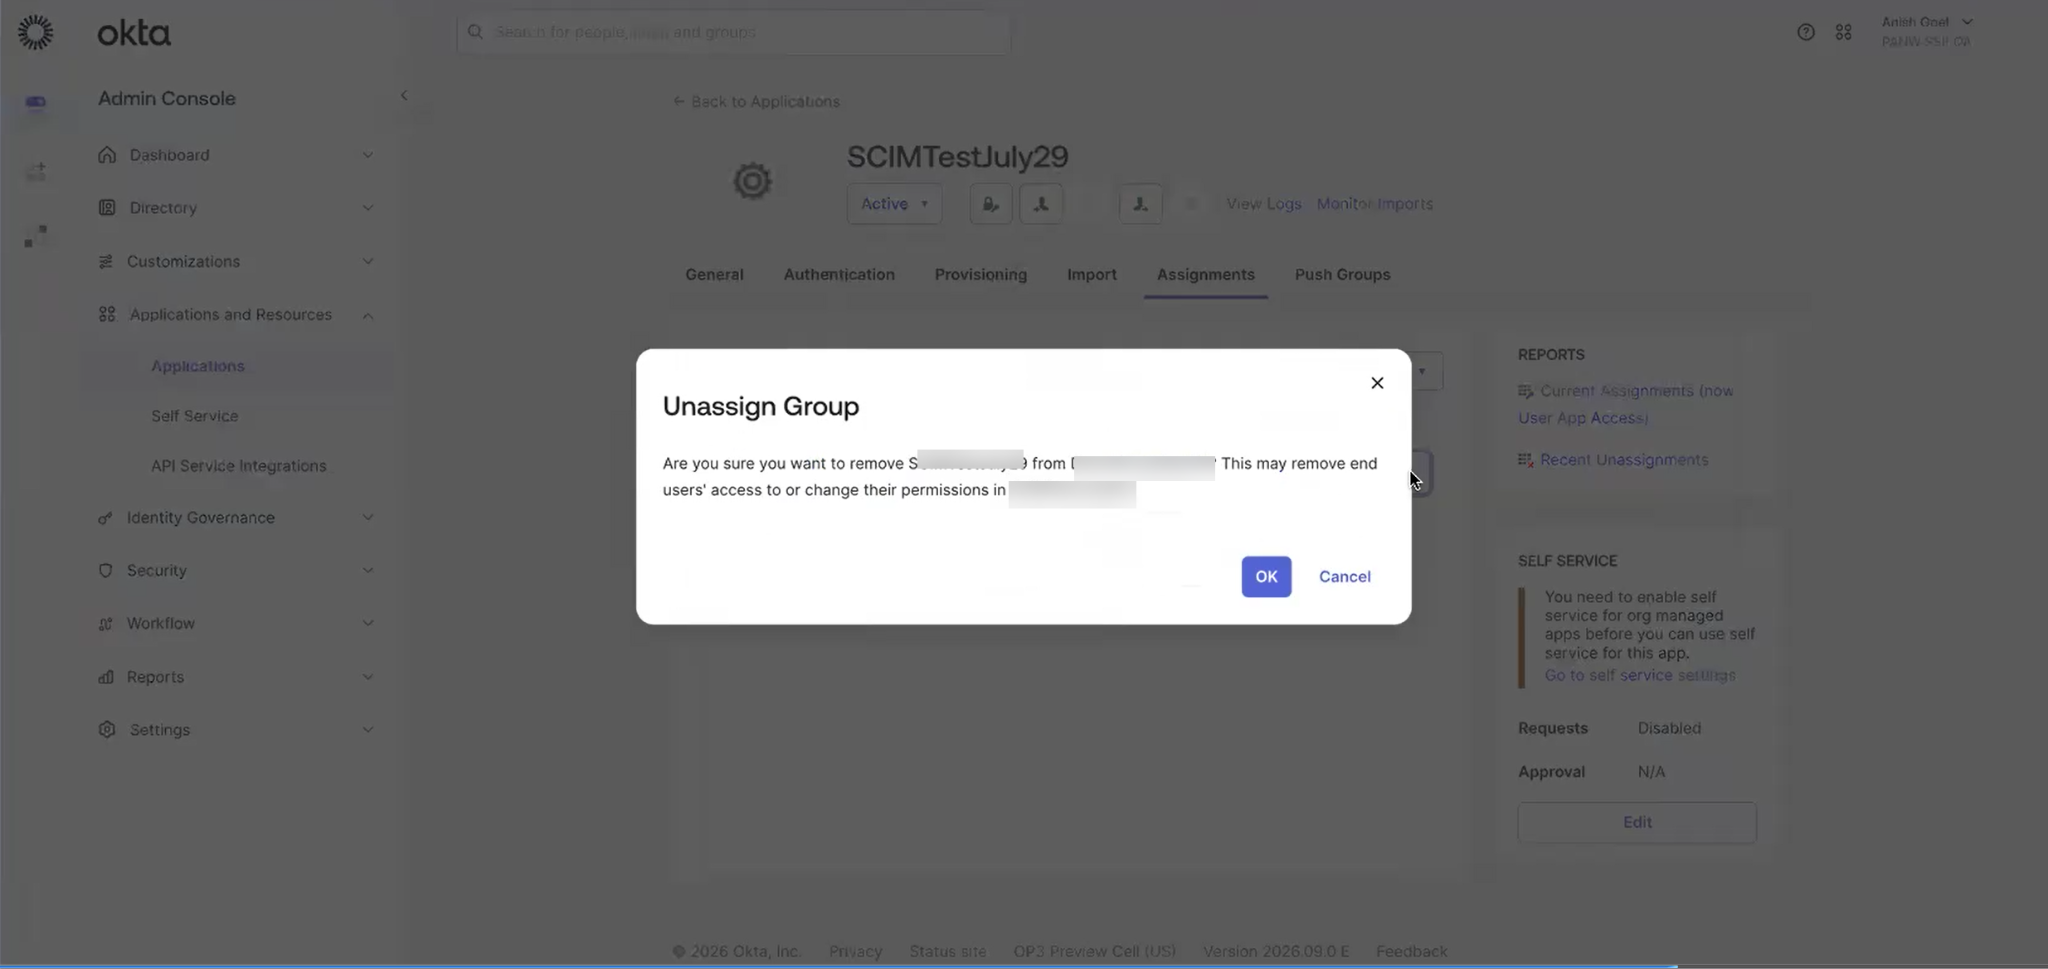
Wait for the push group status to return to Active.Log in to Strata Cloud Manager and navigate to .Verify that the removed user no longer appears in the Strata Cloud Manager tenant.Removing a user from the Okta group does not automatically remove them from Strata Cloud Manager. You must manually push the group to synchronize the removal. If you skip the Push Now step, the user retains access in Strata Cloud Manager.Remove and unlink a group from Strata Cloud Manager.Remove a group assignment from the Okta application and unlink it from the Strata Cloud Manager role. This process removes all users in the group from the Strata Cloud Manager tenant and disconnects the group mapping.- In the Okta Admin Console, navigate to and select your Strata Cloud Manager SCIM application.Select the Assignments tab.Locate the group under Groups and click Remove to unassign the group from the application.
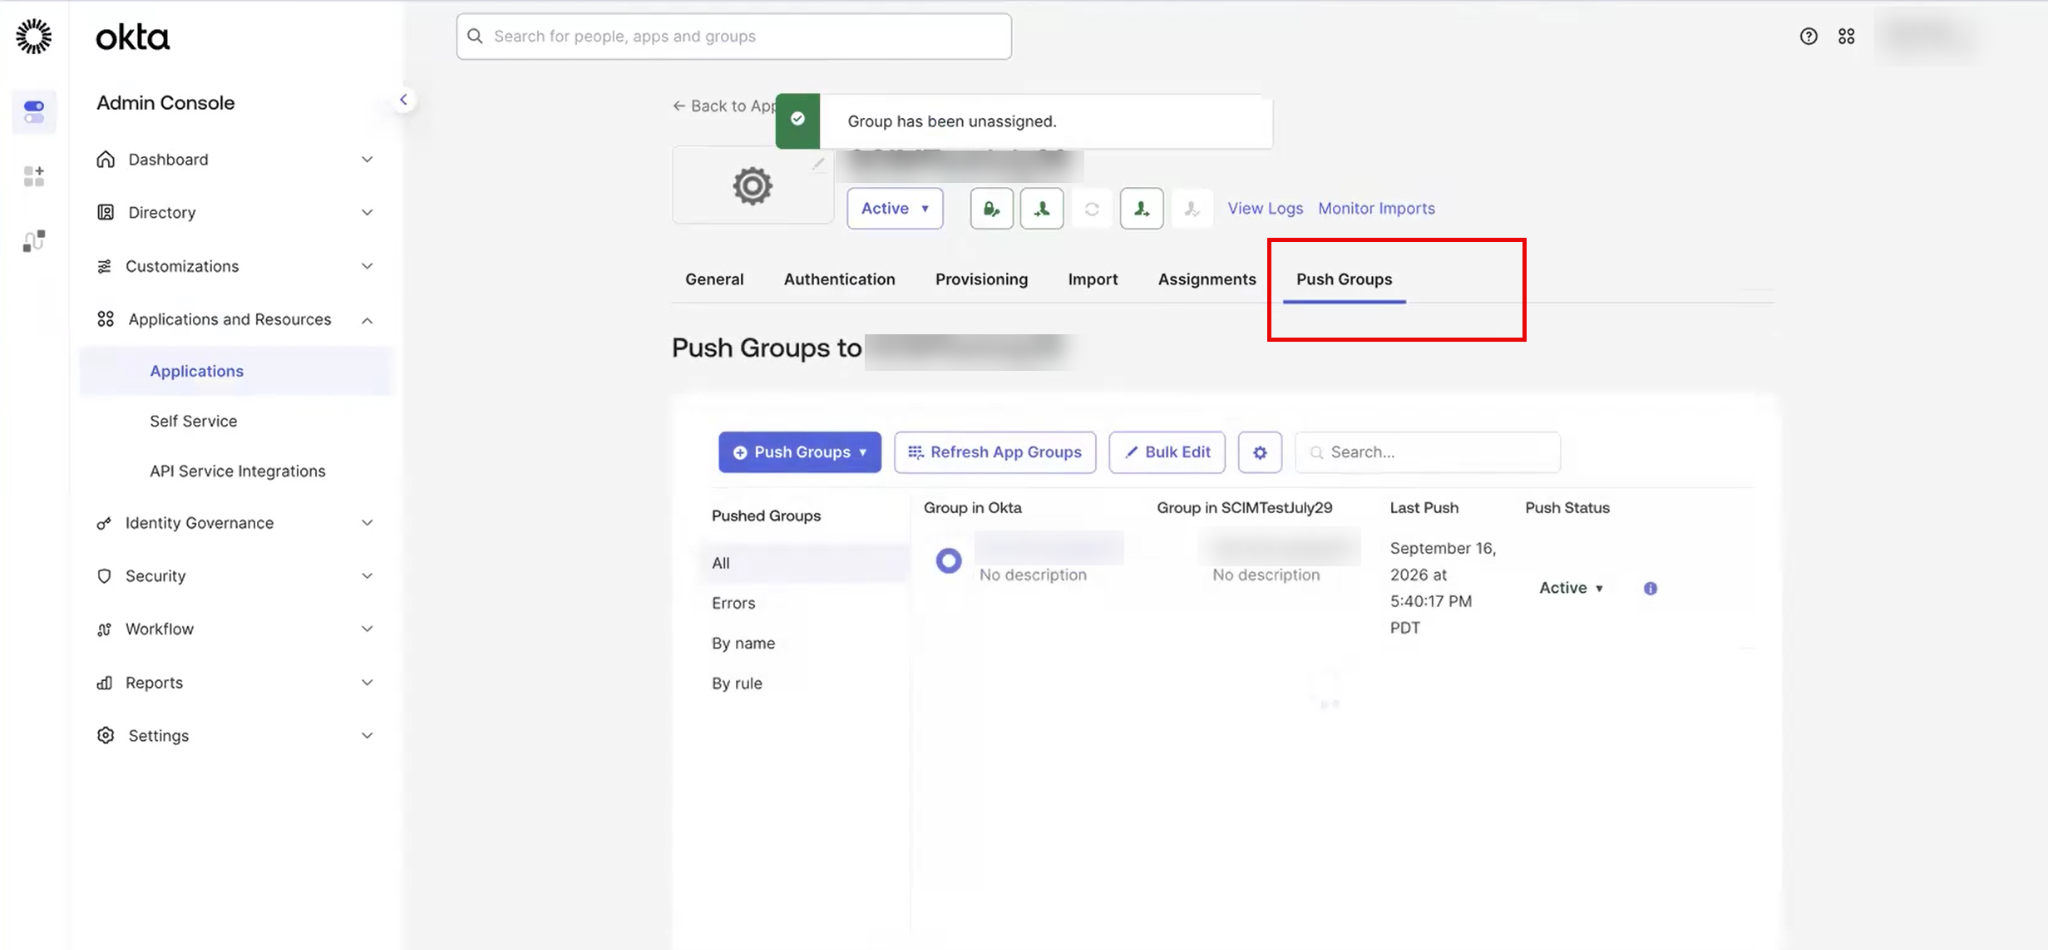
![]() Select the Push Groups tab.Click the arrow next to the Active status for the group and select Push Now.
Select the Push Groups tab.Click the arrow next to the Active status for the group and select Push Now.![]() Wait for the push to complete and the status to return to Active.Log in to Strata Cloud Manager, navigate to , and verify that the users from the removed group no longer appear.
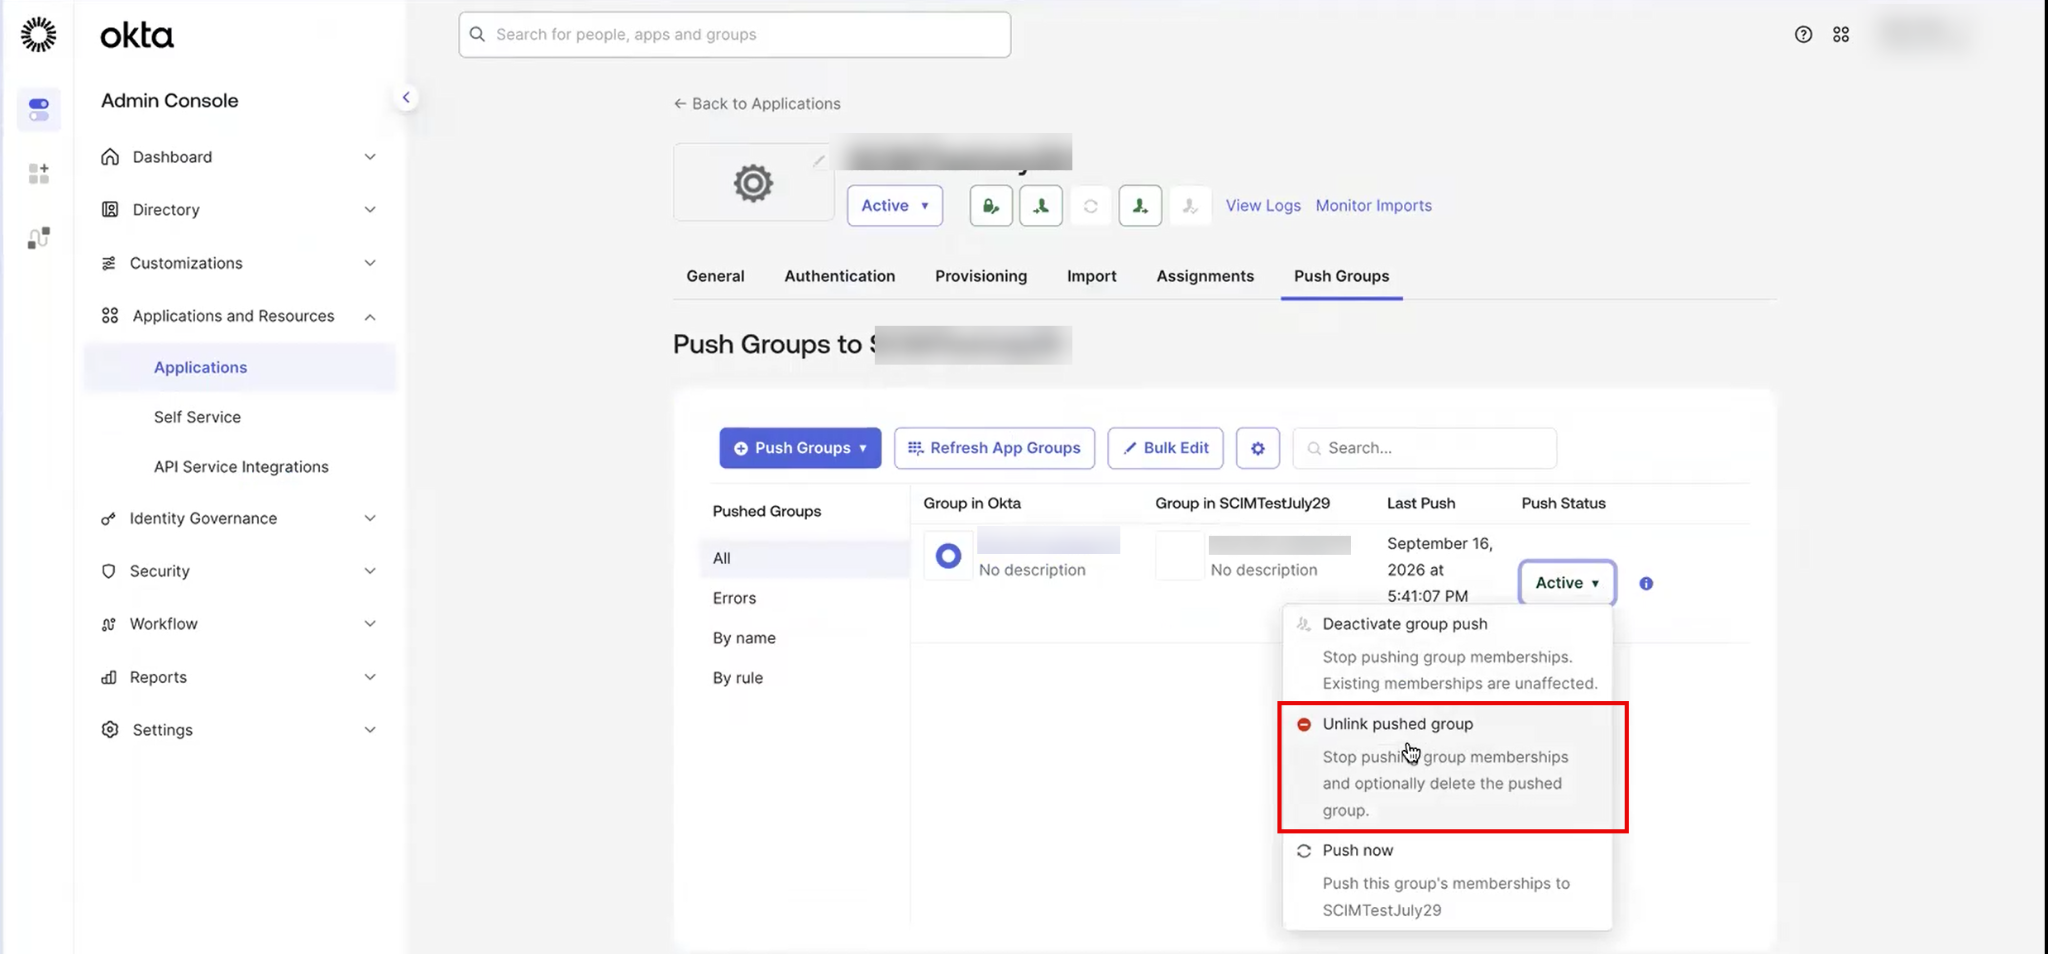
Wait for the push to complete and the status to return to Active.Log in to Strata Cloud Manager, navigate to , and verify that the users from the removed group no longer appear.![]() Return to the Okta application Push Groups tab.Click the arrow next to the group status and select Unlink pushed group.
Return to the Okta application Push Groups tab.Click the arrow next to the group status and select Unlink pushed group.![]() When prompted, select Leave the group in the target app and click Unlink.Unassigning the group from the application alone does not remove users from Strata Cloud Manager. You must push the change and then unlink the group to fully disconnect the mapping. The Leave the group in the target app option preserves the Strata Cloud Manager role definition while removing the Okta synchronization link.
When prompted, select Leave the group in the target app and click Unlink.Unassigning the group from the application alone does not remove users from Strata Cloud Manager. You must push the change and then unlink the group to fully disconnect the mapping. The Leave the group in the target app option preserves the Strata Cloud Manager role definition while removing the Okta synchronization link.