Configure Third-Party Identity Provider Integration with Microsoft Entra ID
Table of Contents
Configure Third-Party Identity Provider Integration with Microsoft Entra ID
Configure SAML-based integration with Microsoft Entra ID to enable centralized
authentication and secure access to the platform.
| Where Can I Use This? | What Do I Need? |
|---|---|
|
|
SAML-based integration with a third-party identity provider, such as Microsoft
Entra ID, enables centralized authentication and secure access to the platform. By
configuring Entra ID as the identity provider, you can provide a Single Sign-On (SSO) experience,
strengthen access control, and simplify user management.
This integration supports the following methods for handling authentication and
authorization:
- Authentication Only—Users are authenticated by Entra ID, while roles and permissions are managed within the platform.
- Authentication and Authorization—Users are authenticated by Entra ID, and roles and permissions are also defined and managed within Entra ID.
Select the approach that aligns with your access control requirements and refer to the
corresponding tab for configuration steps.
- Configure Entra ID SAML Integration for Authentication Only
- Configure Entra ID SAML Integration for Authentication and Authorization
Configure Entra ID SAML Integration for Authentication Only
Configure SAML integration where Microsoft Entra ID handles user authentication while
roles and permissions are managed within the platform.
This section describes how to configure a Security Assertion Markup Language (SAML)
integration where Microsoft Entra ID acts as the identity provider and the SCM
platform acts as the Service Provider (SP). In this setup, Entra ID handles both
user authentication and authorization—users sign in through Entra ID, and their
roles and permissions are also defined and managed there.
- Add and verify your domain.This step establishes the trust boundary between your tenant and domain through DNS verification. You add your organization's domain and verify ownership by adding a DNS TXT record. This verification is required for creating an identity federation and is the foundation for all subsequent SSO configuration.
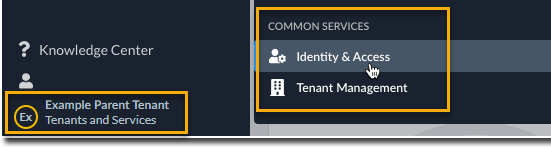
- Use one of the various ways to access .
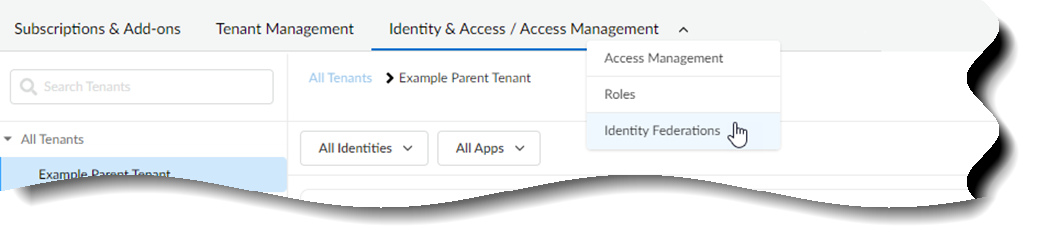
![]() Select Identity & Access.Select to add an identity federation.
Select Identity & Access.Select to add an identity federation.![]()
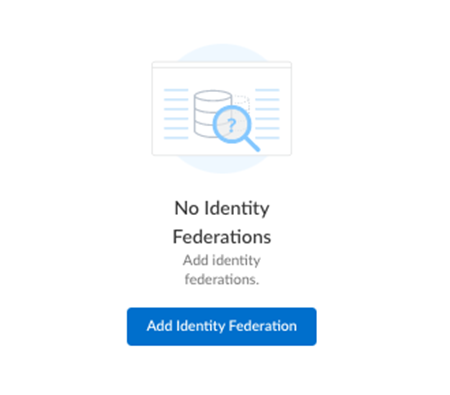
![]() Add the Domain information for your enterprise.The character limit is 50. Special characters are not allowed, with the exception of "-" and "."Select Next.Follow the Instructions for Verification to add a DNS record within your domain name provider.
Add the Domain information for your enterprise.The character limit is 50. Special characters are not allowed, with the exception of "-" and "."Select Next.Follow the Instructions for Verification to add a DNS record within your domain name provider.- Copy the TXT record from Common Services.
- Select Finish.
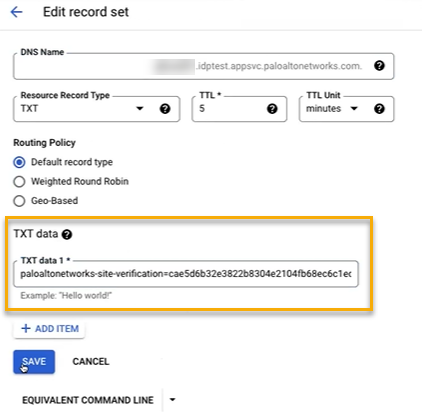
- Go to your domain provider's console and paste the TXT record, so that Palo Alto Networks can verify that you are an owner of the domain.
- (Optional) In the domain provider's console, revise your identity provider's time to live (TTL) setting if you need a faster refresh rate. The TTL setting impacts, for example, how long it takes to verify ownership of the identity federation.
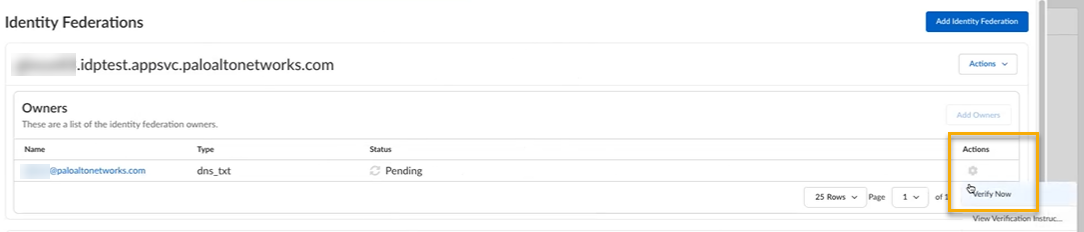
![]() In Common Services, select Verify Now to verify ownership of the identity federation.
In Common Services, select Verify Now to verify ownership of the identity federation.![]() Download the SAML metadata.After you add an identity federation, you can configure Palo Alto Networks as a service provider by downloading the service provider (SP) metadata from Common Services. The SP metadata helps you configure your identity provider integration with Palo Alto Networks as an SP, so that you don't have to provide the details manually.
Download the SAML metadata.After you add an identity federation, you can configure Palo Alto Networks as a service provider by downloading the service provider (SP) metadata from Common Services. The SP metadata helps you configure your identity provider integration with Palo Alto Networks as an SP, so that you don't have to provide the details manually.- Use one of the various ways to access .Select .
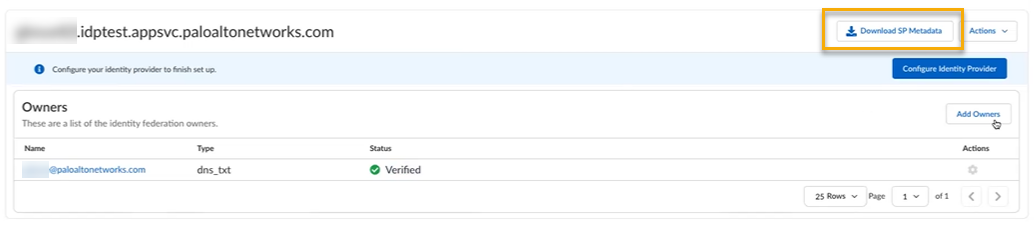
![]() Scroll to your identity federation and select Download SP Metadata.
Scroll to your identity federation and select Download SP Metadata.![]() Save the metadata file in a secure location. You need this file to upload to Entra ID. The metadata file contains the Entity ID, Assertion Consumer Service (ACS) URL, and certificate that Entra ID needs to send SAML assertions.Create an enterprise application in Entra ID and configure it to use SAML for single sign-on.
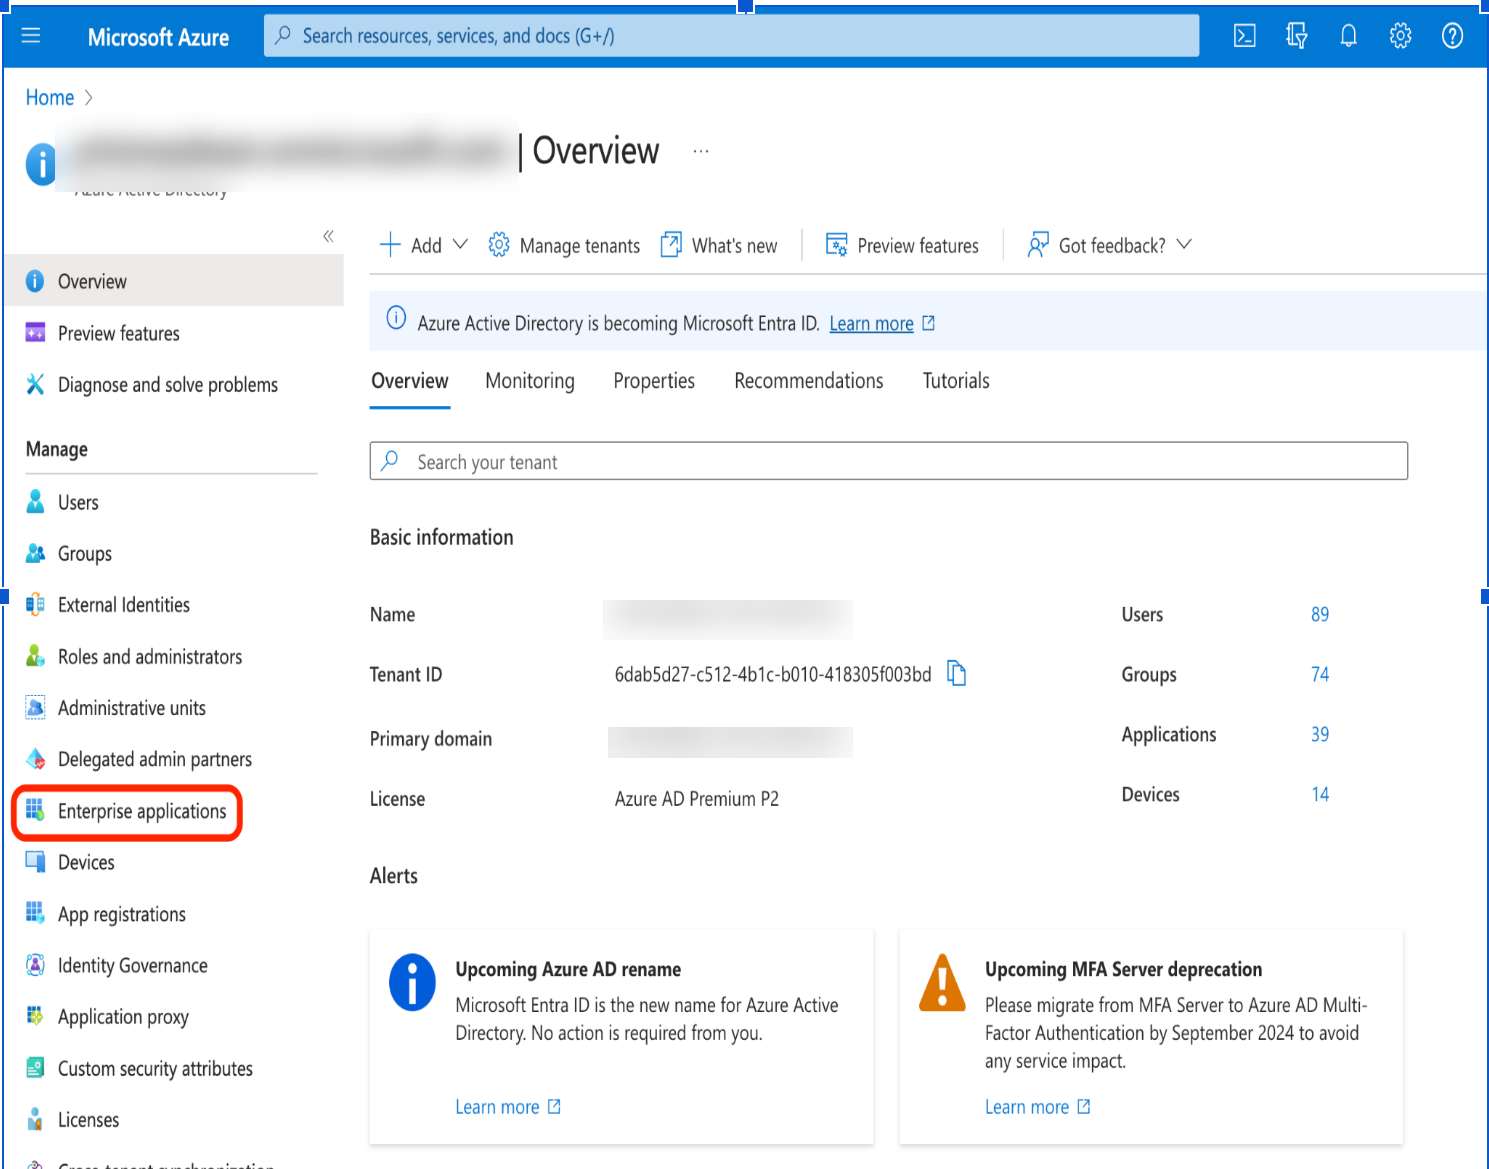
Save the metadata file in a secure location. You need this file to upload to Entra ID. The metadata file contains the Entity ID, Assertion Consumer Service (ACS) URL, and certificate that Entra ID needs to send SAML assertions.Create an enterprise application in Entra ID and configure it to use SAML for single sign-on.- Log in to the Entra ID Portal with your Cloud Application Administrator or Application Administrator account.Select Enterprise applications.
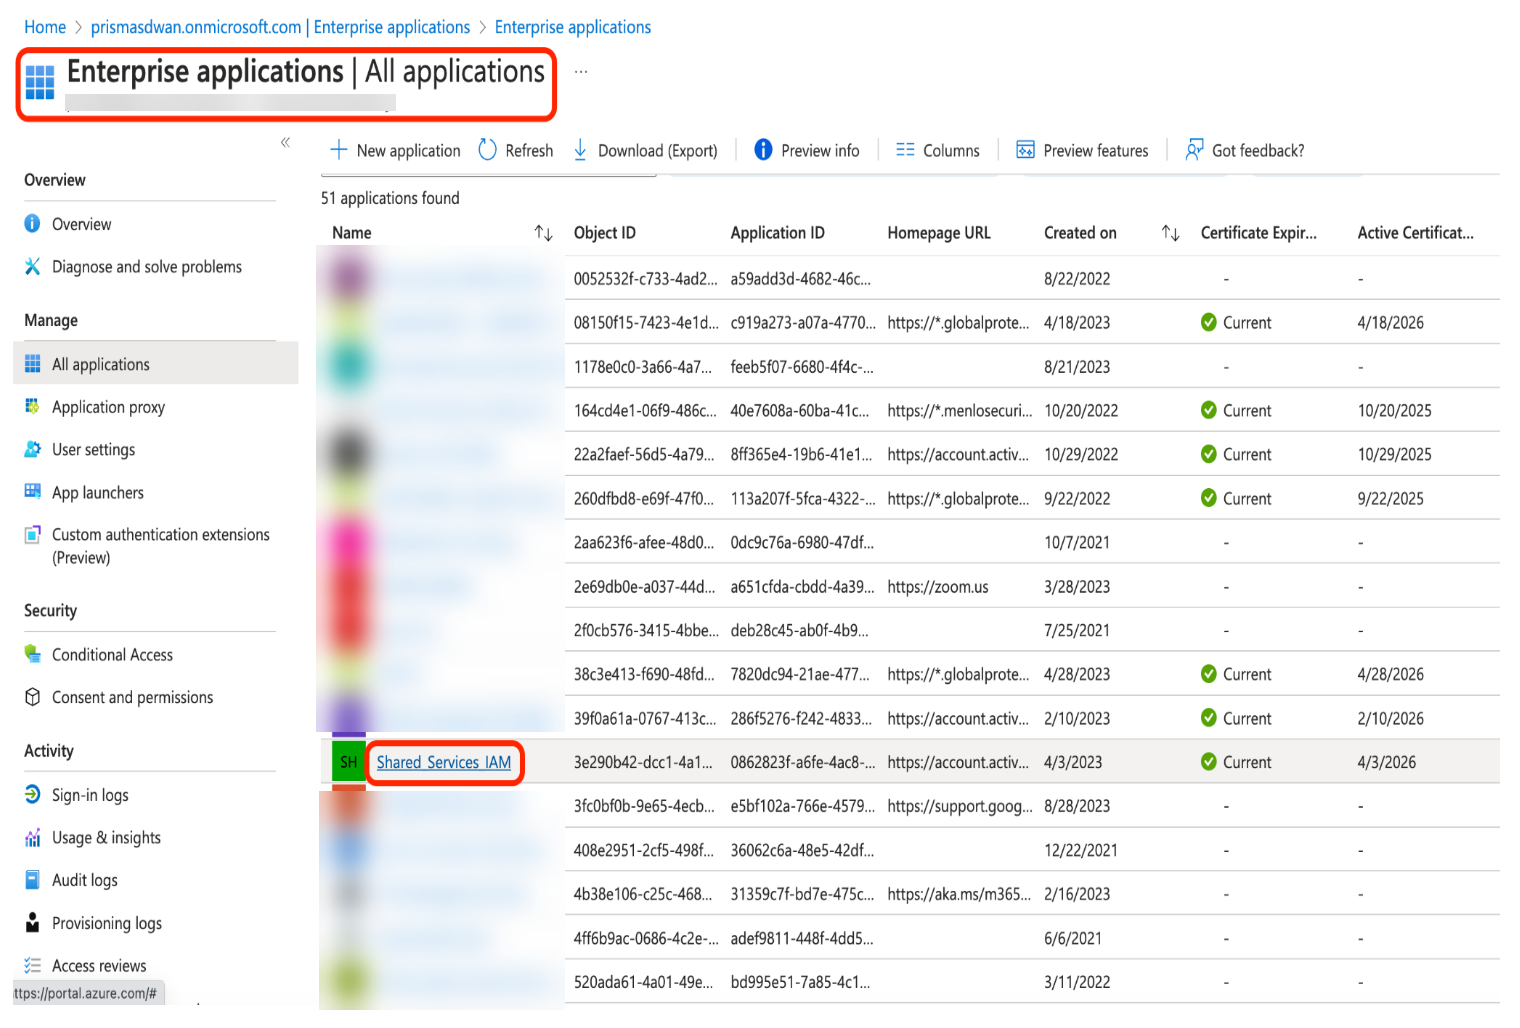
![]() Select the application that you enabled for SAML authentication.
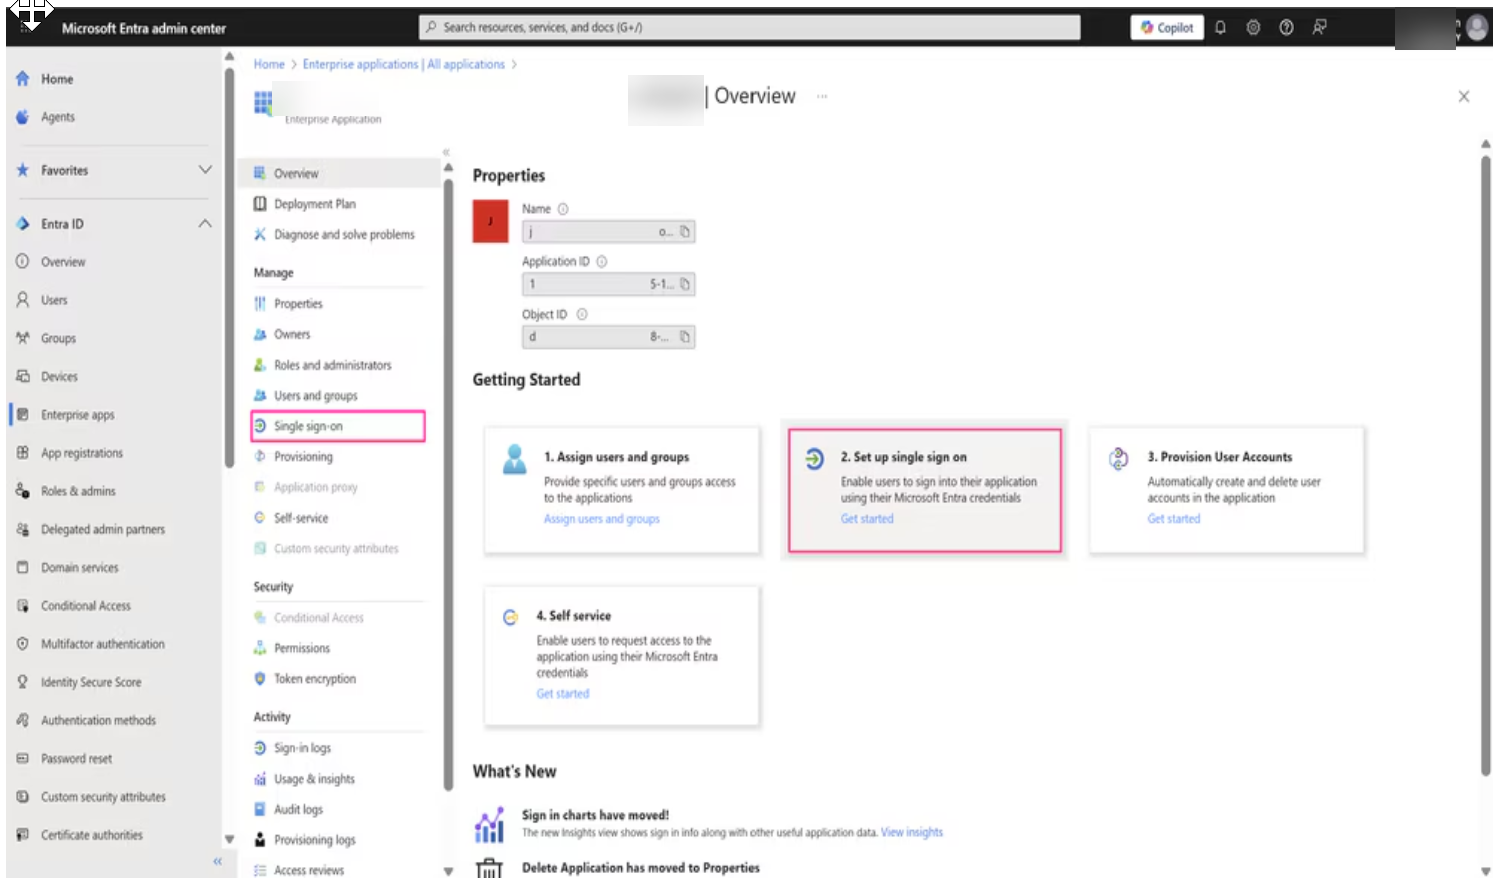
Select the application that you enabled for SAML authentication.![]() In the enterprise application, go to .
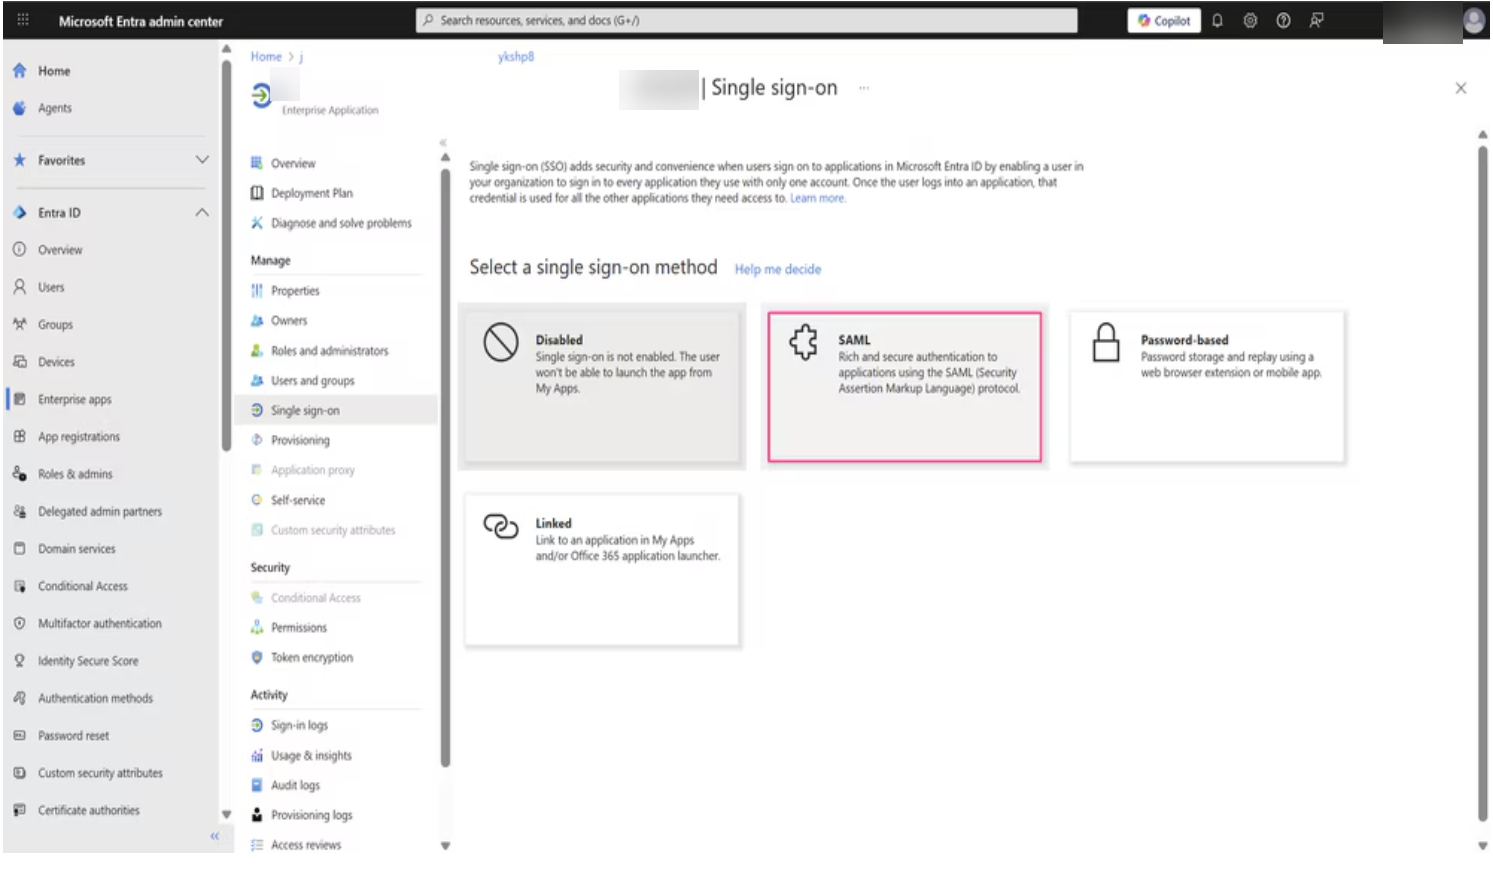
In the enterprise application, go to .![]() Select SAML.
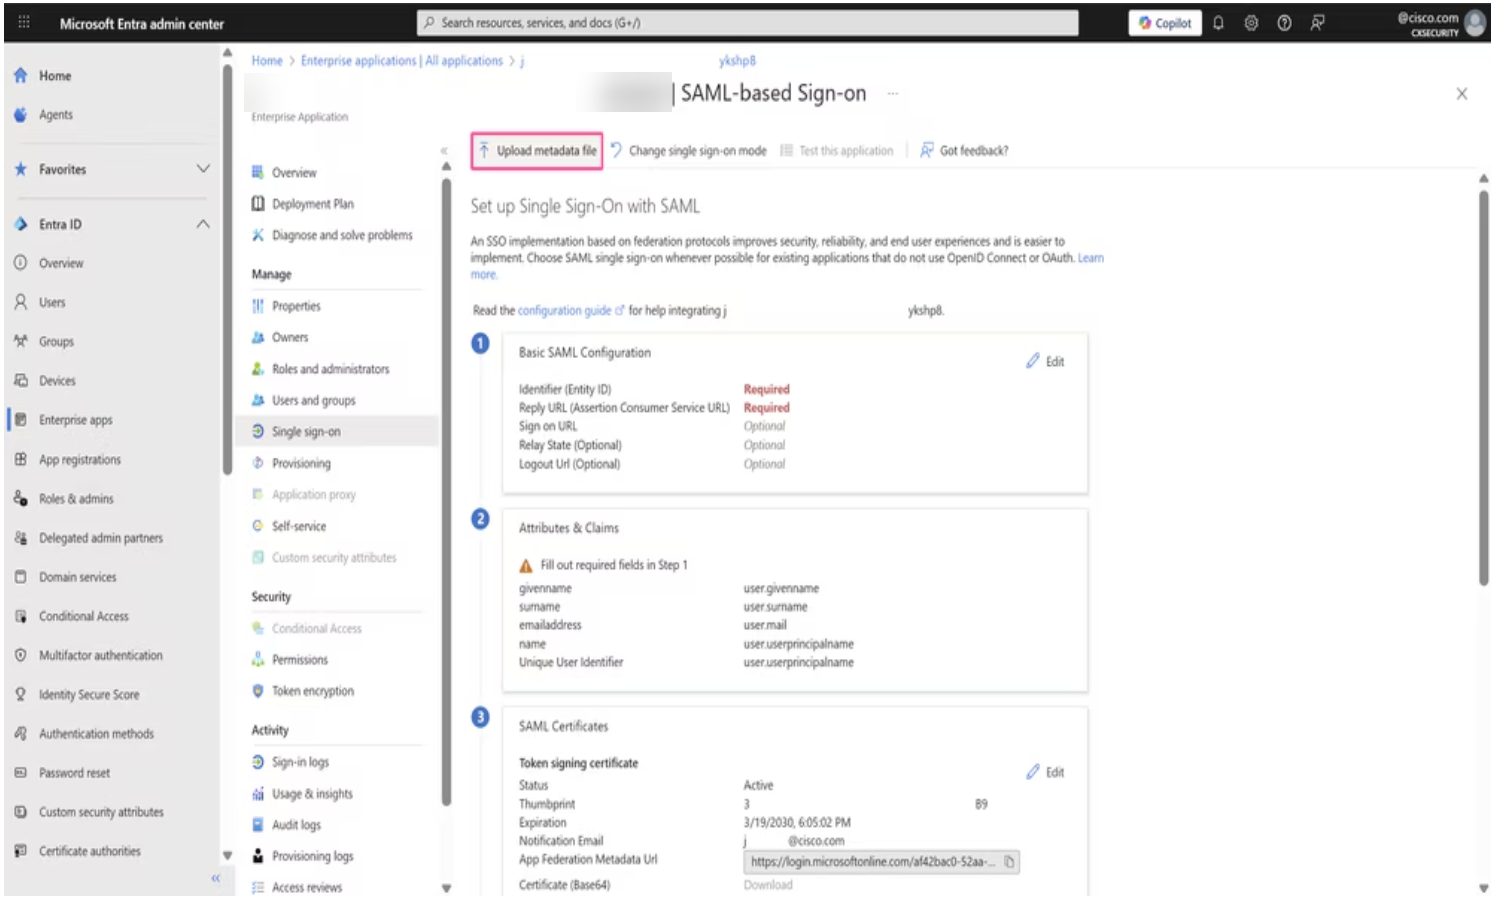
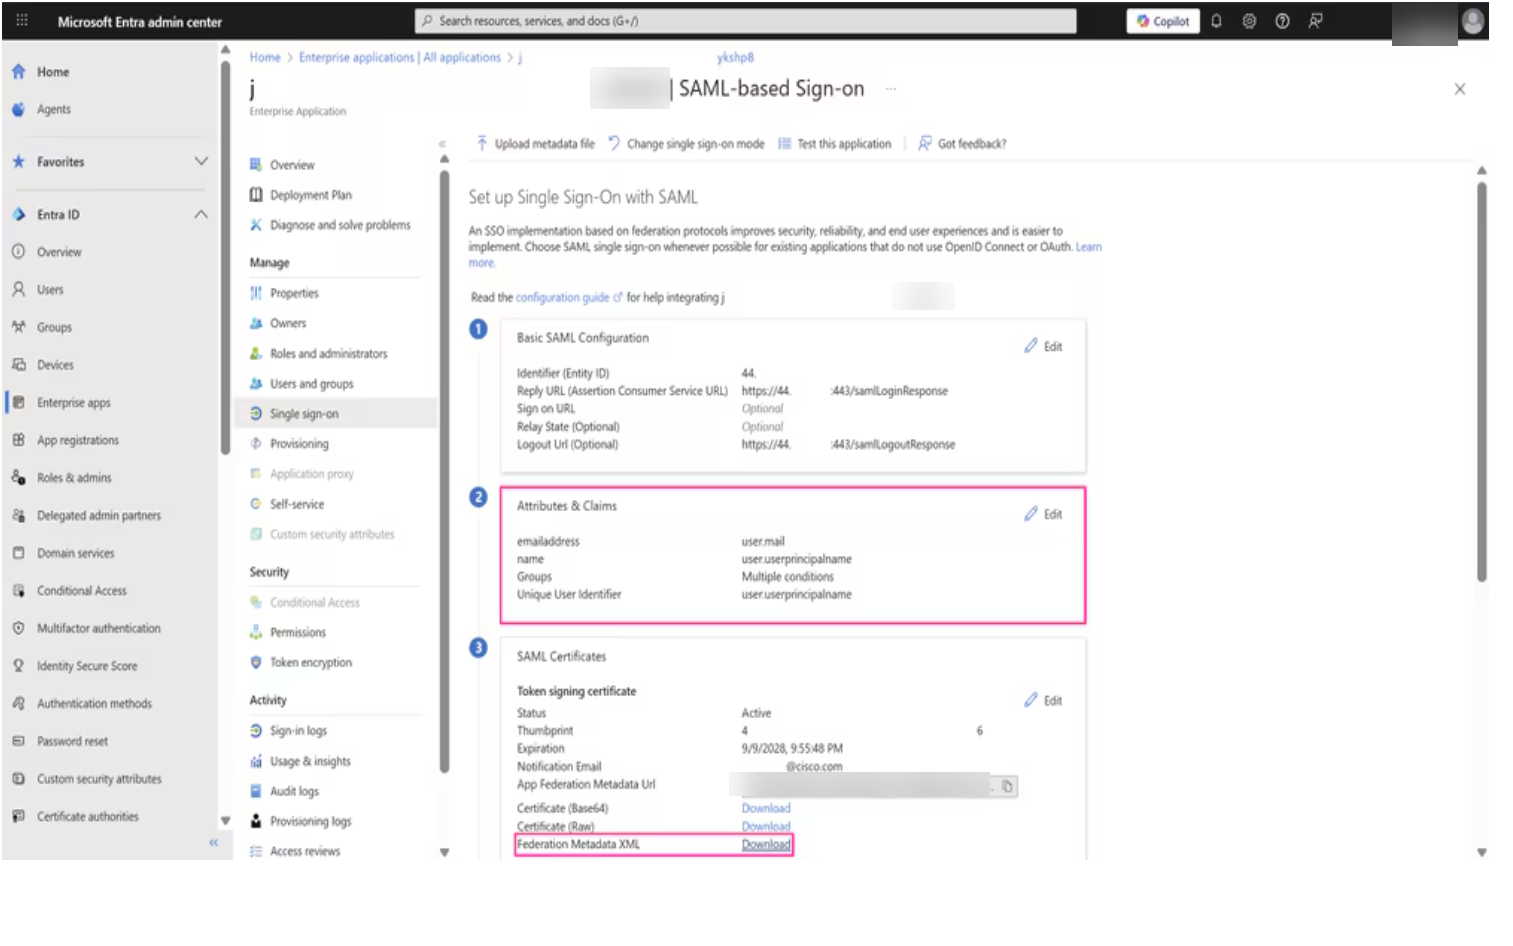
Select SAML.![]() On the SAML configuration page, click Upload metadata file and select the metadata file you downloaded in the previous step.
On the SAML configuration page, click Upload metadata file and select the metadata file you downloaded in the previous step.![]() After uploading the metadata, verify that the following fields are correctly populated in the Basic SAML Configuration section:
After uploading the metadata, verify that the following fields are correctly populated in the Basic SAML Configuration section:- Identifier (Entity ID)—Should match the Entity ID from the metadata
- Reply URL (ACS URL)—Should be the SAML assertion consumer service endpoint
- Logout URL—Should be the logout endpoint
If any field is incorrect, click Edit in the Basic SAML Configuration section and update the values to match the metadata.Create users and groups in Entra ID and map the user group to the enterprise application to authorize which users can access the platform.- In the Entra ID portal, open the enterprise application that you created.Add new users to the application.Create a new user group and assign users to the group.Assign the user group to the enterprise application.Configure SAML claims in Entra ID to pass user information during authentication.
- In the Entra ID portal, open the enterprise application you created and select .
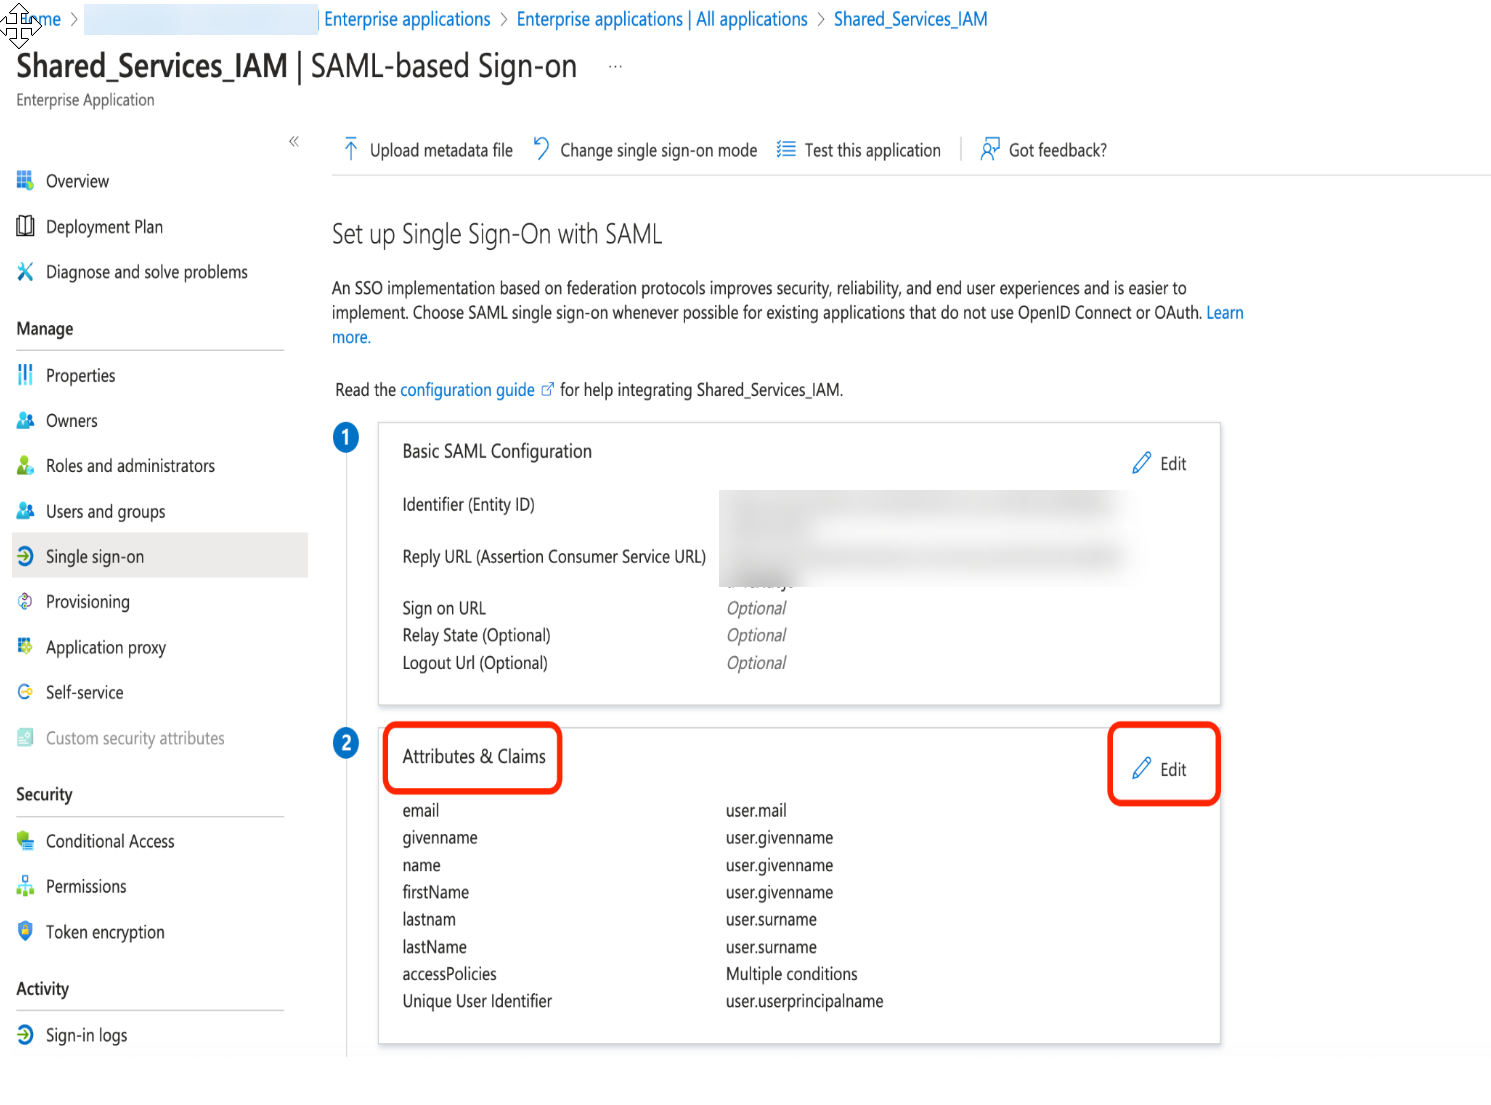
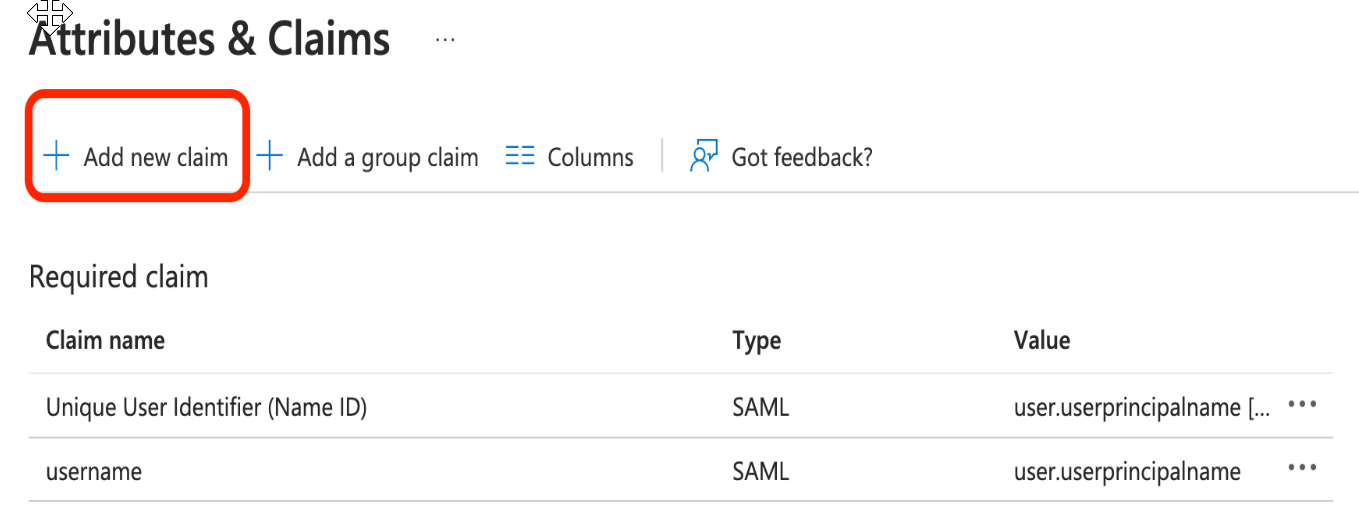
![]() Remove all existing claims and add the following new claims:
Remove all existing claims and add the following new claims:Claim Name Claim Value firstName user.firstName lastName user.lastName email user.email ![]() Click Save to apply all changes.Click Download next to Federation Metadata XML to download the Entra ID metadata file.Save the metadata file in a secure location. You need this file to upload to the platform.
Click Save to apply all changes.Click Download next to Federation Metadata XML to download the Entra ID metadata file.Save the metadata file in a secure location. You need this file to upload to the platform.![]() Upload the Entra ID metadata to complete the integration.
Upload the Entra ID metadata to complete the integration.- Use one of the various ways to access .Select .
![]() Select Configure Identity Provider.
Select Configure Identity Provider.![]() Select Upload Metadata and choose the file downloaded in the previous step.After the provider profile fields auto-populate, select Finish.The Configure Identity Provider button is replaced with the Login URL. Select .
Select Upload Metadata and choose the file downloaded in the previous step.After the provider profile fields auto-populate, select Finish.The Configure Identity Provider button is replaced with the Login URL. Select .![]() The Login URL is how Palo Alto Networks knows where to send the user when they log in. This is disabled by default.Add users and assign roles in the platform.Add all the Entra ID users for whom you want to define access roles. Since this is an authentication-only setup, you must manage user roles and permissions within the platform.Ensure the user email ID precisely matches the corresponding user email ID in Entra ID to guarantee correct identity mapping during authentication.
The Login URL is how Palo Alto Networks knows where to send the user when they log in. This is disabled by default.Add users and assign roles in the platform.Add all the Entra ID users for whom you want to define access roles. Since this is an authentication-only setup, you must manage user roles and permissions within the platform.Ensure the user email ID precisely matches the corresponding user email ID in Entra ID to guarantee correct identity mapping during authentication.Configure Entra ID SAML Integration for Authentication and Authorization
Configure SAML integration where Microsoft Entra ID handles both user authentication and authorization, with roles and permissions defined in Entra ID.This section describes how to configure a Security Assertion Markup Language (SAML) integration where Microsoft Entra ID acts as the identity provider and the SCM platform acts as the Service Provider (SP). In this setup, Entra ID is used for both user authentication and authorization—users sign in through Entra ID, and their roles and permissions are also defined and managed there.- Add and verify your domain.This step establishes the trust boundary between your tenant and domain through DNS verification. You add your organization's domain and verify ownership by adding a DNS TXT record. This verification is required for creating an identity federation and is the foundation for all subsequent SSO configuration.
- Use one of the various ways to access .
![]() Select Identity & Access.Select to add an identity federation.
Select Identity & Access.Select to add an identity federation.![]()
![]() Add the Domain information for your enterprise.The character limit is 50. Special characters are not allowed, with the exception of "-" and "."Select Next.Follow the Instructions for Verification to add a DNS record within your domain name provider.
Add the Domain information for your enterprise.The character limit is 50. Special characters are not allowed, with the exception of "-" and "."Select Next.Follow the Instructions for Verification to add a DNS record within your domain name provider.![]() In Common Services, select Verify Now to verify ownership of the identity federation.
In Common Services, select Verify Now to verify ownership of the identity federation.![]() Download the SAML metadata.After you add an identity federation, you can configure Palo Alto Networks as a service provider by downloading the service provider (SP) metadata from Common Services. The SP metadata helps you configure your identity provider integration with Palo Alto Networks as an SP, so that you don't have to provide the details manually.
Download the SAML metadata.After you add an identity federation, you can configure Palo Alto Networks as a service provider by downloading the service provider (SP) metadata from Common Services. The SP metadata helps you configure your identity provider integration with Palo Alto Networks as an SP, so that you don't have to provide the details manually.- Use one of the various ways to access .Select .
![]() Scroll to your identity federation and select Download SP Metadata.
Scroll to your identity federation and select Download SP Metadata.![]() Save the metadata file in a secure location. You need this file to upload to Entra ID. The metadata file contains the Entity ID, Assertion Consumer Service (ACS) URL, and certificate that Entra ID needs to send SAML assertions.Create an enterprise application in Entra ID and configure it to use SAML for single sign-on.
Save the metadata file in a secure location. You need this file to upload to Entra ID. The metadata file contains the Entity ID, Assertion Consumer Service (ACS) URL, and certificate that Entra ID needs to send SAML assertions.Create an enterprise application in Entra ID and configure it to use SAML for single sign-on.- Log in to the Entra ID Portal with your Cloud Application Administrator or Application Administrator account.Select Enterprise applications.
![]() Select the application that you enabled for SAML authentication.
Select the application that you enabled for SAML authentication.![]() In the enterprise application, go to and then select SAML.
In the enterprise application, go to and then select SAML.![]() Select SAML.
Select SAML.![]() On the SAML configuration page, click Upload metadata file and select the metadata file you downloaded in the previous step.
On the SAML configuration page, click Upload metadata file and select the metadata file you downloaded in the previous step.![]() After uploading the metadata, verify that the following fields are correctly populated in the Basic SAML Configuration section:If any field is incorrect, click Edit in the Basic SAML Configuration section and update the values to match the metadata.Create users and groups in Entra ID and map the user group to the enterprise application to authorize which users can access the platform.
After uploading the metadata, verify that the following fields are correctly populated in the Basic SAML Configuration section:If any field is incorrect, click Edit in the Basic SAML Configuration section and update the values to match the metadata.Create users and groups in Entra ID and map the user group to the enterprise application to authorize which users can access the platform.- In the Entra ID portal, open the enterprise application that you created.Add new users to the application.Create a new user group and assign users to the group.Assign the user group to the enterprise application.Configure SAML claims and access policies in Entra ID to pass user role information based on group membership.If you have configured Custom SAML Role Mapping in Strata Cloud Manager, you do not need to construct access policy claim values in the format shown below. Instead, use your existing group names or attribute values in Entra ID, and define the mapping to access policies within Strata Cloud Manager. See Configure Custom SAML Role Mapping.
- In the Entra ID portal, open the enterprise application you created and select .
![]() Remove all existing claims and add the following new claims:
Remove all existing claims and add the following new claims:Claim Name Claim Value firstName user.firstName lastName user.lastName email user.email ![]() Create a conditional claim with the source attribute pointing to the role and Tenant Service Group (TSG) ID.
Create a conditional claim with the source attribute pointing to the role and Tenant Service Group (TSG) ID.![]() Scoped Group: Add the group whose members are authorized using the claim value that includes the role and TSG ID.Claim value format: <predefined_role_name or custom_role_id>@prn:<TSG_ID>:<app_id>:<region>:<instance>:<resource_scope>For the role-name or role-id in the claim value:Click Save to apply all changes.Click Download next to Federation Metadata XML to download the Entra ID metadata file.Save the metadata file in a secure location. You need this file to upload to the platform.
Scoped Group: Add the group whose members are authorized using the claim value that includes the role and TSG ID.Claim value format: <predefined_role_name or custom_role_id>@prn:<TSG_ID>:<app_id>:<region>:<instance>:<resource_scope>For the role-name or role-id in the claim value:Click Save to apply all changes.Click Download next to Federation Metadata XML to download the Entra ID metadata file.Save the metadata file in a secure location. You need this file to upload to the platform.![]() Upload the Entra ID metadata to complete the integration.
Upload the Entra ID metadata to complete the integration.- Use one of the various ways to access .Select .
![]() Select Configure Identity Provider.
Select Configure Identity Provider.![]() Select Upload Metadata and choose the file downloaded in the previous step.After the provider profile fields auto-populate, select Finish.The Configure Identity Provider button is replaced with the Login URL. Select .
Select Upload Metadata and choose the file downloaded in the previous step.After the provider profile fields auto-populate, select Finish.The Configure Identity Provider button is replaced with the Login URL. Select .![]() The Login URL is how Palo Alto Networks knows where to send the user when they log in. This is disabled by default.Map a tenant for authorization.If you want to grant authorization to your users by passing the login information through your SAML provider, you can map your identity federation to a tenant or tenant service group (TSG) hierarchy. By using the tenant mapping, you no longer have to add users and access directly through Common Services, but that option is still available.After you add an identity federation and add an identity federation owner, the federation owner can map tenants for authorization. In addition to adding an admin as a federation owner, you must also give that admin a role that has permissions to assign and remove access policies on the given tenant, such as the following:
The Login URL is how Palo Alto Networks knows where to send the user when they log in. This is disabled by default.Map a tenant for authorization.If you want to grant authorization to your users by passing the login information through your SAML provider, you can map your identity federation to a tenant or tenant service group (TSG) hierarchy. By using the tenant mapping, you no longer have to add users and access directly through Common Services, but that option is still available.After you add an identity federation and add an identity federation owner, the federation owner can map tenants for authorization. In addition to adding an admin as a federation owner, you must also give that admin a role that has permissions to assign and remove access policies on the given tenant, such as the following:- Use one of the various ways to access Identity & Access.Select .
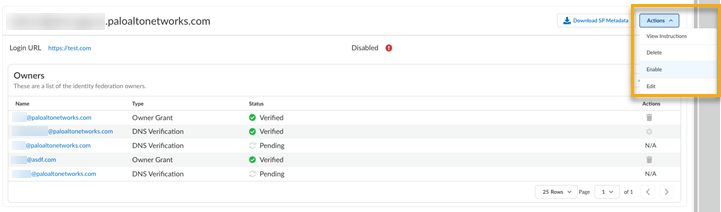
![]() Scroll or search to find your identity federation.Select Edit Tenant Mapping for Authorization.
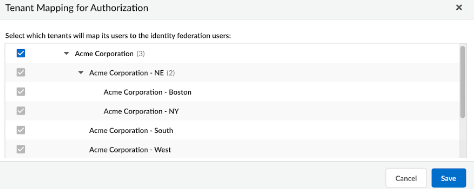
Scroll or search to find your identity federation.Select Edit Tenant Mapping for Authorization.![]() Select which tenants can map users to the identity federation users and Save.
Select which tenants can map users to the identity federation users and Save.![]() Inheritance applies the same way as it does in access management. If you map a tenant at the top level of the hierarchy, the child tenants nested below it inherit the mapping so that the parent can manage them.The identity federation owner can now manage the user access for all the selected tenant service groups.
Inheritance applies the same way as it does in access management. If you map a tenant at the top level of the hierarchy, the child tenants nested below it inherit the mapping so that the parent can manage them.The identity federation owner can now manage the user access for all the selected tenant service groups.