Enterprise DLP
Create a Granular Data Profile
Table of Contents
Expand All
|
Collapse All
Enterprise DLP Docs
Create a Granular Data Profile
Create a granular Enterprise Data Loss Prevention (E-DLP) data profile to apply differentiated
inline traffic inspection and response actions within a single Security policy rule.
On May 7, 2025, Palo Alto Networks is introducing new Evidence Storage and Syslog Forwarding service IP
addresses to improve performance and expand availability for these services
globally.
You must allow these new service IP addresses on your network
to avoid disruptions for these services. Review the Enterprise DLP
Release Notes for more
information.
| Where Can I Use This? | What Do I Need? |
|---|---|
|
Or any of the following licenses that include the Enterprise DLP license
|
Granular data profiles enhance your Enterprise Data Loss Prevention (E-DLP) detection capabilities
by enabling you to apply differentiated inline content inspection requirements and
response actions within the same Security policy rule. For example, you can use a
single granular data profile to block high-risk data patterns while alerting on
lower-risk ones, set varying log severities for different data profiles, and
selecting specific file types for each data profile included the granular data
profile. Granular data profiles simplify policy rulebase management by consolidating
multiple rules into a single, more flexible policy. This enables your data security
administrators to streamline Security policy rulebase administration, reduce false
positive detections, and achieve a more nuanced approach to data protection that
aligns closely with your organization's risk management strategy while maintaining a
lean and efficient policy rulebase.
(Panorama) Panorama must run
PAN-OS 12.1 or later version and Enterprise DLP plugin 6.0 or
later release to create a granular data profile. However, the granular data profiles
themselves are backwards compatible. This means that you can push a Security policy
rule using a granular data profile to enforcement points managed by Panorama that are running PAN-OS 10.2 or later version.
(Strata Cloud Manager) Granular data profiles
are backwards compatible. This means that you can push a Security policy rule using
a granular data profile to enforcement points managed by Strata Cloud Manager that
are running PAN-OS 10.2 or later version.
- Enterprise DLP does not support adding a granular data profile to another granular data profile.
- Enterprise DLP supports adding data profiles that have only a Primary Rule configured. Enterprise DLP does not support adding data profiles that include both Primary and Secondary Rules to a granular data profile.
- (SaaS Security) Enterprise DLP supports adding a granular data profile to SaaS Security Inline policy recommendations and Internet Access policy rules only.Enterprise DLP does not support adding a granular data profile to data asset policy rules in Data Security.
- Enterprise DLP doesn't support user exclusions for granular data profiles created on Panorama.
Create a Granular Data Profile on Strata Cloud Manager
Create a granular Enterprise Data Loss Prevention (E-DLP) data profile to apply differentiated
inline traffic inspection and response actions within a single Security policy rule on Strata Cloud Manager.
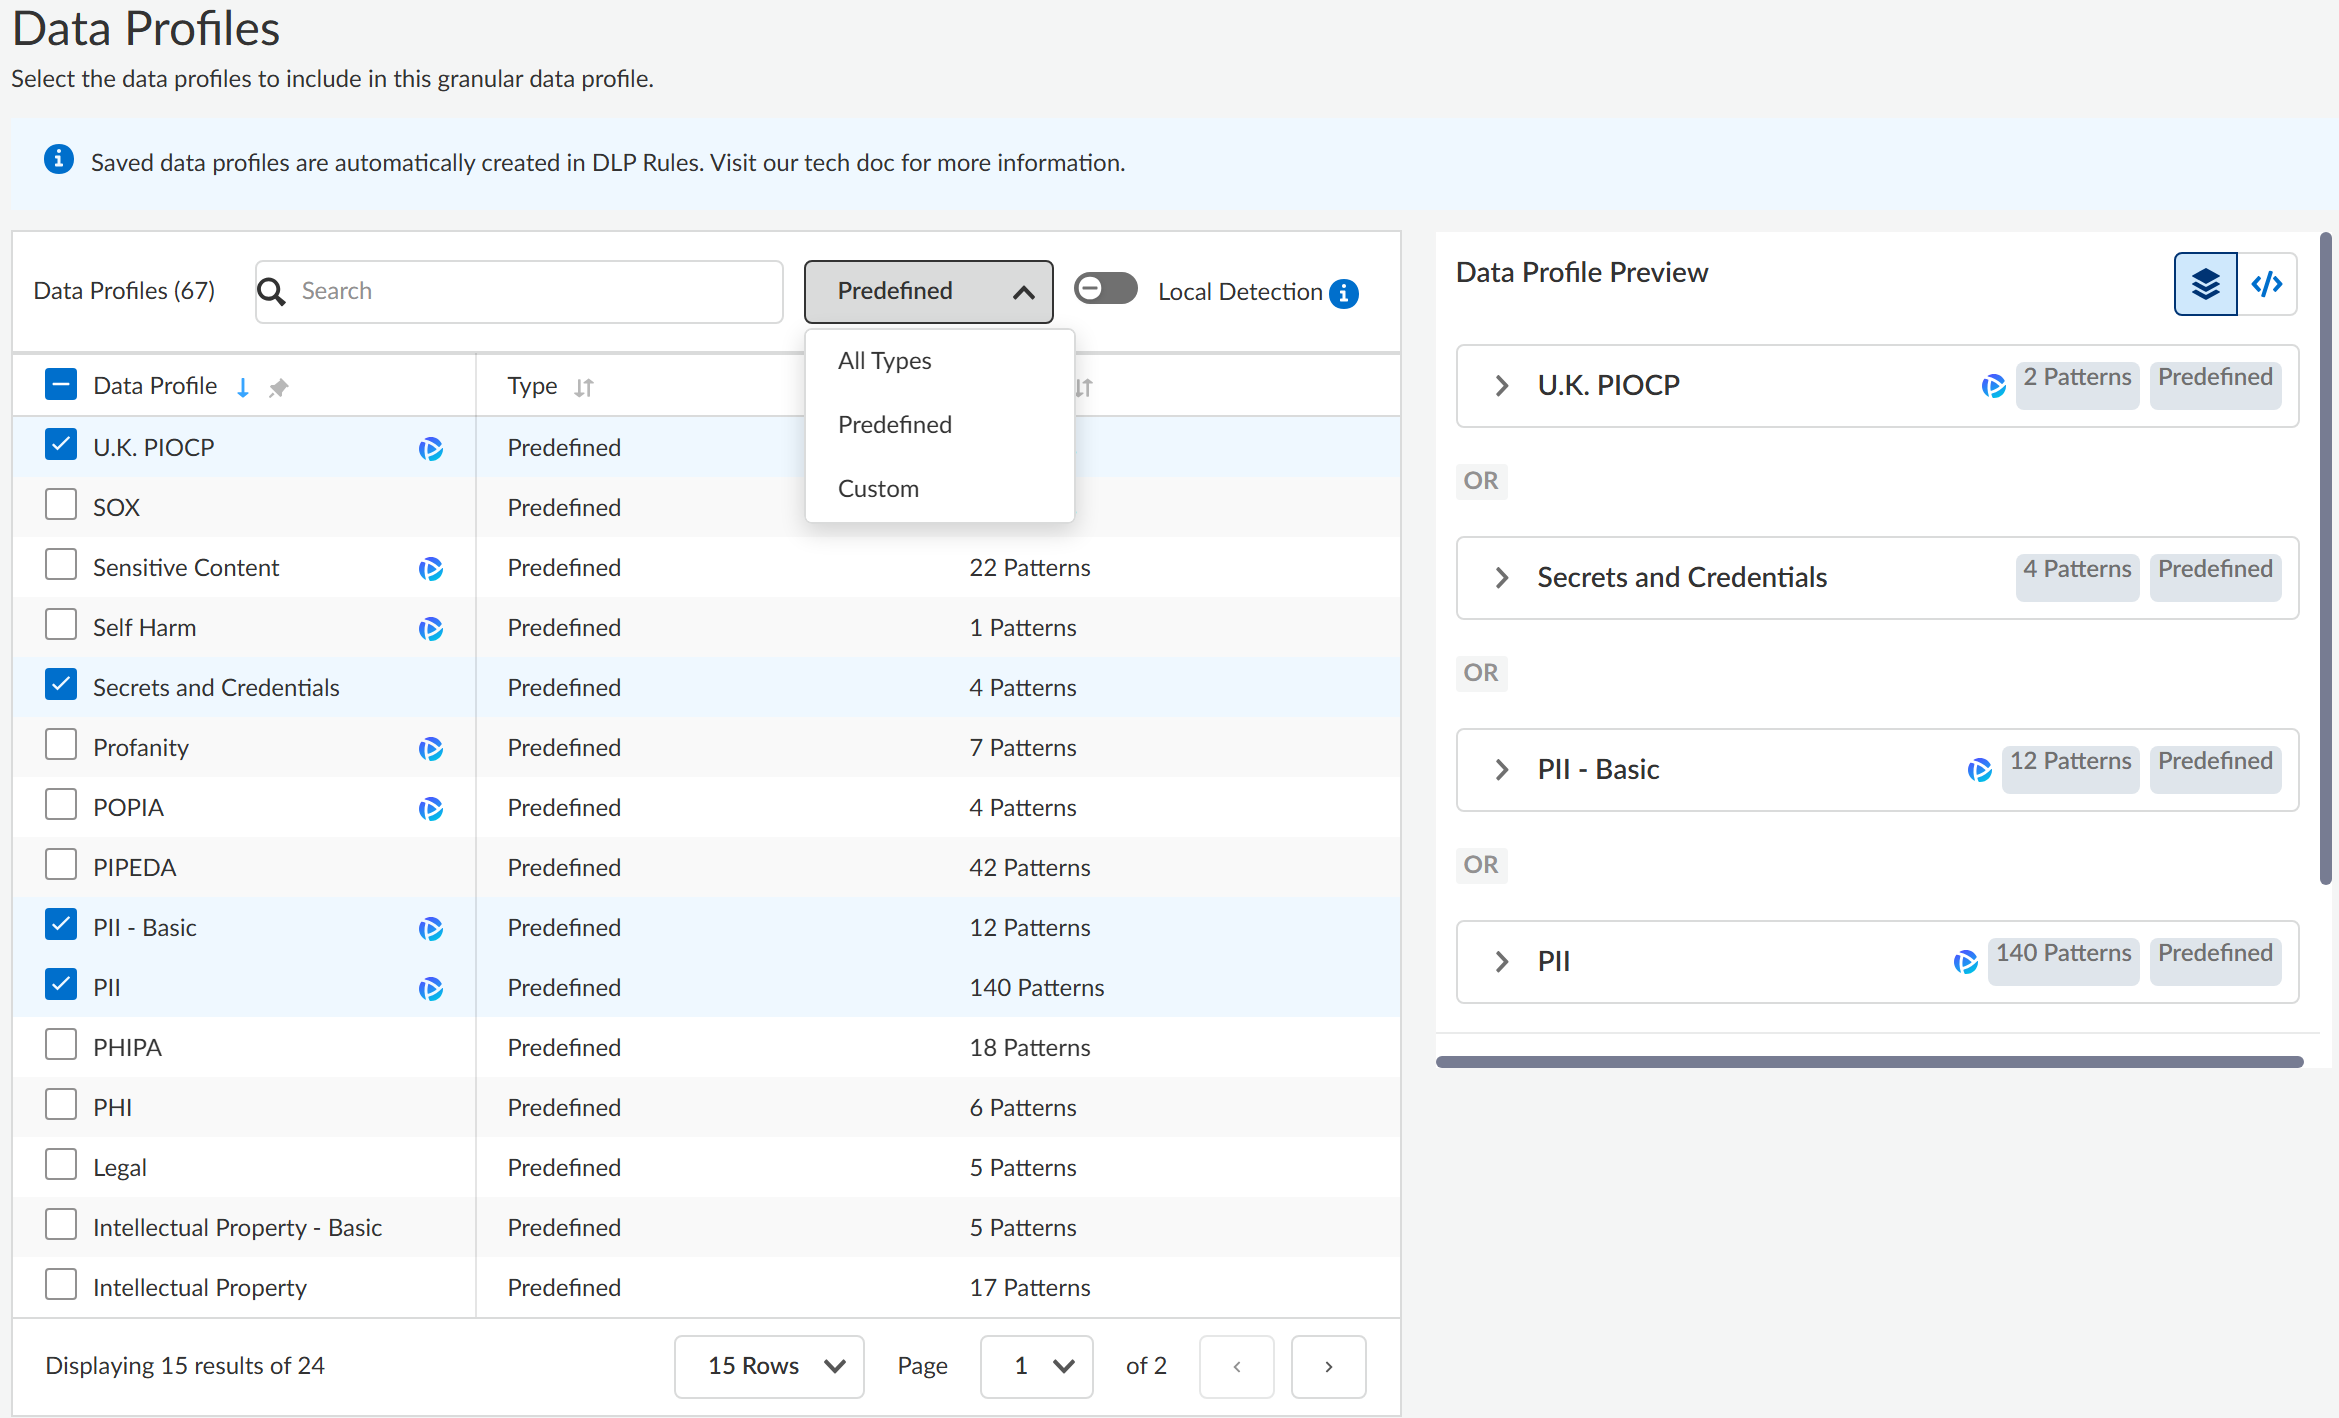
- Log in to Strata Cloud Manager.(Optional) Create your custom data profiles on Strata Cloud Manager.You can create a data profile that contains multiple data profiles using both predefined data profiles and custom data profiles you create.Select ConfigurationData Loss PreventionData ProfilesAdd Data Profile and create a Granular Data Profile.Enter a descriptive Name for the granular data profile and click Next to continue.(Prisma Browser) Enable Local Detection to make the granular data profile available only for Prisma Browser.If you enabled Local Detection, you can only add other data profiles with Local Detection enabled.You can't use a data profile with Local Detection enabled for NGFW or Prisma Access (Managed by Panorama or Strata Cloud Manager).Select the Data Profiles you want to add the granular data profile.You can search for or filter the list of available data profiles you want to add. Enterprise DLP displays All Types of data profiles by default, or you can filter for all Predefined or Custom data profiles. Enterprise DLP does not support adding a granular or nested data profile to a granular data profile.
![]() Use the Data Profile Preview to review the granular data profile configuration. Enterprise DLP displays how many pattern match criteria are added to each data profile and whether the data profile is a Predefined or Custom data profile. Expand each data profile to review all pattern match criteria added to the data profile.Granular data profiles support only an OR operator for all added data profiles.Click Next to continue.Review the Summary of the granular data profile.Edit the Basic Information or Data Profiles to modify the granular data profile configuration if needed. Save the granular data profile if you don't need to make any further edits.Use the Data Profile Preview to review the granular data profile configuration. Granular data profiles support only an OR operator for all added data profiles. Expand each data profile to review all associated data patterns.expand the Actions column to test the granular data profile match efficacy.Select ConfigurationNGFW and Prisma Access and Push Config.Modify the DLP rule or add the data profile to a Data Control Rule
Use the Data Profile Preview to review the granular data profile configuration. Enterprise DLP displays how many pattern match criteria are added to each data profile and whether the data profile is a Predefined or Custom data profile. Expand each data profile to review all pattern match criteria added to the data profile.Granular data profiles support only an OR operator for all added data profiles.Click Next to continue.Review the Summary of the granular data profile.Edit the Basic Information or Data Profiles to modify the granular data profile configuration if needed. Save the granular data profile if you don't need to make any further edits.Use the Data Profile Preview to review the granular data profile configuration. Granular data profiles support only an OR operator for all added data profiles. Expand each data profile to review all associated data patterns.expand the Actions column to test the granular data profile match efficacy.Select ConfigurationNGFW and Prisma Access and Push Config.Modify the DLP rule or add the data profile to a Data Control Rule- NGFW and Prisma Access Tenants—Modify a DLP rule to define the type of traffic to inspect, the impacted file types and apps, the action Enterprise DLP takes when sensitive data is detected, log severity, and more for the data profile match criteria. Enterprise DLP automatically creates a DLP rule with an identical name as the data profile from which it was created.
- Prisma Browser—Create or edit a Data Control rule to prevent exfiltration of sensitive data for specific apps, website classifications, or URLs.
Create a Granular Data Profile on Panorama
Create a granular Enterprise Data Loss Prevention (E-DLP) data profile to apply differentiated inline traffic inspection and response actions within a single Security policy rule on your Panorama® management server.- Log in to the Panorama web interface.Select ObjectsDLPData Filtering Profiles.(Optional) Create your data profiles on Panorama or Strata Cloud Manager.You can create a granular data profile that combines predefined data profiles and any custom data profiles you created.Add a new data profile.Enter a descriptive Name for the granular data profile.For the Profile Type, select Granular.Select the File Mode to explicitly include or exclude specific file types from Enterprise DLP inspection.
- Include—Enterprise DLP only inspects the selected file types configured in the data profiles added to the granular data profile. Enterprise DLP ignores all other forwarded file types.
- Exclude—The NGFW or Prisma Access tenant ignores the selected File Types and does not send them Enterprise DLP for inspection and verdict rendering. The NGFW or Prisma Access tenant forwards all other file types to Enterprise DLP.
In the Profile Selection, Add a data profile.Repeat this step to add additional data profiles.- Select the Data Filtering Profile.Select the File/None-File based traffic to forward to Enterprise DLP.You can select File (default), Non-File, or Both.Select the File Type you want to forward to Enterprise DLP. Click Modify to add one or more supported file types.Enterprise DLP prioritizes the File Type settings configured in the granular data profile, and ignores the existing File Type settings configured in the data profile added to the granular data profile.Select the File Direction you want to inspect.You can select Upload, Download, or Both (default).Select the Action Enterprise DLP takes if inspected traffic contains sensitive data.You can select Alert (default) or Block.Set the Log Severity for the DLP incident when Enterprise DLP detects sensitive data that matches this data profile.You can select critical, high, medium, low, or informational (default).Click OK to add the data profile.(Requires Non-File Data Profile) Configure the URL category list to exclude URL traffic from inspection for non-file based traffic.You can configure the URL category list only if you add a non-file based data profile to the granular data profile.
- Select URL Category List Excluded From Non-File.Add a new URL category list.Select a predefined URL category, custom URL category, or EDL.(Requires Non-File Data Profile) Configure the application exclusion list to exclude application traffic from inspection for non-file based traffic.You can configure the application list only if you add a non-file based data profile to the granular data profile. At least one application list or application group is required to create a data filtering profile for inspecting non-file traffic.
- Select Application List Excluded From Non-File.Add an application filter or application group.If you did not create a custom application filter or application group, you must add the DLP App Exclusion Filter.(Exclude File Mode Required) Configure the File Types you want to exclude from Enterprise DLP inspection.The NGFW or Prisma Access tenant ignores the selected File Types and does not send them Enterprise DLP for inspection and verdict rendering. The NGFW or Prisma Access tenant forwards all other file types to Enterprise DLPClick Modify to search for and select the supported file types you want to exclude. This setting applies to all data profiles added to the granular data profile. Click OK after making your selections to continue.Click OK to save your changes.Attach the data filtering profile to a Security policy rule.
- Select PoliciesSecurity and specify the Device Group.Select the Security policy rule to which you want to add the data filtering profile.Select Actions and set the Profile Type to Profiles.Select the Data Filtering profile you created previously.Click OK.Commit and push the new configuration to your NGFW.The Commit and Push command isn't recommended for Enterprise DLP configuration changes. Using the Commit and Push command requires the additional and unnecessary overheard of manually selecting the impacted templates and managed firewalls in the Push Scope Selection.
- Full configuration push from Panorama
- Select CommitCommit to Panorama and Commit.
- Select CommitPush to Devices and Edit Selections.
- Select Device Groups and Include Device and Network Templates.
- Click OK.
- Push your configuration changes to your NGFW that are using Enterprise DLP.
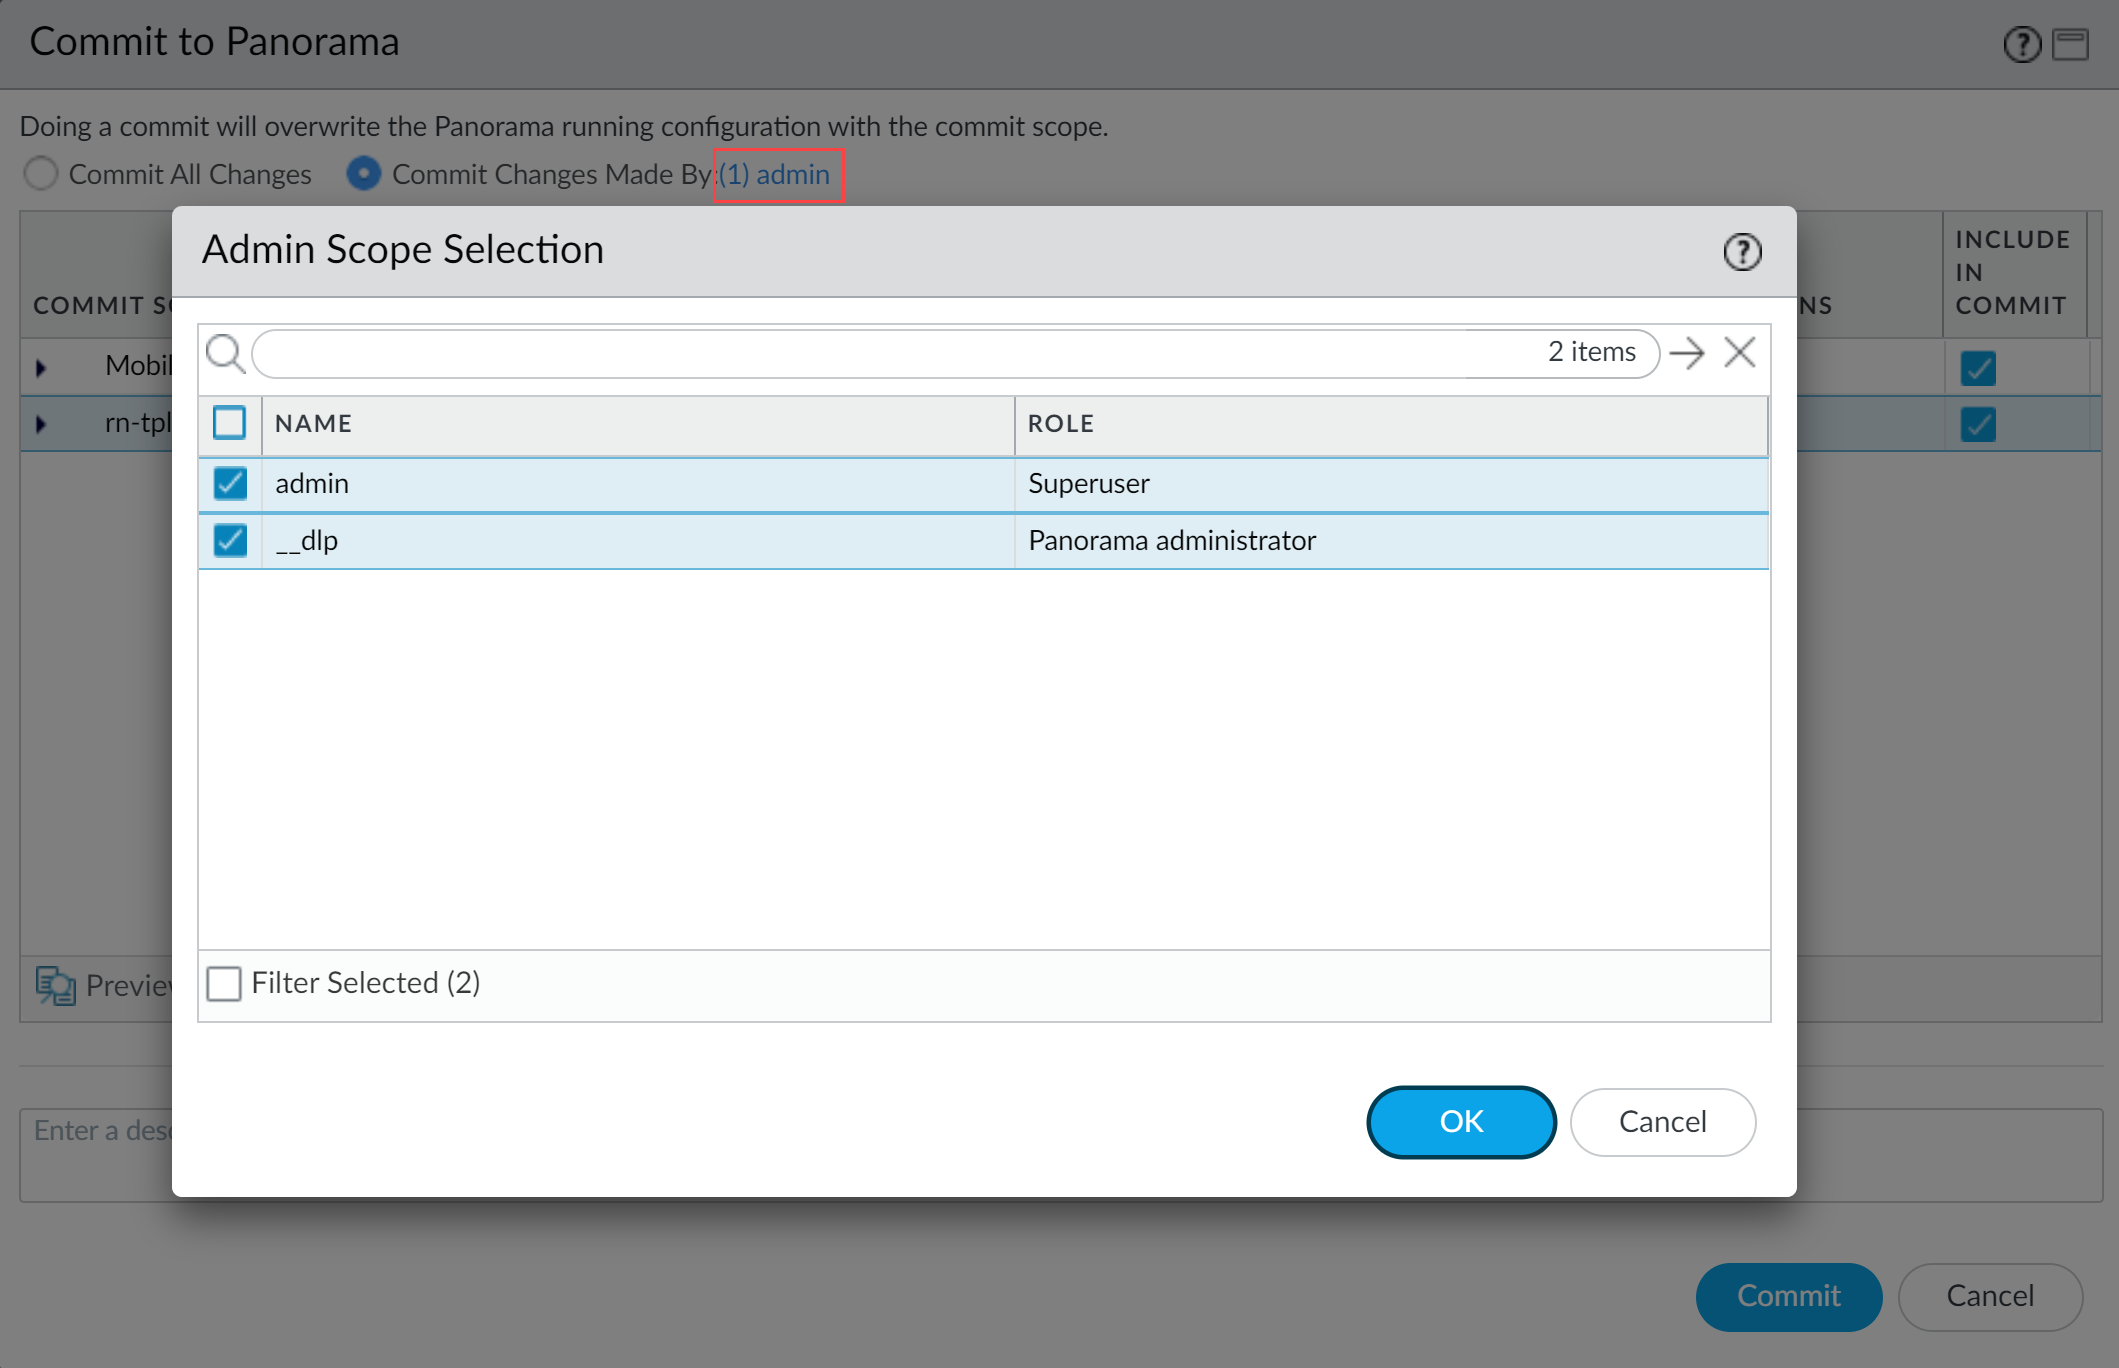
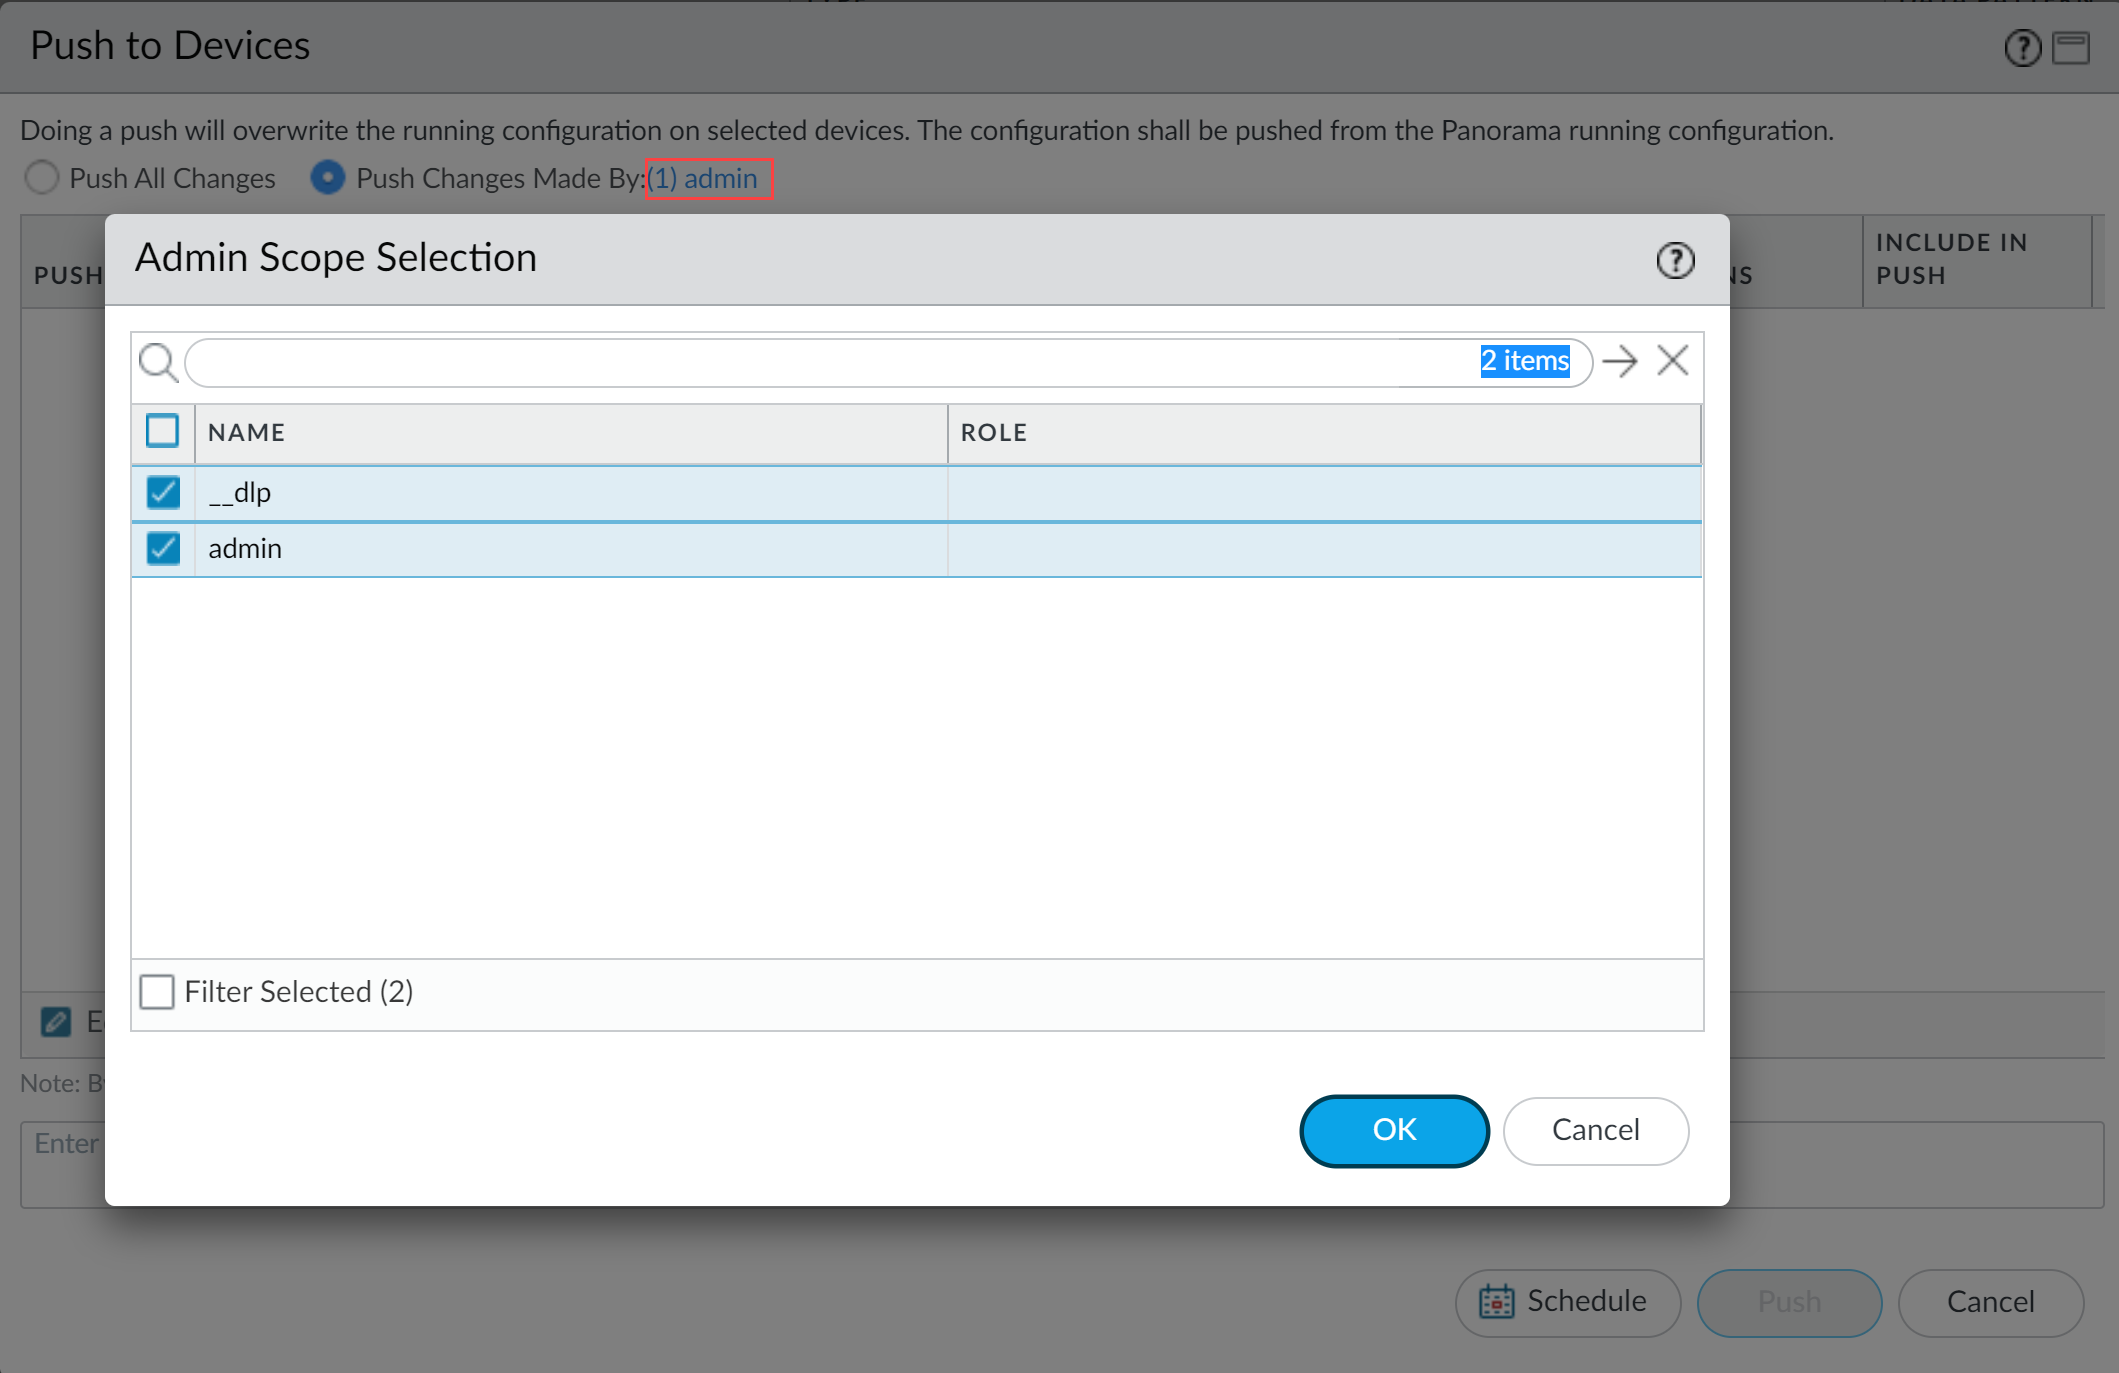
- Partial configuration push from PanoramaAlways include the temporary __dlp administrator when performing a partial configuration push. This is required to keep Panorama and Enterprise DLP in sync.For example, you have an admin Panorama admin user who is allowed to commit and push configuration changes. The admin user made changes to the Enterprise DLP configuration and only wants to commit and push these changes to managed firewalls. In this case, the admin user is required to also select the __dlp user in the partial commit and push operations.
- Select CommitCommit to Panorama.
- Select Commit Changes Made By and then click the current Panorama admin user to select additional admins to include in the partial commit.In this example, the admin user is currently logged in and performing the commit operation. The admin user must click admin and then select the __dlp user. If there are additional configuration changes made by other Panorama admins they can be selected here as well.Click OK to continue.
![]()
- Commit.
- Select CommitPush to Devices.
- Select Push Changes Made By and then click the current Panorama admin user to select additional admins to include in the partial push.In this example, the admin user is currently logged in and performing the push operation. The admin user must click admin and then select the __dlp user. If there are additional configuration changes made by other Panorama admins they can be selected here as well.Click OK to continue.
![]()
- Select Device Groups and Include Device and Network Templates.
- Click OK.
- Push your configuration changes to your NGFW that are using Enterprise DLP.


