PA-800 Front Panel
Table of Contents
PA-800 Front Panel
The following image shows the front panel
of the PA-800 Series firewall and the table describes each front
panel component. The only differences between the PA-820 (shown)
and PA-850 front panel is the model name and the Ethernet port speeds
as described in the table.
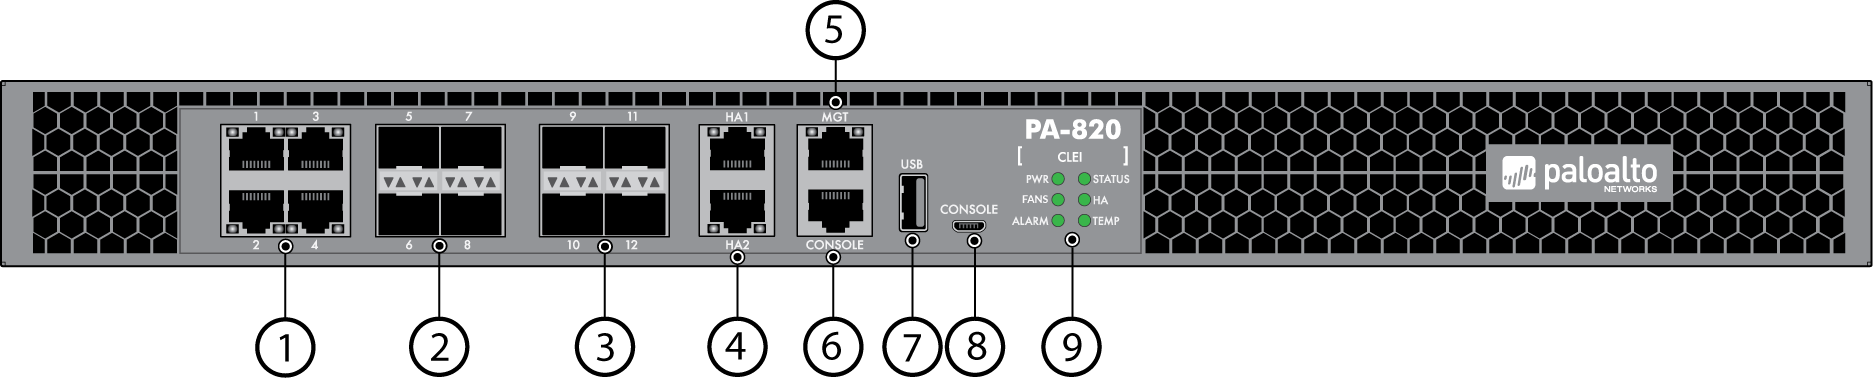
| Item | Component | Description |
|---|---|---|
1 | Ethernet ports 1 through 4 | Four RJ-45 10/100/1000Mbps ports for network traffic. You
can set the link speed and duplex or choose auto-negotiate. |
2 | SFP ports 5 through 8 | Four small form-factor pluggable (SFP) ports
for network traffic. |
3 | SFP/SFP+ ports 9 through 12 | These ports are for network traffic and
their speed varies depending on your firewall and configuration. PA-820
FirewallsFour 1Gbps SFP ports; you cannot reconfigure these
ports. PA-850 FirewallsFour 1Gbps SFP ports or four
10Gbps SFP+ ports (default); you can specify which you want to use but
you cannot mix the two. You can install up to 4 of the same
type transceivers (SFP or SFP+) as needed but if you install SFP
transceivers, then you also need to reconfigure ports 9 through
12 (as a group) to SFP using the command line interface (CLI). To
confirm the current settings for these four ports, run the following
command: admin@PA-850> show system setting ports-9-12-speedDevice Ports 9-12 mode: sfp+ The
output shows that the ports are set to SFP+. If the firewall is
not already set to the correct port type for your transceivers,
use the set system setting ports-9-12-speed command. For example,
if the output shows that these ports are set to SFP+ and you are
using SFP transceivers, then run the following commands to change
the port type from SFP+ to SFP and then restart the firewall to
apply the change: admin@PA-850> set system setting ports-9-12-speed sfp admin@PA-850> request restart system |
4 | HA1 and HA2 ports | Two RJ-45 10/100/1000Mbps ports for high-availability
control (HA1) and synchronization (HA2). |
5 | MGT port | Use this Ethernet 10/100/1000Mbps port to access
the management web interface and perform administrative tasks. The
firewall also uses this port for management services, such as retrieving
licenses and updating the threat and application signatures. |
6 | CONSOLE port (RJ-45) | Use this port to connect a management computer
to the firewall using a 9-pin serial to RJ-45 cable and terminal
emulation software. The console connection provides access
to firewall boot messages, the Maintenance Recovery Tool (MRT),
and the command line interface (CLI). If your management
computer does not have a serial port, use a USB-to-serial converter. Use
the following settings to configure your terminal emulation software
to connect to the console port:
|
7 | USB port | Use the USB port to bootstrap the firewall. Bootstrapping
enables you to provision the firewall with a specific PAN-OS configuration
and then license it and make it operational on your network. |
8 | CONSOLE port (Micro USB) | Use this port to connect a management computer
to the firewall using a standard Type-A USB-to-micro USB cable. The
console connection provides access to firewall boot messages, the
Maintenance Recovery Tool (MRT), and the command line interface (CLI). Refer
to Micro USB Console Port for
more information and to download the Windows driver or to learn
how to connect from a Mac or Linux computer. |
9 | LED status indicators | Six LEDs that indicate the status of the
firewall hardware components (see Interpret the LEDs on a PA-800 Series Firewall). |