Prisma Access Hub Support
Table of Contents
Prisma Access Hub Support
Description and brief steps to configure Prisma Access
Hub Support.
With SD-WAN plugin 2.2 and later releases,
PAN-OS Secure SD-WAN provides you with Prisma Access hub support to
give you full control of how and where applications are secured.
Prisma Access Hub support allows PAN-OS firewalls to connect to
Prisma Access compute nodes (CNs) to achieve cloud-based security
in an SD-WAN hub-and-spoke topology. This support enables a seamless
link failover from on-premises security to Prisma Access and the
ability to mix both to meet your security needs.
In a mixed topology with both SD-WAN firewalls and Prisma Access hubs, the SD-WAN hubs are Prisma
Access CNs (IPSec Termination Nodes) and the SD-WAN branches are PAN-OS firewalls.
SD-WAN automatically creates IKE and IPSec tunnels that connect the branch to the
hub. Using Traffic Distribution profiles, you can create SD-WAN policies to match
specific internet applications and redirect them to a PAN-OS firewall or Prisma
Access deployment of your choice. With Prisma Access hub support, on-premises and
cloud security platforms work together to provide a complete solution with
consistent security policies managed by Panorama.
The minimum PAN-OS and SD-WAN plugin versions required
for Prisma Access Hub support are:
| Minimum Release | |
|---|---|
PAN-OS | 10.0.8 |
Prisma Access Compute Node | 10.0.7 |
Prisma Access Cloud Configuration Plugin | 2.1 |
SD-WAN Plugin | 2.2 |
Panorama | 10.1.0 |
Before you connect SD-WAN to Prisma Access,
you must have a branch firewall with an interface that has SD-WAN
enabled. You must also have performed the Prisma Access prerequisites.
- Log in to the Panorama Web Interface.
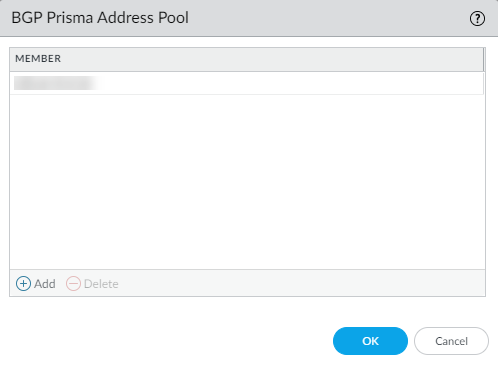
- Specify the BGP local address pool for loopback addresses.
- Select .
- Select BGP Prisma Address Pool.
![]()
- Add an unused private subnet
(prefix and netmask) for the local BGP addresses for Prisma Access.
![]()
- Click OK.
- Commit.
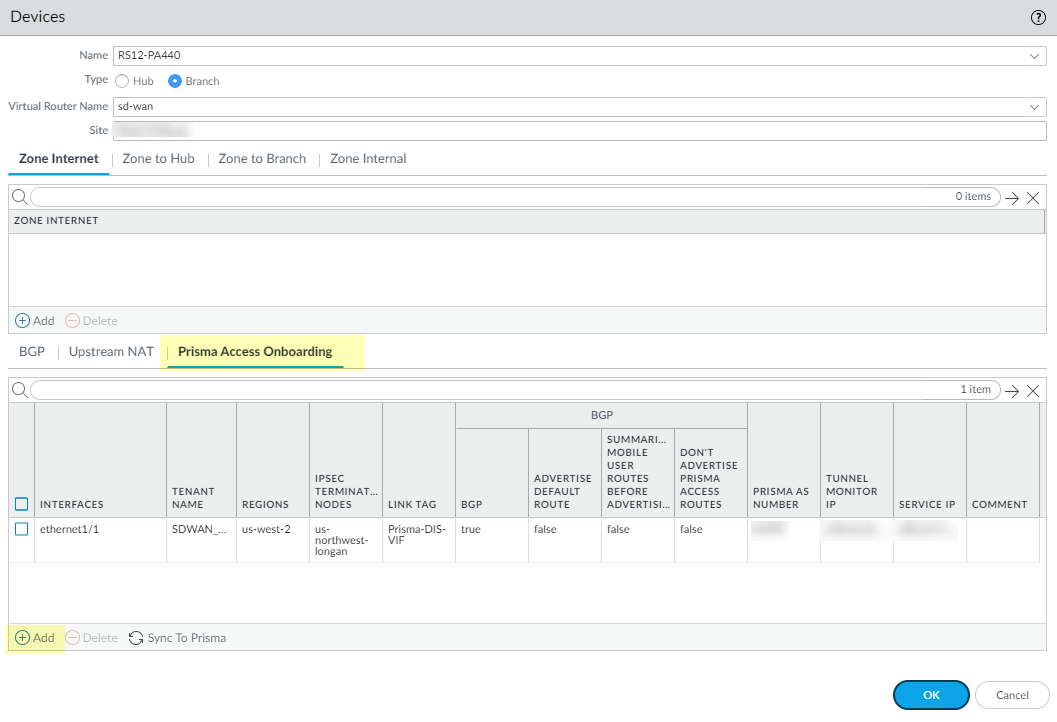
- Select the SD-WAN branch firewall to connect to the Prisma
Access hub and configure the connection.
- Select .
- Select the branch firewall on which you enabled SD-WAN, whose name then populates the Name field.
- Select the Type of device as Branch.
- Select the Virtual Router Name.
- Enter the Site.All SD-WAN devices must have a unique Site name.
- Select Prisma Access Onboarding and Add.
![]()
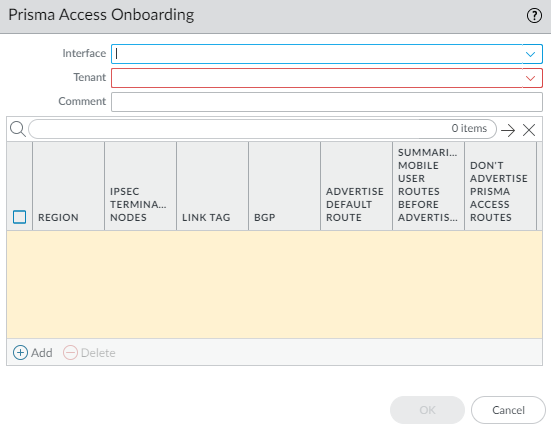
- Select a local, SD-WAN-enabled Interface on the firewall to connect to the Prisma Access hub.
- Select a Prisma Access Tenant (select default for
a single tenant environment).All SD-WAN interfaces on a branch firewall must use the same Prisma Access tenant.
![]()
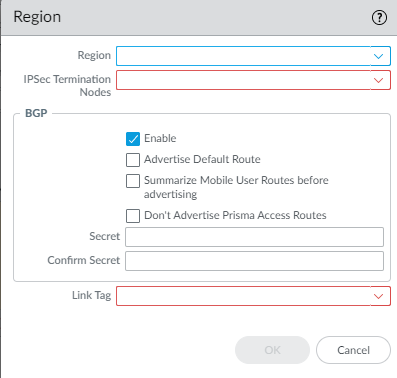
- Add a compute node to a Region by
selecting the region where the CN (Prisma Access hub) is located.There can be multiple regions per interface.
![]()
- Select an IPSec Termination Node (GP gateway) from the list of nodes; the list is based on the nodes that Prisma Access spun up for the region earlier. You are choosing the hub to which this branch connects. SD-WAN Auto VPN configuration builds IKE and IPSec relationships and tunnels with this node.
- Enable BGP for communication between the branch and hub (Enable is the default).
- Complete the configuration for the connection.
- Click OK.
- Commit and Push the configuration to the cloud, where Prisma Access spins up the correct number of IPSec Termination Nodes based on requested bandwidth.
- Verify that onboarding is complete.
- Synchronize the branch firewall to Prisma Access to retrieve the service IP address(es) of the CNs.
- Commit to Panorama.
- Push to Devices to push to the local branch firewall. Edit Selections to select the Push Scope Selection. Select the correct Template and Device Group.
- On the branch firewall, select and see the new interface; Verify the IPSec tunnel and IKE gateway are up.
- Create an SD-WAN policy rule to generate monitoring data.
- Commit and Commit and Push to branch firewalls.
- Monitor Prisma Access Hubs.