Claim the Prisma SD-WAN ION and Assign to a Datacenter
Table of Contents
Claim the Prisma SD-WAN ION and Assign to a Datacenter
Learn how to claim the ION device and assign it to a data center site.
After the ION successfully boots, as long
as it can connect to the Prisma SD-WAN controller it will show up
as Unclaimed: Online under the Map -> Unclaimed Devices section
of the portal.
It can take up to 10 minutes for the
ION to show up in the Controller.
- Claim the device by selecting .It will transition to an offline state while going through the claiming process.Create a Data Center Site while the device is being claimed.Although this workflow depicts how to assign the vION to a data center site, you can also assign the vION to a branch site or a branch gateway site. However, Prisma SD-WAN does not support high availability for vIONs deployed at a branch site or a branch gateway site.
- Select .Enter a name for the site and other site details and click Next.Add an Internet Circuit in the Circuits section and click Next.
![]() Assign the device to the data center by selecting Assign Devices and selecting the ION device from the list of Select Devices and Save.
Assign the device to the data center by selecting Assign Devices and selecting the ION device from the list of Select Devices and Save.![]() Once the device is successfully assigned, click the device name to enter the device configuration screen.
Once the device is successfully assigned, click the device name to enter the device configuration screen.- Enter a Device Name.
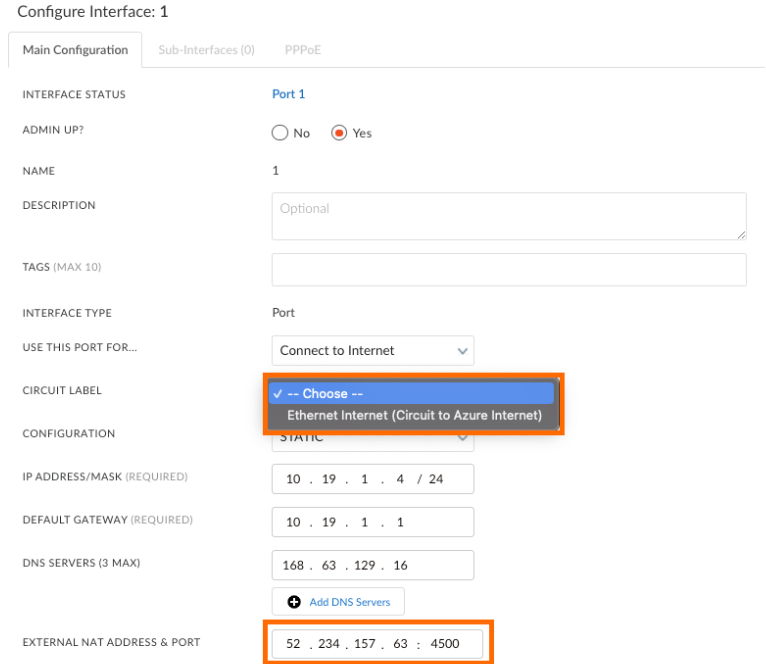
![]() Configure Port 1, by assigning the Internet WAN circuit label you created in step 2 and providing the external NAT address and port.To figure out the external IP address go to the Azure portal and find the Public IP address provisioned in the resource group.
Configure Port 1, by assigning the Internet WAN circuit label you created in step 2 and providing the external NAT address and port.To figure out the external IP address go to the Azure portal and find the Public IP address provisioned in the resource group.![]()
![]() Configure port 2 to be Admin Up and Use this port to: Peer with a Network, and set for DHCP.
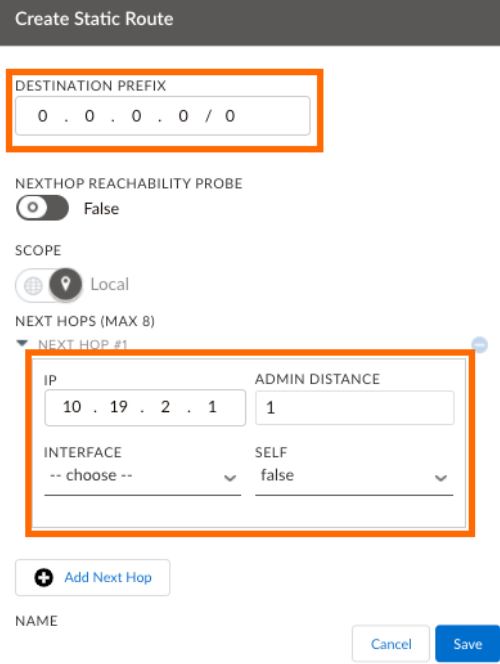
Configure port 2 to be Admin Up and Use this port to: Peer with a Network, and set for DHCP.![]() Configure a static default route pointing to the gateway of port 2 (the 1st IP address of the private subnet specified in the deployment template).
Configure a static default route pointing to the gateway of port 2 (the 1st IP address of the private subnet specified in the deployment template).![]()
![]() Switch the site to Control mode and verify the VPNs are up and active.
Switch the site to Control mode and verify the VPNs are up and active.![]() Proceed to the next section to finalize the Azure deployment steps.
Proceed to the next section to finalize the Azure deployment steps.