SaaS Security
Configure WildFire Analysis
Table of Contents
Expand All
|
Collapse All
SaaS Security Docs
-
-
- Begin Scanning an Amazon S3 App
- Begin Scanning a Bitbucket App
- Begin Scanning a Box App
- Begin Scanning ChatGPT Enterprise App
- Begin Scanning a Cisco Webex Teams App
- Begin Scanning a Confluence App
- Begin Scanning a Confluence Data Center App
- Begin Scanning a Dropbox App
- Begin Scanning a GitHub App
- Begin Scanning a Gmail App
- Begin Scanning a Google Cloud Storage App
- Begin Scanning a Google Drive App
- Begin Scanning a Jira App
- Begin Scanning a Jira Data Center App
- Begin Scanning a Microsoft Azure Storage App
- Begin Scanning a Microsoft Exchange App
- Begin Scanning a Microsoft Teams App
- Begin Scanning Office 365 Apps
- Begin Scanning a Salesforce App
- Begin Scanning a ServiceNow App
- Begin Scanning a ShareFile App
- Begin Scanning a Slack Enterprise App
- Begin Scanning a Slack for Pro and Business App
- Begin Scanning a Workday App
- Begin Scanning a Zendesk App
- Begin Scanning a Zoom App
- Perform Actions on Sanctioned Apps
- API Throttling
- Configure Classification Labels
- Microsoft Labeling for Office 365
- Google Drive Labeling
- Configure Phishing Analysis
- Configure WildFire Analysis
- Fine-Tune Policy
-
- What is an Incident?
- Filter Incidents
- Configure Slack Notification Alerts on Data Security
- Security Controls Incident Details
- Track Down Threats with WildFire Report
- Customize the Incident Categories
- Close Incidents
- Download Assets for Incidents
- View Asset Snippets for Incidents
- Modify Incident Status
- Email Asset Owners
- Generate Reports on Data Security
- Integrate CIE with Data Security
- Search in Data Security
-
-
- View Usage Data for Unsanctioned SaaS Apps
- SaaS Visibility Application Attributes
- How SaaS Security Inline Determines an App's Risk Score
- Identify Risky Unsanctioned SaaS Apps and Users
- Generate the SaaS Security Report
- Filter Unsanctioned SaaS Apps
-
- SaaS Policy Rule Recommendations
- App-ID Cloud Engine
- Guidelines for SaaS Policy Rule Recommendations
- Apply Predefined SaaS Policy Rule Recommendations
- Create SaaS Policy Rule Recommendations
- Enable SaaS Policy Rule Recommendations
- Monitor SaaS Policy Rule Recommendations
- Delete SaaS Policy Rule Recommendations
- Modify Active SaaS Policy Rule Recommendations
- Manage Enforcement of Rule Recommendations on Strata Cloud Manager
- Manage Enforcement of Rule Recommendations on Panorama
- Tag Discovered SaaS Apps
- Apply Tag Recommendations to Sanctioned Apps
- Change Risk Score for Discovered SaaS Apps
- Troubleshoot Issues on SaaS Security Inline
-
-
- Onboarding Overview for Supported SaaS Apps
- Onboard an Aha.io App to SSPM
- Onboard an Alteryx Designer Cloud App to SSPM
- Onboard an Aptible App to SSPM
- Onboard an ArcGIS App to SSPM
- Onboard an Articulate Global App to SSPM
- Onboard an Atlassian App to SSPM
- Onboard a BambooHR App to SSPM
- Onboard a Basecamp App to SSPM
- Onboard a Bitbucket App to SSPM
- Onboard a Bito AI App to SSPM
- Onboard a BlueJeans App to SSPM
- Onboard a Box App to SSPM
- Onboard a Bright Security App to SSPM
- Onboard a Celonis App to SSPM
- Onboard a Cisco Meraki App to SSPM
- Onboard a Claude App to SSPM
- Onboard a ClickUp App to SSPM
- Onboard a Codeium App to SSPM
- Onboard a Cody App to SSPM
- Onboard a Confluence App to SSPM
- Onboard a Contentful App to SSPM
- Onboard a Convo App to SSPM
- Onboard a Couchbase App to SSPM
- Onboard a Coveo App to SSPM
- Onboard a Crowdin Enterprise App to SSPM
- Onboard a Customer.io App to SSPM
- Onboard a Databricks App to SSPM
- Onboard a Datadog App to SSPM
- Onboard a DocHub App to SSPM
- Onboard a DocuSign App to SSPM
- Onboard a Dropbox Business App to SSPM
- Onboard an Envoy App to SSPM
- Onboard an Expiration Reminder App to SSPM
- Onboard a Gainsight PX App to SSPM
- Onboard a GitHub Enterprise App to SSPM
- Onboard a GitLab App to SSPM
- Onboard a Google Analytics App to SSPM
- Onboard a Google Workspace App to SSPM
- Onboard a GoTo Meeting App to SSPM
- Onboard a Grammarly App to SSPM
- Onboard a Harness App to SSPM
- Onboard a Hellonext App to SSPM
- Onboard a Hugging Face App to SSPM
- Onboard an IDrive App to SSPM
- Onboard an Intercom App to SSPM
- Onboard a Jira App to SSPM
- Onboard a Kanbanize App to SSPM
- Onboard a Kanban Tool App to SSPM
- Onboard a Krisp App to SSPM
- Onboard a Kustomer App to SSPM
- Onboard a Lokalise App to SSPM
- Onboard a Microsoft 365 Copilot App to SSPM
- Onboard a Microsoft Azure AD App to SSPM
- Onboard a Microsoft Exchange App to SSPM
- Onboard a Microsoft OneDrive App to SSPM
- Onboard a Microsoft Outlook App to SSPM
- Onboard a Microsoft Power BI App to SSPM
- Onboard a Microsoft SharePoint App to SSPM
- Onboard a Microsoft Teams App to SSPM
- Onboard a Miro App to SSPM
- Onboard a monday.com App to SSPM
- Onboard a MongoDB Atlas App to SSPM
- Onboard a MuleSoft App to SSPM
- Onboard a Mural App to SSPM
- Onboard a Notta App to SSPM
- Onboard an Office 365 App to SSPM
- Onboard Office 365 Productivity Apps to SSPM
- Onboard an Okta App to SSPM
- Onboard an OpenAI App to SSPM
- Onboard a PagerDuty App to SSPM
- Onboard a Perplexity App to SSPM
- Onboard a Qodo App to SSPM
- Onboard a RingCentral App to SSPM
- Onboard a Salesforce App to SSPM
- Onboard an SAP Ariba App to SSPM
- Onboard a ServiceNow App to SSPM
- Onboard a Slack Enterprise App to SSPM
- Onboard a Snowflake App to SSPM
- Onboard a SparkPost App to SSPM
- Onboard a Tableau Cloud App to SSPM
- Onboard a Tabnine App to SSPM
- Onboard a Webex App to SSPM
- Onboard a Weights & Biases App to SSPM
- Onboard a Workday App to SSPM
- Onboard a Wrike App to SSPM
- Onboard a YouTrack App to SSPM
- Onboard a Zendesk App to SSPM
- Onboard a Zoom App to SSPM
- Onboarding an App Using Azure AD Credentials
- Onboarding an App Using Okta Credentials
- Register an Azure AD Client Application
- View the Health Status of Application Scans
- Delete SaaS Apps Managed by SSPM
-
-
-
- New Features Introduced in December 2024
- New Features Introduced in November 2024
- New Features Introduced in October 2024
- New Features Introduced in August 2024
- New Features Introduced in July 2024
- New Features Introduced in June 2024
- New Features Introduced in May 2024
- New Features Introduced in April 2024
- New Features Introduced in March 2024
- New Features Introduced in January 2024
-
- New Features Introduced in November 2023
- New Features Introduced in October 2023
- New Features Introduced in September 2023
- New Features Introduced in August 2023
- New Features Introduced in July 2023
- New Features Introduced in June 2023
- New Features Introduced in May 2023
- New Features Introduced in April 2023
- New Features Introduced in March 2023
- New Features Introduced in January 2023
-
- New Features Introduced in December 2021
- New Features Introduced in October 2021
- New Features Introduced in September 2021
- New Features Introduced in August 2021
- New Features Introduced in July 2021
- New Features Introduced in June 2021
- New Features Introduced in May 2021
- New Features Introduced in March 2021
- New Features Introduced in January 2021
Configure WildFire Analysis
Learn how to configure WildFire analysis on which WildFire Report depends.
Where Can I Use This? | What Do I Need? |
---|---|
|
Or any of the following licenses that include the Data Security license:
|
Data Security leverages a WildFire service to detect known and unknown malware for
supported file types. To provide you the visibility you need, Data Security
integrates with WildFire by using a predefined data pattern. This process is
known as WildFire analysis.
To
enable WildFire analysis:
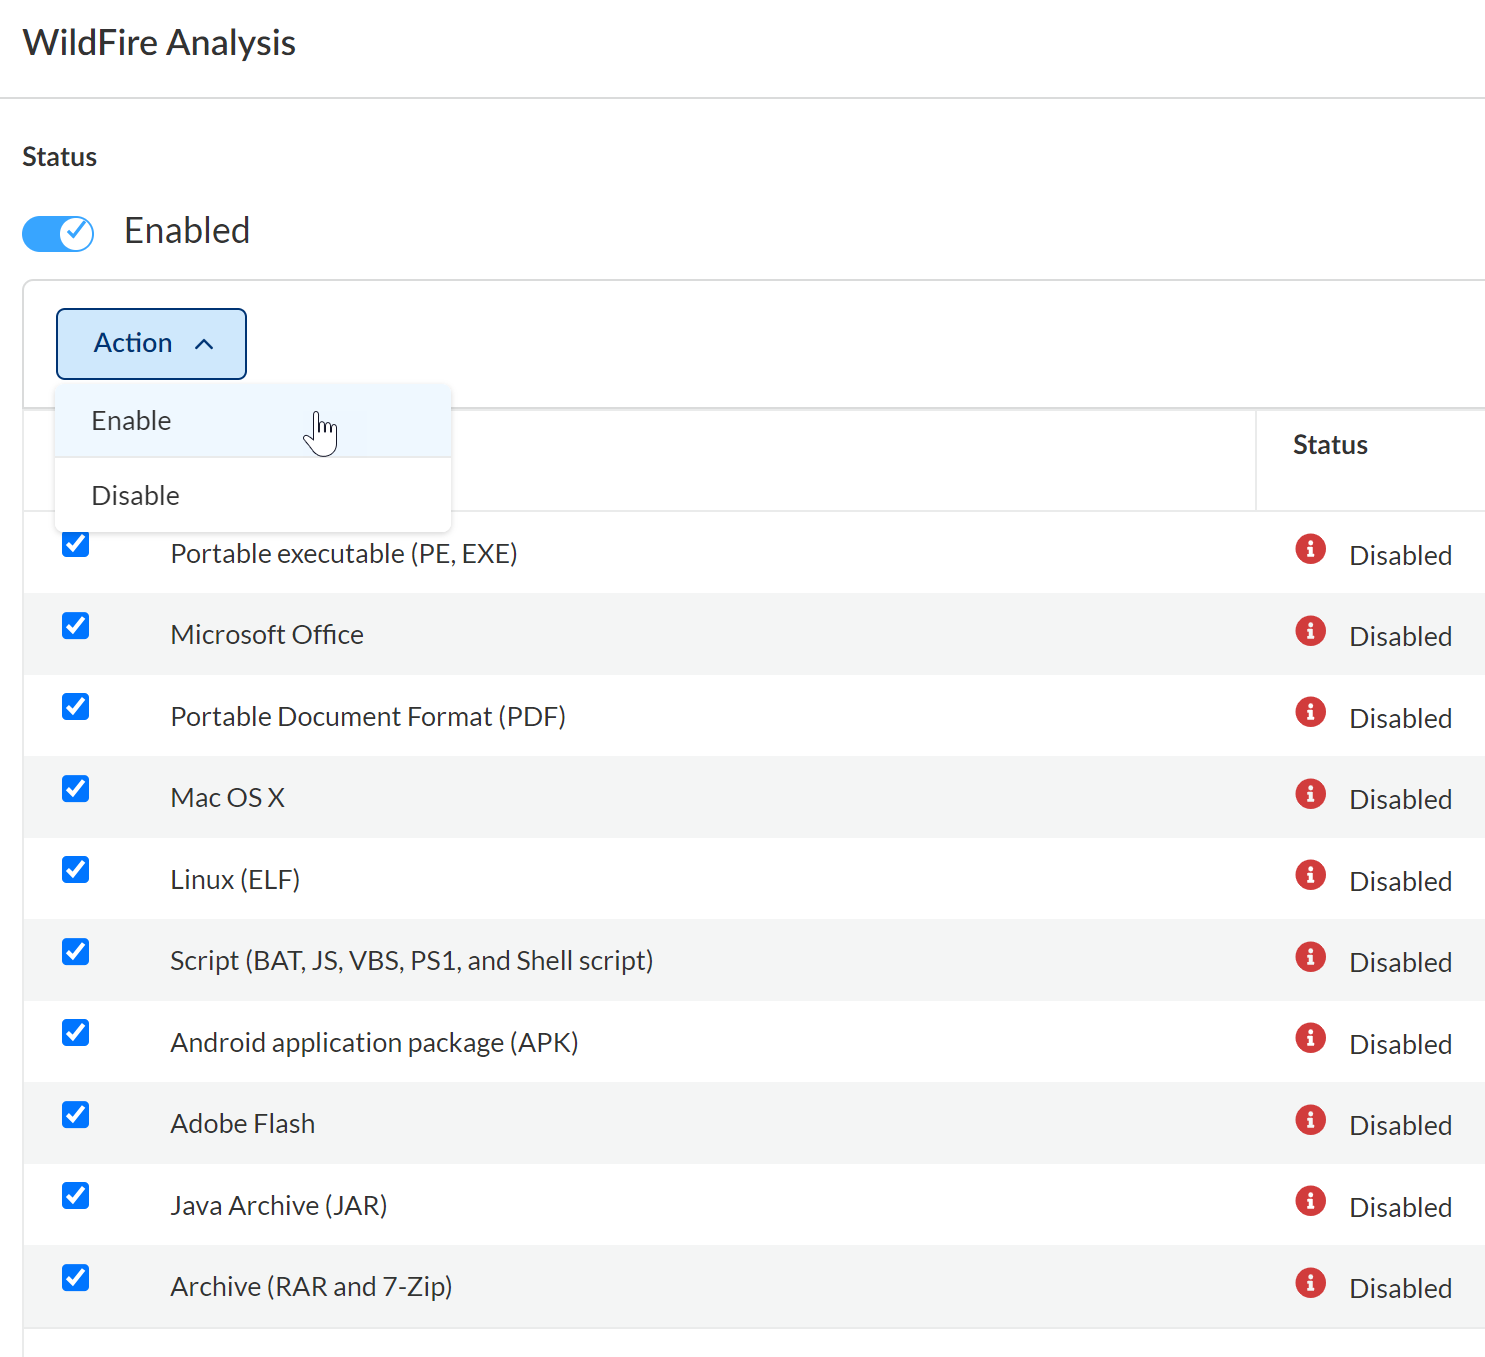
- Enable file types.
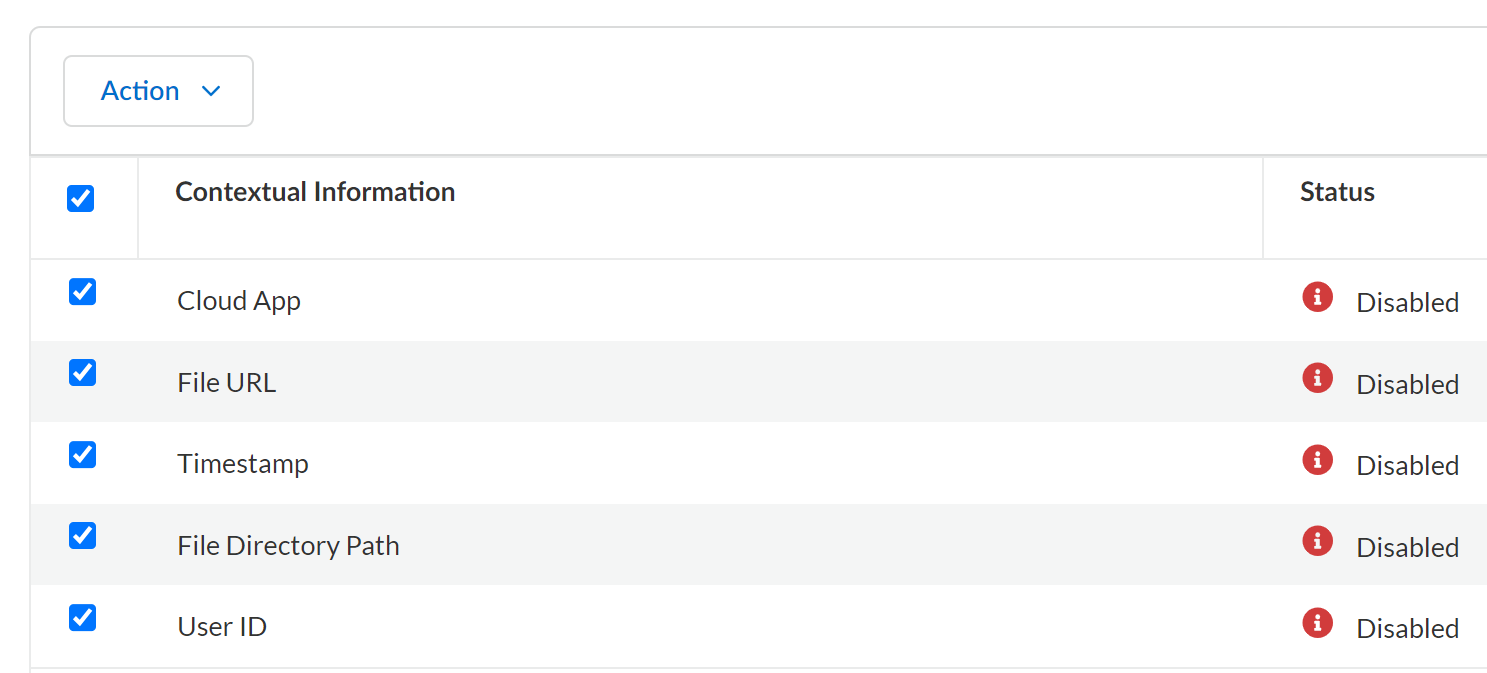
- Enable contextual information.
- Configure policies for Wildfire analysis.
- Monitor malware scanning.
After you configure WildFire analysis, if WildFire detects malware on an asset, WildFire informs
Data Security and it flag the asset as a risk. From there, you can
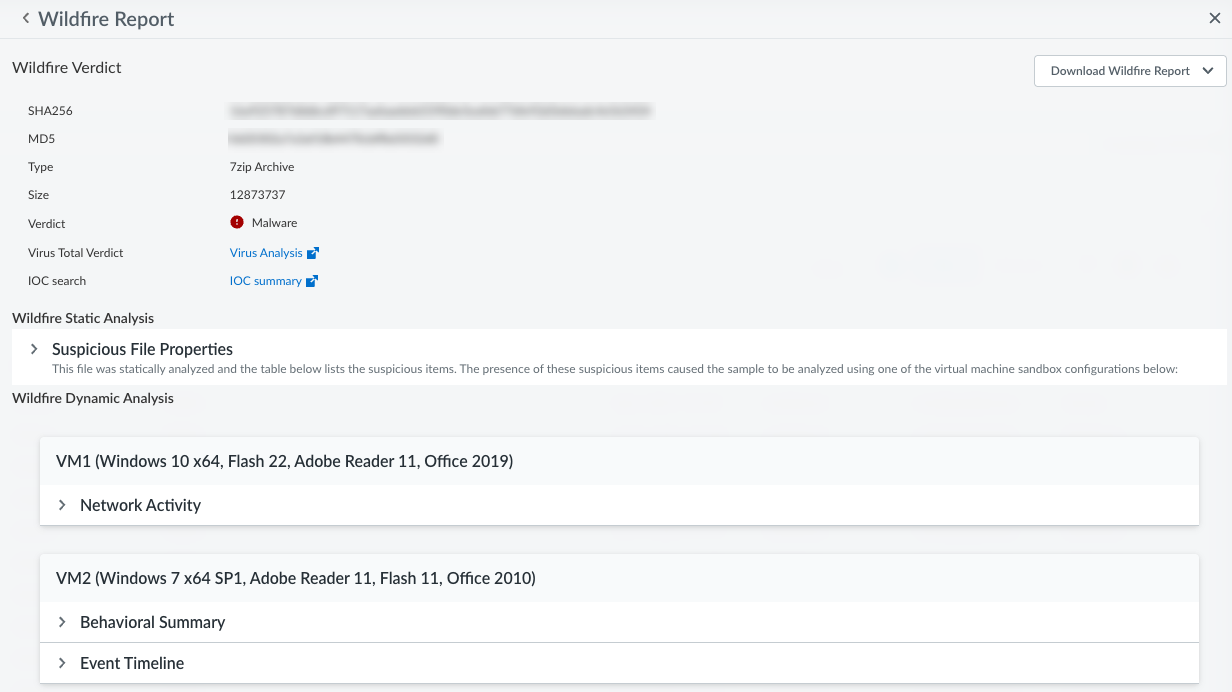
track down threats using the WildFire Report on Data Security. Simply configure WildFire analysis to send files to
WildFire, then analyze the report.
Enable File Types
Data Security enables you to submit files of specific file type categories to WildFire
for analysis, classification, and reporting. However, by default, Data Security does not submit any files for processing: you control
which file type categories apply to the WildFire service.
If you have privacy concerns with sharing specific file type categories, don’t select that file
category in Data Security. Data Security supports specific
file type categories, and the file types listed in parenthesis in the SaaS
Security web interface are examples.
- Locate the WildFire Analysis toggle and verify that WildFire is enabled.If any of your policies use the WildFire data pattern, you must remove the data pattern from those policies before you can disable WildFire analysis.
- Select the Files to Submit.
- After selecting the files, select ActionEnable.Data Security logs any changes to file type changes in the audit logs. If you want your changes to apply retroactively, initiate a rescan.
- Next step:Enable Contextual Information.
Enable Contextual Information
In addition to
sending files to WildFire
, Data Security
enables you to send contextual information with the file so that your global
administrator has the necessary context to the WildFire verdict, to determine
and investigate threats. By default, Data Security does not send contextual information
to WildFire.Palo Alto Networks recommends that you enable all contextual information. Data Security
enables you to send your files to WildFire with contextual information.
- Before you begin:Enable File Types.
- Specify the Contextual Information.
- Cloud App—Name of the SaaS application that you specified at the time of onboarding the app. For example, Box - HR or Box - HQ.
- File URL—the file path in Data Security.
- Timestamp—the latest update time on the file.
- File Directory Path—parent folder level.
- User ID—email address or username of file creator.
- After selecting the files, select ActionEnable.Data Security logs any changes to contextual information in the audit logs. If you want your changes to apply retroactively, initiate a rescan.
- Next step:Configure Policies for WildFire Analysis.
Configure Policies for WildFire Analysis
Data Security integrates with WildFire
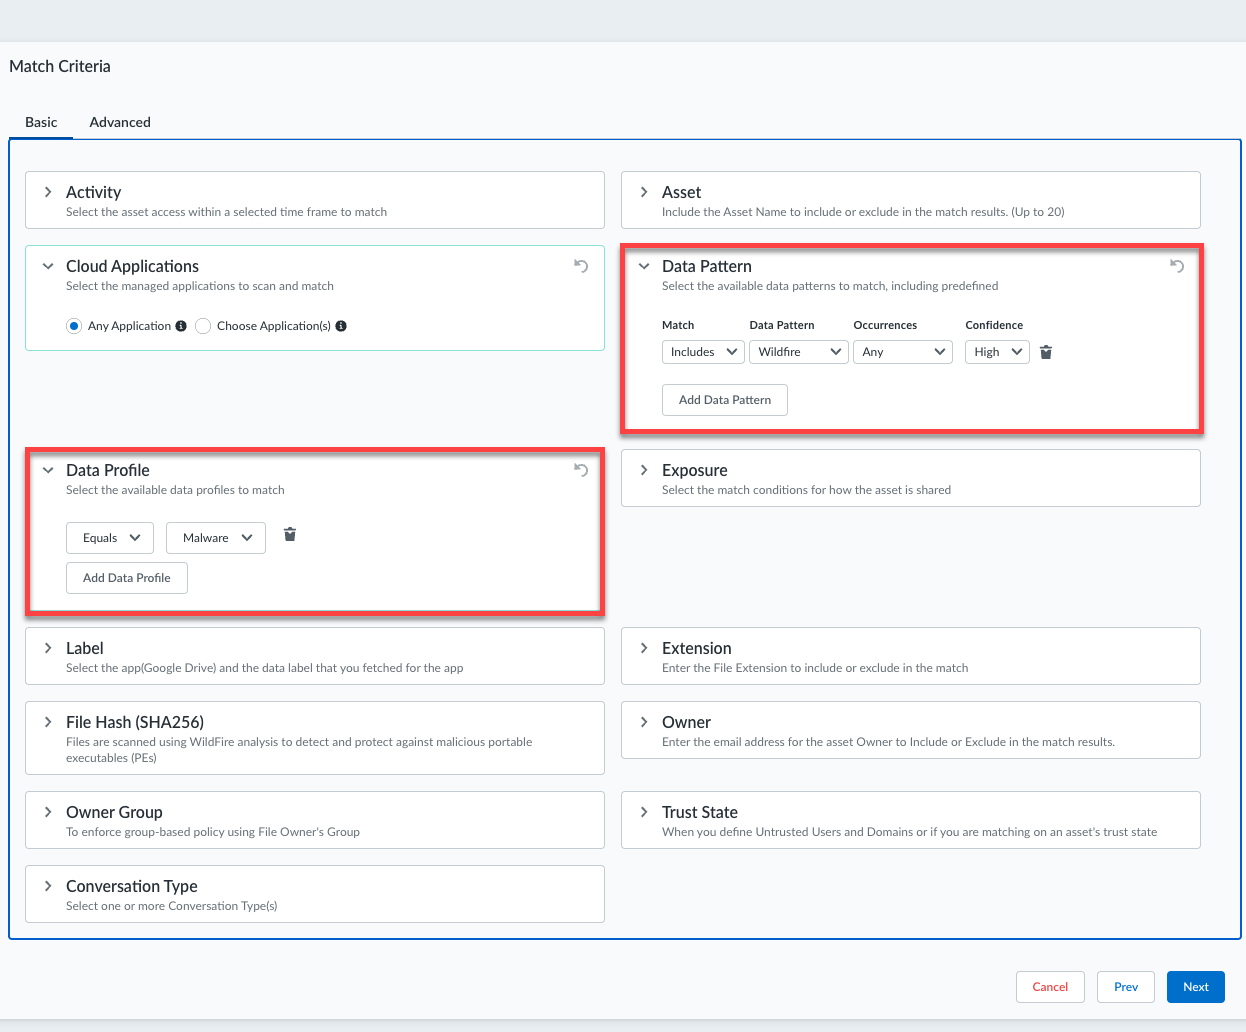
by using a predefined data pattern and predefined policy rule (WildFire).
- Before you begin:Enable Contextual Information.
- Specify the WildFire Data Pattern or Malware Data Profile as match criteria in your policies.If you forget to specify the data pattern or data profile, your match results will not be accurate—they will include a large number of false positives.
- Next step:Monitor Malware Scanning.
Monitor Malware Scanning
file types configured
for WildFire analysis
. When you View Asset Details for such
files, Data Security displays a malware scan status.- Log in to Strata Cloud Manager.
- To monitor malware scanning, select Data SecurityIncidents.
- Select the data asset you want to monitor. It is now displayed under the Data Assets tab.
- Select the asset you want to monitor. Observe the Malware Verdict in the Details pane.
- Observe the Malware Verdict.
- Pending Analysis—Data Security is waiting for WildFire to analyze the file and return a verdict.
- Analyzed—WildFire analyzed the file and returned a verdict.
- Not Analyzed—WildFire did not analyze the file and an information icon next to the status displays an explanation. The most common reason for Not Analyzed is the file type is within an unsupported file type category for WildFire analysis.
- File Unavailable—File unavailable to Data Security. For example, when a file is quarantined by the cloud app.
- If WildFire detected malware, Track Down Threats with WildFire Report.