Configure SCTP Security
Table of Contents
Configure SCTP Security
SCTP security features allow you to inspect and filter
SCTP packets. Allocate SCTP log storage so the firewall can store
SCTP log information.
Before you configure SCTP security on a firewall:
- Determine which of the SCTP Use Cases applies to your environment:
roaming security, radio access network (RAN) security, or some other
use case.
- For roaming security, gather the list of interfaces where you want to inspect SCTP traffic and the IP addresses of all related network nodes. For example, for an S6a interface, gather the IP addresses of the home subscriber server (HSS) in the home network and the Mobility Management Entity (MME) in the roaming partner’s network. In another example, for an S9 interface, gather the IP addresses of the Policy and Charging Rules Function (PCRF) in the home network and the PCRF in the roaming partner’s network.
- For RAN security, gather the list of interfaces where you want to inspect SCTP traffic and the IP addresses of all related network nodes. For example, for an S1-MME interface, gather the IP addresses of eNodeB and MME.
- Identify the interfaces on your firewall that will receive and send SCTP traffic and note the zone to which each interface belongs.
- Decide which SCTP payload protocols you want to allow, receive alerts about, or block.
The following procedure describes
how to enable SCTP. After you enable SCTP (using either the web
interface or the CLI), the other SCTP options become visible in
both the web interface and CLI. You then must allocate SCTP log
storage for the SCTP logs on the firewall or your commit will fail.
You perform a Commit and then continue to configure SCTP security.
To
inspect SCTP, create an SCTP Protection profile to apply to a Security
policy rule that covers a zone for an interface where you expect
to receive SCTP traffic. In the SCTP Protection profile, configure SCTP Security Measures on the Firewall, such
as validating SCTP packets based on their chunk types, chunk flags,
or length of the SCTP chunks. The firewall allows all SCTP chunks
by default as long as they pass the state and validation checks.
You can establish granular SCTP chunk-based controls by creating
SCTP, Diameter, and SS7 filters to allow or block specific chunks
or to generate logs based on specific chunks.
For your convenience,
each supported firewall model has a predefined SCTP Protection profile
named default-ss7 (this profile is read-only, but you can clone
and edit the profile to create a new profile).
You can configure
whether the firewall logs several chunk types that the firewall
allowed, all control chunks, the start and end of SCTP associations,
and state failure events.
- Enable SCTP security on the firewall.
- Select and edit the General Settings.
- Select SCTP Security to enable SCTP.
- Click OK.If you disable SCTP, you must also Commit your change; otherwise, the firewall continues to perform SCTP stateful inspection. After you disable SCTP, the firewall does not check SCTP four-way handshakes but still checks the SCTP packets against security policy rules and still applies App-ID™.
- (Optional) You can gracefully enable SCTP stateful
inspection to minimize disruption when you deploy a new firewall
or migrate SCTP traffic.
- Access the CLI.
- >set sctp nodrop yesThe firewall continues to perform SCTP stateful inspection and generate logs, but won’t drop SCTP packets that fail SCTP stateful inspection. When you later decide to re-enable the firewall to drop packets that fail SCTP stateful inspection, use the CLI operational command: set sctp nodrop no (this is the default setting).
- >show sctp infoThe firewall displays whether SCTP stateful inspection is gracefully enabled (sctp-no-drop: True) or not (sctp-no-drop: False).
- (Optional) You can improve SCTP Security performance
by bypassing Layer 7 scanning of Selective Acknowledgment (SACK)
messages in SCTP traffic.
- Access the CLI.
- >set sctp fast-sack yes
- Allocate SCTP log storage on the firewall.
- Select and edit Session Log Storage in the Logging and Reporting Settings.
- Enter a Quota (%) for SCTP. Each SCTP quota percentage must equate to a minimum of 32MB (displayed to the right of the percentage) or your Commit will fail. The percentage you enter equates to a number of MB or GB, depending on the firewall model.
- (Optional) Next to the quota is the Max Days that the firewall keeps SCTP logs. The maximum number of days is unlimited by default, but you can enter a limit for the number of days (range is 1 to 2,000).
- Scroll up and enter a Quota (%) for SCTP Summary; the percentage must equate to a minimum of 32MB.
- (Optional) The Max Days that the firewall keeps SCTP Summary logs is unlimited by default, but you can enter a limit for the number of days (range is 1 to 2,000).
- Enter percentage quotas for Hourly SCTP Summary, Daily SCTP Summary, and Weekly SCTP Summary; each percentage must equate to a minimum of 32MB.
- (Optional) The Max Days that the firewall keeps Hourly SCTP Summary logs, Daily SCTP Summary logs, and Weekly SCTP Summary logs is unlimited by default, but you can enter a limit for the number of days (range is 1 to 2,000).
- Click OK.
![]()
- Commit your changes.
- Create an SCTP Protection profile and configure validation
of SCTP packets.
- Select and Add a
profile by Name.Alternatively, you can select the check box next to the predefined SCTP Protection profile default-ss7 and select Clone, enter a Name for the new profile, and click OK.
- Enter a Description for the profile.
- (Hardware-based firewalls only) Select Shared to apply the profile to all virtual systems.
- Select and Add a
profile by Name.
- Configure the validity checks that the firewall performs
on SCTP traffic.
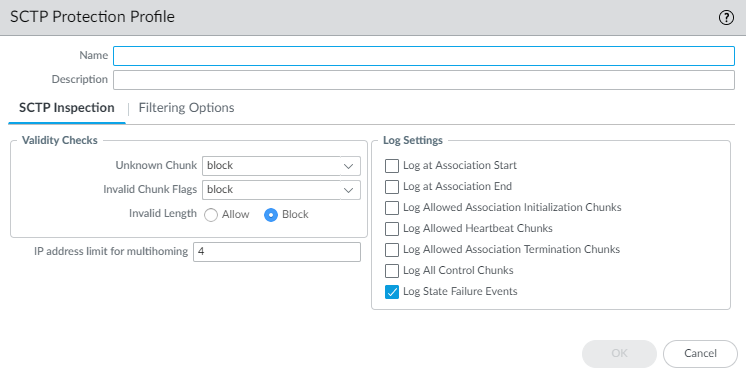
- On the SCTP Inspection tab,
select the firewall response if an SCTP node transmits an Unknown
Chunk in an SCTP packet. (SCTP Security Measures on the Firewall explains
unknown chunks.)
- allow (default)—Allow the packet to pass without modification
- alert—Allow the packet to pass without modification and generate an SCTP log.
- block—Nullify the chunk before inspecting the next chunk and generate an SCTP log. The firewall nullifies the chunk by changing the data chunk payload slightly so that the data chunk is ignored by the endpoint.
- Select the response to Chunk Flags in
the event the chunk flags don’t comply with RFC 4960:
- allow (default)—Allow the packet to pass without modification
- alert—Allow the packet to pass without modification and generate an SCTP log.
- block—Drop the packet and generate an SCTP log.
- Select the response to Invalid Length of
an SCTP chunk:
- Allow (default)—Allow the packet to pass without modification
- Block—Drop the packet and generate an SCTP log.
![]()
- On the SCTP Inspection tab,
select the firewall response if an SCTP node transmits an Unknown
Chunk in an SCTP packet. (SCTP Security Measures on the Firewall explains
unknown chunks.)
- Specify the IP address limit for multihoming for the profile—The maximum number of IP addresses you can configure for SCTP Multihoming for an endpoint before the firewall generates an alert message (range is 1 to 8; default is 4). If the path to one IP address for the endpoint fails, SCTP uses one of the other addresses for the association to keep that association functioning.
- Select the Log Settings for the profile—Options to generate SCTP logs for allowed chunks, association start or end, and state failure events. The default for a new profile is to Log State Failure Events.
- Configure the filtering that the firewall performs on
SCTP traffic.
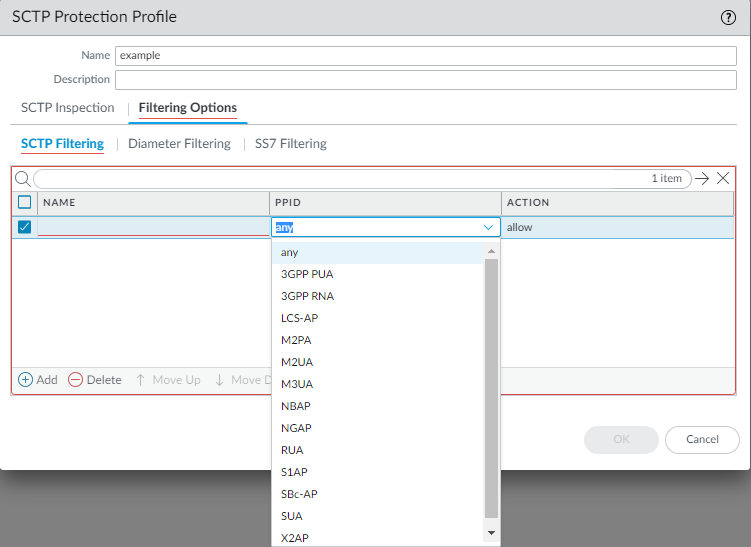
- On the Filtering Options tab, select SCTP Filtering to filter payload protocols.
- Add an SCTP filter by Name using a maximum of 20 characters—numbers, uppercase and lowercase letters, periods, hyphens, and underscores.
- Select an SCTP payload protocol ID (PPID);
the firewall takes the action you specify on the data chunk that
includes the specified PPID. Select any to
configure the firewall to take the action you specified for all
SCTP data chunks. Alternatively, enter a valid PPID value to configure the firewall the
action only for specific types of SCTP data chunks; for example,
the PPID value for Service Area Broadcast Protocol (SABP) data chunks
is 31.Each SCTP filter can specify only one PPID or any PPID.
![]()
- Specify the Action the firewall
takes on data chunks containing the specified PPID:
- allow (default)—Allow the chunk to pass without modification
- alert—Allow the chunk to pass without modification before inspecting the next chunk and generate an SCTP log.
- block—Nullify the chunk before inspecting the next chunk and generate an SCTP log. The firewall nullifies the chunk by changing the data chunk payload slightly so that the data chunk is ignored by the endpoint.
- Add more SCTP filters by PPID
for the SCTP Protection profile to filter additional payload protocols.
The order of filters in the list makes a difference because the
firewall takes the action (allow, alert, or block) specified by
the first filter that matches the PPID in a chunk. The firewall
then examines the PPID of the next chunk to see which filter that
PPID matches. After the firewall takes action on a PPID (chunk),
a subsequent filter for the same PPID has no effect. For example,
if SCTP filter 1 specifies that the firewall send an alert for
PPID SUA, then, if SCTP filter 3 specifies
that the firewall block PPID SUA,
SCTP filter 3 will never be applied because PPID SUA will
always match filter 1 first and the firewall will take that action.
However, you can select a filter and Move Up or Move
Down to change its order in the SCTP Filtering list.
You can also Delete a filter. In the search
field () enter a PPID and then search (
![]() ) for that PPID in the list.
) for that PPID in the list.![]()
- Select Diameter Filtering to apply
granular-level filtering on Diameter applications and their messages.
- Add a Diameter filter by Name using a maximum of 20 characters—numbers, uppercase and lowercase letters, periods, hyphens, and underscores.
- Specify the Action the firewall
takes on a chunk that includes any of the specified Diameter application
IDs, command codes, or attribute-value pair (AVP) codes:
- allow (default)—Allow the Diameter chunk to pass without modification
- alert—Allow the chunk to pass without modification before inspecting the next chunk, and generate an SCTP log.
- block—Nullify the chunk before inspecting the next chunk, and generate an SCTP log. The firewall nullifies the chunk by changing the data chunk payload slightly so that the data chunk is ignored by the endpoint.
The firewall does not apply Diameter filtering on Data chunks that an endpoint has fragmented. - Select a Diameter Application ID for
which the firewall takes action or select any to
configure the firewall to take the action you specified for all
Diameter application IDs.
![]()
- Add one or more Diameter
Command Codes from the list, or select Any.
The only codes listed are those that apply to the Diameter Application
ID you selected.
![]()
- Add one or more Diameter AVP codes or values (range is 1 to 16,777,215) or select Any.
- Click OK to save the Diameter filter. A chunk that matches any one of the AVP codes and any one of the Diameter command codes for the specified Diameter application ID matches the criteria for the filter.
- Add more Diameter filters for
the SCTP Protection profile to filter additional Diameter applications
and messages. The order of filters makes a difference. For example,
if you configure the first Diameter filter with an application ID,
a command code, and AVP 1032 with the action set to alert, and then
you configure a second filter for the same application ID and command
code but you configure it to block any AVP, then when a Diameter
chunk with the specified application ID, command code, and AVP 1032
arrives, it matches the first filter and causes an alert but is
never blocked. If the order of filters were reversed, the chunk
with AVP 1032 would arrive and match the filter set to block the
chunk with any AVP. To change the order, select a filter and Move
Up or Move Down through the Diameter
filtering list. You can also Delete a filter
or select a filter and Clone it to make a
copy of the filter, which you can modify. In the search field, enter
a filter name and search () for a Diameter filter.
![]()
- Click OK to save the Diameter filter.
- Select SS7 Filtering to apply
granular-level filtering on applications using SCCP signaling and
messages of MAP and CAP.
- Add an SS7 filter by Name using a maximum of 20 characters—numbers, uppercase and lowercase letters, periods, hyphens, and underscores.
- Specify the Action the firewall
takes on specified SS7 chunks:
- allow (default)—Allow the chunk to pass without modification
- alert—Allow the chunk to pass without modification before inspecting the next chunk, and generate an SCTP log.
- block—Nullify the chunk before inspecting the next chunk, and generate an SCTP log. The firewall nullifies the chunk by changing the data chunk payload slightly so that the data chunk is ignored by the endpoint.
The firewall does not apply SS7 filtering to Data chunks that an endpoint has fragmented. - Select an SCCP Calling Party SSN entry
or select any-map. If you select INAP or SCCP
Management, you cannot enter an Operation Code.
![]()
- Add one or more SCCP
Calling Party GT strings of digits (0 to 9); the minimum
length is 1 and the maximum length is 15. Alternatively, select Any. A
string of 1234567 does not match a data chunk in an SCCP Calling
Party GT of 123456789012345. An asterisk (*) at the end of a string
acts like a wildcard and matches any number of trailing digits in
the SCCP Calling Party GT. For example, a string of 12345* matches
an SCCP Calling Party GT of 123456789012345. Only one asterisk is
allowed per string and it must be in the last position in the string.You can filter MAP and CAP messages in ANSI format using Calling Party SSN and Operation Code only.
- Add an Operation Code (or multiple codes) or select Any.
- Click OK to save the SS7 filter. An SS7 chunk that matches any one of the Operation Codes and any one of the SCCP Calling Party GT values for the specified SCCP Calling Party SSN matches the filter.
- Add more SS7 filters for the
SCTP Protection profile to apply filtering on additional applications
using SCCP signaling and messages of MAP and CAP. The order of filters
makes a difference because the first filter that an SS7 chunk matches
determines the action the firewall takes on the chunk. Select a
filter and Move Up or Move Down through
the SS7 filtering list. You can also Delete a
filter or Clone a filter to make a copy and
modify it. In the search field (), enter a filter name and search (
![]() ) for an SS7 filter.
) for an SS7 filter.![]()
- Click OK to save the SCTP Protection profile. If none of the SCTP, Diameter, or SS7 filters match the SCTP packet, the firewall allows the packet by default.
- Apply the SCTP Protection profile to a Security policy
rule.
- Select and select a Security policy rule, or Add a new Security policy rule.
- For the Source Zone, select a zone that includes the interface where you want to secure SCTP associations.
- On the Application tab, select sctp as
the App-ID.Other SCTP-based App-IDs (such as s1ap, diameter-over-sctp, and m3ua) become non-functional when you enable SCTP security.
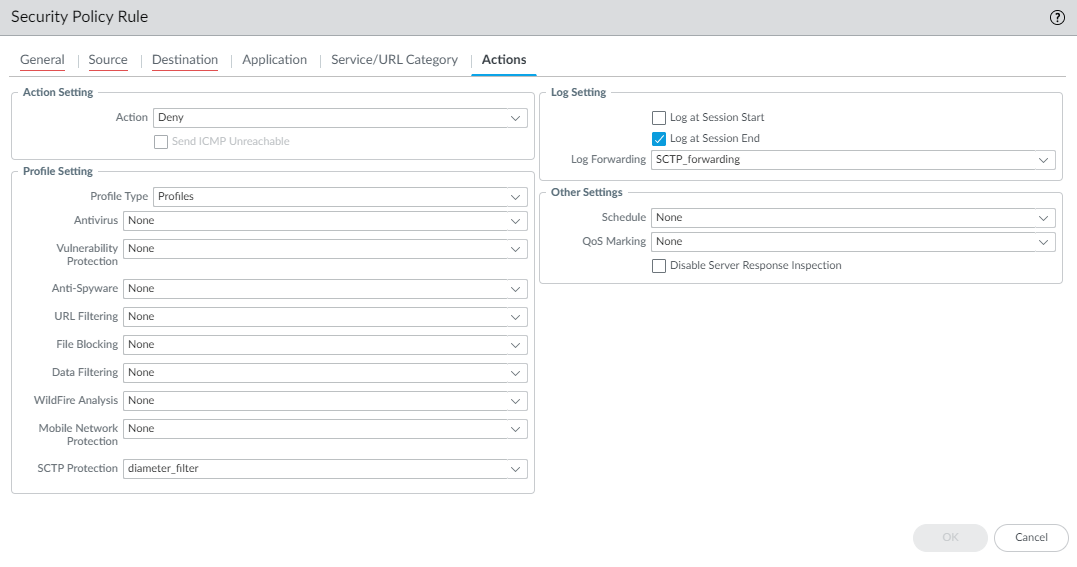
- On the Actions tab, select
an Action and in the Profile Setting section,
select the SCTP Protection profile you just
created.
![]()
- Continue to Create a Security Policy Rule, making sure that you allow packets from the proper IP address of each SCTP endpoint.
- Click OK to save the Security policy rule.
- (Optional) Change the default SCTP session timeouts,
which affect an SCTP
Association. For example, if your SCTP endpoints use shorter
or custom timeouts, you can adjust timeouts on the firewall to be
more in line with your endpoint timeouts.
- Select and
edit the various Session Timeouts as needed:
- SCTP INIT timeout (in seconds)—The maximum length of time after receiving an INIT chunk that the firewall must receive the INIT-ACK chunk before the firewall stops the SCTP association initiation (range is 1 to 60; default is 5).
- SCTP COOKIE timeout (in seconds)—The maximum length of time after receiving an INIT-ACK chunk with the STATE COOKIE parameter that the firewall must receive the COOKIE ECHO chunk containing the cookie before the firewall stops the SCTP association initiation (range is 1 to 600; default is 60).
- Discard SCTP timeout (in seconds)—The maximum length of time that an SCTP association remains open after it is denied based on a Security policy rule configured on the firewall (range is 1 to 604,800; default is 30).
- SCTP timeout (in seconds)—The maximum length of time that an SCTP association and its related SCTP sessions remain open without a response after an SCTP association is in the Established state (after the handshake is complete and/or data is being transmitted); range is 1 to 604,800; default is 3,600.
- SCTP Shutdown timeout (in seconds)—The maximum length of time that the firewall waits after a SHUTDOWN chunk to receive a SHUTDOWN-ACK chunk before the firewall stops the SCTP association termination (range is 1 to 600; default is 30).
- Click OK to save your SCTP session timeout changes.
- Select and
edit the various Session Timeouts as needed:
- (Optional) Configure the firewall to apply newly
committed Security policy rules to SCTP sessions in progress.
- Select and edit Session Settings.
- Select Rematch Sessions.
- Click OK.
- Commit your changes.