Network Security
Configure Post-Quantum IKEv2 with QKD and ETSI-014
Table of Contents
Expand All
|
Collapse All
Network Security Docs
Configure Post-Quantum IKEv2 with QKD and ETSI-014
Set up quantum key distribution to prevent quantum "harvest now, decrypt later
attacks."
| Where Can I Use This? | What Do I Need? |
|---|---|
|
|
Quantum key distribution (QKD) uses quantum mechanics to create an encryption key and
synchronizes that key between QKD devices. Additionally, QKD separates the key
creation and exchange from IKEv2 peering transmission to reduce the chance of a
successful harvest now, decrypt later attack. Using the ETSI GS QKD 014
standard, your PAN-OS NGFW requests symmetric encryption keys from a QKD device
(typically installed in the same location as the firewall) when bringing up a
site-to-site VPN tunnel.
To use QKD with your NGFW, you must configure a QKD profile and assign that profile
to an IKE Gateway. You can create one or more QKD profiles to permit a different QKD
key management entity (KME) device for each IKE peer the firewall communicates with.
Before you configure a QKD profile, ensure you have met the following
prerequisites.
- Create or import a local firewall certificate for authentication.
- Import the QKD KME device CA certificate as a trusted certificate.
- Import the QKD KME server certificate for certificate pinning.
To ensure strong security for the QKD communication network, use
VLANs to separate QKD communications from other network traffic. Limit access to the
QKD network to specific, authorized personnel only.
Configure a QKD Profile
Create a QKD profile to define a unique connection to each QKD KME device the
firewall must communicate with. An enterprise site-to-site VPN topology should
only require a single QKD KME device connection per site. However, PAN-OS
firewalls deployed in a service provider use case might require additional QKD
profiles to support different parties sharing the same firewall.
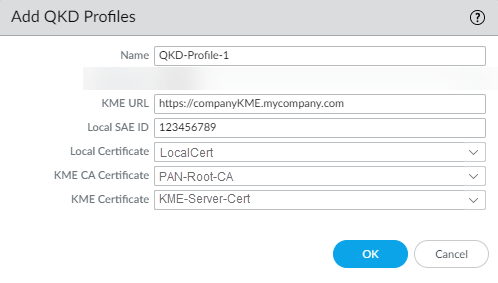
- Select DeviceSetupQuantum and Add a new QKD Profile.Enter a descriptive Name for your QKD profile.Enter the KME URL of your local KME device.Enter the Local SAE ID.Select the Local Certificate, used to authenticate the firewall with the KME, from the drop-down.Select the KME CA Certificate, the KME certificate authority, from the drop-down.Select the KME Certificate, the KME server certificate used for authentication, from the drop-down.Click OK.
![]()
Configure an IKEv2 Gateway
- Select NetworkNetwork ProfilesIKE Gateways and Add a new gateway.Configure the General settings and select either IKEv2 only mode or IKEv2 preferred mode as the Version.In IKEv2 only mode, if the peer does not support IKEv2, the firewall aborts the connection. In IKEv2 preferred mode, if the peer does not support IKEv2, the firewall falls back to IKEv1. However, the VPN must negotiate IKEv2 to use the post-quantum VPN features, so if the firewall falls back to IKEv1, those features are not available.IKEv1 is considered to be weak. If both IKE peers can support it, upgrade your VPN connections to IKEv2 and select IKEv2 only mode to ensure adequate levels of security and the ability to use PQ VPNs.
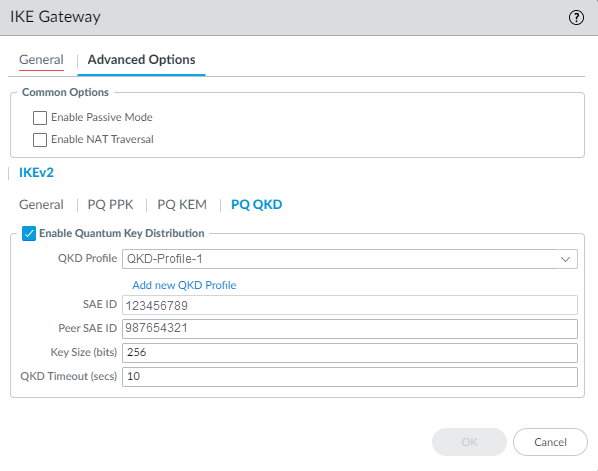
![]() Select Advanced Options and configure the non-quantum options. Select IKEv2 and configure the General settings.General enables you to add an IKE Crypto profile, enable IKEv2 Fragmentation, and set the Liveness Check.Enable Quantum Key Distribution to use QKD.
Select Advanced Options and configure the non-quantum options. Select IKEv2 and configure the General settings.General enables you to add an IKE Crypto profile, enable IKEv2 Fragmentation, and set the Liveness Check.Enable Quantum Key Distribution to use QKD.- Select the QKD Profile, which you created previously, from the drop-down.Enter the Peer SAE ID, the serial number of the peer firewall on the other end of the VPN connection.The firewall pre-populates the SAE ID and can’t be changed.Set the Key Size (bits) of the key returned from the QKD KME device. The default value is 256 bits.A larger symmetric key provides higher resistance to a quantum attack using Grover's Algorithm. Use a minimum of 256 bits.Set the QKD Timeout (secs) in seconds. The default value is 10 seconds.Click OK to create the IKE Gateway.
![]() Complete the above procedure on the peer firewall at the other end of the IKEv2 connection.
Complete the above procedure on the peer firewall at the other end of the IKEv2 connection.Configure a QKD Service Route
By default, the NGFW uses the management plane interface to communicate with the QKD KME device. If the KME is on a different network that is connected to the NGFW dataplane, you must configure a service route to direct QKD traffic from the management plane to the dataplane.- Select DeviceSetupServices, and in the Services Features section, click Service Route Configuration.Select Customize and create the service route
- Select IPv4 or IPv6 and click QKD to customize the service route.Select the Source Interface and Source Address for traffic redirection.Click OK to save the service route configuration.Commit your changes.
Validate Connectivity with the KME Host
Use the following commands to validate your KME host connectivity and QKD configuration.- View all QKD profiles configured on the NGFW.show quantumd qkd
- Get the status from the KME server.debug quantumd test qkd get-status qkd-profile <qkd-profile-name> peer-sae-id <peer-sae-id>
- Get the key and key ID from the KME server.debug quantumd test qkd get-key qkd-profile <qkd-profile-name> peer-sae-id <peer-sae-id>
Use the following commands to validate the IKEv2 key negotiation between the VPN endpoints.- View granular information on the IKEv2 exchange.debug ike global on dump
- View IKE statistics.debug ike stat
- View IKE gateway configuration information.show vpn ike-sa gateway
- Trigger IKE Phase 1 peering.test vpn ike-sa gateway
- View IPSec configuration information.show vpn ipsec-sa
- Trigger IKE Phase 2 tunneling.test vpn ipsec-sa
- View a realtime dump of ikemgr.log for IKE key negotiation and IPSec activity.tail follow yes mp-log ikemgr.log
- Restarts PAN-OS IKE Manager (ikemgr) daemon. Only use for troubleshooting purposes; this command clears resources held by ikemgr.debug software restart process ikemgr


