Network Security
Post-Quantum IKEv2 RFC 8784 Configuration Example
Table of Contents
Expand All
|
Collapse All
Network Security Docs
Post-Quantum IKEv2 RFC 8784 Configuration Example
Configure post-quantum IKEv2 RFC 8784 to resist attacks by quantum
computers.
| Where Can I Use This? | What Do I Need? |
|---|---|
|
|
This example provides a basic IKEv2 post-quantum VPN configuration and topology. It
includes two sites that support RFC 8784 (post-quantum VPNs that resist attacks from
quantum computers and quantum cryptography) and one site that doesn't support RFC
8784.
When a firewall that supports RFC 8784 communicates with a firewall that also
supports RFC 8784, the devices use the post-quantum configuration. The key exchange
uses post-quantum pre-shared keys (PQ PPKs) that are shared out-of-band from the
connection, so the PQ PPK is never exposed during the IKE handshake. The firewalls
mix the PQ PPK with the classical Diffie-Hellmann (DH) key material (which is
transmitted during the IKE handshake) to create a key that isn't based on prime
numbers and therefore can't be cracked by Shor's algorithm. This enables the firewalls to create a
quantum-resistant key to help protect against Harvest Now, Decrypt Later attack, in which attackers
steal data that they can't decrypt now and store it until they can use a
cryptographically relevant quantum computer (CRQC) can decrypt it.
When a firewall that supports RFC 8784 communicates with a firewall that doesn't
support RFC 8784, the RFC 8784 firewall can fall back to the classical DH key
exchange. If that happens, the firewalls don't mix in a PQ PPK and only use the DH
key material to create the key. It's important to understand that the VPN traffic in
this case is vulnerable to Harvest Now, Decrypt Later attacks.
This simple example topology consists of three firewalls located at different sites,
connected by IKEv2 VPNs. Two of the firewalls support RFC 8784 and one firewall does
not support RFC 8784.
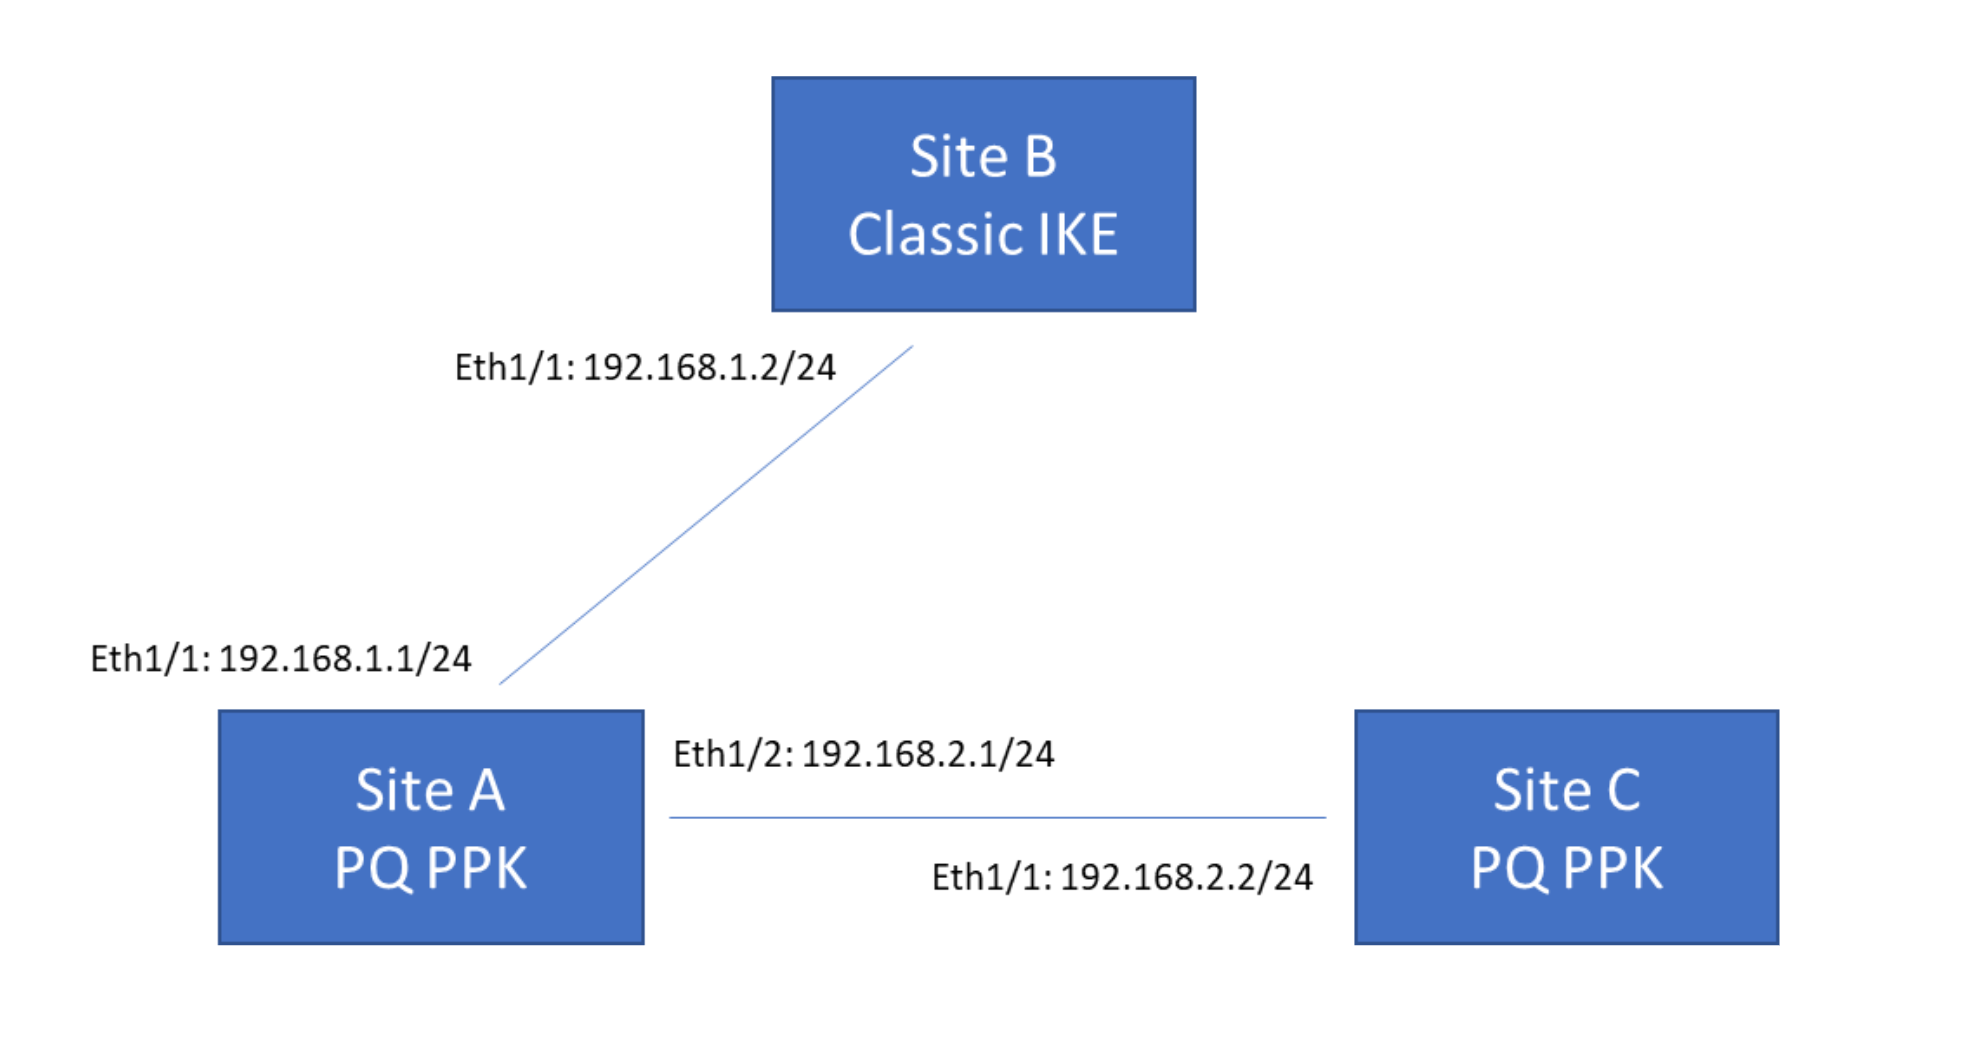
In this example:
- Site A supports RFC 8784. Its connection to Site B is Eth1/1: 192.168.1.1/24 and its connection to Site C is Eth1/2: 192.168.2.1/24. Site A requires two IKEv2 gateways, one to connect with Site B and another to connect with Site A.
- Site B only supports classical IKEv2 VPNs and doesn't support RFC 8784. Its connection to Site A is Eth1/1: 192.168.1.2/24. Site B requires one IKEv2 gateway to connect to Site A. Site B's IKEv2 gateway configuration doesn't include PQ PPKs because Site B doesn't support RFC 8784.
- Site C supports RFC 8784. Its connection to Site A is Eth1/1: 192.168.2.2/24. Site C requires one IKEv2 gateway to connect to Site A.
Each IKEv2 VPN peer that supports RFC 8784 must have exactly the same set of PQ
PPKs (KeyID plus PPK secret string pairs) installed and activated. The
connection is aborted if the selected PQ PPK isn't available on both peers.
The KeyID identifies the PPK secret string.
The IKEv2 peers transmit the KeyID during the IKEv2 handshake, but the PPK secret
string is shared out-of-band and installed on each peer separately, either
pushed by Panorama or installed manually. The PPK secret string is never sent in
the handshake or seen in the resulting IKEv2 tunnel. Instead, the IKEv2 peers
use the KeyID to look up the PPK secret string locally and mix it with the DH
key material to produce the post-quantum encryption key.
To configure the IKEv2 VPNs for the example topology, navigate to NetworkNetwork ProfilesIKE Gateways:
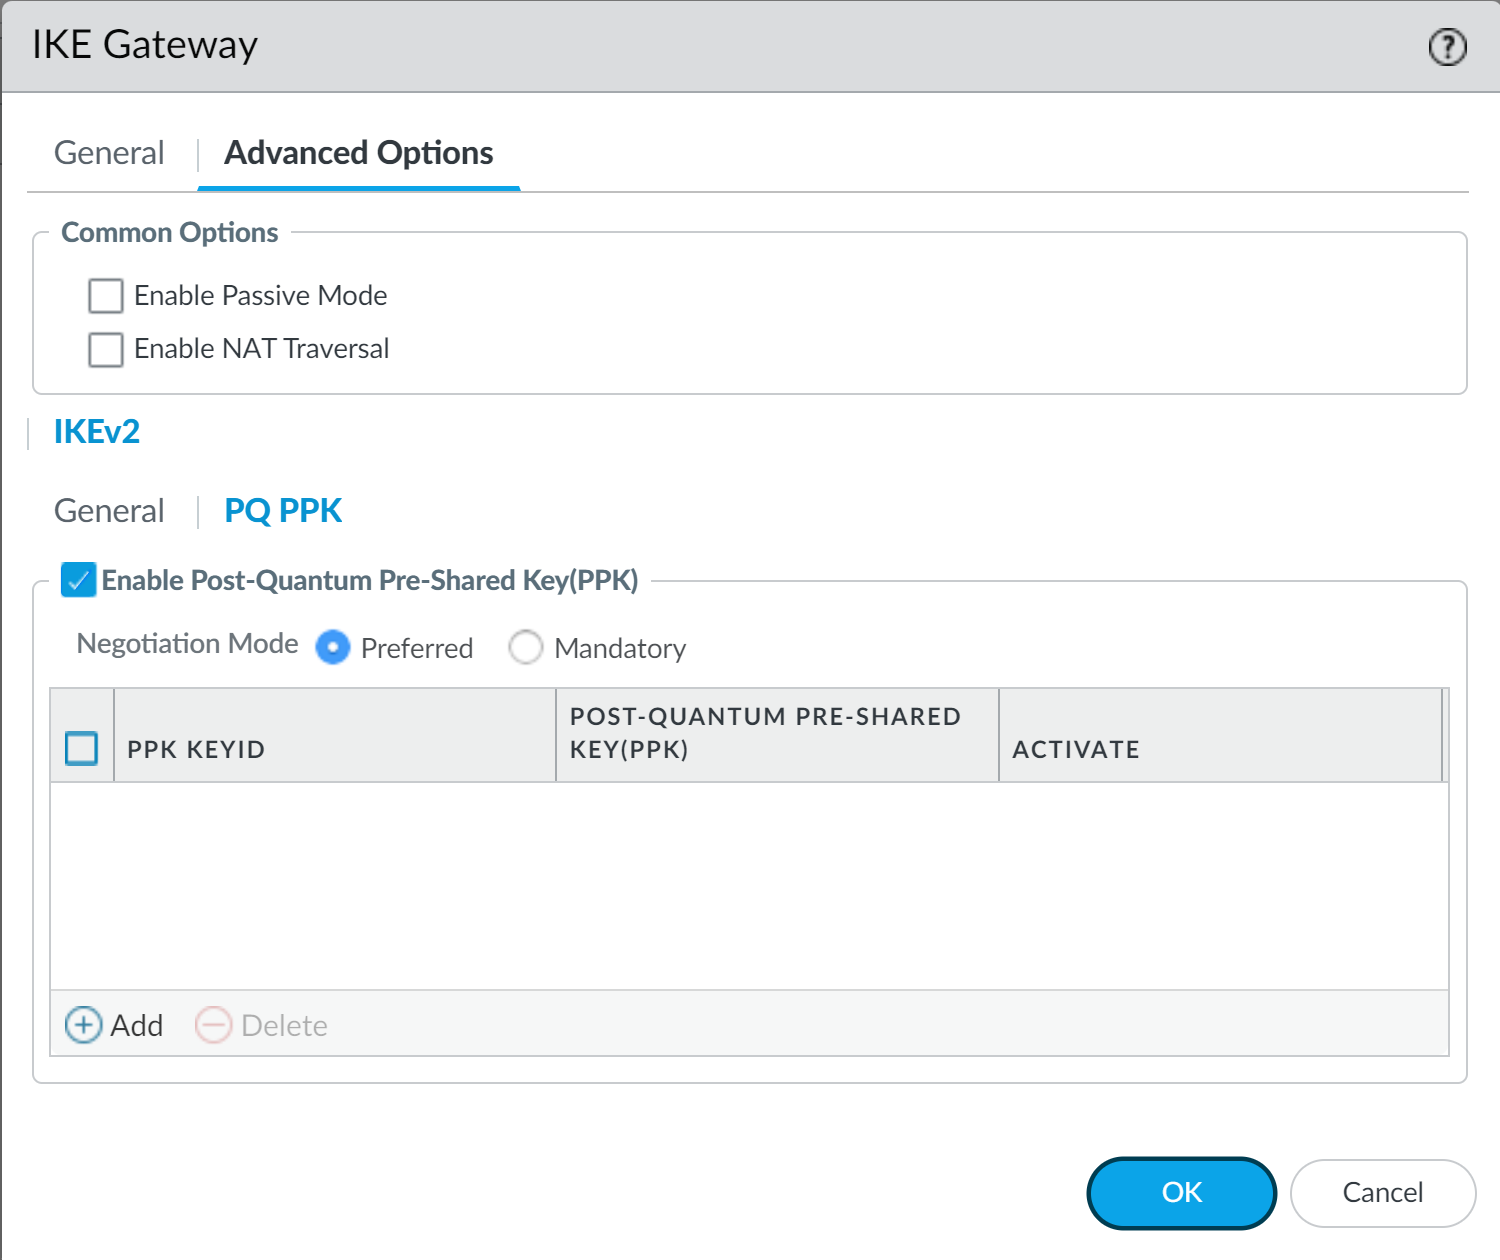
- Configure the IKEv2 VPN Gateway general properties for Site A, B, and C as you would any other IKE gateway.In the General tab, configure the addresses, authentication, and other general IKE gateway information. Set the Version to IKEv2 mode only for best security. IKEv1 is considered to be a weak protocol and does not support RFC 8784 post-quantum VPNs.The pre-shared key you configure on the General tab is not the post-quantum pre-shared key that resists quantum-based attacks. It is used for symmetric authentication across the tunnel.Configure common and general Advanced Options such as passive mode, NAT traversal, and the IKE Crypto Profile for all three sites.On the Advanced OptionsPQ PPK tab, Enable Post-Quantum Pre-Shared Key (PPK) for the Site A IKEv2 VPN to Site C and on the Site C IKEv2 VPN to Site A.Because Site B doesn't support RFC 8784, you don't need to Enable Post-Quantum Pre-Shared Key (PPK) in the Site B IKE Gateway configuration or in the Site A IKEv2 VPN to Site B configuration.
![]() When you Enable Post-Quantum Pre-Shared Key (PPK), the Negotiation Mode default setting is Preferred, which means connections that can't support RFC 8784 fall back using to classical cryptography. (In Mandatory mode, if the peer doesn't support PQ PPKs, the firewall aborts the connection.)Set the Negotiation Mode in the Site A to Site C and the Site C to Site A IKEv2 VPNs to Mandatory.
When you Enable Post-Quantum Pre-Shared Key (PPK), the Negotiation Mode default setting is Preferred, which means connections that can't support RFC 8784 fall back using to classical cryptography. (In Mandatory mode, if the peer doesn't support PQ PPKs, the firewall aborts the connection.)Set the Negotiation Mode in the Site A to Site C and the Site C to Site A IKEv2 VPNs to Mandatory.![]() Using Mandatory as the Negotiation Mode ensures that Site A and Site C always set up quantum-resistant VPNs instead of classical VPNs when they negotiate VPN tunnels. Use Mandatory when you're sure that the peers support RFC 8784. If you're not certain, use Preferred mode so that the firewall can fall back to classical IKEv2 VPNs if the peer doesn't support RFC 8784, for example, when you peer with devices outside of your enterprise that you don't control.Configure active PQ PPKs for the Site A to Site C IKEv2 connection and for the Site C to Site A IKEv2 connection. When Site A and Site C bring up the IKEv2 connection, they select from these active PQ PPKs and mix the chosen PQ PPK with the DH key material to create a secure key that isn't based on prime numbers.There is no post-quantum configuration for Site A to Site B communication or for Site B to Site A communication because Site B doesn't support RFC 8784.Both the Site A and Site C IKEv2 peers must have the same exact configuration of active PQ PPKs.
Using Mandatory as the Negotiation Mode ensures that Site A and Site C always set up quantum-resistant VPNs instead of classical VPNs when they negotiate VPN tunnels. Use Mandatory when you're sure that the peers support RFC 8784. If you're not certain, use Preferred mode so that the firewall can fall back to classical IKEv2 VPNs if the peer doesn't support RFC 8784, for example, when you peer with devices outside of your enterprise that you don't control.Configure active PQ PPKs for the Site A to Site C IKEv2 connection and for the Site C to Site A IKEv2 connection. When Site A and Site C bring up the IKEv2 connection, they select from these active PQ PPKs and mix the chosen PQ PPK with the DH key material to create a secure key that isn't based on prime numbers.There is no post-quantum configuration for Site A to Site B communication or for Site B to Site A communication because Site B doesn't support RFC 8784.Both the Site A and Site C IKEv2 peers must have the same exact configuration of active PQ PPKs.- If Panorama manages both IKEv2 peers, you can create the configuration on Panorama and push it to the managed firewalls.
- If Panorama doesn't manage both IKEv2 peers and different administrators control the peers, communicate the PQ PPK to the other administrator in a secure manner, such as encrypted email, and store the key securely.
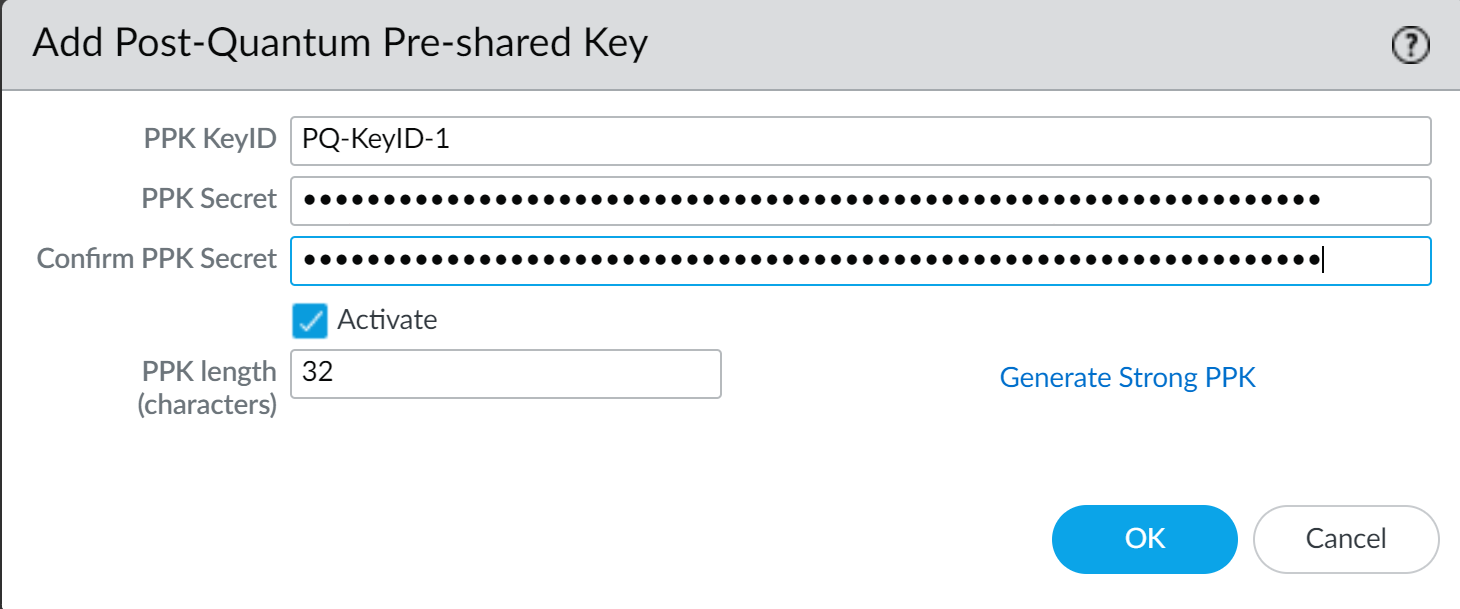
You can give the KeyID for each PQ PPK any name you want. You can configure the PPK secret that you pair with the KeyID for each PQ PPK manually or the firewall can generate a strong PPK secret for you. This example shows you how to use both methods.To create the PQ PPK with a manually configured PPK secret:- Add a PQ PPK.In the Add Post-Quantum Pre-shared Key dialog, enter the PPK KeyID name. In this example, the name is PQ-KeyID-1.Type (or copy and paste from another source) the exact same ASCII string into PPK KeyID and Confirm PPK Secret.Store the PQ PPK (the KeyID and its PPK secret) securely. For manually entered PPK secrets, the secret is never shown in cleartext. If you lose the PPK secret, you can't recover it. (You can delete the PQ PPK and then configure a new one.)If the PPK KeyID and Confirm PPK Secret don't match, the error message PPK Secret and Confirm PPK Secret Do Not Match appears. As a best practice, specify a random PPK secret that's at least 64 characters (32 bytes, or 256 bits of entropy) in length to create a strong key. By default, the new key is active. If you don't want to use the key in negotiation between IKE peers, deselect Activate. If you deactivate the PQ PPK on one peer, you must also deactivate it on the other peer. The following example shows a strong 64-character key (manually entered keys are never displayed in cleartext):
![]() The PPK length (characters) field only applies to keys that the firewall generates for you. It does not control the length of manually configured PPK secret strings.Click OK to install the manually configured PQ PPK.If Panorama manages both peers, you can create the configuration on Panorama and push it to the managed firewalls. If Panorama doesn't manage both peers and a different administrator controls the VPN peer, you securely communicate the PQ PPK to that administrator, who installs it on the peer.To create the PQ PPK with a PPK secret that the firewall generates:
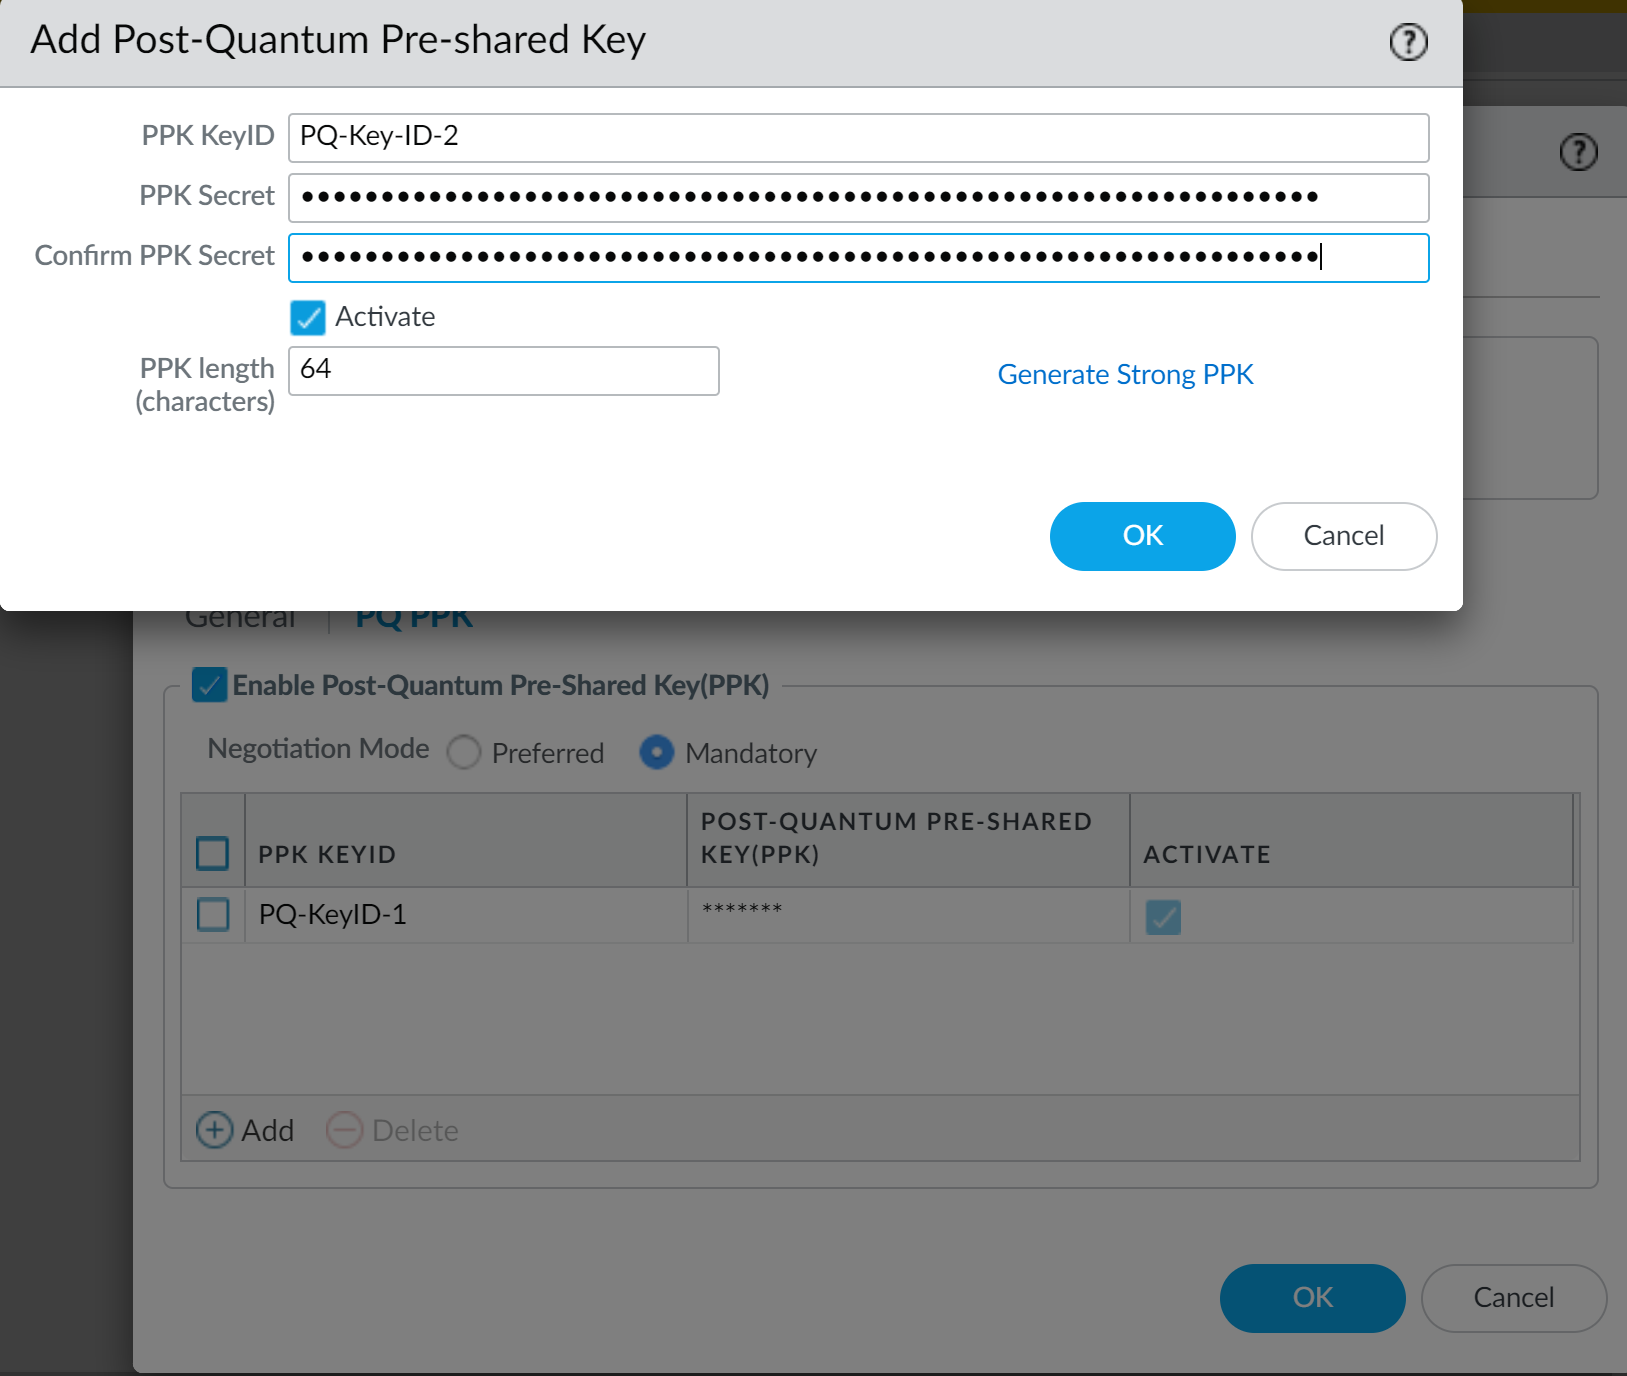
The PPK length (characters) field only applies to keys that the firewall generates for you. It does not control the length of manually configured PPK secret strings.Click OK to install the manually configured PQ PPK.If Panorama manages both peers, you can create the configuration on Panorama and push it to the managed firewalls. If Panorama doesn't manage both peers and a different administrator controls the VPN peer, you securely communicate the PQ PPK to that administrator, who installs it on the peer.To create the PQ PPK with a PPK secret that the firewall generates:- Add a PQ PPK.In the Add Post-Quantum Pre-shared Key dialog, enter the PPK KeyID name. In this example, the name is PQ-Key-ID-2.Set PPK length (characters) to at least 64 characters (32 bytes, or 256 bits of entropy) in length to create a strong key.Click Generate Strong PPK.The firewall generates a strong, random hexadecimal PPK secret of the length configured in PPK length (characters).Highlight and copy the PPK secret string.Copy only the hexadecimal secret. Don't copy the leading PPK: characters. For example, if the generated secret displays as:PPK: 38bcc7f9bd477885541ba0f12b93eb1b8e8ab772ccac1a891802a3abfe132b5dyou only copy:38bcc7f9bd477885541ba0f12b93eb1b8e8ab772ccac1a891802a3abfe132b5dThe leading PPK: is not part of the secret string.
![]() Store the copied PPK secret that the firewall generated securely. After you click OK, the firewall never displays the PPK secret in cleartext again. If you don't copy and securely store the PPK secret now, you won't have it and will need to delete this PQ PPK and configure a new one.With the copied PPK secret still on your clipboard or available to copy from secure storage, click OK. If you didn't copy the PPK secret, generate another strong PPK secret and be sure to copy and securely store it.Paste the copied PPK secret string into both the PPK Secret and Confirm PPK Secret fields in Add Post-Quantum Pre-Shared Key.
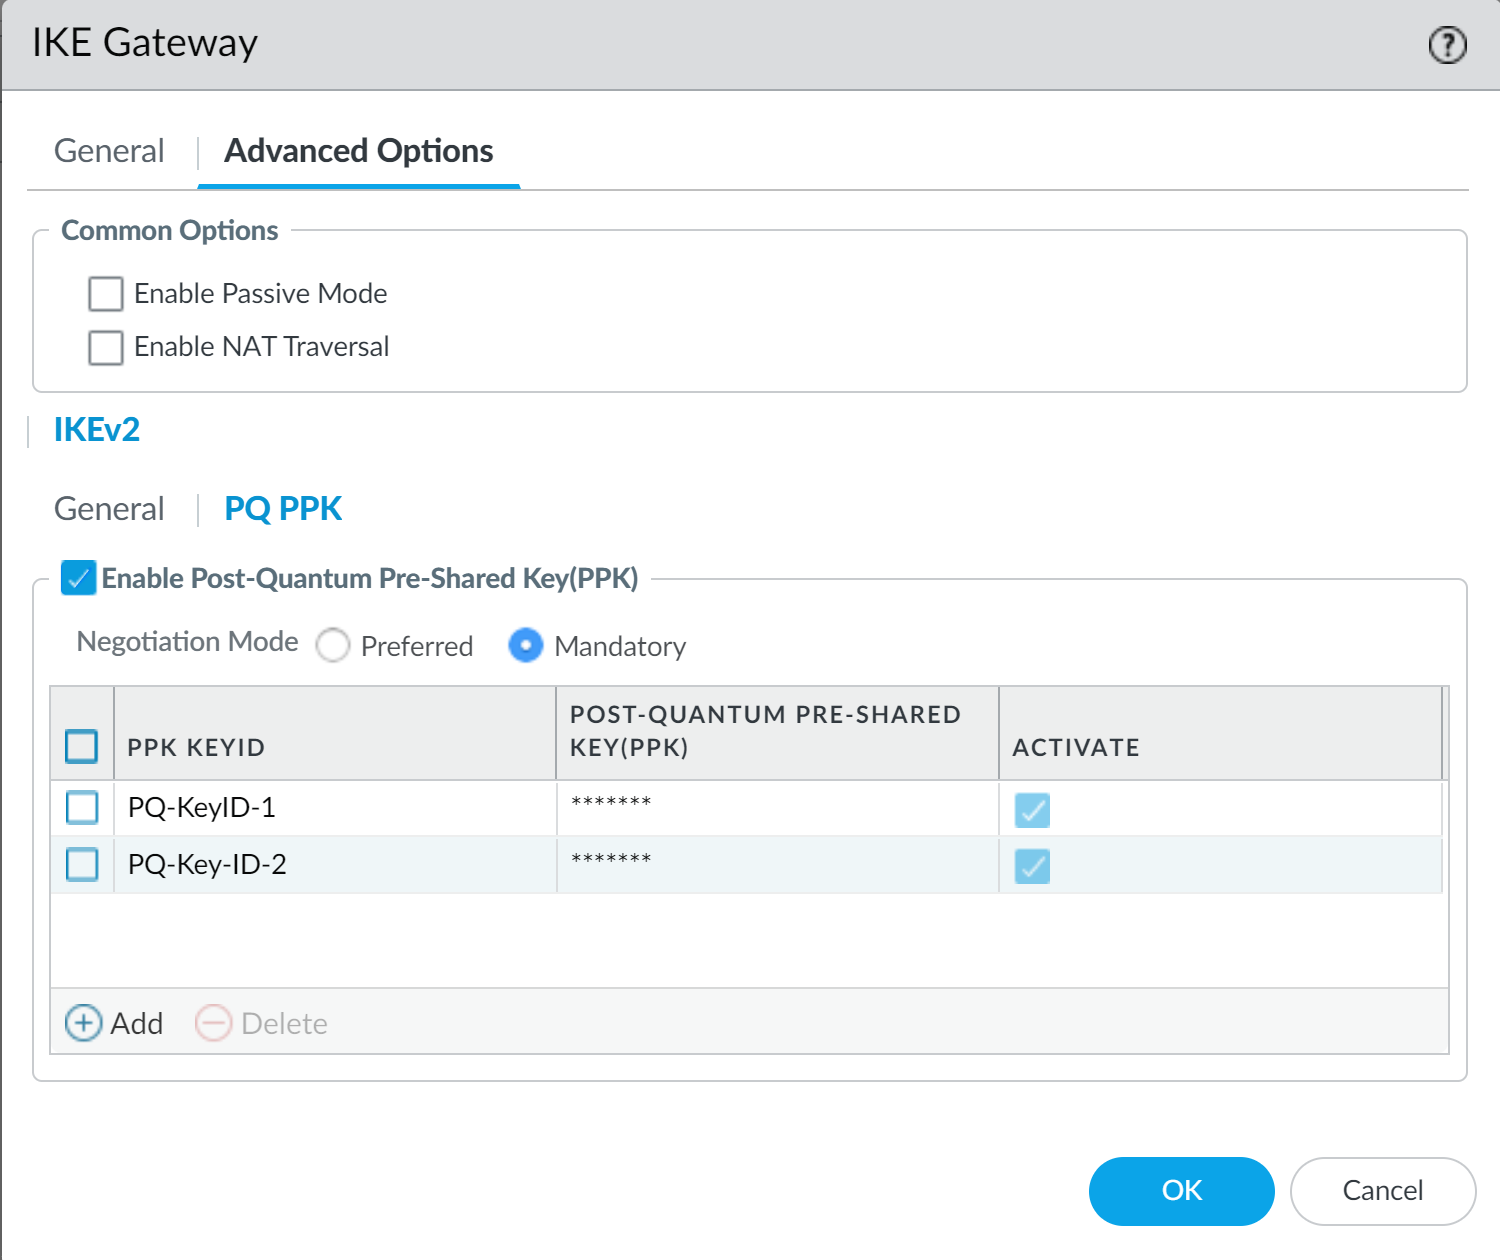
Store the copied PPK secret that the firewall generated securely. After you click OK, the firewall never displays the PPK secret in cleartext again. If you don't copy and securely store the PPK secret now, you won't have it and will need to delete this PQ PPK and configure a new one.With the copied PPK secret still on your clipboard or available to copy from secure storage, click OK. If you didn't copy the PPK secret, generate another strong PPK secret and be sure to copy and securely store it.Paste the copied PPK secret string into both the PPK Secret and Confirm PPK Secret fields in Add Post-Quantum Pre-Shared Key.![]() By default, the new key is active. If you don't want to use the key in negotiation between IKE peers, deselect Activate. If you deactivate the PQ PPK on one peer, you must also deactivate it on the other peer.Click OK to install the firewall-generated PQ PPK.If Panorama manages both peers, you can create the configuration on Panorama and push it to the managed firewalls. If Panorama doesn't manage both peers and a different administrator controls the VPN peer, you securely communicate the PQ PPK to that administrator, who installs it on the peer.For Site A and Site C, the two PQ PPKs created in this example are listed as active PQ PPKs in Mandatory mode.
By default, the new key is active. If you don't want to use the key in negotiation between IKE peers, deselect Activate. If you deactivate the PQ PPK on one peer, you must also deactivate it on the other peer.Click OK to install the firewall-generated PQ PPK.If Panorama manages both peers, you can create the configuration on Panorama and push it to the managed firewalls. If Panorama doesn't manage both peers and a different administrator controls the VPN peer, you securely communicate the PQ PPK to that administrator, who installs it on the peer.For Site A and Site C, the two PQ PPKs created in this example are listed as active PQ PPKs in Mandatory mode.![]() The PPK secret is now hidden and is never shown in cleartext. IKEv2 VPNs between Site A and Site C now implement RFC 8784 to resist quantum attacks. IKEv2 VPNs between Site A and Site B continue to use classical DH key exchanges and are still vulnerable to Harvest Now, Decrypt Later attacks.If Site B in this example were upgraded to support RFC 8784, you would follow the same process to upgrade the Site A to Site B and Site B to Site A IKEv2 VPNs.
The PPK secret is now hidden and is never shown in cleartext. IKEv2 VPNs between Site A and Site C now implement RFC 8784 to resist quantum attacks. IKEv2 VPNs between Site A and Site B continue to use classical DH key exchanges and are still vulnerable to Harvest Now, Decrypt Later attacks.If Site B in this example were upgraded to support RFC 8784, you would follow the same process to upgrade the Site A to Site B and Site B to Site A IKEv2 VPNs.

