Prisma AIRS
Create Prisma AIRS AI Runtime: Network Intercept Deployment Profile for Panorama
Table of Contents
Expand All
|
Collapse All
Prisma AIRS Docs
Create Prisma AIRS AI Runtime: Network Intercept Deployment Profile for Panorama
Create Prisma AIRS AI Runtime: Network intercept deployment
profile in Customer Support Portal for Panorama support.
| Where Can I Use This? | What Do I Need? |
|---|---|
| Panorama managed Prisma AIRS AI Runtime: Network intercept |
This section helps you to create a deployment profile in the Customer Support Portal
for Prisma AIRS AI Runtime: Network intercept for Panorama support.
Before you begin, bring up your Panorama (Refer to Install the Panorama Virtual Appliance to
bring up virtual Panorama).
You can deploy the Panorama™ management server as a virtual appliance or hardware appliance
(M-Series appliance). For a Panorama
virtual appliance, you can:
- Add a firewall as a managed device and the serial number for the server on each firewall.
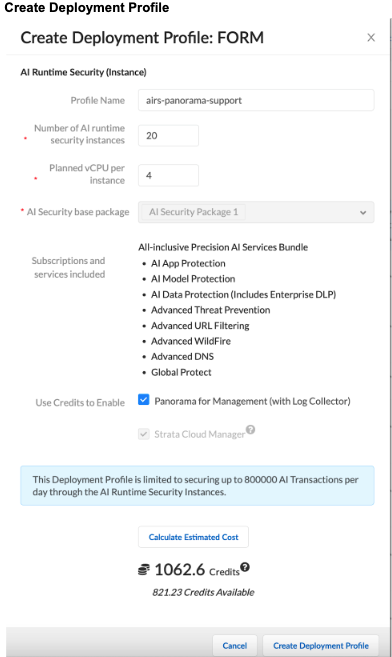
- Or, enable Panorama for Management (with Log Collector) in the deployment profile in the Customer Support Portal. This automatically generates a serial number that you can use to associate the deployment profile with the Hub.
High-level workflow:
- Create a deployment profile in the Customer Support Portal for Prisma AIRS AI Runtime: Network intercept managed by Panorama.
- Associate the deployment profile with a tenant service group (TSG).
- Provision Panorama.
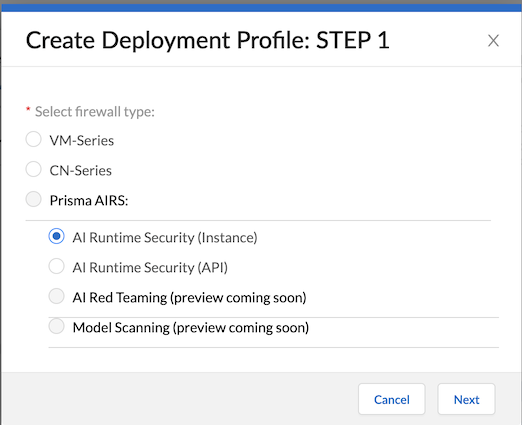
- Log in to the Palo Alto Networks Customer Support Portal.Select Products Software/Cloud NGFW Credits.Locate your credit pool and click Create Deployment Profile.Select AI Runtime Security (Instance) and click Next.
![]() Select PAN-OS 11.2.2 and above and click Next.Enter the Prisma AIRS details:
Select PAN-OS 11.2.2 and above and click Next.Enter the Prisma AIRS details:- Deployment Profile Name.Number of Prisma AIRS instances.Planned vCPU per instances.Review the Prisma AIRS AI Runtime: Network intercept Setup Prerequisites and Limitations to validate your configuration.Enable Panorama for Management (with Log Collector) to manage the firewall by Panorama. (Strata Cloud Manager is auto-selected by default).
![]() Select Create Deployment Profile.
Select Create Deployment Profile.Associate a Deployment Profile to a Tenant Service Group (TSG)
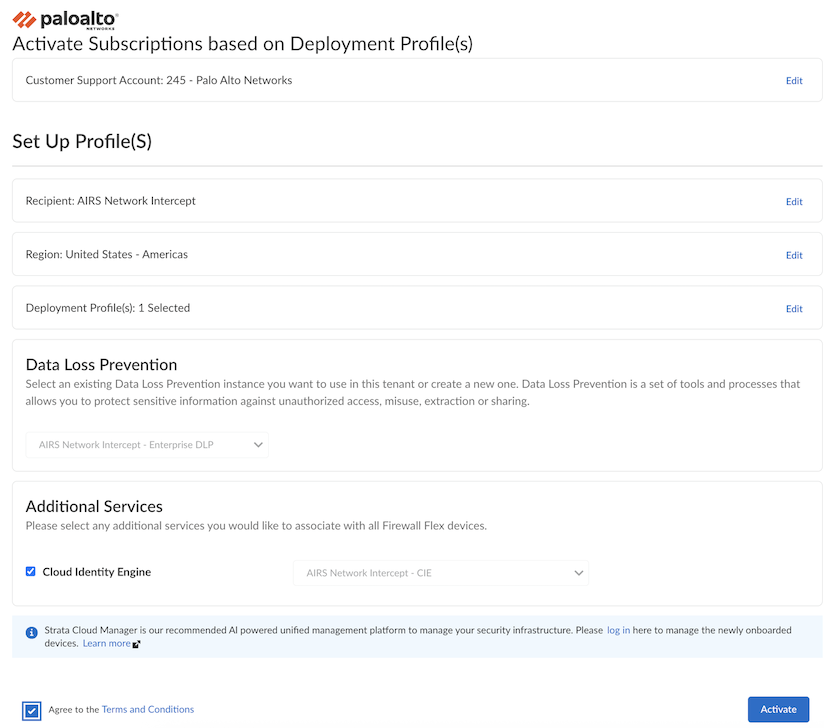
After creating your deployment profile, associate the deployment profile with a TSG. - Log in to Palo Alto Networks Customer Support Portal.Select Products Software/Cloud NGFW Credits.Locate the credit pool you used to create the deployment profile and click Details.Locate your Prisma AIRS deployment profile for Panorama and click Finish Setup (Record the AUTH CODE).In the Activate Subscriptions based on Deployment Profile(s) form, select the following details:Select the Customer Support Account used to create your deployment profile from the available list.Select Tenant.Verify that the Strata Logging Service is enabled for this tenant.Select a Region.In Select Deployment Profile, select the deployment profile you created previously.Click Done.Keep existing deployment profiles checked to maintain their association with the tenant.Enable Cloud Identity Engine or create a new one for centralized, cloud-based user identity management and enhanced security policy enforcement across your entire Palo Alto Networks deployment.Agree to the Terms and Conditions.Click Activate and record the Auth Code.
![]() To verify the successful TSG association, log in to Hub.Navigate to Common Services → Tenant Management, and then select your tenant.Ensure the Profile Association Status shows as Complete.The deployment profile for Panorama in the Customer Support Portal includes the following subscriptions.
To verify the successful TSG association, log in to Hub.Navigate to Common Services → Tenant Management, and then select your tenant.Ensure the Profile Association Status shows as Complete.The deployment profile for Panorama in the Customer Support Portal includes the following subscriptions.![]() Automatically associate a deployment profile with the Hub:
Automatically associate a deployment profile with the Hub:- Provision Panorama: Provision Panorama to
generate a serial number and register it as an asset.
- Log in to the Palo Alto Networks Customer Support Portal.
- Navigate to Products Software/Cloud NGFW Credits.
- Locate the credit pool you used to create the deployment profile and click Details.
- Expand the details of your deployment profile by clicking the down arrow next to its name.
- In the upper left-hand corner next to your deployment profile name, click three dots (…) and select Provision Panorama.
- Confirm Serial Number: To confirm the serial number for the
provisioned Panorama, log in to the Hub.
- Navigate to Common Services → Device Associations, and then select your tenant.
- Add Serial Number to Panorama: When you bring up Panorama, add this serial number to it by going to Panorama > Setup > Management > General Settings.
Panorama may take up to an hour to push the AI security profiles to the AI core service.


