Prepare the VM-Series Firewall Image for Cisco ENCS
Table of Contents
Prepare the VM-Series Firewall Image for Cisco ENCS
Download or create the files necessary to convert the
PAN-OS qcow2 file, and convert the file to a Cisco ENCS image.
You can convert a PAN-OS qcow2 file from the
NFVIS graphical user interface or the command line interface.
Convert a qcow2 File from the Graphical User Interface
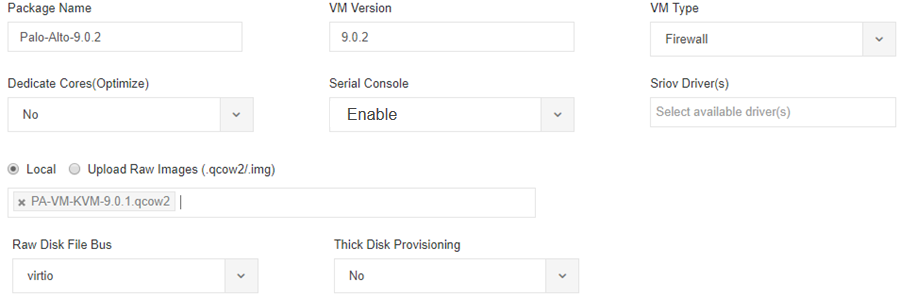
- In NFVIS, go to .Fill in the package information as shown below, supplying your own values.
- Enter a Package Name and VM Version, and for the VM Type, choose Firewall.
- Enable the Serial Console.
- Leave the Sriov Driver(s) field blank, as SR-IOV is not supported.
- Select Local to choose a qcow2 file you uploaded previously, or click Upload Raw Images to upload a qcow2 file.
- Log in to the Palo Alto Networks Customer Support Portal.If you have not already done so, create a support account and register the VM-Series firewall.
- Select and from the Filter By drop-down, select Pan OS for VM-Series KVM Base Image, for example, version 9.1.
- Download the qcow2 image.
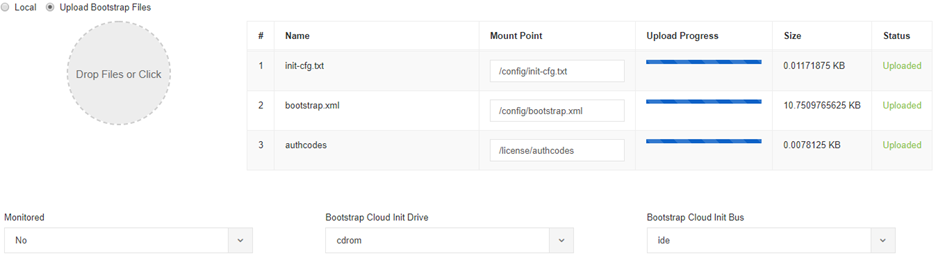
![]() Upload the bootstrap files.
Upload the bootstrap files.![]() Set the Advanced Configuration.
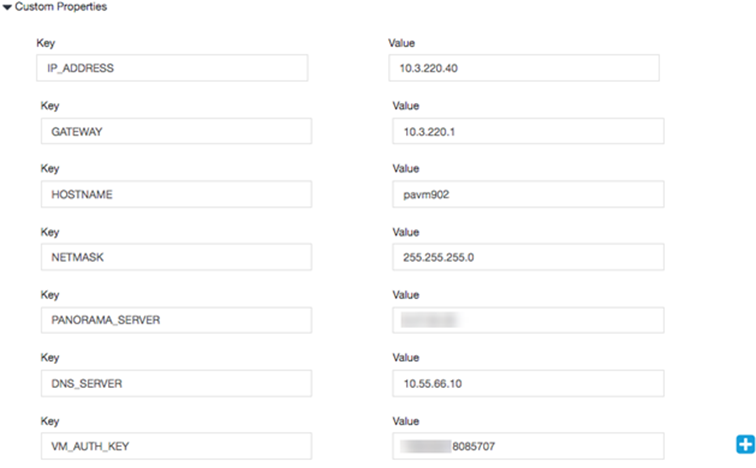
Set the Advanced Configuration.![]() Enter values for Custom Properties.
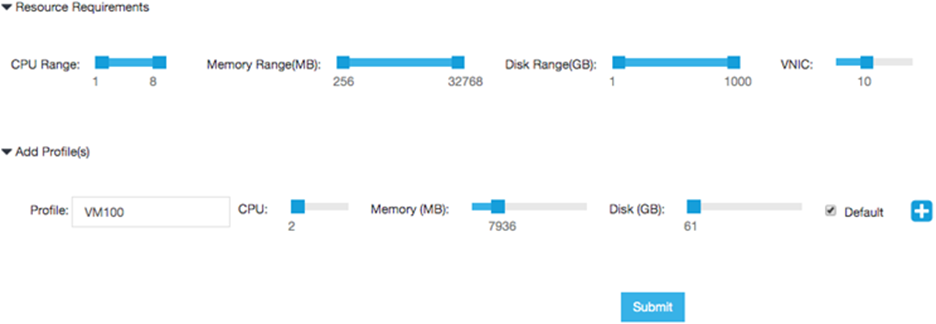
Enter values for Custom Properties.![]() Set values for your resource requirements and choose the Default profile, or add a profile for the current configuration.Click Submit to save your package.
Set values for your resource requirements and choose the Default profile, or add a profile for the current configuration.Click Submit to save your package.![]() Click Register to register the new image.
Click Register to register the new image.![]()
Convert a qcow2 File from the Command Line Interface
To create a bootstrap file from the command line interface, you create the file image_properties_template.xml then use the using the VM Image Packaging utility to create a .tar file, which you convert using the nfvpt.py script. The output is a tar.gz file that can be uploaded from the NFVIS user interface.- Create or choose a folder on your local machine (the conversion folder) in which you want to download and save the files necessary to convert the VM-Series firewall qcow2 image to the Cisco ENCS format.Obtain the VM-Series firewall qcow2 image.
- Log in to the Palo Alto Networks Customer Support Portal.If you have not already done so, create a support account and register the VM-Series firewall.Select and from the Filter By drop-down, select Pan OS for VM-Series KVM Base Image, for example, version 9.1.Download the qcow2 image to the conversion folder.Create the following init-cfg.txt file in the conversion folder.
type=static
ip-address=${IP_ADDRESS}
default-gateway=${GATEWAY}
netmask=${NETMASK}
ipv6-address=
ipv6-default-gateway=
hostname=${HOSTNAME}
vm-auth-key=${VM_AUTH_KEY}
panorama-server=${PANORAMA_SERVER}
panorama-server-2=
tplname=
dgname=
dns-primary=${DNS_SERVER}
dns-secondary=
op-command-modes=jumbo-frame, mgmt-interface-swap**
dhcp-send-hostname=yes
dhcp-send-client-id=yes
dhcp-accept-server-hostname=yes
dhcp-accept-server-domain=yes
Create a text file named authcodes (no extension), and enter the auth codes for the VM-Series firewall capacity and subscriptions. Save the file in the conversion folder.Create the following image_properties_template.xml file in the conversion folder, and supply values for your deployment:<image_properties> <vnf_type>FIREWALL</vnf_type> <name>pafw</name> <version>9.1.0</version> <bootup_time>-1</bootup_time> <root_file_disk_bus>virtio</root_file_disk_bus> <root_image_disk_format>qcow2</root_image_disk_format> <vcpu_min>2</vcpu_min> <vcpu_max>8</vcpu_max> <memory_mb_min>4096</memory_mb_min> <memory_mb_max>16384</memory_mb_max> <vnic_max>8</vnic_max> <root_disk_gb_min>32</root_disk_gb_min> <root_disk_gb_max>60</root_disk_gb_max> <console_type_serial>true</console_type_serial> <sriov_supported>true</sriov_supported> <pcie_supported>false</pcie_supported> <monitoring_supported>false</monitoring_supported> <monitoring_methods>ICMPPing</monitoring_methods> <low_latency>true</low_latency> <privileged_vm>true</privileged_vm> <custom_property> <HOSTNAME> </HOSTNAME> </custom_property> <custom_property> <IP_ADDRESS> </IP_ADDRESS> </custom_property> <custom_property> <NETMASK> </NETMASK> </custom_property> <custom_property> <GATEWAY> </GATEWAY> </custom_property> <custom_property> <PANORAMA_SERVER> </PANORAMA_SERVER> </custom_property> <custom_property> <DNS_SERVER> </DNS_SERVER> </custom_property> <custom_property> <VM_AUTH_KEY> </VM_AUTH_KEY> </custom_property> <default_profile>VM-50</default_profile> <profiles> <profile> <name>VM-50</name> <description>VM-50 profile</description> <vcpus>2</vcpus> <memory_mb>5120</memory_mb> <root_disk_mb>60000</root_disk_mb> </profile> <profile> <name>VM-100-n-200</name> <description>VM-100 and VM-200 profile</description> <vcpus>2</vcpus> <memory_mb>7168</memory_mb> <root_disk_mb>60000</root_disk_mb> </profile> <profile> <name>VM-300</name> <description>VM-300 profile</description> <vcpus>2</vcpus> <memory_mb>9216</memory_mb> <root_disk_mb>60000</root_disk_mb> </profile> <profile> <name>VM-1000-HV</name> <description>VM-1000-HV profile</description> <vcpus>4</vcpus> <memory_mb>9216</memory_mb> <root_disk_mb>60000</root_disk_mb> </profile> <profile> <name>VM-500</name> <description>VM-500 profile</description> <vcpus>4</vcpus> <memory_mb>16384</memory_mb> <root_disk_mb>60000</root_disk_mb> </profile> </profiles> <cdrom>true</cdrom> <bootstrap_file_1>/config/init-cfg.txt</bootstrap_file_1> <bootstrap_file_2>/config/bootstrap.xml</bootstrap_file_2> <bootstrap_file_3>/license/authcodes</bootstrap_file_3> </image_properties>Download the image packaging utility.- Log in to the Enterprise NFVIS user interface and select .Click the Browse Datastore tab, and navigate to .Download nfvisvmpackagingtool.tar to the conversion folder.Untar the file:
tar -xvf nfvisvmpackagingtool.tar
In the conversion folder that contains the qcow2, the init-config.txt and the authcodes file, run the nfvpt.py script. See the nfvpt.py image packaging utility documentation.The following sample creates the image file Palo-Alto-9.1.0, and a VM-100 profile. Options are space-separated (the sample shows options on separate lines for clarity only) and custom options are key-value pairs with a colon separator../nfvpt.py -o Palo-Alto-9.1.0 -i PA-VM-KVM-9.1.0.qcow2 -n PAN902 -t FIREWALL -r 9.1.0 --monitored false --privileged true --bootstrap /config/init-cfg.txt:init-cfg.txt,/license/authcodes:authcodes --min_vcpu 2 --max_vcpu 8 --min_mem 4096 --max_mem 16384 --min_disk 10 --max_disk 70 --vnic_max 8 --optimize true --console_type_serial true --profile VM-100,"VM-100 profile",2,7168,61440 --default_profile VM-100 --custom HOSTNAME:hello --custom IP_ADDRESS:10.2.218.24 --custom NETMASK:255.255.255.0 --custom GATEWAY:10.2.218.1 --custom DNS_SERVER:10.55.66.10 --custom PANORAMA_SERVER:0.10.10.0 --custom VM_AUTH_KEY:123451234512345
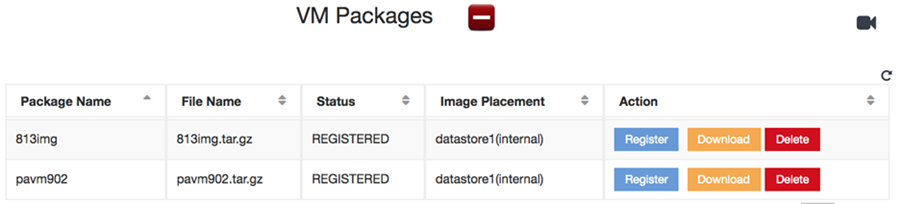
Upload the converted image.- In the NFVIS user interface, select and click the blue Images icon to show the Drop Files or Click circle.Drag the converted file into the circle, or click to browse and select your file.In the Status column, click Start.When the upload is complete, the image is registered, and the file you uploaded displays in the Image Registration tab Images list.