Set up the VM-Series firewall on Azure in a high availability
set up using the VM-Series plugin.
You can configure a pair of VM-Series firewalls
on Azure in an active/passive high availability (HA) configuration.
For HA on Azure, you must deploy both firewall HA peers within the
same Azure Resource Group and you must install the same version
of the VM-Series Plugin on both HA
peers.
Set up Active/Passive HA on Azure (North-South & East-West Traffic)—If you have
an internet-facing application deployed on your Azure infrastructure,
and you need to secure north-south traffic, you require a floating
IP address to secure traffic on failover. This floating IP address,
which enables external connectivity, is always attached to the active
peer. On failover, the process of detaching the IP address and reattaching
it to the now active peer can take a few minutes.
Set up Active/Passive HA on Azure (East-West Traffic Only)—If your application
access and security requirements are contained within the Azure
infrastructure and you need to secure east-west traffic only, you
do not need a floating IP address. Instead, the HA implementation
automatically reconfigures the UDRs in the Azure routing tables
to provide a faster failover time.
All VM-Series firewall interfaces must be assigned an
IPv4 address when deployed in a public cloud environment.
To
enable HA on the VM-Series firewall on Azure, you must create an
Azure Active Directory application and Service Principal that includes the
permissions listed in the table below.
The
following permissions are required only if you have assigned a public
IP address to any of your data interfaces. Standard SKU interface
is recommended.
The
following permissions are required only if you have assigned a public
IP address to any of your data interfaces. Standard SKU interface
is recommended.
Set up Active/Passive HA on Azure (North-South & East-West
Traffic)
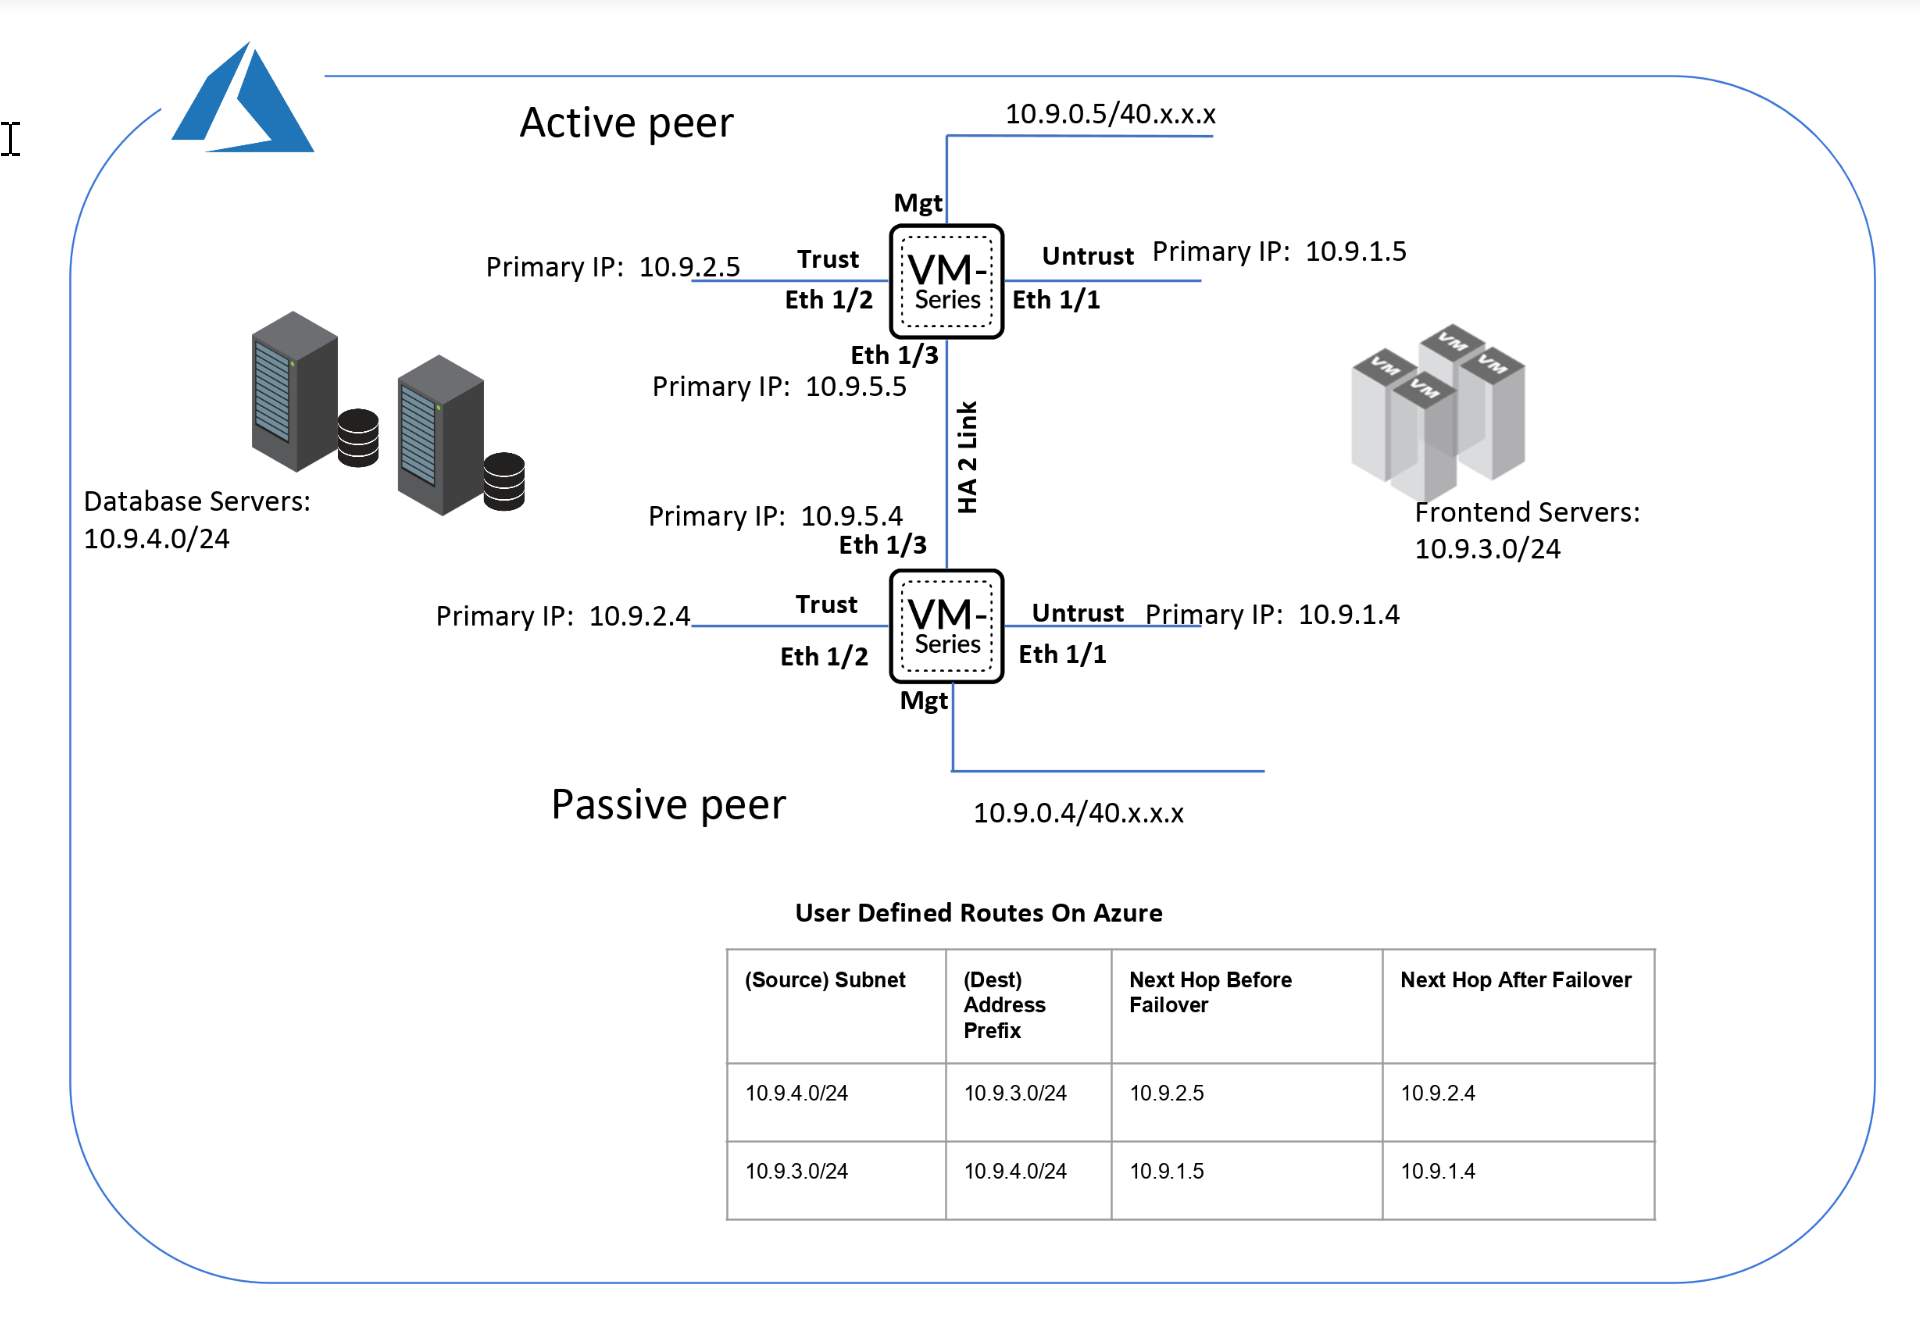
If you want to secure north-south traffic
to your applications in your Azure infrastructure, use this workflow
with floating IP addresses that can quickly move from one peer to
the other. Because you cannot move the IP address associated with
the primary interface of the firewall on Azure, you need to assign
a secondary IP address that can function as a floating IP address.
When the active firewall goes down, the floating IP address moves
from the active to the passive firewall so that the passive firewall
can seamlessly secure traffic as soon as it becomes the active peer.
In addition to the floating IP address, the HA peers also need HA links—a control link
(HA1) and a data link (HA2)—to synchronize data and maintain state
information.
Gather the following details for configuring
HA on the VM-Series firewalls on Azure.
Set up the Active Directory application
and a Service Principal to enable programmatic
API access.
For the firewall to interact with the Azure APIs,
you need to create an Azure Active Directory Service Principal.
This Service Principle has the permissions required to authenticate
to the Azure AD and access the resources within your subscription.To
complete this set up, you must have permissions to register an application
with your Azure AD tenant, and assign the application to a role
in your subscription. If you don't have the necessary permissions,
ask your Azure AD or subscription administrator to create a Service
Principal. See the table above for the required permissions. Copy
the following details for use later in this workflow:
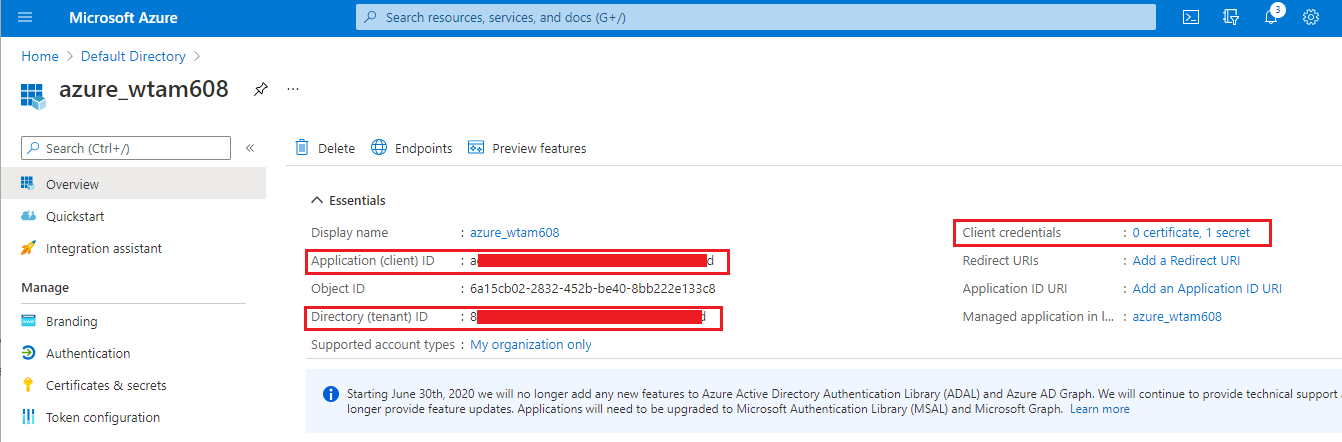
Client
ID—The Application ID associated with the Active Directory (On
the Azure portal, click HomeAzure Active DirectoryApp registrations,
select your application and copy the ID).
Tenant ID—The Directory ID associated with the Active
Directory (On the Azure portal, click HomeAzure Active DirectoryPropertiesDirectory ID, select the application
and copy the ID).
Azure Subscription ID—The Azure subscription in which
you have deployed the firewalls. You must login to your Azure portal
to get this subscription ID.
Resource Group Name— The resource group name in which
you have deployed the firewalls that you want to configure as HA
peers. Both firewalls must be in the same resource group.
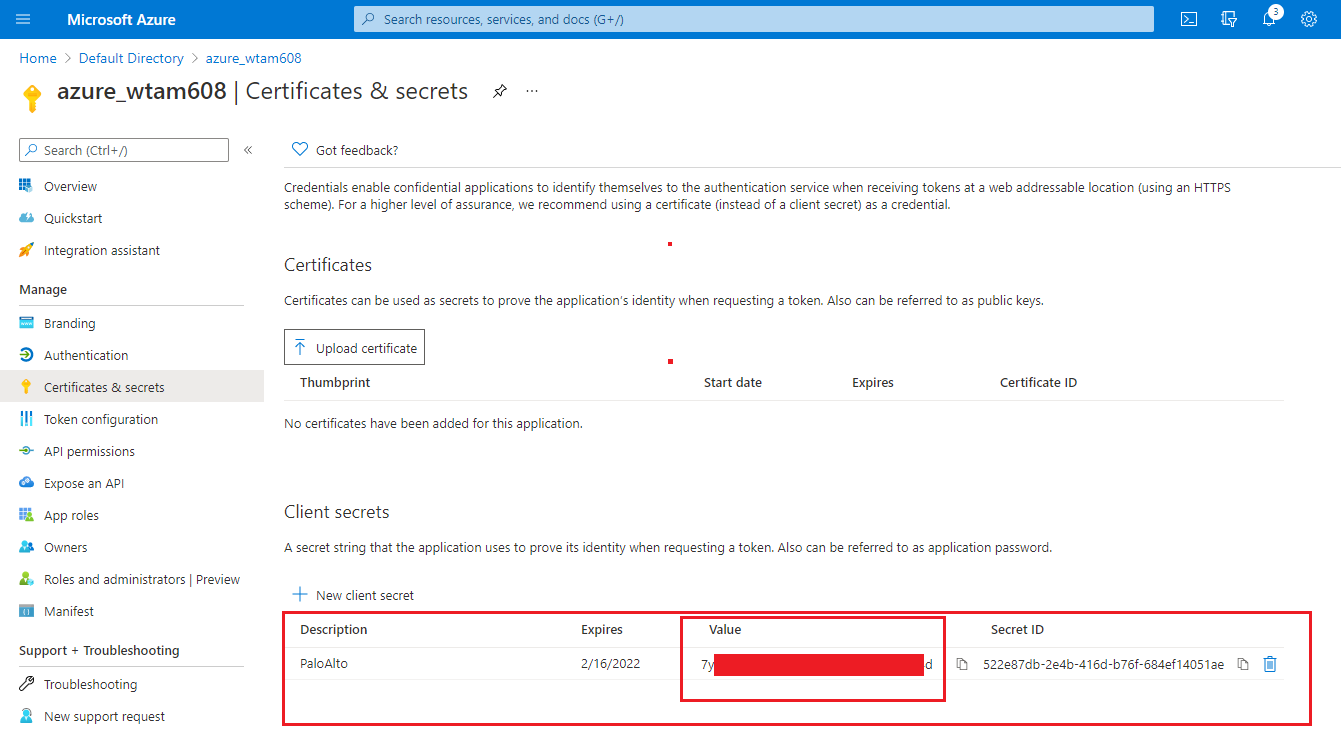
Secret Key—The authentication key associated with
the Active Directory application (On the Azure portal, click HomeAzure Active DirectoryCertificates & secrets,
copy the Value under Client secrets.
If you do not have a Secret Key, create one first, then copy the
value). To log in as the application, you must provide both the
key value and the Application ID.
Know where to get the templates you need to deploy the
VM-Series firewalls within the same Azure Resource Group.
For an HA configuration, both HA peers must belong to the
same Azure Resource Group. If you deploy the first instance of the
firewall from the Azure Marketplace, and must use your custom ARM
template or the Palo Alto Networks sample GitHub template
for deploying the second instance of the firewall into the existing
Resource Group. The reason you need a custom template or the Palo
Alto Networks sample template is because Azure does not support
the ability to deploy the firewall in to an Resource Group that
is not empty.
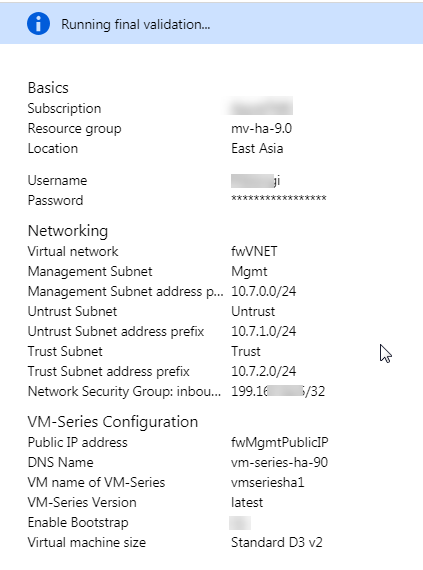
Copy the deployment information for
the first firewall instance. For example:
Match the VM Name of VM-Series firewall
as shown in the screenshot above with the Hostname on
the firewall web interface. You must add the same name on DeviceSetupManagement,
because the hostname of the firewall is used to trigger failover.
Plan the network interface configuration on the VM-Series
firewalls on Azure.
To set up HA, you must deploy both HA peers within the
same Azure Resource Group and both firewalls must have the same
number of network interfaces. A minimum of four network interfaces
is required on each HA peer:
Management interface
(eth0)—Private and public IP address associated with the primary
interface. The public IP address enables access to the firewall
web interface and SSH access.
You can use the private IP
interface on the management interface as the HA1 peer IP address
for the control link communication between the active/passive HA
peers. If you want a dedicated HA1 interface, you must attach an
additional network interface on each firewall, and this means that
you need five interfaces on each firewall.
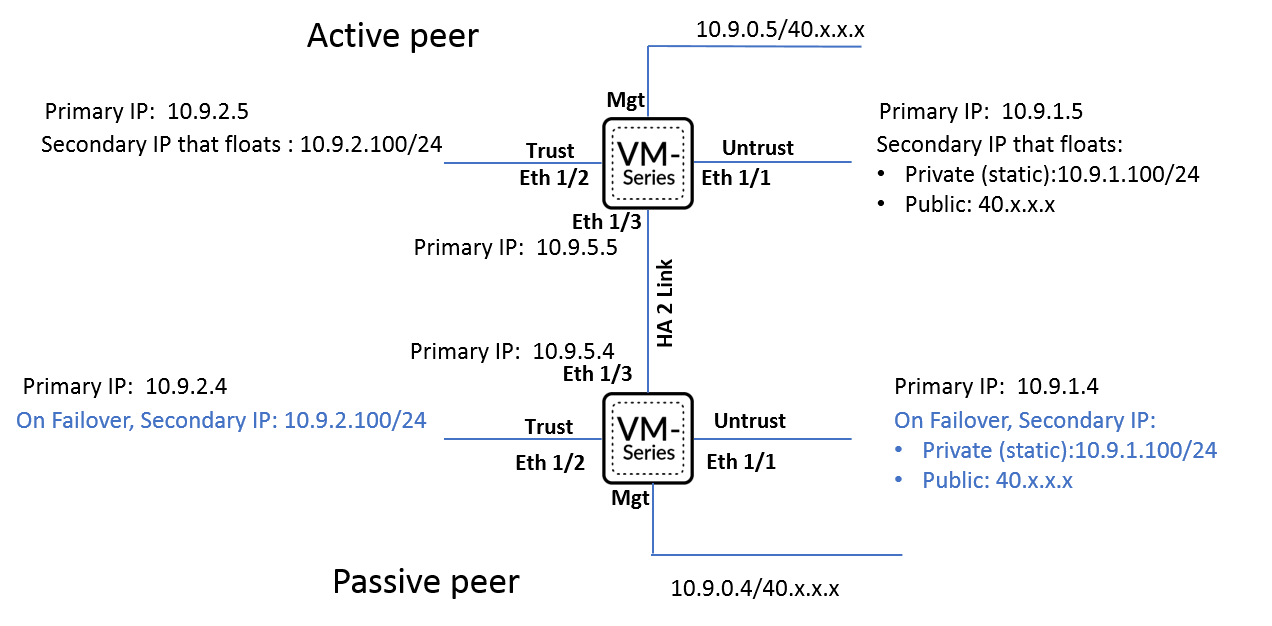
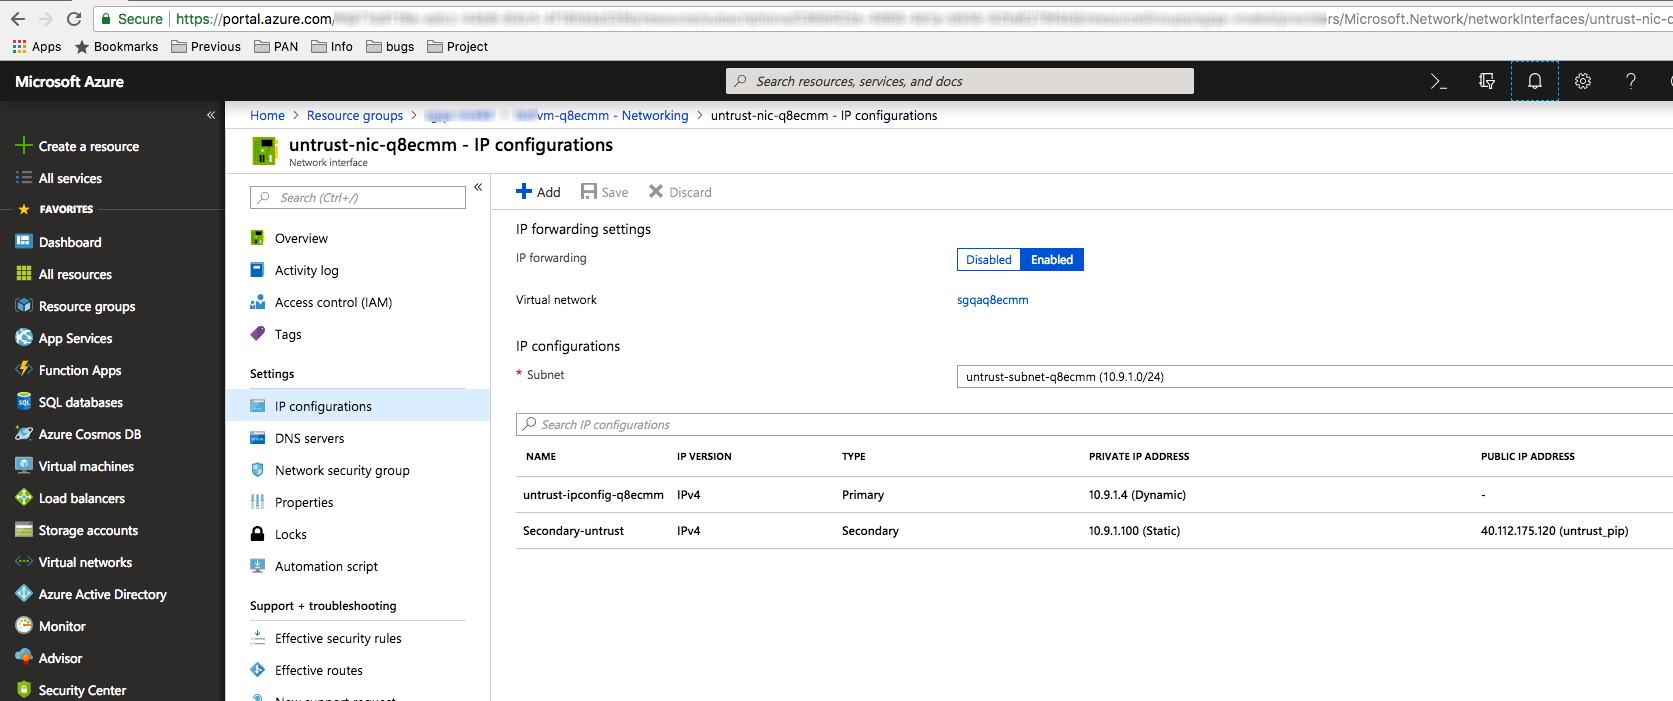
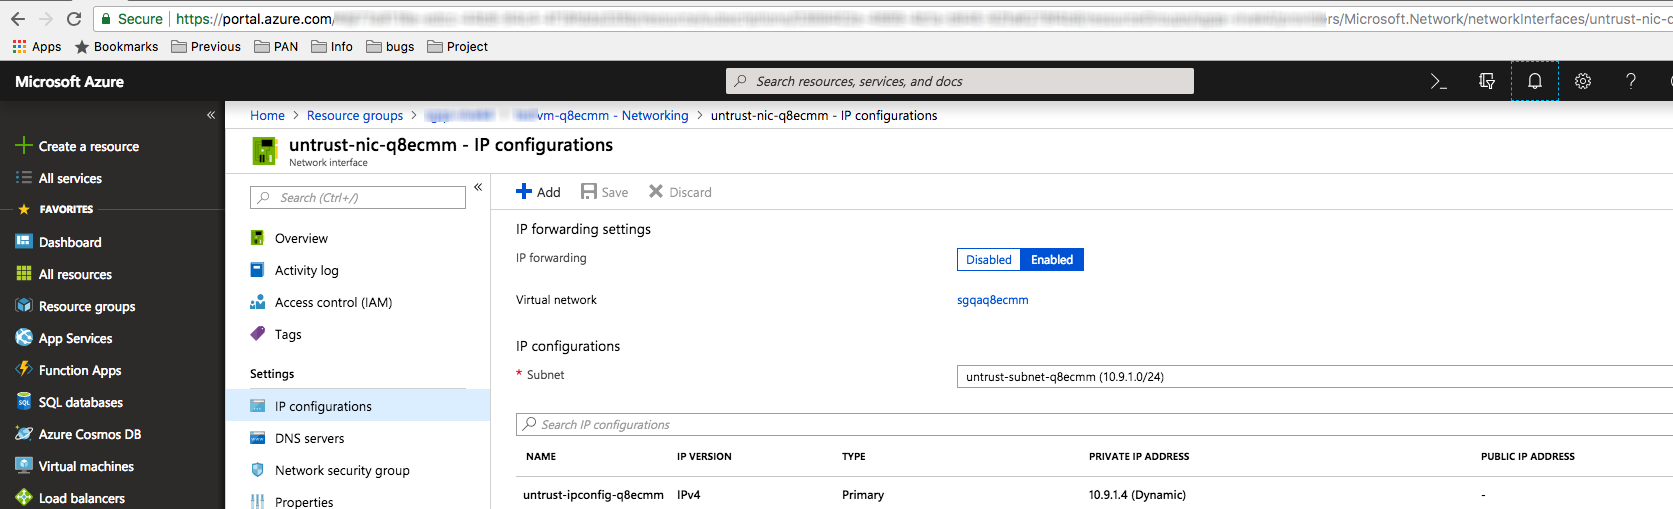
Untrust interface (eth1/1)—Primary private IP address
with /32 netmask, and secondary IP configuration with both a private
IP address (any netmask) and a public IP address.
On failover,
when the passive peer transitions to the active state, the public
IP address associated with the secondary IP configuration is detached
from the previously active peer and attached to the now active HA
peer.
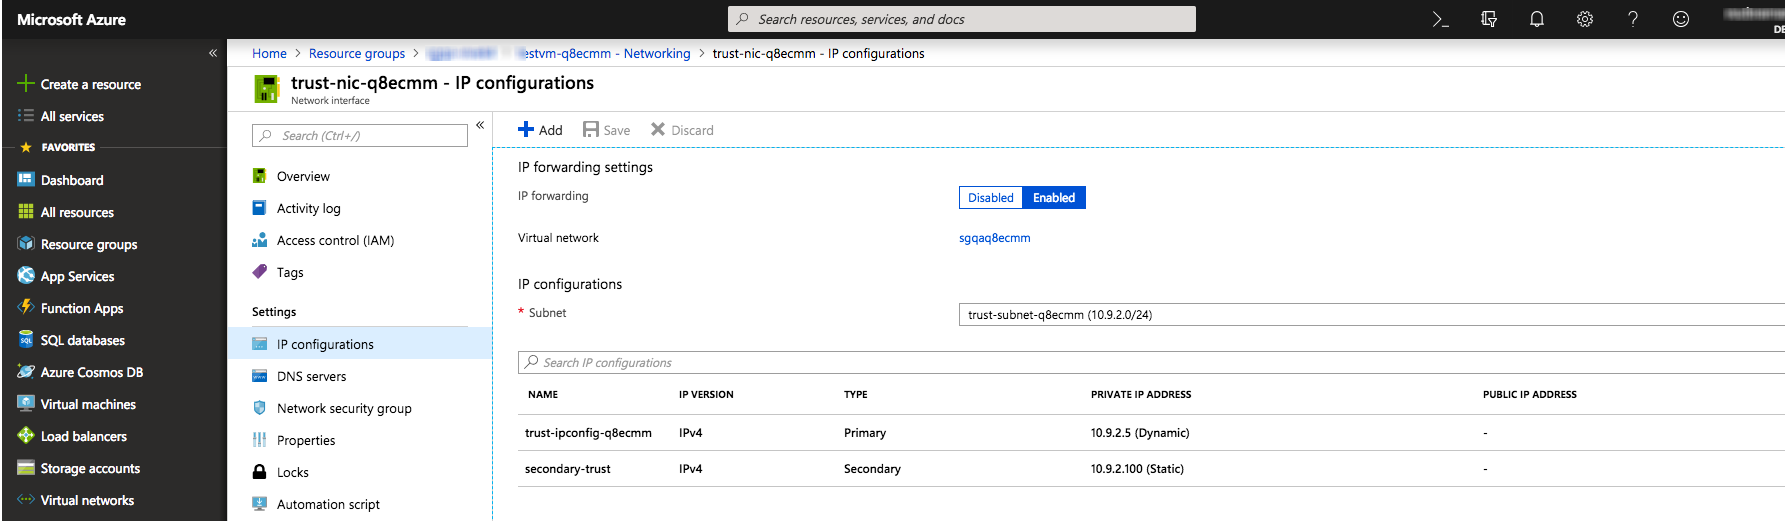
Trust interface (eth1/2)—Primary and secondary private
IP addresses. On failover, when the passive peer transitions to
the active state, the secondary private IP address is detached from
the previously active peer and is attached to the now active HA
peer.
HA2 (eth 1/3)—Primary private IP address. The HA2
interface is the data link that the HA peers use for synchronizing
sessions, forwarding tables, IPSec security associations and ARP
tables.
Interface
Active firewall peer
Passive firewall peer
Description
Trust
Secondary IP address
—
The trust interface of the active peer requires
a secondary IP configuration that can float to the other peer on
failover. This secondary IP configuration on the trust interface
must be a private IP address with the netmask of the servers that
it secures. On failover, the VM-Series plugin calls the Azure API
to detach this secondary private IP address from the active peer
and attach it to the passive peer. Attaching this IP address to
the now active peer ensures that the firewall can receive traffic
on the floating IP on the untrust interface and send it through
to the floating IP on the trust interface and on to the workloads.
Untrust
Secondary IP address
—
The untrust interface of the firewall requires
a secondary IP configuration that includes a static private IP address
with a netmask for the untrust subnet, and a public IP address for
accessing the back-end servers or workloads over the internet. On
failover, the VM-Series plugin calls the Azure API to detach the
secondary IP configuration from the active peer and attach it to
the passive peer before it transitions to the active state. This
process of floating the secondary IP configuration, enables the now
active firewall to continue processing inbound traffic that is destined
to the workloads.
HA2
Add a NIC to the firewall from the Azure management console.
Add a NIC to the firewall from the Azure management console.
On the active and passive peers, add a dedicated HA2
link to enable session synchronization.
The default interface
for HA1 is the management interface, and you can opt to use the
management interface instead of adding an additional interface to
the firewall. For enabling data flow over the HA2 link, you need
to add an additional network interface on the Azure portal and configure
the interface for HA2 on the firewall.
Configure Active/Passive HA on the VM-Series Firewall on
Azure
In this workflow, you deploy the first instance
of the VM-Series firewall using the VM-Series firewall solution
template in the Azure marketplace, and the second instance of the
firewall using the sample GitHub template.
The
authentication key (client secret) associated with the Active Directory
application required for setting up the VM-Series firewall in an
HA configuration, is encrypted with VM-Series plugin version 1.0.4
on the firewall and on Panorama. Because the key is encrypted in VM-Series
plugin version 1.0.4, you must install the same version of the plugin
on Panorama and the managed VM-Series firewalls in order to centrally
manage the firewalls from Panorama.
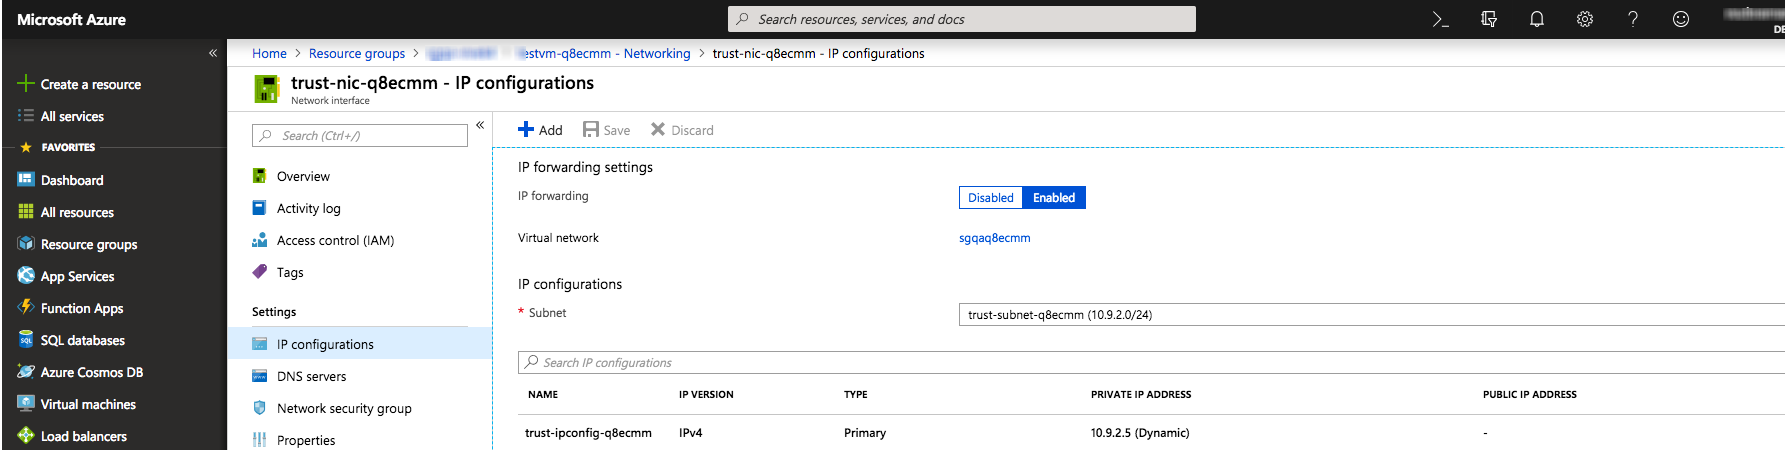
Add a secondary IP configuration to the untrust
interface of the firewall.
You
must attach the secondary IP configuration—with a private IP address
(any netmask) and a public IP address—to the firewall that will
be designated as the active peer. The secondary IP configuration
always stays with the active HA peer, and moves from one peer to
the another when a failover occurs.
In this workflow, this
firewall will be designated as the active peer. The active HA peer
has a lower numerical value for device priority that you configure
as a part of the HA configuration on the firewall, and this value
indicates a preference for which firewall assumes the role of the
active peer.
Add a secondary IP configuration to the trust interface of
the firewall.
The
secondary IP configuration for the trust interface requires a static
private IP address only. This IP address moves from the active firewall to
the passive firewall on failover so that traffic flows through from
the untrust to the trust interface and to the destination subnets
that the firewall secures.
Attach a network interface for the HA2 communication between
the firewall HA peers.
Add a subnet within the virtual
network.
Create and attach a network interface
to the firewall.
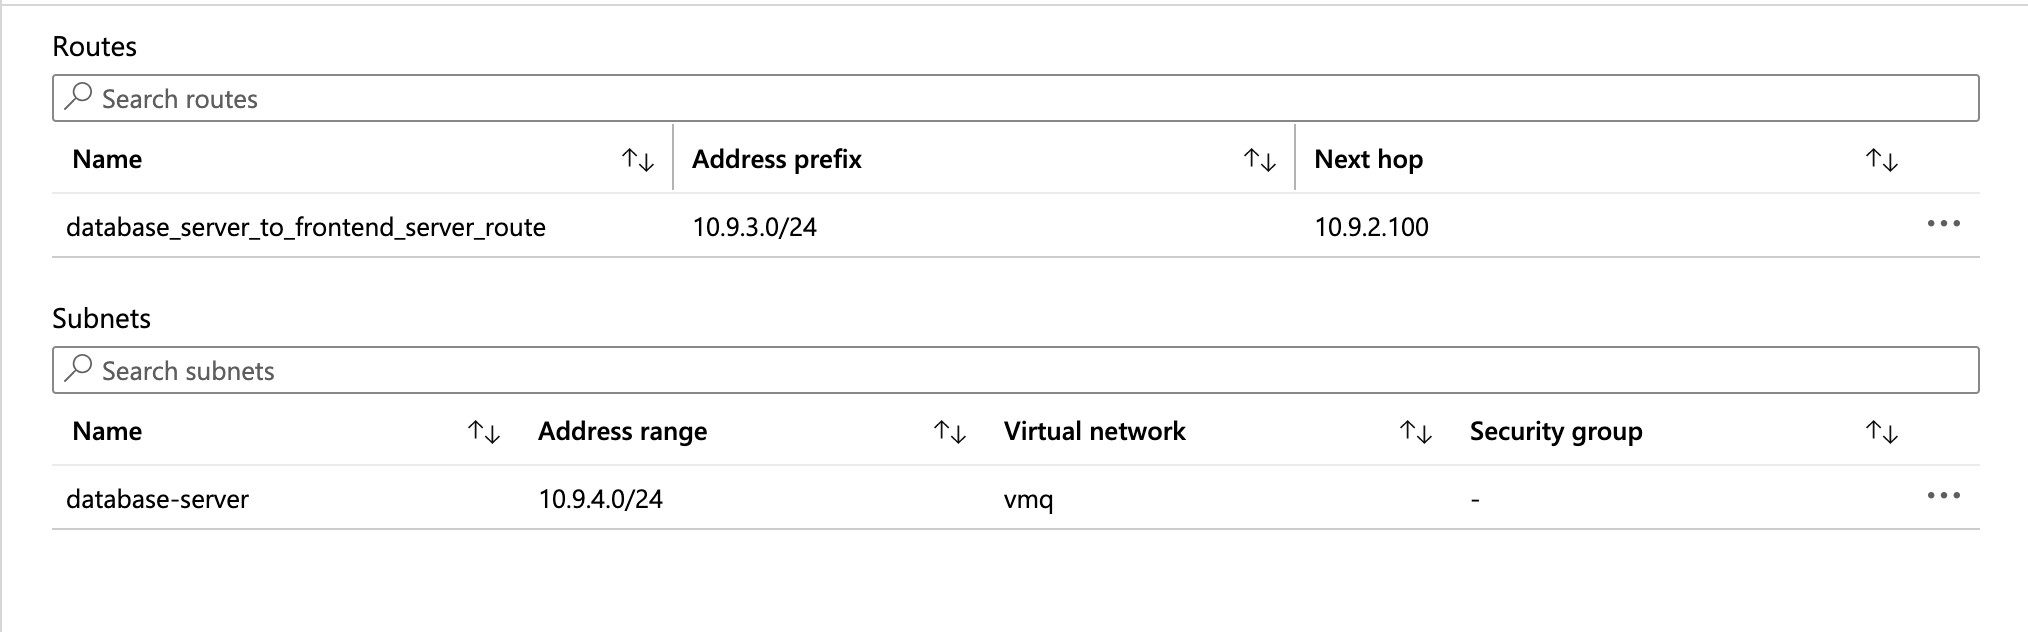
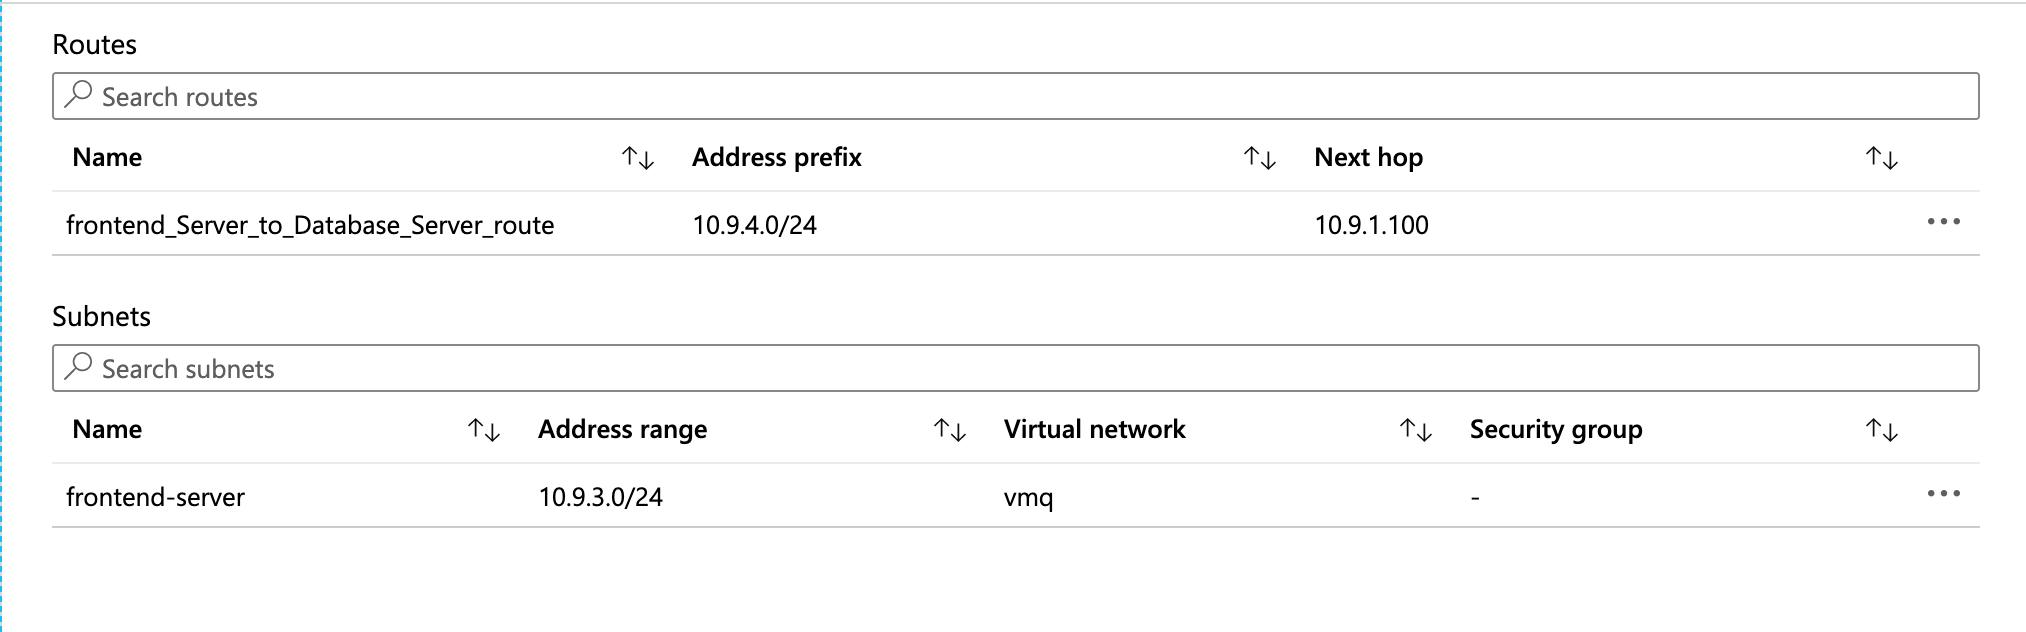
Set up your route table on Azure.
Your next hop should
point to the floating IP address as shown here:
Configure
the interfaces on the firewall.
Complete these steps on the active HA peer, before you
deploy and set up the passive HA peer.
Log in to the firewall web interface.
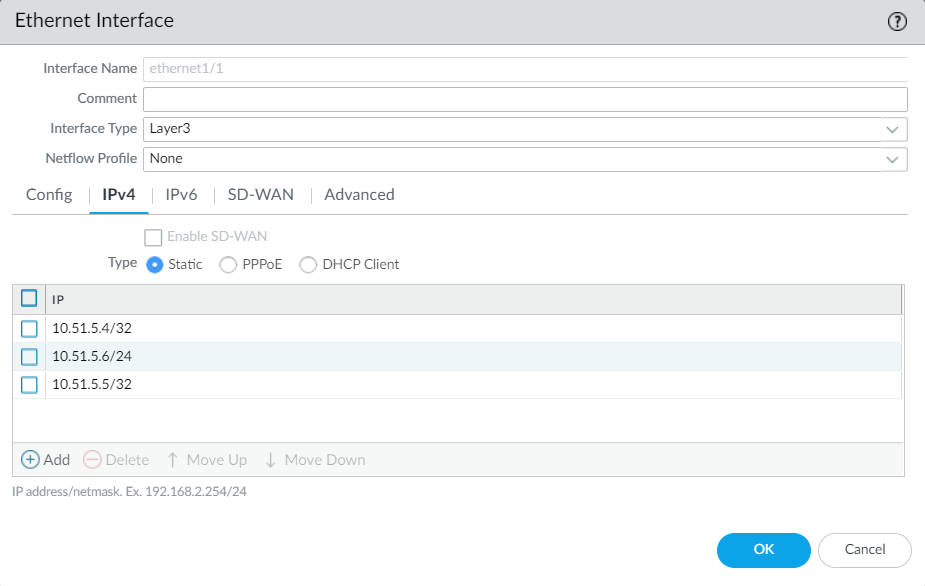
Configure ethernet 1/1 as the untrust interface and
ethernet 1/2 as the trust interface.
Select NetworkInterfaces and
configure as follows:
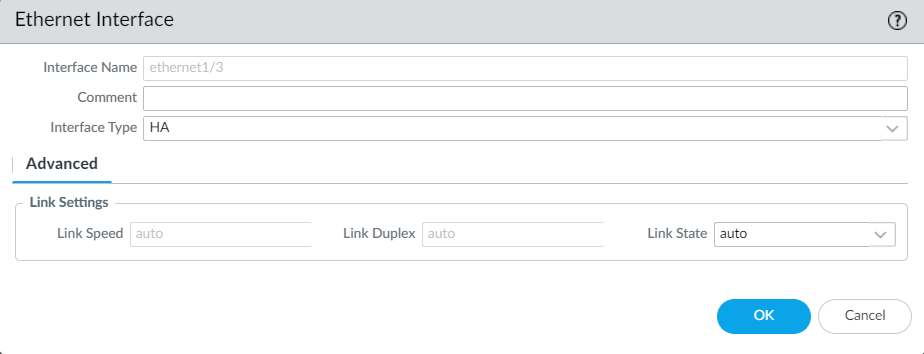
Configure ethernet 1/3 as the HA interface.
To set up the HA2 link, select the interface and set Interface
Type to HA. Set link speed and
duplex to auto.
Configure
the VM-Series plugin to authenticate to the Azure resource group
in which you have deployed the firewall.
Set up the Azure HA configuration on the VM-Series plugin.
To
encrypt the client secret, use the VM-Series plugin version 1.0.4
or later. If using Panorama to manage your firewalls, you must install
the VM-Series plugin version 1.0.4 or later.
Select DeviceVM-Series to
enable programmatic access between the firewall plugin and the Azure
resources.
Enter the Client ID. The client ID
is the Application ID associated with your Azure Active Directory
application.
Enter the Client Secret and re-enter
it to confirm.
Enter the Tenant ID. The tenant ID
is the Directory ID you saved when you set up the Active Directory
application.
Enter the Subscription ID for the
Azure subscription you want to monitor.
Enter the Resource Group name.
(For Azure Stack deployments only) Enter the Resource
Mgr Endpoint URL. This field is mandatory ONLY for Azure
Stack deployments. Do not enter a value for this field if you are
using a regular Azure Cloud deployment; HA failover will not succeed
if you specify the Resource Mgr Endpoint URL
for a regular Azure Cloud deployment.
This field is
available in VM-Series plugin 2.1.2 and later.
Click Validate to verify that the
keys and IDs you entered are valid, and that VM-Series plugin can
successfully communicate with the Azure resources using the API.
Enable
HA.
Select DeviceSetupHA.
Enter Peer HA1 IP address as the private
IP address of the passive peer.
(Optional) Edit the Control Link (HA1). If you do not plan
to use the management interface for the control link and have added
an additional interface (for example ethernet 1/4), edit this section
to select the interface to use for HA1 communication.
Edit the Data Link (HA2) to use Port ethernet
1/3 and add the IP address of this peer and the Gateway IP
address for the subnet.
Commit the changes.
Set up the passive HA peer within the same Azure Resource
Group.
Deploy the second instance of the firewall.
Download the custom template and parameters file
from GitHub.
Log in to the Azure Portal.
Search for custom template and select Deploy
from a custom template.
Select Build your own template in
the editorLoad file.
Select the azuredeploy.json that you
downloaded earlier, and Save.
Complete the inputs, agree to the terms and Purchase.
Make
sure to match the following inputs to that of the firewall instance
you have already deployed— Azure subscription, name of the Resource
Group, location of the Resource Group, name of the existing VNet
into which you want to deploy the firewall, VNet CIDR, Subnet names,
Subnet CIDRs, and start the IP address for the management, trust
and untrust subnets.
Repeat Step 1and Step 2to set
up the interfaces and configure the firewall as the passive HA peer.
After you finish configuring both firewalls, verify that
the firewalls are paired in active/passive HA.
Access the Dashboard on
both firewalls, and view the High Availability widget.
On the active firewall, click the Sync to peer link.
Confirm that the firewalls are paired and synced, as shown
as follows:
On the passive firewall: the state of
the local firewall should display passive and
the Running Config should show as synchronized.
On the active firewall: The state of the local firewall should
display active and the Running
Config should show as synchronized.
On the passive peer, verify that the VM-Series plugin configuration
is now synced.
Select DeviceVM-Series and validate that
you can view the Azure HA configuration that you had omitted configuring
on the passive peer.
Set up Active/Passive HA on Azure (East-West Traffic Only)
If your resources are all deployed within
the Azure infrastructure and you do not need to enforce security
for north south traffic to the Azure VNet, you can deploy a pair
of VM-Series firewalls in an active/passive high availability (HA)
configuration without floating IP addresses. The HA peers will still
need HA links—a control link
(HA1) and a data link (HA2)—to synchronize data and maintain state
information.
You must have the VM-Series Plugin version
1.0.9 or later, and you must deploy both firewall HA peers within
the same Azure Resource Group.
Gather the following details for configuring
HA on the VM-Series firewalls on Azure.
Set up the Active Directory application
and a Service Principal to enable programmatic
API access.
For the firewall to interact with the Azure APIs,
you need to create an Azure Active Directory Service Principal.
This Service Principle has the permissions required to authenticate
to the Azure AD and access the resources within your subscription.To
complete this set up, you must have permissions to register an application
with your Azure AD tenant, and assign the application to a role
in your subscription. If you don't have the necessary permissions,
ask your Azure AD or subscription administrator to create a Service
Principal. See the table above for the required permissions. Copy
the following details for use later in this workflow:
Client
ID—The Application ID associated with the Active Directory (On
the Azure portal, click HomeAzure Active DirectoryApp registrations,
select your application and copy the ID).
Tenant ID—The Directory ID associated with the Active
Directory (On the Azure portal, click HomeAzure Active DirectoryPropertiesDirectory ID, select the application
and copy the ID).
Azure Subscription ID—The Azure subscription in which
you have deployed the firewalls. You must login to your Azure portal
to get this subscription ID.
Resource Group Name— The resource group name in which
you have deployed the firewalls that you want to configure as HA
peers. Both firewalls must be in the same resource group.
Secret Key—The authentication key associated with
the Active Directory application (On the Azure portal, click HomeAzure Active DirectoryCertificates & secrets,
copy the Value under Client secrets.
If you do not have a Secret Key, create one first, then copy the
value). To log in as the application, you must provide both the
key value and the Application ID.
Know where to get the templates you need to deploy the
VM-Series firewalls within the same Azure Resource Group.
For an HA configuration, both HA peers must belong to the
same Azure Resource Group. If you deploy the first instance of the
firewall from the Azure Marketplace, and must use your custom ARM
template or the Palo Alto Networks sample GitHub template
for deploying the second instance of the firewall into the existing
Resource Group. The reason you need a custom template or the Palo
Alto Networks sample template is because Azure does not support
the ability to deploy the firewall in to an Resource Group that
is not empty.
Copy the deployment information for
the first firewall instance. For example:
Match the VM Name of VM-Series firewall
as shown in the screenshot above with the Hostname on
the firewall web interface. You must add the same name on DeviceSetupManagement,
because the hostname of the firewall is used to trigger failover.
Plan the network interface configuration on the VM-Series
firewalls on Azure.
To set up HA, you must deploy both HA peers within the
same Azure Resource Group and both firewalls must have the same
number of network interfaces. A minimum of four network interfaces
is required on each HA peer:
Management interface
(eth0)—Private and public IP address associated with the primary
interface. The public IP address enables access to the firewall
web interface and SSH access.
You can use the private IP
interface on the management interface as the HA1 peer IP address
for the control link communication between the active/passive HA
peers. If you want a dedicated HA1 interface, you must attach an
additional network interface on each firewall, and this means that
you need five interfaces on each firewall.
Untrust interface (eth1/1)—Primary private IP address
with /32 netmask.
On failover, when the passive peer transitions
to the active state, the VM-Series plugin automatically sends traffic
to the primary private IP address of the passive peer. The Azure
UDRs enable the traffic flow.
Trust interface (eth1/2)—Primary private IP address.
On failover, when the passive peer transitions to the active state,
the VM-Series plugin automatically sends traffic to the primary
private IP address of the passive peer.
HA2 (eth 1/3)—Primary private IP address. The HA2
interface is the data link that the HA peers use for synchronizing
sessions, forwarding tables, IPSec security associations and ARP
tables.
Interface
Active firewall peer
Passive firewall peer
Description
HA2
Add a NIC to the firewall from the Azure management
console.
Add a NIC to the firewall from the Azure management console.
On the active and passive peers, add a dedicated
HA2 link to enable session synchronization.
The default interface for
HA1 is the management interface, and you can opt to use the management interface
instead of adding an additional interface to the firewall. For enabling
data flow over the HA2 link, you need to add an additional network interface
on the Azure portal and configure the interface for HA2 on the firewall.
Configure Active/Passive HA on the VM-Series Firewall on
Azure
In this workflow, you deploy the first instance
of the VM-Series firewall using the VM-Series firewall solution
template in the Azure marketplace, and the second instance of the
firewall using the sample GitHub template.
The
authentication key (client secret) associated with the Active Directory
application required for setting up the VM-Series firewall in an
HA configuration, is encrypted with VM-Series plugin version 1.0.9
on the firewall and on Panorama. Because the key is encrypted in VM-Series
plugin version 1.0.9, you must install the same version of the plugin
on Panorama and the managed VM-Series firewalls in order to centrally
manage the firewalls from Panorama.
For securing east west traffic within an Azure VNet, you only
need a primary IP address for the trust and untrust firewall interfaces.
When a failover occurs, the UDR changes and the route points to
the primary IP address of the peer that transitions to the active
state.
Add a Primary IP configuration to the trust interface
of the active firewall peer.
In this workflow, this firewall
will be designated as the active peer. The active HA peer has a
lower numerical value for device priority that you configure
as a part of the HA configuration on the firewall, and this value
indicates a preference for which firewall assumes the role of the
active peer.
Add a Primary IP configuration to the untrust interface of
the active firewall peer.
Attach a network interface for the HA2 communication between
the firewall HA peers.
Add a subnet within the virtual
network.
Create and attach a network interface
to the firewall.
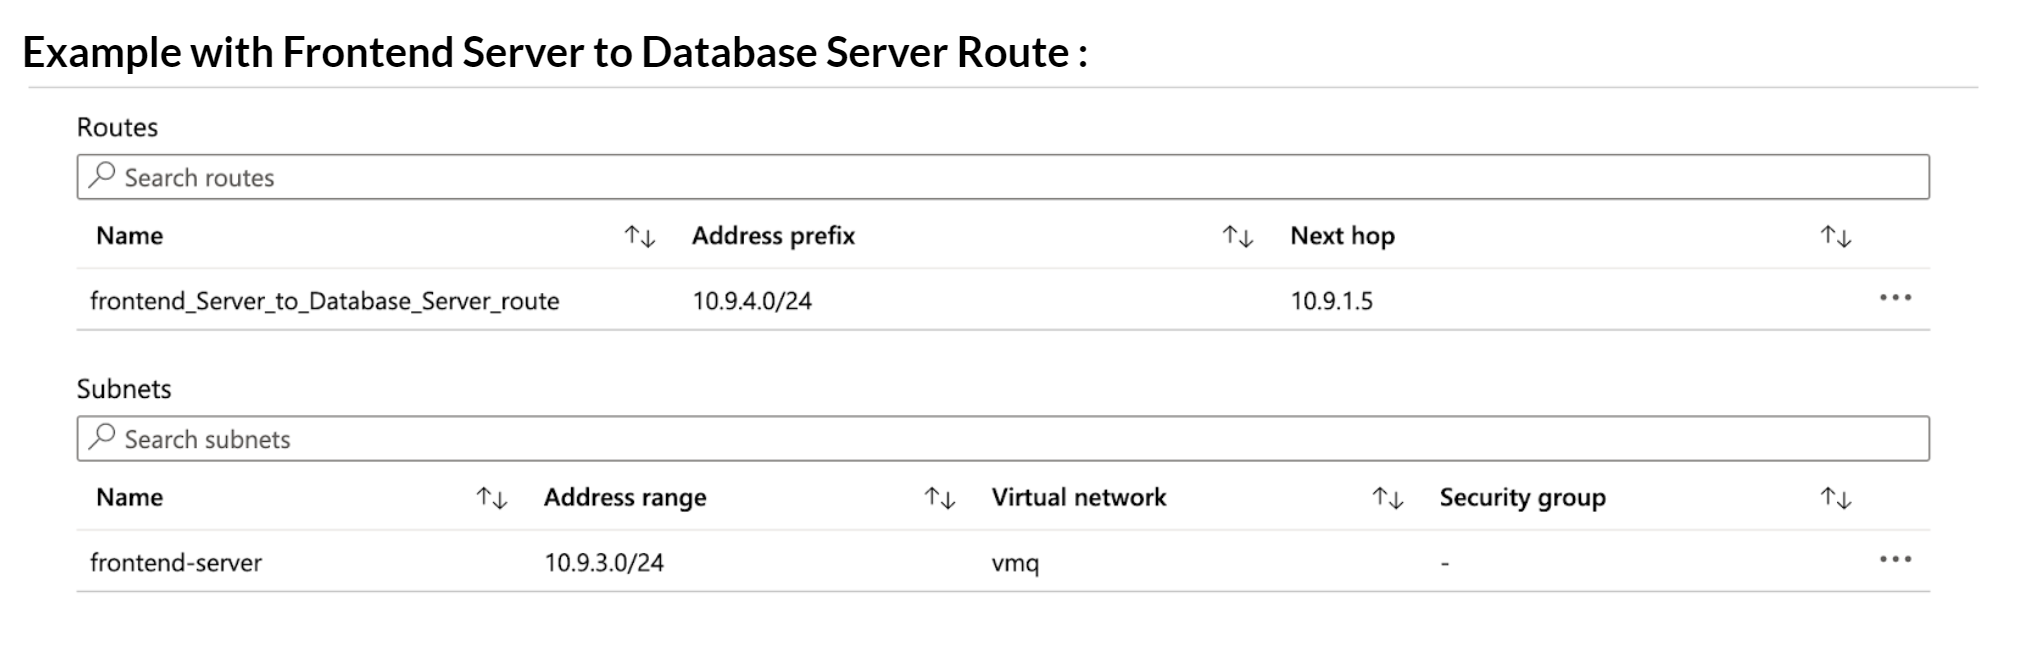
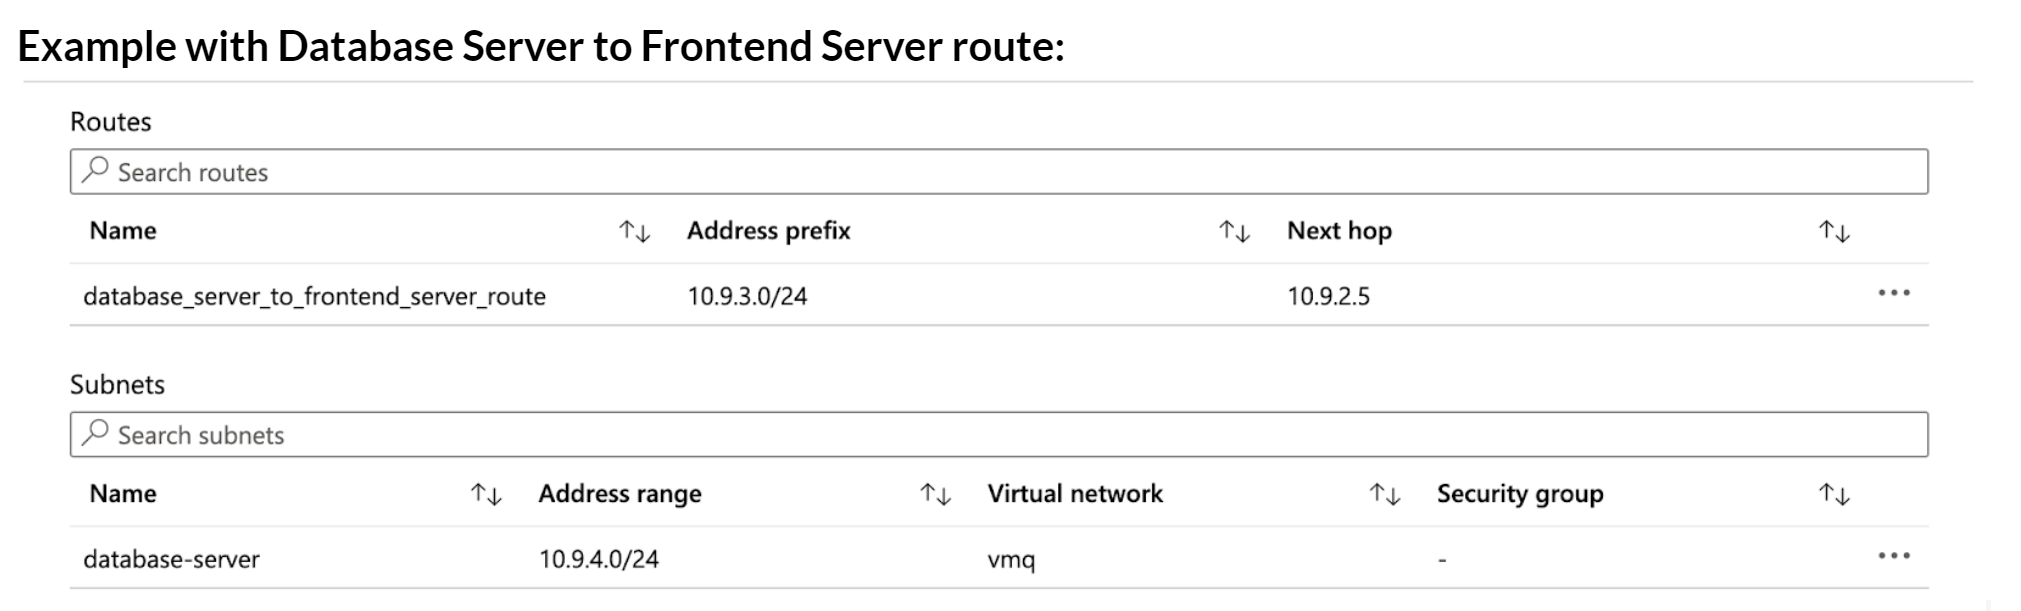
Set up your route table on Azure.
Create a route to
the Next hop of Primary IP address of the trust and untrust interfaces
of the active firewall peer.
After
failover, the next hop for the Database server to Frontend server
route will change from 10.9.2.5 to 10.9.2.4. Similarly, the next
hop of Frontend server to Database server route will change from
10.9.1.5 to 10.9.1.4.
Configure the interfaces on the firewall.
Complete these steps on the active HA peer, before you deploy
and set up the passive HA peer.
Log in to the firewall web interface.
Configure ethernet 1/1 as the untrust interface and
ethernet 1/2 as the untrust interface.
Select NetworkInterfaces and
configure as follows:
Configure ethernet 1/3 as the HA interface.
To set up the HA2 link, select the interface and set Interface
Type to HA. Set link speed and
duplex to auto.
Configure the VM-Series plugin to authenticate to the
Azure resource group in which you have deployed the firewall.
Set up the Azure HA configuration on the VM-Series plugin.
To
encrypt the client secret, use the VM-Series plugin version 1.0.4
or later. If using Panorama to manage your firewalls, you must install
the VM-Series plugin version 1.0.4 or later.
Select DeviceVM-Series to
enable programmatic access between the firewall plugin and the Azure
resources.
Enter the Client ID. The client ID
is the Application ID associated with your Azure Active Directory
application.
Enter the Client Secret and re-enter
it to confirm.
Enter the Tenant ID. The tenant ID
is the Directory ID you saved when you set up the Active Directory
application.
Enter the Subscription ID for the
Azure subscription you want to monitor.
Enter the Resource Group name.
(For Azure Stack deployments only) Enter the Resource
Mgr Endpoint URL.
This field is available
in VM-Series plugin 2.1.2 and later.
Click Validate to verify that the
keys and IDs you entered are valid, and that VM-Series plugin can
successfully communicate with the Azure resources using the API.
Enable HA.
Select DeviceSetupHA.
Enter Peer HA1 IP address as the private
IP address of the passive peer.
(Optional) Edit the Control Link (HA1). If you do not plan
to use the management interface for the control link and have added
an additional interface (for example ethernet 1/4), edit this section
to select the interface to use for HA1 communication.
Edit the Data Link (HA2) to use Port ethernet
1/3 and add the IP address of this peer and the Gateway IP
address for the subnet.
Commit the changes.
Set up the passive HA peer within the same Azure Resource
Group.
Deploy the second instance of the firewall.
Download the custom template and parameters file
from GitHub.
Log in to the Azure Portal.
Search for custom template and select Deploy
from a custom template.
Select Build your own template in
the editorLoad file.
Select the azuredeploy.json that you
downloaded earlier, and Save.
Complete the inputs, agree to the terms and Purchase.
Make
sure to match the following inputs to that of the firewall instance
you have already deployed— Azure subscription, name of the Resource
Group, location of the Resource Group, name of the existing VNet
into which you want to deploy the firewall, VNet CIDR, Subnet names,
Subnet CIDRs, and start the IP address for the management, trust
and untrust subnets.
Repeat Step 1and Step 2to set
up the interfaces and configure the firewall as the passive HA peer.