Launch the Firewall Template (v2.1)
Table of Contents
Launch the Firewall Template (v2.1)
Learn how to launch VM-Series Auto Scaling template for
AWS version 2.1.
You can choose to deploy the firewall and
application templates in the same VPC or in separate VPCs.
The
templates support a hub and spoke architecture in which you can
deploy the firewall template in one AWS account and use it as a
hub to secure applications (spokes) that belong to the same or to
different AWS accounts.
This workflow tells you how to deploy
the external load balancer and the VM-Series firewalls using the
firewall template. The vm-auth-key must be configured on Panorama
prior to launching this template.
- Review the checklists in Plan to Deploy VM-Series Auto Scaling Templates for AWS (v2.1) and Plan the VM-Series Auto Scaling Template for AWS (v2.0 and v2.1).Verify that you have completed the following tasks:
- (For PAYG only) Review and accept the EULA for the PAYG bundle you plan to use.
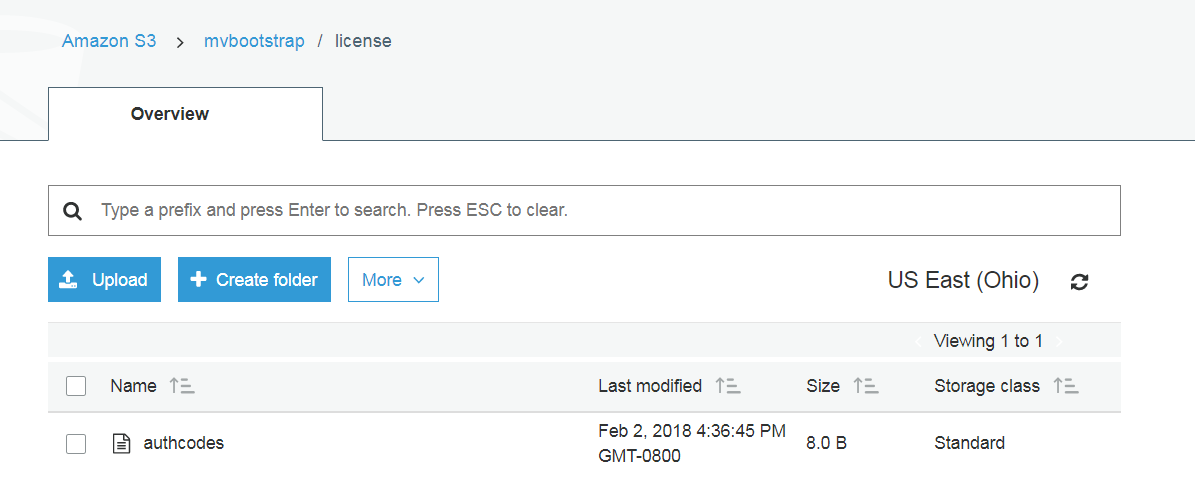
- (For BYOL only) Obtain the auth code for a bundle that supports the number of firewalls that might be required for your deployment. You must save this auth code in a text file named authcodes (no extensions), and put the authcodes file in the /license folder of the bootstrap package.If you use individual auth codes instead of a bundle, the firewall only retrieves the license key for the first auth code in the file.
- Download the files required to launch the VM-Series Auto Scaling v2.1 template from the GitHub repository.
Modify the init-cfg.txt file and upload it to the /config folder.Because you use Panorama to bootstrap the VM-Series firewalls, your init-cfg.txt file should be modified as follows. No bootstrap.xml file is needed.type=dhcp-client
ip-address=
default-gateway=
netmask=
ipv6-address=
ipv6-default-gateway=
hostname=
vm-auth-key=
panorama-server=
panorama-server-2=
tplname=AWS-tmplspoke1
dgname=AWS-dgspoke1
dns-primary=169.254.169.253
dns-secondary=8.8.8.8
op-command-modes=mgmt-interface-swap
dhcp-send-hostname=yes
dhcp-send-client-id=yes
dhcp-accept-server-hostname=yesdhcp-accept-server-domain=yes
vm-series-auto-registration-id=
vm-series-auto-registration-pin-value=
Verify that op-command-modes=mgmt-interface-swap exists. This is the command for swapping the management interface (mgmt) and the dataplane interface (ethernet 1/1) on the VM-Series firewall on AWS. Use the AWS DNS server IP address of 169.254.169.253 for faster load balancer DNS name resolution.You must add the device certificate auto-registration PIN to the init-cfg.txt file to automatically install a device certificate when your VM-Series firewall instance is deployed.(For BYOL only) Add the license auth code in the /license folder of the bootstrap package.- Use a text editor to create a new text file named authcodes (no extension).Add the authcode for your BYOL licenses to this file, and save. The authcode must represent a bundle, and it must support the number of firewalls that might be required for your deployment. If you use individual authcodes instead of a bundle, the firewall only retrieves the license key for the first authcode in the file.
![]() Upload Lambda code for the firewall template (panw-aws-zip) and the Application template (ilb.zip) to an S3 bucket. You can use the same S3 bucket that you use for bootstrapping.
Upload Lambda code for the firewall template (panw-aws-zip) and the Application template (ilb.zip) to an S3 bucket. You can use the same S3 bucket that you use for bootstrapping.![]() If the Application stack is managed by a different account than the firewall, use the Application account to create another s3 bucket in the same AWS region as the firewall template and copy ilb.zip to that s3 bucket.Select the firewall template.
If the Application stack is managed by a different account than the firewall, use the Application account to create another s3 bucket in the same AWS region as the firewall template and copy ilb.zip to that s3 bucket.Select the firewall template.- In the AWS Management Console, select .Select Upload a template to Amazon S3, to choose the application template to deploy the resources that the template launches within the same VPC as the firewalls, or to a different VPC. Click Open and Next.Specify the Stack name. The stack name allows you to uniquely identify all the resources that are deployed using this template.Configure the parameters for the VPC.
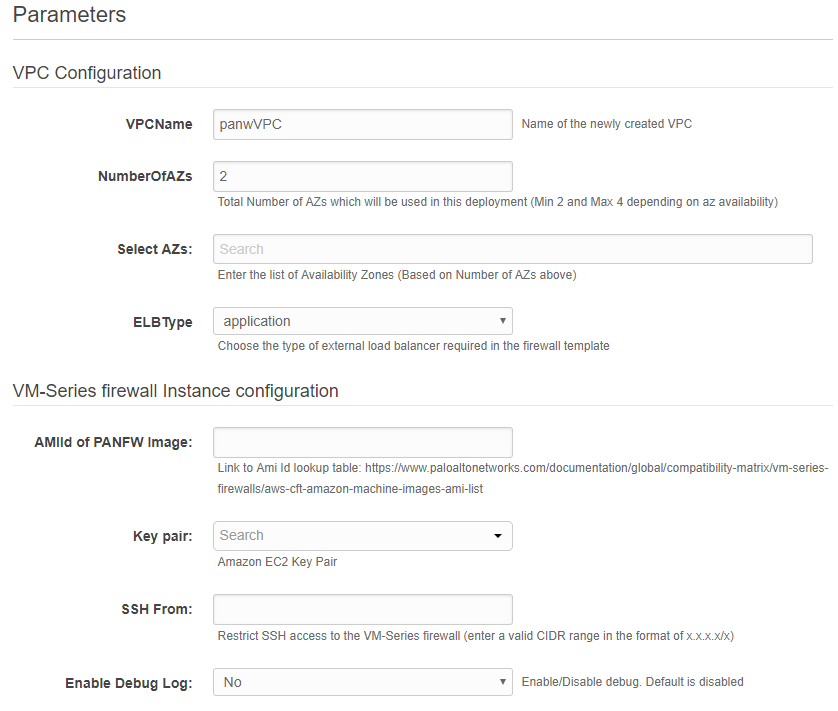
- Be sure to select at least two availability zones
![]() Look up the AMI ID for the VM-Series firewall and enter it. Make sure that the AMI ID matches the AWS region, PAN-OS version and the BYOL or PAYG licensing option you opted to use.Select the EC2 Key pair (from the drop-down) for launching the firewall. To log in to the firewalls, you must provide the name of this key pair and the private key associated with it.For the SSH from field, the firewalls will be managed by Panorama and do NOT have an EIP for the management interface. But just in case you decide to assign an EIP configure the IP range you would connect from.Select Yes if you want to Enable Debug Log. Enabling the debug log generates more verbose logs that help with troubleshooting issues with the deployment. These logs are generated using the stack name and are saved in AWS CloudWatch.By default, the template uses CPU utilization as the scaling parameter for the VM-Series firewalls. Custom PAN-OS metrics are automatically published to the CloudWatch namespace that matches the stack name you specified earlier.Specify the name of the Amazon S3 bucket(s).
Look up the AMI ID for the VM-Series firewall and enter it. Make sure that the AMI ID matches the AWS region, PAN-OS version and the BYOL or PAYG licensing option you opted to use.Select the EC2 Key pair (from the drop-down) for launching the firewall. To log in to the firewalls, you must provide the name of this key pair and the private key associated with it.For the SSH from field, the firewalls will be managed by Panorama and do NOT have an EIP for the management interface. But just in case you decide to assign an EIP configure the IP range you would connect from.Select Yes if you want to Enable Debug Log. Enabling the debug log generates more verbose logs that help with troubleshooting issues with the deployment. These logs are generated using the stack name and are saved in AWS CloudWatch.By default, the template uses CPU utilization as the scaling parameter for the VM-Series firewalls. Custom PAN-OS metrics are automatically published to the CloudWatch namespace that matches the stack name you specified earlier.Specify the name of the Amazon S3 bucket(s).![]()
- Enter the name of the S3 bucket that contains the bootstrap package.If the bootstrap bucket is not set up properly or if you enter the bucket name incorrectly, the bootstrap process fails, and you cannot log in to the firewall. Health checks for the load balancers also fail.Enter the name of the S3 bucket that contains the panw-aws.zip file. As mentioned earlier you can use one S3 bucket for the Bootstrap and Lambda code.Specify the keys for enabling API access to the firewall and Panorama.
![]()
- Enter the key that the firewall must use to authenticate API calls. The default key is based on the sample file and you should only use it for testing and evaluation. For a production deployment, you must create a separate PAN-OS login just for the API call and generate an associated key.Enter the API Key to allow AWS Lambda to make API calls to Panorama. For a production deployment, you should create a separate login just for the API call and generate an associated key.Enter the name for the application load balancer.
![]() Review the template settings and launch the template.
Review the template settings and launch the template.- Select I acknowledge that this template might cause AWS CloudFormation to create IAM resources.Click Create to launch the template. The CREATE_IN_PROGRESS event displays.On successful deployment the status updates to CREATE_COMPLETE.
![]() Verify that the template has launched all required resources.
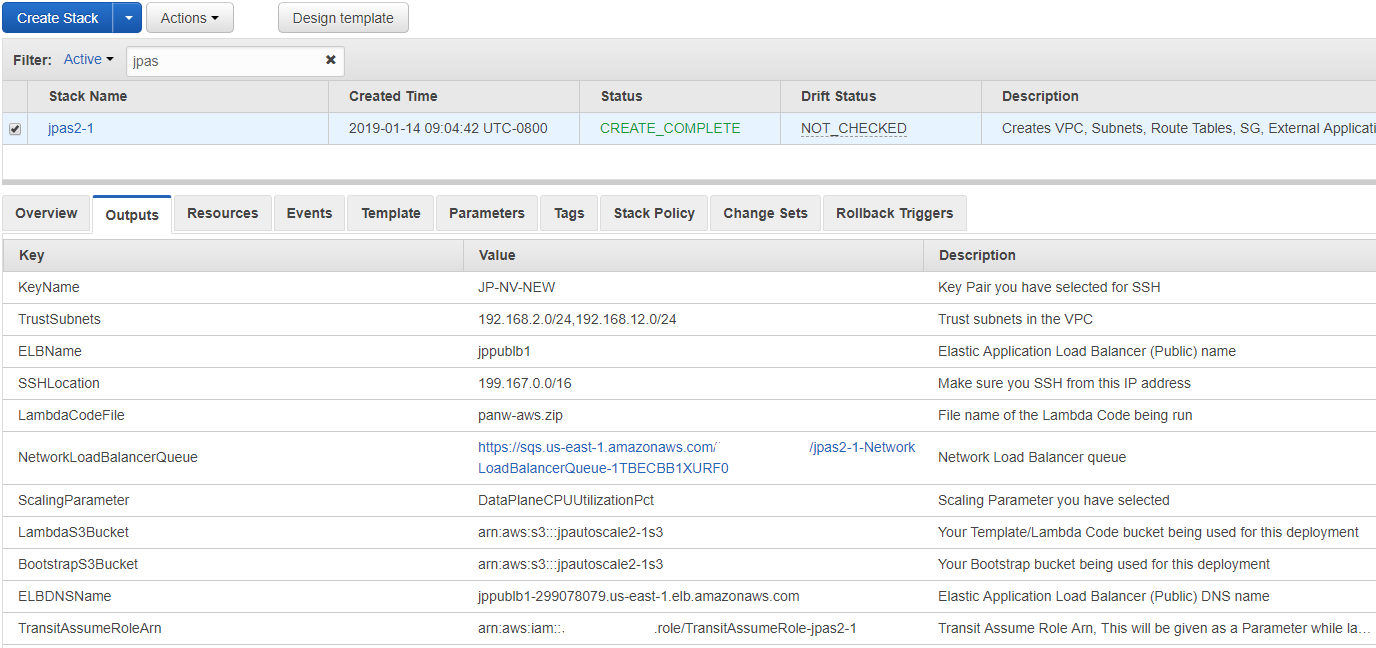
Verify that the template has launched all required resources.- On the EC2 Dashboard, select Auto Scaling Groups. Verify that in each AZ, you have one ASG for the VM-Series firewalls. The ASG name prefix includes the stack name.On the AWS Management Console, select the stack name to view the Output for the list of resources.Your output should look similar to the output in the following image.
- Take note of the Network Load Balancer Queue name.
- Take note of the Elastic Load Balancer public DNS name.
![]() It may take up to 20 minutes for the firewalls to boot up and be available to handle traffic.When you are finished with a testing or a production deployment, the only way to ensure charges stop occurring is to completely delete the stack. Shutting down instances, or changing the ASG maximum to 0 is not sufficient.Save the following firewall template information. You must provide these values as inputs when deploying the application template.
It may take up to 20 minutes for the firewalls to boot up and be available to handle traffic.When you are finished with a testing or a production deployment, the only way to ensure charges stop occurring is to completely delete the stack. Shutting down instances, or changing the ASG maximum to 0 is not sufficient.Save the following firewall template information. You must provide these values as inputs when deploying the application template.- IP addresses of the NAT Gateway in each AZ—You need this IP address to restrict HTTPS access to your Panorama so that Lambda can use the EIPs for the NAT Gateway to communicate with Panorama when needed.
- Network Load Balancer SQS URL—A Lambda function in the firewall stack monitors this queue so that it can learn about any network load balancers that you deploy and create NAT policy rules (one per application) in the Panorama that enable the firewalls to send traffic to the network load balancer IP address.