Integrate VM-Series Firewall with Alibaba Gateway Load Balancer
Table of Contents
Integrate VM-Series Firewall with Alibaba Gateway Load Balancer
Execute the steps to integrate your VM-Series firewall with an Alibaba
GWLB
The following are the pre-requisites to integrate your VM-Series firewall with an
Alibaba GWLB:
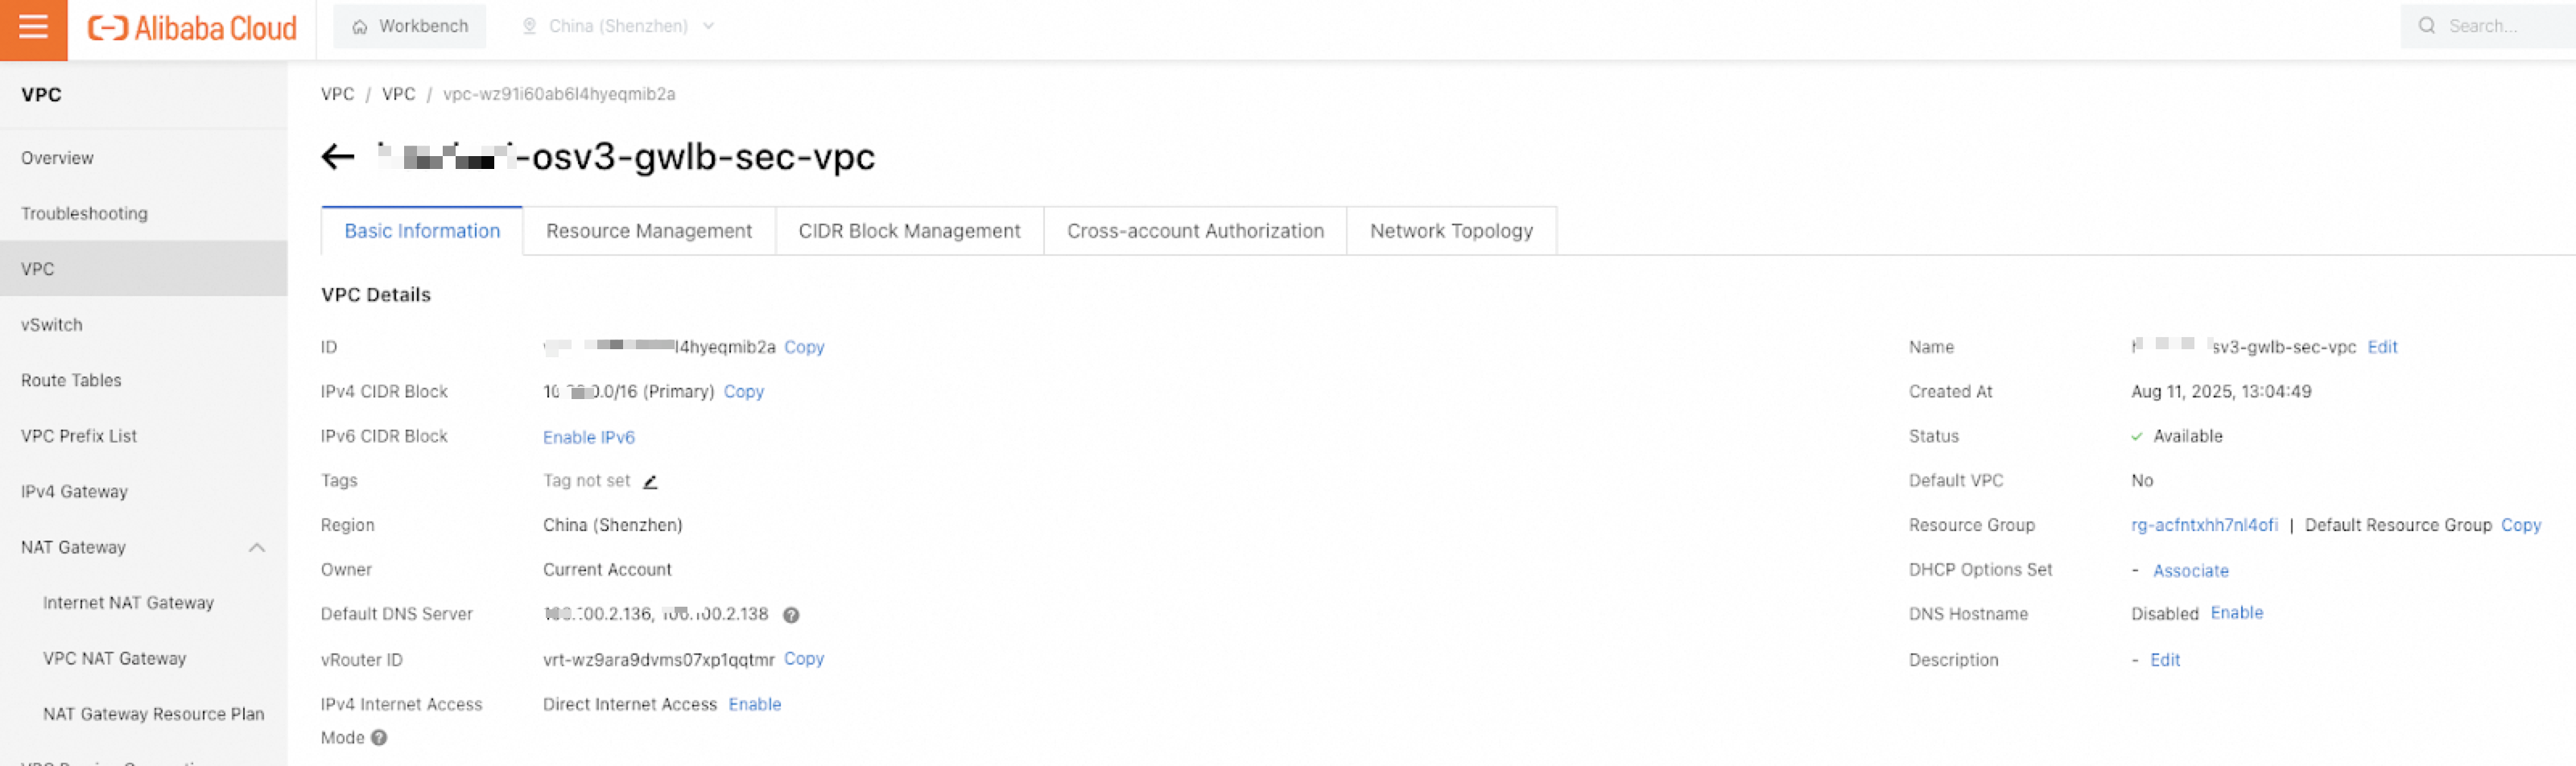
- Create two VPCs—one business VPC and one security VPC.
![]()
- Create two subnets for each firewall in the security VPC—one for management
and one for data.
![]()
- Create a GWLB subnet as a part of the security VPC.
![]()
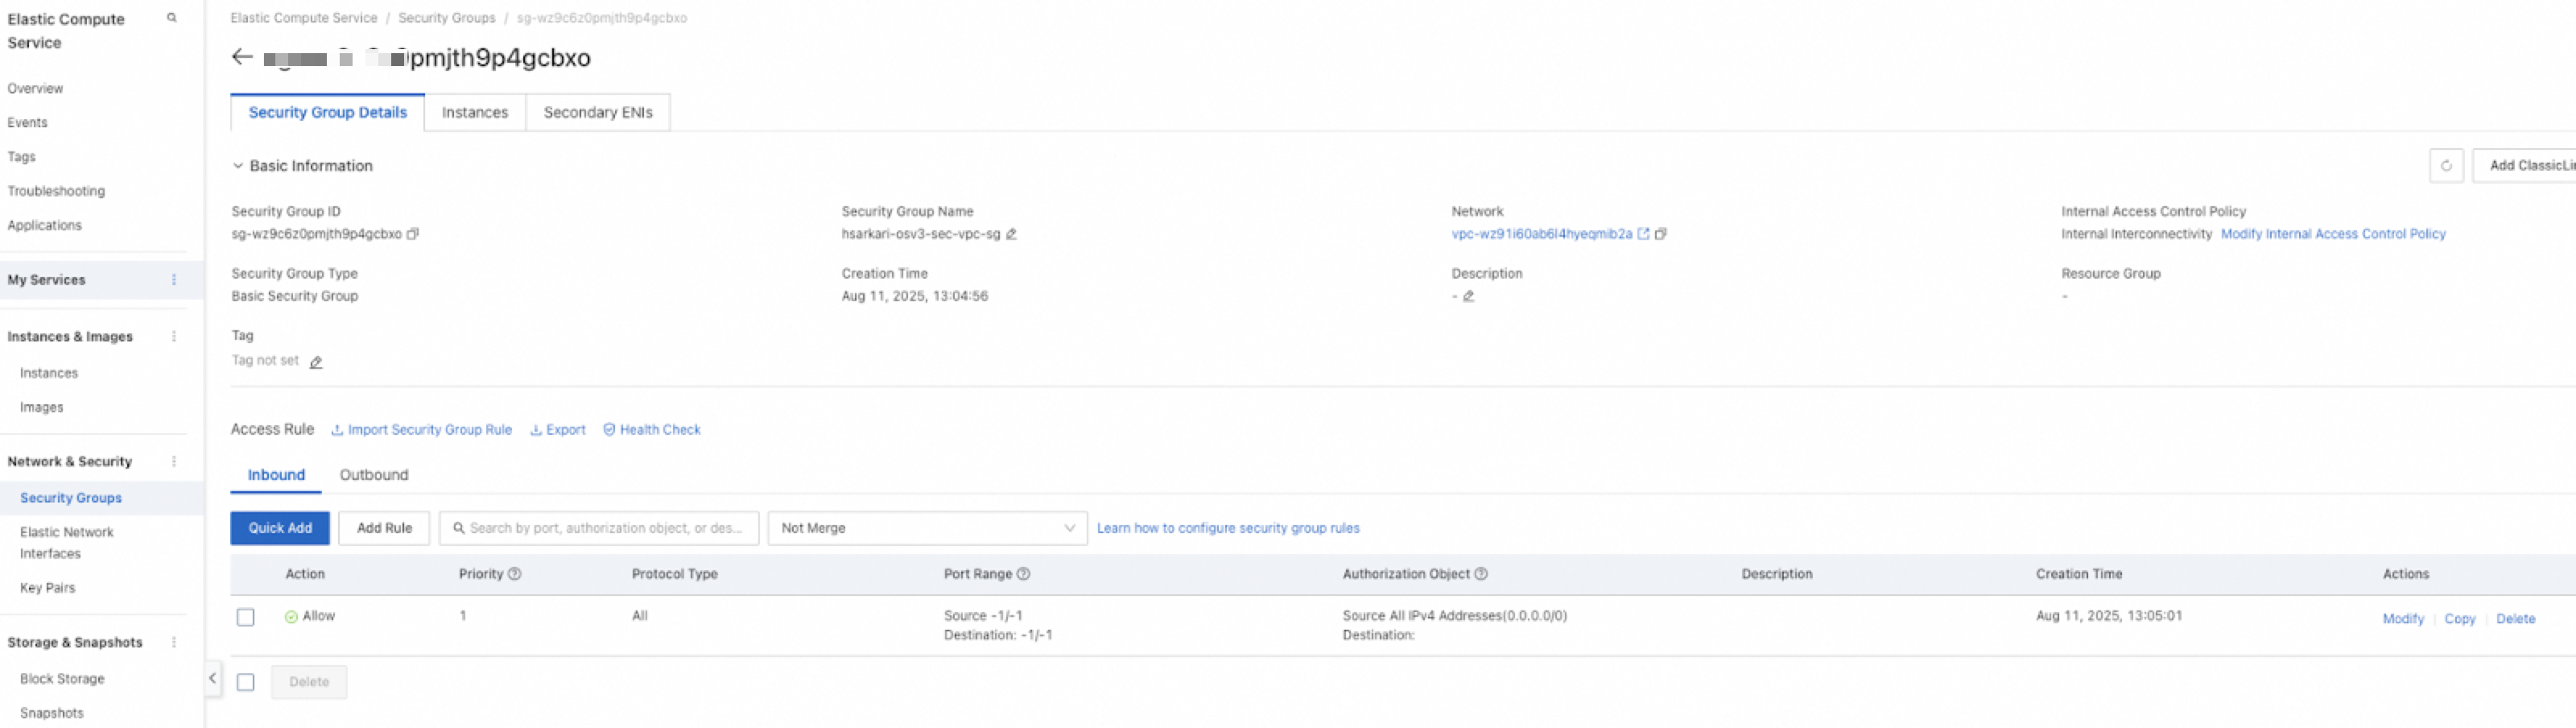
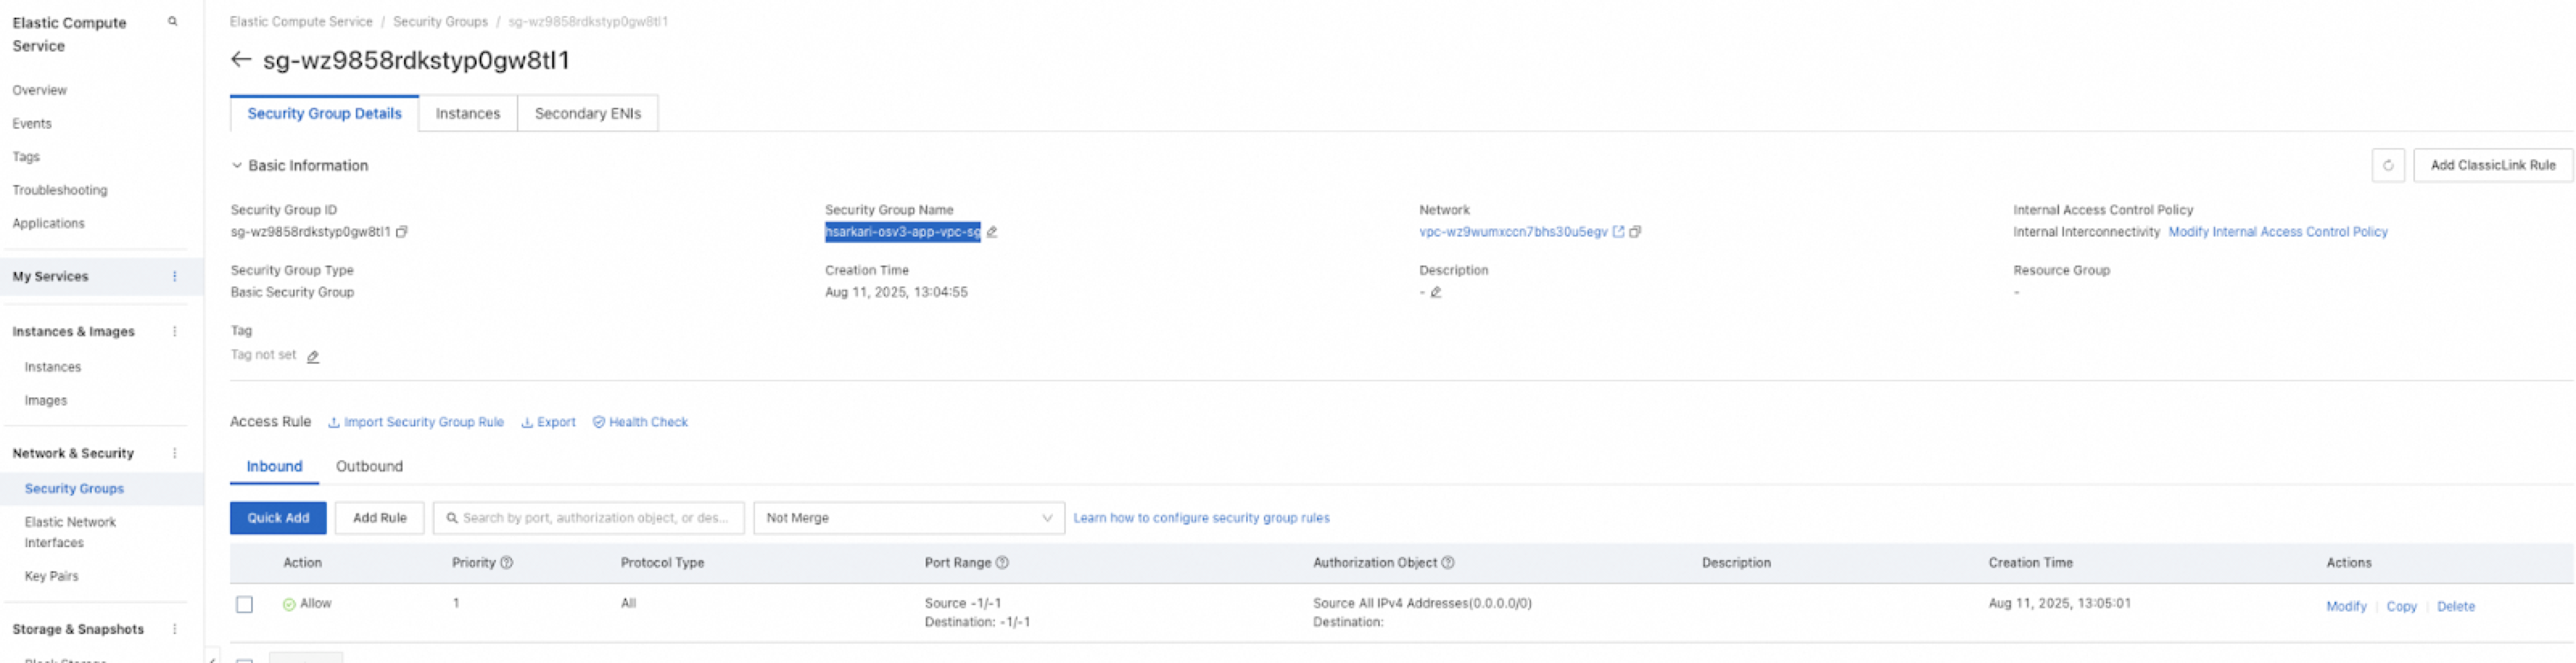
- Create two security groups—one for firewall management and one for data. The
management subnet security groups must allow https and ssh for management
access.
![]()
![]()
![]()
- Ensure that the security group(s) in your data VPC allows GENEVE-encapsulated packets (UDP port 6081).
- Enable appliance mode on security VPC attachment, if your deployment includes a transit gateway and traffic that will move between VPCs.
Complete the following procedure to manually integrate your VM-Series firewall with
an Alibaba GWLB.
- On the PA-VM, configure the following:
- Configure ethernet1/1 for DHCP, enabling interface management to “allow all” and map it to the untrust zone.
![]() Configure a security policy to permit health checks, specifying source IP as GWLB instance IP.Configure the security policy to allow-all.
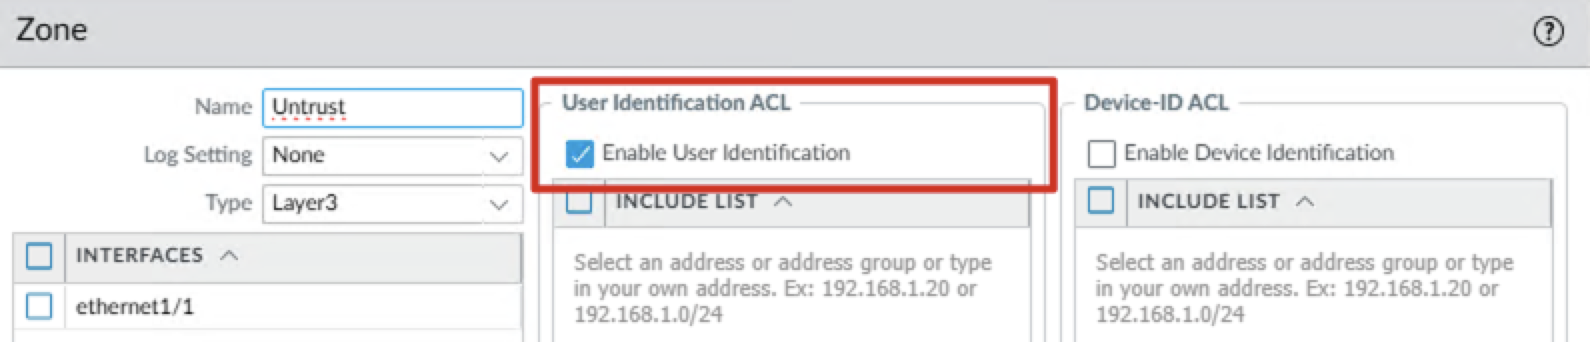
Configure a security policy to permit health checks, specifying source IP as GWLB instance IP.Configure the security policy to allow-all.![]() Set Firewall Interface MTU connected to GWLB to 1432. GENEVE adds 64-68 bytes of overhead to the original packet. So, the effective MTU available to your firewall is: [ 1500 (VPC MTU) - 64 (GENEVE overhead) = 1436 bytes ].set network interface ethernet ethernet1/1 layer3 mtu 1432Disable DPDK on the firewall.set system setting dpdk-pkt-io offEnable Geneve Inspection on the firewall.request plugins vm_series geneve-inspect enable yesEnable the user identification on the zone.set network zone Trust user-identification enable yes
Set Firewall Interface MTU connected to GWLB to 1432. GENEVE adds 64-68 bytes of overhead to the original packet. So, the effective MTU available to your firewall is: [ 1500 (VPC MTU) - 64 (GENEVE overhead) = 1436 bytes ].set network interface ethernet ethernet1/1 layer3 mtu 1432Disable DPDK on the firewall.set system setting dpdk-pkt-io offEnable Geneve Inspection on the firewall.request plugins vm_series geneve-inspect enable yesEnable the user identification on the zone.set network zone Trust user-identification enable yes![]() To use the GWLB service, you must first create a GWLB instance. Create a GWLB instance and attach two data vSwitches to it, ensuring each vSwitch is in a different zone.
To use the GWLB service, you must first create a GWLB instance. Create a GWLB instance and attach two data vSwitches to it, ensuring each vSwitch is in a different zone.- Log on to theGWLB console and select the region where the GWLB instance is deployed.Click Create GWLB on the Instances page.Configure the parameters on the Gateway Load Balancer - Alibaba Cloud International Site. The following table describes only the key parameters. Use the default values for other parameters. For more information about the parameters, seeCreate and manage a GWLB instance.
Parameter Description Instance Name Specify an instance name. VPC Select the security VPC. Region and Zone Select the region in which you want to create the GWLB instance. Zone Select one or more zones. IP version Select IPv4 as the IP version. Service-linked Role The first time you create a GWLB instance, click Create Service-linked Role to create the AliyunServiceRoleForGwlb service-linked role. This parameter is displayed only the first time you create a GWLB instance.Click OK.Return to the Instances page and select the region where the GWLB instance is deployed to view the GWLB instance.Create a backend server group by adding the secondary data interfaces of both firewalls, in advanced mode.- Click Create Server Group on the Server Groups page,Configure the parameters in the Create Server Group dialog box, and click Create.The following table describes only the key parameters. Use the default values for other parameters. For more information about the parameters, see Create and manage a server group.
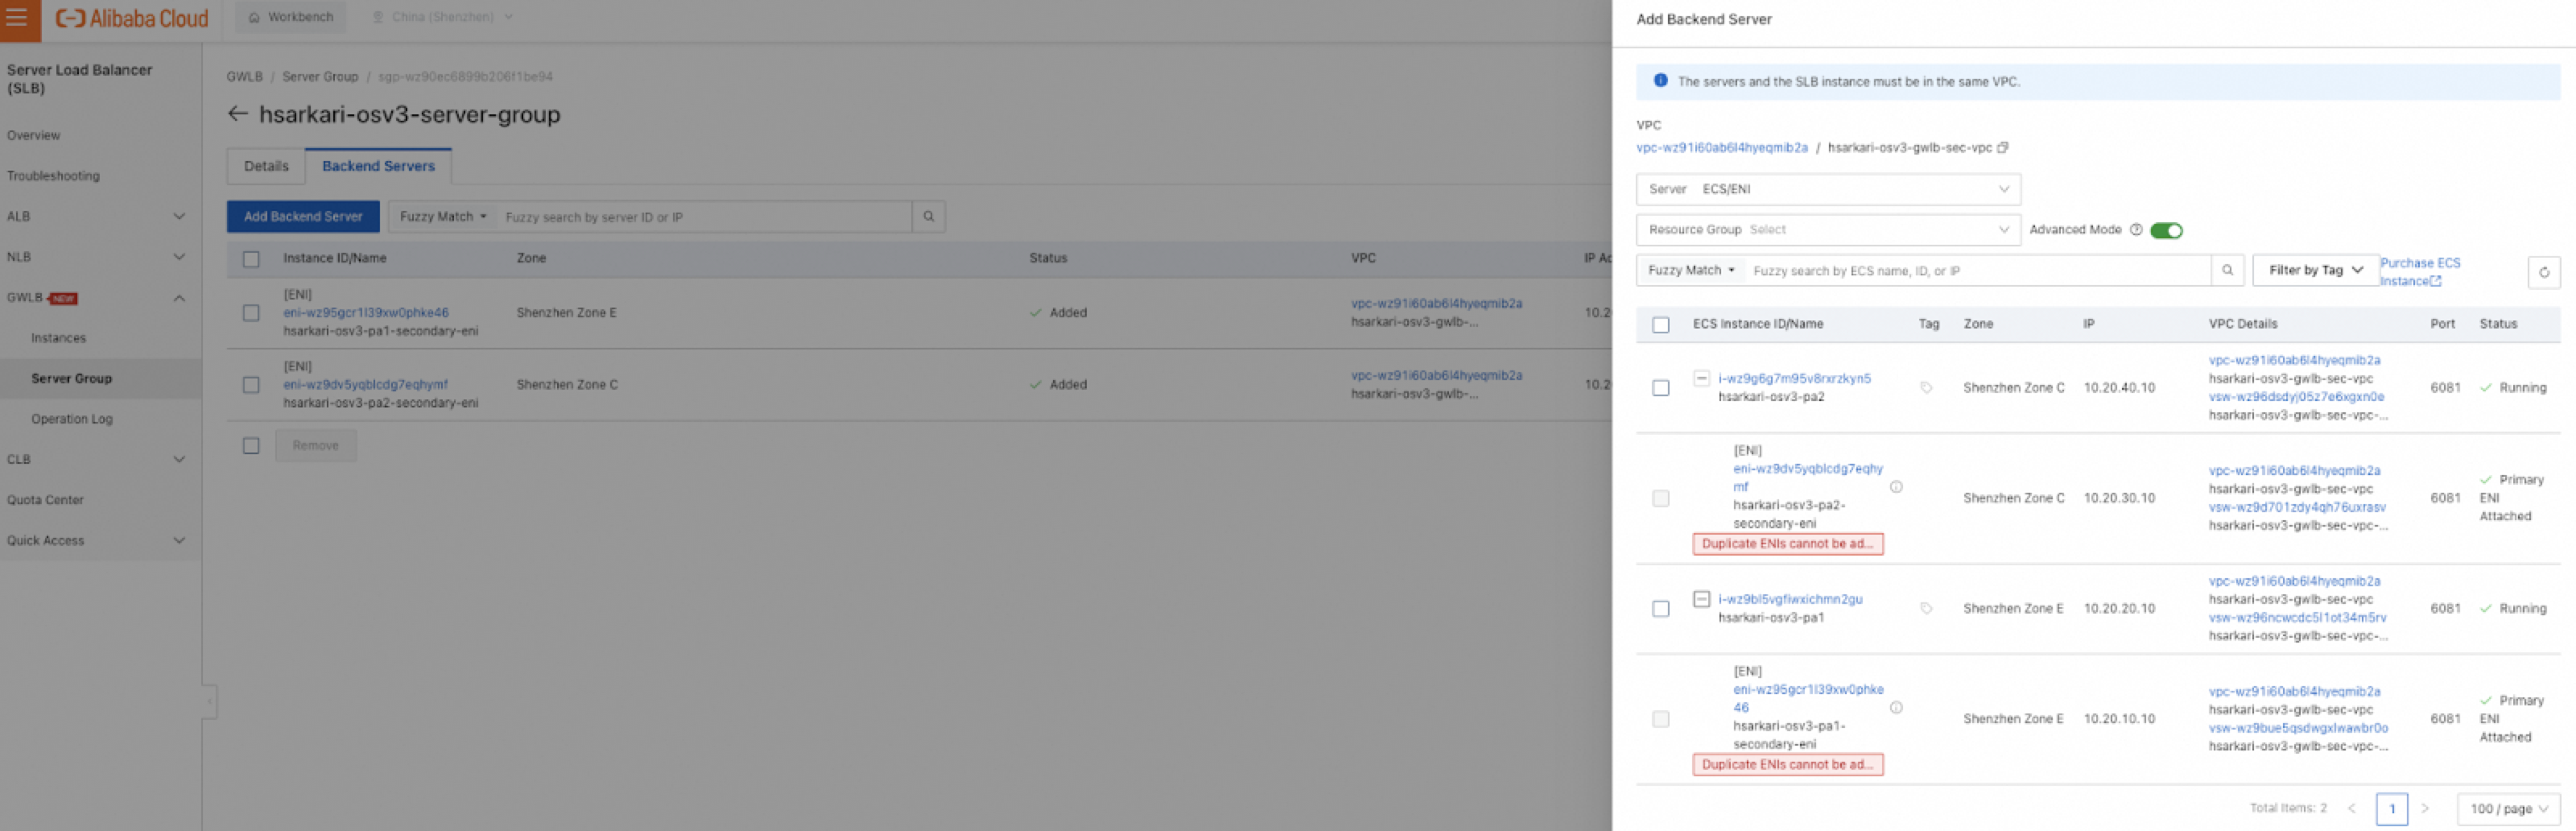
Parameter Description Server Group Type Select a server group type. For example, Server is selected. Server Group Name Specify a server group name. VPC Select the security VPC in which the ECS instances are deployed. Select the VPC in which the GWLB instance is deployed.Scheduling Algorithm Select a scheduling algorithm. For example, 5-tuple Hashing. Health Check Method Select a health check method or disable health checks. For example, HTTP.Health Check Path will be /php/login.phpHealth check status code will be http_2xx.Health Check Port Specify a health check port. For example, 80. Click Add Backend Server, in the The server group is created message.Click Add Backend Server, on the Backend Servers tab of the page that appears subsequently.Append and toggle Advanced Mode to see the secondary NICs of the firewall and set the Server Type in the Add Backend Server panel. You may choose to set Server Type to ECS/ENI.![]() Select FW1 and FW2 data interface and click Next.Configure a listener and add the server group you created in the previous step, as backend server.
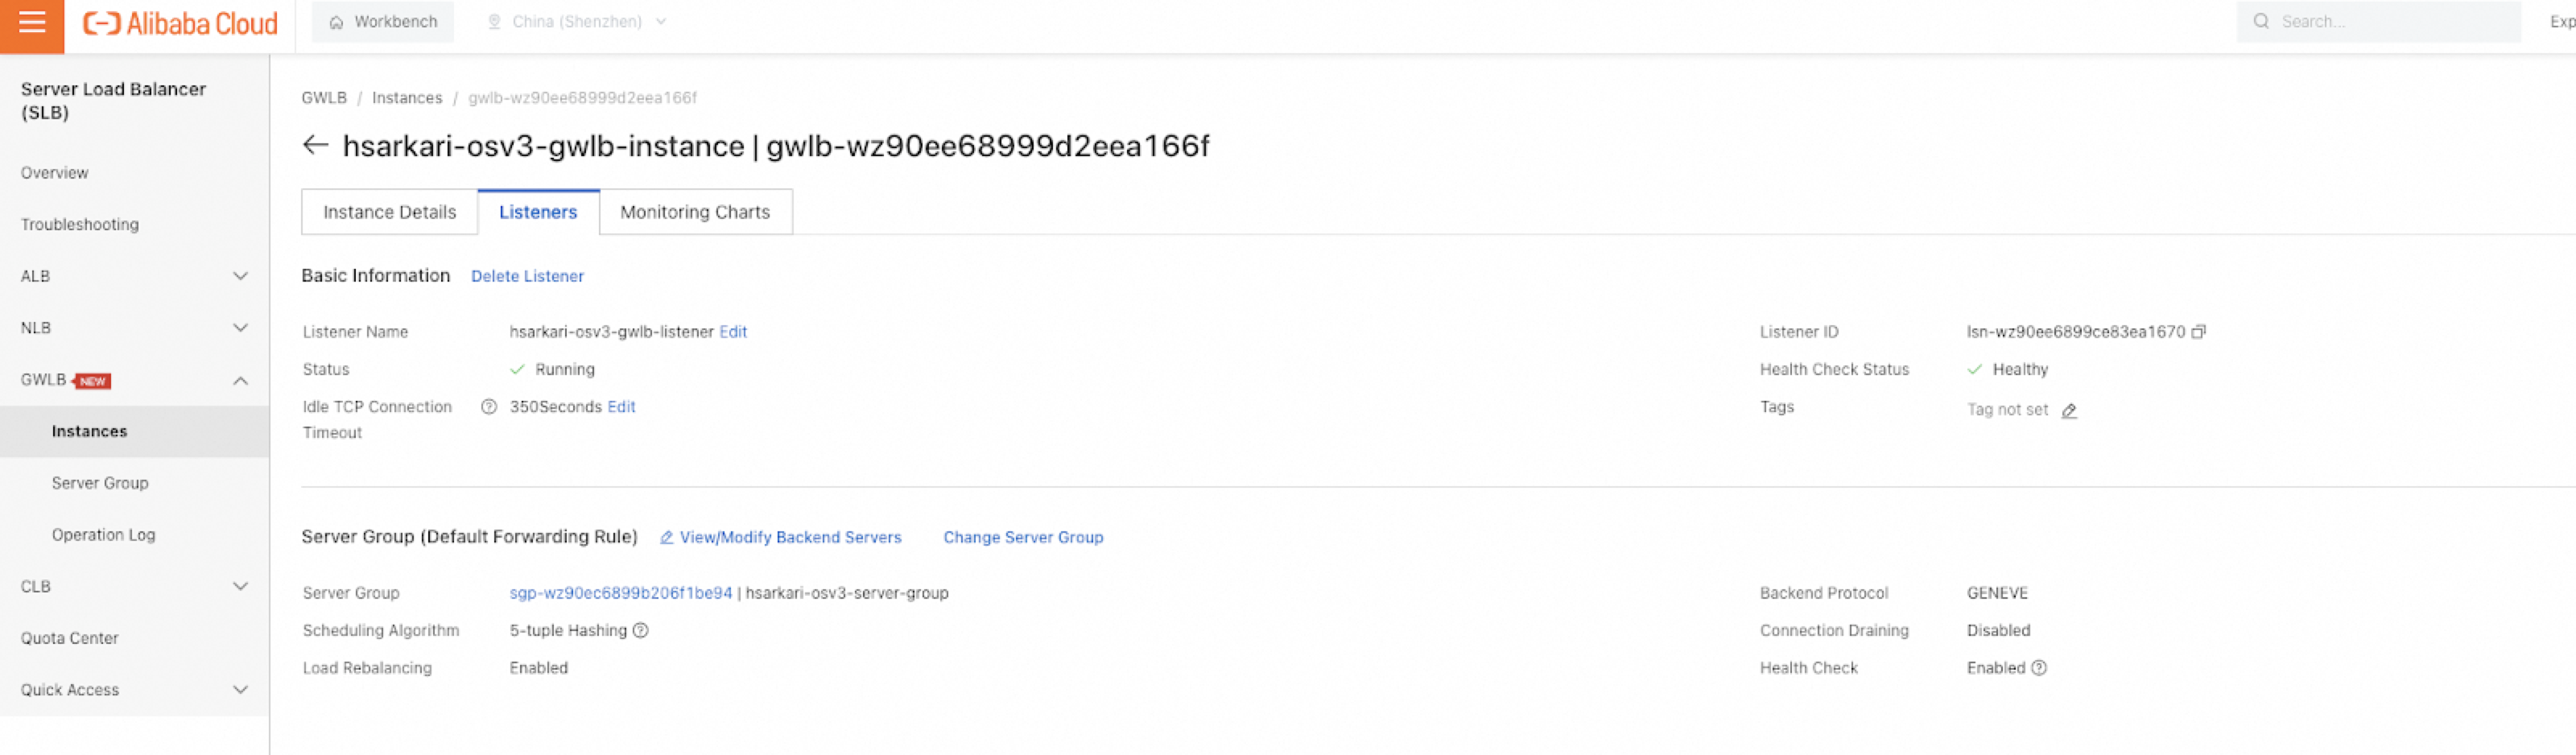
Select FW1 and FW2 data interface and click Next.Configure a listener and add the server group you created in the previous step, as backend server.- Click GWLB > Instances and click the instance ID.Click the Listeners tab and click Create IP Listener.Set Server Group Type in Select Server Group, and select the server group that is created.
![]() Click OK on the backend server list page.Configure an endpoint service
Click OK on the backend server list page.Configure an endpoint service- Log on to the VPC console.Click Create Endpoint Service.Configure the parameters on the Create Endpoint Service page and click OK. The following table describes only the parameters that are relevant to this topic.
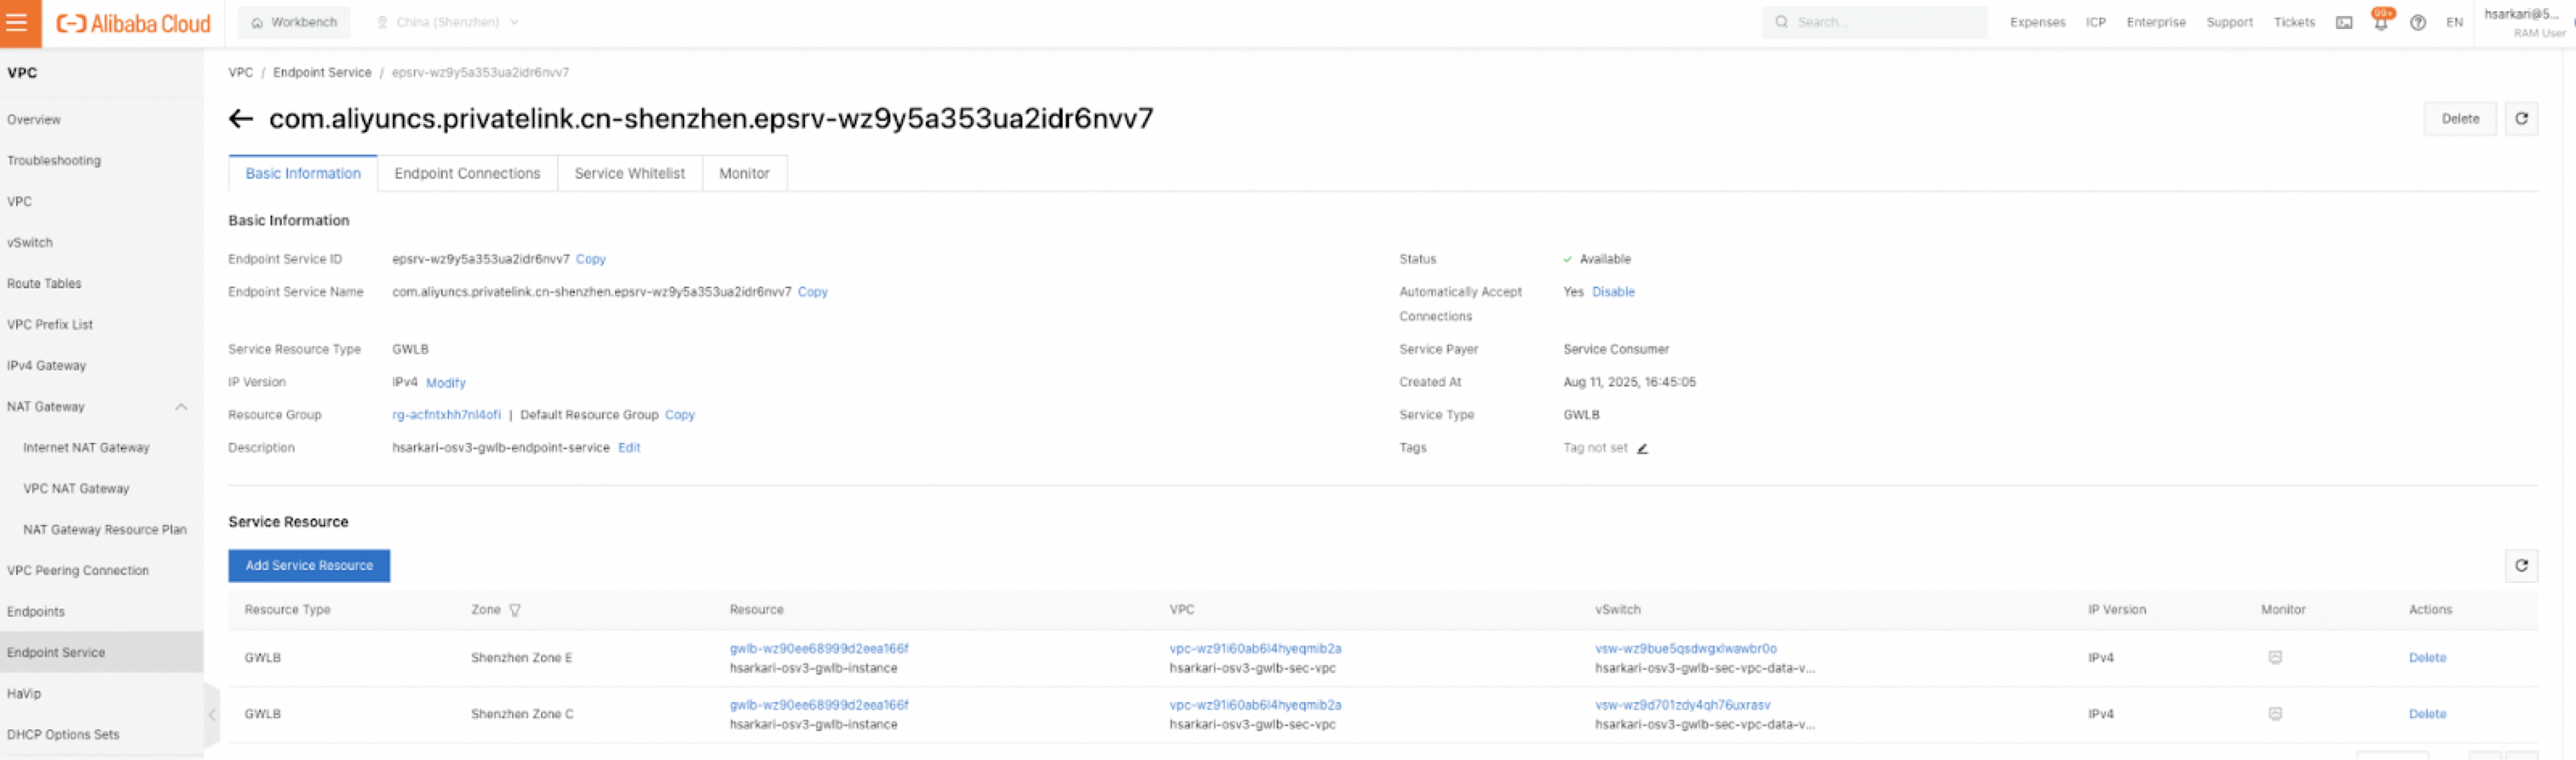
Parameter Description Region Specify the region. For example, China (Ulanqab). Service Resource Type Select the type of the service resource that you want to add to the endpoint service. For example, GWLB. Select Service Resource Select the zone where the service resource is available and select the service resource. For example, select Ulanqab Zone B and select the GWLB instance created in Step 2. Network Type Select the network type. For example, IPv4. Automatically Accept Endpoint Connections Specify whether the endpoint service automatically accepts connection requests from endpoints.If you select Yes, after an endpoint is created, the endpoint service automatically accepts connection requests from the endpoint.Service Payer Specify the service payer. For example, Service Consumer. Click OK.![]() Add the GWLB service resource for each zone by clicking "Add Service Resource." For example, if a GWLB instance spans two zones, add it as a service resource for the first zone, and then repeat the process for the second zone.Configure a GWLB endpoint.
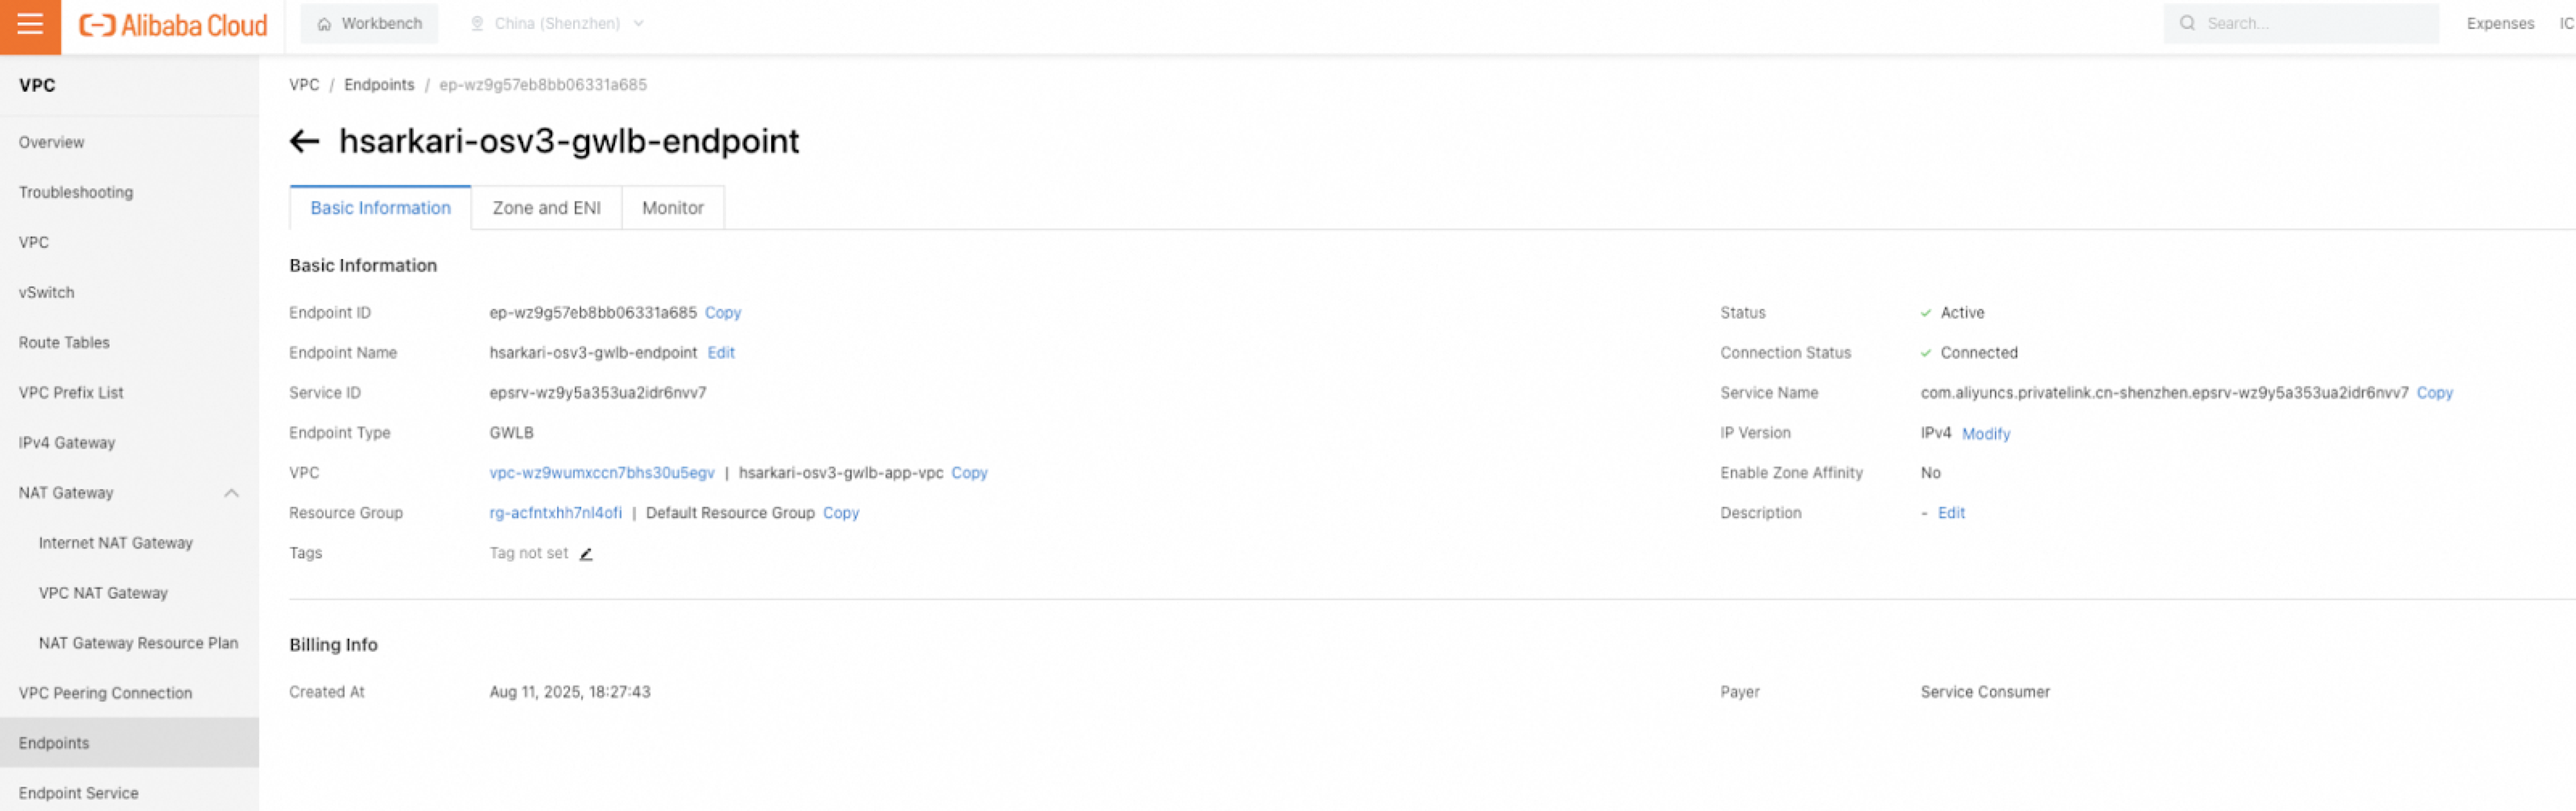
Add the GWLB service resource for each zone by clicking "Add Service Resource." For example, if a GWLB instance spans two zones, add it as a service resource for the first zone, and then repeat the process for the second zone.Configure a GWLB endpoint.- Log on to the Endpoint console.Click Create Endpoint on the Interface Endpoint tab of the Endpoints page.Configure the parameters on the Create Endpoint page, and click OK. The following table describes only the parameters that are relevant to this topic:
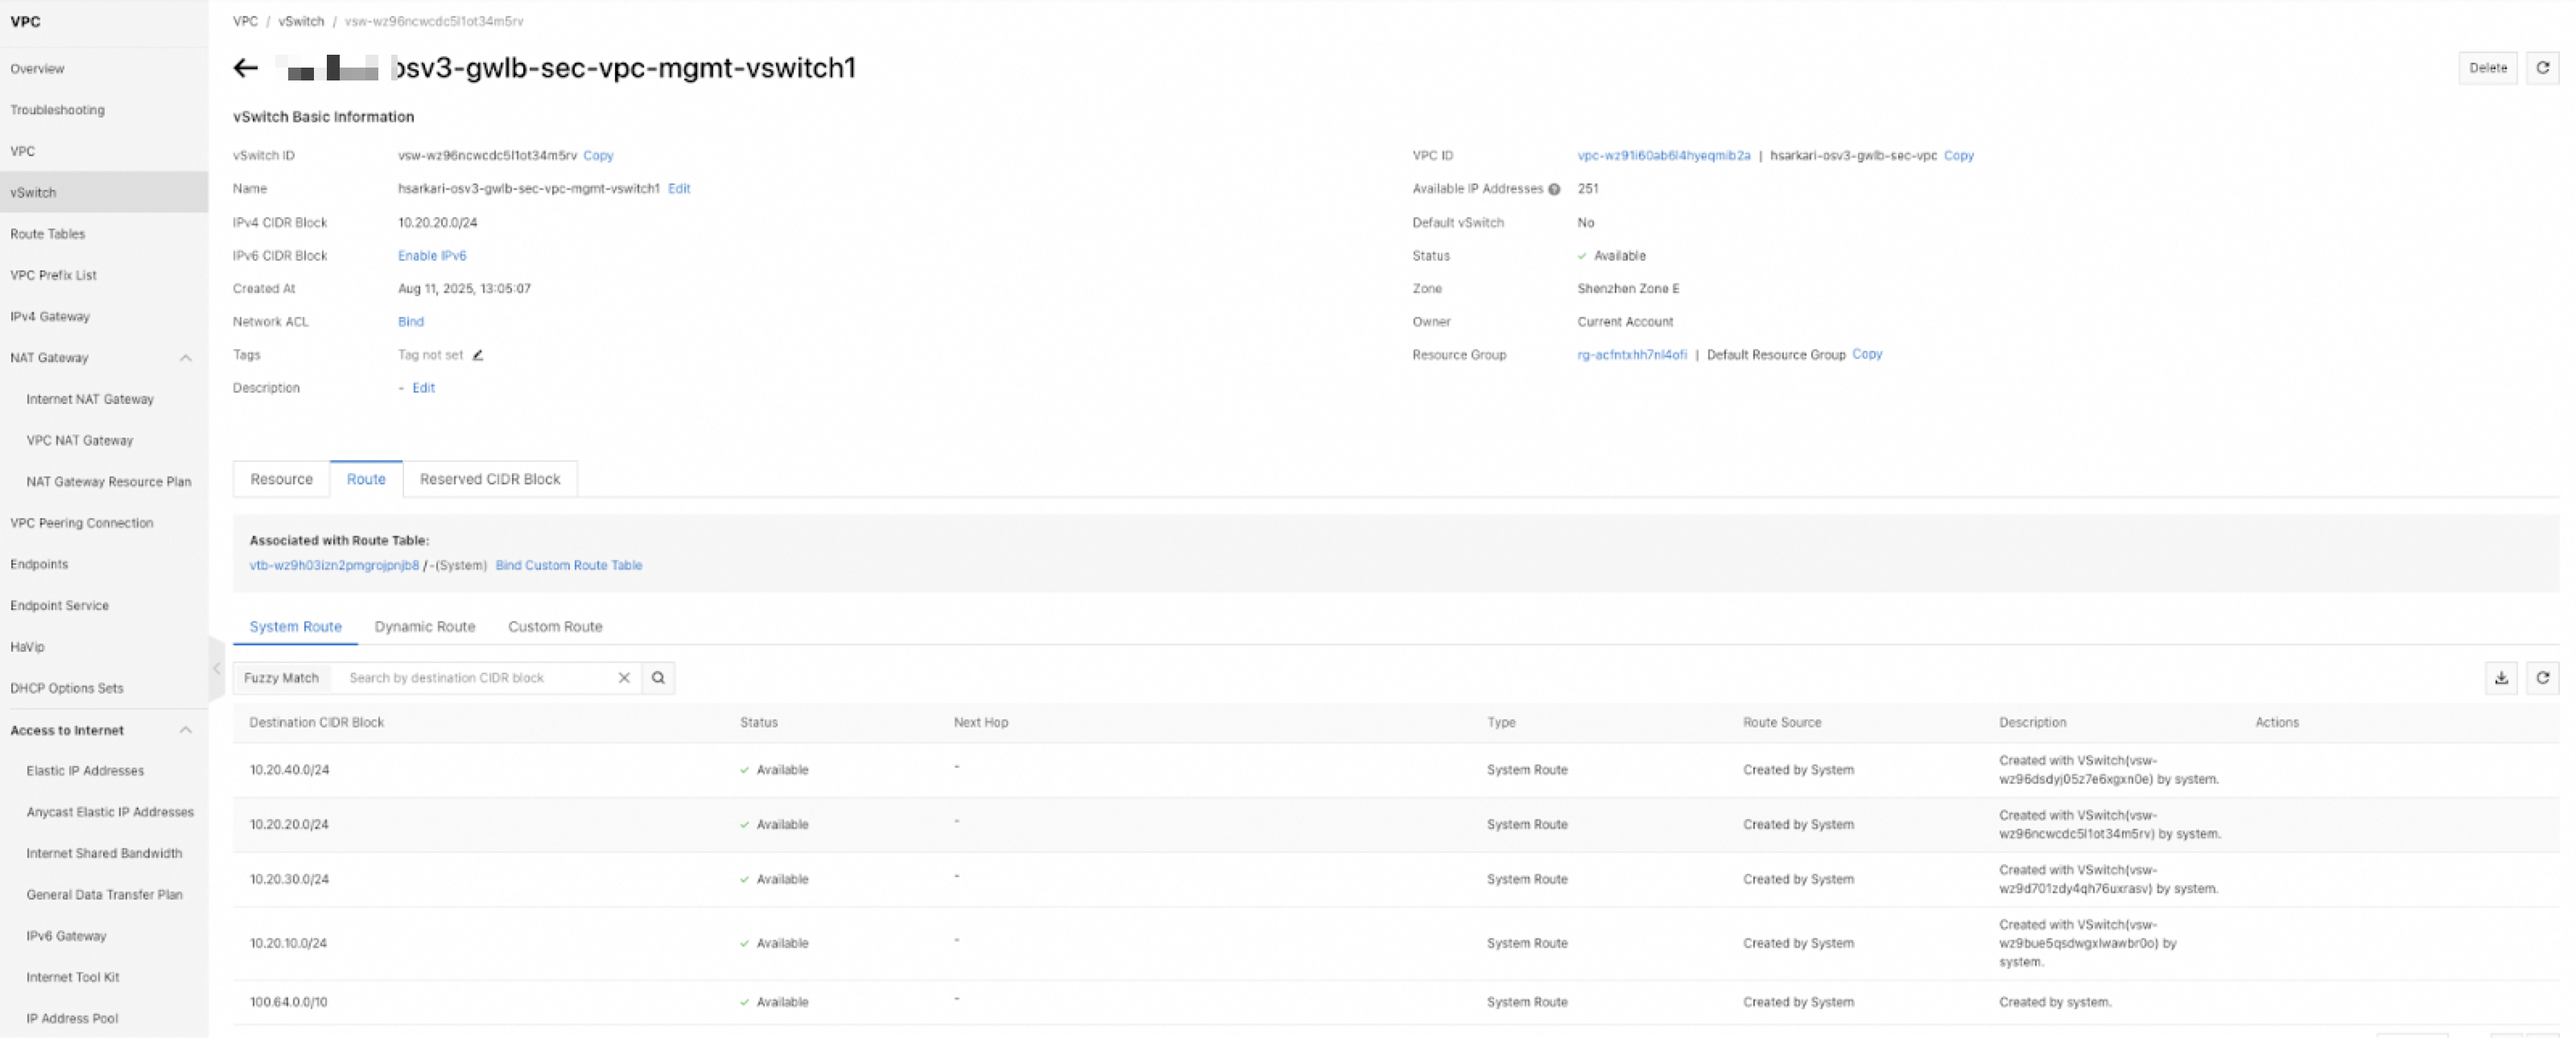
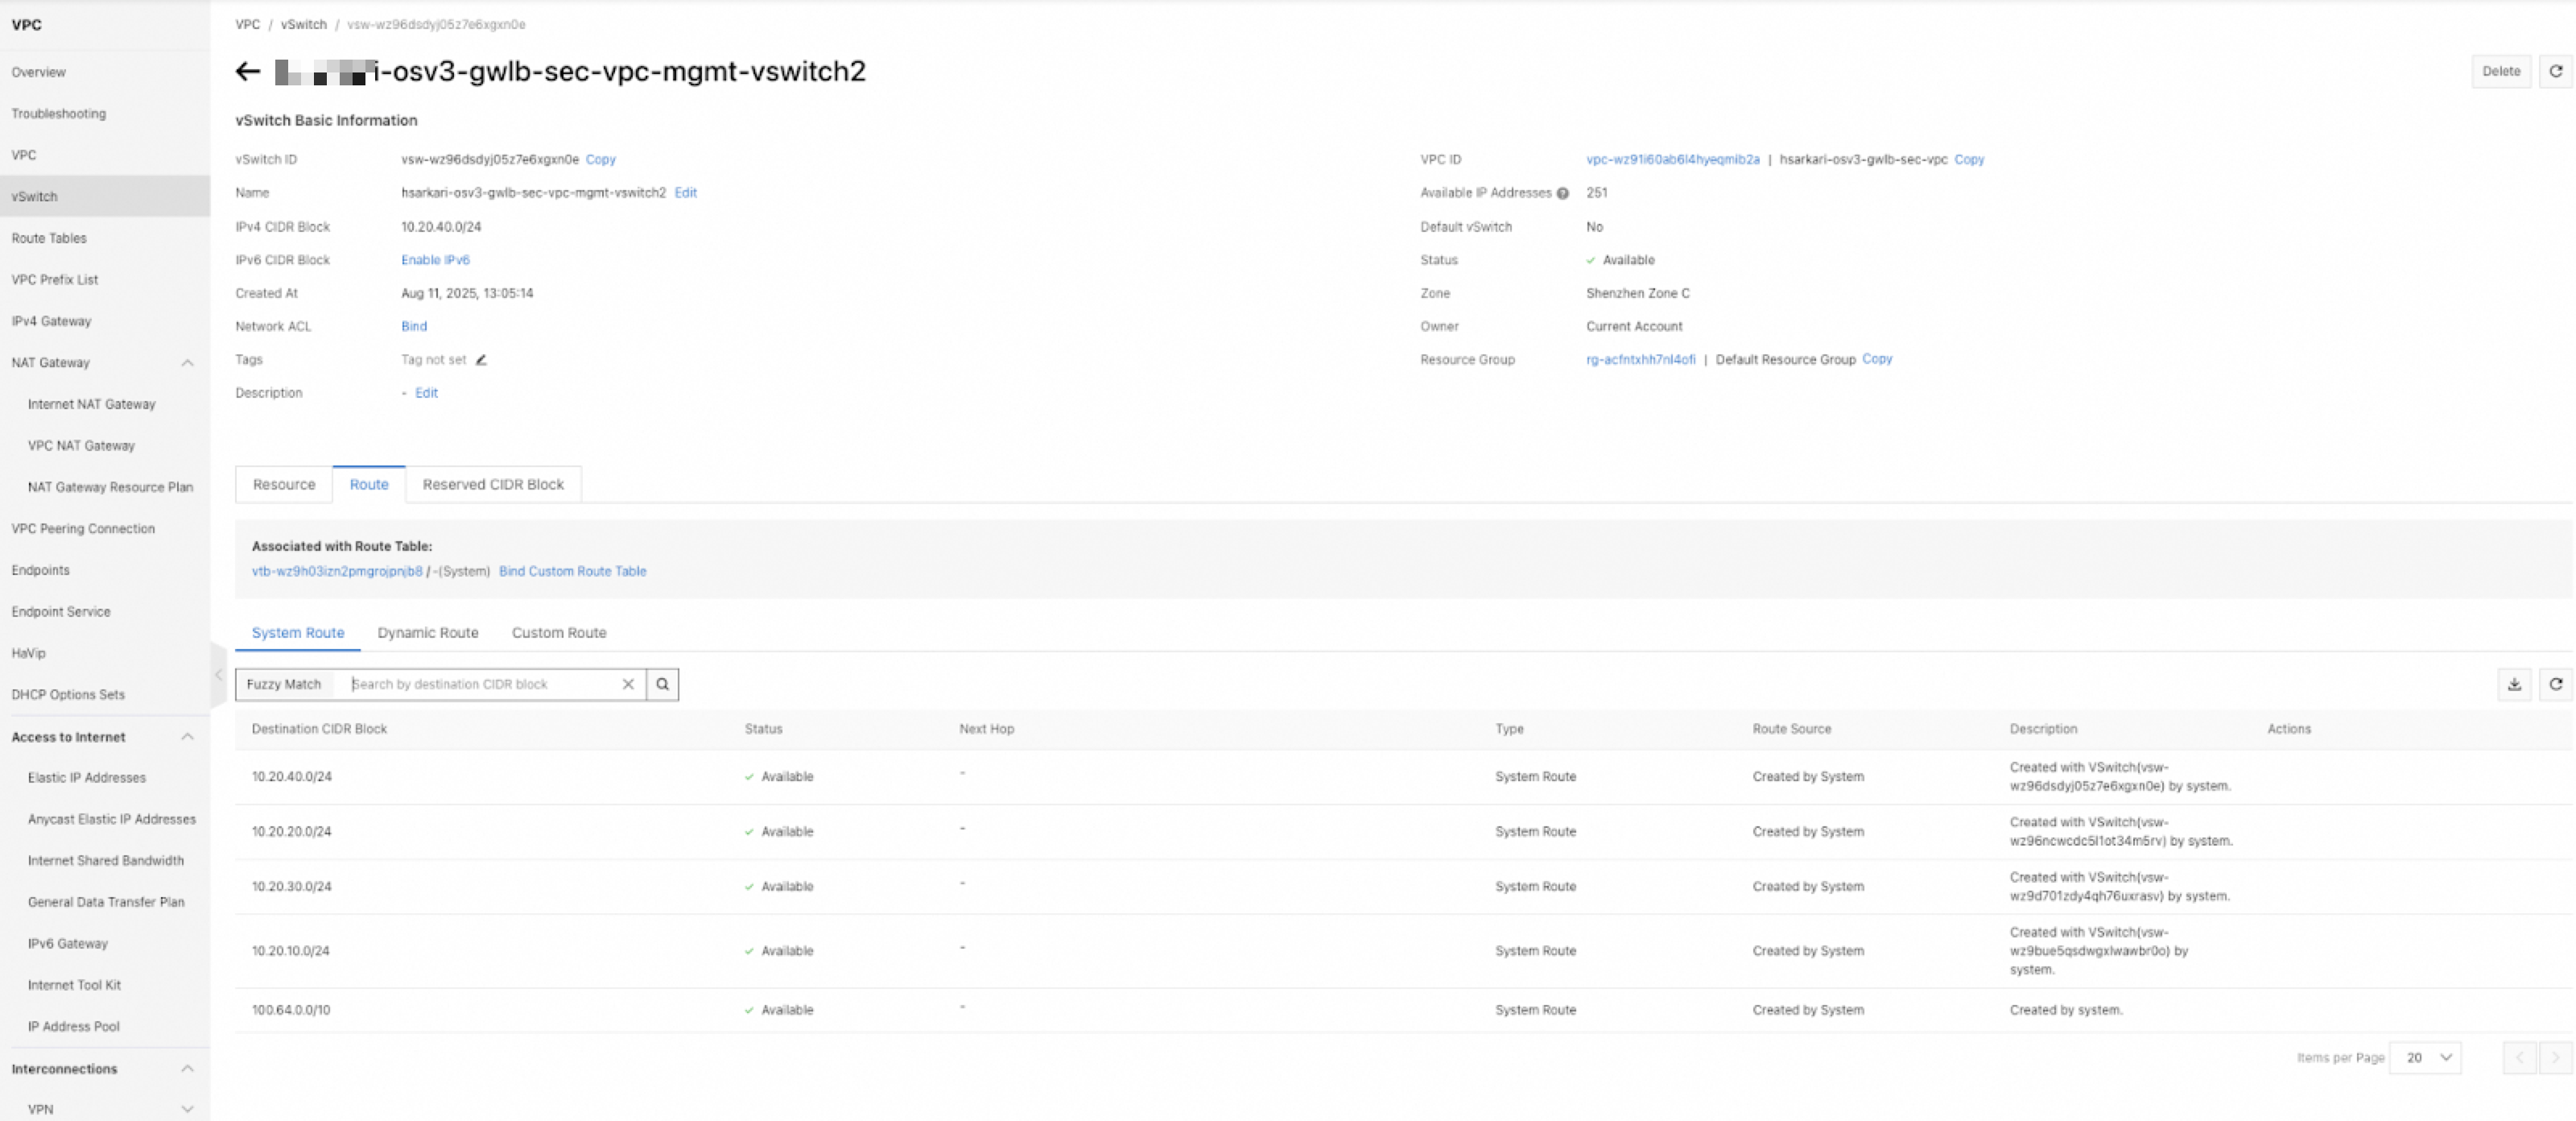
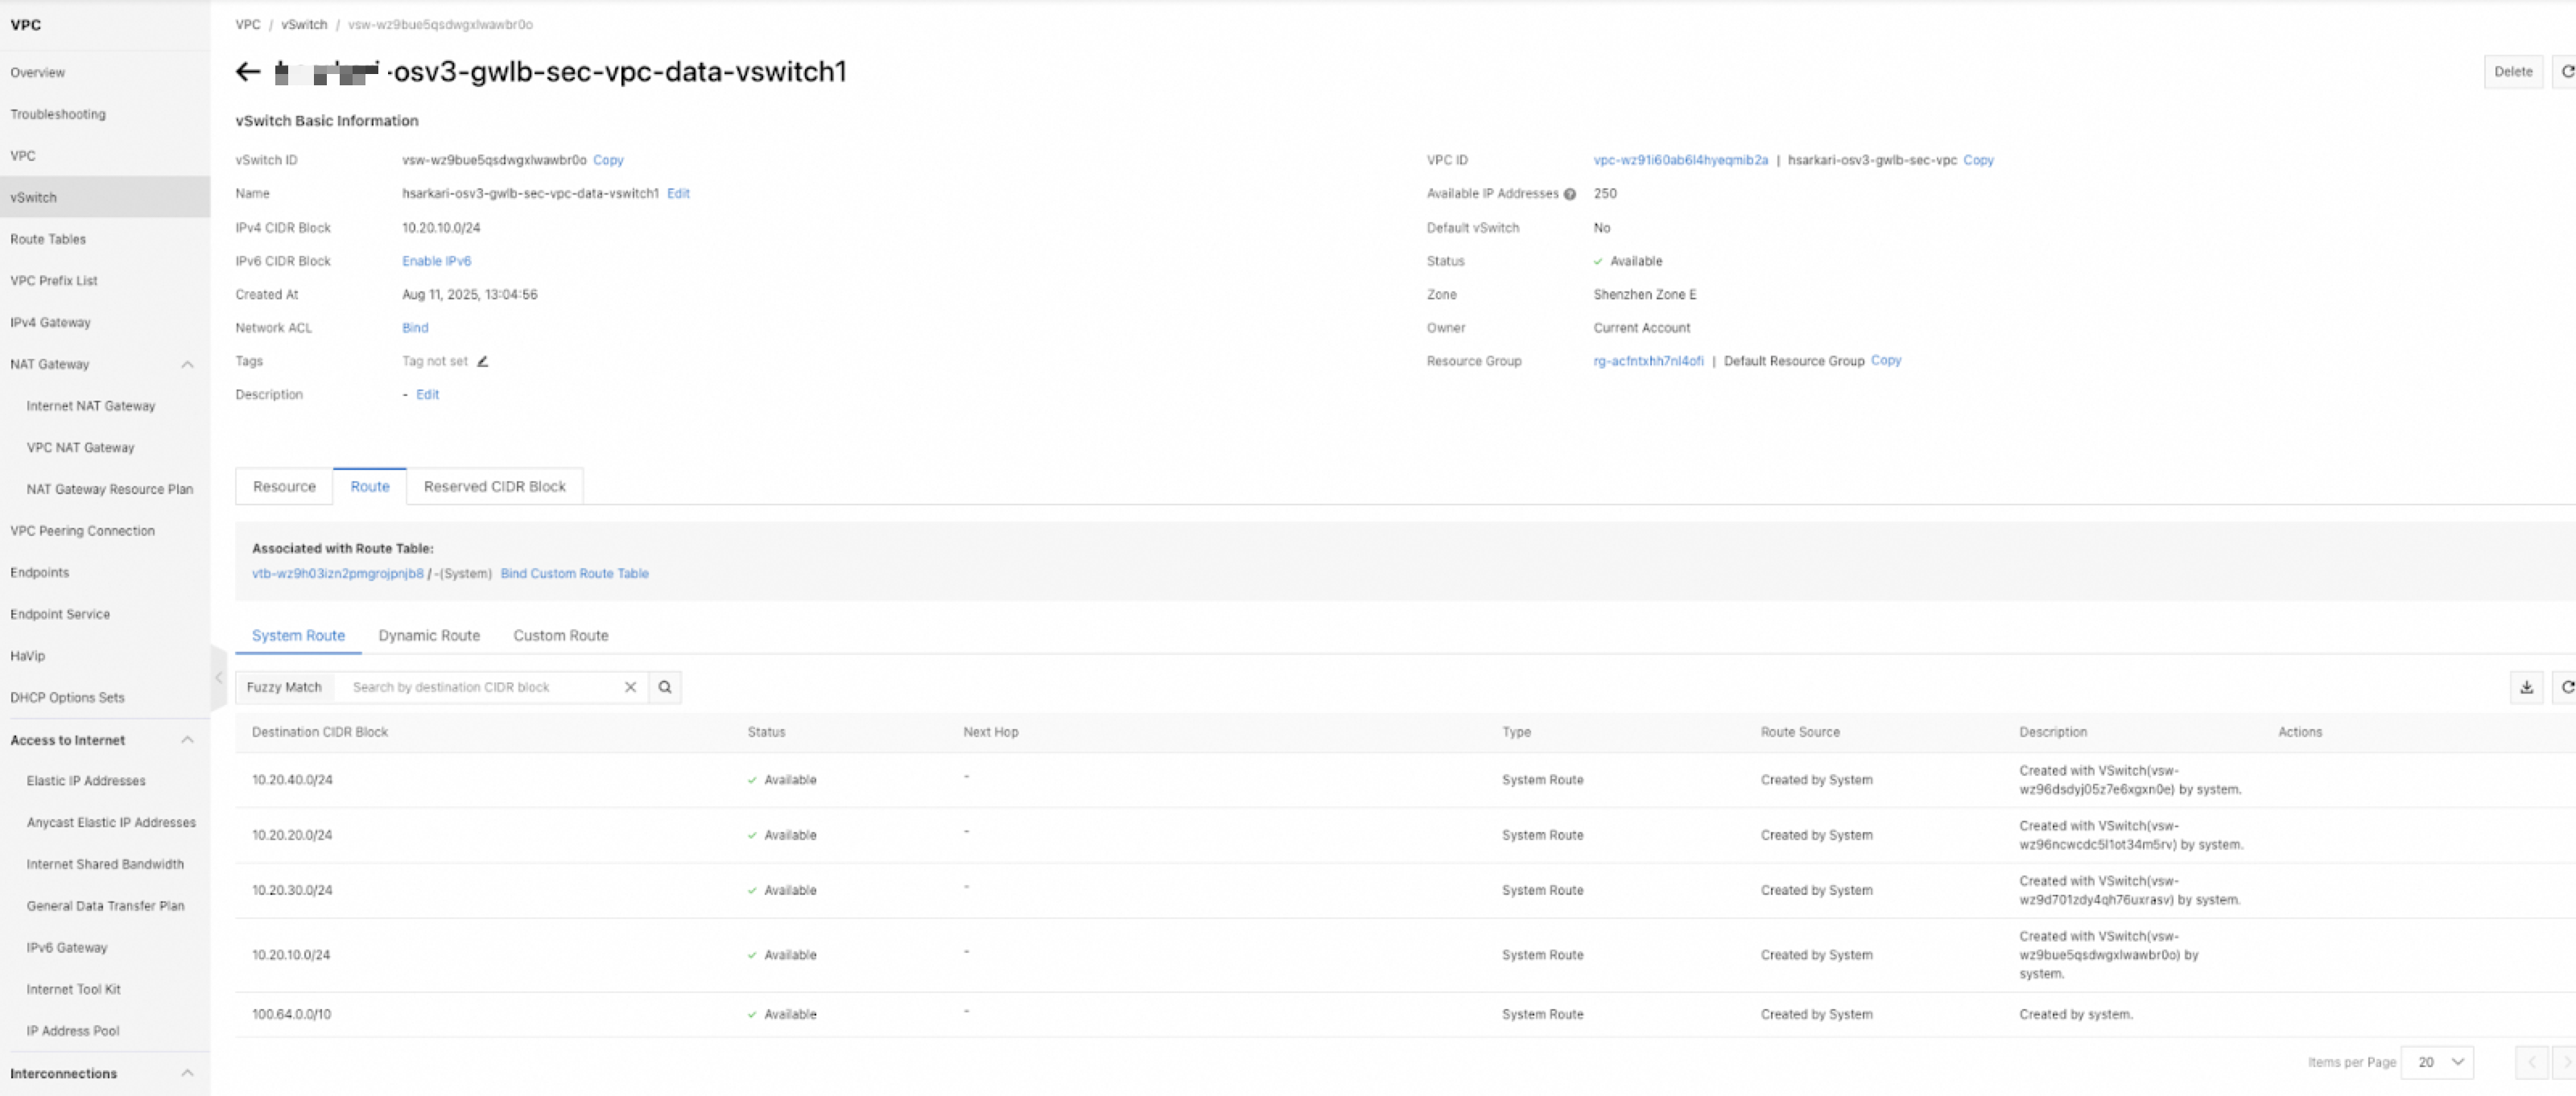
Parameter Description Region Specify the region. For example, China (Ulanqab). Endpoint Name Specify an endpoint name. Endpoint Type Select an endpoint type. For example, Gateway Endpoint. Endpoint Service Select an endpoint service. For example, Select Service as in Configure an endpoint service. VPC Select the VPC in which the endpoint is deployed. For example, you may choose to select the business VPCs. Zone and vSwitch Select the zone where the service resource of the endpoint service is deployed and select the vSwitch in this zone. The system automatically creates an endpoint elastic network interface (ENI) in the vSwitch. For example, you may choose to select Ulanqab Zone B and the vSwitch of the GWLB endpoint subnet. Network Type Select the network type. For example, IPv4. ![]() Click the System Route tab on the Route Entry List tab of the Route Table Details page, and view the routes that are created by the system. Routes destined for the CIDR block of a vSwitch of the VPC to which the route table belongs are automatically added by the system to a custom route table. These routes are used for communication between cloud resources within the vSwitch.
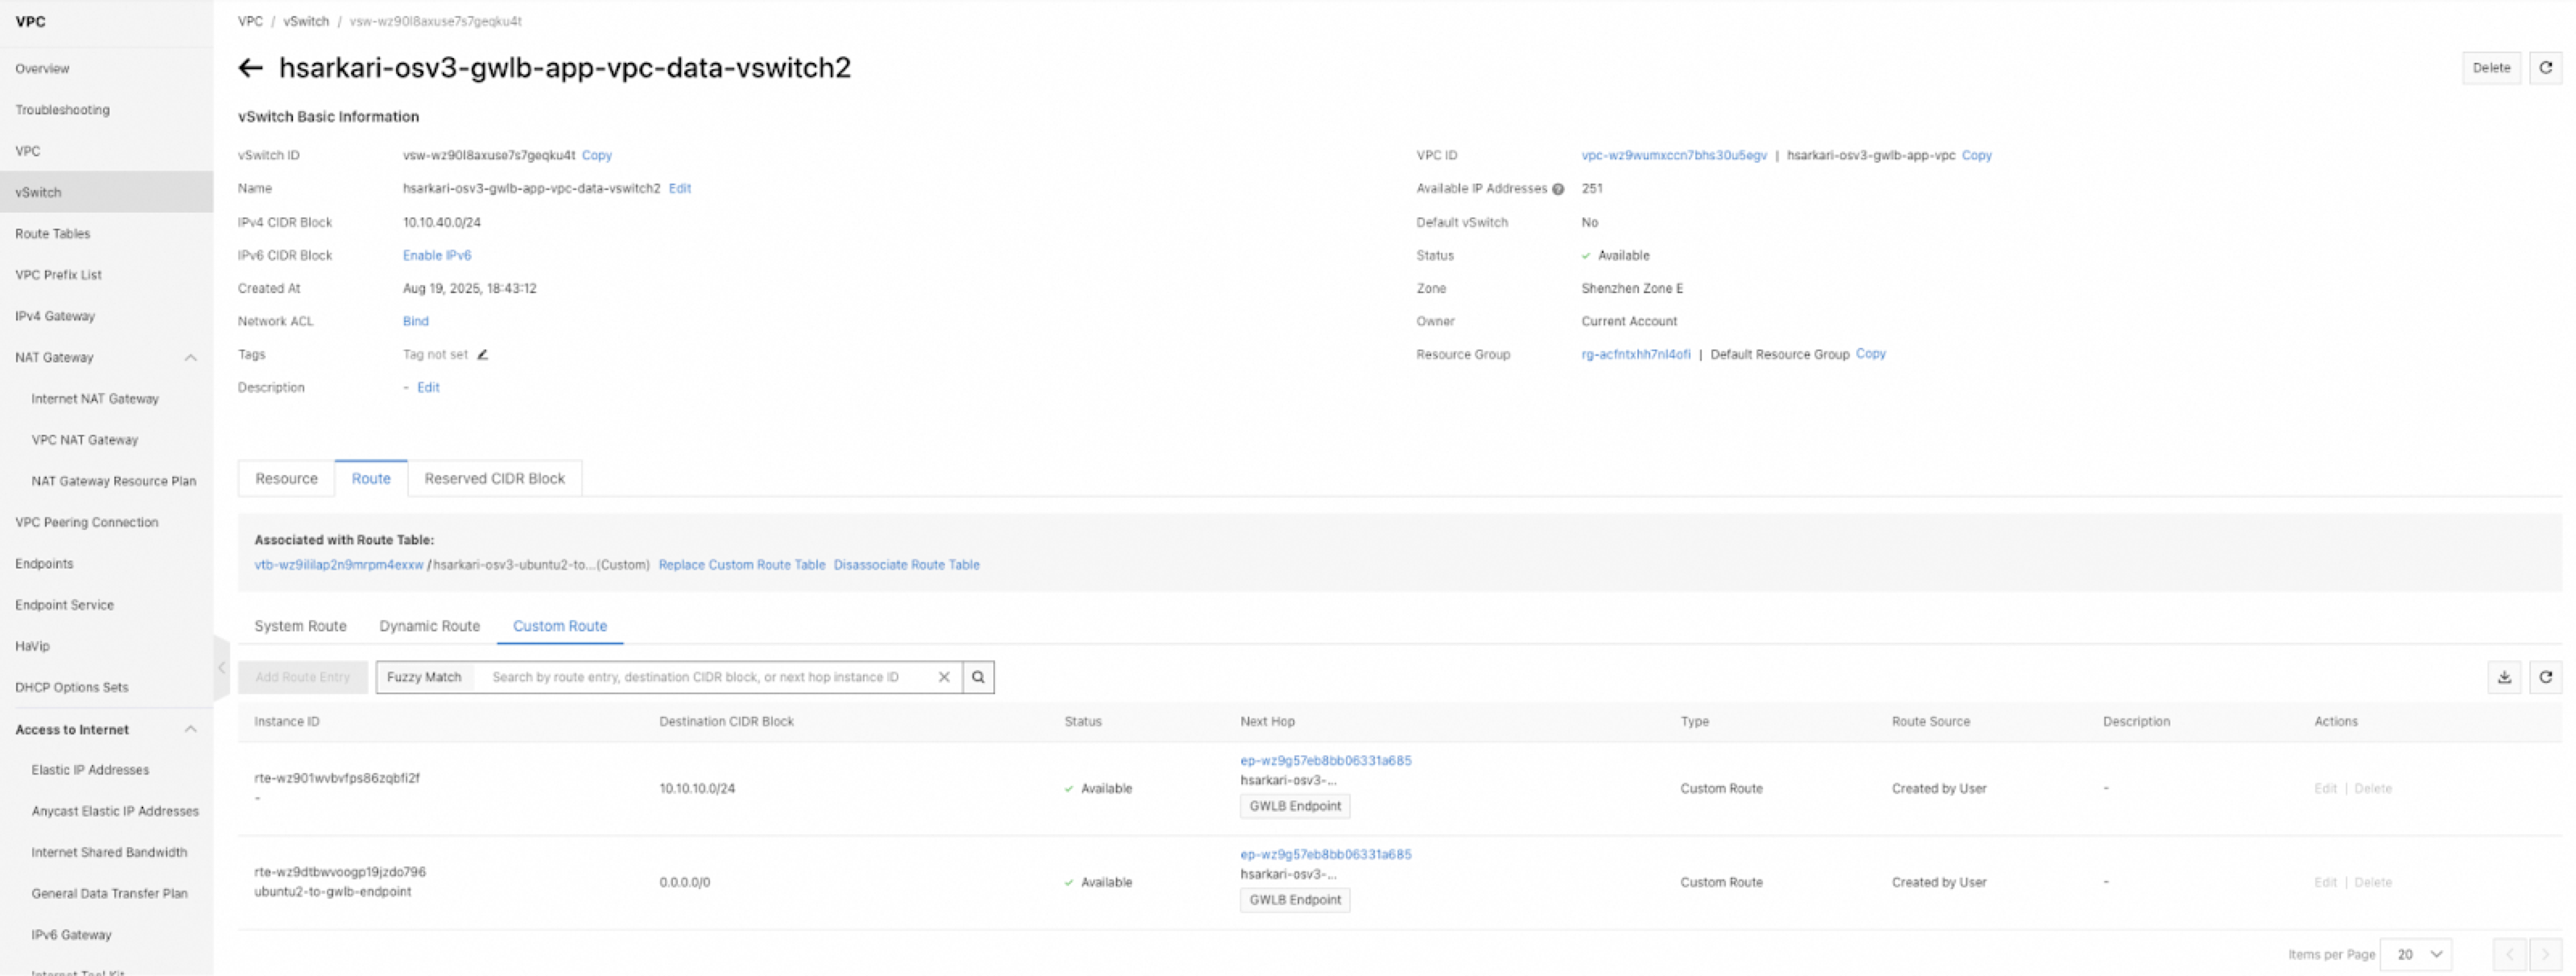
Click the System Route tab on the Route Entry List tab of the Route Table Details page, and view the routes that are created by the system. Routes destined for the CIDR block of a vSwitch of the VPC to which the route table belongs are automatically added by the system to a custom route table. These routes are used for communication between cloud resources within the vSwitch.![]() Modify system routes: Click Route Entry List > System Route, find the system route that you want to modify and click Modify in the Actions column. In the Modify Route Entry dialog box, configure the parameters and click OK. Then this route appears on the Custom Route tab.
Modify system routes: Click Route Entry List > System Route, find the system route that you want to modify and click Modify in the Actions column. In the Modify Route Entry dialog box, configure the parameters and click OK. Then this route appears on the Custom Route tab.![]() The parameters are described below:
The parameters are described below:Parameter Description Destination CIDR Block Displays the destination CIDR block of traffic. Destination CIDR Block cannot be modified. Name Specify a new route name. Next Hop Select the type of the next hop. For example, GWLB Endpoint. GWLB Endpoint Select an endpoint service. For example, Select Service as in Configure an endpoint service. VPC Select the GWLB endpoint that you created in Configure a GWLB endpoint. For more information, see Alibaba Cloud documentation.