Configure the Service Definition on Panorama
Table of Contents
Configure the Service Definition on Panorama
A service definition specifies the configuration
for the VM-Series firewalls installed in your NSX-T data center
environment. The service definition must include the device group,
a template stack, and an OVF URL.
- Add a new service definition.You can create up to 32 service definitions on Panorama.
- Select .
- Select Add to create a new service definition.
- Enter a descriptive Name for your service definition.
- (Optional) Add a Description that identifies the function or purpose for the VM-Series firewalls that will be deployed using this service definition.
- Assign a device group and a template stack to the service
definition.Make sure to Create Template Stacks and Device Groups on Panorama.Because the firewalls deployed in this solution will be centrally administered from Panorama, you must specify the Device Group and the Template Stack that the firewalls belong to. All the firewalls that are deployed using this service definition belong to the specified template stack and device group.
- Select the device group or device group hierarchy in the Device Group drop-down.
- Select the template stack in the Template drop-down.You cannot reuse a template stack or a device group assigned to one service definition in another service definition.
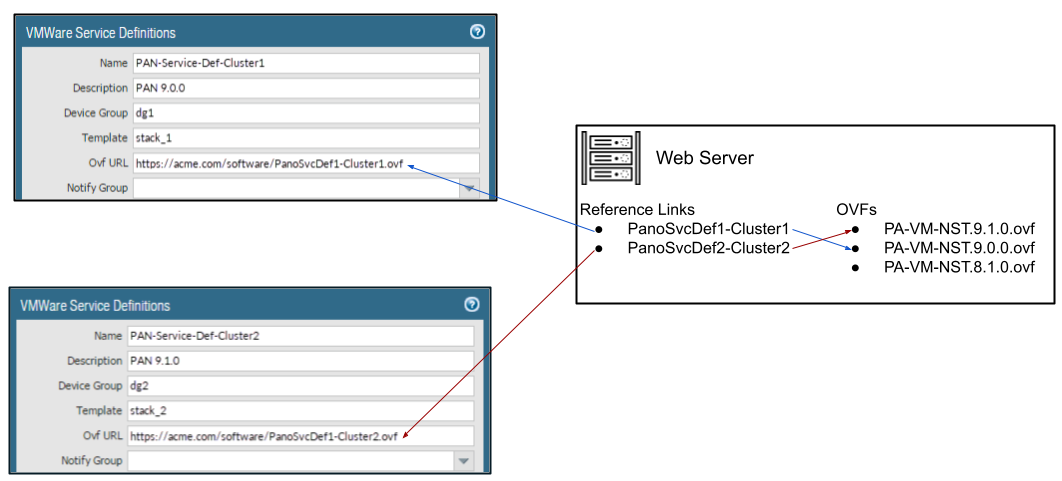
- Specify the location of the OVF file.Download the zip file, unzip it to extract and save the .ovf, mf and .vmdk files to the same directory. The ovf and vmdk files are used to deploy each instance of the firewall.If needed, modify the security settings on the server so that you can download the file types. For example, on the IIS server modify the Mime Types configuration; on an Apache server edit the .htaccess file.Do not change the Panorama service definition OVF path after a successful NSX Service Deployment of VM-Series firewalls. Changing the OVF path, after a successful VM-Series firewall deployment, can result in a NSX Service Deployment failed state. You may resolve this failure in NSX-T Manager, however this may cause all VM-Series firewalls to redeploy.It is recommended that you use an OVF path name that scales and allows you to change the base image without impacting your deployed firewalls. Instead of a path such as https://acme.com/software/PA-VM-NST.9.1.0.ovf, use something such as https://acme.com/software/PanoSvcDef1-Cluster1.ovf. Using a static path reference will eliminate any future need to change the OVF path. It is recommended to create a path for each Panorama service definition (vSphere cluster) in your deployment and change the PAN-OS base images references on the web server as needed.
![]() In OVF URL, add the location of the web server that hosts the ovf file. Both http and https are supported protocols.Panorama must have network connectivity with the web server to retrieve the OVF file.You can use the same ovf version or different versions across service definitions. Using different ovf versions across service definitions allows you to vary the PAN-OS version on the VM-Series firewalls in different ESXi clusters.
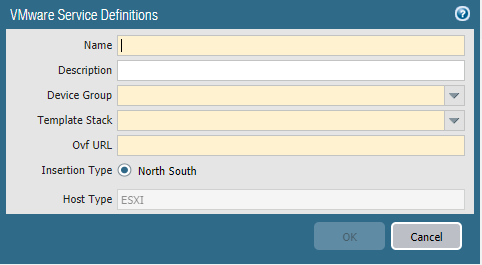
In OVF URL, add the location of the web server that hosts the ovf file. Both http and https are supported protocols.Panorama must have network connectivity with the web server to retrieve the OVF file.You can use the same ovf version or different versions across service definitions. Using different ovf versions across service definitions allows you to vary the PAN-OS version on the VM-Series firewalls in different ESXi clusters. - Select North South as the Insertion Type for your firewall.
- Enable Device Certificate if your OVF is PAN-OS 9.1.5 or later. Otherwise, disable it.
- Click OK to save the service definition.
![]()
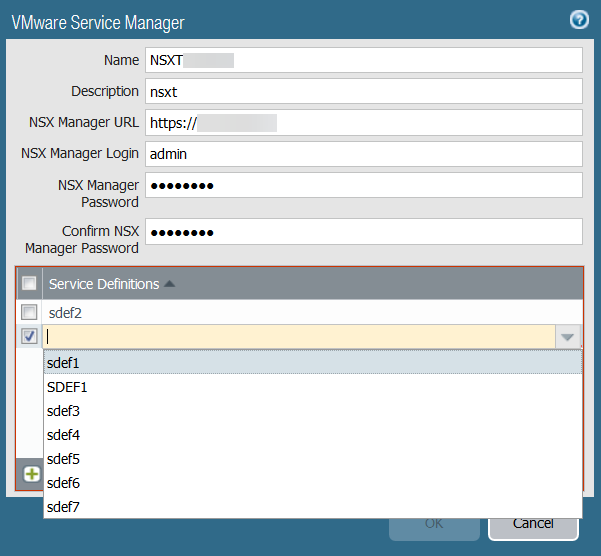
- Attach the service definition to the service manager.
- Select and click the link of the service manager name.
- Under Service Definitions, click Add and select your service definition from the drop-down.
- Click OK.
![]()
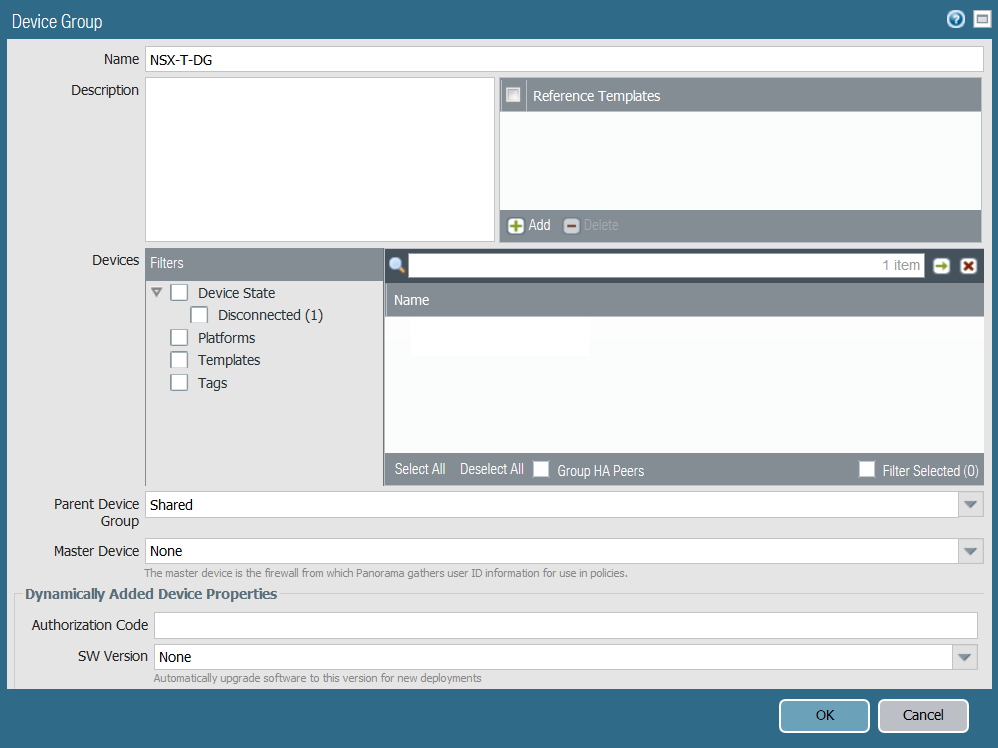
- Add the authorization code to license the firewalls.
- Select and choose the device group you associated with the service definition you just created.
- Under Dynamically Added Device Properties,
add the authorization code you received with your order fulfillment
email and, optionally, select None from the SW Version drop-down.When a new firewall is deployed on NSX-T it is automatically added to the device group, licensed using the authorization code you provided, and upgraded to the PAN-OS version you specified.On the support portal, you can view the total number of firewalls that you are authorized to deploy and the ratio of the number of licenses that have been used to the total number of licenses enabled by your authorization code.
![]()
- Commit to Panorama.
- On the NSX-T Manager, verify that the service definition
is available. Select . The service definition is listed as a Service Instance on the NSX-T Manager.