Replace a System Drive in a PA-5450 MPC
Table of Contents
Replace a System Drive in a PA-5450 MPC
Learn how to replace an SSD in the PA-5400 Series firewall.
- Identify the failed drive and determine the drive model using the show system raid detail CLI command.When the system drives are functioning normally, all system drive partitions show both drives with the status clean. If a system drive fails, the Overall System Drives RAID status shows degraded, one or more failed partition array shows clean, degraded, and one of the drives will be missing (Sys1 or Sys2).In this example, the output from the show system raid detail command shows that the drive model is MICRON_M510DC_MT, the panlogs partition shows the status clean, degraded, and drive Sys1 is missing from the panlogs array; together, these indicate that you need to replace the Sys1 drive.
admin@PA-5450> show system raid detail

Overall System Drives RAID status           degraded
-----------------------------------------------------------------------------
Drive status
   Disk id Sys1                             Present     (MICRON_M510DC_MT)
   Disk id Sys2                             Present     (MICRON_M510DC_MT)
-----------------------------------------------------------------------------
Partition status

panlogs                                     clean, degraded
   Drive id Sys2                            active sync
maint                                       clean
   Drive id Sys1                            active sync
   Drive id Sys2                            active sync
sysroot0                                    clean
   Drive id Sys1                            active sync
   Drive id Sys2                            active sync
sysroot1                                    clean
   Drive id Sys1                            active sync
   Drive id Sys2                            active sync
pancfg                                      clean
   Drive id Sys1                            active sync
   Drive id Sys2                            active sync
panrepo                                     clean
   Drive id Sys1                            active sync
   Drive id Sys2                            active sync
swap                                        clean
   Drive id Sys1                            active sync
   Drive id Sys2                            active sync
When viewing the drives so that the labels are readable, Sys1 is the top drive and Sys2 is the bottom drive.Remove the failed drive from the RAID 1 array. In this example, run the following command to remove drive Sys1 from the array:admin@PA-5450> request system raid remove sys1Confirm that the failed drive is removed from all partitions. In the following output of the show system raid detail, you see that drive id Sys1 is now missing from all partitions.admin@PA-5450> show system raid detail Overall System Drives RAID status degraded ----------------------------------------------------------------------------- Drive status Disk id Sys1 Present (MICRON_M510DC_MT) Disk id Sys2 Present (MICRON_M510DC_MT) ----------------------------------------------------------------------------- Partition status panlogs clean, degraded Drive id Sys2 active sync maint clean, degraded Drive id Sys2 active sync sysroot0 clean, degraded Drive id Sys2 active sync sysroot1 clean, degraded Drive id Sys2 active sync pancfg clean, degraded Drive id Sys2 active sync panrepo clean, degraded Drive id Sys2 active sync swap clean, degraded Drive id Sys2 active sync
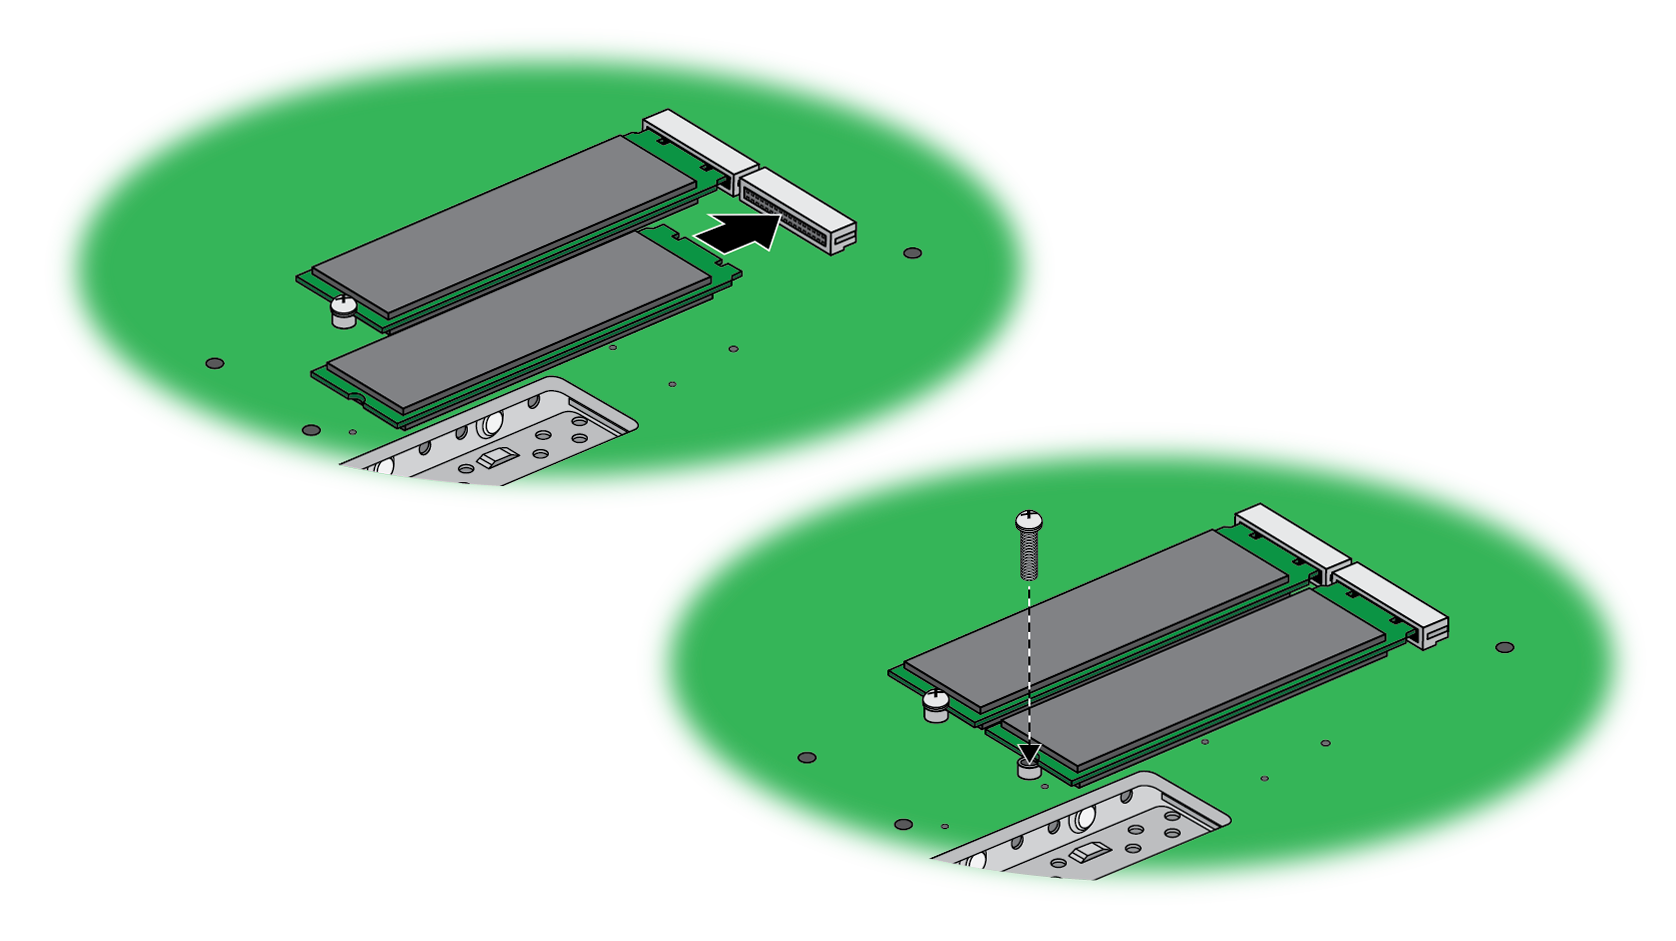
Ensure that you have access to an ESD work surface for placement of the Management Processor Card (MPC).Put the provided ESD wrist strap on your wrist ensuring that the metal contact is touching your skin. Then attach (snap) one end of the ground cable to the wrist strap and remove the alligator clip from the banana clip on the other end of the ESD grounding cable. Plug the banana clip end into one of the ESD ports located on the back of the appliance before handling ESD sensitive hardware. For details on the ESD port location, see PA-5450 Back Panel.Remove the MPC from card slot 7 of the appliance. See Replace a PA-5400 Series Management Processor Card (MPC) for details on removing the MPC.Place the MPC on an ESD work surface. Detach your wrist strap’s ground cable from the ESD port on the appliance and securely attach the alligator clip to the new ESD surface.Flip the MPC over and locate the two SSDs on the bottom surface of the card. Remove the retention screw for the SSD you intend to replace.![]() The plastic standoff becomes loose after the retention screw is removed. Do not lose the standoff as it is needed when installing the new SSD.Gently pull the SSD away from its mating connector. Place the old SSD to the side.Slide the new SSD into the vacant mating connector. Ensure that the SSD aligns with the plastic standoff on the MPC.Fasten the retention screw back into place at a torque of 4 in-lbs.Exceeding a torque of 4 in-lbs will damage the equipment.
The plastic standoff becomes loose after the retention screw is removed. Do not lose the standoff as it is needed when installing the new SSD.Gently pull the SSD away from its mating connector. Place the old SSD to the side.Slide the new SSD into the vacant mating connector. Ensure that the SSD aligns with the plastic standoff on the MPC.Fasten the retention screw back into place at a torque of 4 in-lbs.Exceeding a torque of 4 in-lbs will damage the equipment.![]() Before re-installing the MPC, plug the banana clip end of your ESD wrist strap into one of the ESD ports located on the back of the appliance.Slide the MPC back into slot 7. See Install a PA-5400 Series Firewall Management Processor Card (MPC) for more information.
Before re-installing the MPC, plug the banana clip end of your ESD wrist strap into one of the ESD ports located on the back of the appliance.Slide the MPC back into slot 7. See Install a PA-5400 Series Firewall Management Processor Card (MPC) for more information.