Install a Device Certificate on the VM-Series Firewall
Table of Contents
Install a Device Certificate on the VM-Series Firewall
Get the device certificate to activate the site licenses
on the VM-Series firewalls.
| Where Can I Use This? | What Do I Need? |
|---|---|
|
|
The firewall requires a device certificate to retrieve the site license entitlements and
securely access cloud services such as WildFire, AutoFocus, and Strata Logging Service. There
are two methods for applying a site license to your VM-Series firewall—One-time password and
auto-registration PIN. Each password or PIN is generated on the Customer Support
Portal (CSP) and unique to your Palo Alto Networks support account. The method you use
depends on the license type used to deploy your firewall and if your firewalls are managed by
Panorama. To successfully install the device certificate, the VM-Series firewall must have an
outbound internet connection and the following Fully Qualified Domain Names (FQDN) and ports
must be allowed on your network.
There are three methods for applying a site license to your VM-Series firewall—One-time
password, auto-registration PIN, and through Panorama for managed firewalls. Each password or
PIN is generated on the Customer Support Portal (CSP) and unique to your Palo Alto Networks
support account. The method you use depends on the license type used to deploy your firewall and
if your firewalls are managed by Panorama.
- One Time Password (OTP)—For VM-Series firewalls that have already been registered with Palo Alto Networks licensing server, you must generate a One-Time Password on the Customer Support Portal and apply it to your VM-Series firewall. Use this method for VM-Series firewalls with a BYOL or ELA license in small-scale, unmanaged deployments and manually-deployed VM-Series firewalls managed by Panorama.
- Registration PIN—This method allows you to apply a site license to your VM-Series firewall at initial startup. Use this method for VM-Series firewalls with usage-based licenses (PAYG), that you bootstrap at launch or with any type of automated deployment, regardless of license type. The auto-registration PIN enables you to automatically register your usage-based firewalls at launch with the CSP and retrieve site licenses.
- If you are using Panorama to manage the VM-Series firewall, see Install the device certificate on a managed firewall.
For the VM-Series firewall on NSX-T, you can add the auto-registration PIN to your service
definition configuration so the device certificate is fetched by the firewall upon initial boot
up. See the service definition configuration for NSX-T (North-South) and NSX-T (East-West) for more information. If you
upgrade previously-deployed firewalls to PAN-OS version that supports device certificates, you
can apply a device certificate to the those firewalls individually using a one time
password.
One-time passwords and auto-registration PINs must be used before they expire. If you do not,
you must return to the CSP to generate a new one.
|
FQDN
|
Ports
|
|---|---|
|
TCP 80
|
|
TCP 443
|
|
TCP 444 and TCP 443
|
Retrieve Licenses Automatically at Launch
The firewall requires the device certificate to get the site license entitlements and
securely access the cloud services. To retrieve the site licenses when you launch the firewall,
in the bootstrap package you must include the authcode in the /license folder, and add the auto
registration PIN ID and value in the init-cfg.txt file and place it in the /config folder.
Adding the auto registration PIN ID and value also enable auto-registration of the PAYG or
usage-based instances on the VM-Series firewall.
- Log in to the Customer Support Portal (CSP) as a Superuser.Generate the VM-Series registration PIN.
- Select .Enter a Description and a PIN Expiration time period.Click Generate Registration PIN.Save the PIN ID and value.Make sure to launch the firewall before the PIN expires.
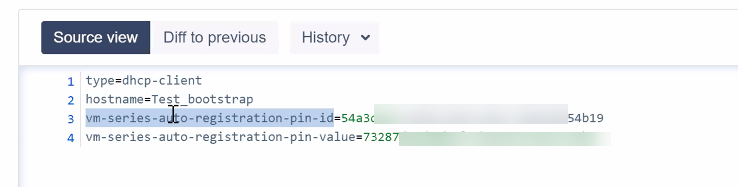
![]() Add the registration PIN ID and value in the init-cfg.txt file.In addition to the required parameters, you must include:vm-series-auto-registration-pin-id=vm-series-auto-registration-pin-value=
Add the registration PIN ID and value in the init-cfg.txt file.In addition to the required parameters, you must include:vm-series-auto-registration-pin-id=vm-series-auto-registration-pin-value=![]() Verify that the device certificate is fetched and that you can see the site license on the firewall.
Verify that the device certificate is fetched and that you can see the site license on the firewall.Manually Retrieve a Device Certificate
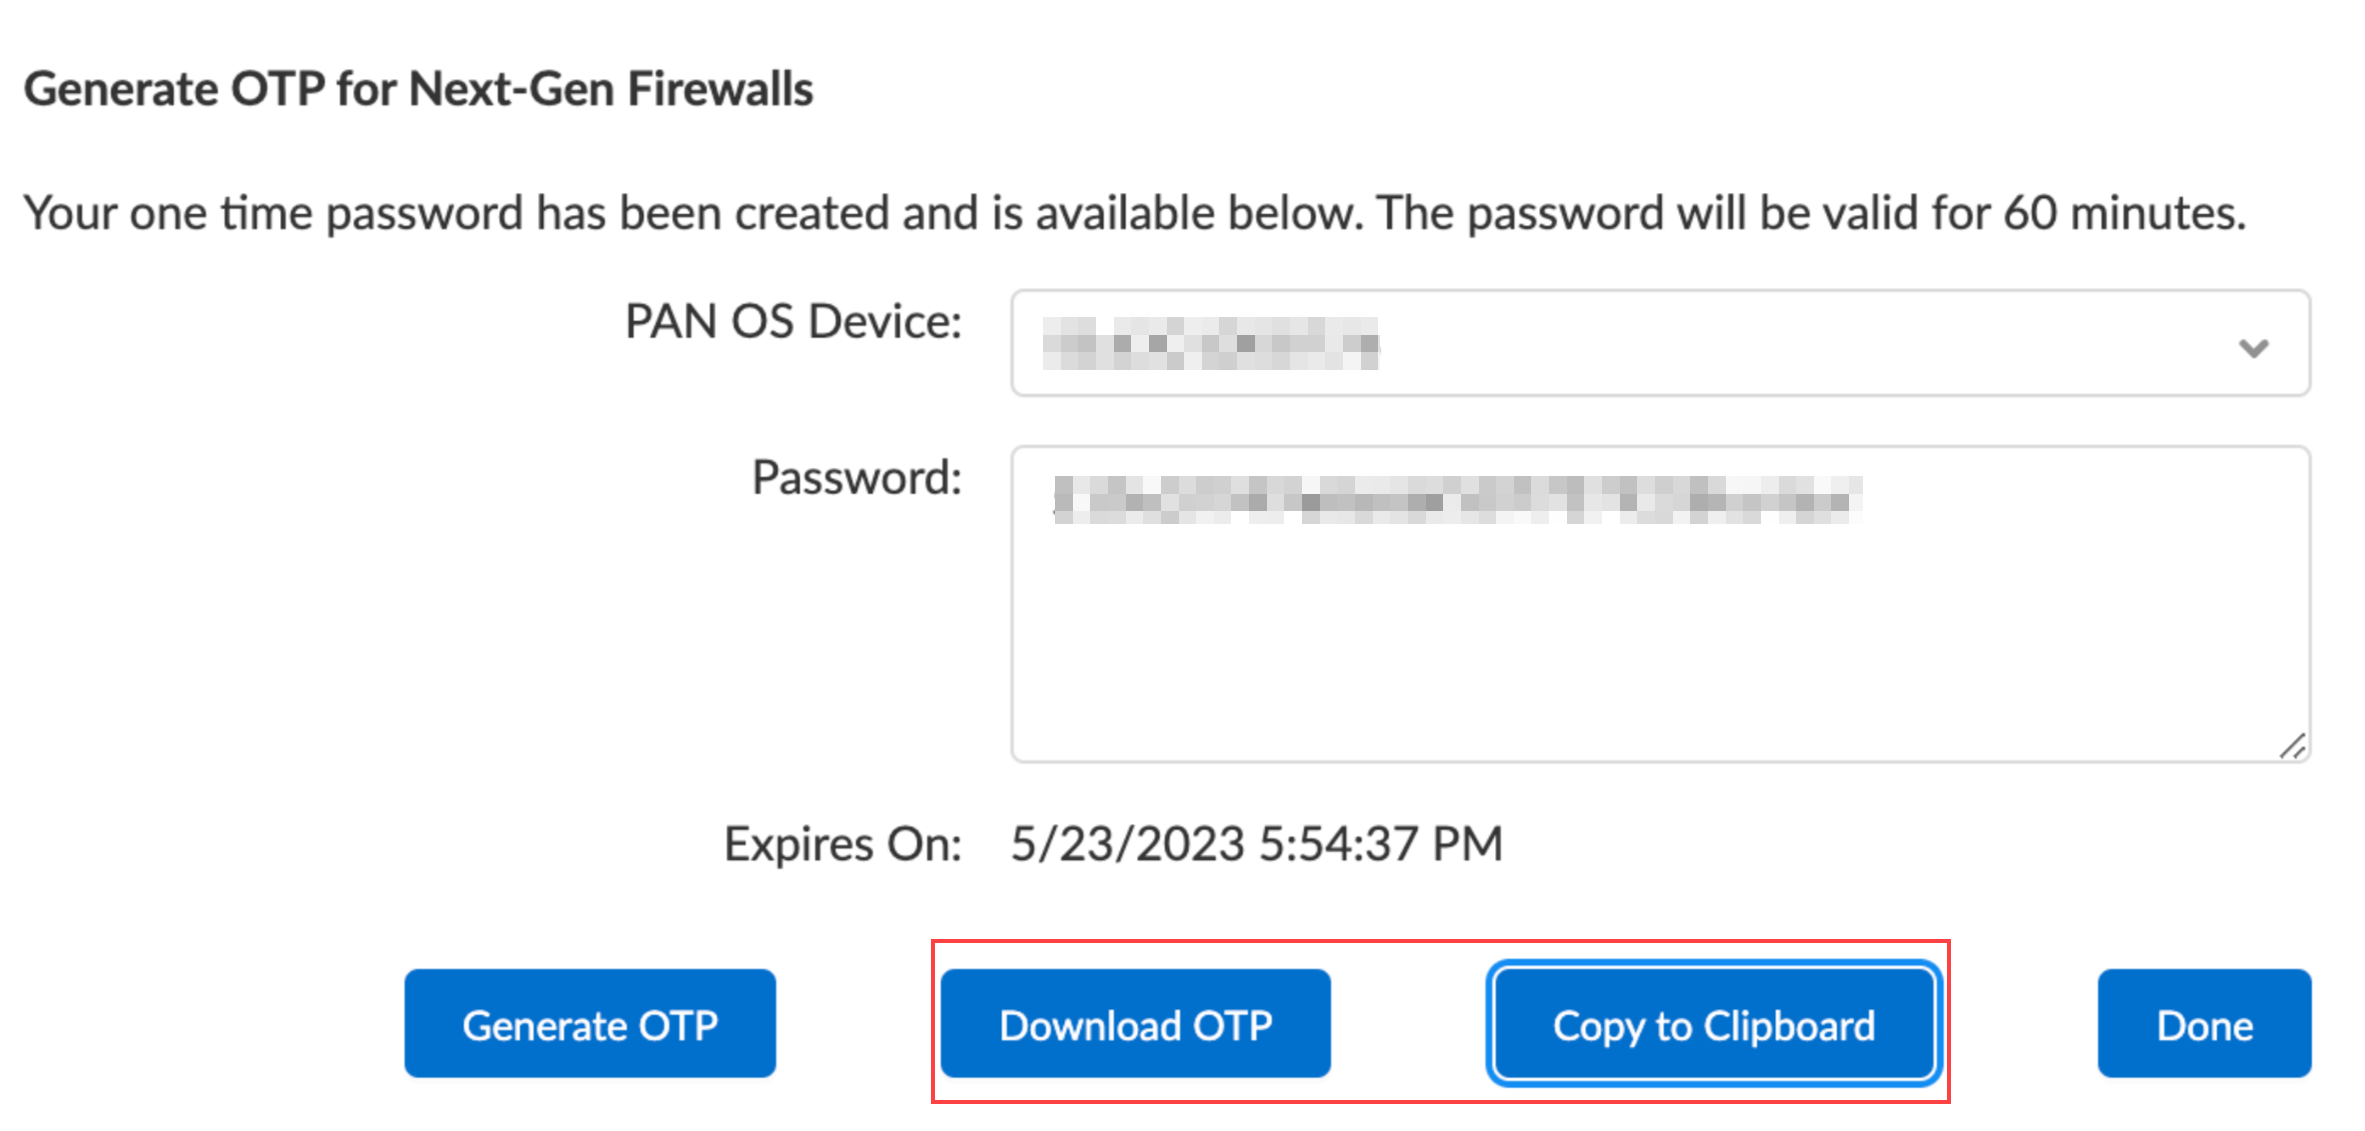
- Generate the One Time Password (OTP).OTP lifetime is 60 minutes and expires if not used within the 60 minute lifetime.Firewall may only attempt to retrieve the OTP from the CSP one time. If the firewall fails for any reason to fetch the OTP, the OTP expires and you must generate a new OTP.
- Log in to the Customer Support Portal with a user role that has permission to generate an OTP.Register your VM-Series firewall, if you have not already.Select and Generate OTP.For the Device Type, select Generate OTP for Next-Gen Firewall and click Next.Select your PAN OS Device serial number and Generate OTP.Download OTP or Copy to Clipboard.
![]() Log in to the VM-Series firewall web interface as a Superuser.An admin with Superuser access privileges is required to apply the OTP used to install the device certificate.Configure the Network Time Protocol (NTP) server for your firewalls.An NTP server is required to validate the device certification expiration date, ensure the device certificate does not expire early or become invalid.
Log in to the VM-Series firewall web interface as a Superuser.An admin with Superuser access privileges is required to apply the OTP used to install the device certificate.Configure the Network Time Protocol (NTP) server for your firewalls.An NTP server is required to validate the device certification expiration date, ensure the device certificate does not expire early or become invalid.- Select and select the Template.Select one of the following depending on your platform:
- For multi-virtual system platforms, select Global and edit the Services section.
- For single virtual system platforms, edit the Services section.
Select NTP and enter the hostname or IP address of the Primary NTP Server.(Optional) Enter a the hostname or IP address of the Secondary NTP Server.(Optional) To authenticate time updates from the NTP server(s), for Authentication Type, select one of the following for each server.- None (default)—Disables NTP authentication.
- Symmetric Key—Firewall uses symmetric key exchange (shared secrets) to authenticate time updates.
- Key ID—Enter the Key ID (1-65534)
- Algorithm—Select the algorithm to use in NTP authentication (MDS or SHA1)
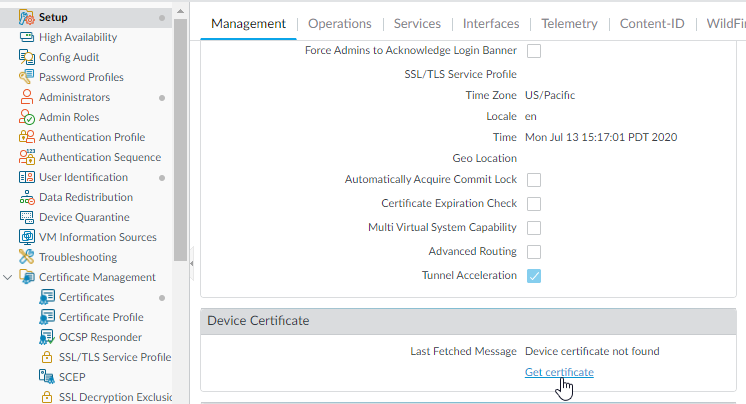
Click OK to save your configuration changes.Select Commit and Commit and Push your configuration changes to your managed firewalls.Select and Get Certificate.![]() Verify that the device certificate is fetched and that you can see the site license on the firewall.
Verify that the device certificate is fetched and that you can see the site license on the firewall.