Deploy the VM-Series Firewall from Google Cloud Platform Marketplace
Table of Contents
Deploy the VM-Series Firewall from Google Cloud Platform Marketplace
Use Google® Cloud Platform Marketplace to deploy the
VM-Series firewall with a minimum of three interfaces (Management,
Trust, and Untrust).
You can use Google® Cloud Platform Marketplace to deploy the VM-Series firewall on
a fixed vCPU capacity license (VM-Series Models). The licensed
images available from public clouds are:
- VM-Series Next-Generation Firewall Bundle 1
- VM-Series Next-Generation Firewall Bundle 2
- VM-Series Next-Generation Firewall (BYOL)
See Deploy the VM-Series Firewall from Google Cloud Platform Marketplace for more about
these license options.
The Marketplace deploys an
instance of the VM-Series firewall with a minimum of one management
interface and two dataplane interfaces (Trust and Untrust). You can
add additional dataplane interfaces for up to five Google Compute
Engine instances in your virtual private cloud (VPC).
Before
you deploy the VM-Series firewall, you must create or choose a project
in your organization and create any networks and subnets that will
connect to the firewall, as described in VPC
Network Planning and Network
Interface Planning.
You cannot attach multiple network
interfaces to the same VPC network. Every interface you create must
have a dedicated network with at least one subnet. Ensure that your
networks include any additional dataplane instances you create.
- Choose a Bootstrap Method.
- Locate the VM-Series firewall listing in the Marketplace.
- Log in to the Google Cloud Console.
- From the Products and Services menu, select Marketplace.
- Search for VM-Series.
- Select one of the VM-Series firewall licensing options.
- Click Launch on Compute Engine.
- Name the instance and choose resources.
- Enter the Deployment Name (this name is displayed in the Deployment Manager). The name must be unique and cannot conflict with any other deployment in the project.
- Select a Zone. See Regions and Zones for a list of supported zones.
- Select a Machine Type based on the VM-Series System Requirements for your license and the Minimum System Requirements for the VM-Series Firewall on Google Cloud Platform.
- Specify
instance metadata.The options Bootstrap Bucket and Interface Swap affect the initial configuration the first time the VM-Series firewall boots.
- Bootstrap Bucket (Optional)—If
you plan to use a bootstrap file, enter the name of a storage bucket,
or the path to a folder within the storage bucket, that contains the bootstrap package.
You need permission to
access the storage bucket. For example:
vmseries-bootstrap-gce-storagebucket=<bucketname>orvmseries-bootstrap-gce-storagebucket=<bucketname/directoryname> - Interface Swap (Optional)—Swap the Management interface (eth0) and the first dataplane interface (eth1) at deployment time. Interface swap is only necessary when you deploy the VM-Series firewall behind Google Cloud Platform HTTP(S) Load Balancing. For details, see Management Interface Swap for Google Cloud Platform Load Balancing.
- SSH key—Paste in the public
key from an SSH key pair. Follow the instructions for your OS in SSH Key Pair, to create,
copy, and paste the key. Windows users must view the key in PuTTY,
copy from the user interface, and paste into Marketplace deployment.If the key is not formatted properly, the VM-Series firewall does not allow you to log in. You must delete the deployment and start over.
- Click More to reveal additional
metadata options. The options blockProjectKeys, and enableSerialConsole are
properties of the instance; you can change these metadata values
after a successful deployment.
- blockProjectKeys (Optional)—If you Block Project Keys, you can use only the public SSH key you supply to access the instance.
- enableSerialConsole (Optional)—Interacting with the Serial Console enables you to monitor instance creation and perform interactive debugging tasks.
- Bootstrap Bucket (Optional)—If
you plan to use a bootstrap file, enter the name of a storage bucket,
or the path to a folder within the storage bucket, that contains the bootstrap package.
You need permission to
access the storage bucket. For example:
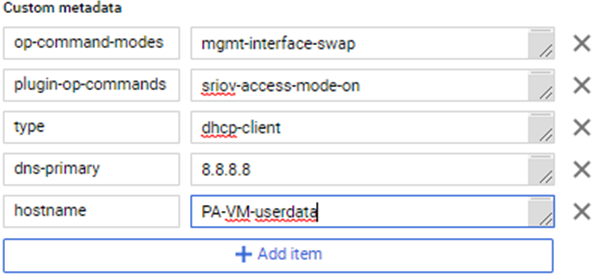
- Specify
custom metadata. If you choose to bootstrap with custom metadata, add any key-value pairs that you did not add in Step 5. See init-cfg.txt File Components for the list of key-value pairs. For example:
![]()
- Configure the boot disk.
- Boot disk type—Select from SSD Persistent disk or Standard Persistent Disk. See Storage Options.
- Enter the Boot disk size—60GB is the minimum size. You can edit the disk size later but you must stop the VM to do so.
- Configure
the management interface.
- Management VPC Network name—Choose an existing network
- Management Subnet name—Choose an existing subnet.
- Enable External IP for Management interface (Optional)—If you enable this option, you can use the IP address assigned to the VM-Series firewall management interface to use SSH to access the VM-Series firewall web interface.
- Enable GCP Firewall rule for connections to Management interface (Optional)—This option automatically creates a GCP firewall Allow rule for an external source IP address that you supply.
- Source
IP in GCP Firewall rule for connections to Management Interface—If
you Enable GCP Firewall rule for connections to Management interface,
enter a source IP address or a CIDR block.
- Do not use 0.0.0.0/0. Supply an IP address or a CIDR block that corresponds to your dedicated management IP addresses or network. Do not make the source network range larger than necessary.
- Verify the address to ensure that you do not lock yourself out.
- Configure the Untrust dataplane interface.
- Untrust VPC Network name—Choose an existing network.
- Untrust Subnet name—Choose an existing subnet.
- Enable External IP for Untrust—Enable GCP to provide an ephemeral IP address to act as the external IP address.
- Configure the Trust dataplane interface.
- Trust VPC Network name—Choose an existing network.
- Trust Subnet name—Choose an existing network.
- Enable External IP for Trust—Enable GCP to provide an ephemeral IP address to act as the external IP address.
- Configure additional interfaces. You must enter the number
of dataplane interfaces you want to add; the default is 0 (none).
The deployment page always displays fields for five additional dataplanes
numbered 4 through 8.
- Additional Dataplane interfaces—Enter
the number of additional dataplane instances.If this number is 0 (default), dataplane numbers 4 through 8 are ignored even if you fill out the interface fields. If, for example, you specify 2 and then fill out information for three interfaces, only the first two are created.
- Additional Dataplane # VPC name—Choose an existing network.
- Dataplane # Subnet name—Choose a subnet that exists.
- Enable External IP for dataplane # interface—Enable GCP to provide an ephemeral IP address to act as the external IP address.
- Additional Dataplane interfaces—Enter
the number of additional dataplane instances.
- Deploy the instance.
- Use Google Cloud Deployment Manager to view and manage your deployment.
- Use the
CLI to change the administrator password on the firewall.
- Log in to the VM-Series firewall from the
command line. In your SSH tool, connect to the External IP for the
management interface, and specify the path to your private key.Windows users: Use PuTTY to connect to the VM-Series firewall and issue command line instructions. To specify the path to the private key, select . In Private key file for authentication: click Browse to select your private key.
- Enter configuration mode:VMfirewall> configure
- Enter the following command:VMfirewall# set mgt-config users admin password
- Enter and confirm a new password for the administrator.
- Commit your new password:VMfirewall# commit
- Return to command mode:VMfirewall# exit
- (Optional) If you used a bootstrap file for
interface swap, use the following command to view the interface
mapping:VMfirewall> debug show vm-series interfaces all
- Log in to the VM-Series firewall from the
command line. In your SSH tool, connect to the External IP for the
management interface, and specify the path to your private key.
- Access the VM-Series
firewall web interface.
- In a browser, create a secure (https) connection
to the IP address for the management interface.If you get a network error, check to see that you have a GCP firewall rule that allows the connection.
- When prompted, enter the username (admin) and the administrator password you specified from the CLI.
- (Optional) If you bootstrapped, then Verify Bootstrap Completion.If you see problems, search the log information on the VM-Series firewall. Choose and, in the manual search field, enter description contains 'bootstrap' and look for a message in the results that indicates that the bootstrap was successful.
After you log in to the firewall, you can add administrators and create interfaces, zones, NAT rules, and policy rules, just as you would on a physical firewall. - In a browser, create a secure (https) connection
to the IP address for the management interface.