Deploy the VM-Series Firewall
Table of Contents
9.1 (EoL)
Expand all | Collapse all
-
- VM-Series Deployments
- VM-Series in High Availability
- Enable Jumbo Frames on the VM-Series Firewall
- Hypervisor Assigned MAC Addresses
- Custom PAN-OS Metrics Published for Monitoring
- Interface Used for Accessing External Services on the VM-Series Firewall
- PacketMMAP and DPDK Driver Support
-
- VM-Series Firewall Licensing
- Create a Support Account
- Serial Number and CPU ID Format for the VM-Series Firewall
-
- Activate Credits
- Transfer Credits
- Create a Deployment Profile
- Manage a Deployment Profile
- Provision Panorama
- Migrate Panorama to a Software NGFW License
- Renew Your Software NGFW Credits
- Amend and Extend a Credit Pool
- Deactivate License (Software NGFW Credits)
- Delicense Ungracefully Terminated Firewalls
- Create and Apply a Subscription-Only Auth Code
- Migrate to a Flexible VM-Series License
-
- Generate Your OAuth Client Credentials
- Manage Deployment Profiles Using the Licensing API
- Create a Deployment Profile Using the Licensing API
- Update a Deployment Profile Using the Licensing API
- Get Serial Numbers Associated with an Authcode Using the API
- Deactivate a VM-Series Firewall Using the API
- Use Panorama-Based Software Firewall License Management
- What Happens When Licenses Expire?
- Install a Device Certificate on the VM-Series Firewall
-
- Supported Deployments on VMware vSphere Hypervisor (ESXi)
-
- Plan the Interfaces for the VM-Series for ESXi
- Provision the VM-Series Firewall on an ESXi Server
- Perform Initial Configuration on the VM-Series on ESXi
- Add Additional Disk Space to the VM-Series Firewall
- Use VMware Tools on the VM-Series Firewall on ESXi and vCloud Air
- Use vMotion to Move the VM-Series Firewall Between Hosts
- Use the VM-Series CLI to Swap the Management Interface on ESXi
-
-
- VM-Series Firewall for NSX-V Deployment Checklist
- Install the VMware NSX Plugin
- Apply Security Policies to the VM-Series Firewall
- Steer Traffic from Guests that are not Running VMware Tools
- Add a New Host to Your NSX-V Deployment
- Dynamically Quarantine Infected Guests
- Migrate Operations-Centric Configuration to Security-Centric Configuration
- Use Case: Shared Compute Infrastructure and Shared Security Policies
- Use Case: Shared Security Policies on Dedicated Compute Infrastructure
- Dynamic Address Groups—Information Relay from NSX-V Manager to Panorama
-
- Supported Deployments of the VM-Series Firewall on VMware NSX-T (North-South)
- Components of the VM-Series Firewall on NSX-T (North-South)
-
- Install the Panorama Plugin for VMware NSX
- Enable Communication Between NSX-T Manager and Panorama
- Create Template Stacks and Device Groups on Panorama
- Configure the Service Definition on Panorama
- Deploy the VM-Series Firewall
- Direct Traffic to the VM-Series Firewall
- Apply Security Policy to the VM-Series Firewall on NSX-T
- Use vMotion to Move the VM-Series Firewall Between Hosts
- Extend Security Policy from NSX-V to NSX-T
-
- Components of the VM-Series Firewall on NSX-T (East-West)
- VM-Series Firewall on NSX-T (East-West) Integration
- Supported Deployments of the VM-Series Firewall on VMware NSX-T (East-West)
-
- Install the Panorama Plugin for VMware NSX
- Enable Communication Between NSX-T Manager and Panorama
- Create Template Stacks and Device Groups on Panorama
- Configure the Service Definition on Panorama
- Launch the VM-Series Firewall on NSX-T (East-West)
- Add a Service Chain
- Direct Traffic to the VM-Series Firewall
- Apply Security Policies to the VM-Series Firewall on NSX-T (East-West)
- Use vMotion to Move the VM-Series Firewall Between Hosts
- Extend Security Policy from NSX-V to NSX-T
- Use Migration Coordinator to Move Your VM-Series from NSX-V to NSX-T
-
-
- Deployments Supported on AWS
-
- Planning Worksheet for the VM-Series in the AWS VPC
- Launch the VM-Series Firewall on AWS
- Launch the VM-Series Firewall on AWS Outpost
- Create a Custom Amazon Machine Image (AMI)
- Encrypt EBS Volume for the VM-Series Firewall on AWS
- Use the VM-Series Firewall CLI to Swap the Management Interface
- Enable CloudWatch Monitoring on the VM-Series Firewall
- VM-Series Firewall Startup and Health Logs on AWS
- Use Case: Secure the EC2 Instances in the AWS Cloud
- Use Case: Use Dynamic Address Groups to Secure New EC2 Instances within the VPC
-
-
- What Components Does the VM-Series Auto Scaling Template for AWS (v2.0) Leverage?
- How Does the VM-Series Auto Scaling Template for AWS (v2.0 and v2.1) Enable Dynamic Scaling?
- Plan the VM-Series Auto Scaling Template for AWS (v2.0 and v2.1)
- Customize the Firewall Template Before Launch (v2.0 and v2.1)
- Launch the VM-Series Auto Scaling Template for AWS (v2.0)
- SQS Messaging Between the Application Template and Firewall Template
- Stack Update with VM-Series Auto Scaling Template for AWS (v2.0)
- Modify Administrative Account and Update Stack (v2.0)
-
- Launch the Firewall Template (v2.1)
- Launch the Application Template (v2.1)
- Create a Custom Amazon Machine Image (v2.1)
- VM-Series Auto Scaling Template Cleanup (v2.1)
- SQS Messaging Between the Application Template and Firewall Template (v2.1)
- Stack Update with VM-Series Auto Scaling Template for AWS (v2.1)
- Modify Administrative Account (v2.1)
- Change Scaling Parameters and CloudWatch Metrics (v2.1)
-
-
- Enable the Use of a SCSI Controller
- Verify PCI-ID for Ordering of Network Interfaces on the VM-Series Firewall
-
- Deployments Supported on Azure
- Deploy the VM-Series Firewall from the Azure Marketplace (Solution Template)
- Deploy the VM-Series Firewall from the Azure China Marketplace (Solution Template)
- Deploy the VM-Series Firewall on Azure Stack
- Enable Azure Application Insights on the VM-Series Firewall
- Set up Active/Passive HA on Azure
- Use the ARM Template to Deploy the VM-Series Firewall
-
- About the VM-Series Firewall on Google Cloud Platform
- Supported Deployments on Google Cloud Platform
- Create a Custom VM-Series Firewall Image for Google Cloud Platform
- Prepare to Set Up VM-Series Firewalls on Google Public Cloud
-
- Deploy the VM-Series Firewall from Google Cloud Platform Marketplace
- Management Interface Swap for Google Cloud Platform Load Balancing
- Use the VM-Series Firewall CLI to Swap the Management Interface
- Enable Google Stackdriver Monitoring on the VM Series Firewall
- Enable VM Monitoring to Track VM Changes on GCP
- Use Dynamic Address Groups to Secure Instances Within the VPC
- Locate VM-Series Firewall Images in the GCP Marketplace
-
- Prepare Your ACI Environment for Integration
-
-
- Create a Virtual Router and Security Zone
- Configure the Network Interfaces
- Configure a Static Default Route
- Create Address Objects for the EPGs
- Create Security Policy Rules
- Create a VLAN Pool and Domain
- Configure an Interface Policy for LLDP and LACP for East-West Traffic
- Establish the Connection Between the Firewall and ACI Fabric
- Create a VRF and Bridge Domain
- Create an L4-L7 Device
- Create a Policy-Based Redirect
- Create and Apply a Service Graph Template
-
- Create a VLAN Pool and External Routed Domain
- Configure an Interface Policy for LLDP and LACP for North-South Traffic
- Create an External Routed Network
- Configure Subnets to Advertise to the External Firewall
- Create an Outbound Contract
- Create an Inbound Web Contract
- Apply Outbound and Inbound Contracts to the EPGs
- Create a Virtual Router and Security Zone for North-South Traffic
- Configure the Network Interfaces
- Configure Route Redistribution and OSPF
- Configure NAT for External Connections
-
-
- Choose a Bootstrap Method
- VM-Series Firewall Bootstrap Workflow
- Bootstrap Package
- Bootstrap Configuration Files
- Generate the VM Auth Key on Panorama
- Create the bootstrap.xml File
- Prepare the Licenses for Bootstrapping
- Prepare the Bootstrap Package
- Bootstrap the VM-Series Firewall on AWS
- Bootstrap the VM-Series Firewall on Azure
- Bootstrap the VM-Series Firewall on Google Cloud Platform
- Verify Bootstrap Completion
- Bootstrap Errors
End-of-Life (EoL)
Deploy the VM-Series Firewall
Learn how to deploy the VM-Series firewall on VMware
NSX-T.
After completing the configuration on Panorama,
perform the following procedure to launch the VM-Series firewall
in your NSX-T Data Center.
When deploying the VM-Series firewall
on NSX-T in high availability, both firewalls are deployed to the
same Device Group and Template Stack.
- Log in to NSX-T Manager.
- Select Advanced Networking & SecurityPartner ServicesCatalog.
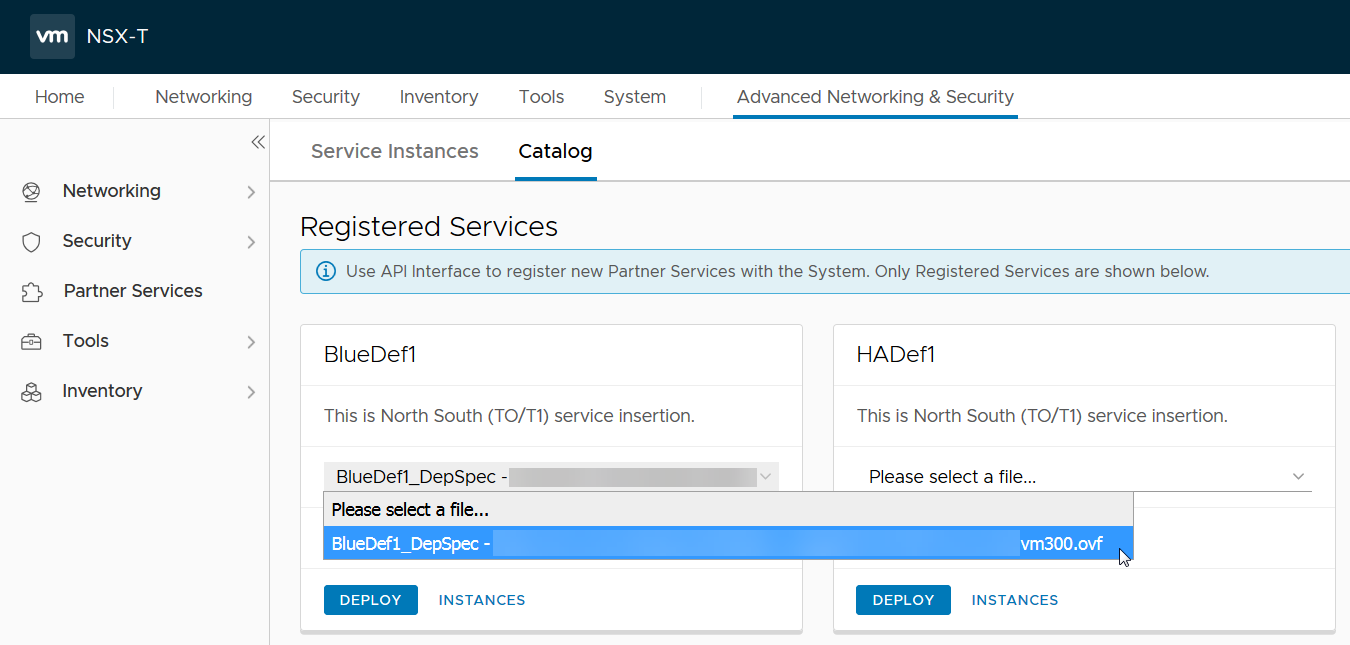
- Select the Registered Service that matches the service definition to be deployed.
- Select the VM-Series firewall image from the drop-down
in the Registered Service entry.
![]()
- Click Deploy under the registered service for the service definition you want to use to launch the firewall.
- Click Proceed.
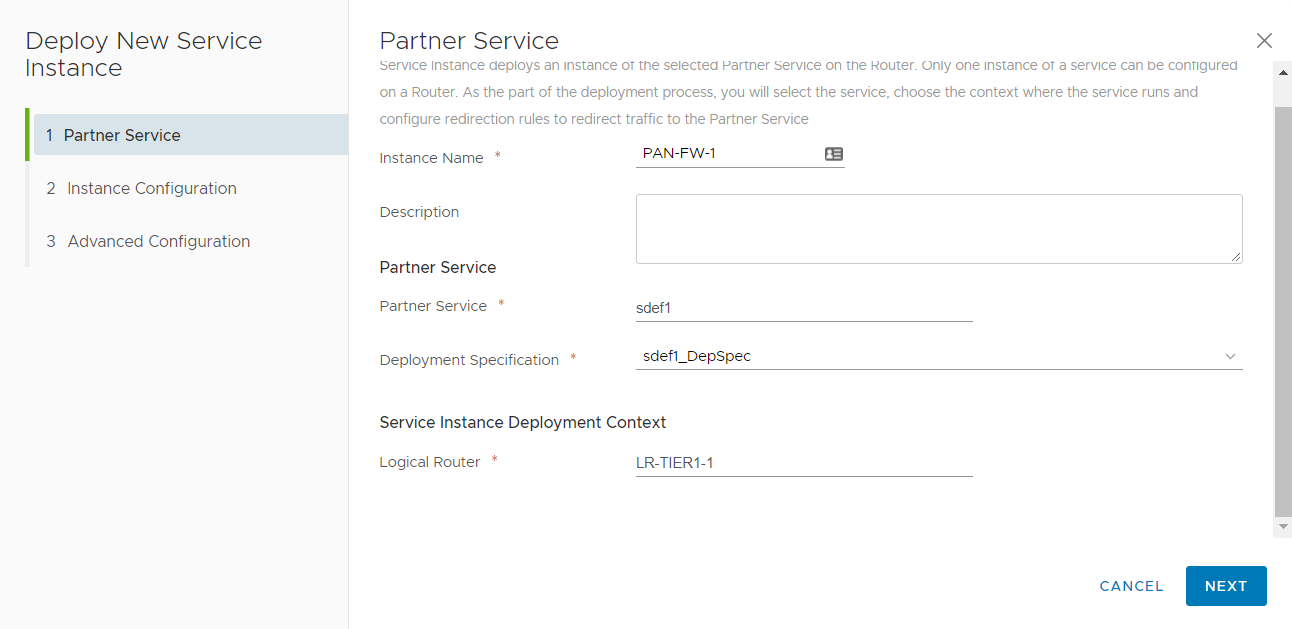
- Enter the Partner Service details. This information tells
NSX-T Manager which Partner Service and logical router to use when
deploying the VM-Series firewall.
- Enter a descriptive Instance Name for your VM-Series firewall.
- NSX-T Manager prepopulates the Partner Service field. Selecting a Partner Service populates the Deployment Specification field.
- Select the Logical Router. Select a tier-0 or tier-1 router. NSX-T Manager attaches the VM-Series firewall to the selected router and redirects traffic passing through that router to the VM-Series firewall for inspection. You must select a router with no service insertion attached.
- Click Next.
![]()
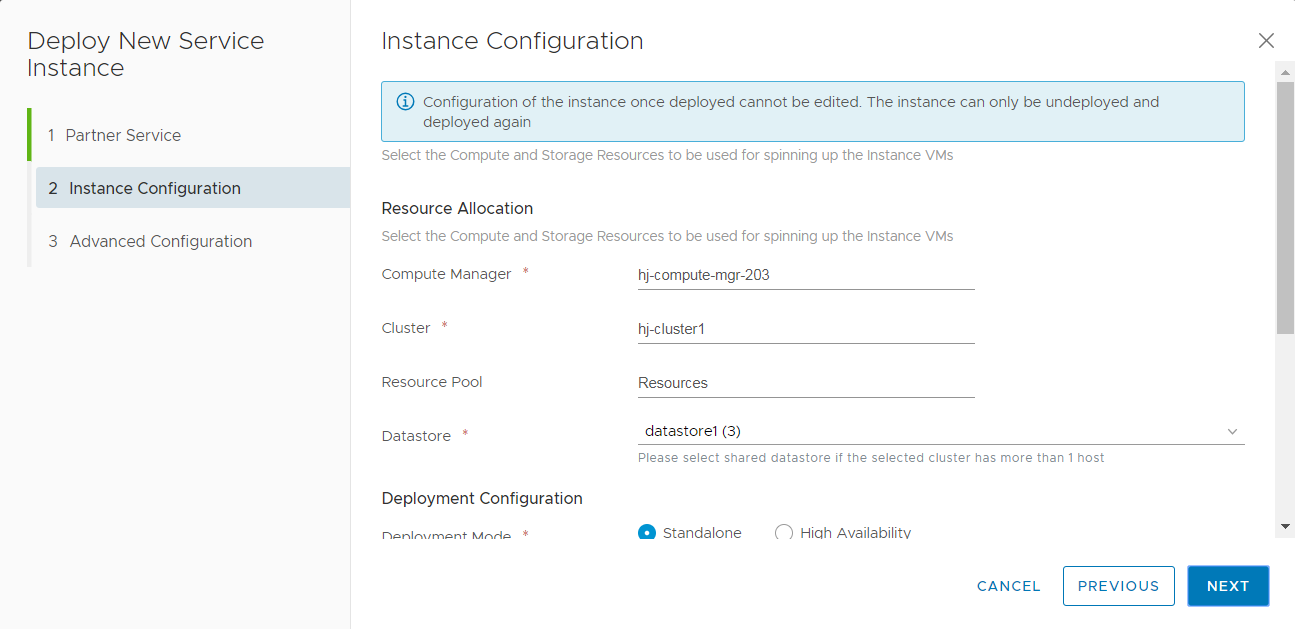
- Configure resource and storage settings.
- Select a Compute Manager. The compute manager is the vCenter server managing your datacenter.
- Select a Cluster. You can deploy the VM-Series firewall on any cluster that does not include any Edge Transport Nodes.
- (Optional) Select the Resource Pool if you have created any on vCenter server.
- Select a Datastore.
![]()
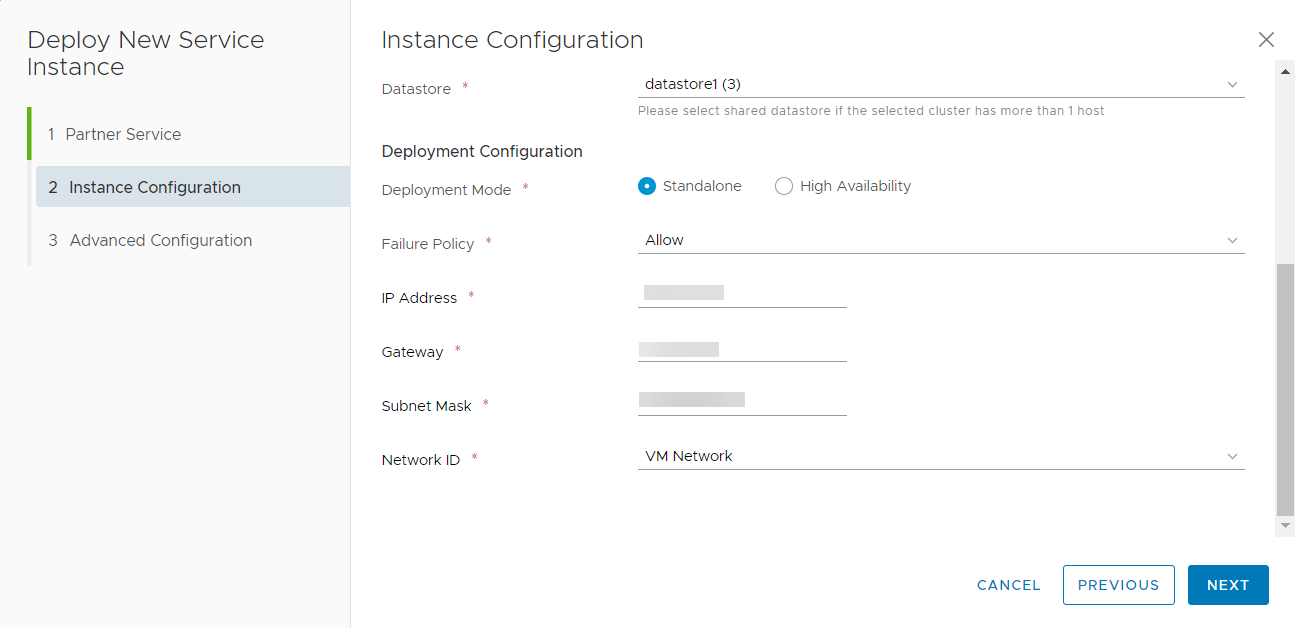
- Select the Deployment Mode for your VM-Series firewall—Standalone or High Availability.
- Set the Failure Policy to Allow or Block. The failure policy defines how NSX-T Manager handles traffic that is directed to the VM-Series firewall if the firewall becomes unavailable.
- Enter the IP Address, Gateway, Subnet Mask, and Network ID for the VM-Series firewall management port.
- If you are deploying the VM-Series firewall in HA mode, repeat the previous step for secondary firewall instance.
- Click Next.
![]()
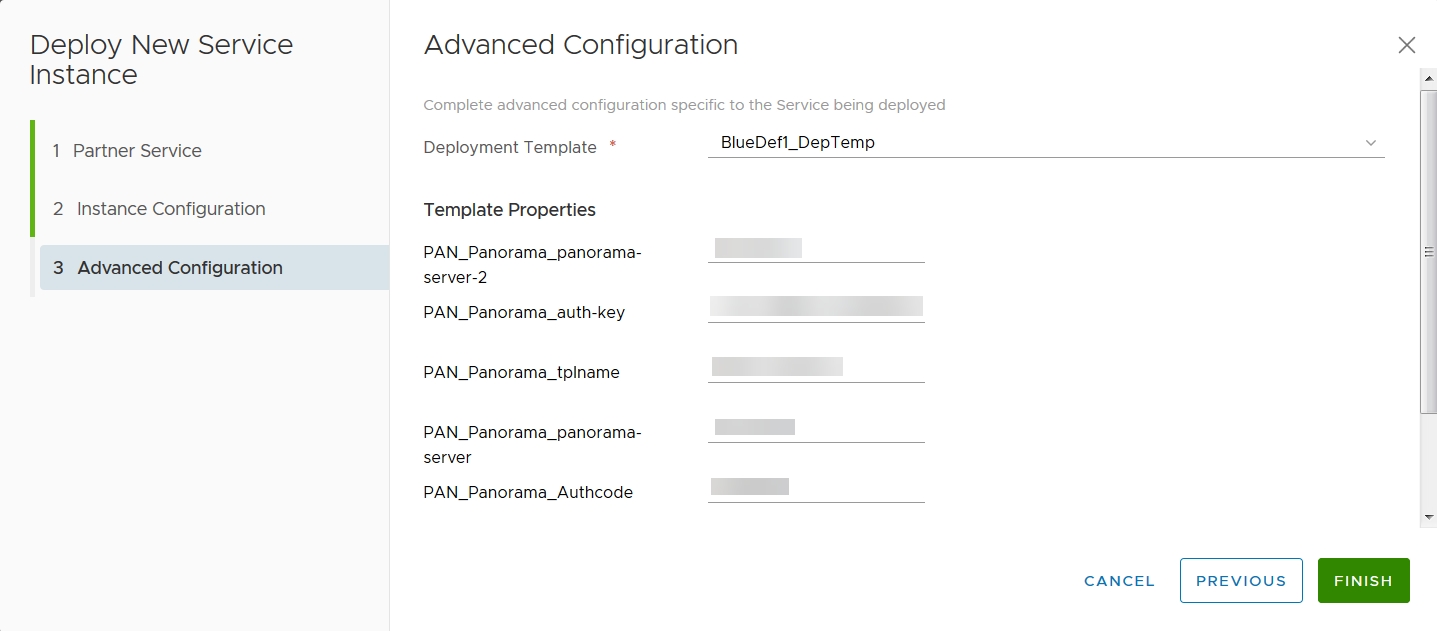
- Click on the Deployment Template field
and select a deployment template. Choosing a deployment template
automatically populates the template properties. Do not edit
the Template Property settings.
![]()
- Click Finish to deploy the VM-Series firewall.
- Access the Panorama web interface to make sure that the
VM-Series firewalls are connected and synchronized with Panorama.
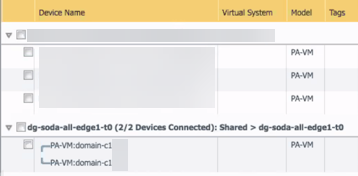
- Select PanoramaManaged DevicesSummary to
verify that the firewalls are connected and synchronized.The Device Name for the VM-Series firewall is displayed on Panorama as PA-VM:<nsx.clusterid> for NSX-T (N-S) deployment and as PA-VM:<nsx.servicevmid> for NSX-T (E-W) deploymentIf the ESXi server hostname is longer than 32 characters, the hostname will not be displayed in Panorama. Instead, only PA-VM is displayed.
![]()
- Click Commit, and select Commit Type as Panorama.A periodic Panorama commit is required to ensure that Panorama saves the device serial numbers to configuration. If you reboot Panorama without committing the changes, the managed devices will not connect back to Panorama; although the Device Group will display the list of devices, the devices will not display in PanoramaManaged Devices.
- Select PanoramaManaged DevicesSummary to
verify that the firewalls are connected and synchronized.
- Verify that the capacity license is applied and apply
any additional licenses that you have purchased. At a minimum, you
must activate the support license on each firewall.When Panorama does not have internet access (Offline), you must manually license each firewall, and then add the serial number of the firewall to Panorama so that it is registered as a managed device, and can receive the template stack and device group settings from Panorama. See Activate the License for the VM-Series Firewall for VMware NSX for more information.
- Select PanoramaDevice DeploymentLicenses to
verify that the VM-Series capacity license is applied.
- To apply additional licenses on the VM-Series firewalls:
- Click Activate on PanoramaDevice DeploymentLicenses.
- Find or filter for the firewall, and in the Auth Code column, enter the authorization code for the license to activate. Only one authorization code can be entered at a time, for each firewall.
- Click Activate, and verify that the result of the license activation was successful.
- Select PanoramaDevice DeploymentLicenses to
verify that the VM-Series capacity license is applied.
- Set a secure password for the admin account on your VM-Series
firewalls.Each VM-Series firewall uses a default username and password (admin/admin), which is used for initial login. Upon logging in for the first time, you are prompted to set a new, more secure password. The new password must be a minimum of eight characters and include a minimum of one lowercase and one uppercase character, as well as one number or special character.You can update the password on each firewall individually or all at once through Panorama.
- Panorama—on Panorama, you can change the default password for all firewalls in a template or delete the admin user and create a new username and password.
- Log in to Panorama
- Select DeviceAdministrators and select the admin user.
- Delete the user or click the user and enter a new password.
- If you changed the password, click OK.
- Select CommitPush to DevicesEdit SelectionsForce Template Values.
- Click OK.
- Firewall—this procedure must be repeated on each VM-Series firewall.
- Log in to the VM-Series firewall using the default username and password.
- Follow the prompts to reset the password.

