Home
EN
Location
Documentation Home
Palo Alto Networks
Support
Live Community
Knowledge Base
Clear
Cloud Identity Engine Getting Started
:
Rename Cloud Identity Engine Tenants
Updated on
Mon Aug 12 18:09:18 UTC 2024
Focus
Download PDF
Updated on
Mon Aug 12 18:09:18 UTC 2024
Focus
Home
Cloud Identity
Cloud Identity Engine Getting Started
Manage the Cloud Identity Engine App
Cloud Identity Engine Tenants
Rename Cloud Identity Engine Tenants
Download PDF
Cloud Identity Engine Getting Started
Rename Cloud Identity Engine Tenants
Table of Contents
Filter
Expand all
|
Collapse all
Get Started with Cloud Identity Engine
Learn About the Cloud Identity Engine
Plan Your Cloud Identity Engine Deployment
Configure Your Network to Allow Cloud Identity Agent Traffic
Configure Domains for the Cloud Identity Engine
Activate the Cloud Identity Engine
Manage Cloud Identity Engine App Roles
Configure the Cloud Identity Engine Visibility Scope
Set Up the Cloud Identity Engine
Choose Your Directory Type
Configure an On-Premises Directory
Install the Cloud Identity Agent
Configure the Cloud Identity Agent
Authenticate the Agent and the Cloud Identity Engine
Configure a Cloud-Based Directory
Configure Azure Active Directory
Deploy or Migrate to Client Credential Flow for Azure AD
Reconnect Azure Active Directory
Revoke Cloud Identity Engine Permissions for Azure Active Directory
Configure Okta Directory
Deploy Client Credential Flow for Okta
Reconnect Okta Directory
Remove Okta Directory
Configure Google Directory
Reconnect Google Directory
Remove Google Directory
Configure SCIM Connector for the Cloud Identity Engine
Manage the Cloud Identity Engine App
Cloud Identity Engine Tenants
Create Cloud Identity Engine Tenants
View Cloud Identity Engine Tenants
Synchronize Cloud Identity Engine Tenants
Rename Cloud Identity Engine Tenants
Delete Cloud Identity Engine Tenants
Delete Domains or Directories from Cloud Identity Engine Tenants
Cloud Identity Engine Attributes
Collect Custom Attributes with the Cloud Identity Engine
View Directory Data
Cloud Identity Engine User Context
Create a Cloud Dynamic User Group
Configure Third-Party Device-ID
Configure an IP Tag Cloud Connection
Configure Dynamic Privilege Access in the Cloud Identity Engine
Configure Security Risk for the Cloud Identity Engine
Manage the Cloud Identity Agent
Configure Cloud Identity Agent Logs
Search Cloud Identity Agent Logs
Clear Cloud Identity Agent Logs
Update the Cloud Identity Agent
Start or Stop the Connection to the Cloud Identity Engine
Remove the Cloud Identity Agent
Manage Cloud Identity Engine Certificates
Revoke Cloud Identity Agent Certificates
Delete Obsolete Cloud Identity Agent Certificates
Associate the Cloud Identity Engine with Palo Alto Networks Apps
Associate the Cloud Identity Engine During Activation
Associate the Cloud Identity Engine with an Existing App
Authenticate Users with the Cloud Identity Engine
Configure a SAML 2.0 Authentication Type
Configure Azure as an IdP in the Cloud Identity Engine
Configure Okta as an IdP in the Cloud Identity Engine
Configure PingOne as an IdP in the Cloud Identity Engine
Configure PingFederate as an IdP in the Cloud Identity Engine
Configure Google as an IdP in the Cloud Identity Engine
Configure a SAML 2.0-Compliant IdP in the Cloud Identity Engine
Configure a Client Certificate
Configure an OIDC Authentication Type
Set Up an Authentication Profile
Configure Cloud Identity Engine Authentication on the Firewall or Panorama
Configure the Cloud Identity Engine as a Mapping Source on the Firewall or Panorama
Configure Dynamic Privilege Access in the Cloud Identity Engine
Troubleshoot the Cloud Identity Engine
Cloud Identity Engine Troubleshooting Checklist
Troubleshoot Cloud Identity Engine Issues
Use the Authentication Logs for Troubleshooting
Monitor Cloud Identity Engine Status
Get Help
Rename Cloud Identity Engine Tenants
Learn how to rename Cloud Identity Engine tenants.
If you want to change the name of a Cloud Identity Engine tenant after you create it, you can rename it in the Cloud Identity Engine app.
Log in to the
hub
.
Select
Common Services
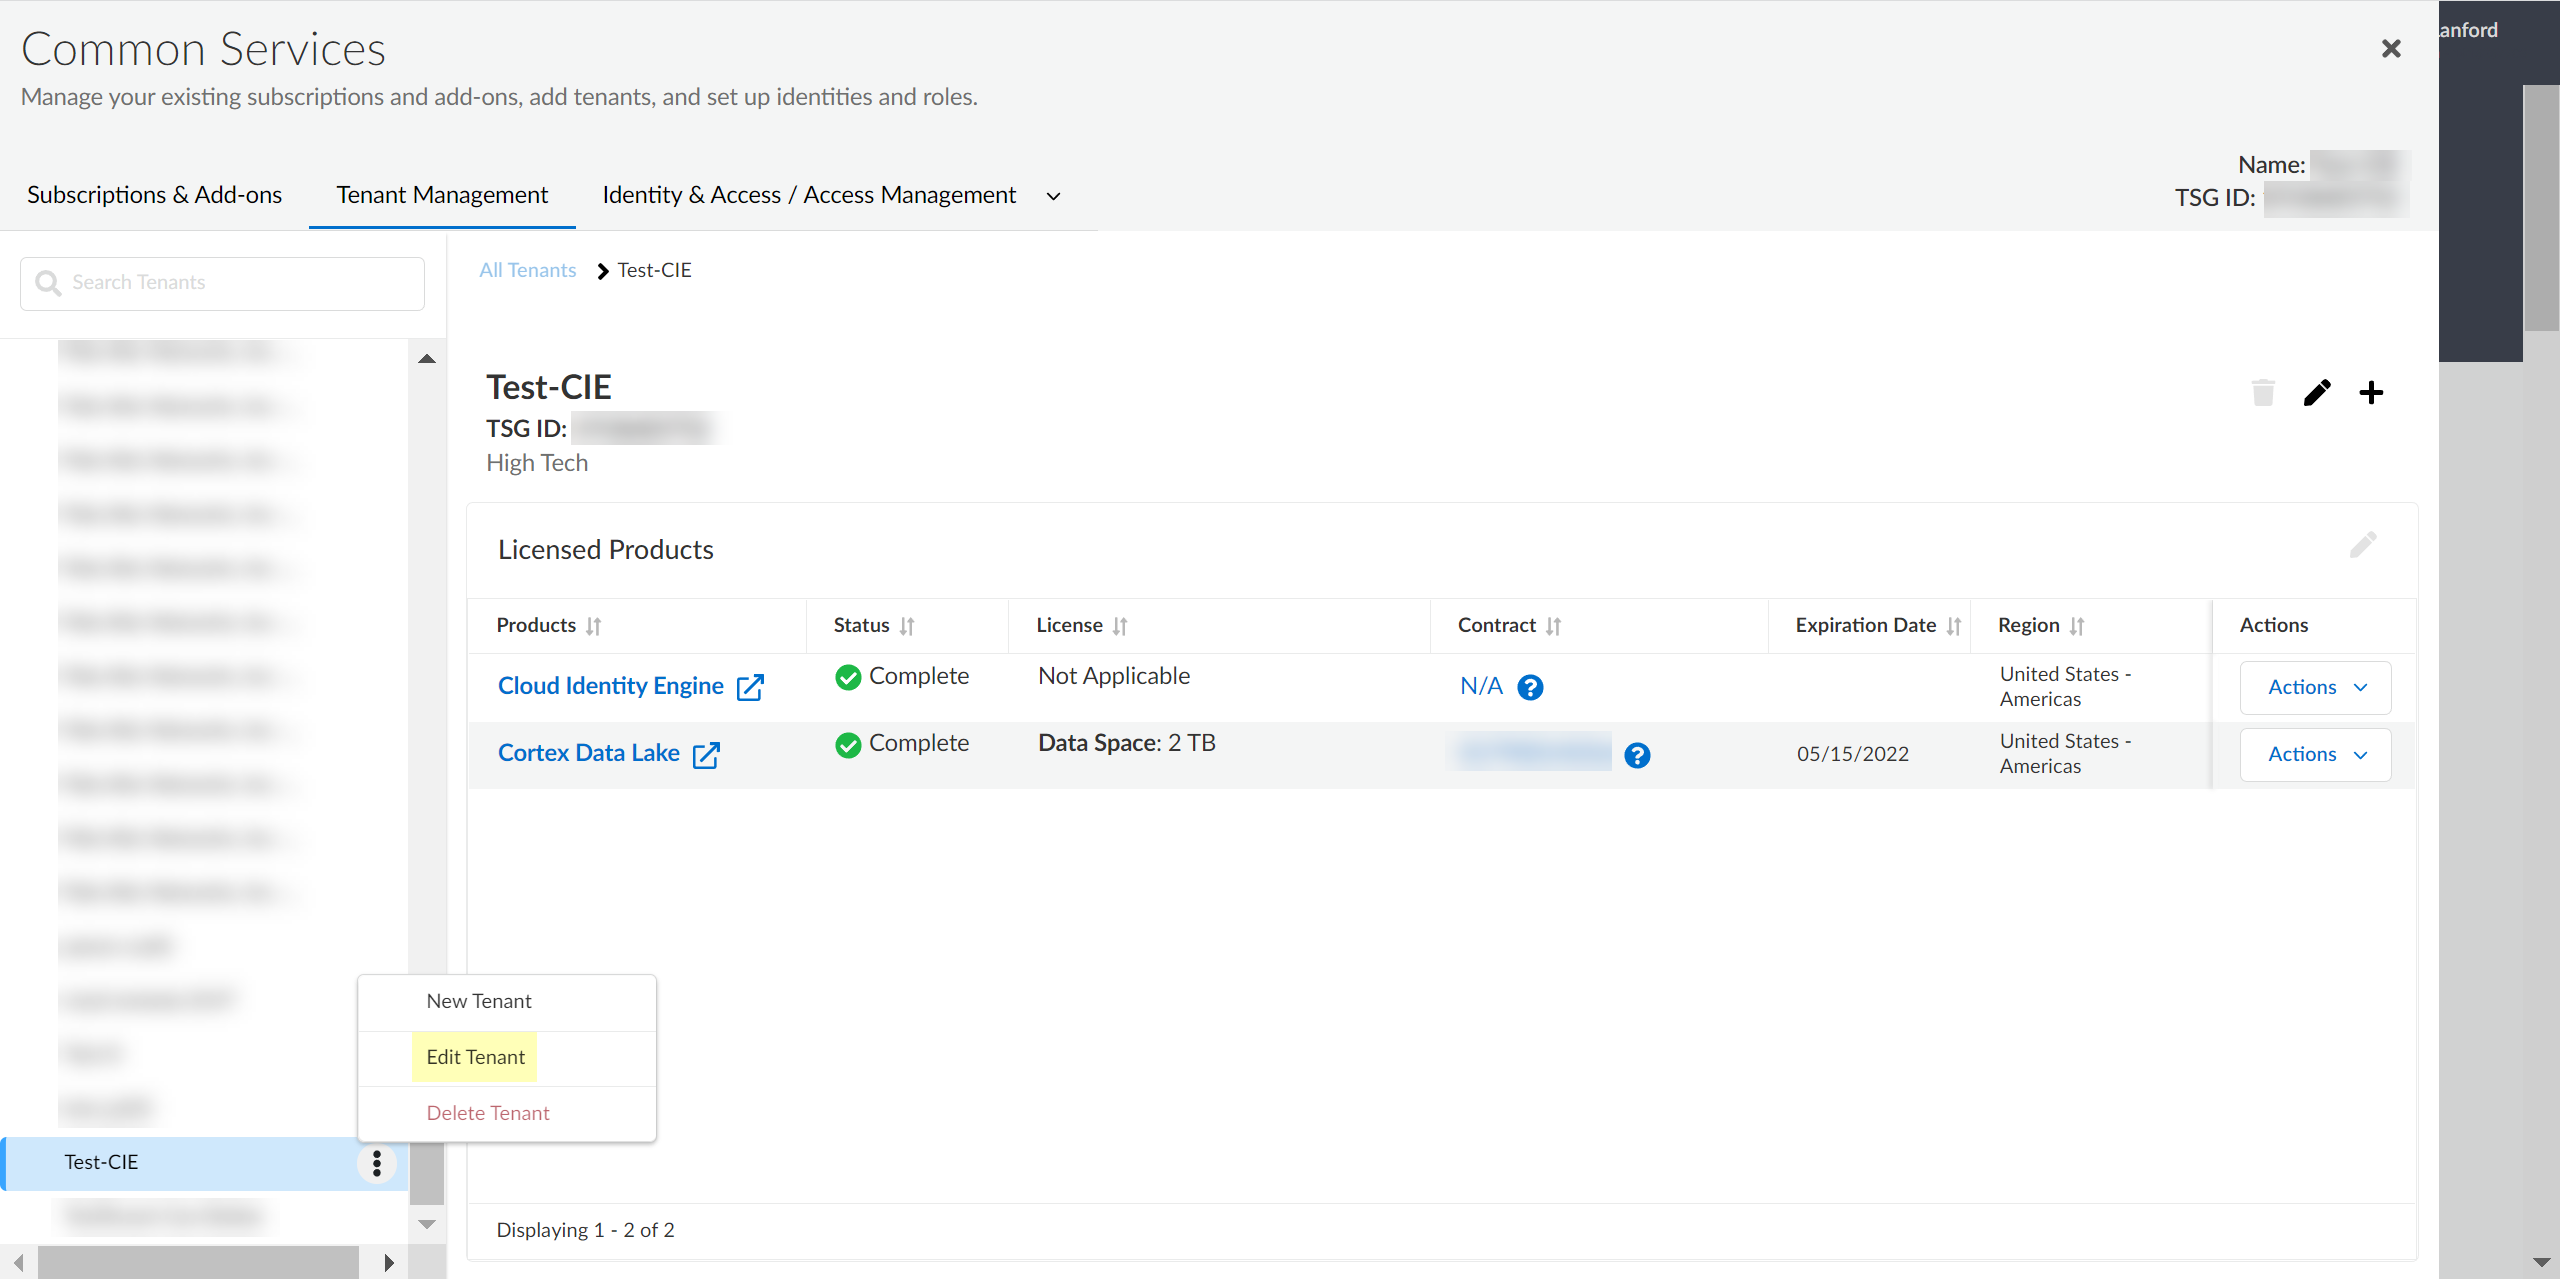
Tenant Management
.
Select the tenant you want to rename then click
Edit Tenant
.
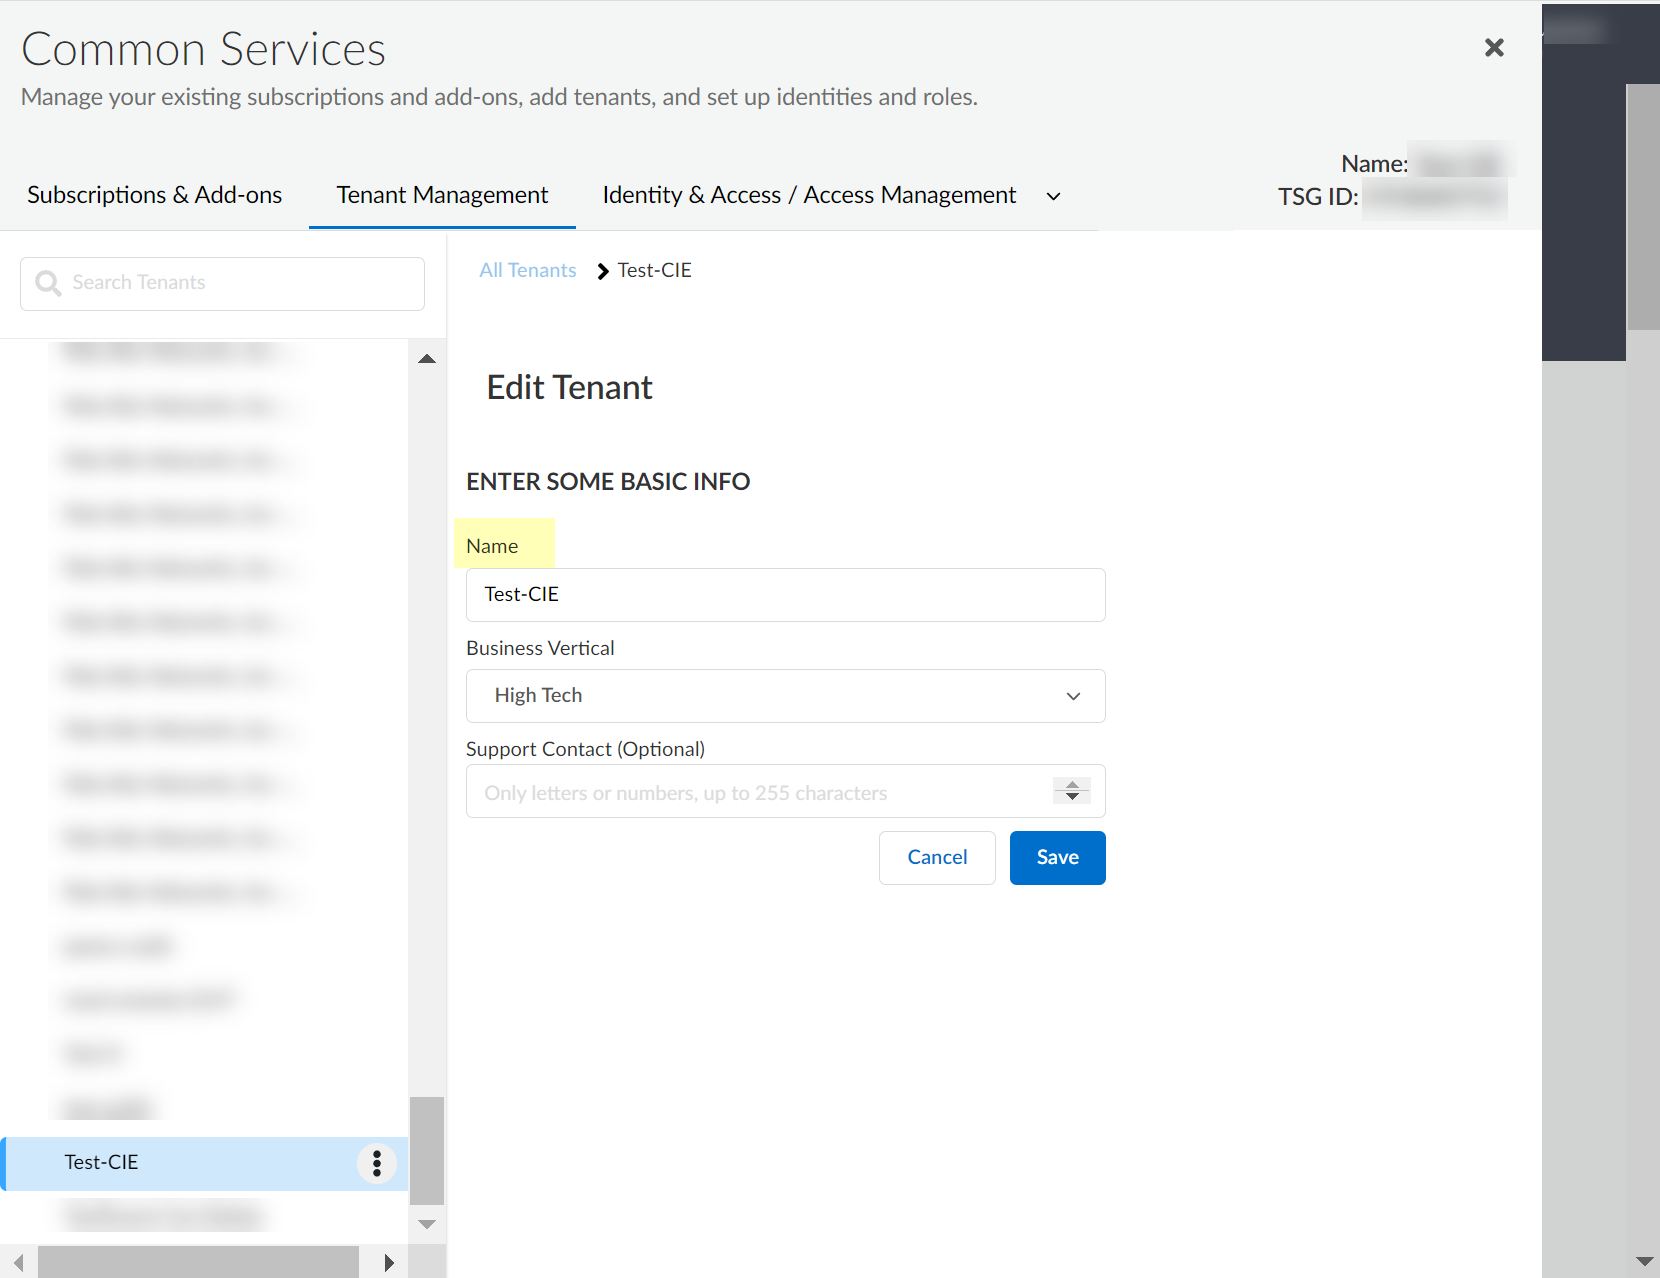
A pop-up displays to allow you to edit the name of the tenant.
You cannot change the region. If you need to change the region for an tenant,
create a new tenant
.
Enter the new
Name
and confirm the change by clicking
Save
.
A confirmation message displays to indicate that the tenant was successfully renamed.
Previous
Synchronize Cloud Identity Engine Tenants
Next
Delete Cloud Identity Engine Tenants
Recommended For You