Configure an OIDC Authentication Type
Table of Contents
Expand all | Collapse all
-
- Cloud Identity Engine Attributes
- Collect Custom Attributes with the Cloud Identity Engine
- View Directory Data
- Cloud Identity Engine User Context
- Create a Cloud Dynamic User Group
- Configure Third-Party Device-ID
- Configure an IP Tag Cloud Connection
- View Mappings and Tags
- Configure Dynamic Privilege Access in the Cloud Identity Engine
- Send Cortex XDR Risk Signals to Okta
- Configure SSF Okta Receiver as a Risk Connection
- Configure the Secrets Vault
-
- Set Up Password Authentication
-
- Configure Azure as an IdP in the Cloud Identity Engine
- Configure Okta as an IdP in the Cloud Identity Engine
- Configure PingOne as an IdP in the Cloud Identity Engine
- Configure PingFederate as an IdP in the Cloud Identity Engine
- Configure Google as an IdP in the Cloud Identity Engine
- Configure a SAML 2.0-Compliant IdP in the Cloud Identity Engine
- Set Up a Client Certificate
- Configure an OIDC Authentication Type
- Set Up an Authentication Profile
- Configure Cloud Identity Engine Authentication on the Firewall or Panorama
- Configure the Cloud Identity Engine as a Mapping Source on the Firewall or Panorama
- Configure Dynamic Privilege Access in the Cloud Identity Engine
- Get Help
Configure an OIDC Authentication Type
Learn how to configure OpenID Connect (OIDC) as an authentication type for the Cloud
Identity Engine.
OpenID Connect (OIDC) provides additional flexibility for your Cloud Identity Engine
deployment. By supporting single sign-on (SSO) across multiple applications, OIDC
simplifies authentication for users, allowing them to log in once with the OIDC
provider to access multiple resources without needing to log in repeatedly.
The OIDC authentication type supports the Prisma® Access
Browser. It does not support Authentication Portal.
To configure an OpenID Connect (OIDC) provider as an authentication type in the Cloud
Identity Engine, complete the following steps for your identity provider (IdP) type.
When you configure OIDC as an authentication type, the
Cloud Identity Engine determines the username attribute using the following order
(where if the current attribute isn’t found, the Cloud Identity Engine attempts to
match using the next attribute in the list):
- preferred_username
- username
- sub
Configure OIDC for Azure
- Set up OIDC as an authentication type in the Cloud Identity Engine.
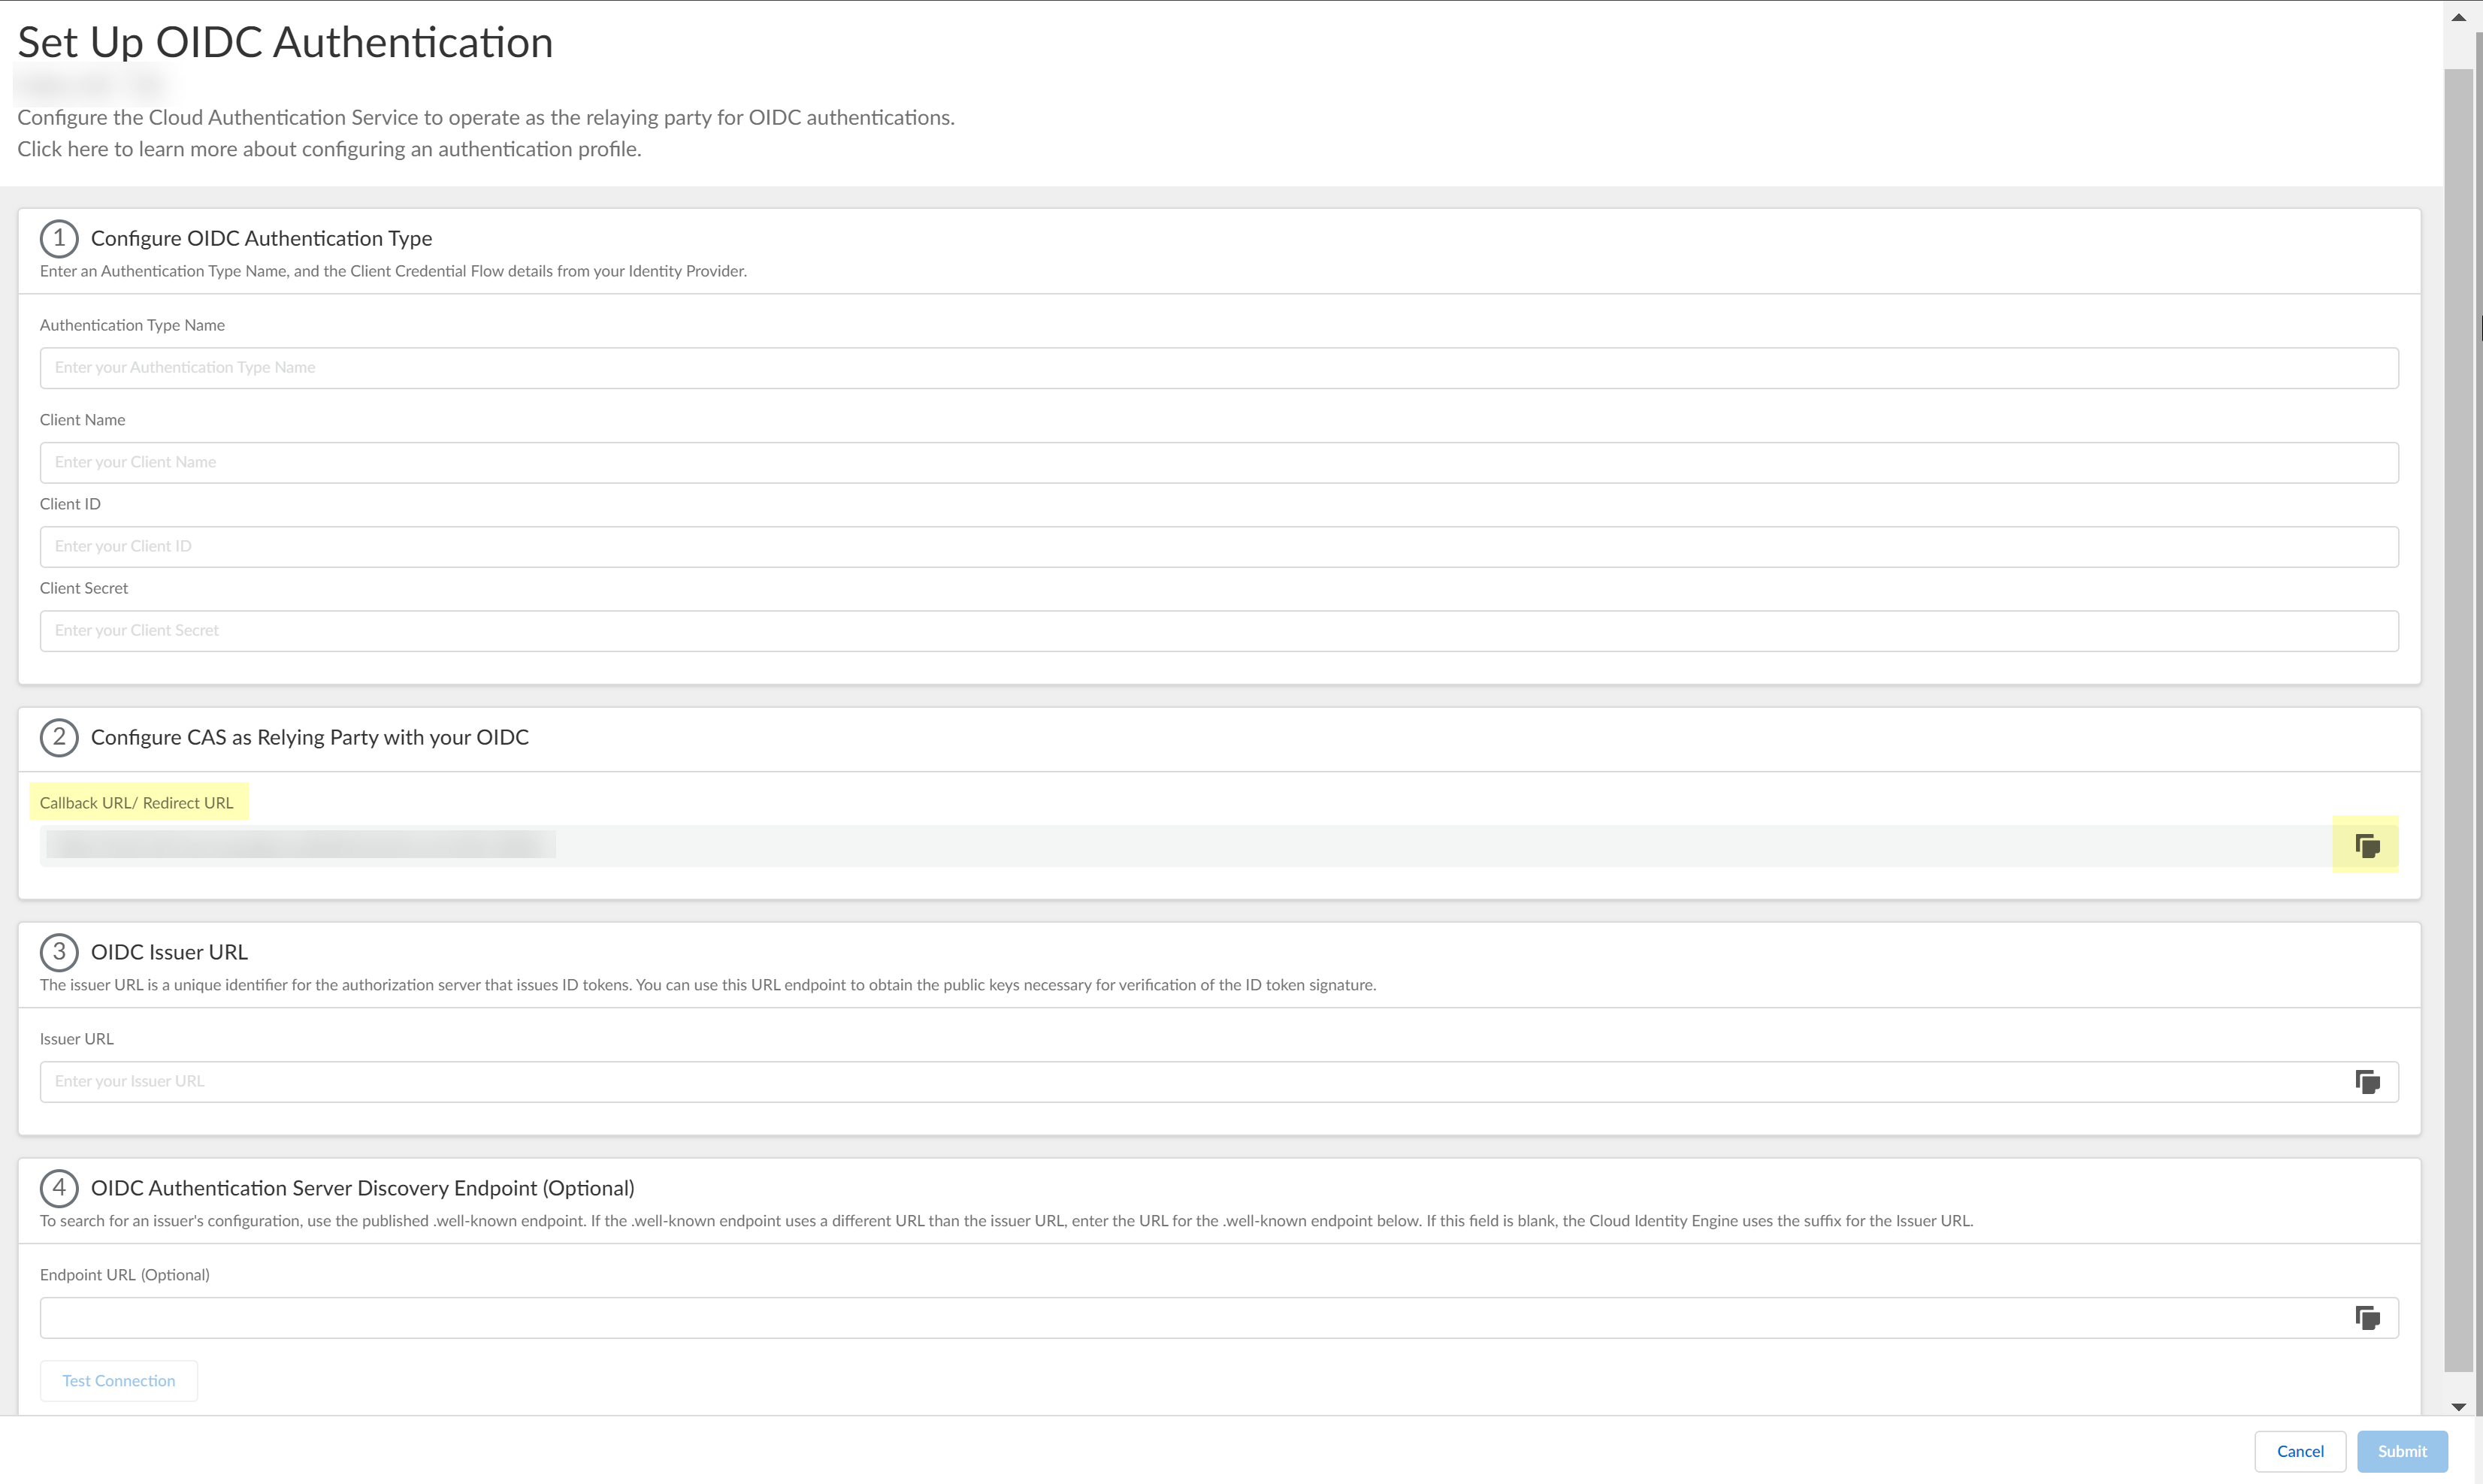
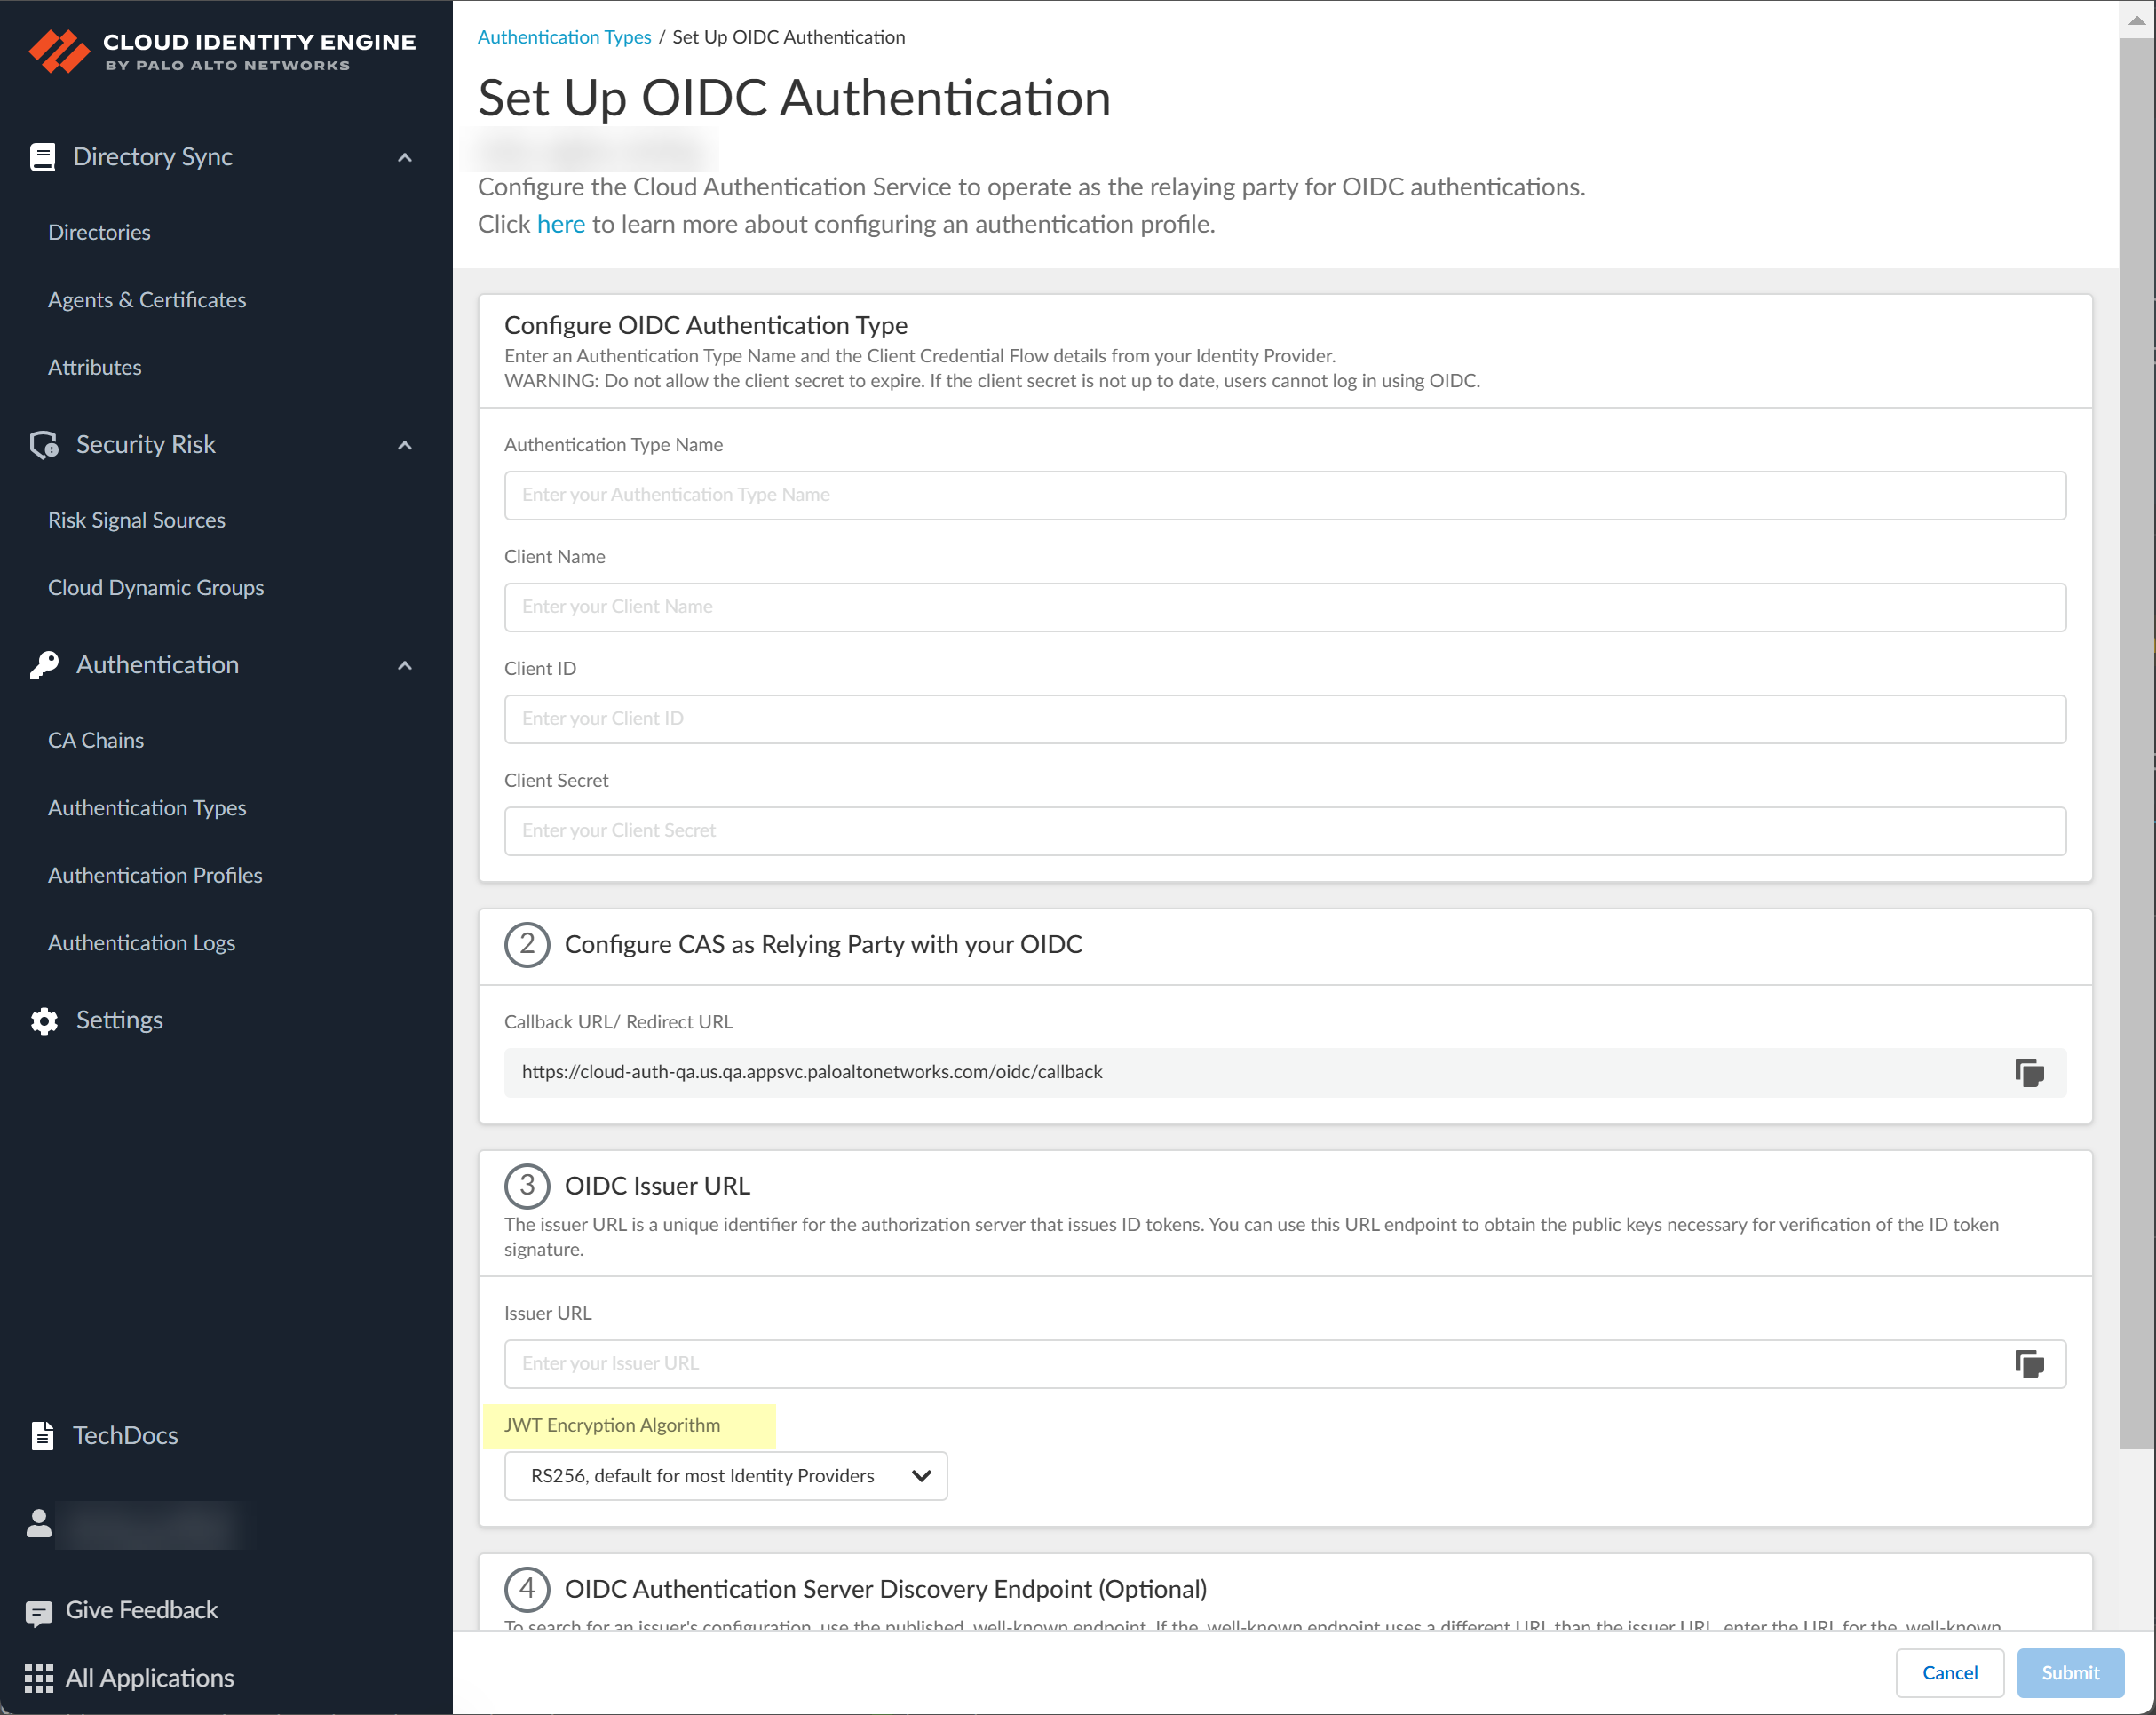
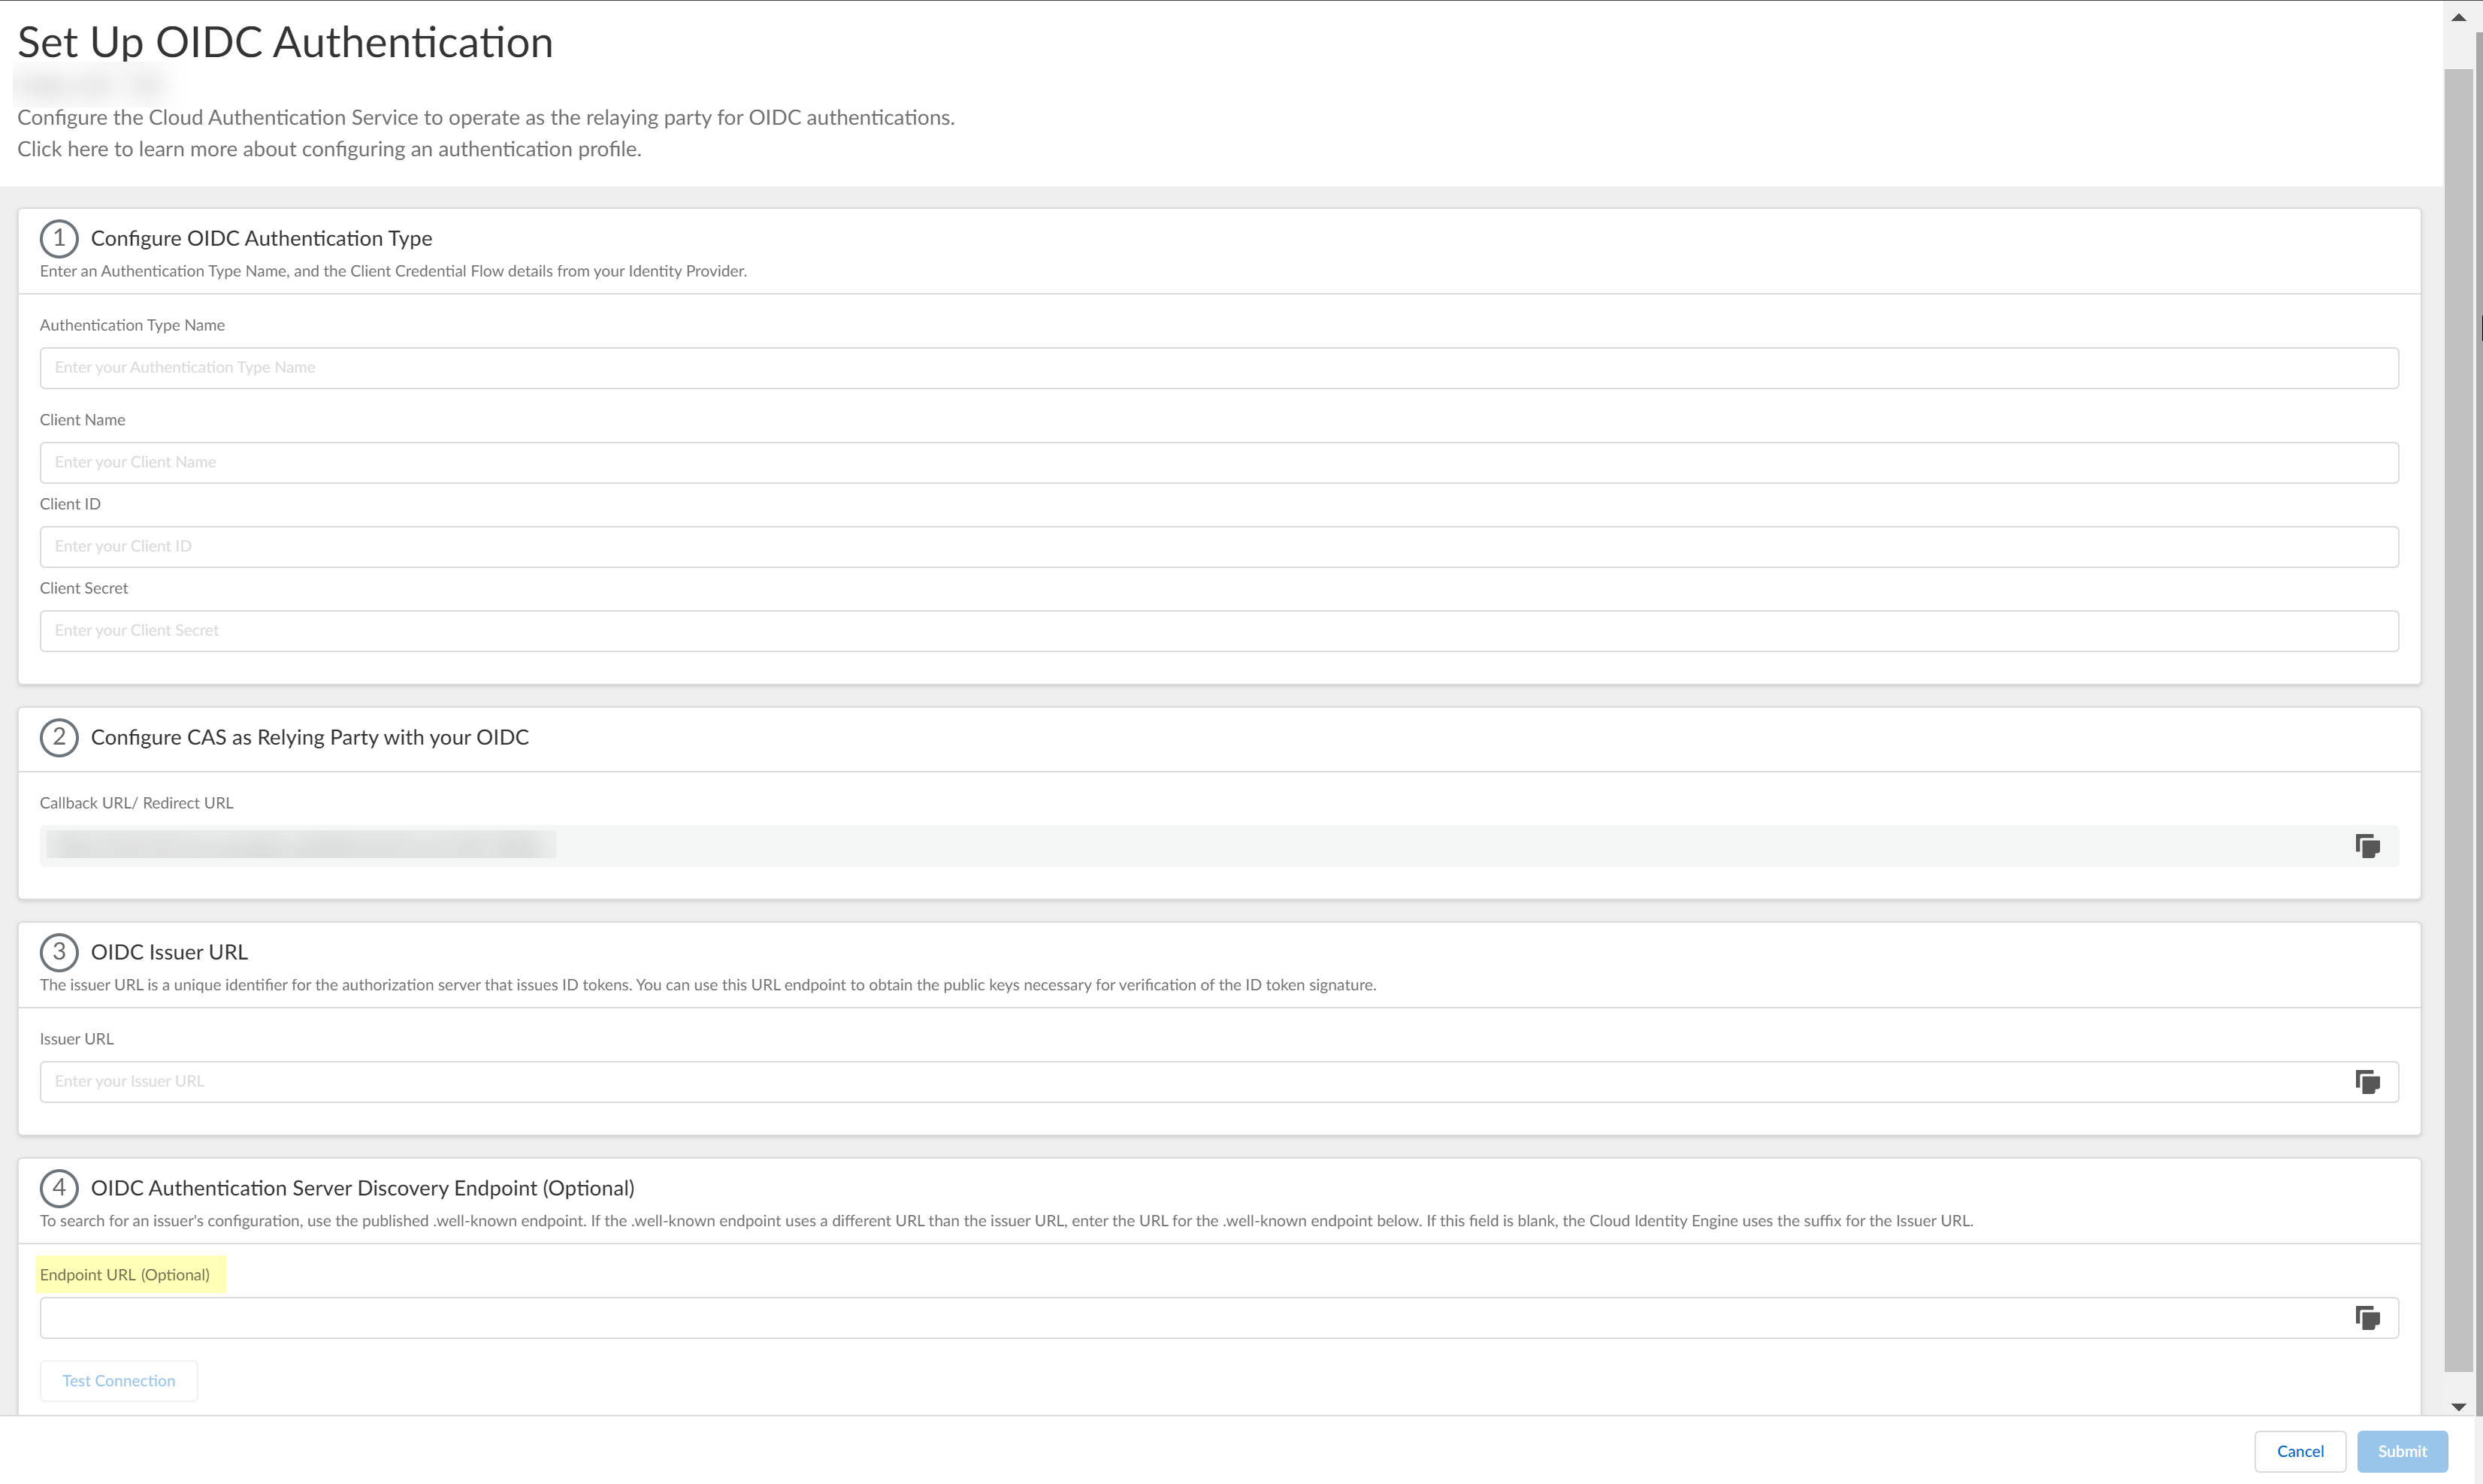
- Select AuthenticationAuthentication TypesAdd New Authentication Type.Set Up the OIDC authentication type.
![]() Enter a unique and descriptive Authentication Type Name for your OIDC configuration.
Enter a unique and descriptive Authentication Type Name for your OIDC configuration.![]() Copy the Callback URL/ Redirect URL.
Copy the Callback URL/ Redirect URL.![]() Select the JWT Encryption Algorithm that you want to use.The default value is RS256, default for most Identity Providers.
Select the JWT Encryption Algorithm that you want to use.The default value is RS256, default for most Identity Providers.![]() Configure Azure to use OIDC with the Cloud Identity Engine.
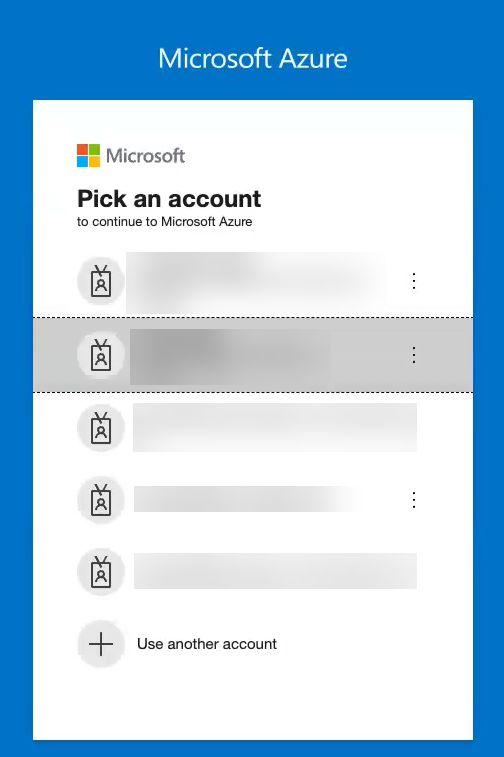
Configure Azure to use OIDC with the Cloud Identity Engine.- Log in to the Azure account you want to use to connect to the Cloud Identity Engine.
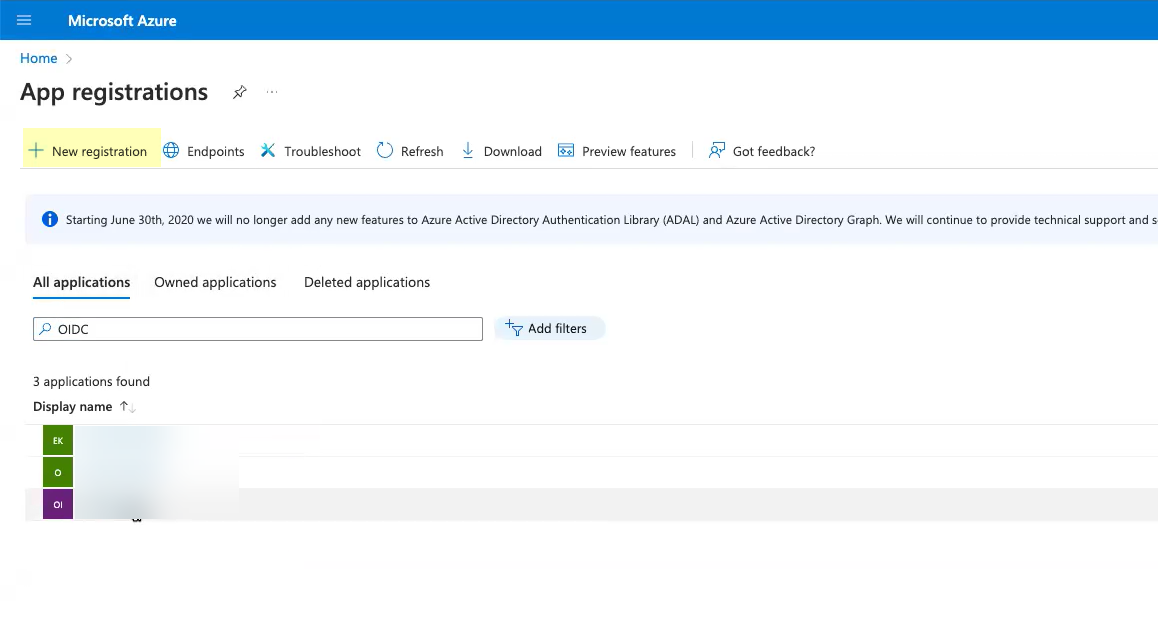
![]() Click App registration.
Click App registration.![]() Click New registration.
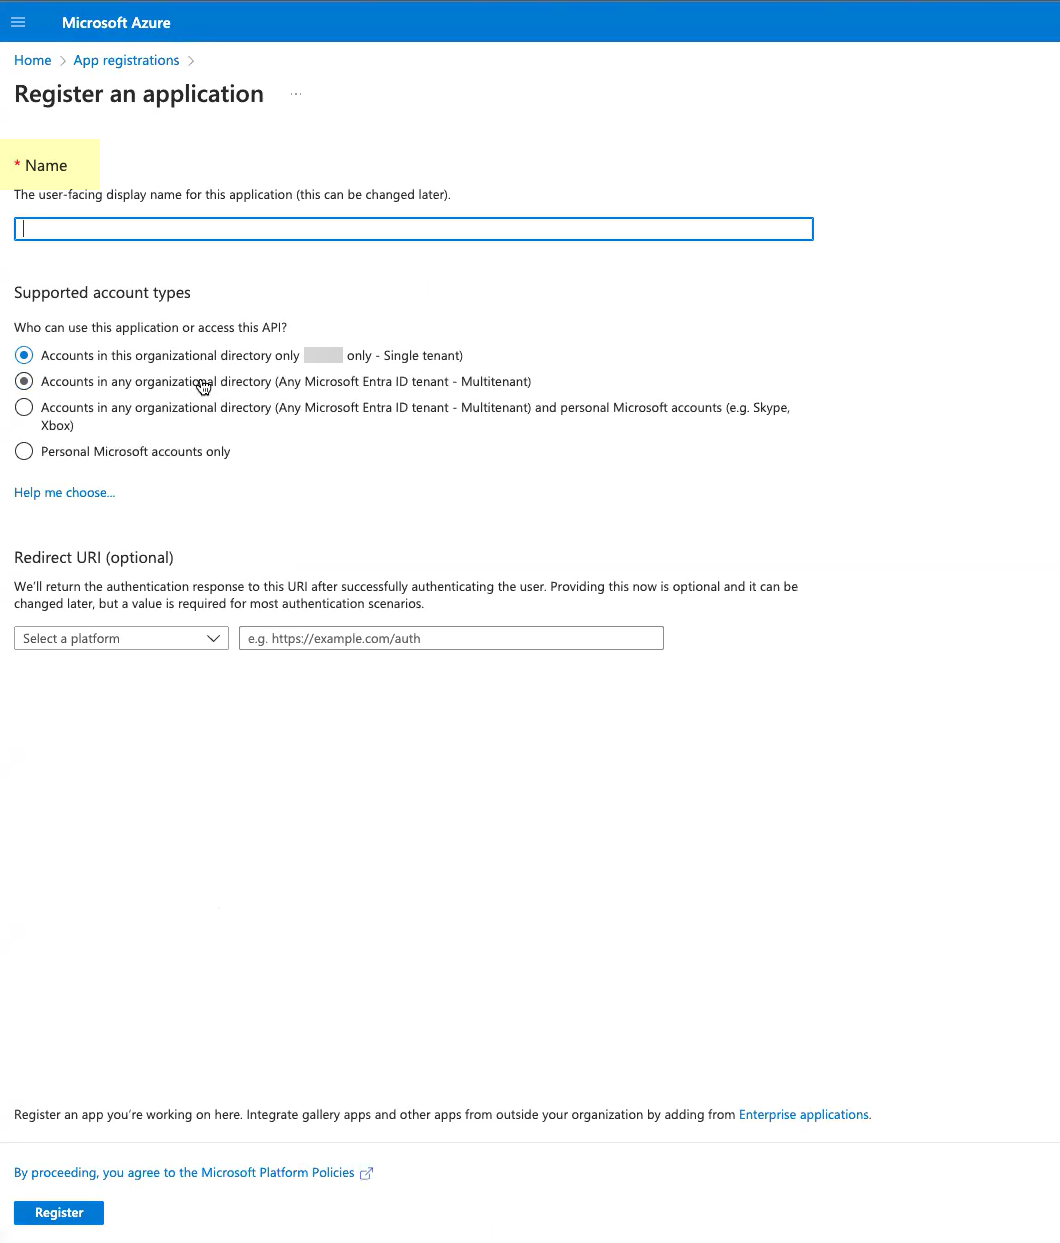
Click New registration.![]() Enter a Name for the application.
Enter a Name for the application.![]() Select Accounts in this organizational directory only.
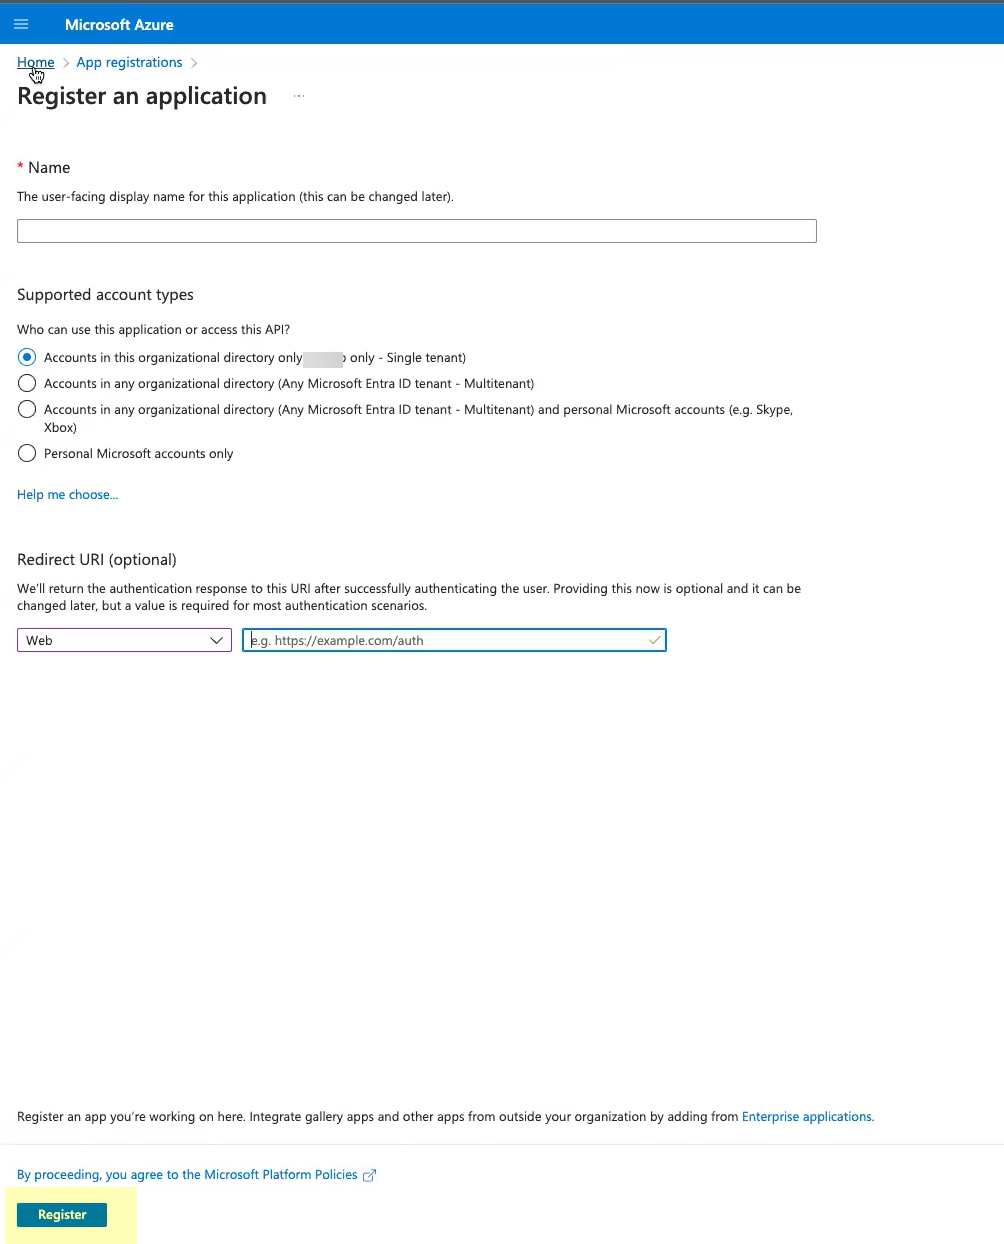
Select Accounts in this organizational directory only.![]() For the Redirect URI, enter the domain for your Cloud Identity Engine instance and append oidc/callback
For the Redirect URI, enter the domain for your Cloud Identity Engine instance and append oidc/callback![]() Click Register to submit the configuration.
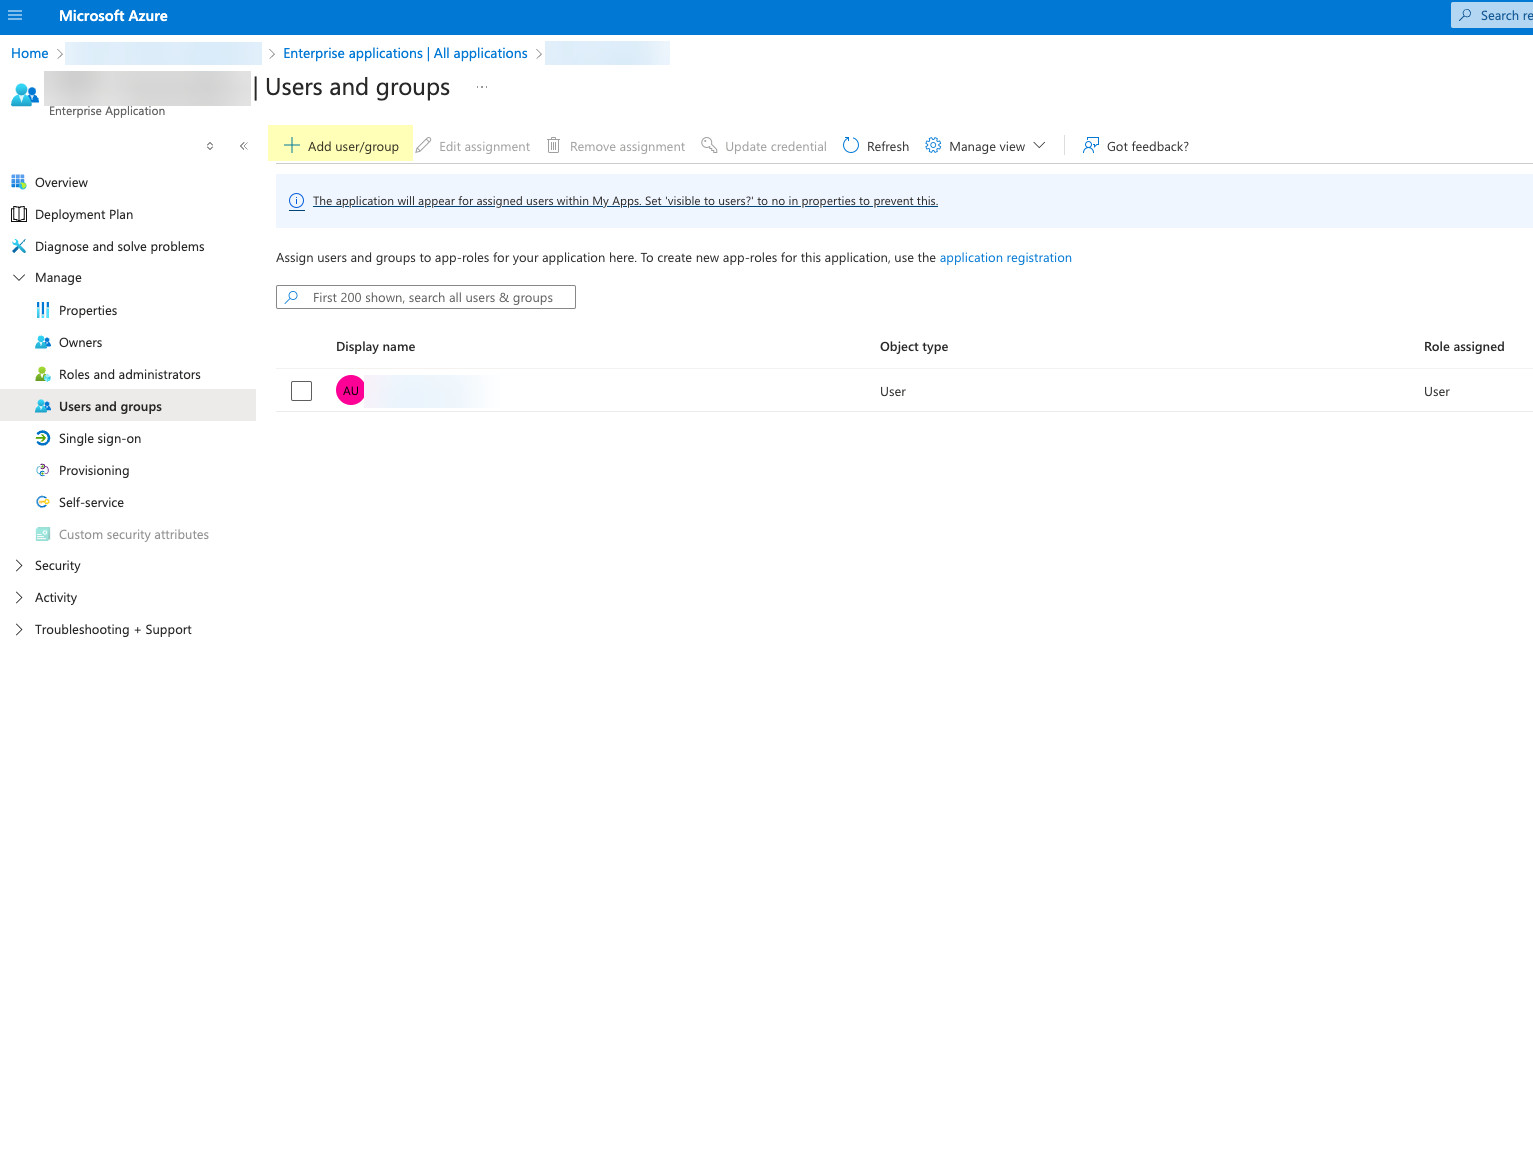
Click Register to submit the configuration.![]() Click Add user/group and add the users or groups you want to be able to configure OIDC as an authentication type (for example, service accounts).
Click Add user/group and add the users or groups you want to be able to configure OIDC as an authentication type (for example, service accounts).![]() Obtain the information you need to complete your OIDC Azure configuration.
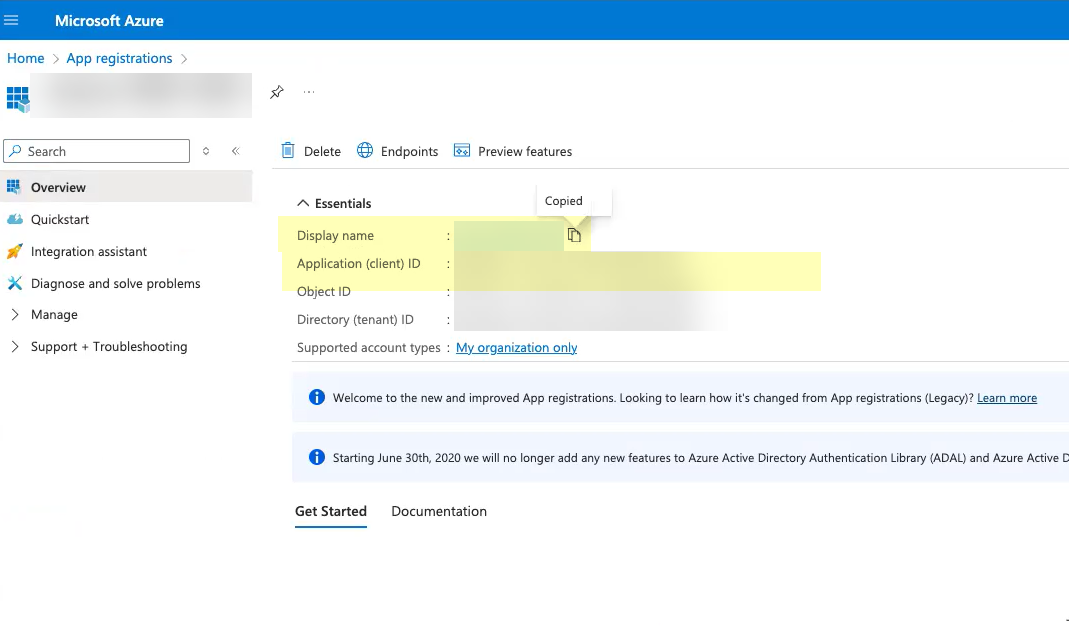
Obtain the information you need to complete your OIDC Azure configuration.- Select the application you just created then click Overview.Copy the Display name and Application (client) ID and save them in a secure location.
![]() Click Add a certificate or secret.Don’t allow the client secret to expire. If the client secret isn’t up to date, users can’t log in using OIDC.
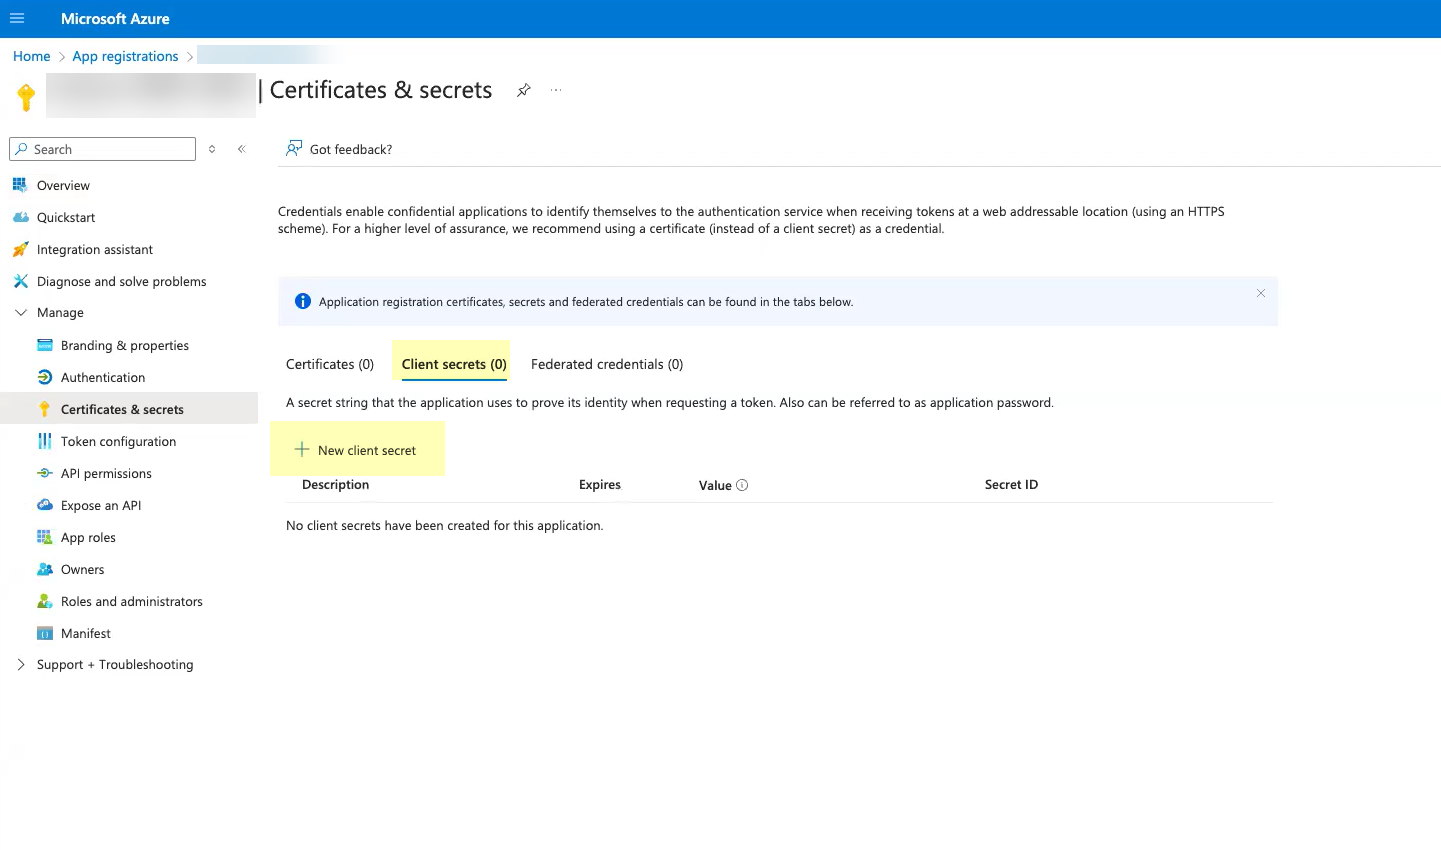
Click Add a certificate or secret.Don’t allow the client secret to expire. If the client secret isn’t up to date, users can’t log in using OIDC.![]() Select Client secrets then click New client secret.Don’t allow the client secret to expire. If the client secret isn’t up to date, users can’t log in using OIDC.
Select Client secrets then click New client secret.Don’t allow the client secret to expire. If the client secret isn’t up to date, users can’t log in using OIDC.![]() Select when the secret Expires then click Add.Don’t allow the client secret to expire. If the client secret isn’t up to date, users can’t log in using OIDC.
Select when the secret Expires then click Add.Don’t allow the client secret to expire. If the client secret isn’t up to date, users can’t log in using OIDC.![]() Copy the Value of the client secret and save them in a secure location.Because the secret displays only once, be sure to copy the information before closing or leaving the page. Otherwise, you must create a new secret.Don’t allow the client secret to expire. If the client secret isn’t up to date, users can’t log in using OIDC.
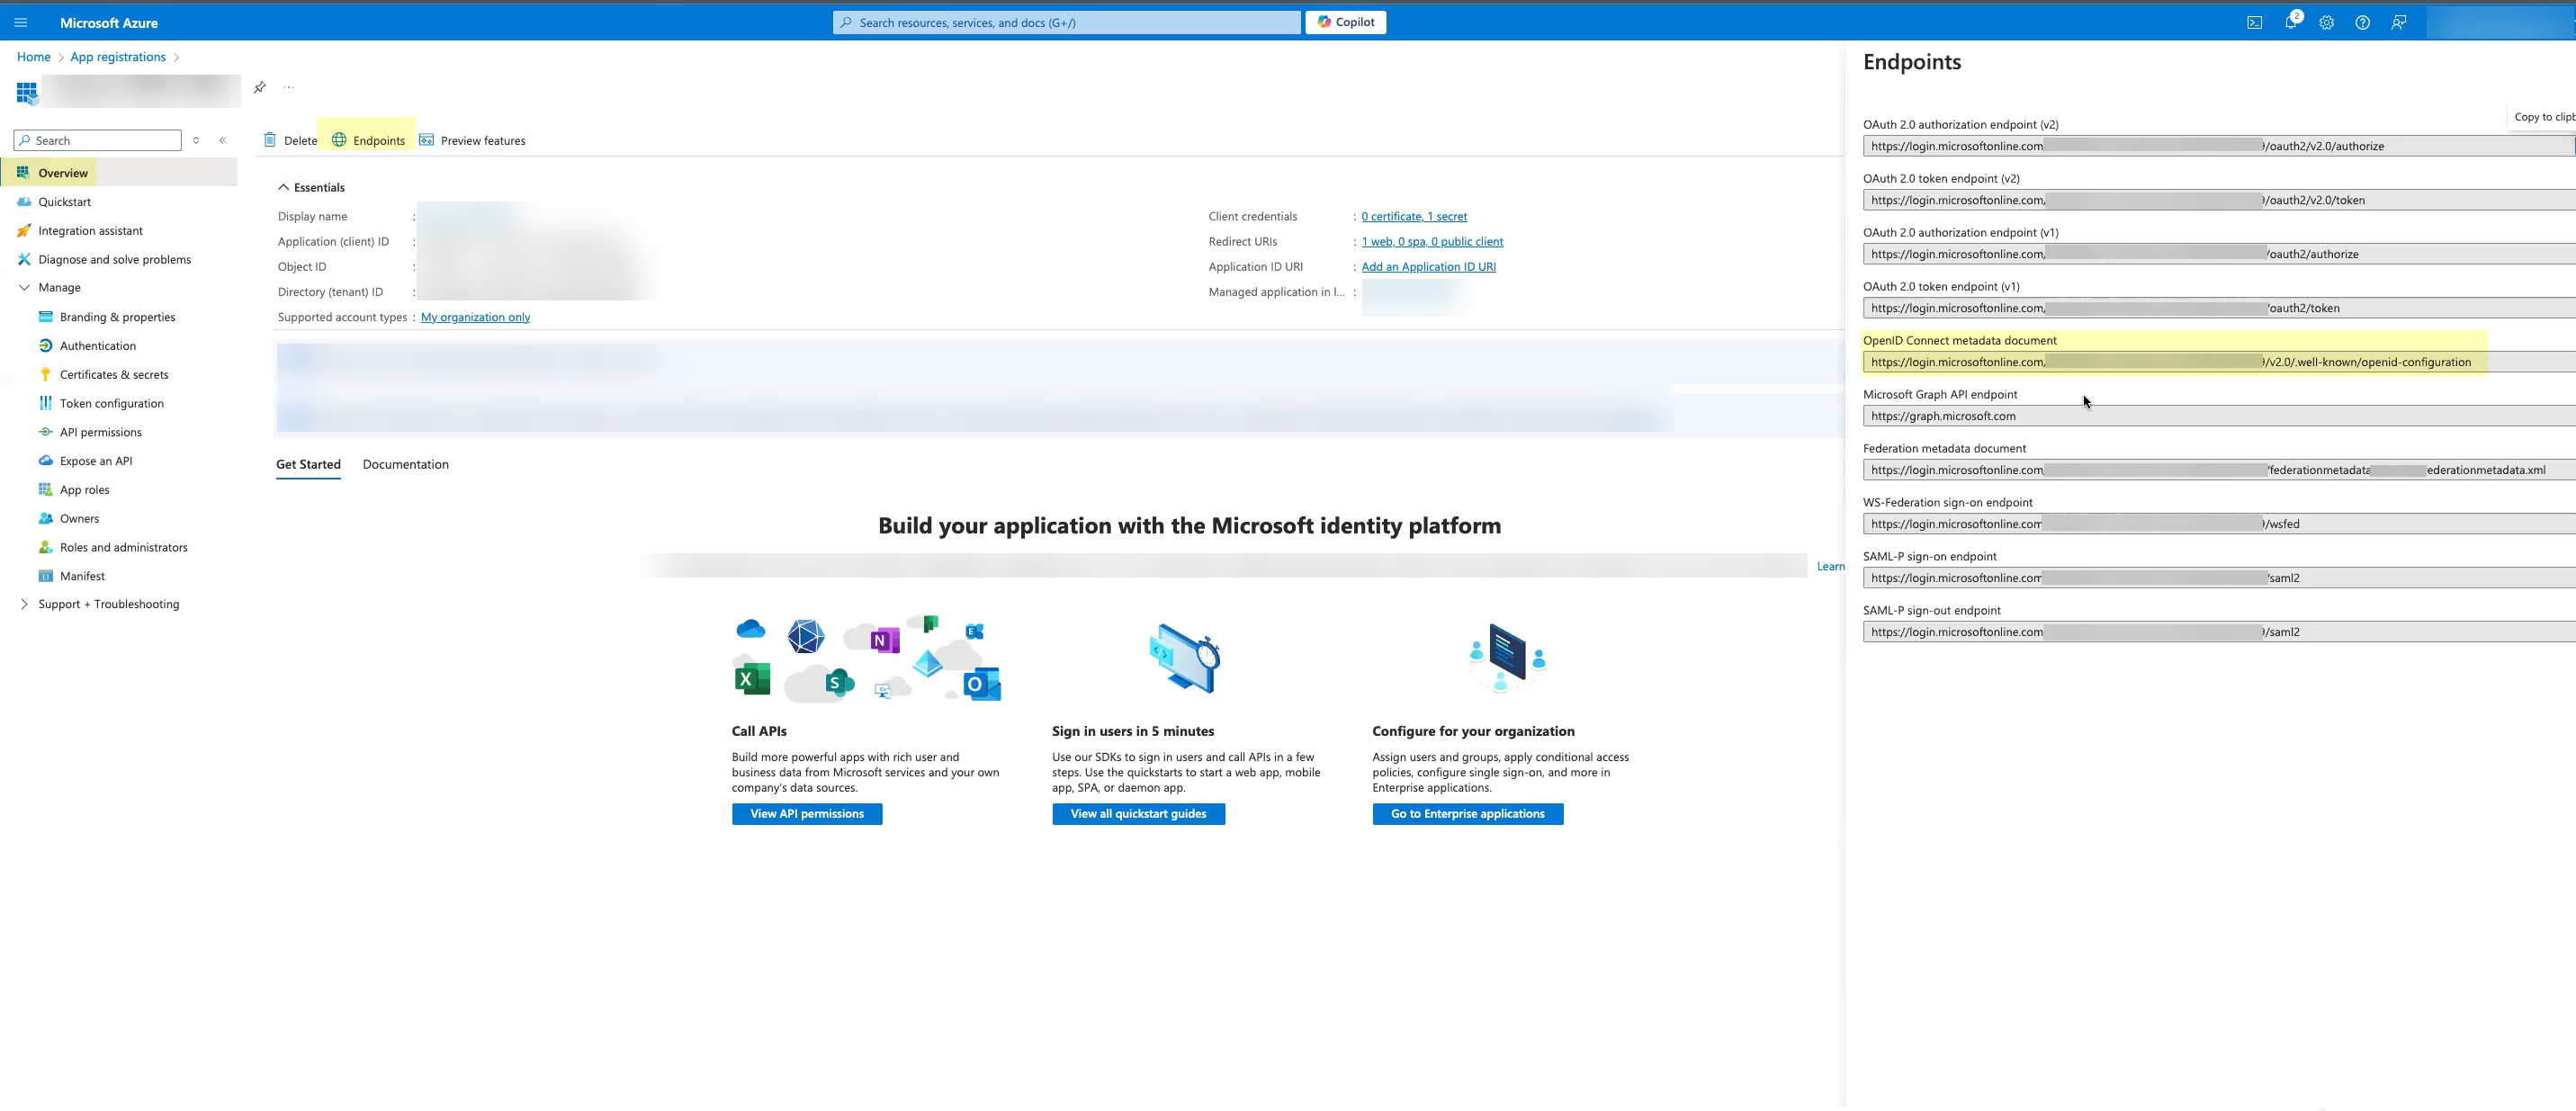
Copy the Value of the client secret and save them in a secure location.Because the secret displays only once, be sure to copy the information before closing or leaving the page. Otherwise, you must create a new secret.Don’t allow the client secret to expire. If the client secret isn’t up to date, users can’t log in using OIDC.![]() (Optional) Select OverviewEndpoints and Copy the OpenID Connect metadata document up to /2.0 (the well-known/openid-configuration section of the URL isn't necessary).
(Optional) Select OverviewEndpoints and Copy the OpenID Connect metadata document up to /2.0 (the well-known/openid-configuration section of the URL isn't necessary).![]() Complete and submit the OIDC configuration.
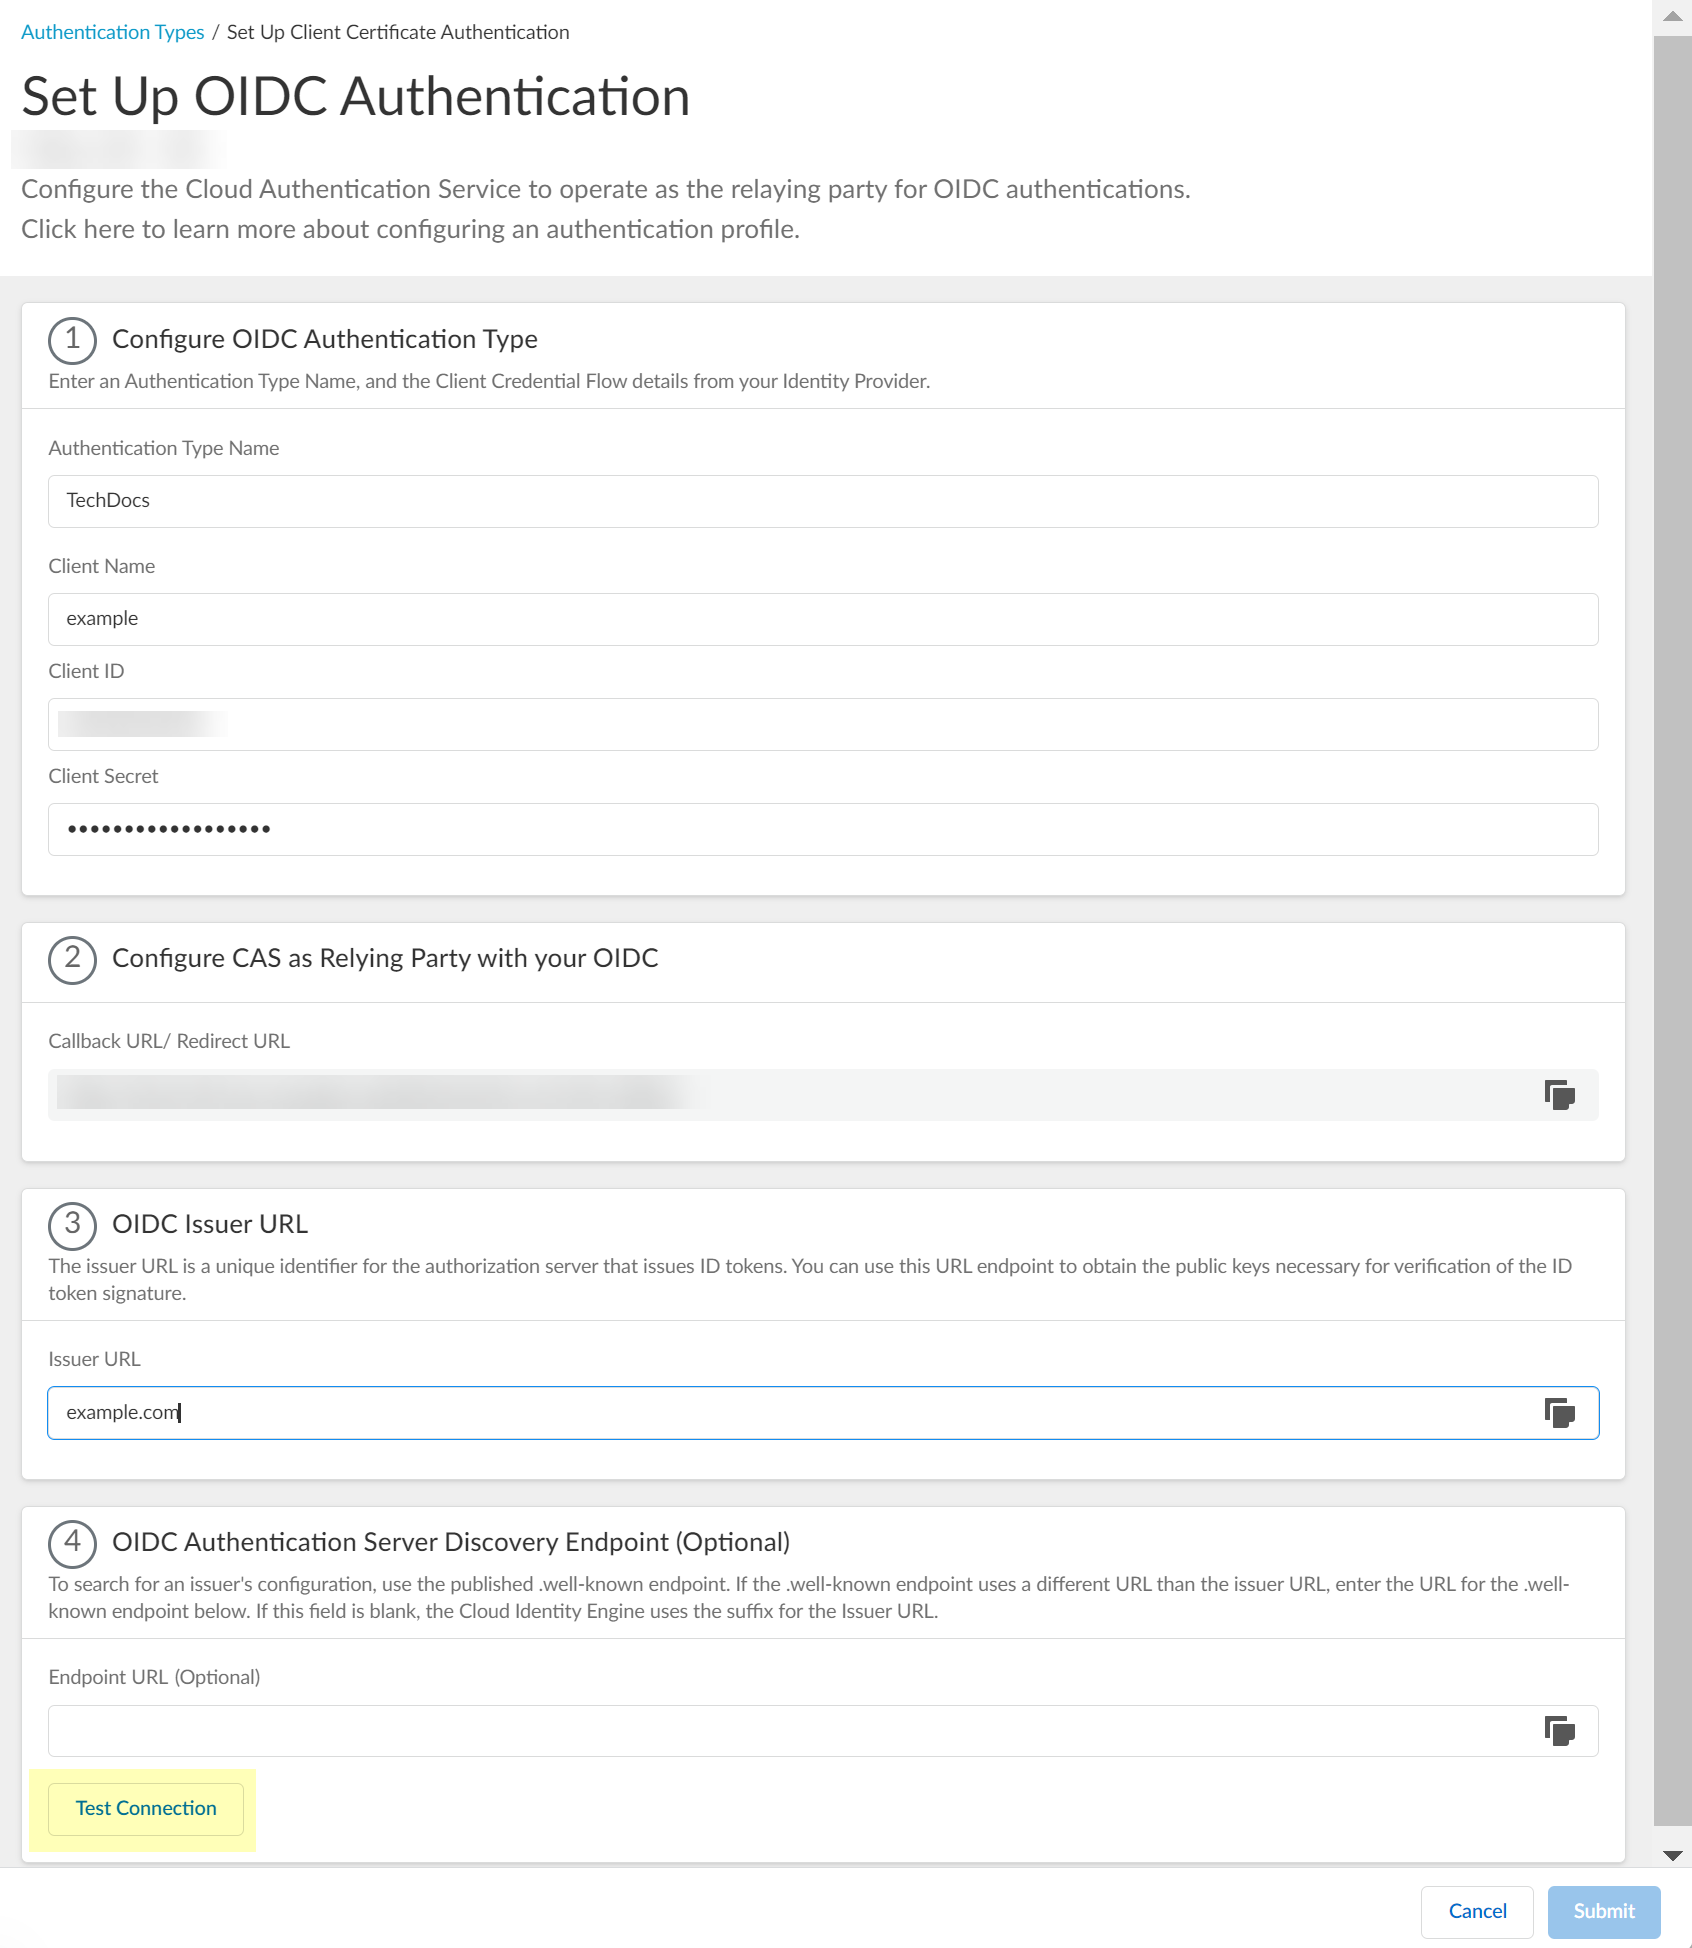
Complete and submit the OIDC configuration.- Enter the Display name you copied from Azure in step 3.2 as the Client Name.
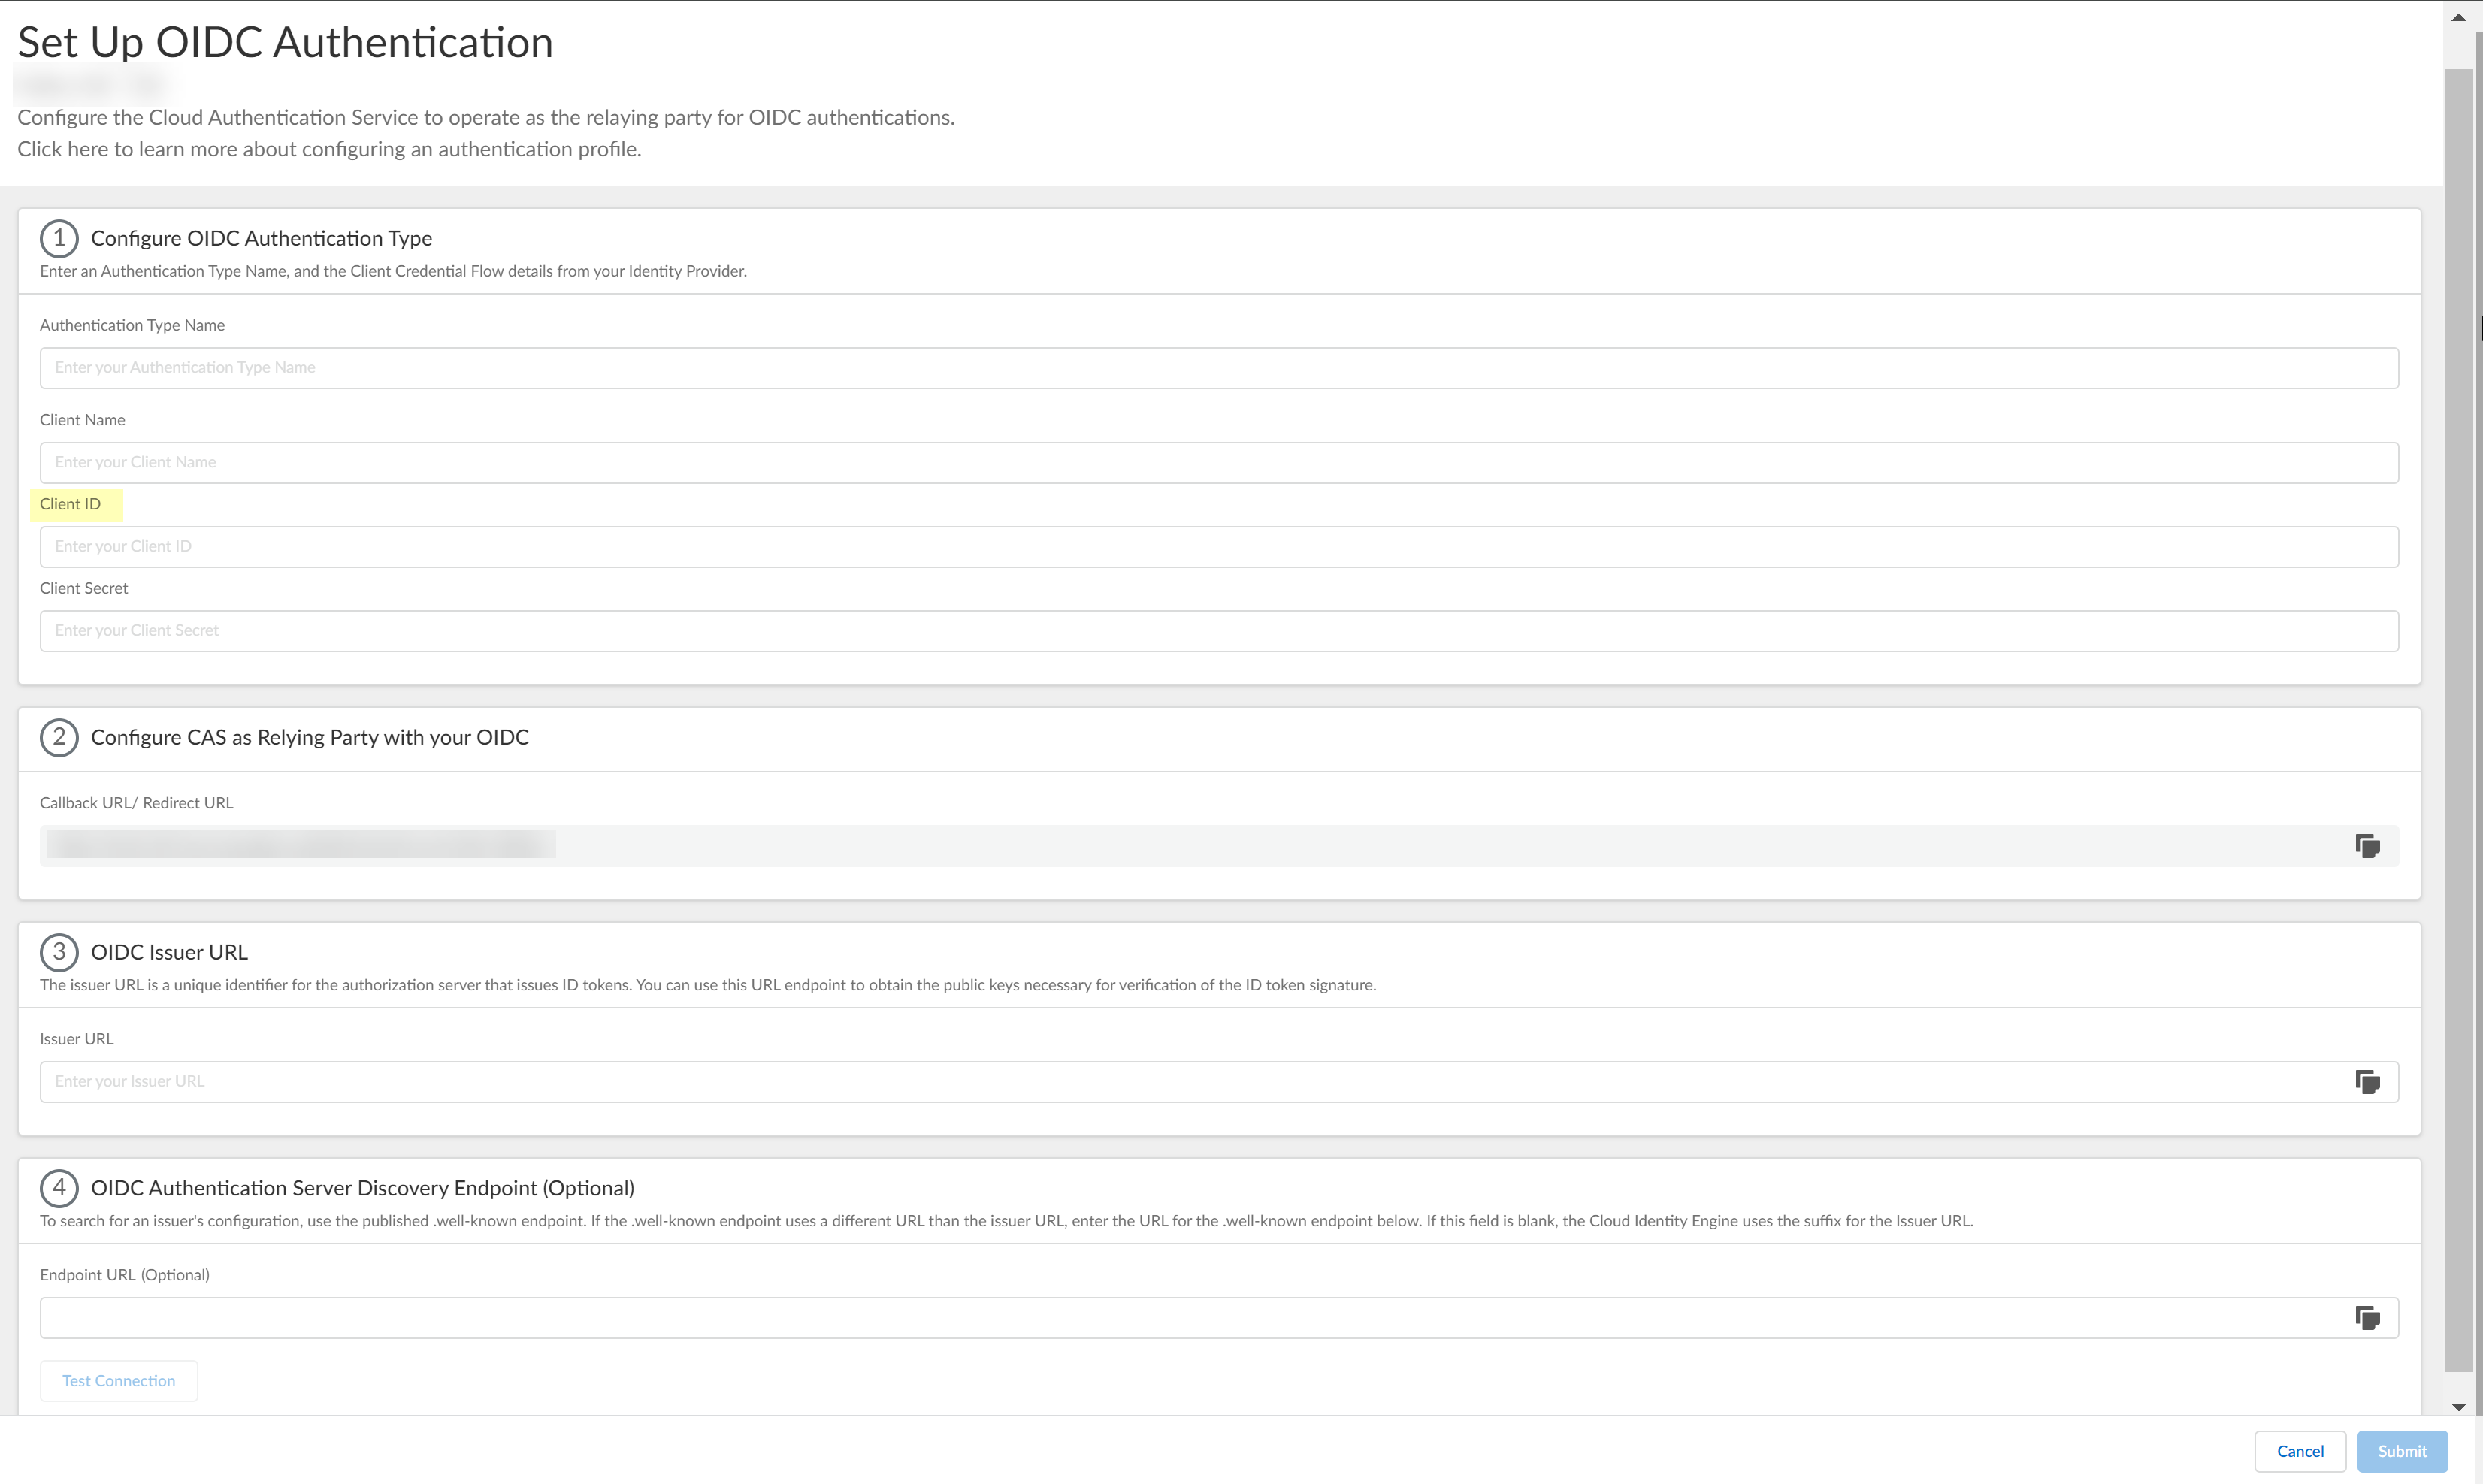
![]() Enter the Client ID you copied from Azure in step 3.6.
Enter the Client ID you copied from Azure in step 3.6.![]() Enter the Value you copied from Azure in step 3.7 as the Client Secret.
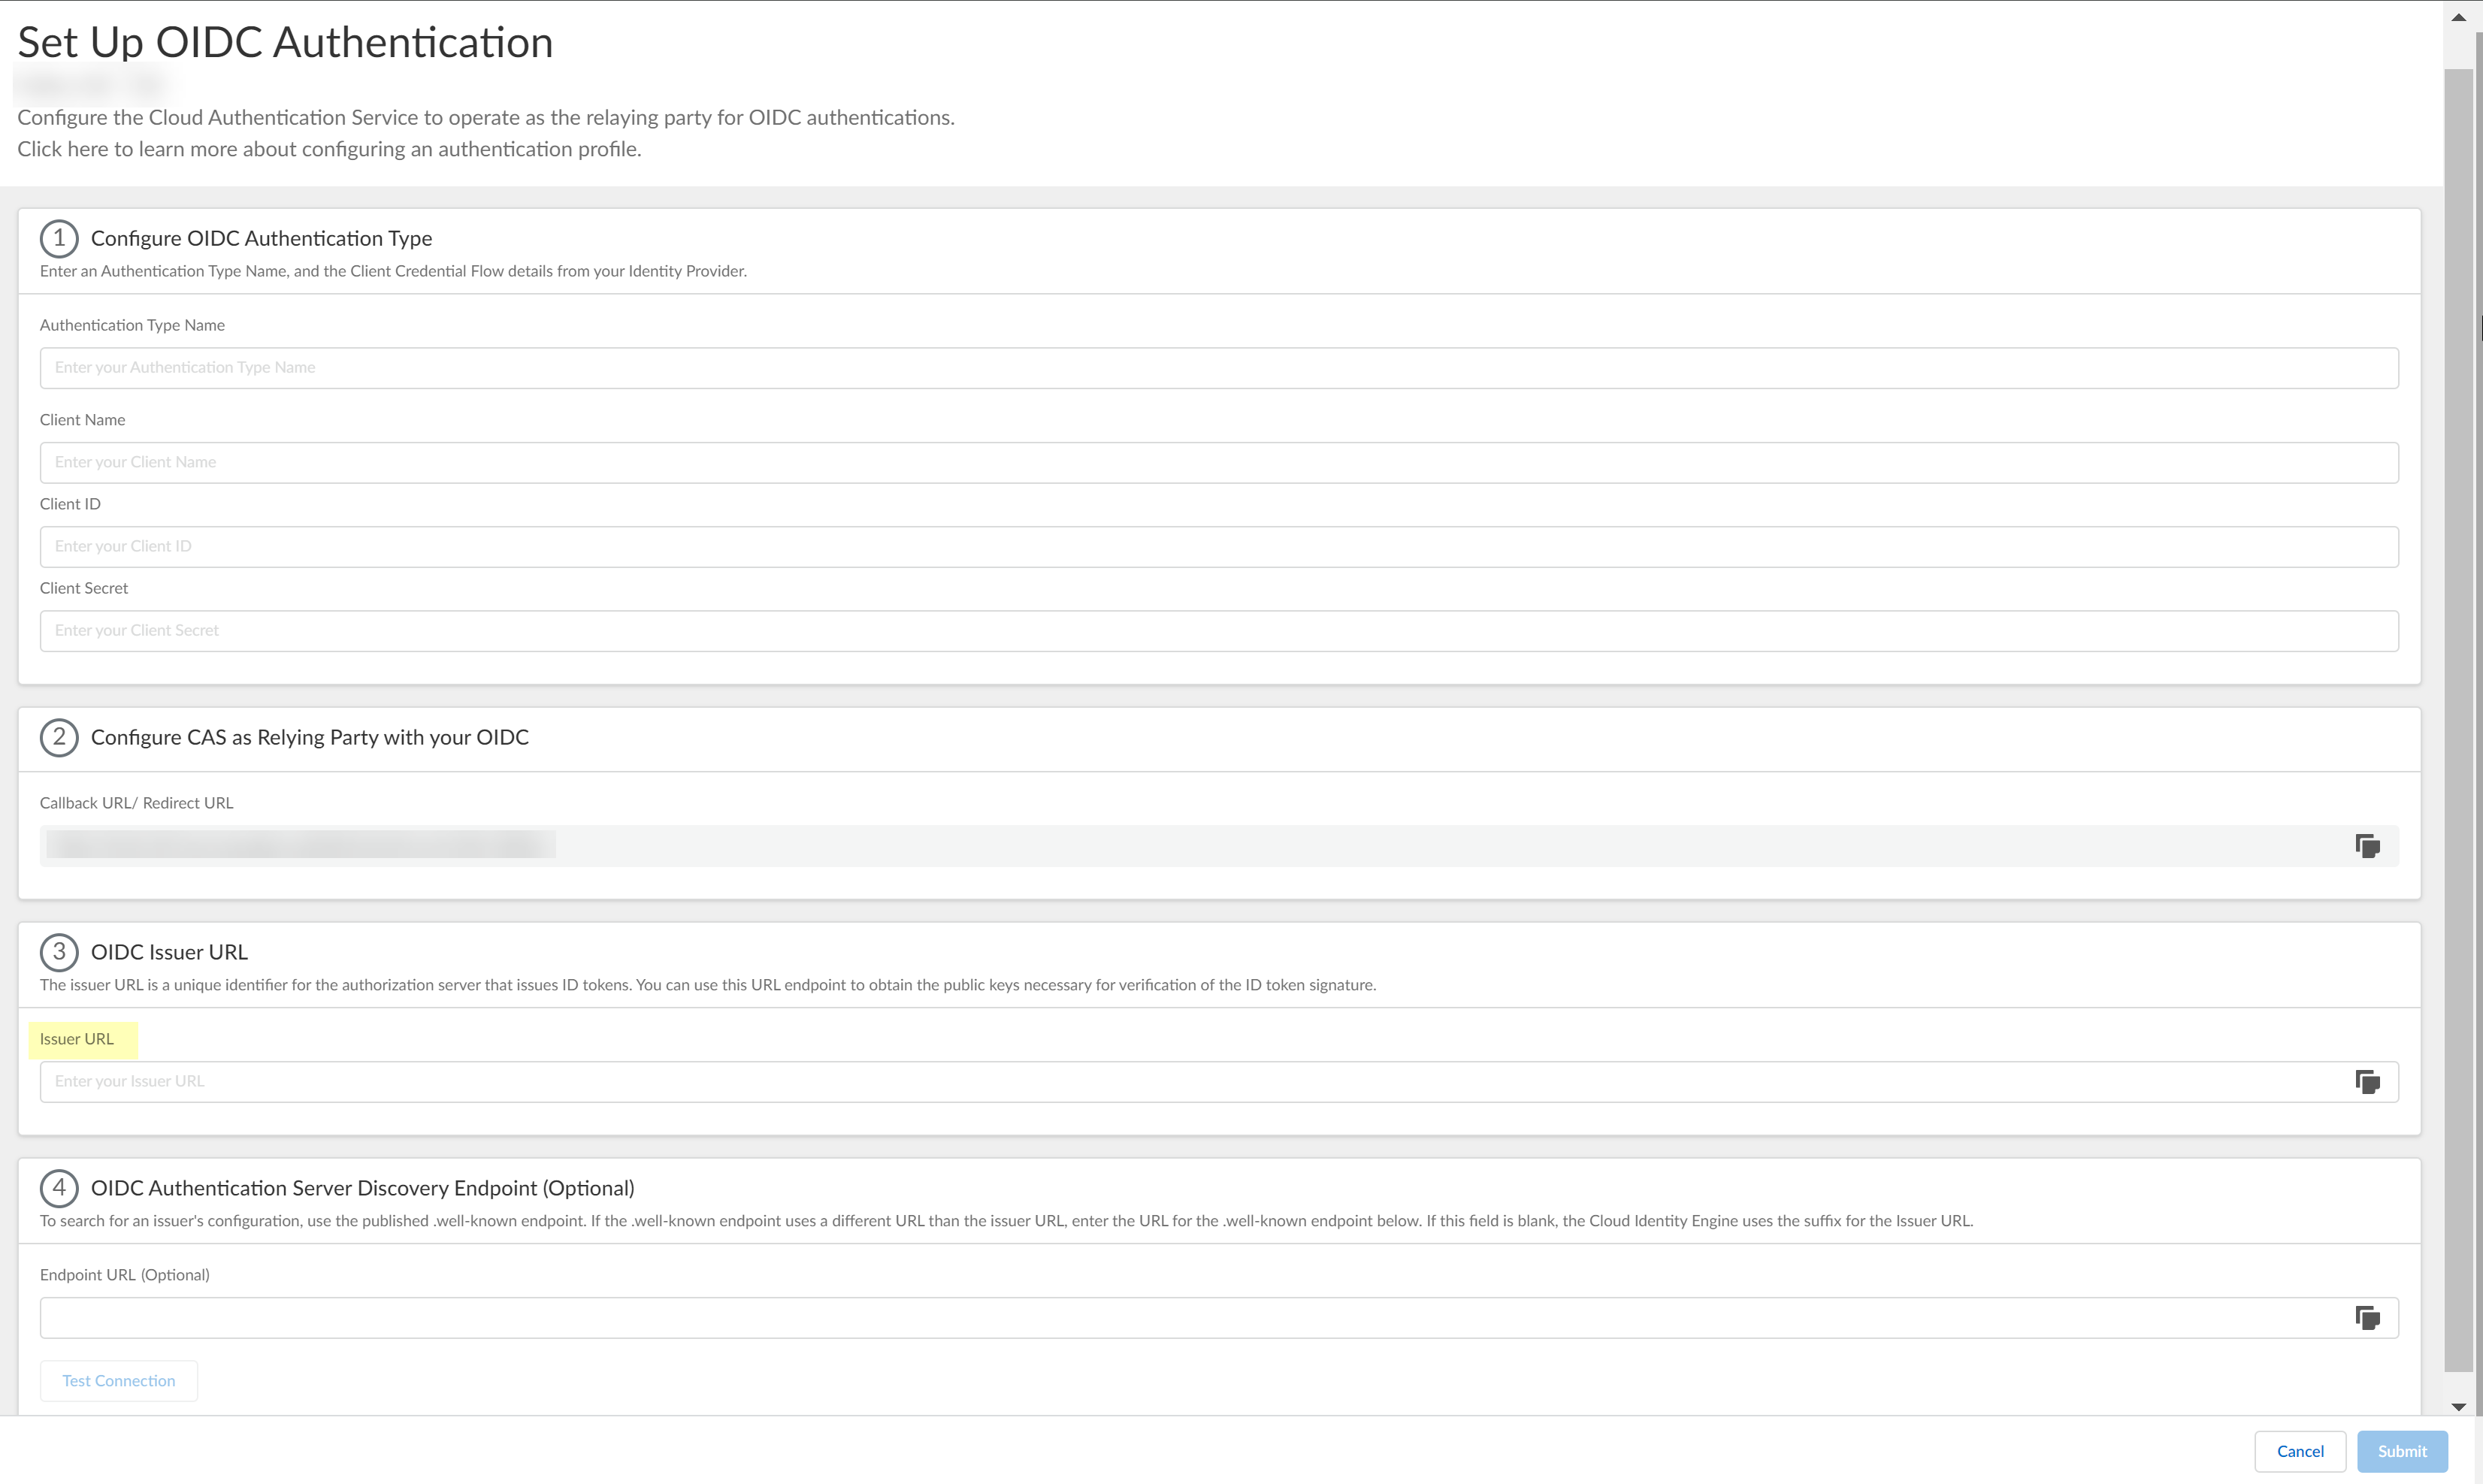
Enter the Value you copied from Azure in step 3.7 as the Client Secret.![]() Enter https://login.microsoftonline.com/organizations/2.0/ as the Issuer URL.
Enter https://login.microsoftonline.com/organizations/2.0/ as the Issuer URL.![]() (Optional) Enter the Endpoint URL you copied in step 3.7.
(Optional) Enter the Endpoint URL you copied in step 3.7.![]() Click Test Connection and log in to confirm that the Cloud Identity Engine can reach your Azure IdP using OIDC.If you did not enter the OIDC Issuer URL in the previous step, the Cloud Identity Engine automatically populates the information.
Click Test Connection and log in to confirm that the Cloud Identity Engine can reach your Azure IdP using OIDC.If you did not enter the OIDC Issuer URL in the previous step, the Cloud Identity Engine automatically populates the information.![]() After confirming that the connection is successful, Submit the configuration.You can now use OIDC as an authentication type when you Set Up an Authentication Profile.
After confirming that the connection is successful, Submit the configuration.You can now use OIDC as an authentication type when you Set Up an Authentication Profile.Configure OIDC for Okta
- Set up OIDC as an authentication type in the Cloud Identity Engine.
- Select AuthenticationAuthentication TypesAdd New Authentication Type.Set Up the OIDC authentication type.
![]() Enter a unique and descriptive Authentication Type Name for your OIDC configuration.
Enter a unique and descriptive Authentication Type Name for your OIDC configuration.![]() Copy the Callback URL/ Redirect URL.
Copy the Callback URL/ Redirect URL.![]() Configure Okta to use OIDC with the Cloud Identity Engine.
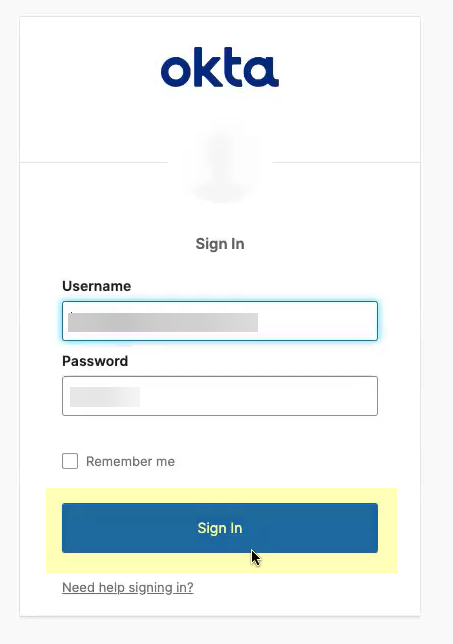
Configure Okta to use OIDC with the Cloud Identity Engine.- Sign in to Okta.
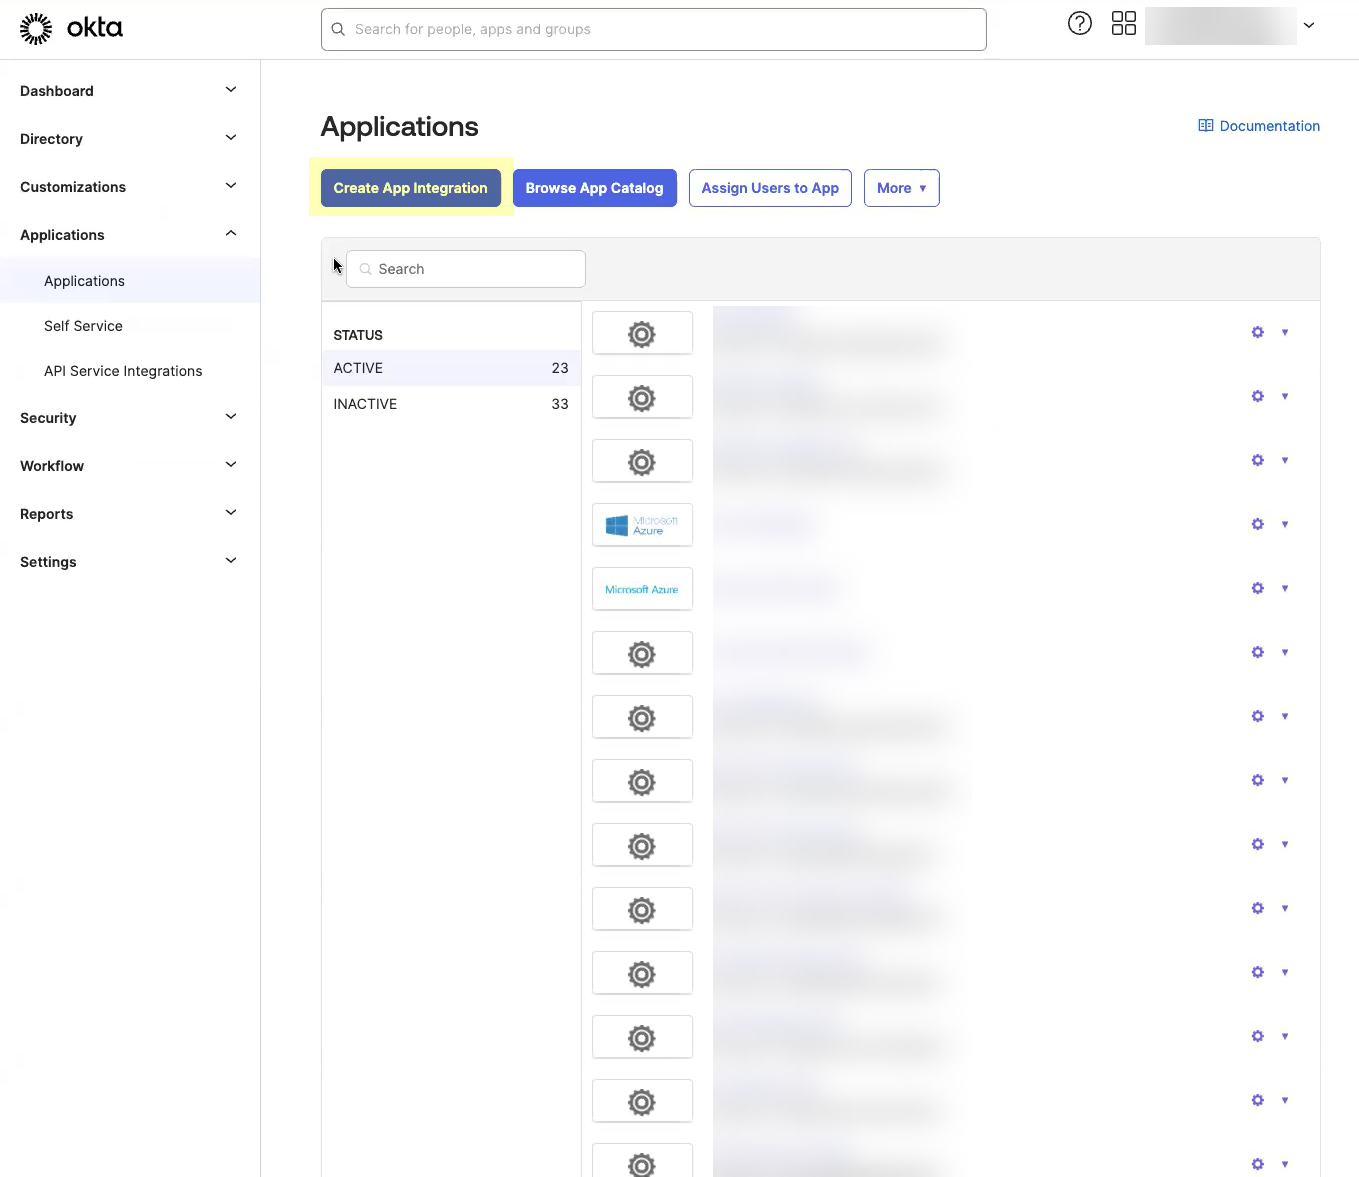
![]() Select ApplicationsApplications.
Select ApplicationsApplications.![]() Click Create App Integration.
Click Create App Integration.![]() Select OIDC - OpenID Connect as the Sign-in method and Web Application as the Application Type then click Next.
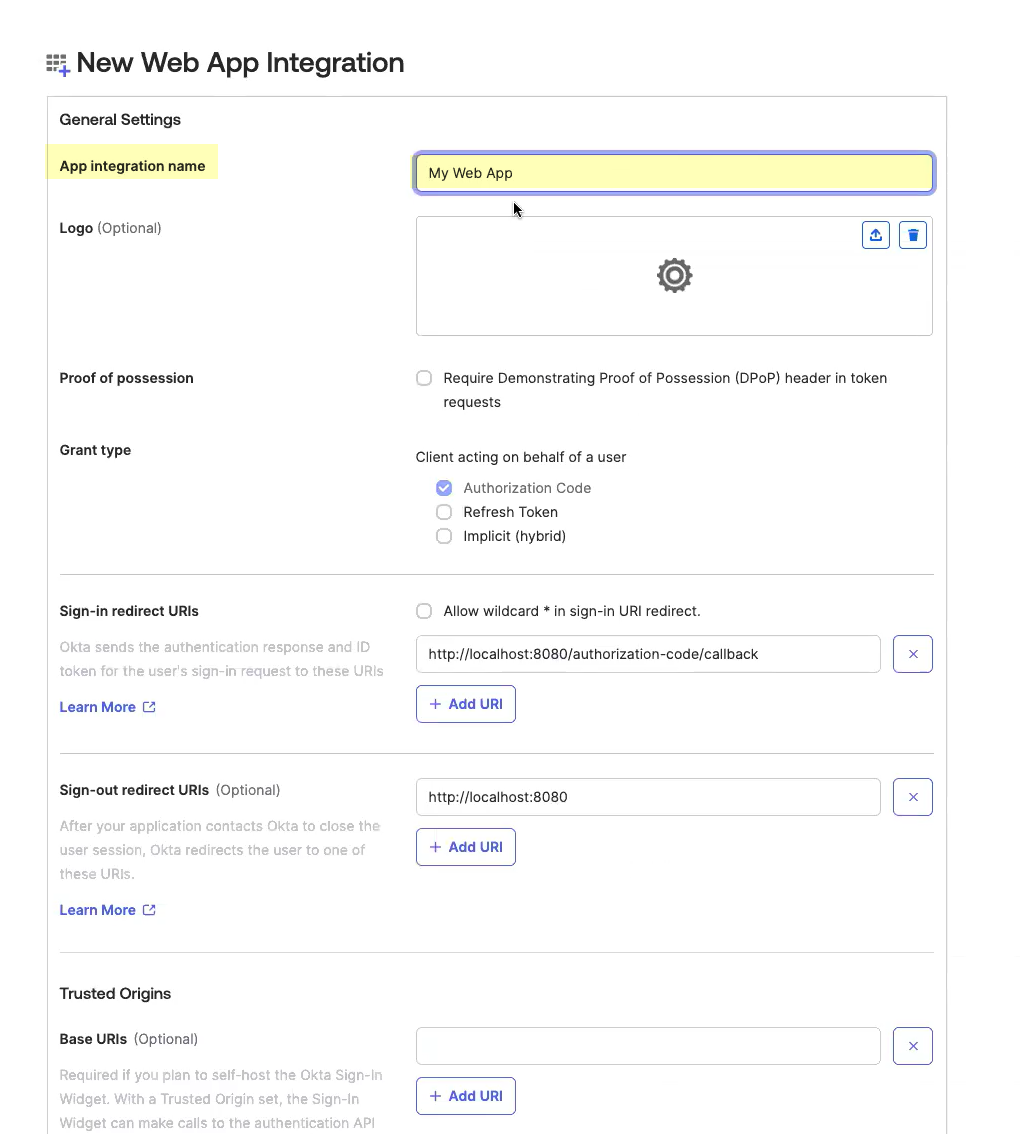
Select OIDC - OpenID Connect as the Sign-in method and Web Application as the Application Type then click Next.![]() Enter an App integration name.
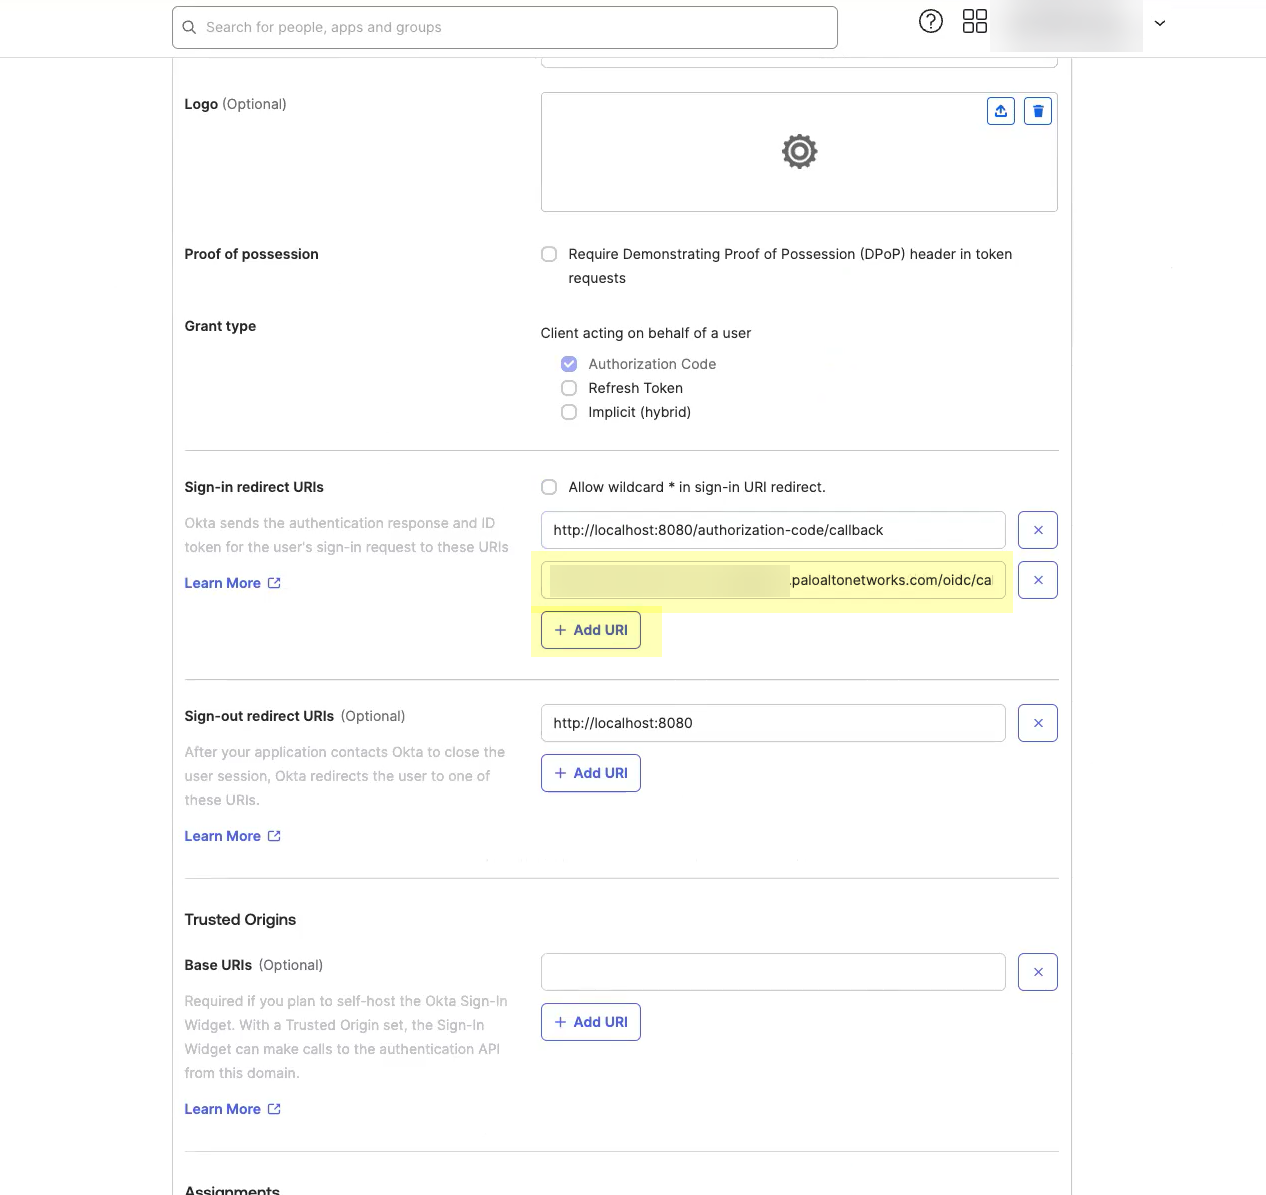
Enter an App integration name.![]() Click Add URI and enter the information you copied in step 1.4.
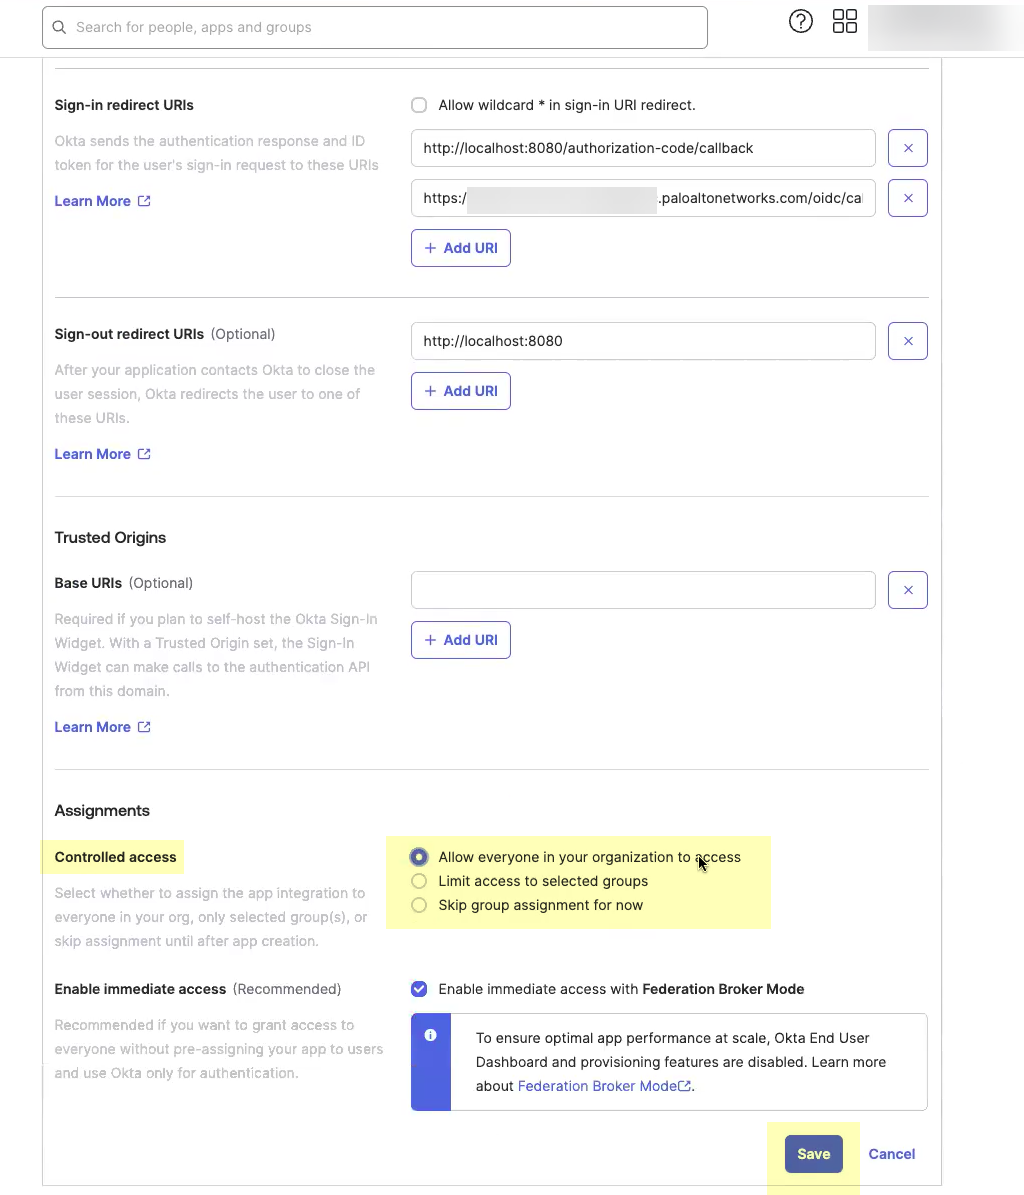
Click Add URI and enter the information you copied in step 1.4.![]() Select the Controlled Access you want to allow then click Save.
Select the Controlled Access you want to allow then click Save.![]() Obtain the information you need to complete your OIDC Okta configuration.
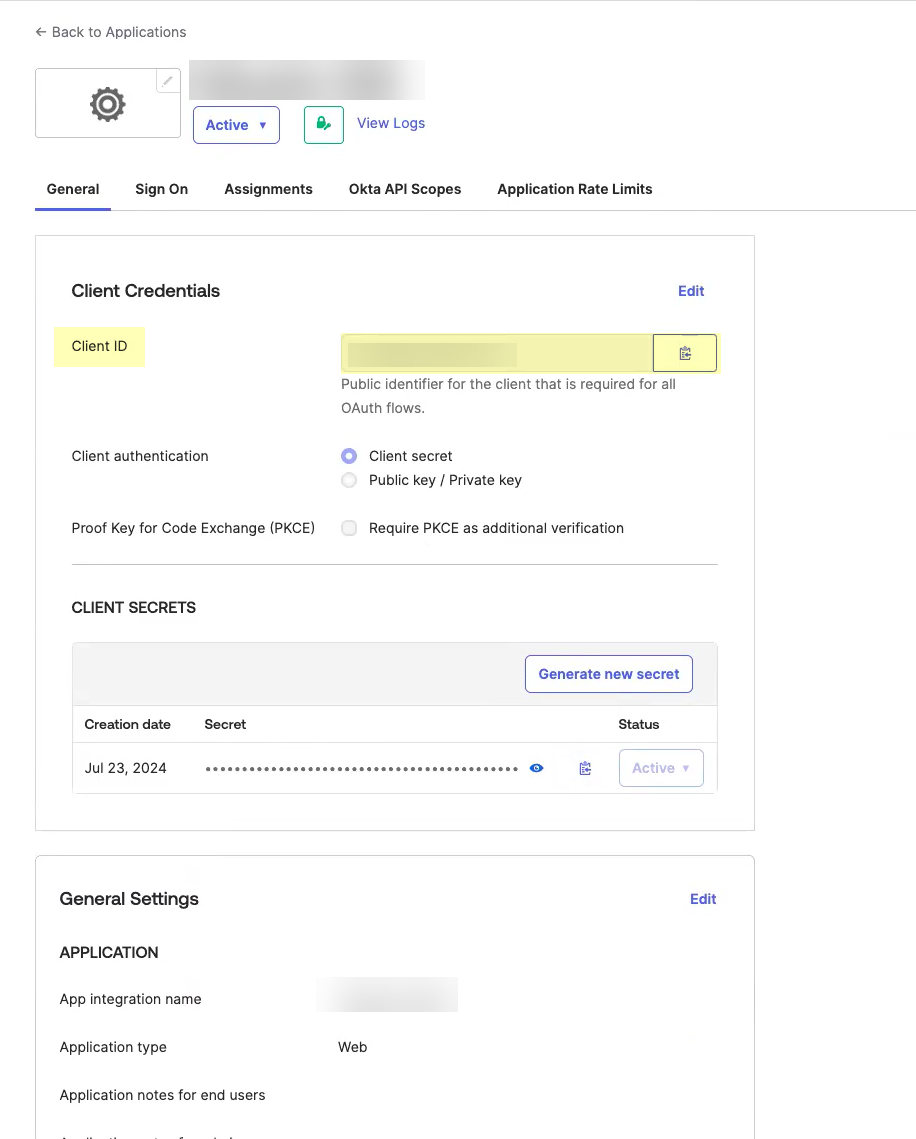
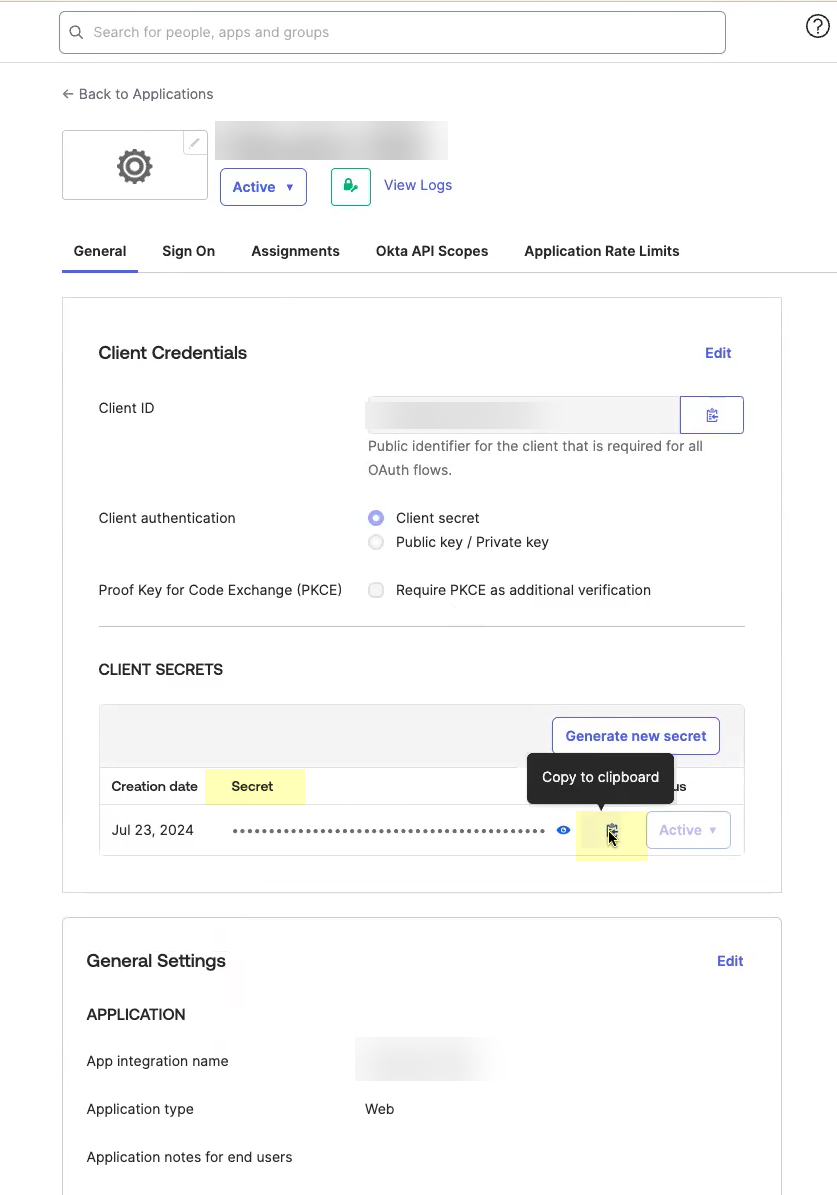
Obtain the information you need to complete your OIDC Okta configuration.- Copy the Client ID.
![]() Copy the Secret.The secret for Okta does not expire.
Copy the Secret.The secret for Okta does not expire.![]() Complete and submit the OIDC configuration.
Complete and submit the OIDC configuration.- Enter the App integration name you entered in Okta in step 2.5 as the Client Name.
![]() Enter the Client ID you copied from Okta in step 3.1.
Enter the Client ID you copied from Okta in step 3.1.![]() Enter the Secret you copied from Okta in step 3.2 as the Client Secret.
Enter the Secret you copied from Okta in step 3.2 as the Client Secret.![]() Enter the domain name URL for your Okta IdP as the Issuer URL.
Enter the domain name URL for your Okta IdP as the Issuer URL.![]() (Optional) If you have your Endpoint URL, enter it here. If not, continue to the next step (the Cloud Identity Engine populates the Endpoint URL automatically after you successfully test the connection).
(Optional) If you have your Endpoint URL, enter it here. If not, continue to the next step (the Cloud Identity Engine populates the Endpoint URL automatically after you successfully test the connection).![]() Click Test Connection and log in to confirm that the Cloud Identity Engine can reach your Okta IdP using OIDC.If you did not enter the OIDC Issuer URL in the previous step, the Cloud Identity Engine automatically populates the information.
Click Test Connection and log in to confirm that the Cloud Identity Engine can reach your Okta IdP using OIDC.If you did not enter the OIDC Issuer URL in the previous step, the Cloud Identity Engine automatically populates the information.![]() After confirming that the connection is successful, Submit the configuration.You can now use OIDC as an authentication type when you Set Up an Authentication Profile.
After confirming that the connection is successful, Submit the configuration.You can now use OIDC as an authentication type when you Set Up an Authentication Profile.Configure OIDC for PingOne
- Set up OIDC as an authentication type in the Cloud Identity Engine.
- Select AuthenticationAuthentication TypesAdd New Authentication Type.Set Up the OIDC authentication type.
![]() Enter a unique and descriptive Authentication Type Name for your OIDC configuration.
Enter a unique and descriptive Authentication Type Name for your OIDC configuration.![]() Copy the Callback URL/ Redirect URL.
Copy the Callback URL/ Redirect URL.![]() Configure PingOne to use OIDC with the Cloud Identity Engine.
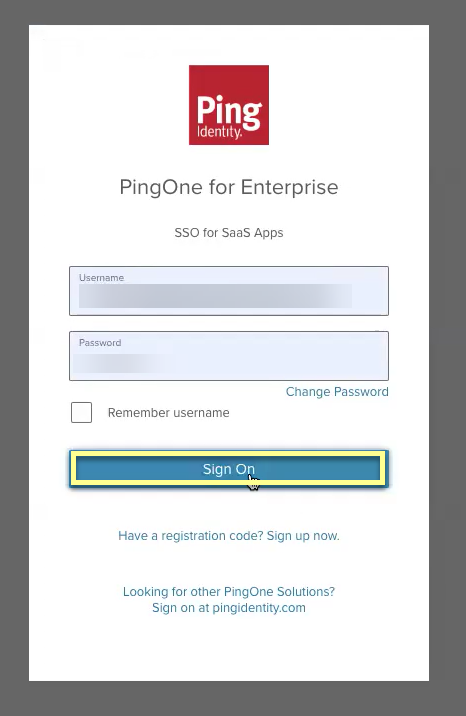
Configure PingOne to use OIDC with the Cloud Identity Engine.- Sign On to your PingOne account.
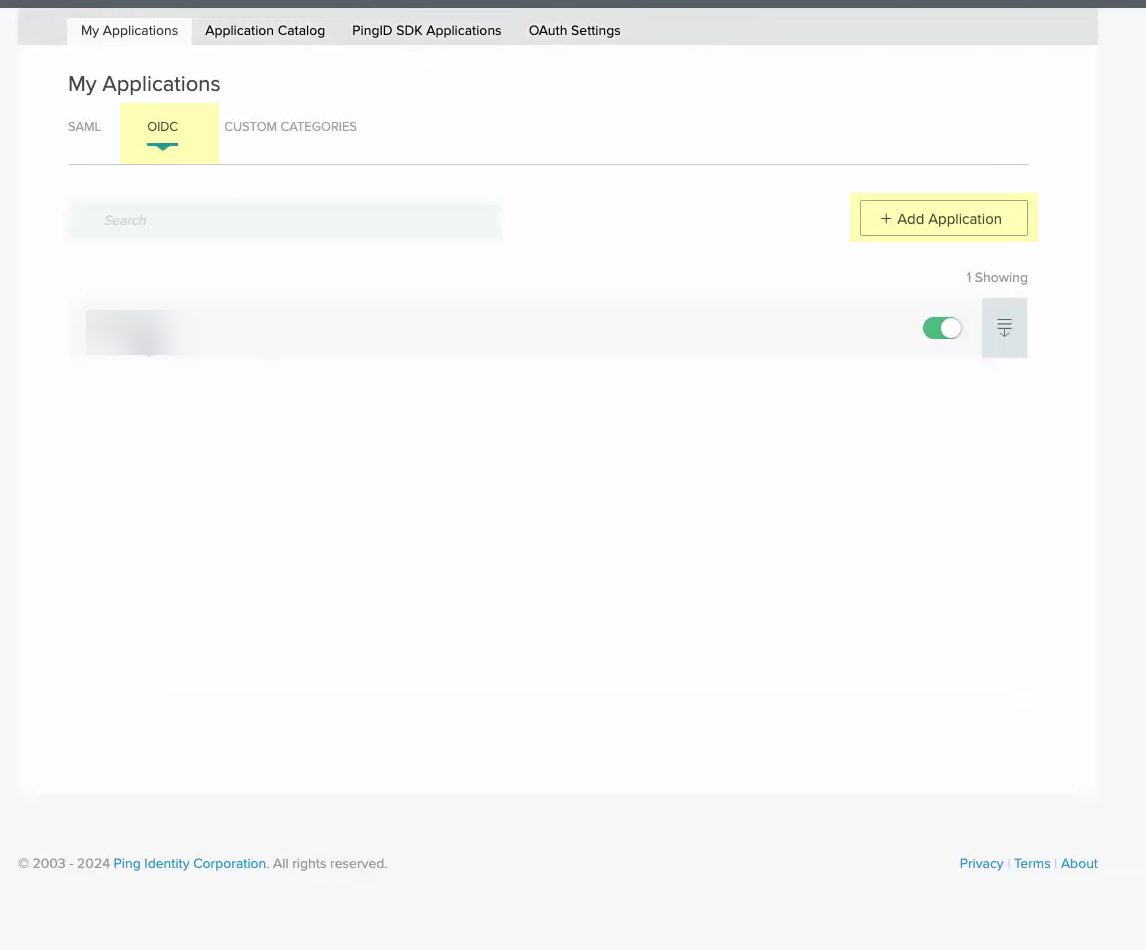
![]() Select Applications.
Select Applications.![]() Select OIDC then click Add Application.
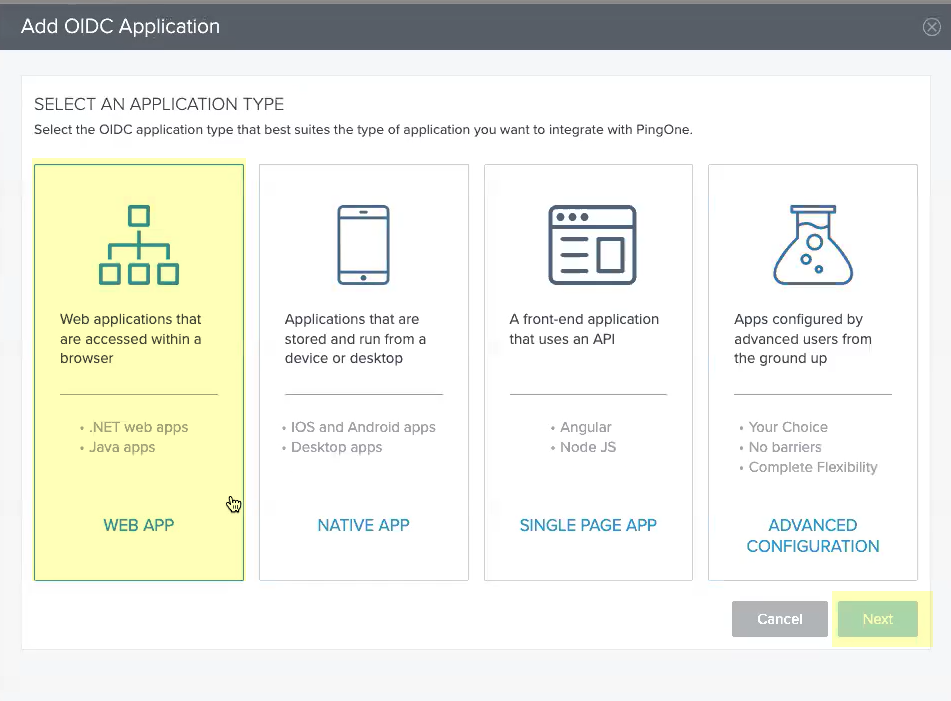
Select OIDC then click Add Application.![]() Select Web App then click Next.
Select Web App then click Next.![]() Enter an Application Name, a Short Description for the app, and select the app Category, then click Next.
Enter an Application Name, a Short Description for the app, and select the app Category, then click Next.![]() Continue the OIDC Okta configuration.
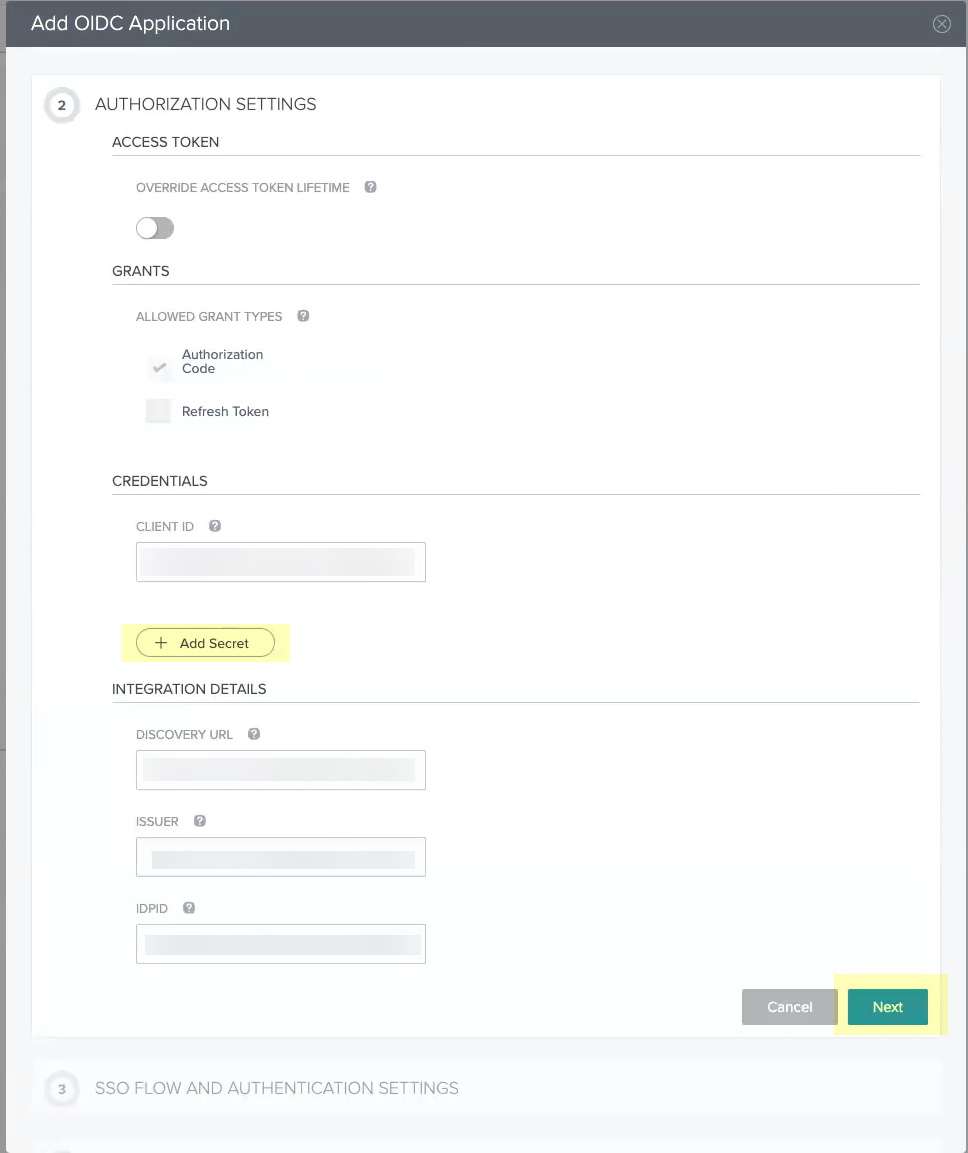
Continue the OIDC Okta configuration.- Click Add Secret then click Next.
![]() Enter the Start SSO URL and the Redirect URIs then click Next.
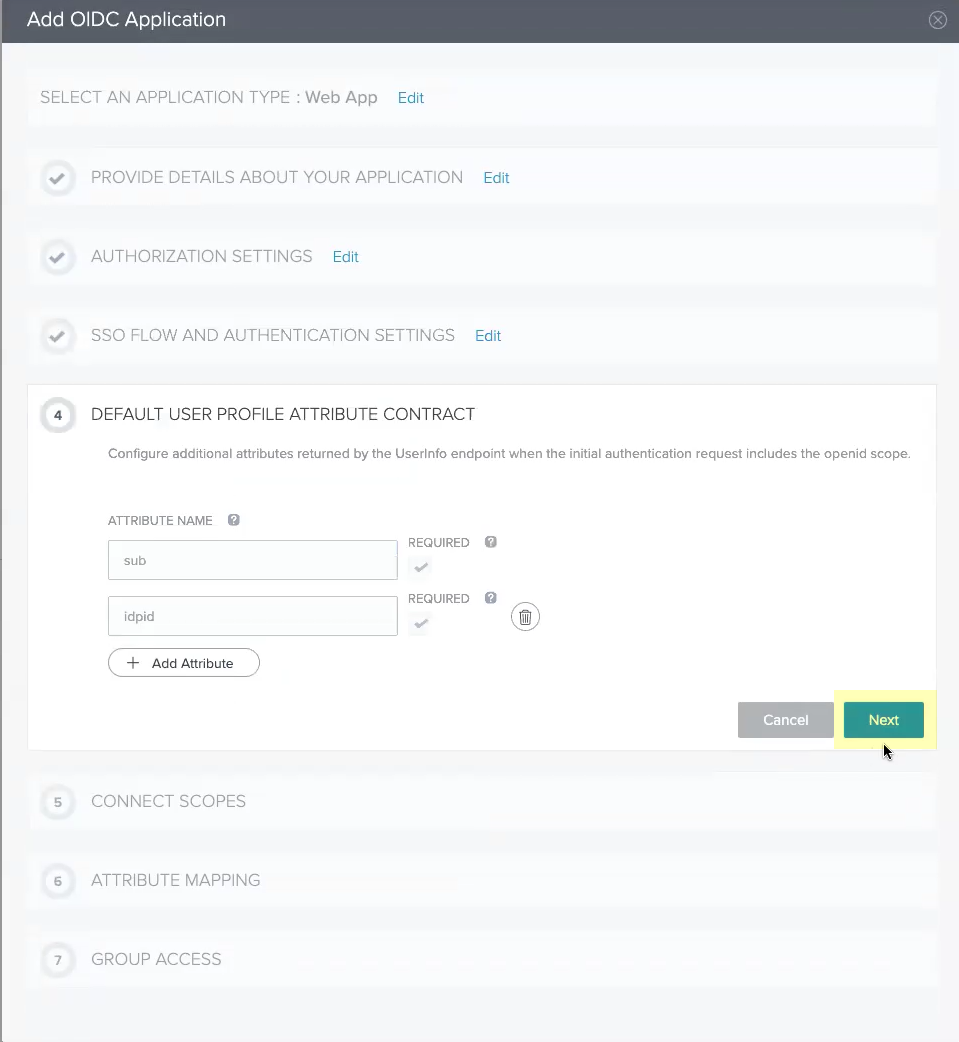
Enter the Start SSO URL and the Redirect URIs then click Next.![]() Click Next.No configuration changes are necessary for this step.
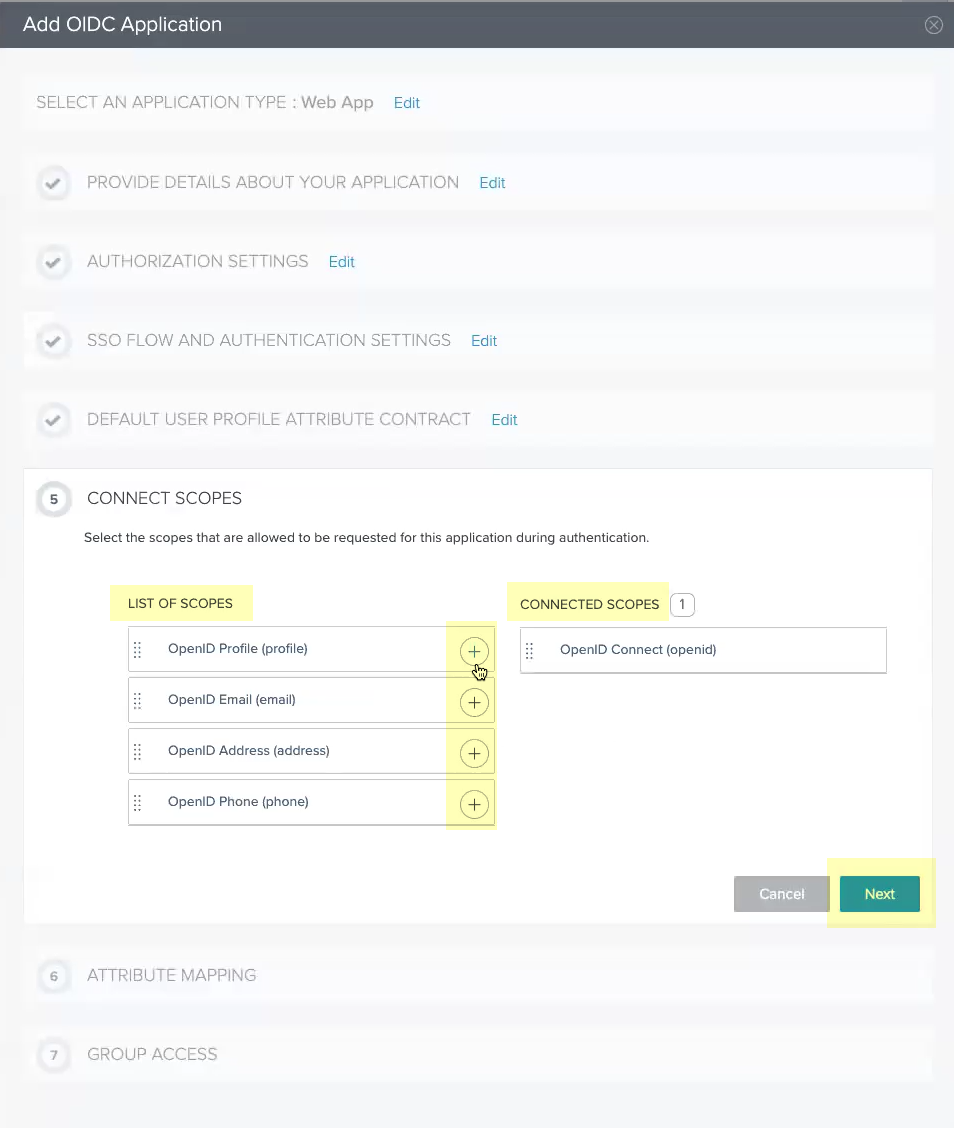
Click Next.No configuration changes are necessary for this step.![]() Add all the scopes in the List of Scopes to the Connected Scopes then click Next.
Add all the scopes in the List of Scopes to the Connected Scopes then click Next.![]() Select Email (Work) as the sub attribute then click Next.
Select Email (Work) as the sub attribute then click Next.![]() Select all the Available Groups and add them to the Added Groups then click Done.
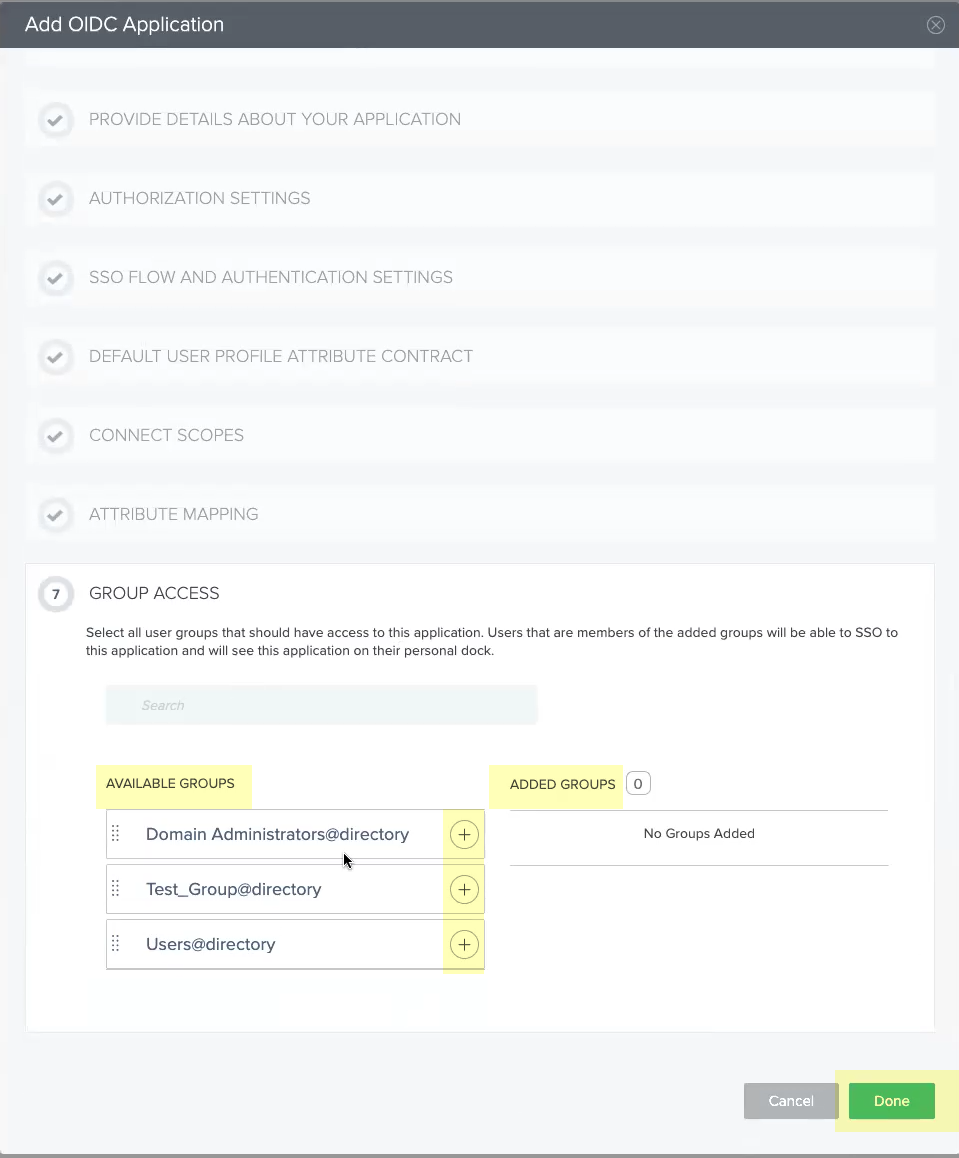
Select all the Available Groups and add them to the Added Groups then click Done.![]() Obtain the information you need to complete your OIDC PingOne configuration and enter it in your Cloud Identity Engine configuration.
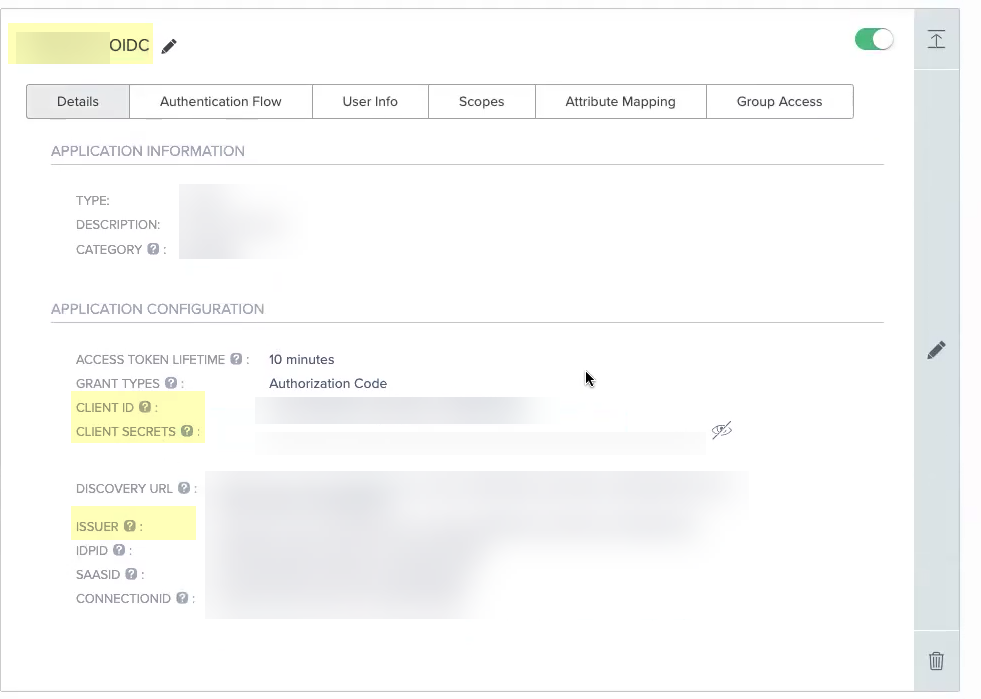
Obtain the information you need to complete your OIDC PingOne configuration and enter it in your Cloud Identity Engine configuration.- Copy the following information from your configuration and save it in a secure location:
- The Application Name you entered in step 2.5.
- The Client ID and Client
Secrets you added in step 3.1.
Don’t allow the client secret to expire. If the client secret isn’t up to date, users can’t log in using OIDC.
- The Issuer URL (as shown below).
![]() Enter the Application Name you entered in PingOne in step 2.5 as the Client Name.
Enter the Application Name you entered in PingOne in step 2.5 as the Client Name.![]() Enter the Client ID you created in PingOne in step 3.1.
Enter the Client ID you created in PingOne in step 3.1.![]() Enter the Client Secrets you created in PingOne in step 3.1 as the Client Secret.
Enter the Client Secrets you created in PingOne in step 3.1 as the Client Secret.![]() Enter the Issuer URL for your PingOne IdP that you copied in step 4.1 as the Issuer URL.
Enter the Issuer URL for your PingOne IdP that you copied in step 4.1 as the Issuer URL.![]() (Optional) If you have your Endpoint URL, enter it here. If not, continue to the next step (the Cloud Identity Engine populates the Endpoint URL automatically after you successfully test the connection).
(Optional) If you have your Endpoint URL, enter it here. If not, continue to the next step (the Cloud Identity Engine populates the Endpoint URL automatically after you successfully test the connection).![]() Click Test Connection and log in to confirm that the Cloud Identity Engine can reach your PingOne IdP using OIDC.If you did not enter the OIDC Issuer URL in the previous step, the Cloud Identity Engine automatically populates the information.
Click Test Connection and log in to confirm that the Cloud Identity Engine can reach your PingOne IdP using OIDC.If you did not enter the OIDC Issuer URL in the previous step, the Cloud Identity Engine automatically populates the information.![]() After confirming that the connection is successful, Submit the configuration.You can now use OIDC as an authentication type when you Set Up an Authentication Profile.
After confirming that the connection is successful, Submit the configuration.You can now use OIDC as an authentication type when you Set Up an Authentication Profile.Configure OIDC for Google
- Set up OIDC as an authentication type in the Cloud Identity Engine.
- Select AuthenticationAuthentication TypesAdd New Authentication Type.Set Up the OIDC authentication type.
![]() Enter a unique and descriptive Authentication Type Name for your OIDC configuration.
Enter a unique and descriptive Authentication Type Name for your OIDC configuration.![]() Copy the Callback URL/ Redirect URL.
Copy the Callback URL/ Redirect URL.![]() Configure Google to use OIDC with the Cloud Identity Engine.
Configure Google to use OIDC with the Cloud Identity Engine.- Select your account and Enter your password then click Next.
![]() Create a new project or select an existing project.Enable the Identity and Access Management (IAM) API (if it's not already enabled).Select APIs & ServicesOAuth consent screen then configure the OAuth consent screen.Create your OAuth 2.0 credentials, copy the Client ID and Client Secret, and store them in a secure location.Don’t allow the client secret to expire. If the client secret isn’t up to date, users can’t log in using OIDC.Obtain the information you need to complete your OIDC Google configuration and enter it in your Cloud Identity Engine configuration.
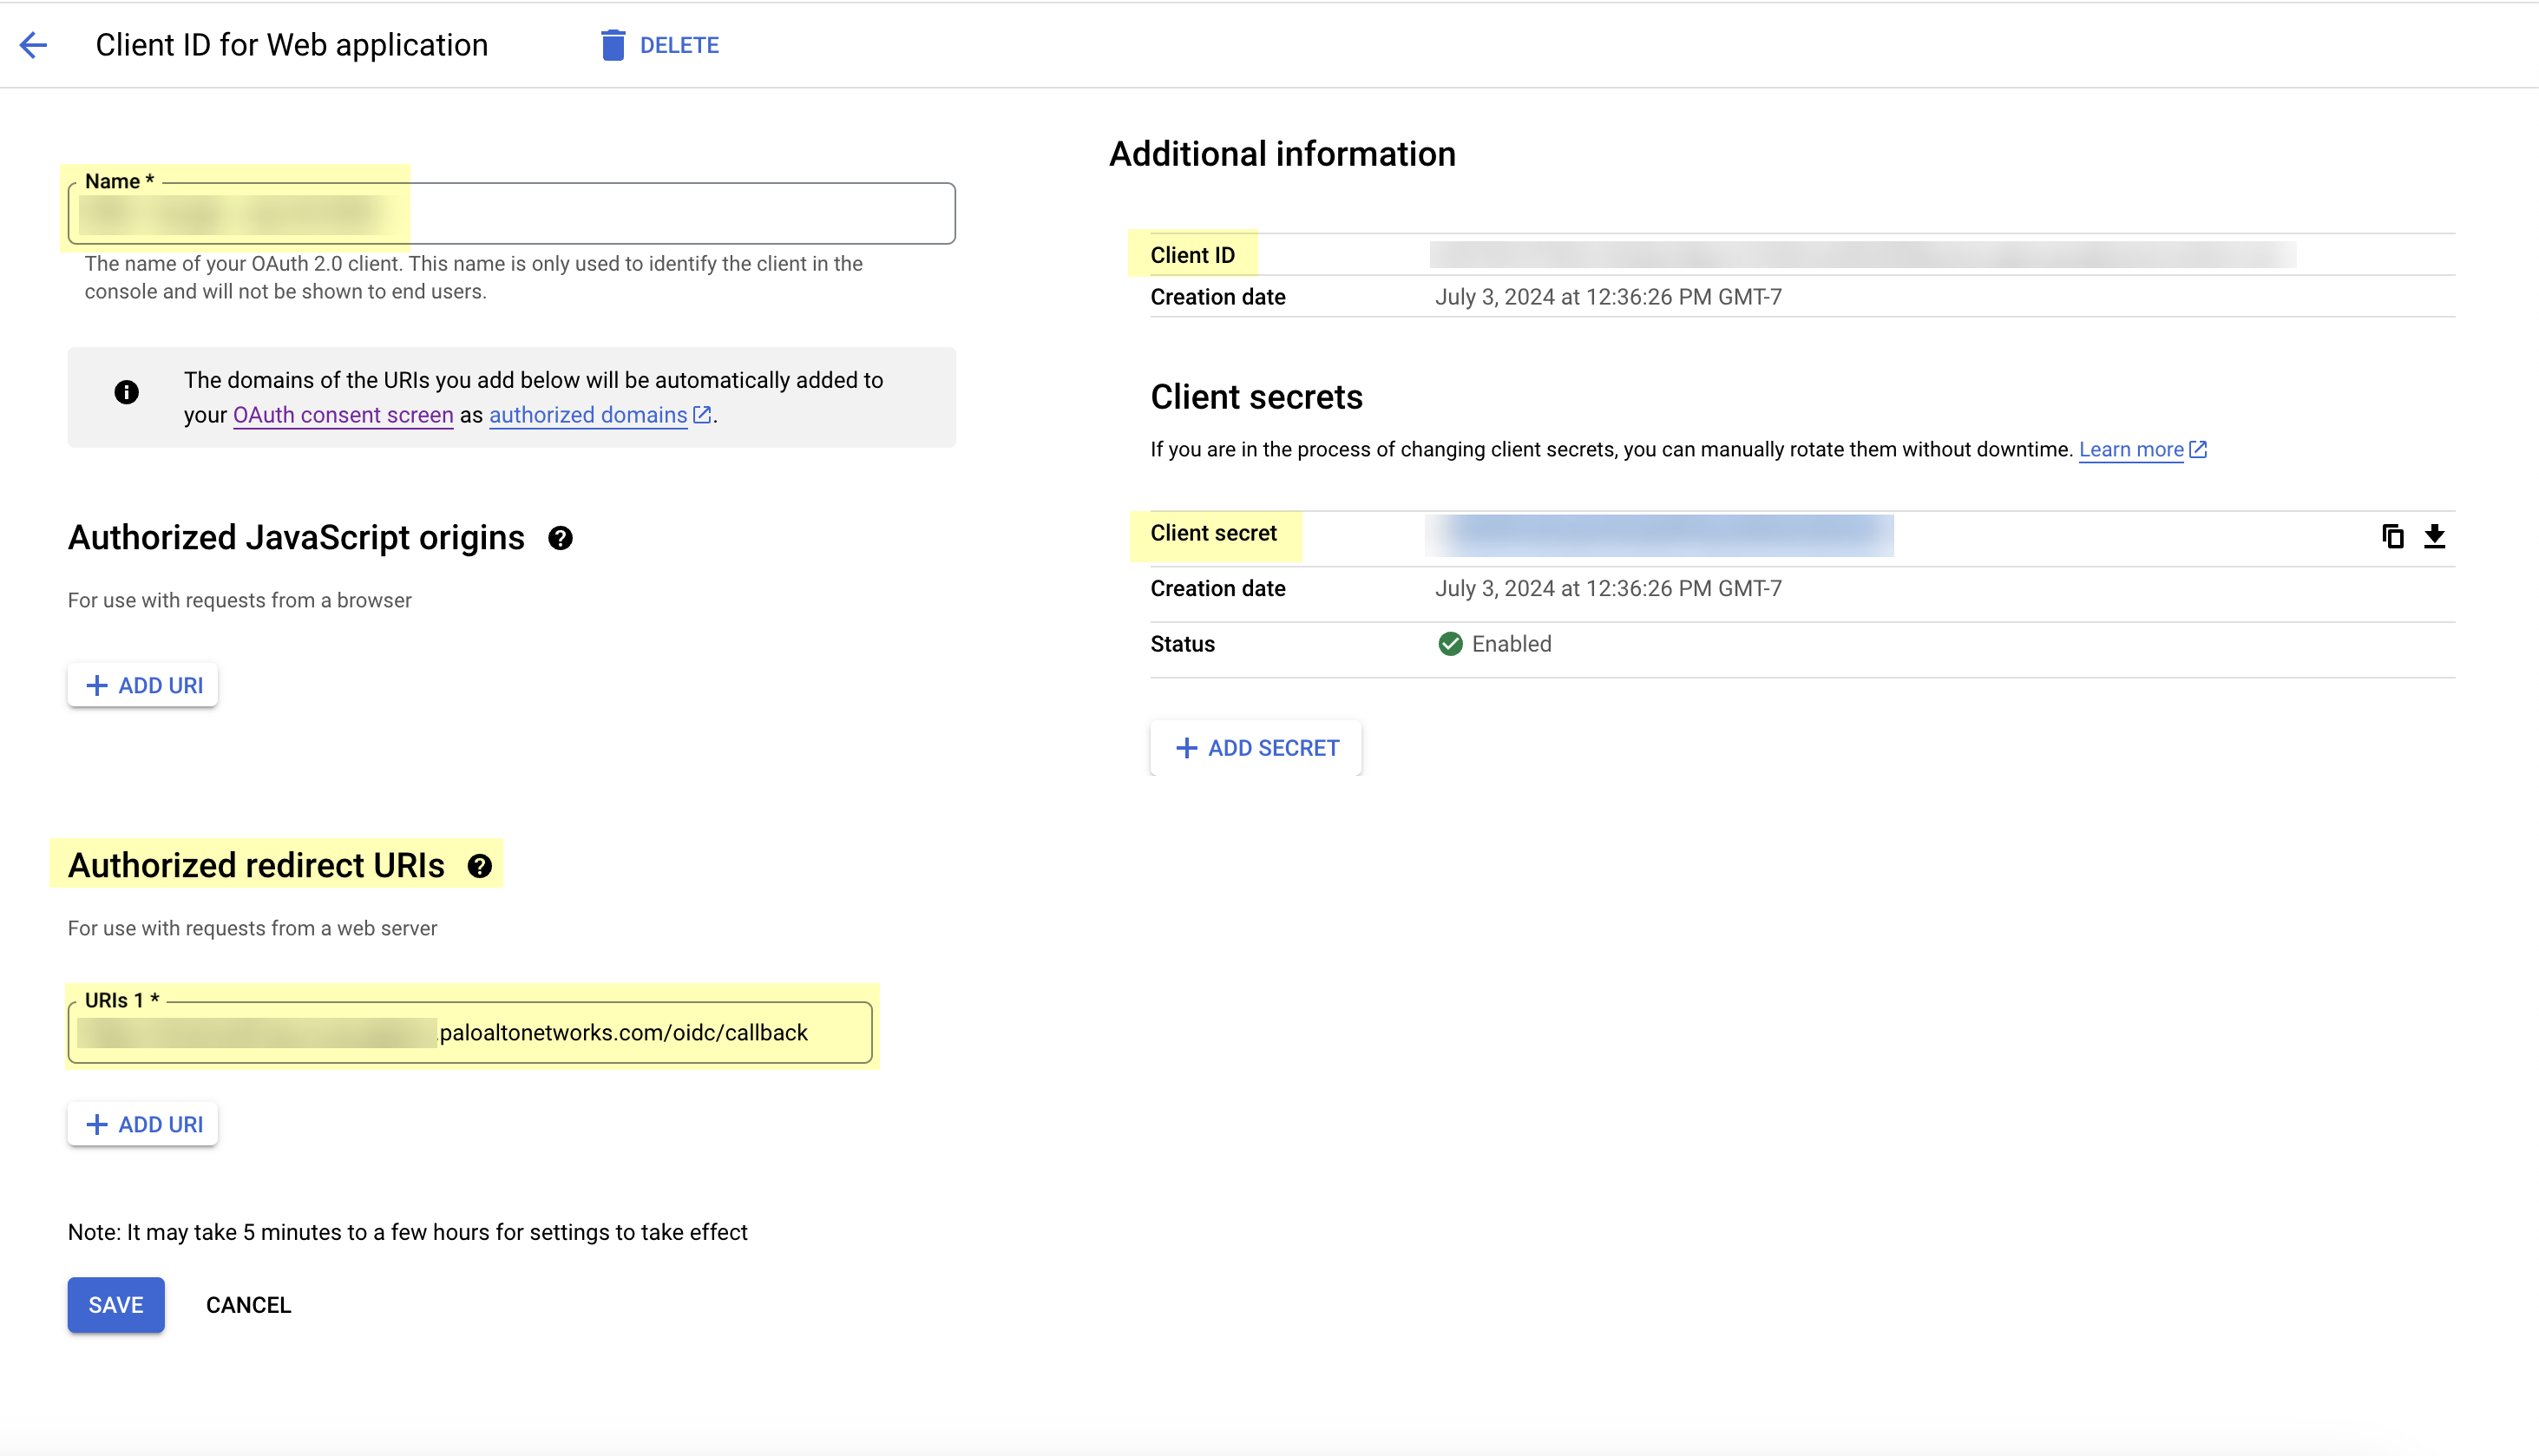
Create a new project or select an existing project.Enable the Identity and Access Management (IAM) API (if it's not already enabled).Select APIs & ServicesOAuth consent screen then configure the OAuth consent screen.Create your OAuth 2.0 credentials, copy the Client ID and Client Secret, and store them in a secure location.Don’t allow the client secret to expire. If the client secret isn’t up to date, users can’t log in using OIDC.Obtain the information you need to complete your OIDC Google configuration and enter it in your Cloud Identity Engine configuration.- Copy the following information from your configuration and save it in a secure location:
- The Name you entered in step 2.4.
- The Client ID and Client secret you copied in step 2.5 (if you did not do so in the previous step).
- The Authorized redirect URIs you copied in step 1.4.
![]() Enter the application name you entered in step 2.4 as the Client Name.
Enter the application name you entered in step 2.4 as the Client Name.![]() Enter the Client ID you copied in step 2.5.
Enter the Client ID you copied in step 2.5.![]() Enter the Client Secret you copied in step 2.5.
Enter the Client Secret you copied in step 2.5.![]() Enter the Authorized redirect URIs that you copied in step 1.4 as the Issuer URL.
Enter the Authorized redirect URIs that you copied in step 1.4 as the Issuer URL.![]() (Optional) If you have your Endpoint URL, enter it here. If not, continue to the next step (the Cloud Identity Engine populates the Endpoint URL automatically after you successfully test the connection).
(Optional) If you have your Endpoint URL, enter it here. If not, continue to the next step (the Cloud Identity Engine populates the Endpoint URL automatically after you successfully test the connection).![]() Click Test Connection and log in to confirm that the Cloud Identity Engine can reach your Google IdP using OIDC.If you did not enter the OIDC Issuer URL in the previous step, the Cloud Identity Engine automatically populates the information.
Click Test Connection and log in to confirm that the Cloud Identity Engine can reach your Google IdP using OIDC.If you did not enter the OIDC Issuer URL in the previous step, the Cloud Identity Engine automatically populates the information.![]() After confirming that the connection is successful, Submit the configuration.You can now use OIDC as an authentication type when you Set Up an Authentication Profile.
After confirming that the connection is successful, Submit the configuration.You can now use OIDC as an authentication type when you Set Up an Authentication Profile.


