Download PDF
Cloud NGFW for AWS
Get Help
Table of Contents
Expand All
|
Collapse All
Cloud NGFW for AWS Docs
Get Help
Learn how to get help with onboarding your Cloud NGFW resource.
| Where Can I Use This? | What Do I Need? |
|---|---|
|
|
Use this information to onboard your Cloud NGFW resource. Information for locating
your Cloud NGFW serial number and how to create a support case are also included.
Register Your Cloud NGFW Tenant during the Initial Login
Cloud NGFW will prompt you to register a support account for your Cloud
NGFW tenant after you successfully reset your password and before you log in to
your Cloud NGFW tenant console for the first time. If you're a registered user
of one or more existing Palo Alto Networks support accounts, you can choose to
register your Cloud NGFW tenant with one of them during initial login.
You may have used a different email address to subscribe to Cloud NGFW and a
different one to access the Palo Alto Networks support account. Alternatively,
you can create a dedicated Palo Alto Networks support account for Cloud NGFW. In
both cases, you will skip the registration option during the initial login but
register your Cloud NGFW tenant in the Customer Support Portal.
Use this procedure to register your Cloud NGFW tenant with your
existing support account:
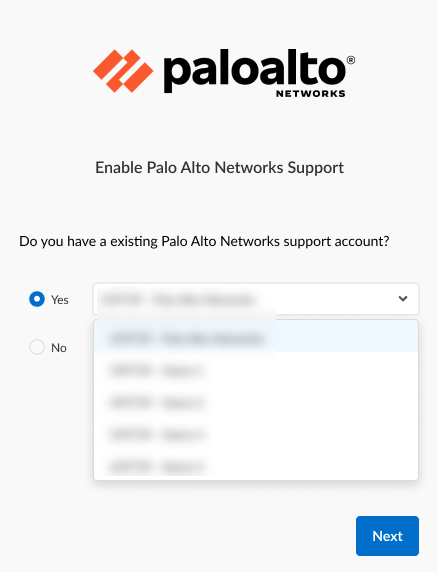
- Log in to the Cloud NGFW console.In the Enable Palo Alto Networks Support screen, select Yes.If you select No in the Enable Palo Alto Networks screen, you’ll need to use the Customer Support Portal (CSP) to register your Cloud NGFW tenant, or use the Cloud NGFW console to register with the CSP.Use the drop-down menu to select the support account.Click Next.
![]() If you have previously registered your customer support (CSP) account the drop-down is populated with existing accounts. If, however, you're a new user and don't yet have an account, use the CSP page to create an account. See Register Your Cloud NGFW Tenant using the Customer Support Portal and Register Your Cloud NGFW Tenant on the Customer Support Portal Using the Cloud NGFW Console.
If you have previously registered your customer support (CSP) account the drop-down is populated with existing accounts. If, however, you're a new user and don't yet have an account, use the CSP page to create an account. See Register Your Cloud NGFW Tenant using the Customer Support Portal and Register Your Cloud NGFW Tenant on the Customer Support Portal Using the Cloud NGFW Console.Register Your Cloud NGFW Tenant Using the Customer Support Portal
You can use the Customer Support Portal to register your Cloud NGFW tenant.You will need an account to log into the CSP. See create a Customer Support account for more information.- In the Customer Support Portal, enter your login credentials, then click Next.
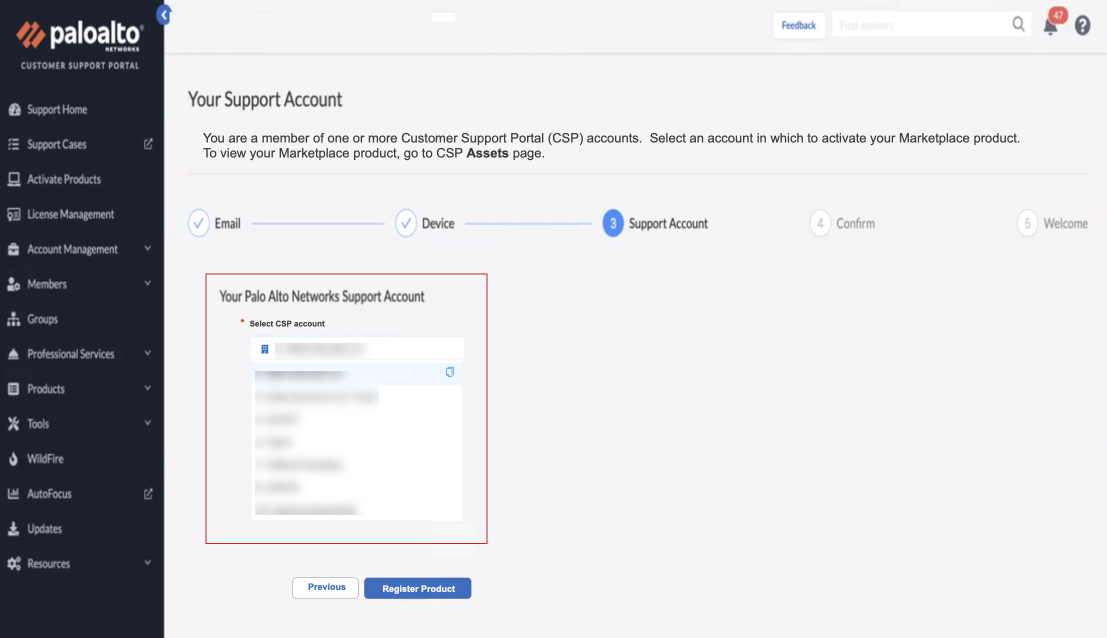
![]() The Your Support Account page displays information associated with your login credentials. Select the Palo Alto Networks Support Account, then click Register Product.
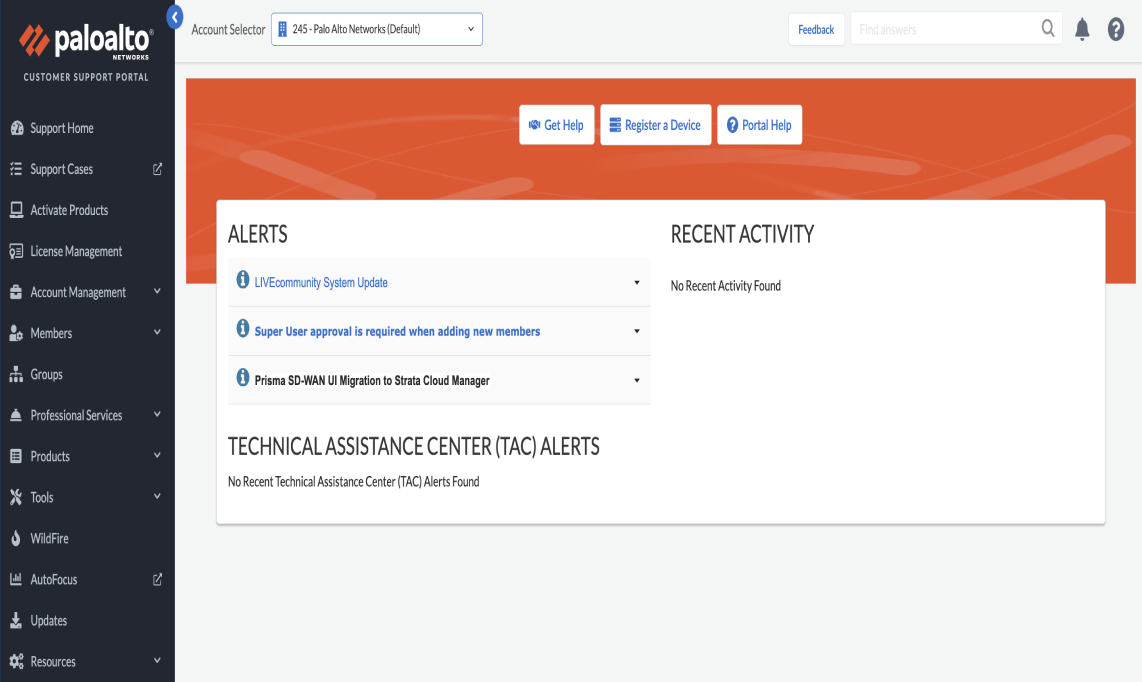
The Your Support Account page displays information associated with your login credentials. Select the Palo Alto Networks Support Account, then click Register Product.![]() Once registration is complete, a confirmation window appears, followed by the Customer Support Portal page:
Once registration is complete, a confirmation window appears, followed by the Customer Support Portal page:![]()
Register Your Cloud NGFW Tenant on the Customer Support Portal Using the Cloud NGFW Console
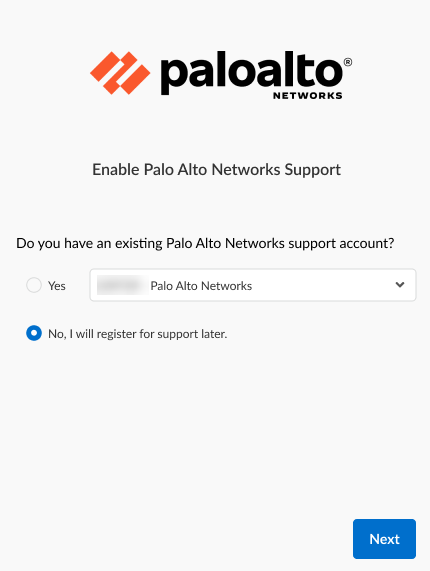
If you don't have an existing Palo Alto Networks support account, you’ll be prompted to secure one prior to using your Cloud NGFW tenant.- Log in to the Cloud NGFW resource.In the Enable Palo Alto Networks Support page, select No.Click Next.
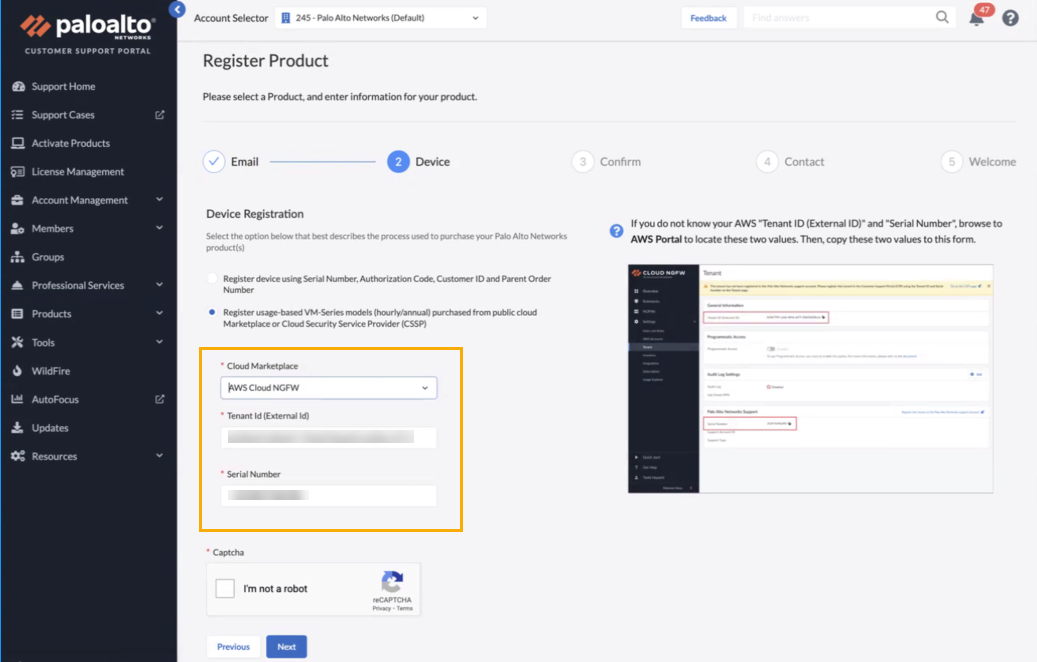
![]() In the Cloud NGFW console, click Register Your Tenant on CSP.To associate your Cloud NGFW tenant with a Customer Support Portal account, you’ll need your device registration information, including your Tenant ID and the Serial Number for your Cloud NGFW resource. You can find this information on the Tenant page in the Cloud NGFW console. See the information provided in the Create a Support case section.
In the Cloud NGFW console, click Register Your Tenant on CSP.To associate your Cloud NGFW tenant with a Customer Support Portal account, you’ll need your device registration information, including your Tenant ID and the Serial Number for your Cloud NGFW resource. You can find this information on the Tenant page in the Cloud NGFW console. See the information provided in the Create a Support case section.![]() On the Register Product page in the Customer Support Portal, use the drop-down menu to select AWS Cloud NGFW for the Cloud Marketplace. Enter the Tenant ID and Serial Number and resolve the Captcha.To locate the tenant ID and serial number, see the information provided in the Create a Support case section.Click Next.
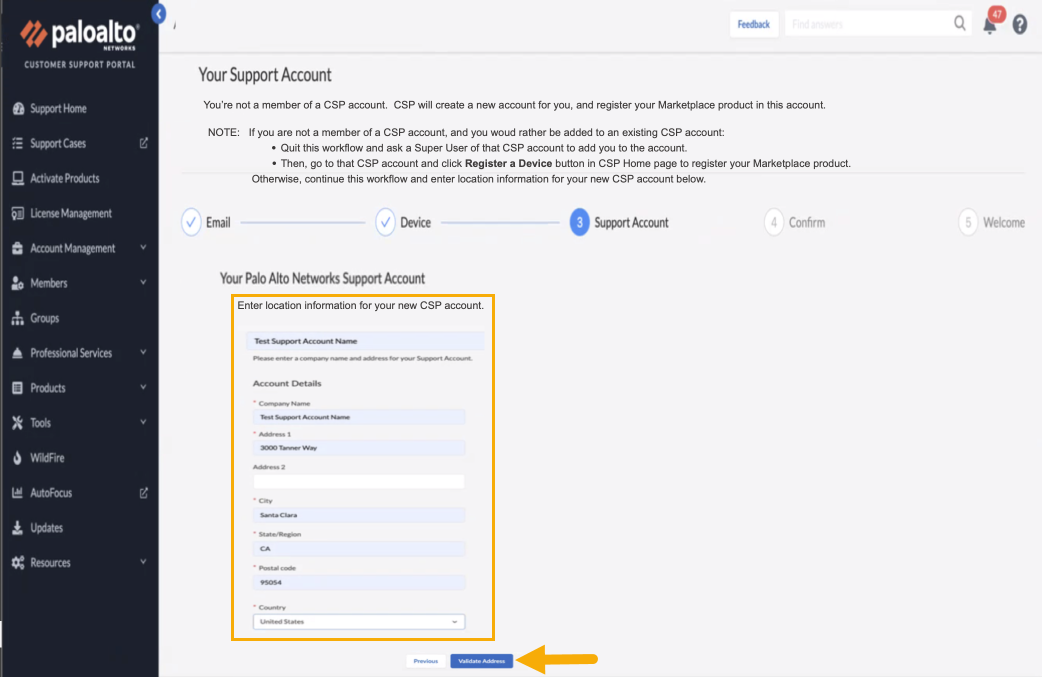
On the Register Product page in the Customer Support Portal, use the drop-down menu to select AWS Cloud NGFW for the Cloud Marketplace. Enter the Tenant ID and Serial Number and resolve the Captcha.To locate the tenant ID and serial number, see the information provided in the Create a Support case section.Click Next.![]() Create your support account. Enter Account Details, then click Validate Address.
Create your support account. Enter Account Details, then click Validate Address.![]() You may be prompted to verify your address for the new support account. If necessary, verify your address, and click OK to send an authentication request to the email address you specified.
You may be prompted to verify your address for the new support account. If necessary, verify your address, and click OK to send an authentication request to the email address you specified.![]() Check your email for an auth code. Enter the Authentication code, then click Next.
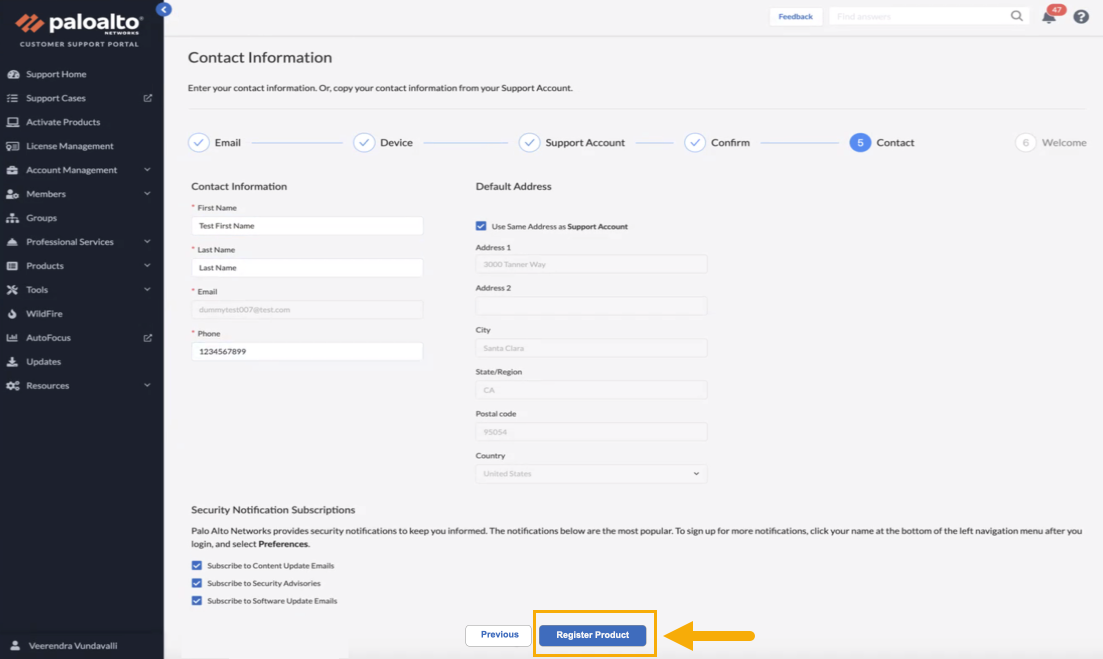
Check your email for an auth code. Enter the Authentication code, then click Next.![]() Confirm your email address for your Customer Support Portal account, then click Next.Verify your Contact Information. Select your Security Notification Subscriptions, then click Register Product
Confirm your email address for your Customer Support Portal account, then click Next.Verify your Contact Information. Select your Security Notification Subscriptions, then click Register Product![]() Once registration is complete, a confirmation window appears, followed by the Customer Support Portal page:
Once registration is complete, a confirmation window appears, followed by the Customer Support Portal page:![]()
Locate Your Cloud NGFW for AWS Serial Number
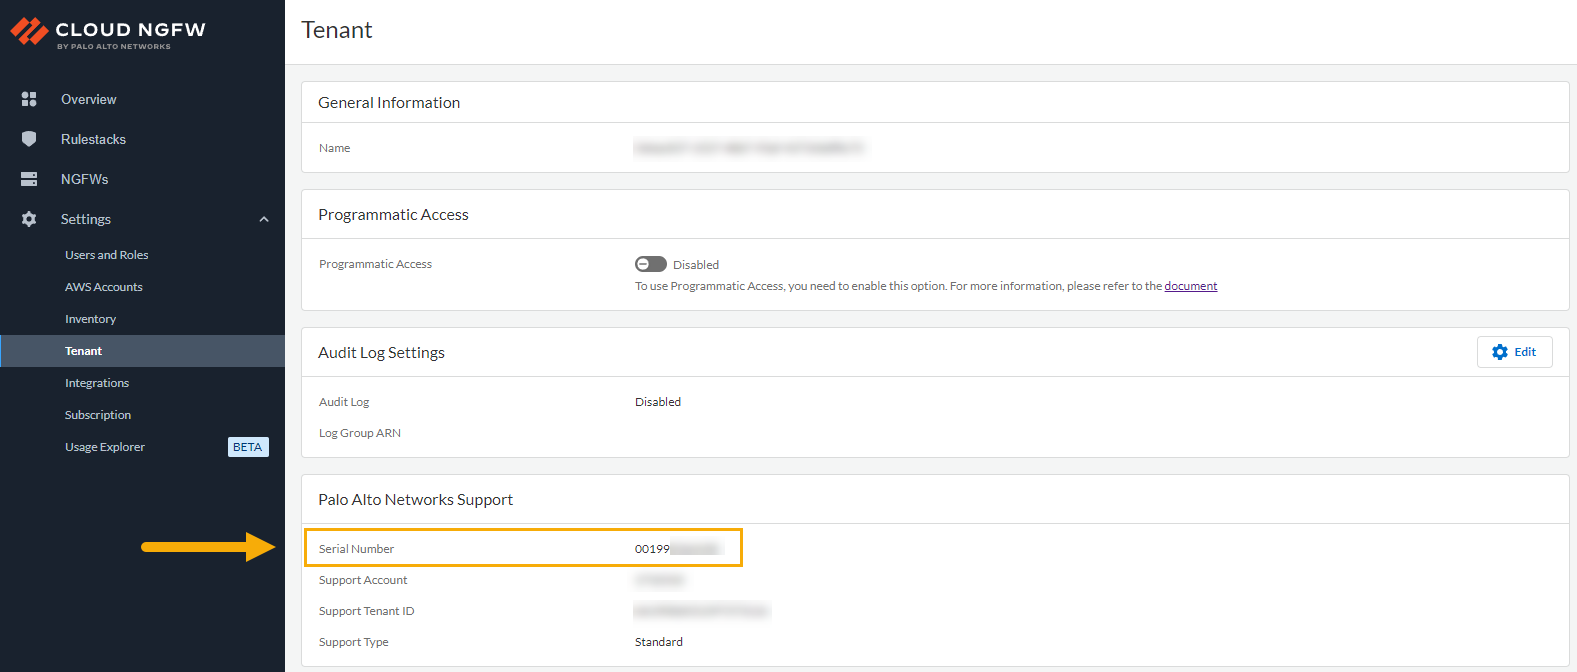
To locate the Cloud NGFW serial number:- Log in to the Cloud NGFW tenant.Click Tenant. The Tenant page displays the Serial Number and additional information in the Palo Alto Networks Support section.
![]()
Create a Support Case
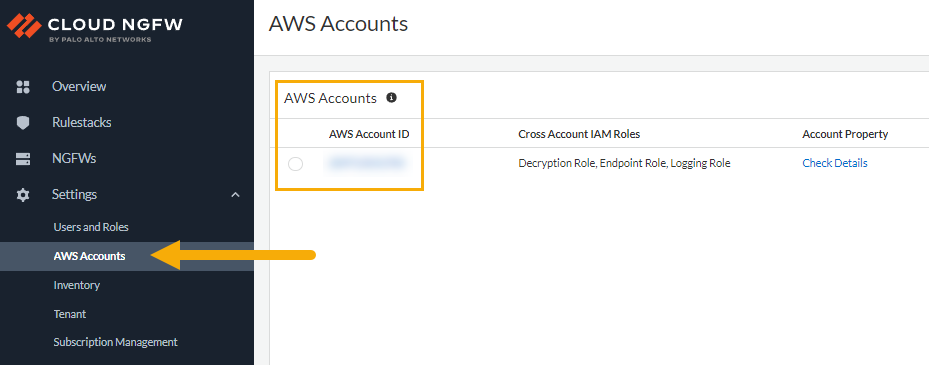
To create a support case using the Cloud NGFW console:- Locate your AWS Account ID. Select AWS Accounts.
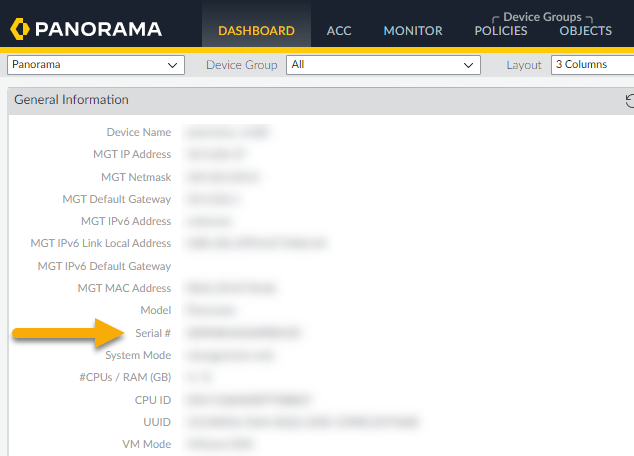
![]() If required, use the Panorama console to determine additional information for the support case, like the tenant ID, or the Panorama serial number.Locate the Panorama serial number using the Dashboard:
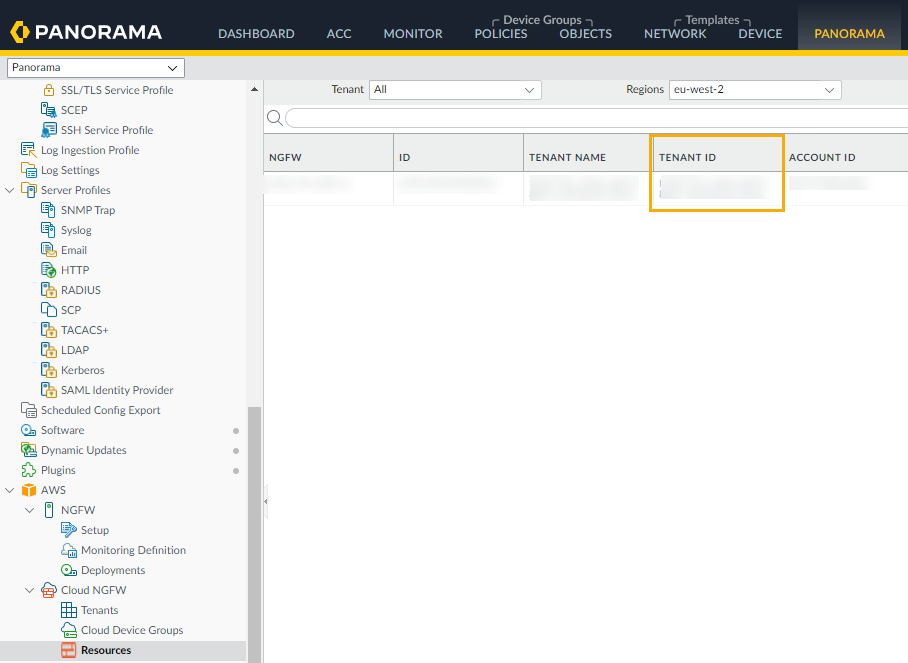
If required, use the Panorama console to determine additional information for the support case, like the tenant ID, or the Panorama serial number.Locate the Panorama serial number using the Dashboard:![]() Locate the Tenant ID for the Cloud NGFW resource:
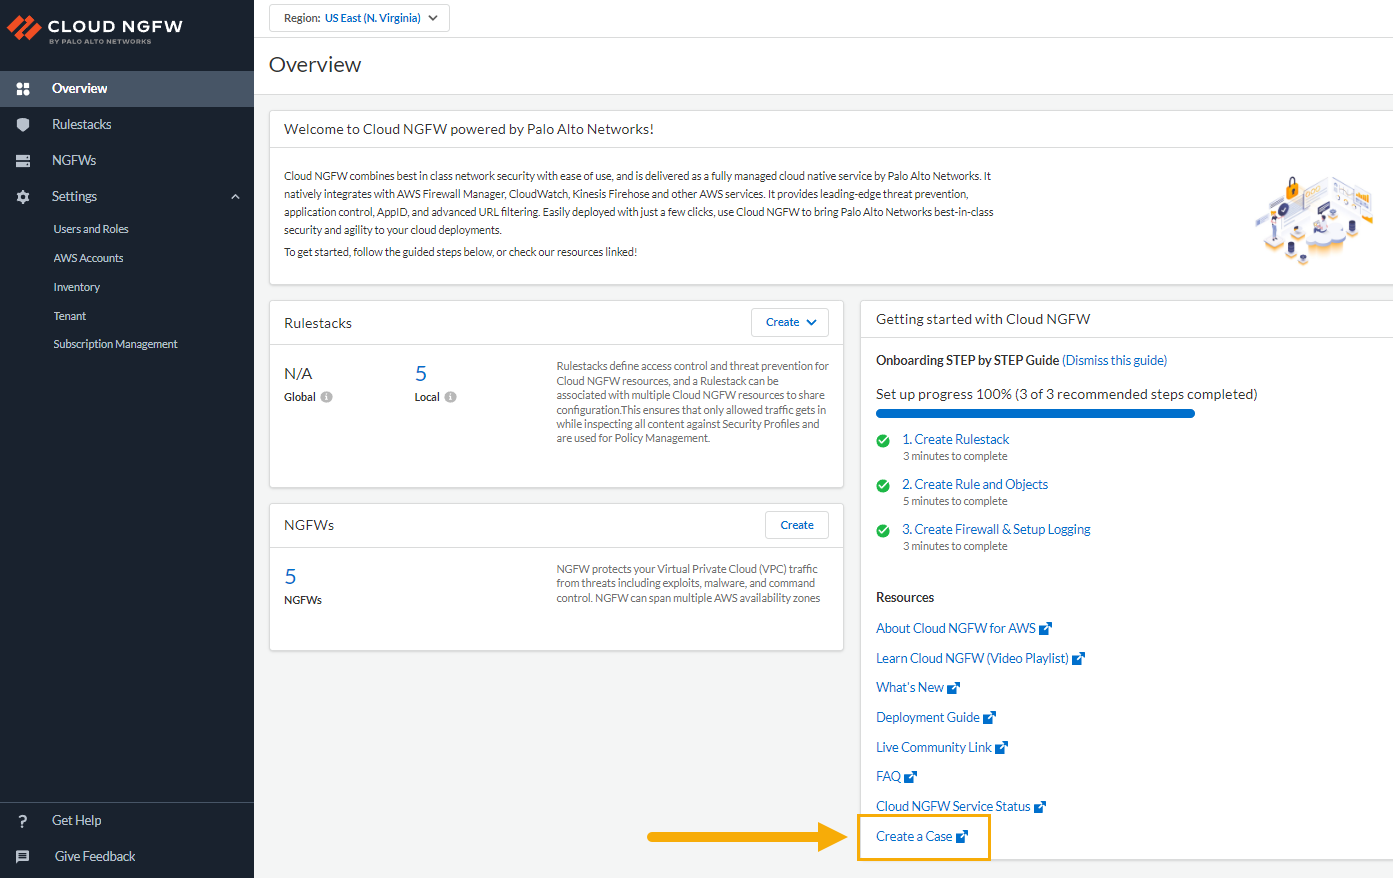
Locate the Tenant ID for the Cloud NGFW resource:![]() On the Overview page in the Cloud NGFW console, click Create a case.
On the Overview page in the Cloud NGFW console, click Create a case.![]()

