Network Security
Policy Object: Address Groups
Table of Contents
Policy Object: Address Groups
Combine addresses that require the same security settings into address groups to simplify
the creation of Security policies.
To simplify the creation of Security policies, addresses that require the same
security settings can be combined into address groups. An address group can be static or
dynamic.
You can Add or update Address Groups and give them a detailed name and
description.
There are two types of Address Groups you can use:
- Dynamic Address Groups—Allow you to create policies that automatically adapt to changes, and are useful in infrastructures where changes in virtual machine location and IP addresses are frequent.A dynamic address group populates its members based on tags and filters. Use AND and OR operators to build filters for a dynamic address group. All IP addresses or address groups that match the criteria you define become members of the dynamic address group.
- Static Address Groups—Can include address objects, dynamic address groups, or a combination of both address objects and dynamic address groups.
Troubleshoot traffic
that isn't being enforced as expected–check the status of specific devices to understand
whether there’s a mismatch between expected policies (as configured) and enforced
policies.
Dynamic Address Groups
A dynamic address group populates its members dynamically using look ups
for tags and tag-based filters. Dynamic address
groups are very useful if you have an extensive virtual infrastructure where changes
in virtual machine location or IP address are frequent. For example, if you have a
sophisticated failover setup or provision new virtual machines frequently and would
like to apply policy to the traffic from or to the new machine without modifying the
configuration or rules, use dynamic address groups.
To use a dynamic address group in policy, you must complete the following tasks:
- Define a dynamic address group and reference it in a security rule.
- The members of the dynamic address group are formed with the IP addresses and the corresponding tags. You can do this using external scripts that use the XML API.
Dynamic address groups can also include statically defined address objects. If you
create an address object and apply the same tags that you have assigned to a dynamic
address group, that dynamic address group will include all static and dynamic
objects that match the tags. You can, therefore use tags to pull together both
dynamic and static objects in the same address group.
Static Address Groups
A static address group can include address objects that are static,
dynamic address groups, or it can be a combination of both address objects and
dynamic address groups.
At its core, a static address group is a logical collection of address
objects or other address groups. These collections can include individual IP
addresses, ranges of IPs, or other address groups, forming a cohesive unit that
represents a specific set of endpoints or network entities.
The primary advantage of using static address groups is their ability to
streamline policy maintenance and updates. Instead of modifying multiple security rules individually, you can simply update the associated static address group. This
change propagates across all rules referencing the group, ensuring consistency and
saving valuable time.
Static address groups can also contribute to policy organization and
clarity. By grouping similar address objects based on criteria such as geographical
location, department, or function, you can develop security rules that are both
comprehensive and comprehensible. This promotes a structured and easily navigable
policy framework, crucial for maintaining an effective security posture.
Address Group Fields
When creating an Address Group, you can specify some or all of the following
fields:
|
Address Group Settings
|
Description
|
|---|---|
|
Name
|
A name that describes the address group (up to 63
characters). This name appears in the address list when defining
Security policies. The name is case-sensitive and must be
unique. Use only letters, numbers, spaces, hyphens, and
underscores.
|
|
Shared
|
When this option is selected, the address group isavailable
to:
|
|
Disable override (Panorama only)
|
Select this option to prevent administrators from overriding the
settings of this address group object in device groups that
inherit the object. This selection is cleared by default, which
means administrators can override the settings for any device
group that inherits the object.
|
|
Description
|
Enter a description for the object (up to 1023 characters).
|
|
Type
|
The type can be Static or Dynamic.
To view the list of attributes for the match criteria, you
must access and retrieve the attributes from the
source/host. Each virtual machine on the configured
information source(s) can be polled to retrieve changes in
IP address or configuration. |
|
Tags
|
Select or enter the tags that you wish to apply to this address
group.
|
|
Members Count and Address
|
After you add an address group, the Members Count column
indicates whether the objects in the group are populated
dynamically or statically.
|
Use Dynamic Address Groups in Policy
Dynamic Address Groups are used in policy. They allow you to create policy that
automatically adapts to changes—adds, moves, or deletions of servers. It also
enables the flexibility to apply different rules to the same server based on
tags that define its role on the network, the operating system, or
the different kinds of traffic it processes.
A Dynamic Address Group uses tags as a filtering criteria to determine its members.
The filter uses logical and and or operators. All IP
addresses or address groups that match the filtering criteria become members of the
Dynamic Address Group. Tags can be defined statically or registered (dynamically).
The difference between static and dynamic tags is that static tags are part of the
configuration, and dynamic tags are part of the runtime configuration. This implies
that a commit isn't required to update dynamic tags; the tags must however be used
by Dynamic Address Groups that are referenced in policy, and the policy must be
committed.
Dynamic address groups can also include statically defined address objects. If you
create an address object and apply the same tags that you have assigned to a dynamic
address group, that dynamic address group will include all static and dynamic
objects that match the tags. You can, therefore use tags to pull together both
dynamic and static objects in the same address group.
Keep reading to learn how to use a dynamic address group in your deployment's
Security policy.
Use Dynamic Address Groups in Policy (Strata Cloud Manager)
Create security rules that automatically adapts to changes.
The following example shows how Dynamic Address Groups can simplify network security
enforcement. The example workflow shows how to:
- Create Dynamic Address Groups and define the tags to filter.
- Use Dynamic Address Groups in policy.
- Create Dynamic Address Groups.View the tutorial to see a big picture view of the feature.
- Select .Select Add Address Group and enter a Name and a Description for the address group.Select Type as Dynamic.Define the match criteria. You can select dynamic and static tags as the match criteria to populate the members of the group. Click Add Match Criteria, and select the And or Or operator and select the attributes that you would like to filter for or match against, then select Save. Negation isn’t supported.Click Commit.Use Dynamic Address Groups in policy.View the tutorial.
- Select .Select Add Rule and enter a Name and a Description for the policy.Add the Source Zone to specify the zone from which the traffic originates.Add the Destination Zone at which the traffic is terminating.For the Destination Address, select the Dynamic Address Group you just created.Specify the action— Allow or Deny—for the traffic, and optionally attach the default security profiles to the rule.Repeats steps 1 through 6 to create another security rule.Select Push Config.
Use Dynamic Address Groups in Policy (PAN-OS & Panorama)
Create security rules that automatically adapts to changes.To dynamically register tags, you can use the XML API or the VM Monitoring agent on the firewall or on the User-ID agent. Each tag is a metadata element or attribute-value pair that is registered on the firewall or Panorama. For example, IP1 {tag1, tag2,.....tag32}, where the IP address and the associated tags are maintained as a list; each registered IP address can have up to 32 tags such as the operating system, the data center or the virtual switch to which it belongs. After receiving the API call, the firewall registers the IP address and associated tags, and automatically updates the membership information for the dynamic address group(s).The maximum number of IP addresses that can be registered for each model is different. Use the following table for specifics on your model:ModelMaximum number of dynamically registered IP addressesM-Series and Panorama virtual appliances500,000PA-5400 Series (excepting the PA-5450), PA-5200 Series, VM-7000 SMC-B Series 500,000 VM-500, VM-700 300,000 PA-3430, PA-3440, PA-3200 Series, VM-300 200,000 PA-3410, PA-3420150,000PA-7000 Series, PA-5450, PA-450, PA-460100,000PA-44050,000PA-850, VM-1002,500PA-820, PA-410, PA-220, VM-501,000An IP set, such as an IP range or subnet, is considered as a single registered IP address when counted toward the maximum number of registered IP addresses supported by each firewall model.The following example shows how Dynamic Address Groups can simplify network security enforcement. The example workflow shows how to:- Enable the VM Monitoring agent on the firewall, to monitor the VMware ESX(i) host or vCenter Server and register VM IP addresses and the associated tags.
- Create Dynamic Address Groups and define the tags to filter. In this example, two address groups are created. One that only filters for dynamic tags and another that filters for both static and dynamic tags to populate the members of the group.
- Validate that the members of the Dynamic Address Group are populated on the firewall.
- Use Dynamic Address Groups in policy. This example uses two different Security policies:
- A Security policy for all Linux servers that are deployed as FTP servers; this rule matches on dynamically registered tags.
- A Security policy for all Linux servers that are deployed as web servers; this rule matches on a Dynamic Address Group that uses static and dynamic tags.
- Validate that the members of the Dynamic Address Groups are updated as new FTP or web servers are deployed. This ensures that the security rules are enforced on these new virtual machines too.
- Enable VM Source Monitoring.Create Dynamic Address Groups on the firewall.View the tutorial to see a big picture view of the feature.
- Log in to the web interface of the firewall.Select .Click Add and enter a Name and a Description for the address group.Select Type as Dynamic.Define the match criteria. You can select dynamic and static tags as the match criteria to populate the members of the group. Click Add Match Criteria, and select the And or Or operator and select the attributes that you would like to filter for or match against, then click OK. Negation isn’t supported.
![]() Click Commit.The match criteria for each Dynamic Address Group in this example is as follows:ftp_server: matches on the guest operating system “Linux 64-bit” and annotated as “ftp” ('guestos.Ubuntu Linux 64-bit' and 'annotation.ftp').web-servers: matches on two criteria—the tag black or if the guest operating system is Linux 64-bit and the name of the server us Web_server_Corp. ('guestos.Ubuntu Linux 64-bit' and 'vmname.WebServer_Corp' or 'black')
Click Commit.The match criteria for each Dynamic Address Group in this example is as follows:ftp_server: matches on the guest operating system “Linux 64-bit” and annotated as “ftp” ('guestos.Ubuntu Linux 64-bit' and 'annotation.ftp').web-servers: matches on two criteria—the tag black or if the guest operating system is Linux 64-bit and the name of the server us Web_server_Corp. ('guestos.Ubuntu Linux 64-bit' and 'vmname.WebServer_Corp' or 'black')![]() Use Dynamic Address Groups in policy.View the tutorial.
Use Dynamic Address Groups in policy.View the tutorial.- Select .Click Add and enter a Name and a Description for the policy.Add the Source Zone to specify the zone from which the traffic originates.Add the Destination Zone at which the traffic is terminating.For the Destination Address, select the Dynamic Address Group you just created.Specify the action— Allow or Deny—for the traffic, and optionally attach the default security profiles to the rule.Repeats steps 1 through 6 to create another security rule.Click Commit.This example shows how to create two policies: one for all access to FTP servers and the other for access to web servers.
![]() Validate that the members of the Dynamic Address Group are populated on the firewall.
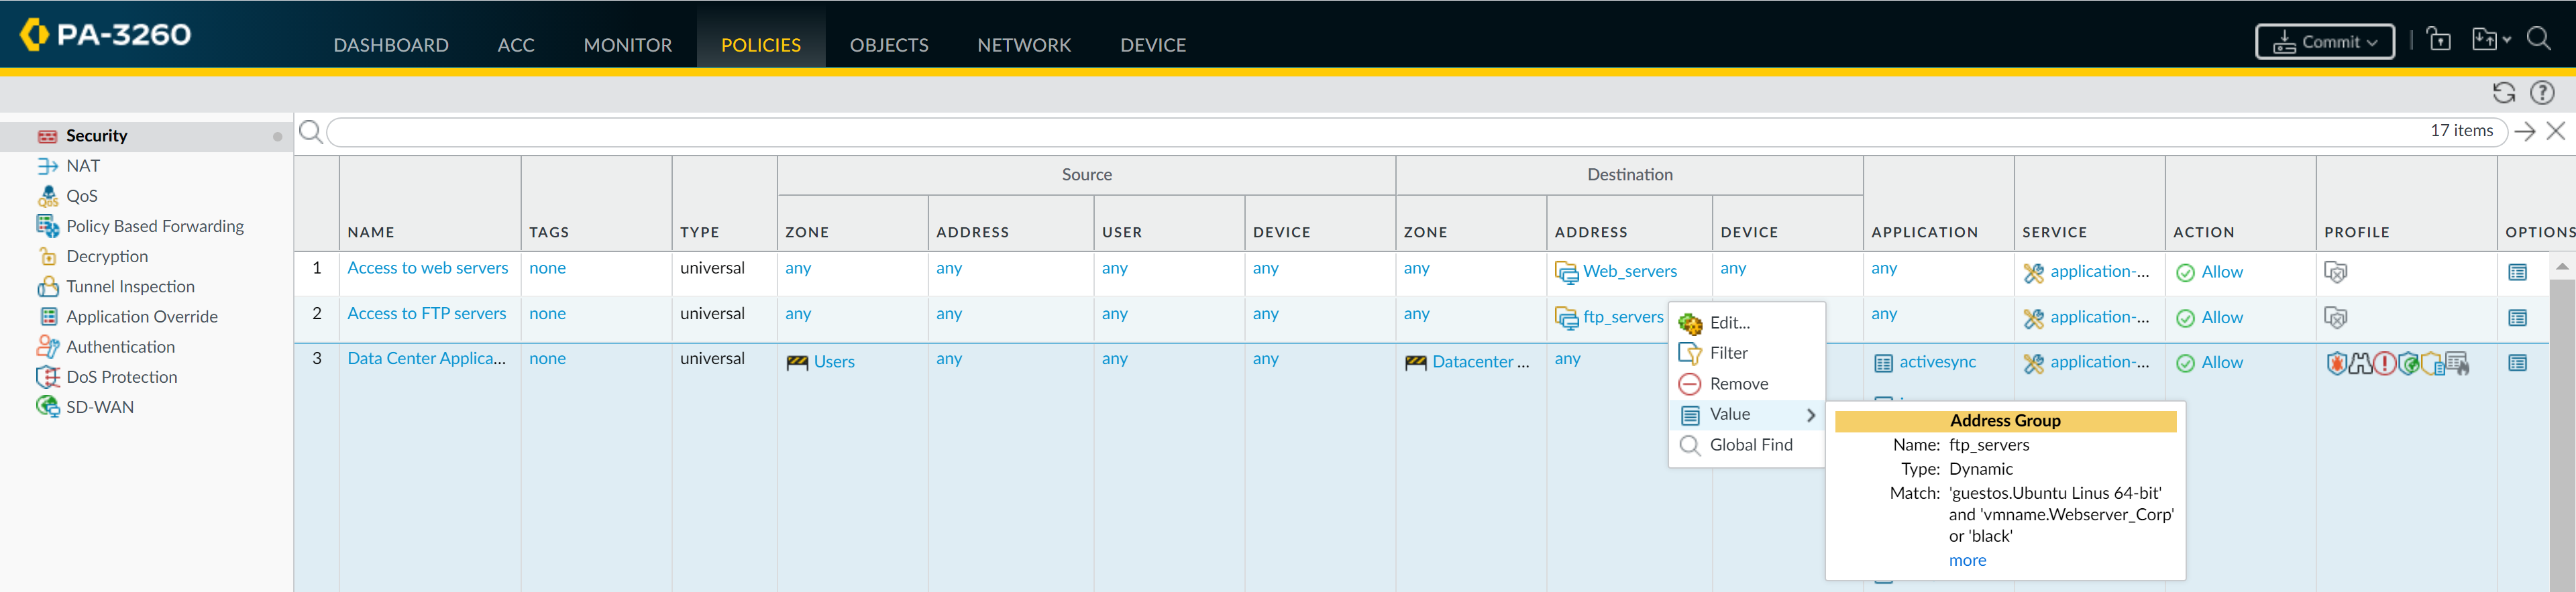
Validate that the members of the Dynamic Address Group are populated on the firewall.- Select , and select the rule.Select the drop-down arrow next to the address group link, and select Value. You can also verify that the match criteria is accurate.
![]() Click the more link and verify that the list of registered IP addresses is displayed.Policy will be enforced for all IP addresses that belong to this address group, and are displayed here.If you want to delete all registered IP addresses, use the CLI command debug object registered-ip clear all and then reboot the firewall after clearing the tags.
Click the more link and verify that the list of registered IP addresses is displayed.Policy will be enforced for all IP addresses that belong to this address group, and are displayed here.If you want to delete all registered IP addresses, use the CLI command debug object registered-ip clear all and then reboot the firewall after clearing the tags.