: Replace a System Drive in a PA-5400 Series Firewall
Focus
Focus

Replace a System Drive in a PA-5400 Series Firewall

Table of Contents

Replace a System Drive in a PA-5400 Series Firewall

Learn how to replace a drive on a PA-5400 Series firewall.
The PA-5410, PA-5420, PA-5430, PA-5440, and PA-5445 firewalls use a pair of solid-state drives (SSDs) to store the PAN-OS system files, system logs, and network traffic logs. If one of these drives fail, you must replace it to restore functionality to the firewall.
When ordering a replacement drive from Palo Alto Networks or your reseller, you receive two drives. This ensures that if the replacement drive is not the same model as the failed drive, you can install two new matching drives. If the replacement drive model is the same as the failed drive, you need only replace one failed drive and can store the second drive as a spare. For firewalls in an HA pair, there is no requirement that the drive sizes match between the paired systems.
If you replace a system drive with a different model drive, you must boot the firewall into the Maintenance Recovery Tool (MRT) to copy data between drives. In a high availability (HA) configuration, suspend the firewall with the failed drive as described in this procedure.
The replacement drive ships with a factory default PAN-OS image with the default configuration. After you install the new drive, you will either need to copy configuration data from one drive to the other or obtain a backup configuration that you saved from the failed firewall to restore your configuration.
To avoid injury to yourself or damage to your Palo Alto Networks® hardware or the data that resides on the hardware, read the Product Safety Warnings.
The following procedure describes how to replace a failed system drive. There are two scenarios: one where the replacement drive is the same model as the failed drive and one where the replacement drive is not the same model.
  1. Identify the failed drive and determine the drive model.
    When the system drives are functioning normally, all system drive partitions show both drives with the status clean. If a system drive fails, the Overall System Drives RAID status shows degraded, one or more failed partition array shows clean, degraded, and one of the drives will be missing (Sys1 or Sys2).In this example, the output from the show system raid detail command shows that the drive model is MICRON_M510DC_MT, the panlogs partition shows the status clean, degraded, and drive Sys1 is missing from the panlogs array; together, these indicate that you need to replace the Sys1 drive.
    admin@PA-5420> show system raid detail
    
    Overall System Drives RAID status           degraded
    -----------------------------------------------------------------------------
    Drive status
       Disk id Sys1                             Present     (MICRON_M510DC_MT)
       Disk id Sys2                             Present     (MICRON_M510DC_MT)
    -----------------------------------------------------------------------------
    Partition status
    
    panlogs                                     clean, degraded
       Drive id Sys2                            active sync
    maint                                       clean
       Drive id Sys1                            active sync
       Drive id Sys2                            active sync
    sysroot0                                    clean
       Drive id Sys1                            active sync
       Drive id Sys2                            active sync
    sysroot1                                    clean
       Drive id Sys1                            active sync
       Drive id Sys2                            active sync
    pancfg                                      clean
       Drive id Sys1                            active sync
       Drive id Sys2                            active sync
    panrepo                                     clean
       Drive id Sys1                            active sync
       Drive id Sys2                            active sync
    swap                                        clean
       Drive id Sys1                            active sync
       Drive id Sys2                            active sync
  2. Remove the failed drive from the RAID 1 array. In this example, run the following command to remove drive Sys1 from the array:
    admin@PA-5420> request system raid remove sys1
  3. Confirm that the failed drive is removed from all partitions. In the following output of the show system raid detail, you see that drive id Sys1 is now missing from all partitions.
    admin@PA-5420> show system raid detail
    
    Overall System Drives RAID status              degraded
    -----------------------------------------------------------------------------
    Drive status
       Disk id Sys1                                Present  (MICRON_M510DC_MT)
       Disk id Sys2                                Present  (MICRON_M510DC_MT)
    -----------------------------------------------------------------------------
    Partition status
    
    panlogs                                        clean, degraded
       Drive id Sys2                               active sync
    maint                                          clean, degraded
       Drive id Sys2                               active sync
    sysroot0                                       clean, degraded
       Drive id Sys2                               active sync
    sysroot1                                       clean, degraded
       Drive id Sys2                               active sync
    pancfg                                         clean, degraded
       Drive id Sys2                               active sync
    panrepo                                        clean, degraded
       Drive id Sys2                               active sync
    swap                                           clean, degraded
       Drive id Sys2                               active sync
  4. Disconnect power from the firewall, then remove the AC power cords.
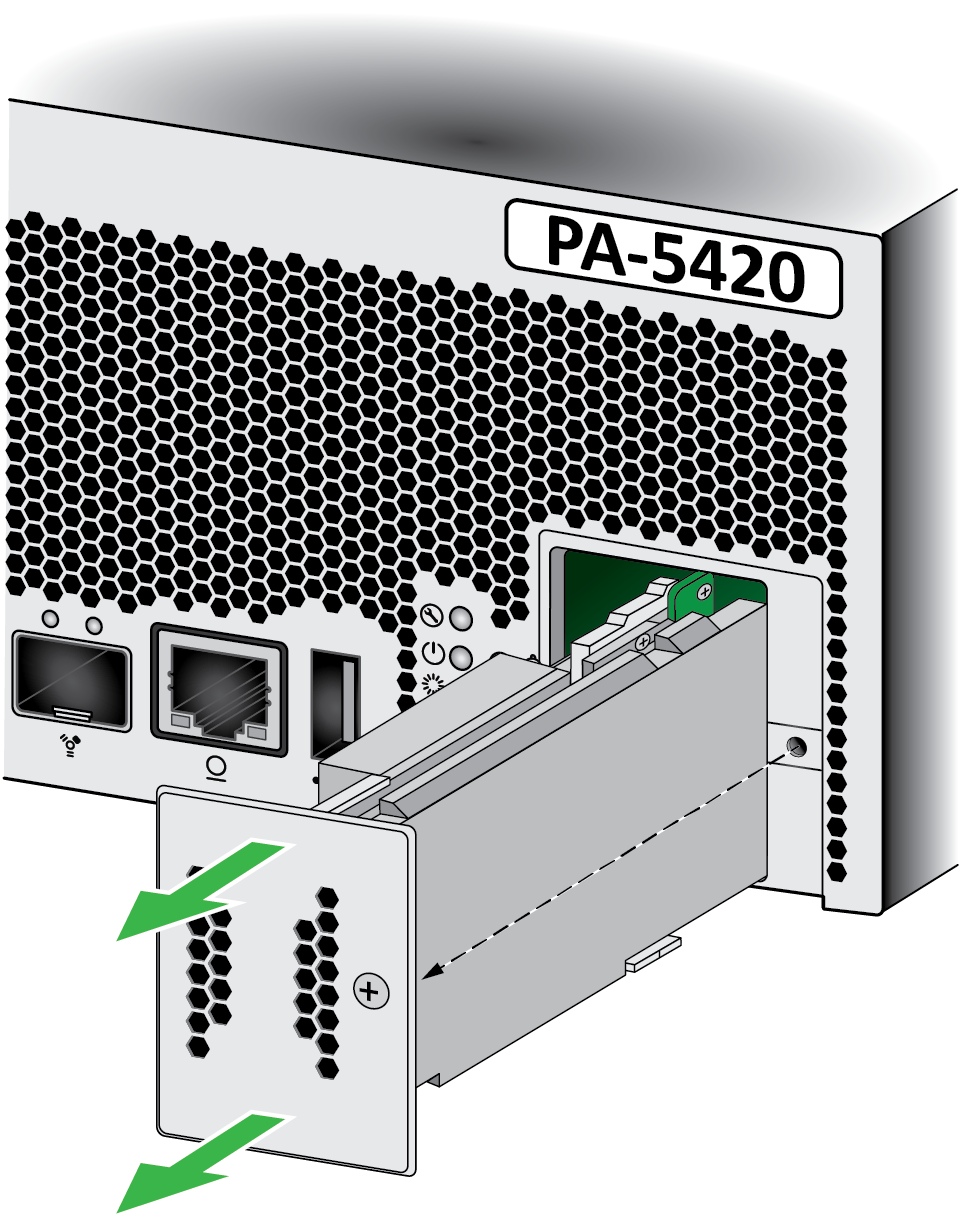
  5. Unscrew the captive screw on the system drive cover on the front side of the firewall. See PA-5400 Series Front Panel for help locating the system drive cover.
  6. Pull the SSD module out of the firewall.
  7. Remove the replacement drive from the packaging, determine the drive model, and place it on an antistatic surface. Then compare this model number with the model number of the failed drive to determine which replacement procedure to use in Step 9.
  8. Slide the replacement SSD module onto the rails and gently push it into the firewall. Re-fasten the captive screw until the module is secure in the appliance.
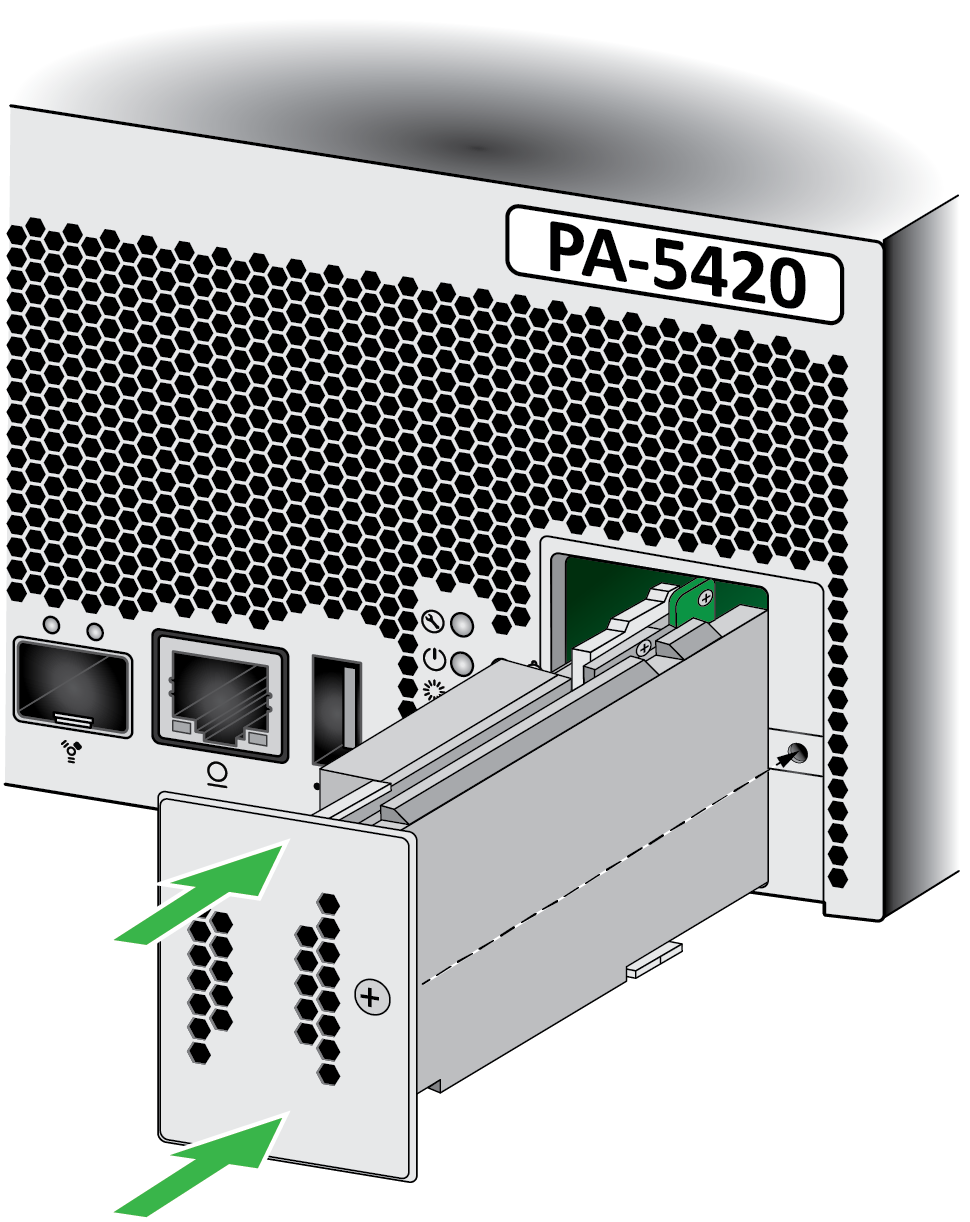
  9. Choose from the following two installation procedures based on your findings in Step 7:
    • If the replacement drive is the same model number as the failed drive, continue to Step 10.
    • If the replacement drive is a different model number than the failed drive, skip to Step 11.
  10. (Same model replacement drive only) Add the replacement drive (one that is the same model as the failed drive) to the RAID 1 array:
    1. Add the replacement drive to the RAID 1 array. In this example, run the following command to add the SYS 1 drive to the array:
      admin@PA-5420> request system raid add sys1
      If the replacement drive was previously used in a different Palo Alto Networks firewall, include the force option in this command to force the system to reformat the drive and add it to the array. If you reboot the firewall after removing the failed drive from the array, the force option is not required. Because the firewall recognizes that a drive is missing and it will automatically reformat the newly inserted drive and adds it to the array.
    2. Periodically view the RAID status until you see that the Overall System Drives RAID status shows Good, all partitions show clean, and both drives show active sync. To view RAID status, run the following command:
      admin@PA-5420> show system raid detail
      Do not reboot the firewall until all partitions are ready; otherwise, the system drives may become out of sync and the firewall will not boot.
      Overall System Drives RAID status        Good
      ---------------------------------------------------------------------------
      Drive status
         Disk id Sys1                          Present     (MICRON_M510DC_MT)
         Disk id Sys2                          Present     (MICRON_M510DC_MT)
      ---------------------------------------------------------------------------
      Partition status
      
      panlogs                                  clean
         Drive id Sys1                         active sync
         Drive id Sys2                         active sync
      maint                                    clean
         Drive id Sys1                         active sync
         Drive id Sys2                         active sync
      sysroot0                                 clean
         Drive id Sys1                         active sync
         Drive id Sys2                         active sync
      sysroot1                                 clean
         Drive id Sys1                         active sync
         Drive id Sys2                         active sync
      pancfg                                   clean
         Drive id Sys1                         active sync
         Drive id Sys2                         active sync
      panrepo                                  clean
         Drive id Sys1                         active sync
         Drive id Sys2                         active sync
      swap                                     clean
         Drive id Sys1                         active sync
         Drive id Sys2                         active sync
  11. (Different model replacement drive only) Add the replacement drive (one that is a different model than the failed drive) to the RAID 1 array:
    1. Connect a serial cable from your computer to the Console port on the firewall and connect to the firewall using terminal emulation software that is configured to use 9600-8-N-1 settings.
    2. (Optional) Suspend the firewall with the failed drive if it is the active firewall in an HA configuration.
      The firewall fails over when you boot into the Maintenance Recover Tool (MRT) as described in the following step but you can choose to Verify Failover or manually suspend the firewall that contains the failed drive.
    3. Reboot the firewall with the failed drive into the MRT by running the following command:
      admin@PA-5420> debug system maintenance-mode
    4. Press Enter on CONTINUE and then navigate to RAID and press Enter again.
    5. Navigate to the Migrate Drive section and select the drive to migrate. In this example, select Migrate drive Sys2 -> Sys1 to initiate the process of copying the system data from the Sys2 drive to the Sys1 replacement drive.
    6. After migration is complete, remove the other system drive. In this example, remove the Sys2 drive.
    7. Press Esc to go back to the main menu and then press Enter on Reboot.
    8. After the firewall boots PAN-OS, replace the other drive in the array so the drives in the array are the same model. In this example, first remove the Sys2 drive from the carrier and install the second replacement drive (one that is the same model as Sys1) into the carrier. Then, install the second replacement drive in slot Sys 2.
    9. Add the second replacement drive to the RAID 1 array. In this example, run the following command to add drive Sys2 to the array
      admin@PA-5420> request system raid add sys2
      If the replacement drive was previously used as a system drive in a different Palo Alto Networks firewall, include the force option in this command to force the system to reformat the drive and add it to the array. If you reboot the firewall after removing the failed drive from the array, the force option is not required. Because the firewall recognizes that a system drive is missing and automatically reformats the newly inserted drive and adds it to the array.
      The system automatically starts to configure the new drive to mirror the other drive in the RAID 1 array.
    10. Periodically view the RAID status until you see that the Overall System Drives RAID status shows Good, all partitions show clean, and both drives show active sync. To view RAID status, run the following command:
      admin@PA-5420> show system raid detail
      Do not reboot the firewall until all partitions are ready; otherwise, the system drives may become out of sync and the firewall will not boot.
      Overall System Drives RAID status        Good
      ---------------------------------------------------------------------------
      Drive status
         Disk id Sys1                          Present     (MICRON_M510DC_MT)
         Disk id Sys2                          Present     (MICRON_M510DC_MT)
      ---------------------------------------------------------------------------
      Partition status
      panlogs                                  clean
         Drive id Sys1                         active sync
         Drive id Sys2                         active sync
      maint                                    clean
         Drive id Sys1                         active sync
         Drive id Sys2                         active sync
      sysroot0                                 clean
         Drive id Sys1                         active sync
         Drive id Sys2                         active sync
      sysroot1                                 clean
         Drive id Sys1                         active sync
         Drive id Sys2                         active sync
      pancfg                                   clean
         Drive id Sys1                         active sync
         Drive id Sys2                         active sync
      panrepo                                  clean
         Drive id Sys1                         active sync
         Drive id Sys2                         active sync
      swap                                     clean
         Drive id Sys1                         active sync
         Drive id Sys2                         active sync