Next-Generation Firewall
Create an IPv4 MRoute
Table of Contents
Expand All
|
Collapse All
Next-Generation Firewall Docs
-
-
-
-
-
-
-
- PAN-OS 12.1
- PAN-OS 11.2
- PAN-OS 11.1
- PAN-OS 11.0 (EoL)
- PAN-OS 10.2
- PAN-OS 10.1
- PAN-OS 10.0 (EoL)
- PAN-OS 9.1 (EoL)
- PAN-OS 9.0 (EoL)
- PAN-OS 8.1 (EoL)
-
- PAN-OS 12.1
- PAN-OS 11.2
- PAN-OS 11.1
- PAN-OS 10.2
- PAN-OS 10.1
Create an IPv4 MRoute
Create an mroute for IPv4 multicast on a logical router.
| Where Can I Use This? | What Do I Need? |
|---|---|
|
One of these licenses for Strata Cloud Manager managed NGFWs:
|
The Advanced Routing Engine allows you to configure IPv4 multicast routing
for a logical router. Recall that PIM checks whether the firewall received the
packets on the same interface that the firewall uses to send unicast packets back to
the source, by checking the unicast RIB.
In a topology where you want unicast packets to take a different route from multicast
packets, you can configure an mroute. An mroute is static unicast route that points
to a multicast source; the mroute is stored in the multicast RIB (MRIB). PIM uses
the mroute for the RPF checks, rather than using the unicast RIB for RPF checks.
Whether PIM uses the MRIB or URIB for RPF checking depends on the RPF lookup mode
configured for PIM. During RPF checks, the mroute used is the one with the longest
prefix match.
An mroute is useful, for example, when some devices along the path do not support
multicast routing, so a tunnel is used to connect multicast routers.
PAN-OS
Create an mroute for IPv4 multicast on a logical router on a PAN-OS
firewall.
Create an mroute (static route) for IPv4 multicast on a logical router on a PAN-OS
firewall.
- Configure a Logical Router.Select NetworkRoutingLogical Routers and select a logical router.Select Multicast and enable multicast protocol.Create an mroute.
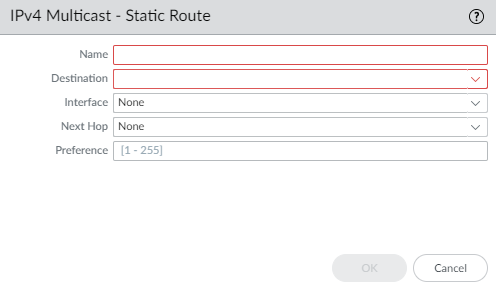
- Select Static and Add an mroute by Name. The name must start with an alphanumeric character, underscore (_), or hyphen (-), and contain zero or more alphanumeric characters, underscore, or hyphen. No dot (.) or space is allowed.
![]() Enter the Destination (IPv4 Address/Mask or address object) of the mroute, which is the multicast source or subnet to which the firewall performs an RPF check.Select the egress Interface for the unicast route to the multicast source.Enter the IPv4 address (or address object) of the Next Hop router toward the source.Enter a Preference for the route; range is 1 to 255.Click OK.Click OK.Commit your changes.
Enter the Destination (IPv4 Address/Mask or address object) of the mroute, which is the multicast source or subnet to which the firewall performs an RPF check.Select the egress Interface for the unicast route to the multicast source.Enter the IPv4 address (or address object) of the Next Hop router toward the source.Enter a Preference for the route; range is 1 to 255.Click OK.Click OK.Commit your changes.Strata Cloud Manager
Create an mroute for IPv4 multicast on a logical router on Strata Cloud Manager.Create an mroute for IPv4 multicast on a logical router on Strata Cloud Manager.- Select ConfigurationNGFW and Prisma Access.For Configuration Scope, select Folders and then select All Firewalls, a specific folder, or the specific firewalls you want to configure. (Don’t choose Global.)Select DeviceRoutingRouters and select the logical router you're configuring.Edit the Multicast card and Enable multicast.Create an IPv4 mroute.
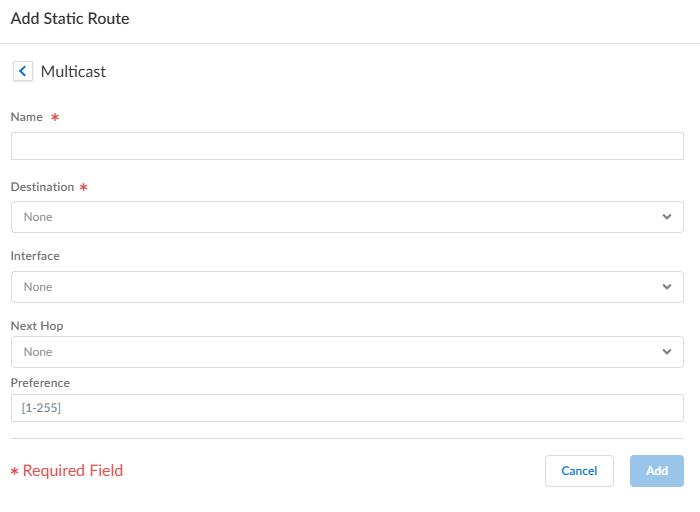
- Select the Static tab and Add a static route.Enter a Name for the static route (mroute). The name contains a maximum of 63 alphanumeric, dot (.), underscore (_), or hyphen (-) characters.
![]() Enter the Destination (IPv4 address/mask or address object) of the mroute, which is the multicast source or subnet to which the firewall performs a reverse-path forwarding (RPF) check.Select the egress Interface for the unicast route to the multicast source.Enter the IPv4 address (or address object) of the Next Hop router toward the source.Enter a Preference for the route; the range is 1 to 255.Add the mroute.Update the static routes.Push Config and Push the configuration. Select the Admin Scope and enter a Description for the configuration. Select Push again.
Enter the Destination (IPv4 address/mask or address object) of the mroute, which is the multicast source or subnet to which the firewall performs a reverse-path forwarding (RPF) check.Select the egress Interface for the unicast route to the multicast source.Enter the IPv4 address (or address object) of the Next Hop router toward the source.Enter a Preference for the route; the range is 1 to 255.Add the mroute.Update the static routes.Push Config and Push the configuration. Select the Admin Scope and enter a Description for the configuration. Select Push again.


