Deploy Azure Auto Scaling Template
Table of Contents
Deploy Azure Auto Scaling Template
Auto scale the VM-Series firewalls on Azure to secure
your application workloads in greenfield and brownfield use cases.
The Azure auto scaling template leverages
multiple components including native Azure services to auto scale
the VM-Series firewall to secure your application workloads as they
scale in or out to meet the needs of your enterprise. To enable
the Azure VM Scale Sets (VMSS) to auto scale VM-Series firewalls,
custom firewall metrics are published to Azure Application Insights
which allows for firewalls to scale in or scale out based on the
monitored thresholds. For this auto scaling mechanism to work, you
require Panorama and the Azure plugin on Panorama. For details on
all the components you need to secure your application workloads
with an auto-scaling tier of VM-Series firewalls, see Auto Scaling on Azure - Components and Planning Checklist.
Watch the videos on deploying the
Azure autoscaling templates.
Before You Begin
Get started with the deploying the VM-Series
firewalls that auto scale with your application workloads on Azure.
- Review the checklist in Plan Your Deployment. Be sure to check the Panorama plugin version information in the Compatibility Matrix.
- Download the templates and files from the GitHub repository.
- Install the Panorama plugin for Azure on Panorama.
- Install the license
deactivation API key for your account on Panorama.This key is required to successfully deactivate licenses on your firewalls when a scale-in event occurs.
- On Panorama create the following:
- In a template stack create a virtual router.Make sure to add the virtual router to the template stack and not to the template. If you do not the create the virtual router in the template stack, the static routes that the Inbound firewall template automatically creates will not be added to the virtual router, and your application template may not launch successfully.
- In a template, create two interfaces—ethernet1/1(Untrust) and ethernet1/2 (Trust) interfaces. On each interface, Enable DHCP and clear Automatically create default route pointing to default gateway provided by server.
- Assign the interfaces to the virtual router.
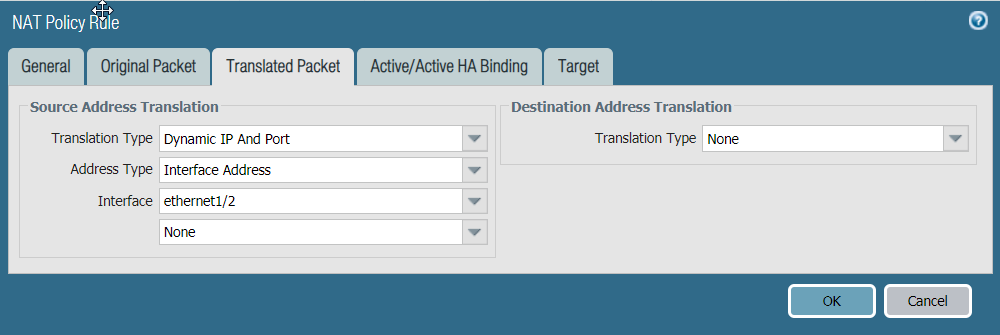
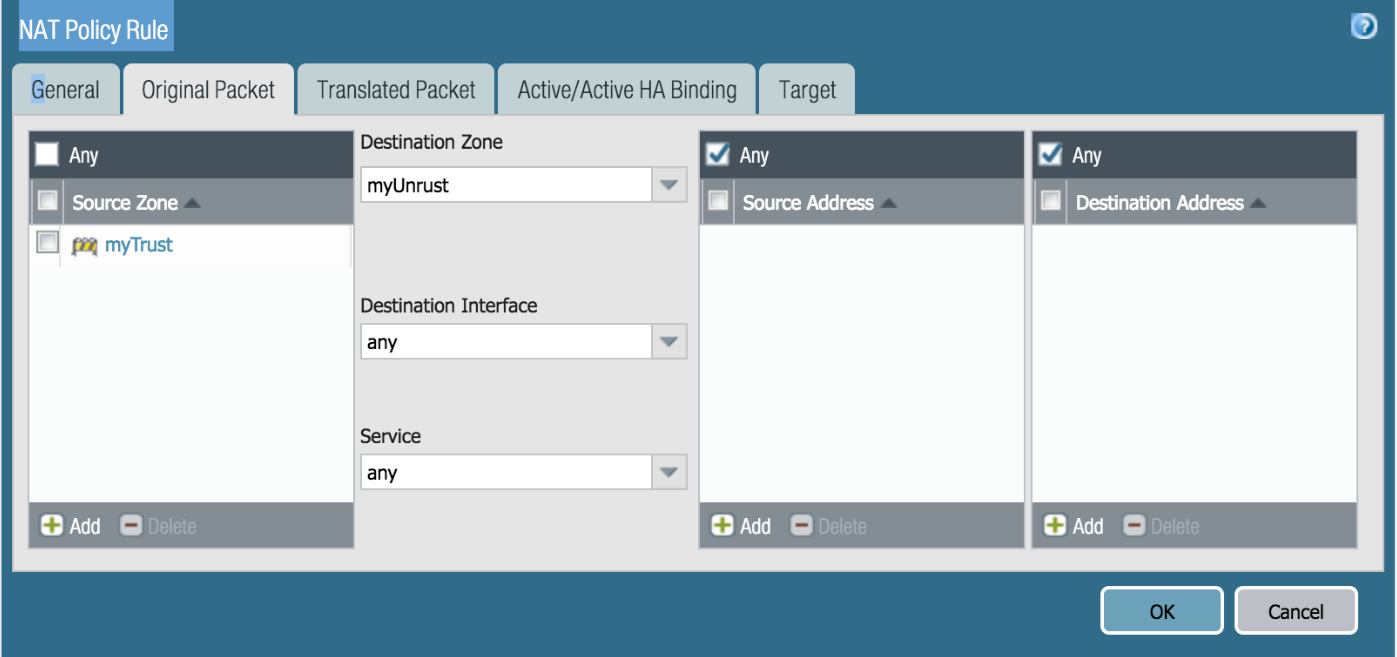
- Create a NAT policy rule.
- Select the device group that you plan to use for the configuration of the Inbound Firewall template, and add a NAT policy rule to direct traffic from the untrust zone to the trust zone, and set the translated packet to use the trust interface (ethernet1/2) IP address so that the return traffic is sent back to the trust interface on the firewall.
![]()
![]()
- Select the device group that you plan to use for the configuration of the Hub Firewall template, and add a NAT policy rule to direct traffic from the trust zone to the untrust zone, and set the translated packet to use the untrust interface (ethernet1/1) IP address so that the return traffic is sent back to the untrust interface on the firewall.
![]()
![]()
- Create Security policy rules to allow traffic for the application(s) you are deploying.
- In a template stack create a virtual router.

Deploy the Auto Scaling VM-Series Firewalls to Secure Your Applications
The following workflow takes you through the
process of setting up the Azure Service Bus infrastructure that
is required to support the messaging system required for detecting
scale-in and scale-out events, auto programming the static routes
and licensing the firewalls. It then helps you deploy the ARM templates
that configure the VM-Series firewalls in VMSS where the firewalls
can scale with your application workloads and ensure high availability
for your services. Finally, it also details how you must configure
your custom application to direct traffic to the VM-Series firewalls
and secure the flow.
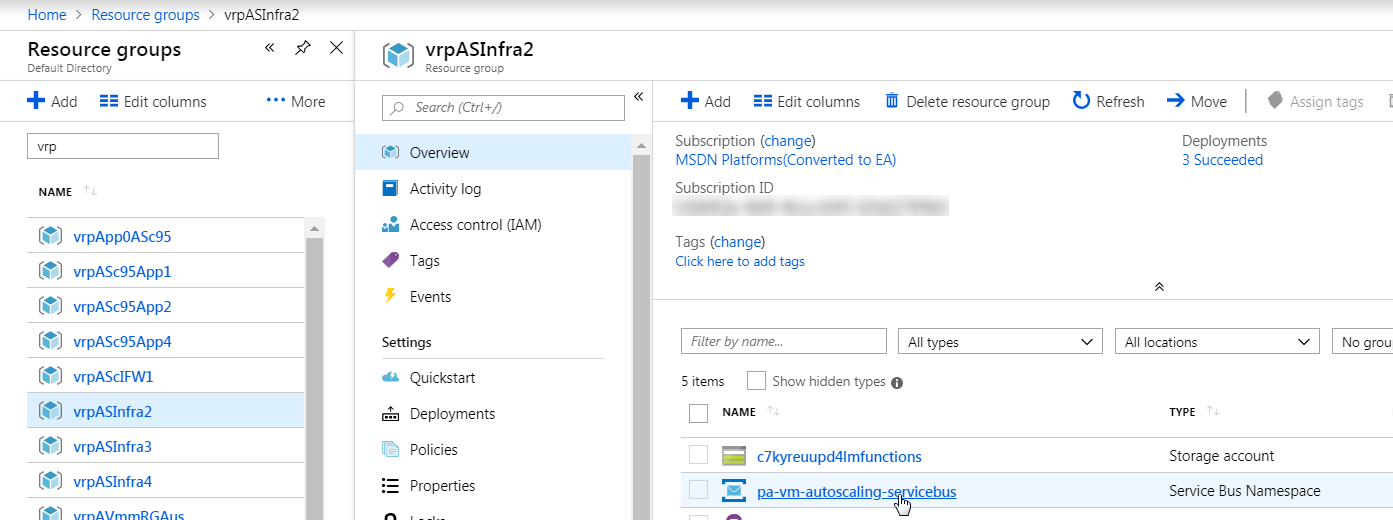
- Launch the Infrastructure template.This allows you to launch the Azure Service Bus and the Azure function. You need to get the SB name, SB credentials (shared access key) for use later on the Panorama Azure plugin. You will also need the Function URL to deploy the firewall template (for inbound and hub).
![]()
![]()
- Log in to the Panorama, and for every VMSS group of firewalls, create a device group, a template stack and one or more templates.
- Set up your Service Principal on the Azure plugin on
Panorama.The Service Principal is the service account that you created on the Azure portal. This account is attached to the Azure AD and has limited permissions to access and monitor the resources in your Azure subscription. For this auto scaling deployment, make sure that the Service Principal has Contributor rights, at a minimum.
- Select .
![]()
- Enter a Name and optionally a Description to identify the service account.
- Enter the Subscription ID for the Azure subscription you want to monitor. You must login to your Azure portal to get this subscription ID.
- Enter the Client Secret and re-enter it to confirm.
- Enter the Tenant ID. The tenant ID is the Directory ID you saved when you set up the Active Directory application.
- Click Validate to verify that the keys and IDs you entered are valid, and Panorama can communicate with the Azure subscription using the API.
- Create your Azure auto scaling definition for the Azure
subscription.You can add up to 10 Autoscaling Definitions and each definition can include up to 25 Virtual Machine Scale Sets (VMSS). The firewalls in a VMSS map to one device group and one template stack on Panorama.
![]()
- Select .
- Enter a Name and Description for the auto scaling definition.
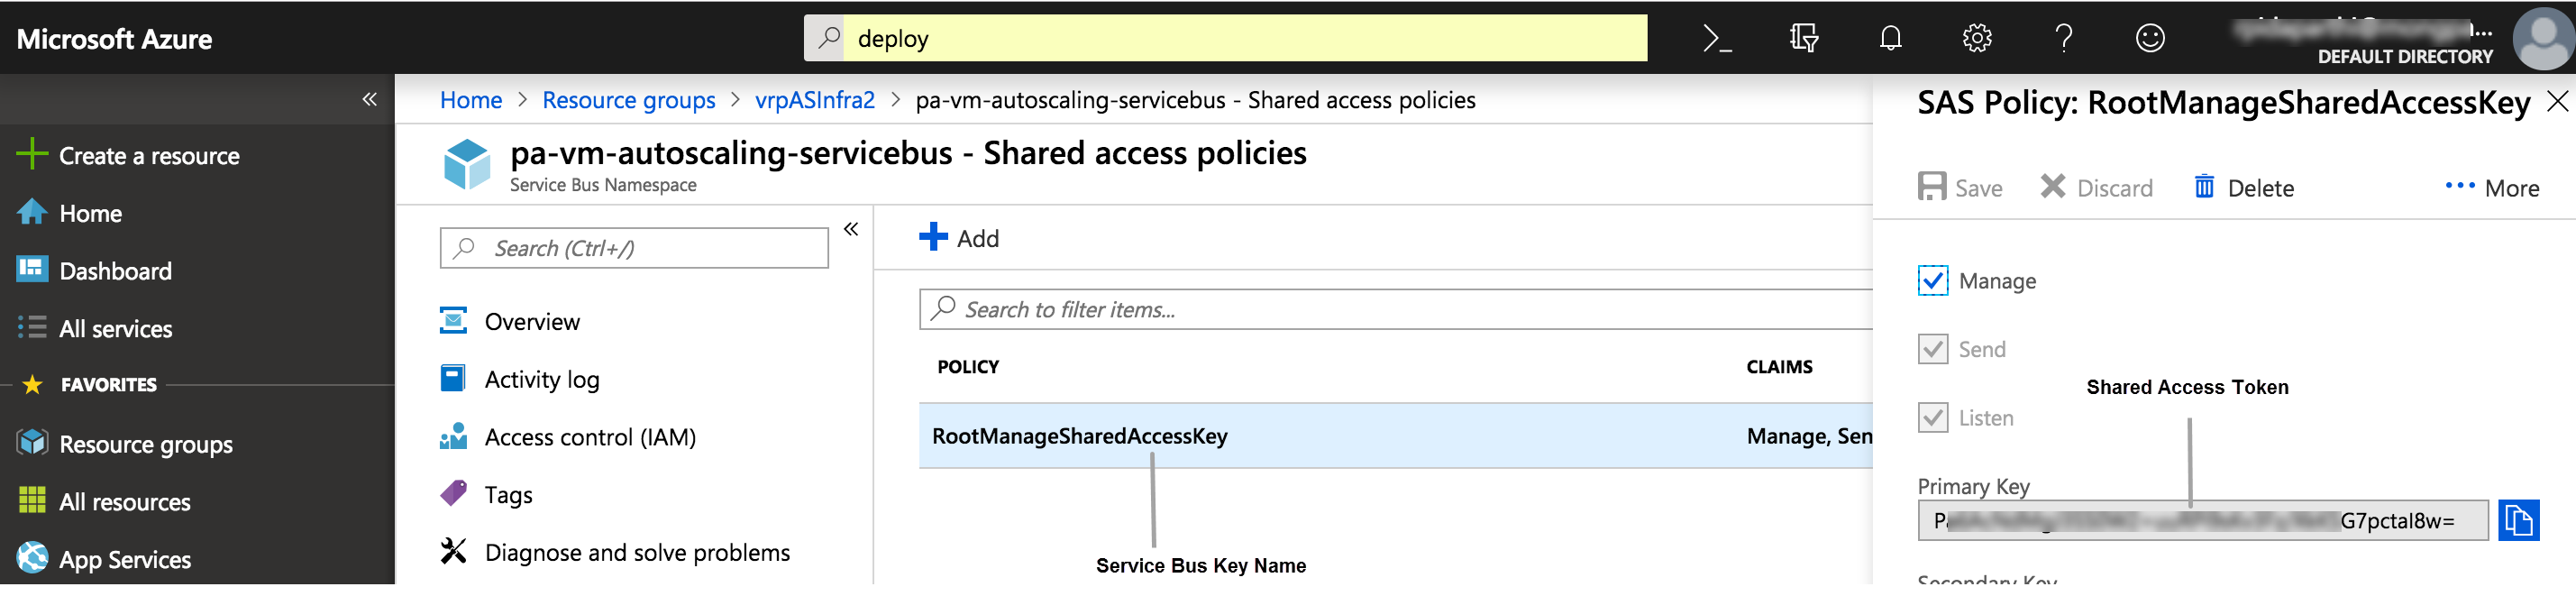
- Add the Service Bus Name—Enter the Service Bus Name that you defined when you launched the Infrastructure template from the GitHub repository. You must copy this name from the from the Azure portal and paste it here.
- Add the Shared Access Token and Service Bus Key Name— You need to get these from the Infrastructure template on the Azure portal.
![]()
- Select the Service Principal that enables Panorama to authenticate to your Azure subscription.
- Add the firewall Resource Group to Panorama.
- Enter a name to identify the Firewall Resource Group, and optionally a Description.
- Select the Resource Group Type: Hub—These firewalls secure outbound traffic and east-west traffic between the VMs in your Azure deployment. Inbound—These firewalls secure inbound traffic to the application VMs in your Azure deployment.
- Select the Device Group. and the Template Stack that you created for the firewalls deployed within the Resource Group above.
- Verify that Push static routes automatically to the template stack is enabled. This option is enabled by default, and it enables Panorama to push static routes to the firewalls that belong to the Inbound Firewall VMSS and the Hub Firewall VMSS. In the Inbound Firewall template, the static routes enable the firewalls to direct inbound traffic to the backend application server pool, route return traffic to the client, and route the health probe initiated by the Azure load balancer. In the Hub Firewall template, the static routes enable the firewalls to route the health probe initiated by the Azure load balancer and direct outbound traffic (that is traffic originating from the applications/services) to the internet.
- Launch the Azure Inbound Firewall template.Whether you want to secure a greenfield deployment or a brownfield deployment, you need the Azure Inbound Firewall template to secure inbound traffic to an internet-facing application.
- Launch the Inbound Firewall template.For a description of the input parameters, see Inbound Firewall Template Parameters. And skip to onboard an app, if you do not want to secure outbound traffic (that is secure traffic originating from your application workloads within a Resource Group).
- To secure inbound application traffic, you must connect
the application to the Inbound firewall VMSS. When you onboard your application, you need to do the following:
- Configure the Application Gateway with the frontend and backend configuration to point to the internal load balancer that fronts the application server pool. Refer to the Azure Application Gateway documentation.
- In the default BackendUDR, add a route with application subnet as the destination, and the next hop IP address as that of the internal load balancer that fronts the firewall VMSS.
- Set up VNet peering between the application VNet and the Inbound firewall VMSS VNet, if they are in different VNets. When you use the sample application template included in the GitHub repository, VNet peering is set up for you.
- Tag the internal load balancer that fronts the application with these name-value pairs.
PanoramaManaged-yes
InboundRG-<Name of the Inbound Firewall Resource Group>
The Inbound template assigns a public IP address to VMSS PA-VM management interface. Make sure to configure the Network Security Group inbound source IP in the template.
- Launch the Inbound Firewall template.
- Launch the Azure Hub Firewall template.You need to deploy this template, only if you want to secure traffic originating from your application workloads within a Resource Group.
- Launch the Hub autoscaling firewall template. For a description of the input parameters, see Hub Template Parameters.
- Connect the Hub firewall VMSS to the application VNet.Complete the following on the Azure portal:
- Add a UDR in the route table and associate the application’s subnet to the route table. Refer to the Azure documentation.
- On the Azure portal, add a default route (0.0.0.0/0) to forward all traffic to the internal load balancer that fronts the Hub firewall VMSS.
- Tag the internal load balancer that fronts the application with these name-value pairs.
HubRG-<Name of the Hub Firewall Resource Group>
On Panorama, you must add a static route to enable the firewalls in the Hub VMSS to direct traffic back to the application workloads (as shown below in this step). Make sure to define the static route on the template stack that manages the configuration of the firewalls in the Hub VMSS.
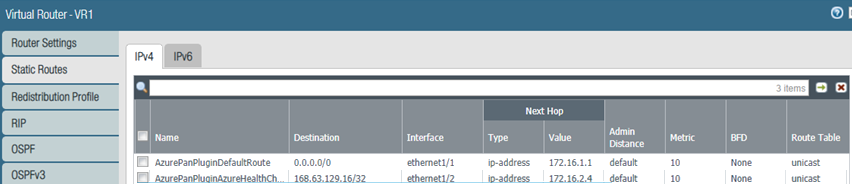
- Verify that the auto-programmed routes are in the
virtual router on Panorama.After you deploy the Hub template, a default route and a route for health checks to the managed firewalls is automatically added to the virtual router in the template stack for the VM-Series firewalls launched with the Hub template. And the Azure Application Insights instrumentation key is also automatically available. You need to verify that these routes and the are included so that the firewalls are properly configured and can send metrics for monitoring the autoscaling thresholds. the Synchronizing Config with Azure button. Follow the same procedure if you do not see routes populated for the Hub template stack as well.
- Log in to Panorama and select Network.
- Select the template stack associated with the Hub firewall VMSS in the Template drop-down.
- Select Virtual Router and select the virtual router.
- Select Static Routes and verify that you can see two routes.
![]()
- Select and view the value for the Azure Instrumentation Key.
If you do not see the static routes or the Azure Instrumentation Key, on , and click the Synchronizing Config with Azure link that corresponds to the autoscaling definition you want to update. - Verify that you have a static route to direct return
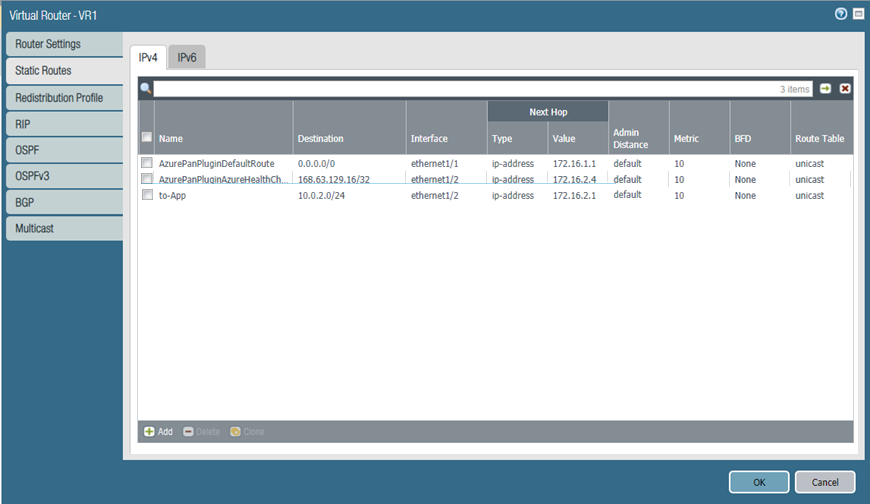
traffic from the internet back to the application.On Panorama, the virtual router associated with the template stack for the Hub firewall must have a static route to direct return traffic to the application workloads. This static route is automatically created when you tag the internal load balancer in the Application VNet withOtherwise, you must add the static route as follows.
HubRG-<Name of the Hub Firewall Resource Group>
- Log in to Panorama and select Network.
- Select the template stack associated with the Hub firewall VMSS in the Template drop-down.
- Select Virtual Router and select the virtual router you are configuring.
- Select Static Routes and add a route with the destination IP address as the subnet for the application, set the outgoing interface as the trust interface on the firewall and the Next Hop IP address for the internal load balancer that fronts your application workloads in the application Resource Group.
![]()
The Inbound template assigns a public IP address to VMSS PA-VM management interface. Make sure to configure the Network Security Group inbound source IP in the template.
- To onboard
an app, complete the following on the Inbound Firewall Resource
Group.
- Access the Application Gateway.
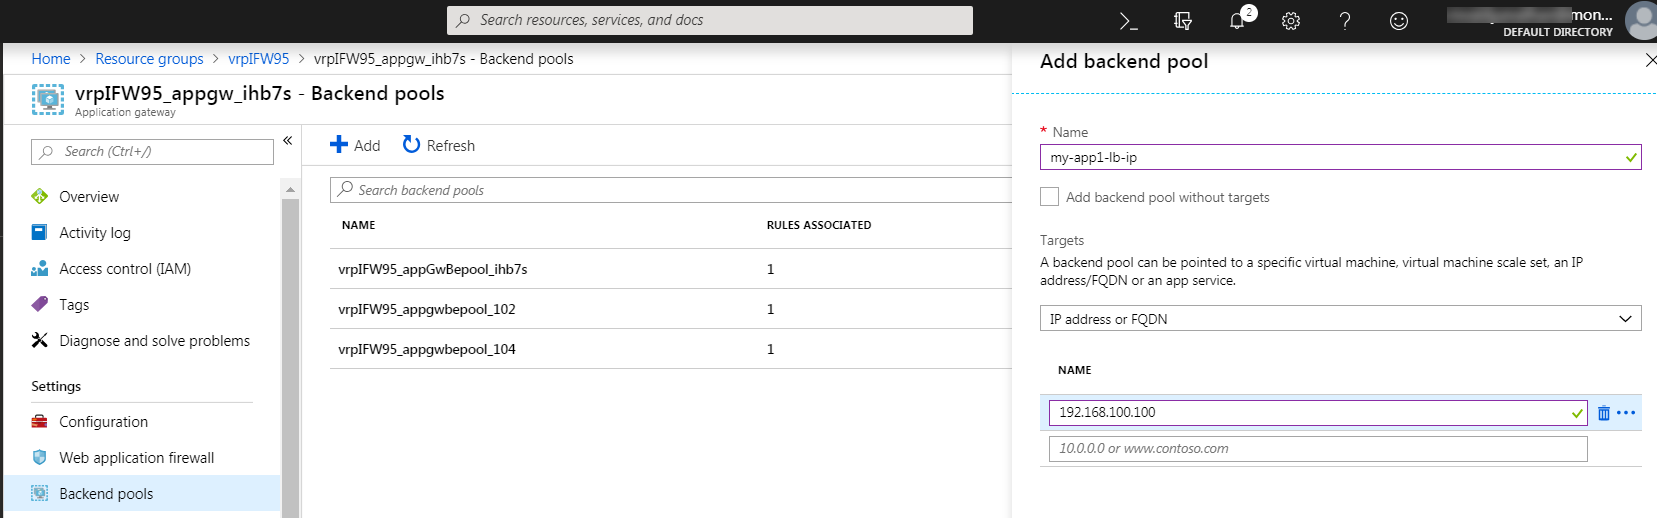
- Add the Load balancer IP address for the sample application
to the Application Gateway backend pool.
![]()
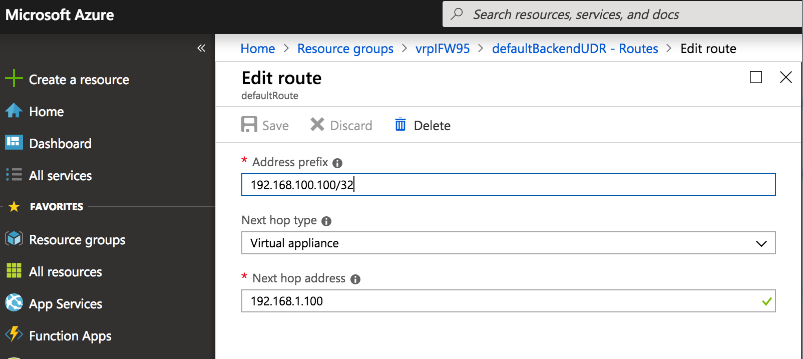
- Add a route to the defaultBackendUDR to direct traffic
through the firewall to the application you want to secure.You need to add a route that specifies the address prefix of the internal load balancer IP address for the application gateway that was created when you launched the App template, and the next hop IP address should match the IP address of the load balancer that fronts the VM-Series firewall VMSS in the Inbound firewall resource group. This route allows the Application Gateway to send traffic to the Inbound firewall VMSS before routing it to the load balancer in the application resource group.
![]()
If you have your own app and you want to configure it to secure traffic to it using the VM-Series firewalls that you deployed using the hub or the firewall template, you must do the following:- Set up VNET peering between the application VNet and the VNet in which your firewall VMSS are deployed.If you are securing inbound and outbound application traffic, on the Azure portal select the virtual network for the application and verify that VNet peering status is connected for the Hub and the Inbound firewall VNets.
![]()
- Add the IP address of the internal Load Balancer that fronts the application to the Application gateway configuration in the inbound firewall Resource Group.
- Add a route to the defaultBackend UDR table to direct traffic through the firewall. You need to add a route that specifies the IP address of the load balancer that fronts the application, and specify the IP address load balancer that fronts the firewall VMSS as the next hop. This route allows the Application Gateway to send traffic to the firewall VMSS before routing it to the load balancer in the application resource group.
- Add the following tags to the internal load balancer that fronts your application workloads.
- HubRG: Enter the name of the Hub firewall Resource Group
- PanoramaManaged: yes
- InboundRG: Enter the name of the Inbound firewall Resource Group
![]()
- To onboard an app, complete the following on the Hub
Firewall Resource Group.
- Access the Application Gateway.
- Add the Load balancer IP address for the sample application
to the Application Gateway backend pool.
![]()
- Add a route to the defaultBackendUDR to direct traffic
through the firewall to the application you want to secure.You need to add a route that specifies the address prefix of the internal load balancer IP address for the application gateway that was created when you launched the App template, and the next hop IP address should match the IP address of the load balancer that fronts the VM-Series firewall VMSS in the Inbound firewall resource group. This route allows the Application Gateway to send traffic to the Inbound firewall VMSS before routing it to the load balancer in the application resource group.
![]()
If you have your own app and you want to configure it to secure traffic to it using the VM-Series firewalls that you deployed using the hub or the firewall template, you must do the following:- Set up VNET peering between the application VNet and the VNet in which your firewall VMSS are deployed.If you are securing inbound and outbound application traffic, on the Azure portal select the virtual network for the application and verify that VNet peering status is connected for the Hub and the Inbound firewall VNets.
![]()
- Add the IP address of the internal Load Balancer that fronts the application to the Application gateway configuration in the inbound firewall Resource Group.
- Add a route to the defaultBackend UDR table to direct traffic through the firewall. You need to add a route that specifies the IP address of the load balancer that fronts the application, and specify the IP address load balancer that fronts the firewall VMSS as the next hop. This route allows the Application Gateway to send traffic to the firewall VMSS before routing it to the load balancer in the application resource group.
- Add the following tags to the internal load balancer that fronts your application workloads.
- HubRG: Enter the name of the Hub firewall Resource Group
- PanoramaManaged: yes
- InboundRG: Enter the name of the Inbound firewall Resource Group
![]()
- On Panorama, create Security policy rules.For securing inbound application traffic, you can specify the source zone and destination zones as any, and add the destination IP addresses as a dynamic address group object and reference it in the Security policy rule.