Configure the Cloud Identity Agent
Table of Contents
Expand all | Collapse all
-
- Cloud Identity Engine Attributes
- Collect Custom Attributes with the Cloud Identity Engine
- View Directory Data
- Cloud Identity Engine User Context
- Create a Cloud Dynamic User Group
- Configure Third-Party Device-ID
- Configure an IP Tag Cloud Connection
- View Mappings and Tags
- Configure Dynamic Privilege Access in the Cloud Identity Engine
- Send Cortex XDR Risk Signals to Okta
- Configure SSF Okta Receiver as a Risk Connection
- Configure the Secrets Vault
-
- Set Up Password Authentication
-
- Configure Azure as an IdP in the Cloud Identity Engine
- Configure Okta as an IdP in the Cloud Identity Engine
- Configure PingOne as an IdP in the Cloud Identity Engine
- Configure PingFederate as an IdP in the Cloud Identity Engine
- Configure Google as an IdP in the Cloud Identity Engine
- Configure a SAML 2.0-Compliant IdP in the Cloud Identity Engine
- Set Up a Client Certificate
- Configure an OIDC Authentication Type
- Set Up an Authentication Profile
- Configure Cloud Identity Engine Authentication on the Firewall or Panorama
- Configure the Cloud Identity Engine as a Mapping Source on the Firewall or Panorama
- Configure Dynamic Privilege Access in the Cloud Identity Engine
- Get Help
Configure the Cloud Identity Agent
After you download the agent and install it on a Windows server, configure the agent to
connect to your supported on-premises directory and to the Cloud Identity
Engine.
Avoid configuring the agent for the first time during the daily certificate revocation list
(CRL) reload time (9:00-10:00 PM/21:00-22:00 CDT for US or CEST for EU). If you
configure the agent and the initial attribute sync occurs at this time but isn’t
successful, wait a few minutes, then Synchronize All Attributes to ensure the attributes are
synchronized with your tenant.
After you download the agent from the Cloud Identity Engine app and Install the Cloud Identity Agent on a supported Windows server, configure the agent
to establish a connection with your Active Directory or OpenLDAP-based directory and
the Cloud Identity Engine so that it can collect all of the attributes from the
Active Directory during the initial setup.
OpenLDAP requires specific attributes. For more information,
refer to the On-Premises OpenLDAP attributes.
In the Cloud Identity Engine app, you can optionally Synchronize Cloud Identity Engine Tenants instantly to ensure attribute and
other directory changes are available in the Cloud Identity Engine.
The minimum required permissions
for the service account are the ability to create LDAP bind requests
(LDAP protocol version, the DN for the account, and the account
credentials) and the IP address or domain for the directory.
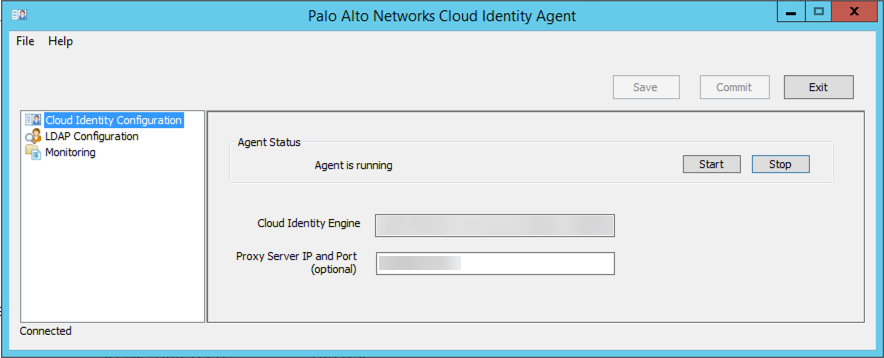
- If you haven’t already done so, Configure Your Network to Allow Cloud Identity Agent Traffic.Install the certificate authority (CA) certificate used to sign the certificate used by the directory in the Local Computer Trusted root CA certificate store of the agent host.You must complete this step if the server that hosts the agent doesn’t already have the CA certificate of the domain controller or the CA certificate from the issue of the domain controller’s certificate.On the agent host, launch the Cloud Identity agent (StartPalo Alto NetworksCloud Identity Agent).Don’t manually edit configuration files for the agent. Manually editing the agent configuration files might cause unexpected behavior.Select Cloud Identity Configuration and enter the regional agent configuration endpoint for the Cloud Identity Engine that matches the region that the corresponding Cloud Identity Engine tenant uses.
![]()
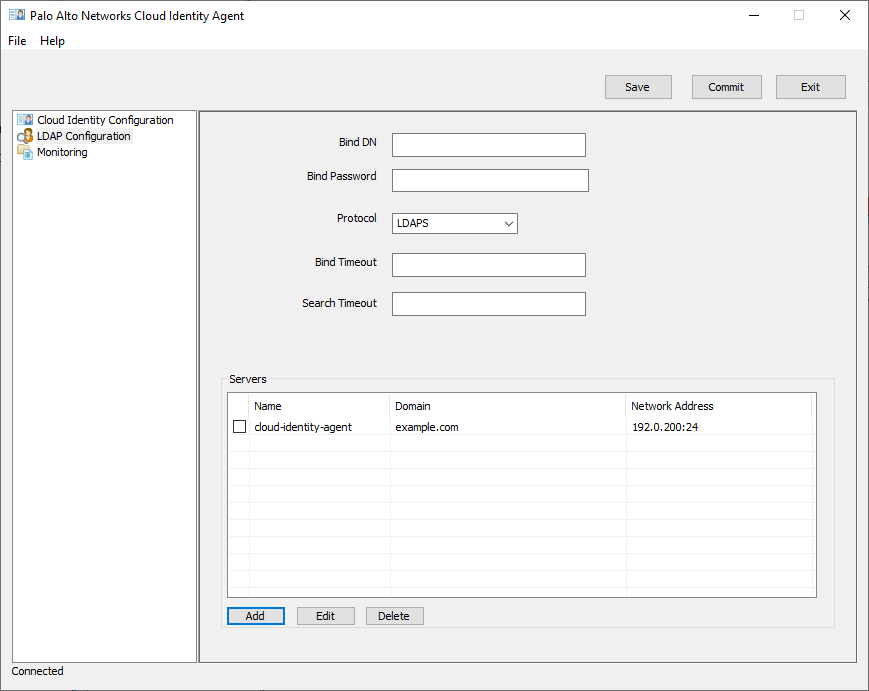
Region Agent Configuration United States (US) agent-directory-sync.us.paloaltonetworks.com European Union (EU) agent-directory-sync.eu.paloaltonetworks.com United Kingdom (UK) agent-directory-sync.uk.paloaltonetworks.com Singapore (SG) agent-directory-sync.sg.paloaltonetworks.com Canada (CA) agent-directory-sync.ca.apps.paloaltonetworks.com Japan (JP) agent-directory-sync.jp.apps.paloaltonetworks.com Australia (AU) agent-directory-sync.au.apps.paloaltonetworks.com Germany (DE) agent-directory-sync.de.apps.paloaltonetworks.com United States - Government agent-directory-sync.gov.apps.paloaltonetworks.com India (IN) agent-directory-sync.in.apps.paloaltonetworks.com Switzerland (CH) agent-directory-sync.ch.apps.paloaltonetworks.com Spain (ES) agent-directory-sync.es.apps.paloaltonetworks.com Italy (IT) agent-directory-sync.it.apps.paloaltonetworks.com France (FR) agent-directory-sync.fr.apps.paloaltonetworks.com China (CN) agent-directory-sync.cn.apps.prismaaccess.cn This region is only accessible in the Cloud Identity Engine within the specified region.Poland (PL) agent-directory-sync.pl.apps.paloaltonetworks.com Qatar (QA) agent-directory-sync.qa.apps.paloaltonetworks.com Taiwan (TW) agent-directory-sync.tw.apps.paloaltonetworks.com Israel (IL) agent-directory-sync.il.apps.paloaltonetworks.com Indonesia (ID) agent-directory-sync.id.apps.paloaltonetworks.com South Korea (KR) agent-directory-sync.kr.apps.paloaltonetworks.com Saudi Arabia (SA) agent-directory-sync.sa.apps.paloaltonetworks.com South Africa (ZA) agent-directory-sync.za.apps.paloaltonetworks.com (Optional) If your network configuration uses a proxy server, enter the Proxy IP Server and Port (optional) to allow the Cloud Identity agent to use a secure mTLS connection to tunnel the agent traffic through the proxy server.Enter the proxy server’s IP address in <IP_Address>:<Port> format, where <IP_Address> represents the IP address of the proxy server and <Port> represents the port number.Configure the LDAP Configuration to allow the agent to communicate with your on-premises directory.To learn how to collect attributes from multiple domains, see Configure Domains for the Cloud Identity Engine.![]()
- Enter the Bind DN for the service account you want to bind to your directory (for example, CN=admin,OU=IT,DC=domain1,DC=example,DC=com).If you don’t know the DN of the service account, enter the following command in the command prompt on the Active Directory server: dsquery user -name username (where username is the service account login name). Be sure to delete the quotation marks if you copy the DN from the command output.Enter the Bind Password to authenticate the session.The Bind Password is saved in encrypted format in the Windows credential store, not the configuration file. If you delete the LDAP configuration for the server and commit the changes, you must re-enter the password.Select a Protocol:
- LDAP—Connect to the directory using the default unencrypted LDAP protocol on port 389.
- LDAPS—(Default) Connect to the directory server using LDAP over SSL (LDAPS) on port 636. This option requires a CA certificate in the Local Computer certificate store on the agent host or in the Trusted Root CA store for your directory.
- LDAP with STARTTLS—Connect to the directory server using LDAPv3 Transport Layer Security (TLS) on port 389. This option requires a CA certificate in the Local Computer certificate store on the agent host or in the Trusted Root CA store for your directory.
Verify that the Bind Timeout value will allow enough time for the agent to connect to your on-premises directory.The default is 30 seconds and the range is from 1-60 seconds. When the timeout limit is reached, the agent attempts to connect to the next domain controller in the sequence for that domain.Verify that the Search Timeout value will allow enough time for the LDAP query to complete.The default is 15 seconds and the range is 1-120 seconds. If the timeout occurs, the search stops and the timeout error is included in the debug logs. If you Configure Cloud Identity Agent Logs to Information, any partial results retrieved by the Cloud Identity Engine are deleted. If the log level is set to Debug or higher, the results might not be deleted, but they aren’t used by the agent.Add your on-premises directory.To ensure that the Cloud Identity Engine can calculate group membership correctly, use a value that doesn’t end in 65 if you must use a custom value for the MaxValRange attribute in your LDAP query policy rule.![]()
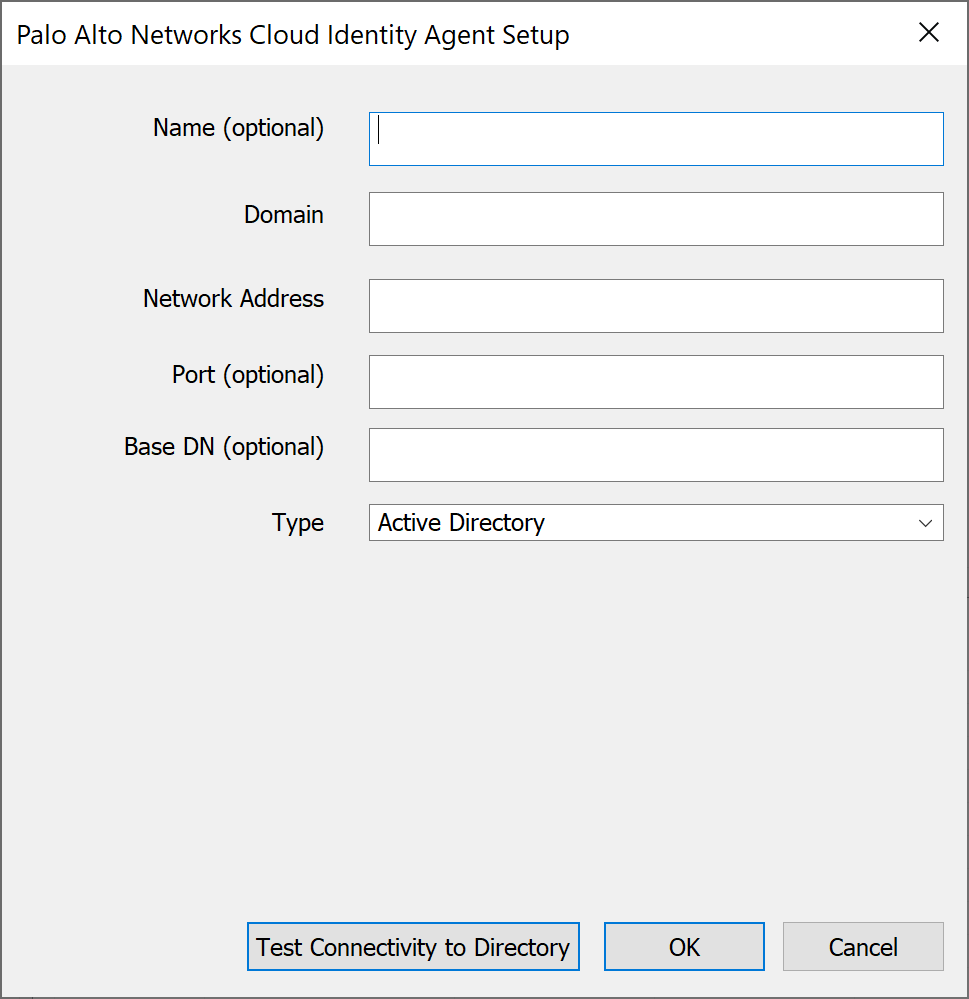
- (Optional) Enter the Name (optional) for your directory.Enter the fully qualified Domain name for your directory.You can configure up to 20 domains for each agent.Enter the IP address or fully qualified domain name (FQDN) as the Network Address for your directory.If you enter an FQDN, it must be the complete original FQDN for that IP address (for example, if the FQDN is example.hr.com, you must enter example.hr.com, not just example.com).(Optional) Enter the Port (optional) number for your directory.Don’t configure the agent to use the Global Catalog port (3268 for LDAP or 3269 for LDAPS).If you don’t enter a port number, the agent uses the following default ports:
- 636 for LDAPS
- 389 for LDAP or LDAP with STARTTLS
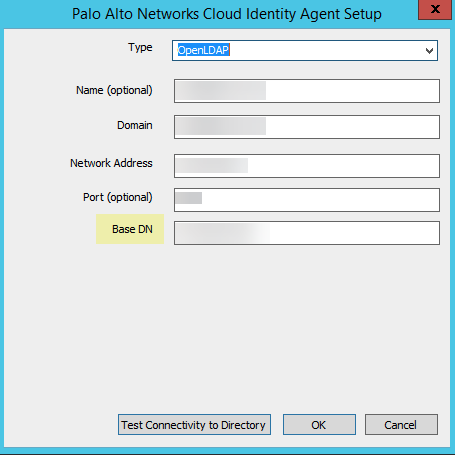
(Required for OpenLDAP) Enter the Base DN (base Distinguished Name) for your directory.![]() OpenLDAP requires the Base DN; without the Base DN, directory searches can’t complete successfully.When you enter the Base DN, use the domainComponent format (for example, DC=example, DC=com).Select your directory Type.
OpenLDAP requires the Base DN; without the Base DN, directory searches can’t complete successfully.When you enter the Base DN, use the domainComponent format (for example, DC=example, DC=com).Select your directory Type.- OpenLDAP—Configure the agent
to use an OpenLDAP-based directory server. The Cloud Identity Engine supports OpenLDAP groups with the following ObjectClass: groupsOfUniqueNames. When configuring another application (for example, GlobalProtect) with the Cloud Identity Engine for an OpenLDAP-based directory, specify the Common-Name as the Primary Name. By default, the Cloud Identity Engine uses the sAMAccountName.
- Active Directory—Configure the agent to use an Active Directory directory server.
(Optional but recommended) To confirm the agent can successfully connect to your Active Directory, you can Test Connectivity to Directory. The agent verifies that it can successfully connect to the domain and validates the NetBIOS name based on the domain.Click OK.When you add an on-premises directory, the Cloud Identity agent automatically attempts to complete a full synchronization of all domains, including existing domains, so confirm the agents are active and all configured domains are active before adding a new domain to the agent. If an inactive domain is no longer necessary, delete the domain from your configuration.Commit the changes to restart the agent and apply the configuration.The agent will connect to your directory to collect the attributes and to the Cloud Identity Engine to share the attributes with the Palo Alto Networks cloud-based apps.To confirm the agent is able to connect to your on-premises directory and the Cloud Identity Engine, log in to the Cloud Identity Engine app, select the tenant, then select Directories to verify the following information:- The domains currently monitored by the Cloud Identity Engine and each domain’s NetBIOS name.
- The sync status of the most recent attribute collection update from the directory (for example, In Progress or Successful).
- When the last successful attribute collection update from the directory occurred.
- The number of users, computers, groups, containers, and organizational units (OUs) in the domains monitored by the Cloud Identity Engine.
(Optional but recommended) Configure an additional agent for high availability (HA).You can configure HA for the Cloud Identity Engine by configuring two or more agents to collect attributes from the same domain in the same tenant. The configuration for each agent must be identical. We recommend this configuration to ensure that if an agent is temporarily unavailable, any in-progress syncs complete successfully and service isn’t interrupted. If the Cloud Identity Engine fails to connect to an agent, it searches for the next available agent. The Cloud Identity Engine communicates with only one agent at a time and the agents don’t communicate with each other.(Optional but recommended) To enhance security, you can optionally update the bind password at regular intervals (also known as password rotation). To automate this process, you can create a script to enter the command instead of manually updating the agent configuration.- To update the bind password, update the password on the LDAP server then enter the following command on the agent host: CloudIdAgentCLI.exe ldap_bind_password:<password> (where <password> represents the new password).If the password contains any of the following non-alphanumeric characters, use an escape character to interpret it as a literal character:`*\~;(%?.:@/$%^*()!''"The escape character depends on the shell or programming language you use to enter the command.For example, if you are using Powershell version 7.4.2:
- If the password contains the specified non-alphanumeric characters, use quotation marks ( " ) before and after the password.
- If the password contains quotation marks or escape characters, use the escape character ( ` ) before the character. You must also use quotation marks before and after the password.
For example, if the new password is `*\~;(%?.:@/$%^*()!''" and you are using Powershell version 7.4.2, enter the following command: .\CloudIdAgentCLI.exe ldap_bind_password:"``*\~;(%?.:@/$%^*()!''`""![]() For more information on using non-alphanumeric characters in passwords, refer to the Microsoft documentation.To troubleshoot any issues, check the log file (CloudIdAgentCLIDebug.log).The log file location is the same as the installation location for the agent (C:\Program Files (x86)\Palo Alto Networks\Cloud Identity Agent.
For more information on using non-alphanumeric characters in passwords, refer to the Microsoft documentation.To troubleshoot any issues, check the log file (CloudIdAgentCLIDebug.log).The log file location is the same as the installation location for the agent (C:\Program Files (x86)\Palo Alto Networks\Cloud Identity Agent.Next Steps
- After you’ve configured the agent, you can optionally Configure Cloud Identity Agent Logs to track the agent events you want to monitor.
- For a comprehensive user identity and authentication solution, learn how to Authenticate Users with the Cloud Identity Engine.


