Download PDF
Cloud NGFW for AWS
Configure Egress NAT
Table of Contents
Expand All
|
Collapse All
Cloud NGFW for AWS Docs
Configure Egress NAT
Use Egress NAT (network address translation) to perform source address translation on
outbound traffic to destinations in the public internet.
| Where Can I Use This? | What Do I Need? |
|---|---|
|
|
Cloud NGFW offers two ways to perform source NAT on outbound traffic to destinations
in the public internet: AWS NAT Gateway and Cloud NGFW Egress NAT.
Egress NAT functionality isn't supported on existing
firewalls (those created before this release of Cloud NGFW for AWS). Create a
new one to use Egress NAT.
AWS NAT Gateway
The Amazon NAT gateway allows your VPC
resources in your Private subnets to securely access services outside the
subnet, including the public internet, while keeping Private resources
accessible to unsolicited traffic.
You can continue to use the AWS NAT gateway in your VPC. In this scenario, the
Cloud NGFW acts as a bump-in-the-wire, directing all inspected traffic back to
its endpoint.
You pay AWS for the NAT gateway and
for associated Egress data transfer costs.
Egress NAT is not supported on Strata Cloud Manager (SCM) firewalls.
The image below illustrates source NAT on Internet-bound traffic using the AWS
NAT gateway:

See Work with NAT gateways for information
about using AWS to configure NAT.
Cloud NGFW Egress NAT
Alternatively, configure the Egress NAT feature. In this case, Cloud NGFW will
perform source NAT on all outbound traffic except for those sessions with
destination IP addresses within the Configure Private Traffic Range
defined for the endpoint on which the traffic enters the Cloud NGFW resource. In
this case, the Cloud NGFW resource does not redirect the inspected traffic back
to the endpoint. Alternatively, the inspected egress traffic is sent directly to
the internet. You no longer incur AWS NAT gateway costs but would pay Palo Alto
Networks for the egress traffic data transfer. However, you will associate
public IP addresses to the Cloud NGFW resource in one of two ways:
- Configure the Cloud NGFW resource to use Palo Alto Networks managed AWS Elastic IP Address (EIP) addresses to perform source NAT for your VPC. In this case, you’ll incur hourly EIP management costs.
- Transfer your BYOIPs to the Cloud NGFW from your AWS account to avoid the hourly EIP management costs. For more information, see BYOIPs with AWS IPAM.
The image below illustrates how source NAT works on Internet-bound traffic using
Cloud NGFW Egress NAT; source NAT on Internet-bound traffic using Cloud NGFW
Egress NAT:

Hybrid NAT Settings
You can enable Egress NAT for an NGFW resource, but you can customize the Egress
NAT setting as disabled on one or more endpoints. In this case, Cloud NGFW
operates as follows:
- If you disable Egress NAT on an endpoint, Cloud NGFW acts as a bump-in-the-wire, directing all inspected traffic back to the endpoint.
- If you leave the Egress NAT enabled on an endpoint, Cloud NGFW redirects the inspected traffic directly to the internet.
The image below illustrates Egress NAT enabled for endpoint 1 and disabled for
endpoint 2:

Configure Egress NAT with Palo Alto Networks Managed AWS EIPs
In AWS, an elastic IP address (EIP) represents a static IPv4 address, used for
dynamic cloud computing. An Elastic IP Address is reachable from the public
internet, however, you can associate it with a private instance to enable
communication with the internet. Egress NAT is supported for rulestack and
Panorama policy management only.
To configure Egress NAT using Palo Alto Networks managed AWS EIPs:
- Log in to the Cloud NGFW console.Click NGFWs.Create a new NGFW resource.In the Policy Management section, select Panorama. Use the drop-down menu to select the integrated Panorama.In the Egress NAT section, select Enable Egress NAT.In the Public IPs section, select AWS Service IPs.Select the Public IPs tab in the firewall page to view the list of supported IP addresses for Egress NAT traffic:
![]() After the firewall is created, verify its status.
After the firewall is created, verify its status.Configure Egress NAT with Bring Your Own IPs (BYOIPs)
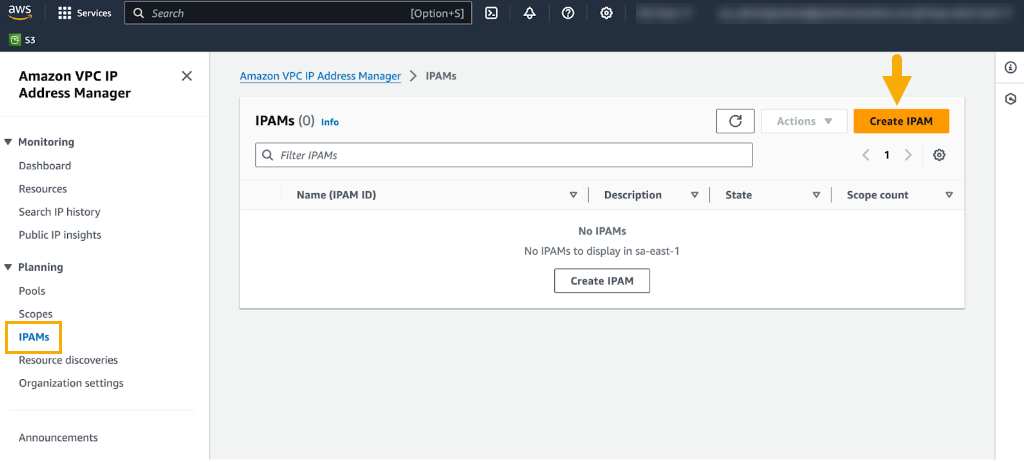
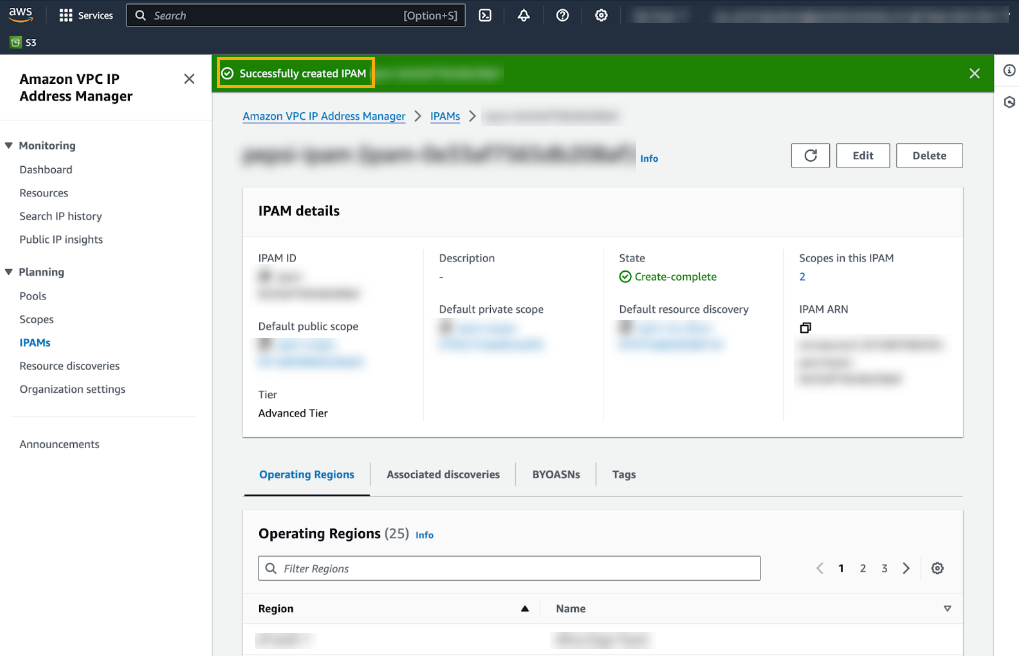
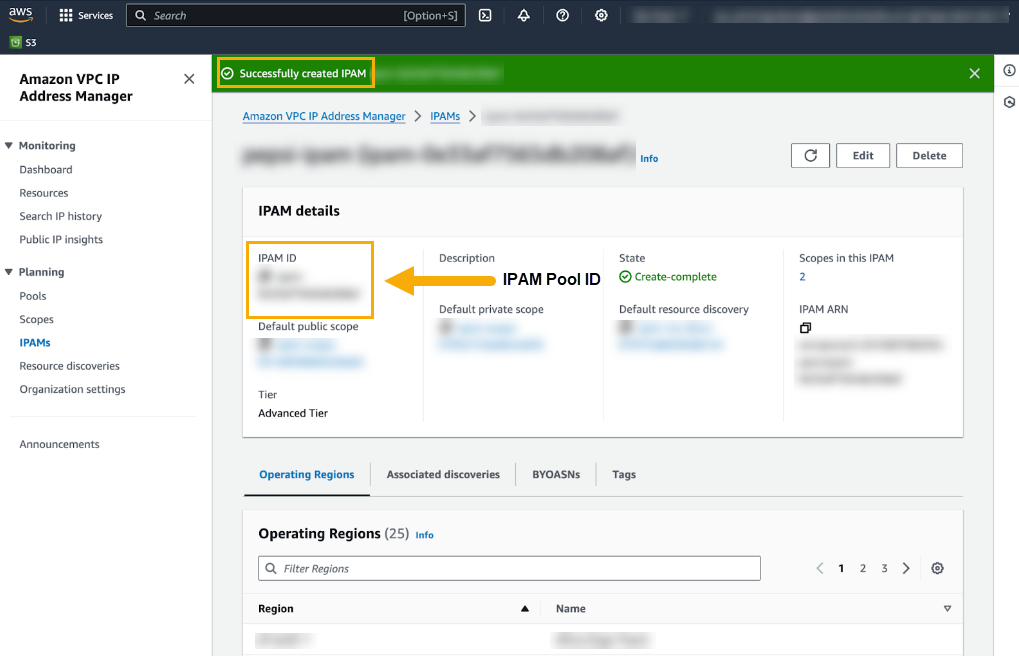
In this scenario, you’ll transfer your BYOIP addresses from your AWS account to avoid incurring hourly EIP management costs.To use BYOIPs, you must create a IP Address Management (IPAM) pool in your AWS account and share it in your Cloud NGFW for AWS deployment account. IPAM helps manage your IP addressing schema to meet security requirements. See Bring your own IP addresses on the AWS site for more information. Egress NAT is supported for rulestack and Panorama policy management only.When creating an IPAM pool in AWS you must whitelist the Palo Alto Networks AWS Account ID for Cloud NGFW to share IP addresses between the Cloud NGFW dataplane and AWS. During the IPAM pool creation process, you select the option to Allow Amazon VPC IP Address Manager (a mandatory step to create the IPAM pool); specify the AWS Data Plane Account ID for your Cloud NGFW resource: 010510656586.It may take approximately 10 minutes to create an IPAM pool.Create an IPAM PoolTo create an IPAM pool:- Log in to the AWS VPC IP Address Manager.Select Planning > IPAMs.In the IPAMs page, click Create IPAM.For more information, see the instructions on the AWS page to Create an IPAM.After you successfully create the IPAM, the AWS VPC IP Address Manager displays details of the IPAM:
![]() After you successfully create the IPAM, the AWS VPC IP Address Manager displays details of the IPAM:
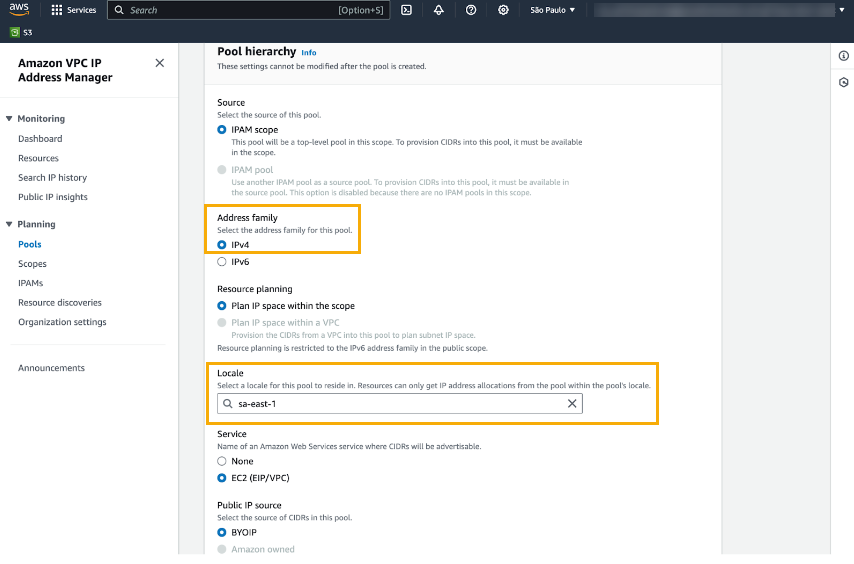
After you successfully create the IPAM, the AWS VPC IP Address Manager displays details of the IPAM:![]() Create an IPAM pool to plan for IP address provisioning. Select Planning>Pools and click Create pool.When creating an IPAM pool, you must set the Address Family to IPv4, and set the Locale to where you want to deploy your Cloud NGFW resource, as illustrated in the Pool Hierarchy screen:
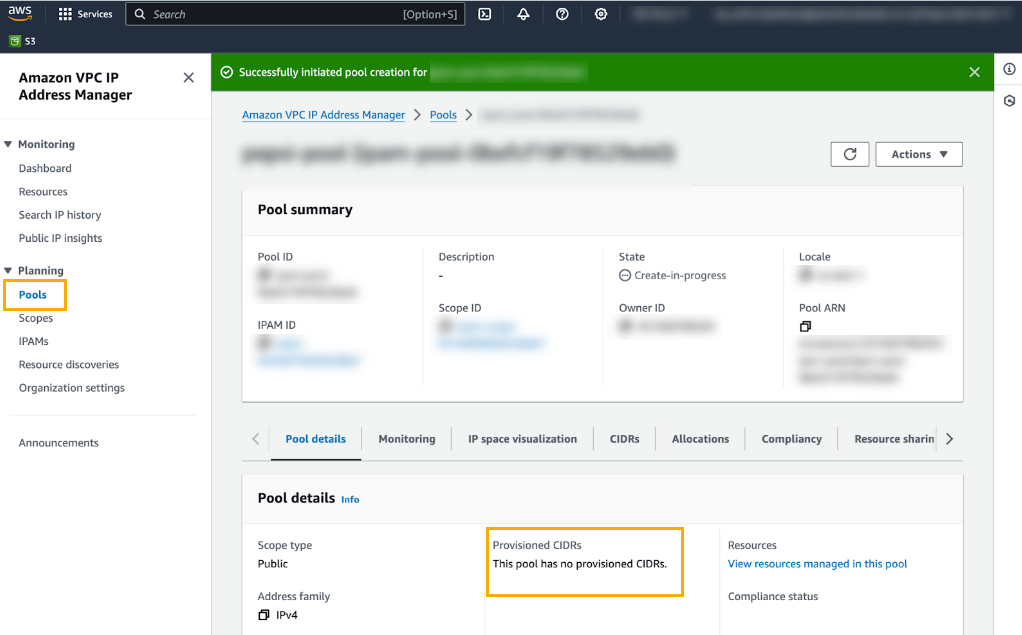
Create an IPAM pool to plan for IP address provisioning. Select Planning>Pools and click Create pool.When creating an IPAM pool, you must set the Address Family to IPv4, and set the Locale to where you want to deploy your Cloud NGFW resource, as illustrated in the Pool Hierarchy screen:![]() After you successfully create the IPAM, the AWS VPC IP Address Manager displays details about the new pool:
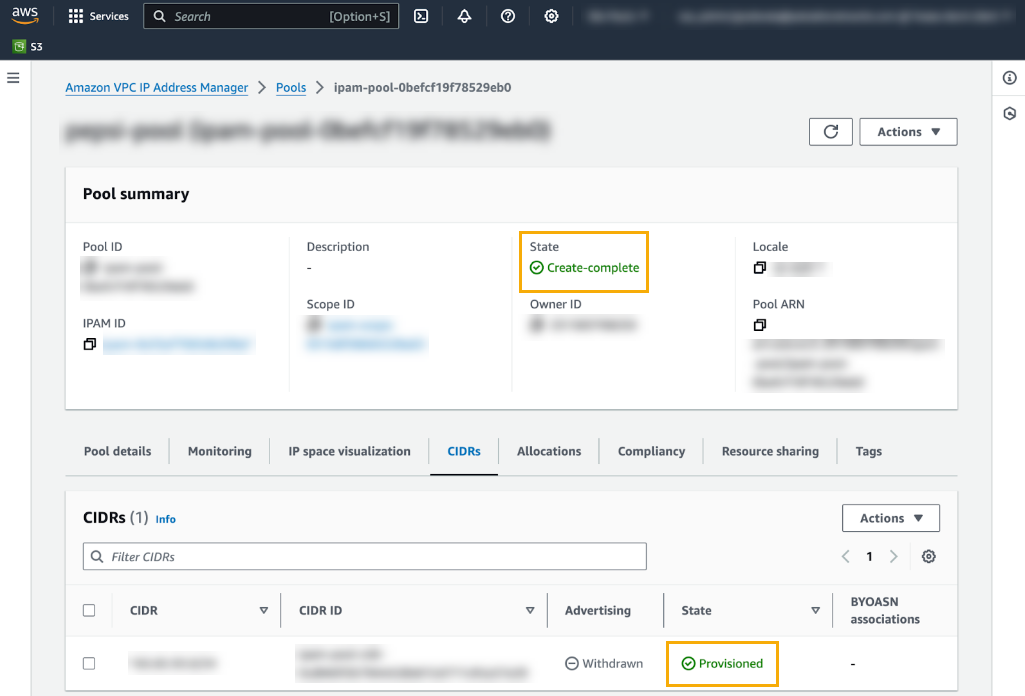
After you successfully create the IPAM, the AWS VPC IP Address Manager displays details about the new pool:![]() The newly created pool does not have CIDRs provisioned. You’ll need a public IP CIDR range and the corresponding certificate’s private key.Provision CIDRS to the newly created pool from the previous step. Select Planning>Pools then select the CIDR tab below the Pool Summary.Select Actions>Provision CIDR. You’ll use this process to retrieve a public IP CIDR range and the corresponding certificate’s private key. See Provision CIDRS to a pool for more information.In the CIDRs to provision, click Input a CIDR with a X.509 Certificate .Copy the Signature.Click Provision.Confirm that the CIDR is successfully provisioned, and that the pool was successfully created:
The newly created pool does not have CIDRs provisioned. You’ll need a public IP CIDR range and the corresponding certificate’s private key.Provision CIDRS to the newly created pool from the previous step. Select Planning>Pools then select the CIDR tab below the Pool Summary.Select Actions>Provision CIDR. You’ll use this process to retrieve a public IP CIDR range and the corresponding certificate’s private key. See Provision CIDRS to a pool for more information.In the CIDRs to provision, click Input a CIDR with a X.509 Certificate .Copy the Signature.Click Provision.Confirm that the CIDR is successfully provisioned, and that the pool was successfully created:![]() By default, when you add a CIDR to a pool it isn't advertised. Advertise it to make it publicly accessible over the internet. To advertise the CIDR:
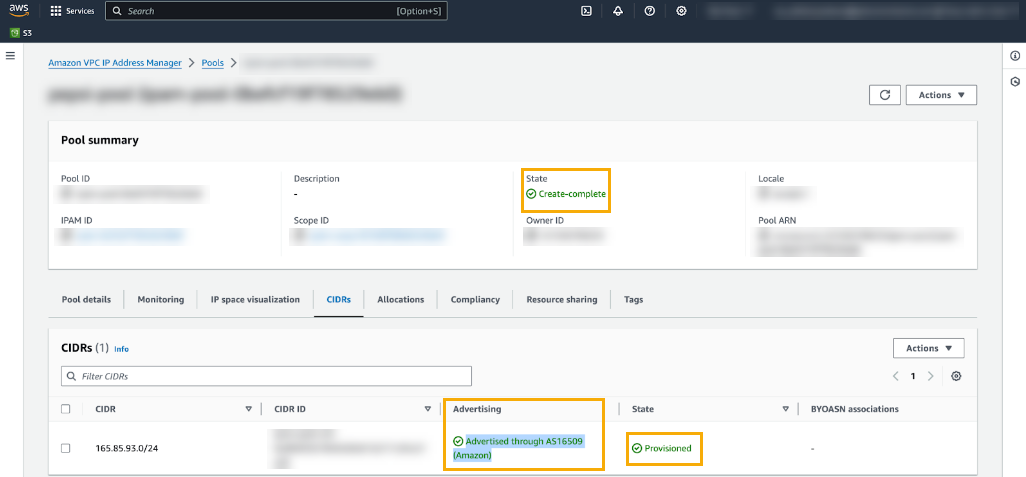
By default, when you add a CIDR to a pool it isn't advertised. Advertise it to make it publicly accessible over the internet. To advertise the CIDR:- Select the pool.Click the CIDR tab.In the Actions menu, select Advertise.In the Advertise CIDR menu, use the drop-down menu to select the appropriate ASN; click Advertise CIDR. For more information, see Advertise your CIDR.Confirm that the CIDR is successfully advertised:
![]() After advertising the CIDR, share the IPAM pool with your Cloud NGFW deployment account. To do this:
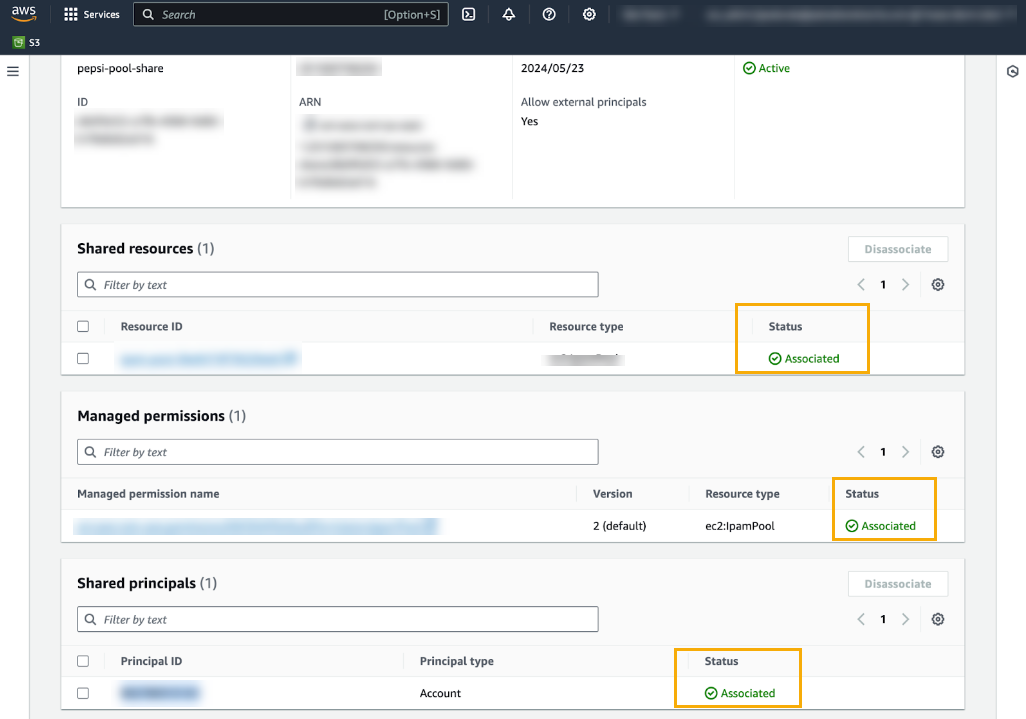
After advertising the CIDR, share the IPAM pool with your Cloud NGFW deployment account. To do this:- Select the pool.Click the Resource sharing tab.In the Resource sharing menu, select Create resource share.In the Resource share name menu, enter the name of the IPAM pool you want to share.Optionally add the ARN to the resource share name.Click Next.Grant access to principals.Review the resource share options and principals, then click Create. For more information, see Share an IPAM pool.Confirm that resources associated with the IPAM pool were successfully shared:
![]()
Create a Cloud NGFW Resource, Enable Egress NAT and Specify BYOIPs
After you complete the steps to create the IPAM pool, you create the Cloud NGFW resource, enable Egress NAT and specify BYOIPs.To configure Egress NAT using BYOIPs:- Log in to the Cloud NGFW console.Click NGFWs.Create a new NGFW resource.In the Policy Management section, select Panorama. Use the drop-down menu to select the integrated Panorama.In the Egress NAT section, select Enable Egress NAT.Select Bring Your Public IPs and enter the IPAM pool ID created in step 3 (above).The IPAM Pool ID is located in the IPAM Pool Details section.
![]() Select the Public IPs tab in the firewall page to view the list of supported IP addresses for Egress NAT traffic:
Select the Public IPs tab in the firewall page to view the list of supported IP addresses for Egress NAT traffic:![]() After the firewall is created, verify its status.To release addresses back to your IPAM pool if you choose not to use BYOIPs contact Palo Alto Networks to create a support case.
After the firewall is created, verify its status.To release addresses back to your IPAM pool if you choose not to use BYOIPs contact Palo Alto Networks to create a support case.


