Device Security
Vulnerabilities Page
Table of Contents
Expand All
|
Collapse All
Device Security Docs
Vulnerabilities Page
The Vulnerabilities page in the Device Security portal displays
detected vulnerabilities.
| Where Can I Use This? | What Do I Need? |
|---|---|
|
One of the following subscriptions:
|
The Vulnerabilities page lists the vulnerabilities that Device Security has detected or learned
about through a third-party integration.
In Device Security in Strata Cloud Manager, you can find the Vulnerabilities page at
RisksVulnerabilties. In the Device Security portal, the Vulnerabilities page is at
VulnerabilitiesVulnerability OverviewAll Vulnerabilities.
You can search for a text string in any of the columns, download
the list of vulnerabilities, create a filter to show only the vulnerabilities
you want to see, and control which columns you want to show and
hide.
Although the Severity column in the table shows only icons,
you can still search by the severity level words Critical, High,
Medium, and Low.
You can also set the number of rows you want to see on each page
(from 5 to 200) and navigate among multiple pages.

| CVSS Score Range | Severity Level |
|---|---|
| 9.0 – 10.0 | Critical |
| 7.0 – 8.9 | High |
| 4.0 – 6.9 | Medium |
| < 4.0 | Low |
While a severity level in the Device Security system reflects a Common Vulnerability Scoring
System (CVSS) score, there isn’t always a direct correlation between the two.
Device Security bases the severity level not only on the CVSS score but on other determing
risk factors as well. For
example, a hard-coded password in a device might have a CVSS score of 10.0, but an Device Security severity level of High rather than Critical. This can happen when
there isn’t proof that the device can be accessed from the Internet or by an
unauthorized user. While the National Institute of Standards and Technology (NIST)
assigns a CVSS score to a vulnerability generically, Device Security assigns a “risk
severity” level to vulnerabilities based on the specifics of each case.

The Vulnerabilities table columns are organized into five categories: Risk, Basic, Vulnerability
Metrics, Threat Metrics, and Impact Metrics. While the Risk and Basic categories each
contain a single column, the three metrics categories each contain a group of columns.
You can click-drag columns to rearrange them within their respective groups or
click-drag the groups to rearrange their order on the table. However, you can't
click-drag columns outside of their groups while grouping is enabled. To disable
grouping, click the three vertical dots icon above the table on the right and click
Ungroup columns. With the columns ungrouped, you can
reposition them so that they mingle with columns that were previously separated into
other groups.
As with other tables in the Device Security portal, you can control which columns are shown.
Click the three vertical dots above the table on the right, click Edit
columns, and then select the columns you want to see and clear the ones
you want to hide.

Risk – The risk is a sort of ranking of the potential danger a vulnerability
poses. It's the result of various factors that, when combined, help you prioritize which
vulnerabilities to watch and address.
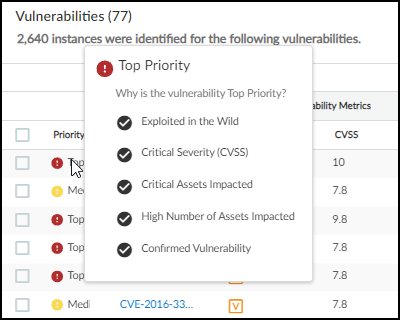
- Priority – Device Security determines a ranking of Top, Medium, and Low by weighing various factors that calculate the likelihood of an attack and the impact it would pose on your resources. Hover your cursor over a priority to see a summary of the indicators of risk that contribute to its ranking.
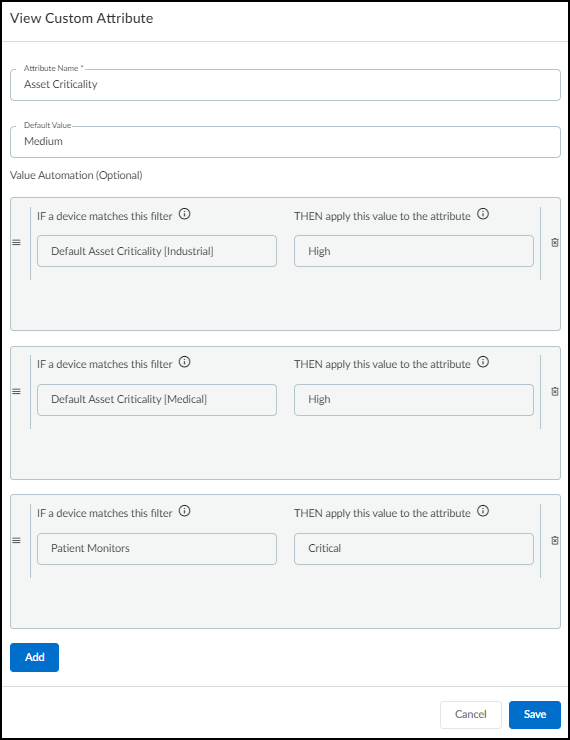
![]() When Processing... is displayed here, it indicates that Device Security is still determining the priority of a vulnerability. Because Device Security runs a service to determine priority on a daily basis, it can take up to 24 hours to determine the priority of a device.Device Security automatically assigns a high asset criticality level to industrial and medical devices and a medium level to all other devices by default. It does this through the system-defined Asset Criticality attribute, which you can see in SettingsCustom Attributes. You can also define filters on AssetsDevices and add them to the Asset Criticality attribute to assign different asset criticality levels to devices based on attributes such as device category, profile, or vendor. For example, you might first define a filter for patient monitor profiles on AssetsDevices and then add a rule to the system-defined Asset Criticality attribute, the rule stating that if a device matches the filter for patient monitor profiles, then Device Security will apply an asset criticality level of Critical to it.
When Processing... is displayed here, it indicates that Device Security is still determining the priority of a vulnerability. Because Device Security runs a service to determine priority on a daily basis, it can take up to 24 hours to determine the priority of a device.Device Security automatically assigns a high asset criticality level to industrial and medical devices and a medium level to all other devices by default. It does this through the system-defined Asset Criticality attribute, which you can see in SettingsCustom Attributes. You can also define filters on AssetsDevices and add them to the Asset Criticality attribute to assign different asset criticality levels to devices based on attributes such as device category, profile, or vendor. For example, you might first define a filter for patient monitor profiles on AssetsDevices and then add a rule to the system-defined Asset Criticality attribute, the rule stating that if a device matches the filter for patient monitor profiles, then Device Security will apply an asset criticality level of Critical to it.![]() You can also edit asset criticality for an individual device on its Device Details page. Click Edit in the Custom Attributes section and change the Asset Criticality field to the level you want.
You can also edit asset criticality for an individual device on its Device Details page. Click Edit in the Custom Attributes section and change the Asset Criticality field to the level you want.
Basic – This is the name of a vulnerability.
- Vulnerability Name – The name or Common Vulnerabilities and Exposures (CVE) number of a vulnerability. This links to the Vulnerability Details page.
Vulnerability Metrics – These metrics are about vulnerabilities and the attacks
that exploit them
- Severity – The severity level of a vulnerability: critical, high, medium, or low.
- CVSS – The CVSS (Common Vulnerability Scoring System) score of a vulnerability.
- Vulnerability Type – (Not shown by default) This identifies the type of vulnerability, such as Info Leak, Overflow, or Code Execution.
- Vulnerability Source – (Not shown by default) The source that identified the device vulnerability: Device Security, a third-party integration (Rapid7, Qualys, Tenable), or Device Security Device Software Library.
- Attack Vector – (Not shown by default) Also referred to as "Access Vector", this is the type of access an attacker must have to exploit a vulnerability. The metric values are defined in the CVE. The vulnerability score increases as the possible distance from the target increases:
- Physical – An attacker must physically touch or control the vulnerable device.
- Local – An attacker must launch an exploit locally or use social engineering to dupe a user into helping launch it.
- Adjacent – An attacker must have access to the same physical or logical network as that of the vulnerable device.
- Network – An attacker can launch an exploit remotely from anywhere on a network that can access the vulnerable device.When an attack vector is not defined, it's classified as "Unknown".
- Attack Complexity – (Not shown by default) Indicates the level of complexity required to exploit a vulnerability "Low" or "High".
- Privilege Required – (Not shown by default) Indicates the level of administrative privilege necessary to execute an exploit on the vulnerability, which can be "None", "Low", or "High".
- User Interaction – (Not shown by default) Whether a user, other than the threat actor, must participate in exploiting a vulnerability in some way. The values shown here are "None" or "Required".
- Confidentiality Impact – (Not shown by default) Whether sensitive information would be accessible to an attacker exploiting the vulnerability and the degree of sensitivity that might be disclosed. The values are "None", "Low", and "High".
- Integrity Impact – (Not shown by default) Whether protected information might be altered in any way. The values are "None" (no loss of data integrity), "Low" (a small amount of data can be modified), and "High" (any or all data can be modified).
- Availability Impact – (Not shown by default) Whether an exploit of the vulnerability makes data or devices inaccessible. The values are "None" (no loss of availability), "Low" (either poor performance or occasional loss of accessibility), and "High" (complete loss of accessibility).
Threat Metrics – These metrics focus on the threat that vulnerabilities pose to
the security of your network and the devices on it.
- EPSS – The Exploit Prediction Scoring System (EPSS) provides a daily estimate of the probability that a vulnerability will be exploited within the next 30 days. To learn more about EPSS, see the EPSS Model.
- Exploit Status – (Not shown by default) Shows if a proof of concept has been identified for the vulnerability ("POC") or not ("Unknown").
- APTs – (Not shown by default) Shows if there have been any known exploits of a vulnerability for Advanced Persistent Threats (APTs). The values are "Yes" or "No".
- Covered by Threat Prevention – (Not shown by default) Indicates if a vulnerability is covered by the Palo Alto Networks Threat Prevention application ("Yes") or not ("No").
Impact Metrics – These metrics provide insight into how extensive and severe the
impact would be of an exploited vulnerability.
- Confirmed – Indicates if a vulnerability is confirmed to apply to one or more devices. An empty field indicates that it is a potential vulnerability.
- Confirmed Instances – The number of devices to which a vulnerability is confirmed to be applicable. This number links to the Vulnerability Details page.
- Potential Instances – The number of devices to which a vulnerability might be applicable but has not been confirmed. This number also links to the Vulnerability Details page.
- Addressed Instances – (Not shown by default) The number of instances of the vulnerability that have been addressed.
- Critical Assets Impacted – The number of assets categorized as critical that the vulnerability impacts.
- Vulnerable Profiles – The number of device profiles to which a confirmed or potential vulnerability applies.
When you hover your cursor over an entry in the Vulnerability
column, a panel pops up with showing its description and impact.

Clicking the name of a vulnerability entry opens the Vulnerability Details page.


