Strata Cloud Manager
Migrate from Panorama to Strata Cloud Manager
Table of Contents
Expand All
|
Collapse All
Strata Cloud Manager Docs
Migrate from Panorama to Strata Cloud Manager
Learn about migrating your Prisma Access or NGFW deployments from Panorama to Strata
Cloud Manager using the automated migration workflow.
| Where Can I Use This? | What Do I Need? |
|---|---|
|
Migrating NGFWs:
Migrating Prisma Access:
|
Migration from Panorama to Strata Cloud Manager is now available for both Prisma
Access and NGFW deployments, allowing you the benefits of cloud management and
shared configuration management in the cloud environment. The migration process
addresses considerations such as configuration preservation and policy
continuity.
For NGFW deployments, you can follow this workflow to review configuration
compatibility, even if you're not yet ready to migrate. You can decide to trim or
accept any features that aren't supported or are partially supported for Strata
Cloud Manager configuration management. During migration, Strata Cloud Manger
converts Panorama device group hierarchies into corresponding Strata Cloud Manager
folder structures, and converts Panorama templates and template stacks into reusable
snippets.
For Prisma Access deployments, migrations focus on preserving your remote access
infrastructure, mobile user configurations, and site-to-site connectivity while
transitioning management oversight to Strata Cloud Manager.
Migrate From Panorama to Strata Cloud Manager (NGFW)
Learn about the migration process for migrating your NGFW deployments from Panorama to
Strata Cloud Manager.
You can migrate your existing NGFW configurations from Panorama to Strata Cloud
Manager for cloud-based configuration management.
During the migration, Strata Cloud Manager:
- Copies and translates supported security policies, network configurations, and objects.
- Maintains existing network topology and NGFW deployments.
- Highlights areas that are partially supported or unsupported.
Contact your Palo Alto Networks account team to enable migration workflow.
Managing your NGFWs using Strata Cloud Manager instead of Panorama can offer you benefits such
as unified management for Prisma Access and NGFWs, cloud-native scalability of your
network, and enhanced visibility.
Strata Cloud Manager guides you through migrating your configurations with these
key steps:
- Upload existing configurations — Import your current Panorama configurations.
- Run compatibility assessment — Identify unsupported features or configurations that need attention.
- Perform validation and prepare for deployment — Complete final checks before migration.
- Migration control — Devices and device groups can be migrated in phases, allowing you to migrate non-critical devices or go site-by-site.
Review results at each step, make necessary adjustments, and verify that your
configurations are fully compatible with Strata Cloud Manager before completing the
migration.
How Configuration Management Changes When You Move from Panorama to Strata Cloud Manager
Panorama configuration management is based on:
- Device Groups — Organize firewalls into hierarchical groups for security policy management (security rules, NAT policies, application filters).
- Templates and Template Stacks — Define network and device settings (interfaces, zones, routing, system settings).
- Inheritance — Device Groups inherit policies from parent groups; Template Stacks layer multiple templates with override capabilities.
Strata Cloud Manager configuration management is based on:
- Folders — Hierarchical containers that hold both security policies AND network configurations.
- Snippets — Reusable configuration blocks that can be attached to folders at any level.
- Containers — Device-specific configuration holders for unique firewall requirements .
During migration, Strata Cloud Manager converts your Panorama-based
configuration and builds it into folders and snippets:
| Panorama | Strata Cloud Manager |
|---|---|
| Device Groups | Folders |
| Templates & Template Stacks | Snippets |
| Shared DG | All Firewalls Folder |
| Shared Objects | Global folder as an attached Snippet |
| Policies in Device Groups | Policies under mapped Folder(s) |
| Objects (addresses, EDLs, etc.) | Objects under mapped Folder(s) |
Key difference between Panorama and Strata Cloud Manager to keep in mind:
- Strata Cloud Manager Folders contain both network and security configurations, while Panorama separates these between Templates and Device Groups
- Strata Cloud Manager Folders provide more flexible inheritance with Snippet-based overrides versus the lower-level group overrides seen in Panorama
- Strata Cloud Manager Snippets provide a more plug-and-play approach to configurations compared to Panorama's Templates and Template stacks that are inherited down the stack.
After migration, you manage configurations through the folder and snippet
model. Snippet attachment order determines configuration precedence, providing granular
control over how multiple configuration sources combine. You can also create
device-specific containers for NGFWs requiring unique configurations outside the folder
inheritance model.
Additional Resources
Learn more about Device Groups and Templates.
Prepare to Migrate Your NGFWs to Strata Cloud Manager
Before beginning the migration, ensure you have the following items ready:
- Minimum Software Requirements: PAN-OS 10.2.3 or later
- Export Panorama Configuration File: Export the complete running configuration from your source Panorama instance in XML format
- Panorama Master Key: Obtain the master key used for encryption in your Panorama configuration (if not using the default key)
- Strata Cloud Manager Tenant: Verify that your Strata Cloud Manager tenant is deployed, properly licensed, and operational
- NGFW Configuration: Collect the last-pushed configuration files (Technical Support Files) from NGFWs you plan to validate post-migration
- Network Topology: Review your current device group hierarchies, template relationships, and NGFW assignments
- Configuration Backup: Create complete backups of your current Panorama and NGFW configurations as a safety measure
- Administrative Access: Ensure you have access to the Superuser role in both Panorama and Strata Cloud Manager.
- Migration Planning: Identify which device groups, templates, and NGFWs you want to migrate in your initial phase
- Compatibility Matrix: Understand which features may not be supported in Strata Cloud Manager and plan for any necessary configuration adjustments
Migrate Your Panorama Managed NGFWs to Strata Cloud Manager
Migrate your NGFW configurations from Panorama to Strata Cloud Manager:
- Prepare your Panorama for the migration.
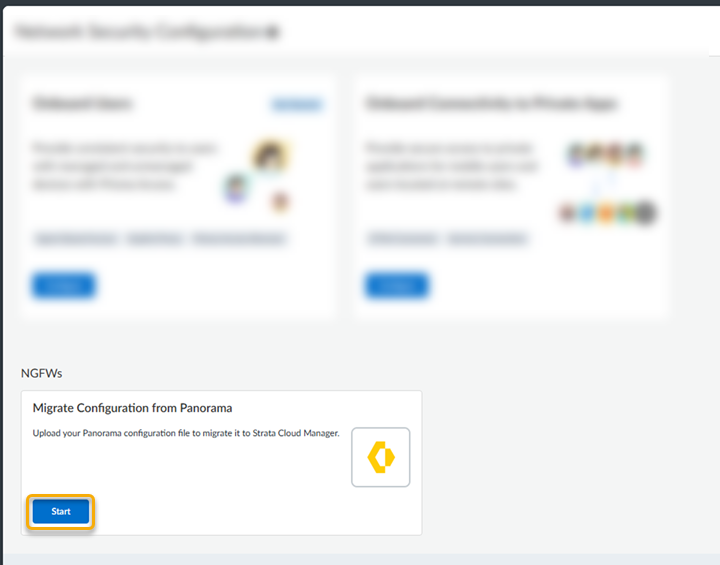
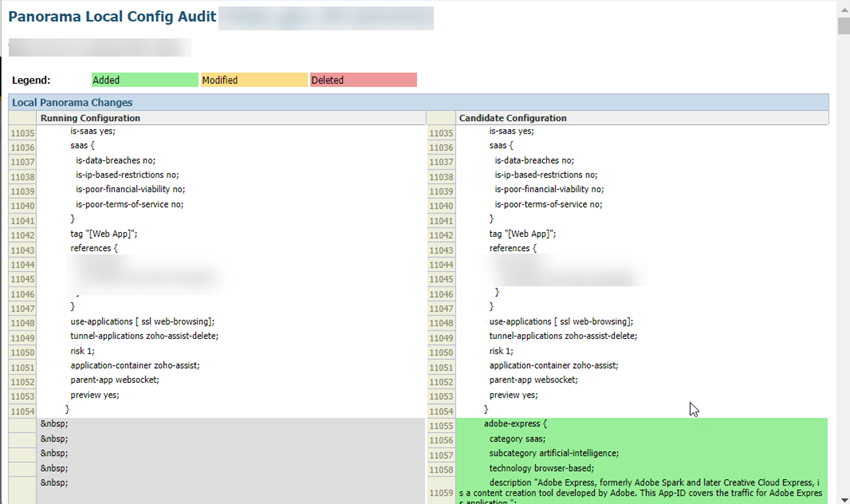
- Log in to the Panorama that manages your NGFWs with an administrative account that is assigned the Superuser role.(Optional) If you have configured a custom Master Key for Panorama, make a note of it.If your deployment uses the default Master Key, this step isn't required.Ensure that your current Panorama configuration is up to date and that you have committed and pushed all your current changes to Panorama by going to CommitCommit & Push and Preview Changes.(Optional) Check the diffs between the running configuration and the candidate configuration and determine whether you want to push those changes. To commit and push the changes, Edit Selections and select the NGFWs you want to push in the Push Scope.(Optional) Commit and Push your changes.Go to PanoramaSetupOperations and Export the named Panorama configuration snapshot.The .xml file is required to upload to Strata Cloud Manager during the migration process. Don't upload a techsupport file or any other file except an .xml configuration file.Select the running-config.xml configuration file and click OK.Log in to Strata Cloud Manager as an administrator with a Superuser role and go to ConfigurationOnboarding.
![]() The migration program detects that you have a Panorama managed deployment.
The migration program detects that you have a Panorama managed deployment.- Confirm the tenant is correct.
- (Optional) Create a Named Snapshot of your running configuration in the event that a rollback is necessary.
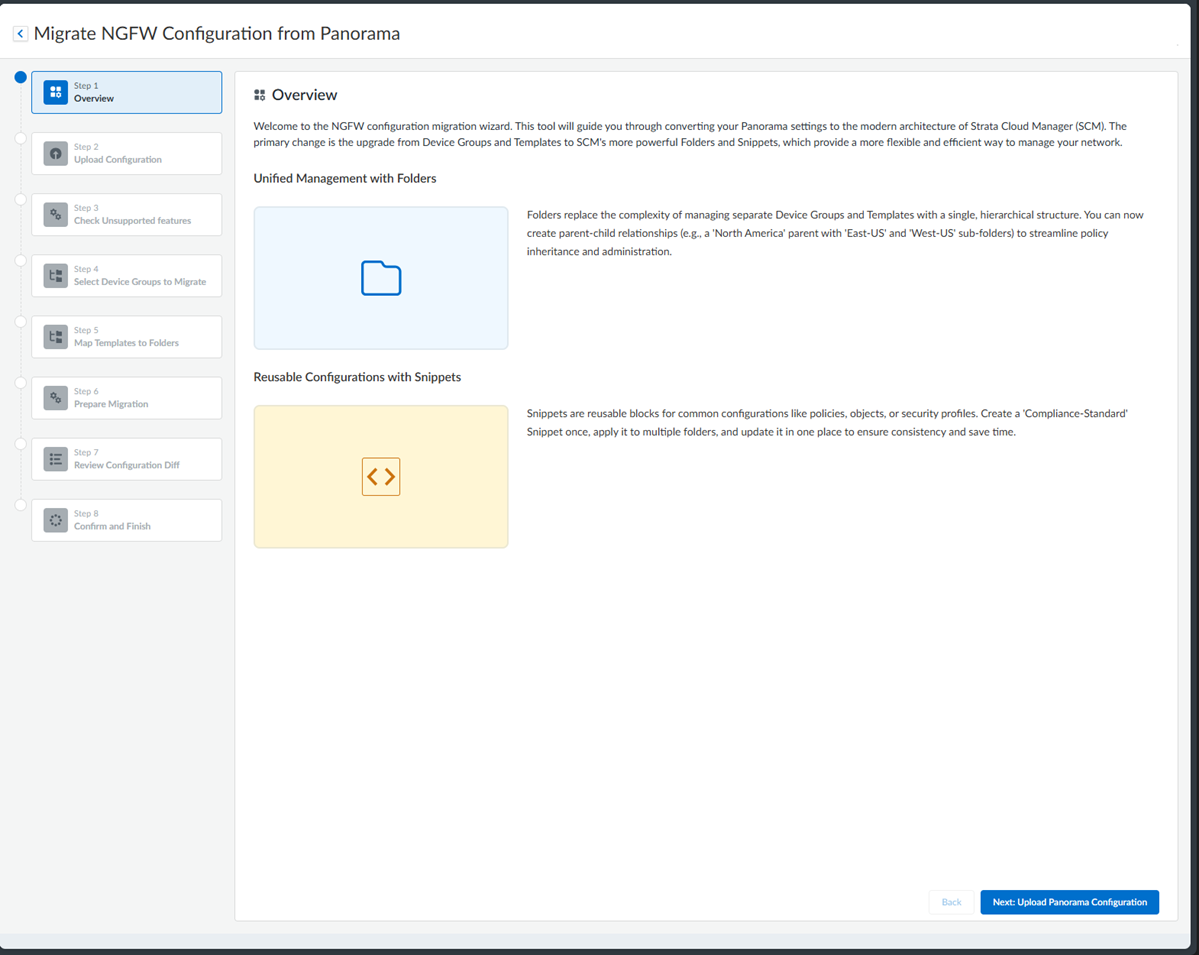
Migration should not be attempted during an Strata Cloud Manager upgrade window. Check your upgrade schedule to see if you have an upcoming upgrade.Read the migration Overview.![]()
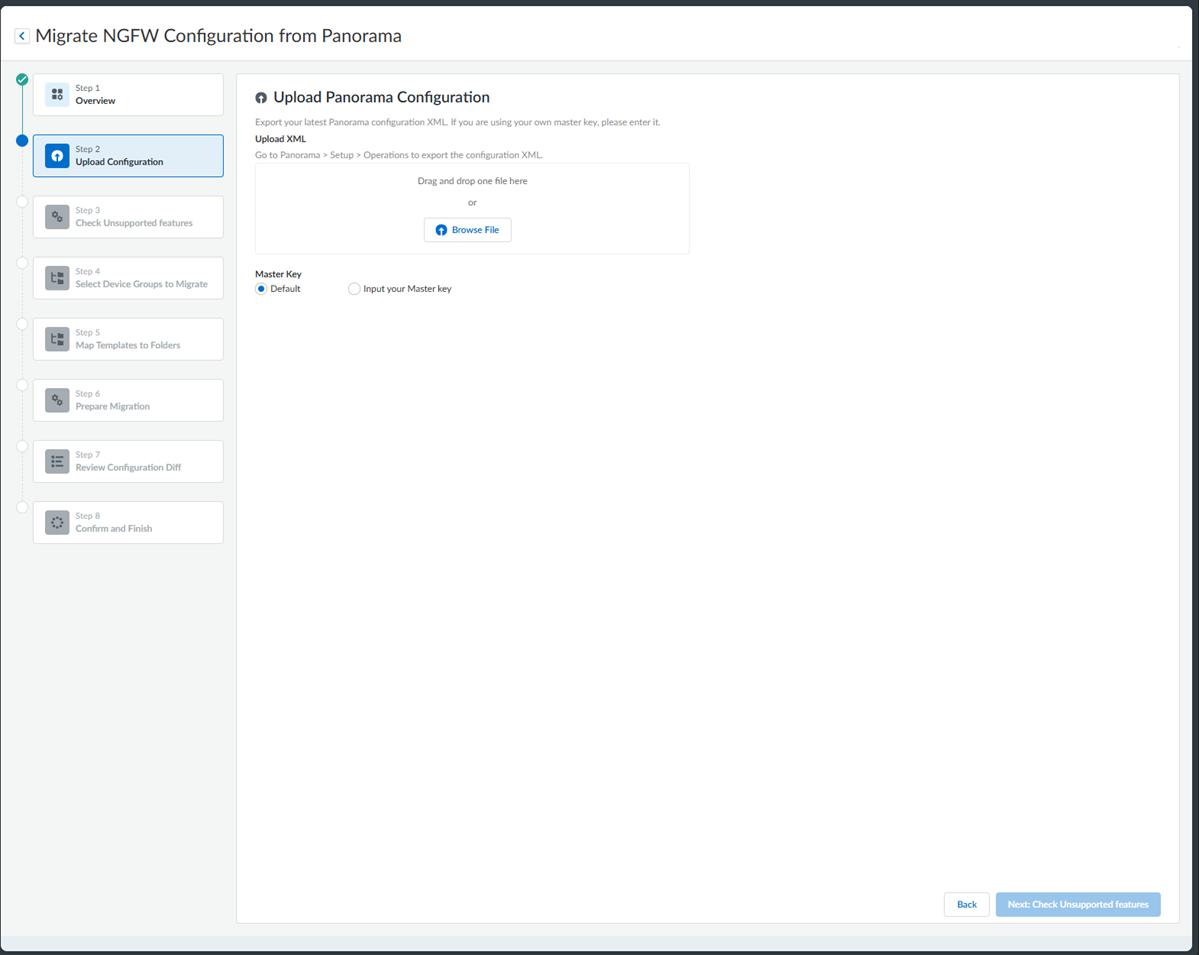
- Review the management building blocks of Strata Cloud Manager: Folders and Snippets.Click Next: Upload Panorama Configuration.Upload the Panorama configuration.
![]()
![]()
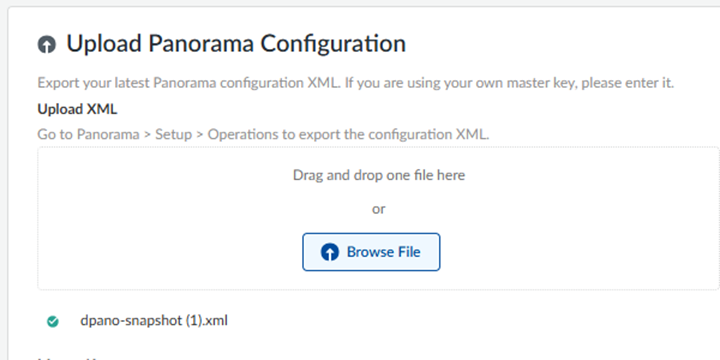
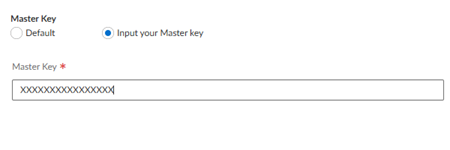
- Select the Panorama configuration .xml file you downloaded in an earlier step by dragging and dropping it from your file explorer or selecting Choose File.(Optional) Input your Master Key or, if you did not create a custom master key, use the Default one.
![]() Click Next: Review Migration Compatibility.Review the configuration compatibility.
Click Next: Review Migration Compatibility.Review the configuration compatibility.![]()
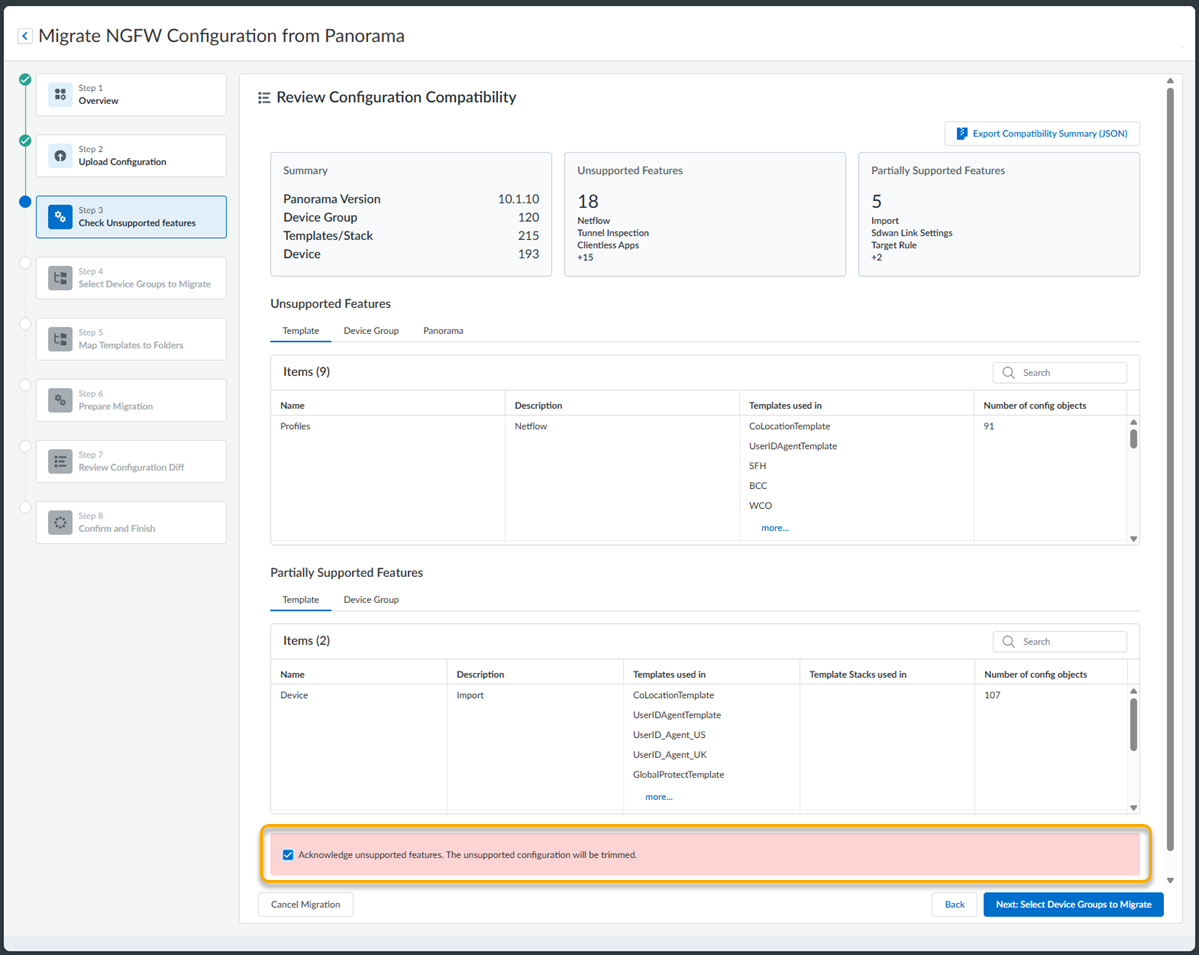
- (Optional) Export Compatibility Summary and review your organization’s configuration compatibility before continuing and allowing Strata Cloud Manager to trim any unsupported or partially supported configurations.The trimming of unsupported and partially supported features avoids migrating features that cannot be deployed safely or securely in Strata Cloud Manager.This process will only impact the staged configuration for Strata Cloud Manager. The configurations in Panorama will remain unaffected.For each flagged area, you should plan to rebuild, replace, or defer those configurations.
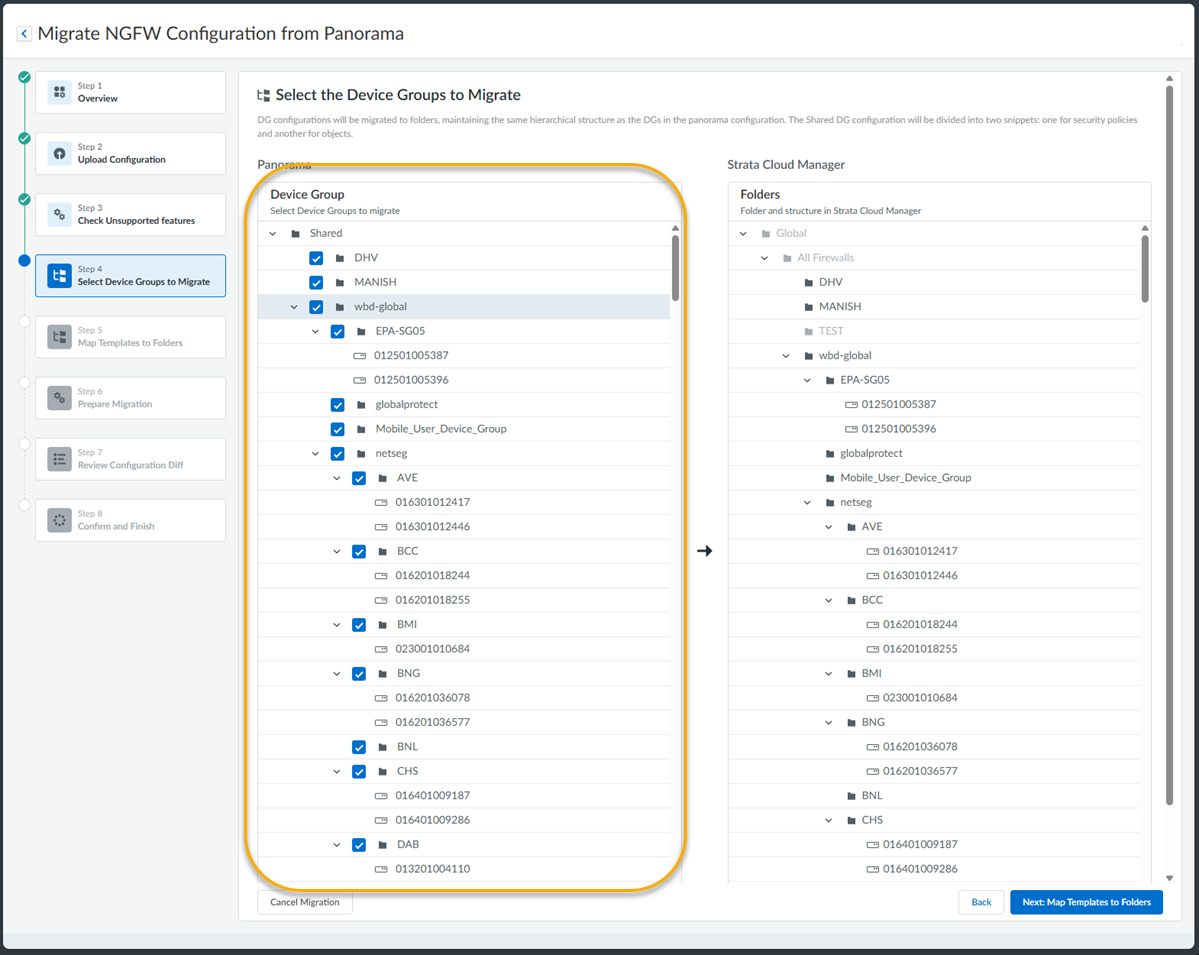
![]() Review the Unsupported Features that will be trimmed from your configuration during the migration.These features will be trimmed from your configurations and will not be staged in Strata Cloud Manager during the configuration migration process.Review the Partially Supported Features and determine a resolution path.Identify what exactly is going to be missing from the configuration.You can accept the partially supported features and build a remediation plan post-migration or return to your Panorama configuration and clean these areas up before starting the migration process again.Acknowledge the unsupported and partially supported features.Click Next: Select Device Groups to Migrate.For those just looking to compare supported configurations, or if it is decided than more planning is needed, you can end the migration process here.Select the Devices or Device Groups you would like to migrate.If you are migrating NGFWs from Panorama for the first time, it is recommended to only migrate non-critical devices or device groups first to test how your configurations will be migrated to Strata Cloud Manager.
Review the Unsupported Features that will be trimmed from your configuration during the migration.These features will be trimmed from your configurations and will not be staged in Strata Cloud Manager during the configuration migration process.Review the Partially Supported Features and determine a resolution path.Identify what exactly is going to be missing from the configuration.You can accept the partially supported features and build a remediation plan post-migration or return to your Panorama configuration and clean these areas up before starting the migration process again.Acknowledge the unsupported and partially supported features.Click Next: Select Device Groups to Migrate.For those just looking to compare supported configurations, or if it is decided than more planning is needed, you can end the migration process here.Select the Devices or Device Groups you would like to migrate.If you are migrating NGFWs from Panorama for the first time, it is recommended to only migrate non-critical devices or device groups first to test how your configurations will be migrated to Strata Cloud Manager.![]() During the migration:
During the migration:- Objects are imported to a Snippet and attached to the Global folder.
- Policies are imported under the Folder(s) migrated by the workflow.
- Shared Device Groups are automatically mapped to the All Firewalls Folder.
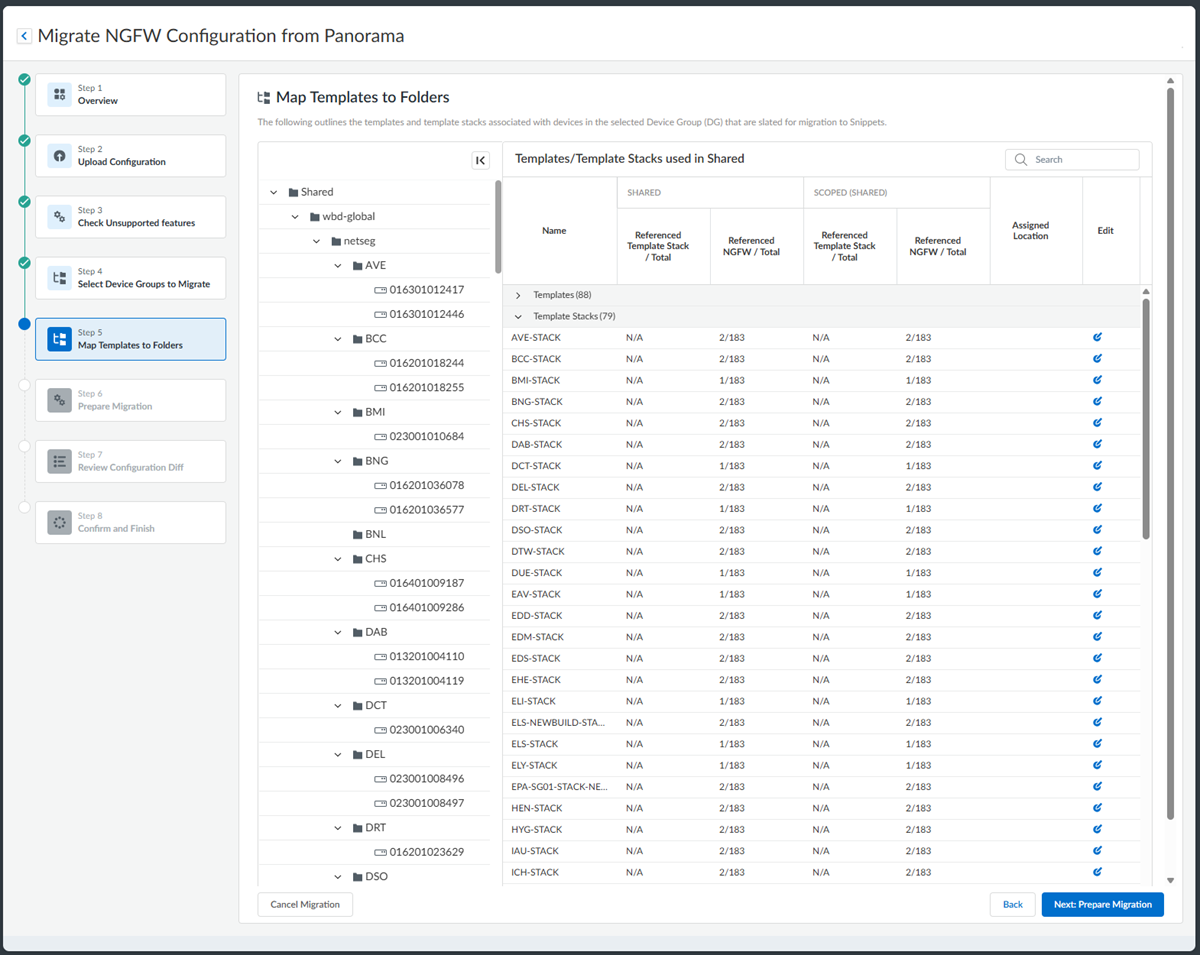
After selecting the devices, click Next: Map Templates to Folders.Map Templates to your newly configured Folders.![]() You can choose between two template mapping options:
You can choose between two template mapping options:- Auto Template Mapping: Automatically associate template and template stack configurations with folders after migration to snippets. This feature eliminates the need for manual configuration mapping and reduces the iterative process that you typically face during the migration workflow.Strata Cloud Manager processes the entire Panorama configuration, even when you only select a subset of device groups for migration. This comprehensive analysis prevents issues in subsequent device group migrations; however, it may extend the processing time for the initial migration.
- Manual Template Mapping: Manually associate template and template stack configurations with folders after migration to snippets.
- During migration, Device Groups are transformed into folders, while templates and template stacks are converted into configuration snippets.
- If two or more Device Groups reuse the same template, elevate it to a higher folder. If only one site requires it, keep it at the site level.
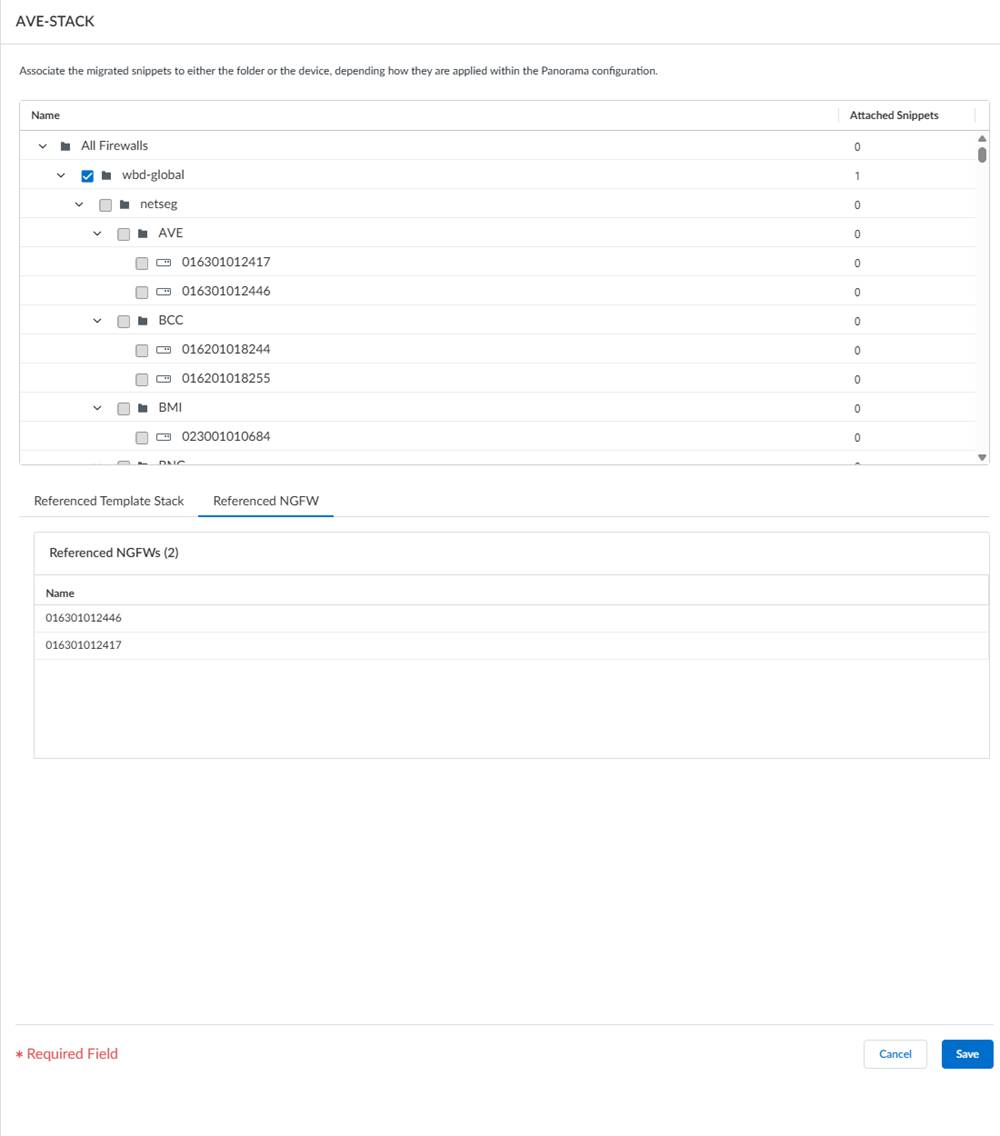
Here is the procedure to manually associate templates:- Select a Device Group to reveal the Templates/Template Stacks used by that device group.
![]() Edit the mapping to assign each Template/Template Stack to a Folder.Elevate templates referenced in multiple places to higher folders.For example, if you have global template settings, mapping them to the All Firewalls folder establishes those settings as the source of truth for all NGFWs.After assigning more than one Snippet to a Folder, adjust the order.Move Up or Move Down to finalize the order.Update the order.Save the new order.Before moving on to the next step, ensure the following:
Edit the mapping to assign each Template/Template Stack to a Folder.Elevate templates referenced in multiple places to higher folders.For example, if you have global template settings, mapping them to the All Firewalls folder establishes those settings as the source of truth for all NGFWs.After assigning more than one Snippet to a Folder, adjust the order.Move Up or Move Down to finalize the order.Update the order.Save the new order.Before moving on to the next step, ensure the following:- No unassigned templates or template stacks remain.
- Any templates referenced by multiple device groups have been elevated to the proper folders.
Click Next: Prepare Migration.The migration process begins.Wait for all steps to be completed.If there are any issues with the migration, return to the previous steps to evaluate and make changes. If issues continue to persist, please contact Palo Alto Networks Support.Prepare to migrate.- Load Configuration to Strata Cloud Manager to prepare to migrate.
- The migration worfklow:
- Translates Devices and Device Groups and Templates and Template Stacks to Folders and Snippets using the mappings and snippets order defined by you.
- Creates a Strata Cloud Manager snapshot to enable rollback of staged changes.
- Checks for conflicts in existing Strata Cloud Manager configurations (name collisions, missing references, 31-character limits, RBAC scope).
- Builds the staged configuration that will be in Strata Cloud Manager post-load.
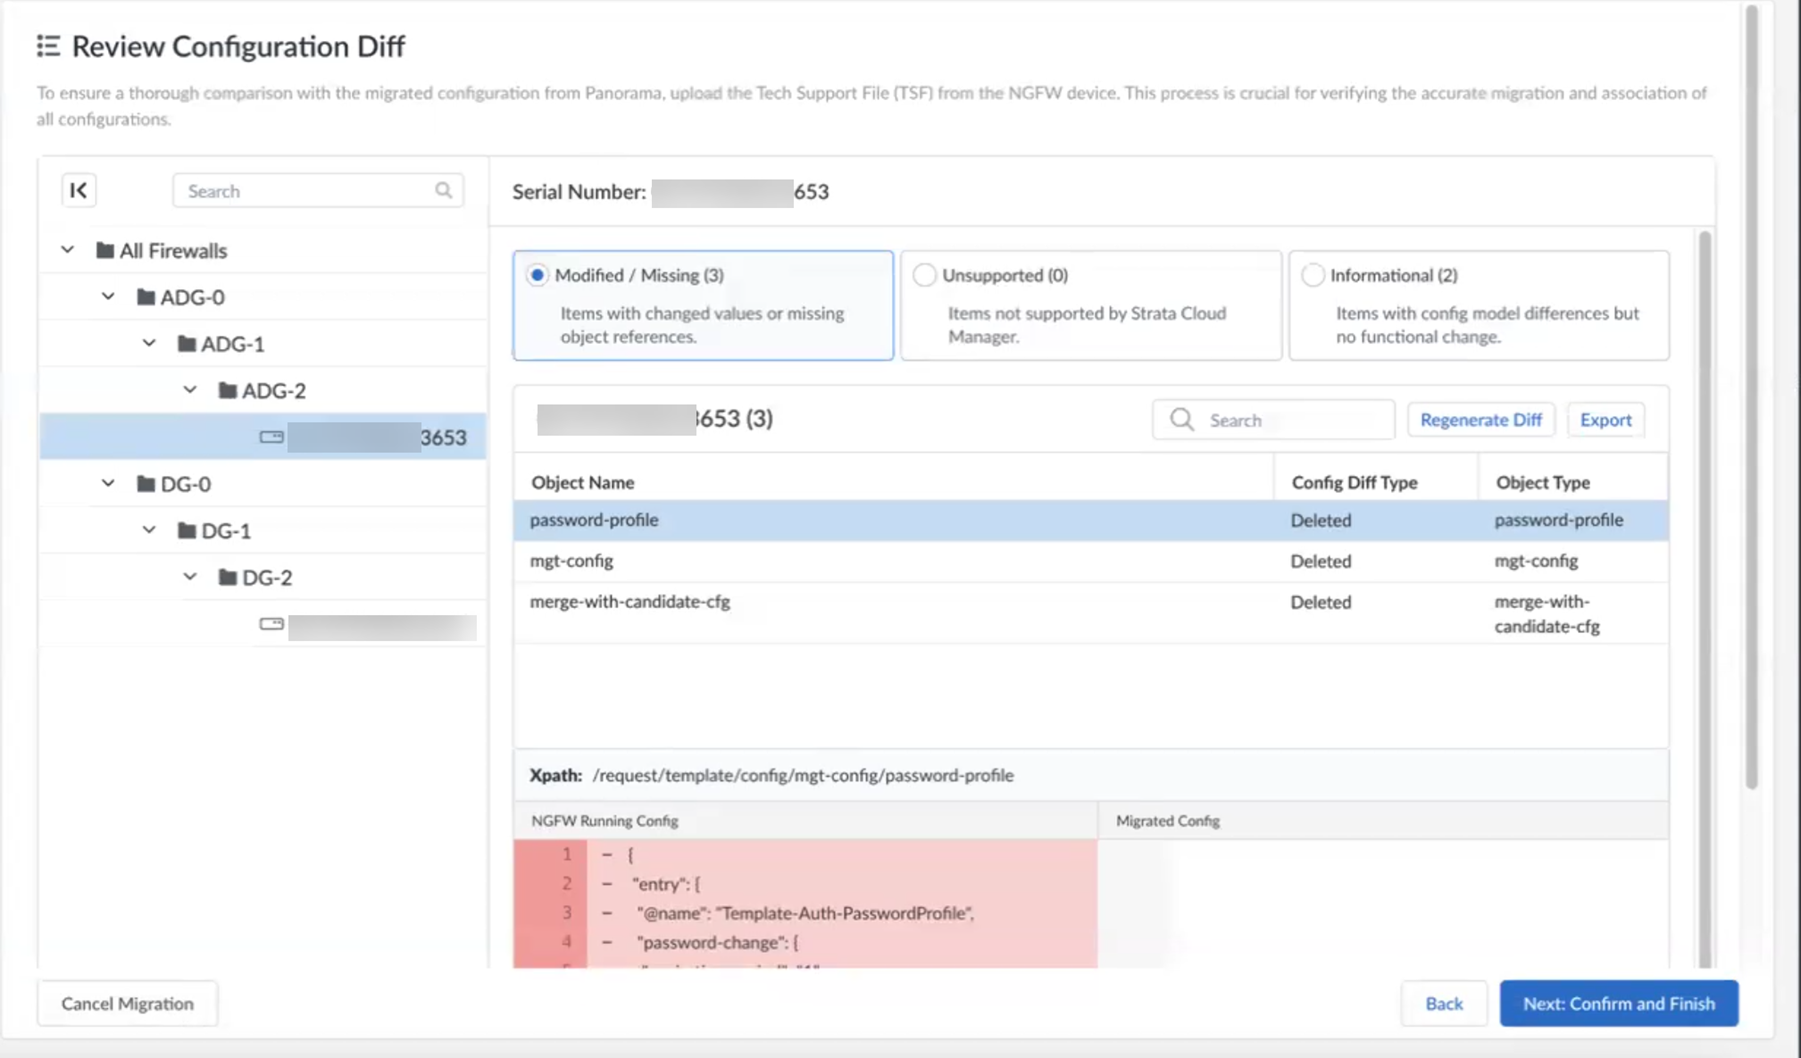
Load Results and review what objects, policies, or snippets were created, updated, or skipped.Review the Validation Results for any errors, warning, and informational messages post migration.Click Next: Review Config Diffs.This commits the newly generated configuration to Strata Cloud Manager.Review the configuration diffs.- In the left folder tree, expand to the Folder and select an NGFW serial number to be validatedBrowse File and choose the TSF for the selected serial number.Uploading the TSF for the chosen NGFW will allow you to properly validating all the supported, partially supported, and unsupported configurations.Strata Cloud Manager categorizes configuration diffs into three groups:
- Modified/Missing: Represents changes to existing objects during the migration process. It can be items with changed values or missing object references.
- Unsupported: Represents items that cannot be migrated due to feature parity gaps between Panorama and Strata Cloud Manager, detected using predefined parity checks.
- Informational: Represents changes where object functionality remains the same but names or references have been automatically updated to comply with Strata Cloud Manager naming conventions. For example, profile names.
Be sure to look for anything that has been created, modified, or deleted. Configurations being trimmed should not come as a surprise. You can use the search functionality to locate specific configuration elements by name, object type, or difference category, streamlining the review process for migrations with extensive configuration differences.Because of naming conventions in Strata Cloud Manager, some long names will be compressed when needed.![]() Review the configuration diff panes.
Review the configuration diff panes.- Green Panes: Created or added. They are present in Strata Cloud Manager, but not on the original device.
- Red Panes: Deleted or trimmed. May not be supported in Strata Cloud Manager, but are on the device.
- Yellow Panes: Modified.
The diff view may be extensive, limited to one NGFW at a time, and calculated from the last pushed XML from the TSF.Verify the diffs for representative devices from each pattern or site type.(Optional) Export the diff results.(Optional)Regenerate Diffs if any corrections have been made.Click Next: Confirm and Finish.Confirm and finish your migrations of NGFWs to Strata Cloud Manager.Now that your migration is complete, review the available documentation for Strata Cloud Manager.- Ensure the results from Steps 8 and 9 are accepted.Confirm the migration.This officially marks the migration as complete.(Optional) To revert the configuration to its pre-migration state at any point, select Revert. This initiates a rollback workflow, restoring Strata Cloud Manager to a Snapshot taken before the migration was loaded.(Optional) To cancel the migration at any point, select Cancel Migration. This aborts the migration process and cleans up any temporary changes.
Migrate from Panorama to Strata Cloud Manager (Prisma Access)
Learn about the migration process for migrating your Prisma Access deployments from Panorama to Strata Cloud Manager.If you have an existing Prisma Access Deployment for which the configuration is managed by Panorama and want to migrate to Strata Cloud Manager for configuration management, Palo Alto Networks offers an in-product workflow that lets you migrate your existing Prisma Access configuration to Strata Cloud Manager.To enable migration workflow, you must contact your Palo Alto Networks account team.Managing your Prisma Access configuration using Strata Cloud Manager instead of Panorama can offer you benefits such as:- Continuous best practice assessments
- Secure default configurations
- Machine Learning (ML)-based configuration optimization
- Streamlined web security workflows
- An interactive visual summary (Command Center) that helps you to assess the health, security, and efficiency of the network
- Intuitive workflows for complex tasks
- Simple and secure management APIs
- Cloud-native architecture provides scalability, resilience, and global reach
- No hardware to manage or software to maintain
Prepare to Migrate to Prisma Access (Managed by Strata Cloud Manager)
Before you start your migration, you should be aware of the minimum software requirements and the types of Prisma Access (Managed by Panorama) deployments you can migrate. - When to Migrate—Do not perform your upgrade during a dataplane or infrastructure upgrade. Check your upgrade preferences to see if you have an upcoming dataplane upgrade.
- One-Way Migration from Panorama to Prisma Access (Managed by Strata Cloud Manager)—You can only migrate from a Prisma Access (Managed by Panorama) to a Prisma Access (Managed by Strata Cloud Manager) deployment. After you migrate to Strata Cloud Manager, you cannot return to managing your Prisma Access deployment using Panorama.
- Minimum Panorama Version—A minimum Panorama version of 10.0 is required.
- Required Administrator Role—You must be logged in as a superuser in Strata Cloud Manager to begin the migration.
- Licensing Requirements—A valid Prisma Access license is required.
- Cloud Identity Engine—You must have integrated the Directory Sync component of the Cloud Identity Engine with the current Prisma Access (Managed by Panorama) tenant before migrating.
- Unsupported Functionalities—The migration program does not support
the following Prisma Access functionalities:
- Data Filtering (as an alternative, use Enterprise DLP)
- FedRAMP deployments
- IoT Security
- Multi-tenant deployments
- SSH proxy
- Separate authentication for GlobalProtect portals and gateways
- Prisma SD-WAN and Prisma Access Migrations—If you migrate a Prisma Access and a Prisma SD-WAN deployment, Prisma Access and Prisma SD-WAN must share the same tenant service group ID (TSG ID).
- Config Diff Issues—When you run the config diff
during the migration, ignore any diffs that show the following object names
because they don't affect your configuration:
- Clientless-vpn crypto-settings
- Hip-profiles rename
- Mobile-user-redundancy
- Exclude-video-traffic
Migrate Your Prisma Access (Managed by Panorama) Deployment to Strata Cloud Manager
To migrate your Prisma Access (Managed by Panorama) to a Prisma Access (Managed by Strata Cloud Manager) deployment, complete the following steps. At a high level, you:- Make sure that you have successfully pushed the latest configuration to Prisma Access, have saved the latest configuration, and have exported an .xml configuration file from the Panorama that manages Prisma Access.
- Start the migration program from Strata Cloud Manager.
- Check the configuration differences (diffs) between the Panorama configuration and the migrated Strata Cloud Manager configuration.
- Resolve the diffs and complete the migration.
- Prepare your Panorama for the migration.
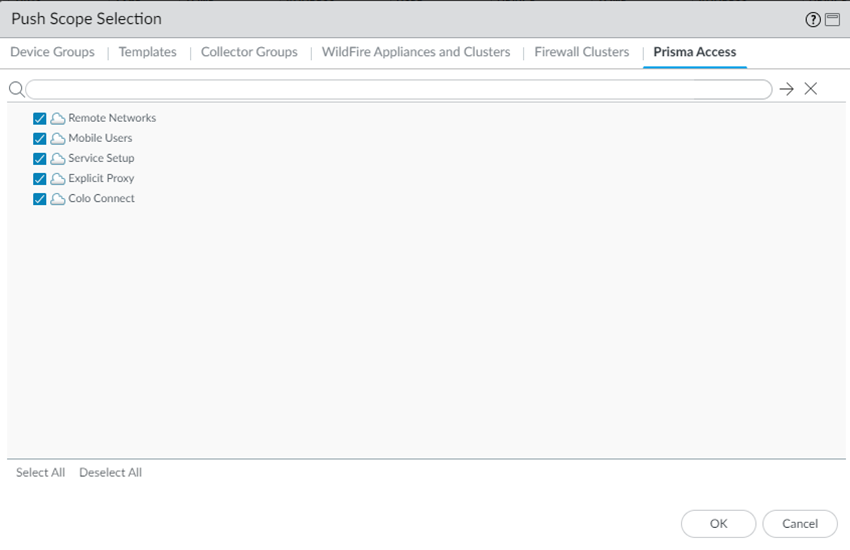
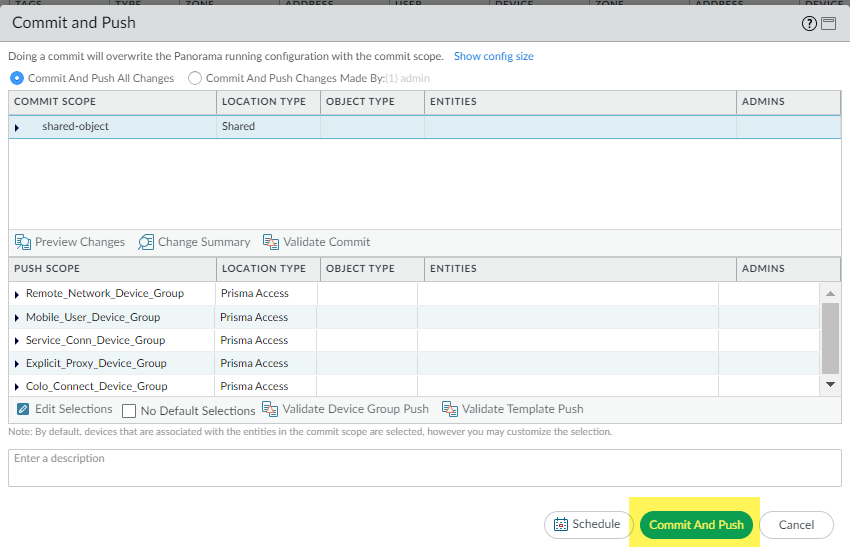
- Log in to the Panorama that manages Prisma Access with an administrative account that is assigned the superuser role.(Optional) If you have configured a custom Master Key for your Panorama and for Prisma Access, make a note of it.If your deployment uses the default Master Key, this step isn't required.Make sure that your current Panorama configuration is up to date and you have committed and pushed all your changes to Panorama and to Prisma Access by going to CommitCommit & Push and Preview Changes.(Optional) Check the diffs between the running config and the candidate config and determine whether you want to push those changes. If you want to commit and push the changes, Edit Selections and select the Prisma Access components you want to push in the Push Scope.
![]()
![]() (Optional) Commit and Push your changes.
(Optional) Commit and Push your changes.![]() Go to PanoramaSetupOperations and Export named Panorama configuration snapshot.This .xml file is required to upload to Strata Cloud Manager during the migration process. Don't upload a techsupport file or any other file except an .xml configuration file.Select the running-config.xml configuration file and OK.
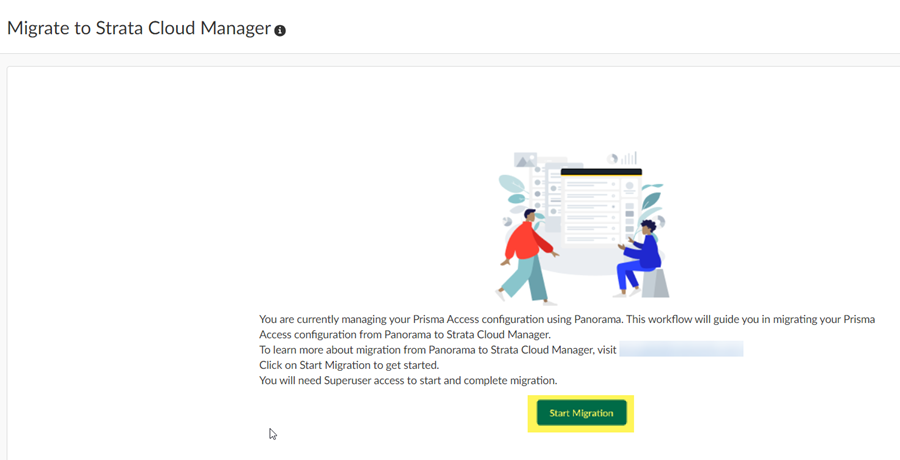
Go to PanoramaSetupOperations and Export named Panorama configuration snapshot.This .xml file is required to upload to Strata Cloud Manager during the migration process. Don't upload a techsupport file or any other file except an .xml configuration file.Select the running-config.xml configuration file and OK.![]() Log in to Strata Cloud Manager as an administrator with a Superuser role and go to ManageConfigurationNGFW and Prisma AccessConfigurationNGFW and Prisma Access.The migration program detects that you have a Panorama managed deployment.Start Migration.
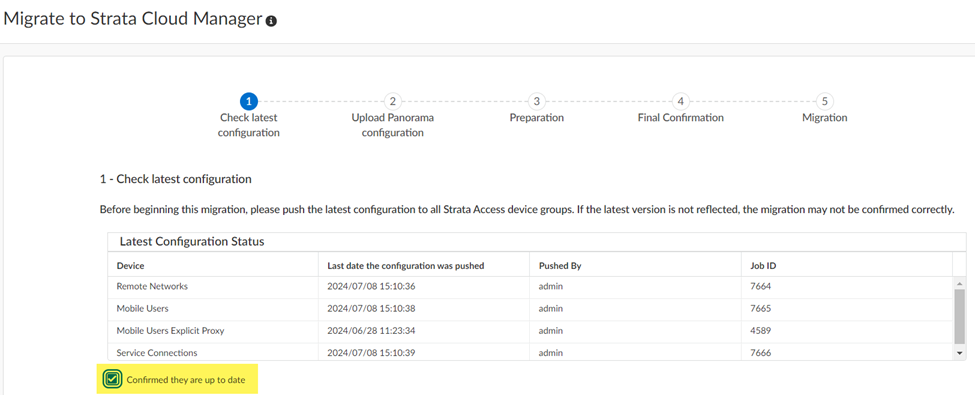
Log in to Strata Cloud Manager as an administrator with a Superuser role and go to ManageConfigurationNGFW and Prisma AccessConfigurationNGFW and Prisma Access.The migration program detects that you have a Panorama managed deployment.Start Migration.![]() The migration program asks you to make sure that your configuration is up to date and shows you the last user who updated it. After you have verified that this configuration has the latest changes, select Confirmed they are up to date and click Next.
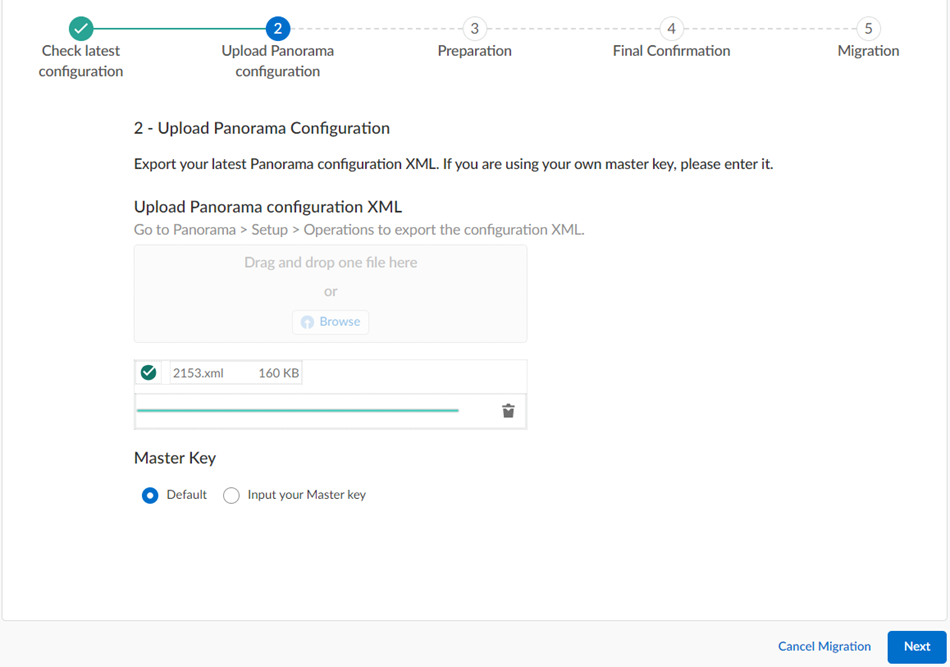
The migration program asks you to make sure that your configuration is up to date and shows you the last user who updated it. After you have verified that this configuration has the latest changes, select Confirmed they are up to date and click Next.![]() Select the Panorama configuration .xml file you downloaded in an earlier step by dragging and dropping it or Choose File.Input your Master Key, or if you did not create a custom master key, ask Strata Cloud Manager to use the Default one and click Next.
Select the Panorama configuration .xml file you downloaded in an earlier step by dragging and dropping it or Choose File.Input your Master Key, or if you did not create a custom master key, ask Strata Cloud Manager to use the Default one and click Next.![]() The migration program begins.
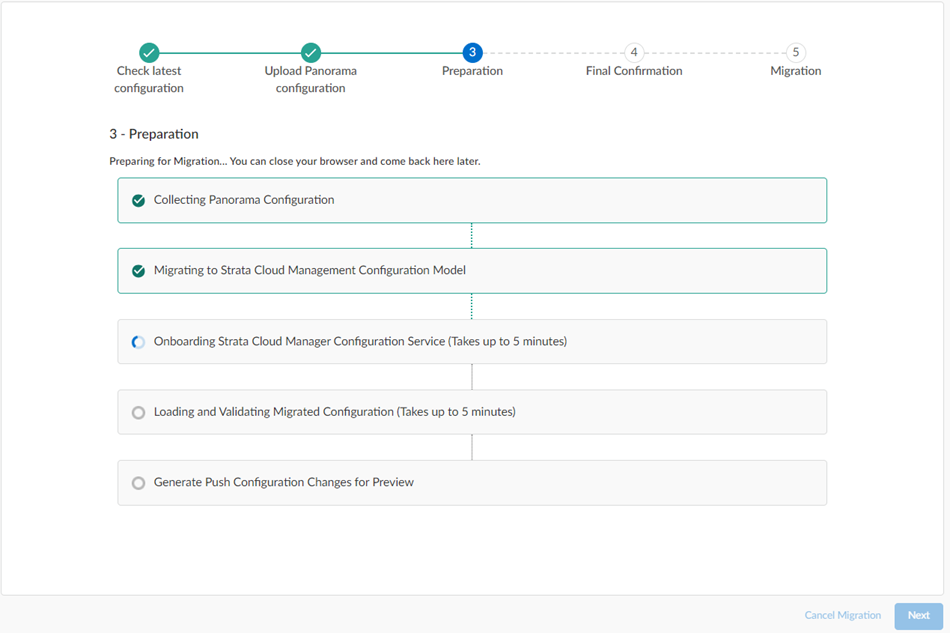
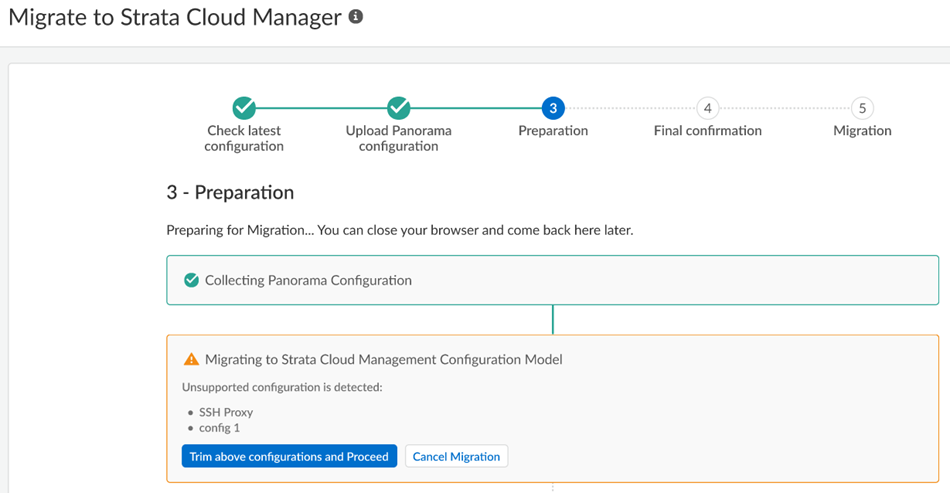
The migration program begins.![]() Wait for all the steps to complete.If, during migration, the program indicates that it encountered an unsupported configuration, you can Trim the above configurations and proceed or Cancel migration.
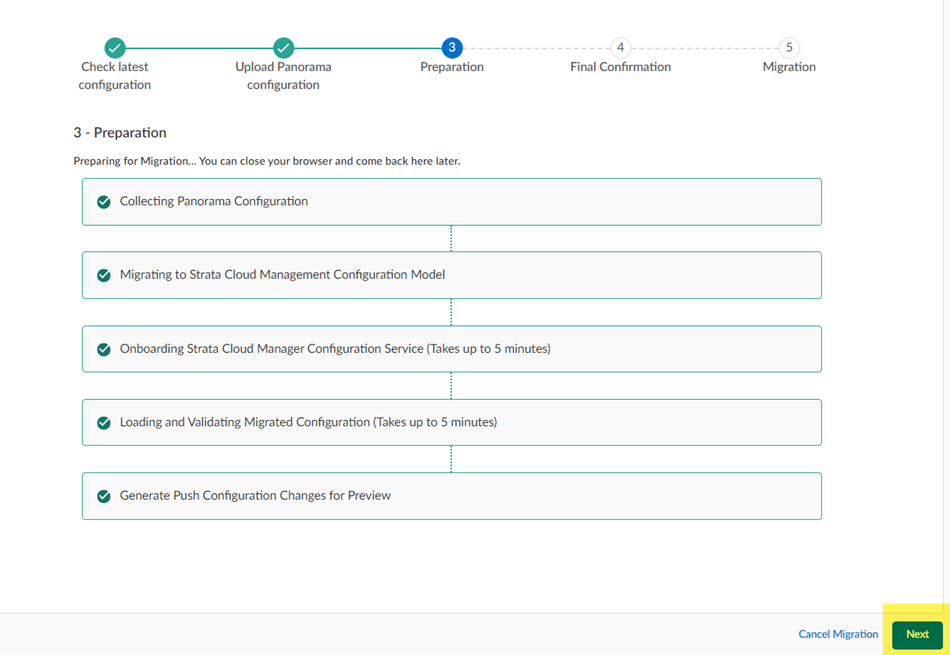
Wait for all the steps to complete.If, during migration, the program indicates that it encountered an unsupported configuration, you can Trim the above configurations and proceed or Cancel migration.![]() Some unsupported configurations (such as a multitenant configuration) cancel the migration and the migration program can't resolve the issue; in this case, Cancel Migration.After migration completes, click Next.
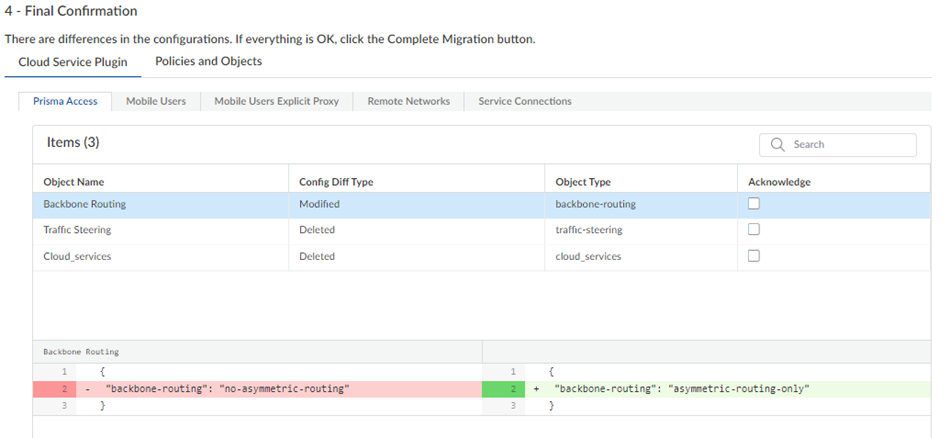
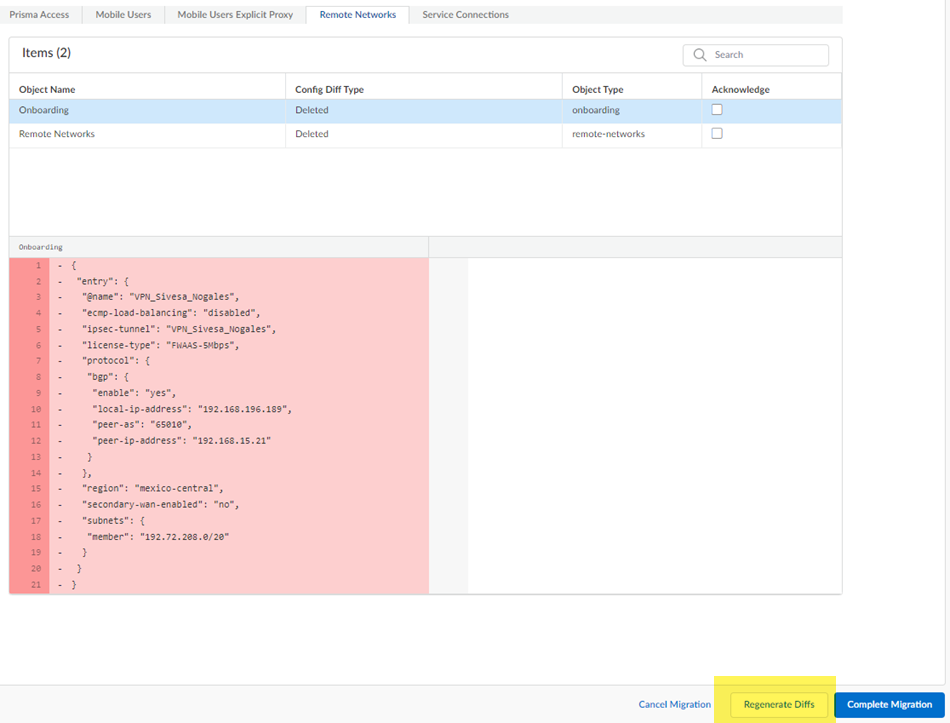
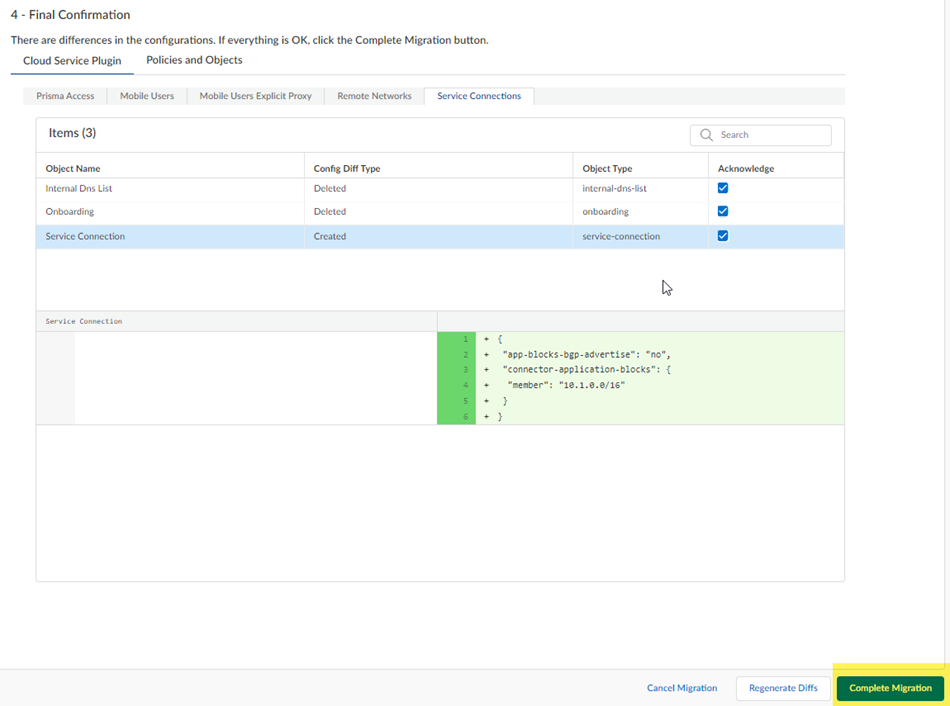
Some unsupported configurations (such as a multitenant configuration) cancel the migration and the migration program can't resolve the issue; in this case, Cancel Migration.After migration completes, click Next.![]() If the migration program made changes, review them in the final confirmation screen.The migration program might make changes to your configuration to account for differences in the Panorama and the Strata Cloud Manager configuration or to fix unsupported functionality. If changes are required, the migration program shows those changes in a diff view with the new lines in green and the deleted lines in red.Ignore any diffs that show the following object names; they don't affect your configuration:
If the migration program made changes, review them in the final confirmation screen.The migration program might make changes to your configuration to account for differences in the Panorama and the Strata Cloud Manager configuration or to fix unsupported functionality. If changes are required, the migration program shows those changes in a diff view with the new lines in green and the deleted lines in red.Ignore any diffs that show the following object names; they don't affect your configuration:- Clientless-vpn crypto-settings
- Hip-profiles rename
- Mobile-user-redundancy
- Exclude-video-traffic
![]() (Optional) Make changes to the diffs.Any changes you make are not committed to your configuration until you complete the migration and push your changes to Strata Cloud Manager.
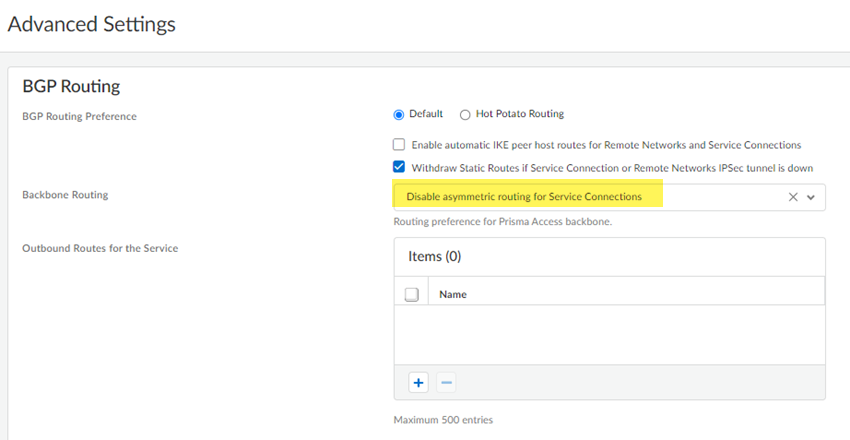
(Optional) Make changes to the diffs.Any changes you make are not committed to your configuration until you complete the migration and push your changes to Strata Cloud Manager.- Navigate to the area in the Prisma Access configuration where you found the diffs and make changes to the configuration.For the example in the previous step, the migration program made a change to Backbone Routing (from no-asymmetric-routing to asymmetric-routing-only). To change this setting back to your original configuration, go to WorkflowsPrisma Access SetupService ConnectionsAdvanced Settings ConfigurationNGFW and Prisma AccessConfiguration ScopePrisma AccessService ConnectionsAdvanced Settings and change the Backbone Routing configuration to Disable Asymmetric Routing for Service Connections.
![]() (Optional) To keep track of your changes, Acknowledge them as you complete them.While not required, it can be useful to acknowledge each change as you make them, so you can keep track of them.
(Optional) To keep track of your changes, Acknowledge them as you complete them.While not required, it can be useful to acknowledge each change as you make them, so you can keep track of them.![]() Continue to review the changes and make changes and acknowledge them.(Optional) If you have made any changes to the configuration, Regenerate Diffs to see the updated diffs.
Continue to review the changes and make changes and acknowledge them.(Optional) If you have made any changes to the configuration, Regenerate Diffs to see the updated diffs.![]() Complete Migration.While not required, you can also Acknowledge your changes.After you Complete Migration, you can't go back to a Panorama managed deployment and your deployment permanently uses Strata Cloud Manager for its management.
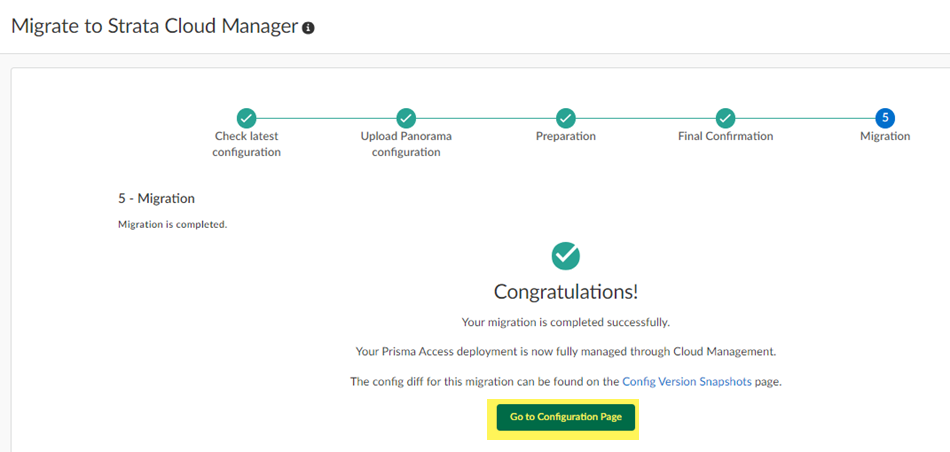
Complete Migration.While not required, you can also Acknowledge your changes.After you Complete Migration, you can't go back to a Panorama managed deployment and your deployment permanently uses Strata Cloud Manager for its management.![]() (Optional) Go to Configuration Page to see your migrated configuration.
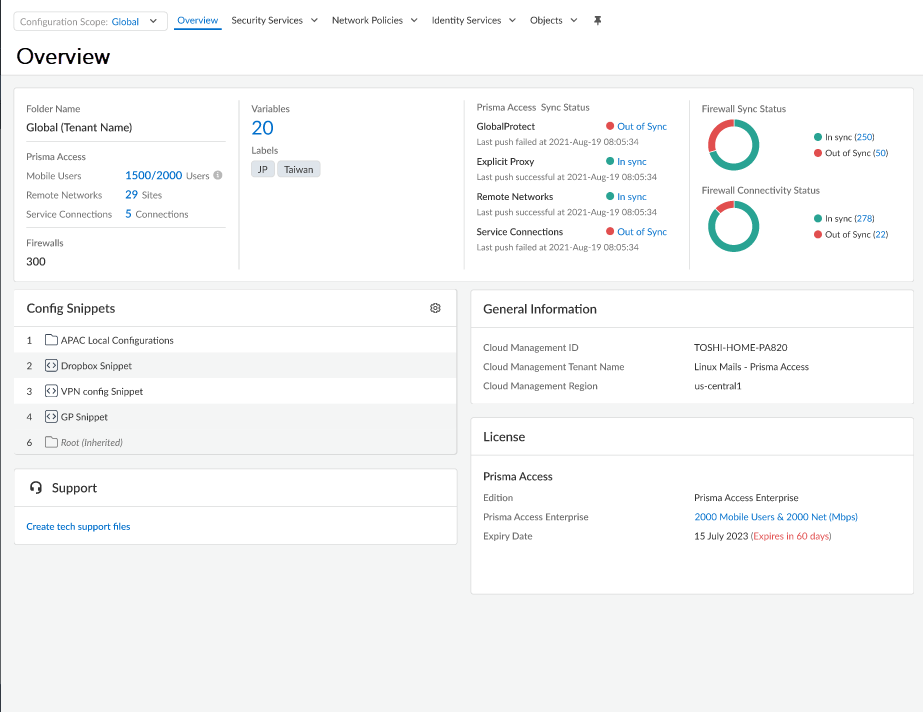
(Optional) Go to Configuration Page to see your migrated configuration.![]() Your migrated deployment displays.
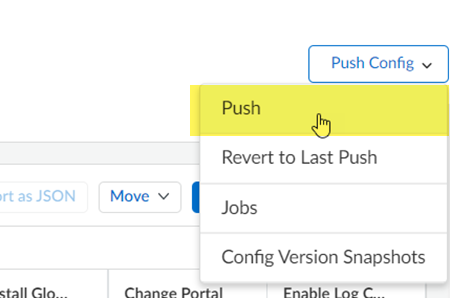
Your migrated deployment displays.![]() Push ConfigPush to apply your migrated configuration changes.This Push operation ensures that your migration has successfully completed and that Prisma Access has applied all changes to your migrated configuration.
Push ConfigPush to apply your migrated configuration changes.This Push operation ensures that your migration has successfully completed and that Prisma Access has applied all changes to your migrated configuration.![]() Make a note of any messages you received during the Push operation and, if you see any issues, make changes to your configuration as required.
Make a note of any messages you received during the Push operation and, if you see any issues, make changes to your configuration as required.
- The migration worfklow:

