Intelligent Traffic Offload
Table of Contents
Intelligent Traffic Offload
Implement Intelligent Traffic Offload using hardware or software cut-through.
The Intelligent Traffic Offload (ITO) service routes the first few packets of a flow to
the firewall for inspection to determine whether the rest of the packets in the flow
should be inspected or offloaded. This decision is based on policy or whether the flow
can be inspected (for example, encrypted traffic can’t be inspected) By only inspecting
flows that can benefit from security inspection, the overall load on the firewall is
greatly reduced and VM-Series firewall performance increases without sacrificing
security.
- Intelligent Traffic Offload
- Intelligent Traffic Offload Requirements
- Intelligent Traffic Offload Interfaces
- High Availability
- Install the BlueField-2 DPU
- Install the VM-Series Firewall
- Run Intelligent Traffic Offload
- BlueField-2 DPU Troubleshooting
- PAN-OS Troubleshooting
Intelligent Traffic Offload
Intelligent Traffic Offload is a VM-Series firewall Security
subscription that, when configured with the NVIDIA BlueField-2 DPU, increases capacity
throughput for the VM-Series firewall. The VM-Series firewall and the BlueField-2
DPU must be installed on an x86 physical host running Ubuntu 18.04, with kernel
version 4.15.0-20. The VM-Series firewall must be deployed in virtual wire mode.
The current NVIDIA BlueField-2 DPU scalability limitations are as
follows:
- Session table capacity: 500,000 sessions
- Session table update rate: 7000 sessions/second
- Connections per second: 20,000
- Offload hairpin rate: ~90 Gbps for 1500 byte packets
If offload traffic to the BlueField-2 DPU exceeds 7,000 sessions per second, or the
offload session table is full, traffic still flows through the VM-Series firewall
and is inspected. When the sessions per second drops below 7,000, intelligent
traffic offload to the Bluefield-2 DPU resumes.
Active/Passive HA is supported for the VM-Series firewalls running on physical hosts
with identical configurations.
Intelligent Traffic Offload does not support the accelerated aging session setting.
Intelligent Traffic Offload Requirements
ITO requires one VM-Series firewall and one BlueField-2 DPU installed on the same x86
physical host. Active/Passive high availability for VM-Series firewalls is
supported.
You can deploy only one VM-Series firewall and one BlueField-2 DPU per host.
- Network switch with 2 available 100GB/s ports (4 for HA).If you want to use VLANs, make sure your switch is capable.
- X86 physical host hardware requirements.
- Minimum 64GB available RAM (64GB for server / 56GB for VM-Series firewall)
- Minimum 8 Physical cores
- Bluefield-2 SmartNIC MBF2M516A-CEEOT with two 100GB/s ports installed in PCI-e slot 3 or 4
- A certified 100GigE SFP for each port on the BlueField2 DPU, as recommended by the NVIDIA BlueField Ethernet DPU User Guide.
- X86 host software requirements:
- Ubuntu 18.04, with kernel version 4.15.0-20
- Bluefield Binary bootstream version: 5.3-1.0.0.1Accept the End User License Agreement to start the download.
- Virtual machine for the VM-Series firewall.
- PAN-OS 11.0 or later.
- VM-Series Plugin 2.1.0 or later.
- To license Intelligent Traffic Offload, create a Software NGFW deployment profile for 10.0.4 and above, with a minimum of 8 vCPUs and the Intelligent Traffic Offload service. The profile can include other security services.With PAN-OS 10.1.1 or later and VM-Series Plugin 2.1.1 or later, to license Intelligent Traffic Offload, create a Software NGFW deployment profile for 10.0.4 and above, with a minimum of 8 vCPUs and the Intelligent Traffic Offload service. The profile can include other security services.
Intelligent Traffic Offload Interfaces
An Intelligent Traffic Offload deployment connects three
types of interfaces:
- PAN-OS virtual interfaces:
- eth0: management interface
- eth1, eth2: dataplane
- eth3: HA interface
- eth4: gRPC interface
- BlueField-2 DPU physical interfaces (created from the host OS).
- Host physical interfaces for the BlueField-2 DPU 100GB ports (created from the host OS).
You connect the PAN-OS interfaces to the BlueField-2 DPU through
SR-IOV virtual functions (VFs) you create on the physical host (see Enable Virtual Functions).
In the following figure, the two BlueField-2 DPU ports are shown
as Physical Functions PF0 and PF1. These PFs can be observed from
the host side as enp4s0f0 and enp4s0f1, and are divided into multiple
VFs for SR-IOV functionality.
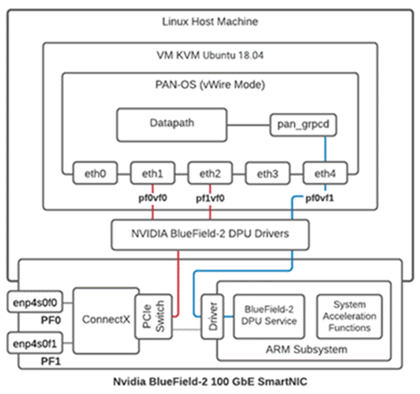
- The first VF for each PF must be the data port (eth1:pf0vf0).
- An additional VF is required for the control channel for the gRPC client/server interface (eth4:pf0v1).
- VFs from the host side are as follows:
- enp4s0f0 is represented by pf0vf0 and pf1vf0 on the BlueField-2 DPU, and are used for data.
- enp4s0f1 is represented by pf0vf1 and is used for gRPC control traffic.
High Availability
Active/Passive HA is supported for a pair of VM-Series
firewalls deployed in Vwire mode on physical
hosts.
- The firewalls must be installed on physical hosts with the BlueField-2 DPU configured as specified in Intelligent Traffic Offload Requirements.
- For the HA2 interface (see the figures in Active Packet Flow and Passive Packet Flow), use the same Mellanox interface (cx-3, cx-4, or cx-5) on both hosts.
- (optional) To support traffic switching, the hosts must be on separate VLANs so you can use VLAN tags to select the primary, as described in Secure Traffic Across Linux hosts.
ITO H/A focuses on VM-Series firewall availability. Each firewall
maintains a session table, and each BlueField-2 DPU maintains a
flow table. The HA configuration synchronizes the active session
table, ensuring it is mirrored to the passive firewall at runtime.
The session table stores both sessions that require inspection and
sessions that are marked for offload.
HA uses the PAN-OS interface eth3, which is on a NIC on the VM-Series
firewall. Eth3 is used to select the active firewall, and sync the
VM-Series firewall session tables on the active/passive pair.
Active Packet Flow
The following diagram steps through the active packet
flow for an HA configuration that uses an optional VLAN configuration.
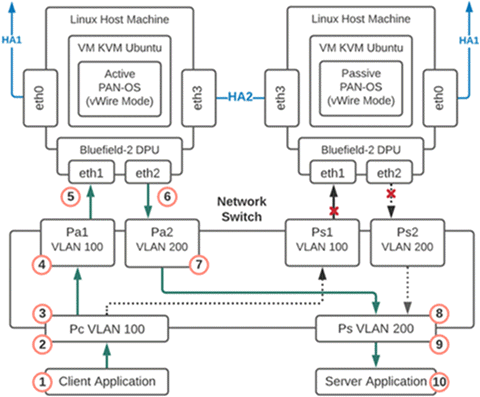
- Packet is sent from the client application to the network switch.
- The packet arrives at the switch port that is programmed to add a VLAN 100 tag to the packets.
- The tagged packets can only go to Port Pa1 as the interface for port Ps1 is down because that firewall is in passive mode.
- The packet arrives at port Pa1 and VLAN 100 is removed from the packet and the packet is delivered to the firewall eth1.
- The firewall is running in vWire mode so the packet is processed by the firewall and then sent out eth2.
- The packet arrives at port Pa2 and VLAN 200 is added.
- The packet is sent out port Pa2 and can only be delivered to port Ps because the other VLAN 200 port Ps2 is down.
- The packet arrives at port Ps and the VLAN 200 tag is removed.
- The packet is sent out port Ps with no VLAN tag
- The packet is delivered to the server.
Failover Event
A failover event occurs when there is either a notification
from the active VM-Series firewall or the passive firewall detects
that the active is not responding. When this happens the network
connections to ports Pa1 and Pa2 go down and the network connections
to ports Ps1 and Ps2 become active.
Passive Packet Flow
When the VM-Series firewall is in the passive state,
the BlueField-2 DPU on the passive member is live but does not pass
traffic until there is a failover and the co-located VM-Series firewall
becomes active. The following diagram steps through the passive packet
flow for an HA configuration that uses an optional VLAN configuration.
- The packet is sent from the client application to the network switch.
- The packet arrives at the switch port that is programmed to add a VLAN 100 tag to the packets.
- The tagged packets can only go to Port Ps1 because the interface for port Pa1 is down and that firewall has now moved from passive to active.
- The packet arrives at port Ps1 and VLAN 100 is removed from the packet and the packet is delivered to the firewall eth1.
- The firewall is running in vWire mode so the packet is processed by the firewall and then sent out eth2.
- The packet arrives at port Ps2 and VLAN 200 is added.
- The packet is sent out port Ps2 and can only be delivered to port Ps because the other VLAN 200 port Pa2 is down.
- The packet arrives at port Ps and the VLAN 200 tag is removed.
- The packet is sent out port Ps with no VLAN tag.
- The packet is delivered to the server.
Configure Software Cut-through
Use the command line interface to configure software cut-through on your VM-Series
firewall.
- Access the VM-Series firewall as an administrator.
- Use the CLI command set session sw-cut-thru yes to enable software cut-through. To disable software cut-through, enter set session sw-cut-thru no.
Install the BlueField-2 DPU
Install the BlueField-2 DPU on the physical host before
you install the VM-Series firewall. For information on the BlueField-2
DPU, see the software documentation: NVIDIA BLUEFIELD DPU FAMILY SOFTWARE
V3.5.0.11563 DOCUMENTATION.
- Install the BlueField-2 DPU on the host machine as directed in the NVIDIA BlueField Ethernet DPU User Guide.
- Install the BlueField drivers as directed in the NVIDIA BlueField-2 DPU Software Quick Start Guide.
Install the VM-Series Firewall
The standard installation for KVM on the VM-Series firewall
installs PAN-OS. Follow the installation steps in the following
sections.
Enable Virtual Functions
As mentioned in Intelligent Traffic Offload Interfaces virtual
functions (VFs) connect PAN-OS interfaces to the BlueField-2 DPU.
The
maximum number of virtual functions VFs per port is 2. You need
a total of three—two for the data path and one for the management
interface.
- Enable virtual functions on the host machine.
- By default the BlueField-2 DPU uses the first VF for the datapath, i.e. enp4s0f0v0 and enp4s0f1v0 in the following example.
- The other VF, enp4s0f0v1, is used for the management interface for the service running on the BlueField-2 card (not to be confused with the VM-Series firewall management interface).
$ cat /sys/class/net/enp4s0f0/device/sriov_totalvfs8
$ echo 3 > /sys/class/net/enp4s0f0/device/sriov_numvfs$ cat /sys/class/net/enp4s0f1/device/sriov_totalvfs8
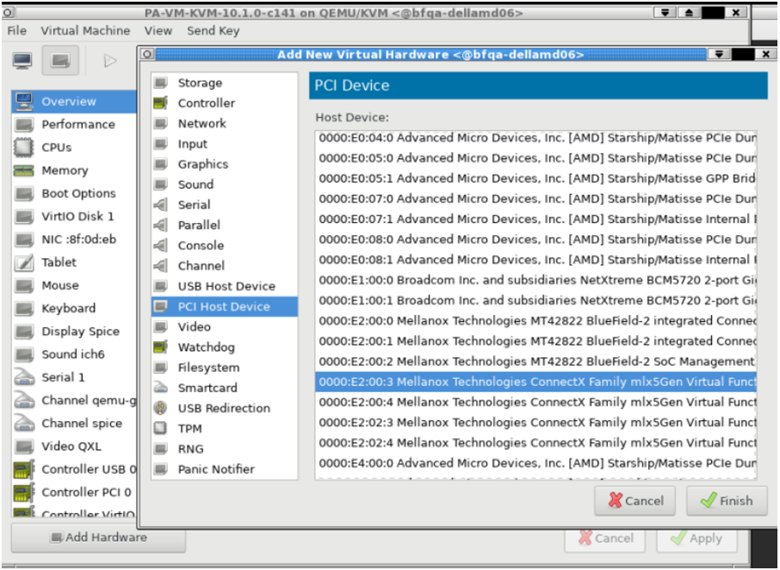
$ echo 3 > /sys/class/net/enp4s0f1/device/sriov_numvfsAllocate VFs to the VM-Series firewall from the KVM hypervisor.The Guest PAN-OS won’t boot unless VFs are allocated to the VM.- Shut off the VM.On KVM use virt-manager to add VFs to the VM.
- Select Add Hardware, select VF0 of PF1, and click Finish.
- Select Add Hardware, select VF0 of PF0, and click Finish.
- Select Add Hardware, select VF1 of PF0, and click Finish.
![]()
Check the BlueField-2 DPU System
The BlueField-2 DPU first communicates with the host when the Rshim driver driver is installed on the host. The Rshim provides a tty (accessible through minicom) interface and a networking interface called tmfifo_net0. With the tmfifo_net0 interface you can ssh in to the BlueField-2 DPU from the host. The Rshim driver runs on the x86 Hypervisor OS, and in fact, the OFED installation installs an Rshim driver by default.- Log in to the host machine.$ ssh user@<host-ip-address>
$ password:
If the host network interface for the Rshim driver does not have an IP address, you must create one.$ ip addr add dev tmfifo_net0 192.168.100.1/24From the host machine log in to the BlueField-2 DPU subsystem.$ ssh ubuntu@192.168.100.2$ password: <fake-password>If this is your first login the system prompts you to replace the default password with a new password.Change the default password on the BlueField-2 DPU.Log in to BlueField-2 DPU with initial username as ubuntu and the password ubuntu.Once you log in, the system prompts you to set up a new password.WARNING: Your password has expired. You must change your password now and login again! Changing password for ubuntu. Current password: ***** New password: ***** Retype new password: ***** passwd: password updated successfully
Log out and log in with your new password.Check the software version.$ ofed_info -sThis should return the following version or later:$ MLNX_OFED_LINUX-5.3-0.3.3Check that the Bluefield 2 DPU is in the correct mode.The correct mode is embedded CPU function ownership mode. See the Embedded CPU Function Ownership Mode documentation for instructions to check and configure the mode.Install or Upgrade the BlueField Bootstream Software
Follow these steps to ensure you have the latest Bluefield bootstream (BFB) software for the BlueField-2 DPU. The BFB includes the BlueField OS and other software such as drivers and network interfaces.- Download the BFB package to the physical host for the BlueField-2 DPU.Get the latest version of the driver for the OS running on the DPI ARM cores from the NVIDIA website—you must accept the end-user license agreement to download.Install the BFB from the Rshim boot location on the physical host.Note, the filename below (the string starting with DOCA and ending with .bfb) does not contain spaces. Enter the command on a single line.$ cat DOCA_v1.0_BlueField_OS_Ubuntu_20.04-5.3-1.0.0.0-3.6.0.11699-1-aarch64.bfb > /dev/rshim0/bootLog in to the BlueField-2 DPU.Use the new password you created in Check the BlueField-2 DPU System.$ ssh ubuntu@192.168.100.2
$ password:Apply the firmware upgrade on the BlueField-2 DPU.Enter the following command on a single line.$ sudo /opt/mellanox/mlnx-fw-updater/firmware/mlxfwmanager_sriov_dis_aarch64_41686Power cycle the system.Log off the BlueField-2 DPU and return to Linux host.$ ipmitool chassis power cycleLog in to the BlueField-2 DPU.$ ssh ubuntu@192.168.100.2$ password:Start the opof (open offload) service on the BlueField-2 DPU. opof is a standalone service at this time.The VFs must exist before you start opof. See Enable Virtual Functions.$ opof_setup$ service opof restartVerify the opof service is running without issues.$ service opof statusInstall or Upgrade the Debian Package
If the Debian package version is earlier than 1.0.4 you must upgrade.- On the BlueField-2 DPU, check the version of the opof package.$ opof -vIf it is earlier than 1.0.4 it must be upgraded.Add the NViIDIA repository for packages.$ cd /etc/apt/sources.list.dEnter each wget command all on one line. There are no spaces in the URLs:wget https://linux.mellanox.com/public/repo/doca/1.0/ubuntu20.04/doca.listwget -qO - https://linux.mellanox.com/public/repo/doca/1.0/ubuntu20.04/aarch64/GPG-KEY-Mellanox.pub | sudo apt-key add -$ apt updateOn the BlueField-2 DPU check the Debian package in the repository.$ apt search opof
Sorting... Done
Full Text Search... Done
opof/now 1.0.4 arm64 [installed,local]
  Nvidia Firewall Open Offload Daemon
On ARM, uninstall the obsolete Debian package.$ apt remove opofInstall the new Debian package.$ apt install opofSet up and restart the opof service.$ opof_setup$ service opof restartVerify the opof service is running without issues.$ service opof statusRun Intelligent Traffic Offload
This solution requires a subscription to the Intelligent Traffic Offload software and a minimum of 18 physical cores for the best performance/throughput. By default, PAN-OS allocates 2 cores for Intelligent Traffic Offload, 4 cores for management processes and the remaining 12 cores for dataplane processing.Set Up Intelligent Traffic Offload on the VM-Series Firewall
Follow these steps to enable Intelligent Traffic Offload on PAN-OS.- Bring up the PAN-OS VM. This assumes that you already have a VM instance created and are restarting it.$ virsh start <vm-name>Use SSH to log in to the VM-Series firewall management interface.$ ssh admin@<panos-management-IP-address>
$ admin@PA-VM>Verify that Intelligent Traffic Offload is installed and licensed.admin@PA-VM> show intelligent-traffic-offload statusIntelligent Traffic Offload: Configuration : Enabled Operation Enabled : True Min number packet : 8 Min Rate : 95 TCP ageing : 12- UDP ageing : 20Configuration:Enabled means Intelligent Traffic Outload is licensed.Operation Enabled:True means you have rebooted a configured device.Enable Intelligent Traffic Offload.Use the following command to enable ITO.admin@PA-VM> set session offload yesYou can also use set session offload no to disable the ITO without rebooting the system.Use the set session offload command without rebooting when you first enable the feature. However, if you choose to disable ITO at a later time, you must reboot. Additionally, if you choose to enable ITO after deploying your firewall, you must reboot. For non-DPU ITO or software cut-through environments rebooting is not necessary.Validate Intelligent Traffic Offload.admin@PA-VM> show session info | match offloadHardware session offloading: True Hardware UDP session offloading: True
To view global counters, use the following command:admin@PA-VM> show counter global | match flow_offloadSee Session Counters for more on the organization of the output and a description of each counter.Set Up the Intelligent Traffic Offload Service on the BlueField-2 DPU
The service must be built as described in Set Up Intelligent Traffic Offload on the VM-Series Firewall.- From the host machine, log in to the BlueField-2 DPU complex.$ ssh ubuntu@192.168.100.2
$ password: <fake-password>
$ ubuntu> sudo -i
Set up the preliminary configuration in the BlueField-2 DPU OS.root@bf2SmartNIC:~# opof_setup[ INFO ] No num of hugepages specified, use 2048 [ INFO ] No gRPC port specified, use pf0vf1 Configure ovs fallback Configure grpc for pf0vf1 Reserved 2048*2MB hugepagesStart or Restart the Intelligent Traffic Offload Service
If the ITO service is running on a DPU, the service probably started automatically. To check the status, run the following command:$ service opof statusIf the opof service is not running, enter the following command to start the controller:$ service opof startTo restart the service, run the following command:$ service opof restartGet Service Status and Health
Use opof to get the service status and health. Each command has its own command-line help, for example: $ opof -h- Query a session:$ opof query -i <session_id>
- Query service offload statistics:$ opof stats
BlueField-2 DPU Troubleshooting
Use the following procedure to power cycle the system.- To power cycle the system, log out of the BlueField-2 DPU and return to the Linux host OS.$ ipmitool chassis power cycle
- If the interfaces do not come up after the power cycle, log in to the BlueField-2 DPU and enter:$ /sbin/mlnx_bf_configure
- Return to the host OS and enter:$ sudo /etc/init.d/openibd restart
PAN-OS Troubleshooting
Validate Traffic Flows
Data traffic can be generated from the client and consumed through the Intelligent Traffic Offload setup by a server. IPERF3 can be used to generate traffic, as discussed in Run IPERF3 Tests. Once the traffic is initiated, the first few packets of the flow are sent to the PA-VM which decides if the flow needs to be offloaded or not.An application override policy must be defined to identify flows for offload. A TCP flow sets the FIN/RST flag on a control packet and sends it to the PA-VM. When the PA-VM decides to offload the flow, use show session all to display the offloaded flows. Use show session id <flowID> to provide information on the state of the flow. An offloaded flow has the state Offload: yes.The flow counters are not updated while subsequent packets of the flow are in the offload state and are passing through the BlueField-2 DPU. Once the flow completes, the offload service triggers an age-out timer (TCP aging configured from the CLI). When the timer expires, the service collects the updated flow statistics and sends them to the VM-Series firewall. The firewall then updates its flow session counters, and show session id <flowID> returns the updated values.Session Counters
Use the following command to view session counters.admin@PA-VM > show counter global | match flow_offloadThe output columns for each counter are:Counter Name | Value | Rate | Severity | Category | Aspect | Description.- Value—Number of occurrences since system start.
- Rate—Frequency of counter change.
- Severity—Info, Warning, Drop. Used for Tech Support.
- Category—Flow (a component of a session).
- Aspect—Offload for an entire flow.
Counter Name Description flow_offload_rcv_cpu Number of packets received by CPU with session offloaded flow_offload_session_update Number of times the session needs to be updated flow_offload_session_insert Number of sessions inserted in the offload device flow_offload_session_delete Number of sessions deleted from offload device flow_offload_delete_msg_failed Number of del messages to GRPC that failed flow_offload_add_msg_failed Number of session messages to GRPC that failed flow_offload_session_verify Number of verify messages to the offload device flow_offload_verify_msg_failed Number of verify messages to GRPC that failed flow_offload_update_session_stat HW indicates flow age out flow_offload_missing_session_stat Cannot find session for stats flow_offload_invalid_session Offload invalid session ID flow_offload_del_session_fail Offload Delete invalid session flow_offload_add_session_fail Offload Add session failed flow_offload_get_session_fail Offload Get session failed flow_offload_grpc_fail Offload grpc call failed flow_offload_active_session Number of active offloaded sessions flow_offload_aged_session Number of aged out offloaded sessions flow_offload_session Number of offloaded sessions Run IPERF3 Tests
Iperf3 is an optional simple application for generating traffic that is effective in running data traffic tests. To run the server as a service, use iperf3 -s -D. By default the application expects packets on TCP/UDP destination port 5201, but the port can be changed.- Single flow—For single iperf3 flows enter:
iperf3 -c <server-ip-address> -t 60
- Multiple flows—To initiate 20 concurrent flows for a 60 second duration, enter:
iperf3 -c <ip of server> -P 20 -t 60
Validate Intelligent Traffic Offload
You can use VM-Series firewall logs to validate the connectivity between the ITO client running on the firewall and the offload service on the BlueField-2 DPU. The expected log output for a successful offload is as follows.admin@auto-pavm> less mp-log pan_grpcd.log[PD] dec free list 0xe0ff022000 RS LIB INIT in DP! pan_fec_app_init: fec_data 0xe0feef1088, maxentries 120 [FEC] enc free list 0xe0feef1100, dec free list 0xe0feef10b8 Creating dp grpc ring buf Initializing dp grpc ring buf Mapping flow data memory Found offload parameters Heart beat found 1 Established connection to offload device
OPOF Troubleshooting
You can also view the offload service logs to validate connectivity:root@linux:~# service opof status● opof.service - Nvidia Firewall Intelligent Traffic Offload Daemon Loaded: loaded (/etc/systemd/system/opof.service; disabled; vendor preset: enabled) Active: active (running) since Fri 2021-05-21 18:40:38 UTC; 3h 48min ago Docs: file:/opt/mellanox/opof/README.md Process: 163906 ExecStartPre=/usr/sbin/opof_pre_check (code=exited, status=0/SUCCESS) Main PID: 163922 (nv_opof) Tasks: 30 (limit: 19085) Memory: 50.7M CGroup: /system.slice/opof.service └─163922 /usr/sbin/nv_opof -n 1 -a 0000:03:00.0,representor=[0] -a 0000:03:00.1,representor=[0] May 21 18:40:38 localhost.localdomain nv_opof[163922]: EAL: Probe PCI driver: mlx5_pci (15b3:a2d6) device: 0000:03:00.0 (socket 0) May 21 18:40:38 localhost.localdomain nv_opof[163922]: EAL: Invalid NUMA socket, default to 0 May 21 18:40:38 localhost.localdomain nv_opof[163922]: EAL: Probe PCI driver: mlx5_pci (15b3:a2d6) device: 0000:03:00.0 (socket 0) May 21 18:40:38 localhost.localdomain nv_opof[163922]: EAL: Invalid NUMA socket, default to 0 May 21 18:40:38 localhost.localdomain nv_opof[163922]: EAL: Probe PCI driver: mlx5_pci (15b3:a2d6) device: 0000:03:00.1 (socket 0) May 21 18:40:38 localhost.localdomain nv_opof[163922]: EAL: Invalid NUMA socket, default to 0 May 21 18:40:38 localhost.localdomain nv_opof[163922]: EAL: Probe PCI driver: mlx5_pci (15b3:a2d6) device: 0000:03:00.1 (socket 0) May 21 18:40:39 localhost.localdomain nv_opof[163922]: EAL: No legacy callbacks, legacy socket not created May 21 18:40:39 localhost.localdomain nv_opof[163922]: EAL: No legacy callbacks, legacy socket not created May 21 18:40:42 localhost.localdomain nv_opof[163922]: Server listening on: 169.254.33.51:3443The logs show that the Intelligent Traffic Offload is communicating with the VM-Series firewall PA-VM over the server listening on IP address, and you see the VFs along with other details of the DPDK parameters. Also attached is a log from the addition of a TCP flow that is offloaded.