Device Security
Sites and Site Groups
Table of Contents
Expand All
|
Collapse All
Device Security Docs
Sites and Site Groups
Create and manage sites for Device Security protection and
organize them into groups.
| Where Can I Use This? | What Do I Need? |
|---|---|
|
One of the following subscriptions:
|
Only users with owner privileges can create and manage sites, organize sites
into groups, and assign access to sites and site groups to other users.
For Device Security in Strata Cloud Manager, the owner role corresponds
to the superuser role.
There are three sections on the Sites page:
- At the top is a title bar with tabs for other Networks pages. The page header also includes a global filter that controls the content displayed on the page by site and time range.
- The Organization section shows the hierarchical structure of sites in your organization.
- The Sites section is a table with useful information about individual sites.
The Default site is where Device Security initially assigns IP address blocks
and subnets. You can later reassign them to user-defined sites.
To get started with sites and site groups, you first create sites that represent
logical groupings of your infrastructure. You can use sites to filter your devices and
to generate reports, so choose sites that make sense for your network management needs.
Once you have sites, you have the option to organize your sites into groups within a
hierarchical structure and then set controls at different levels within the structure
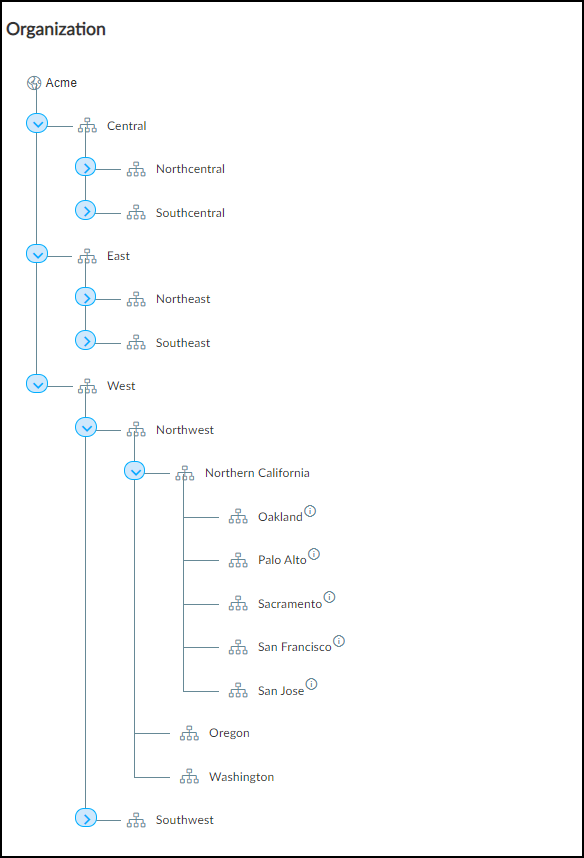
to define what administrative users see and do. For example, in the tree structure
shown below, you might give a user access to data at an individual site level, or
for all sites in a city, or in a state, or within a broader region. If you want, you can
also assign users access on a per-site basis without the use of site groups.
You don’t have to organize sites into groups. In fact, by default, the Organization
panel is hidden. However, if you want to see the Organization panel and use this
feature, click Show Organization and then click
Organize Sites.
Strata Cloud Manager
Create and manage Device Security sites and site groups in Strata Cloud Manager.
Log in as a user with the Superuser role and select
NetworksSites. There you can view, add, edit, and delete sites and site groups with
devices under Device Security protection.
Add a Site
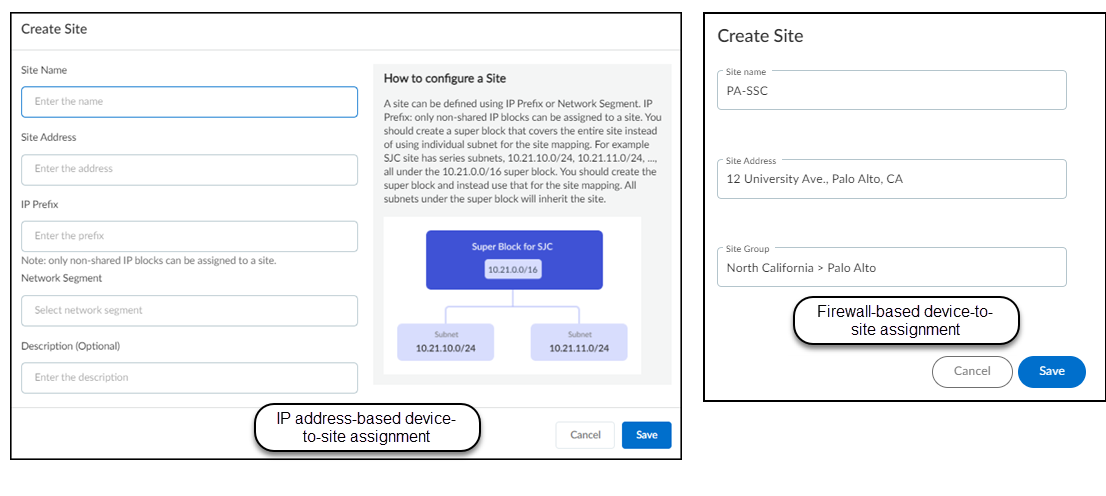
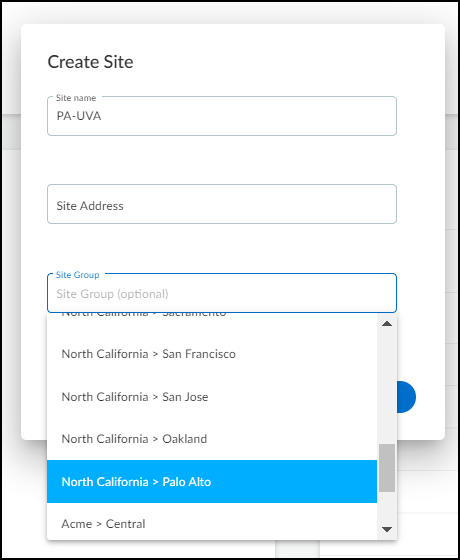
- At the top of the Sites section, click + to open the Create Site dialog.There are different settings based on the device-to-site assignment method that’s in use.Configure your site.IP address-based assignment
- Site Name: Enter a name for the site
- Optional Site Address: Enter an address to help you identify the geographical or network logical location of the site
- Optional IP Prefix: Choose a nonshared IP address block
- Optional Network Segment: Choose a previously defined network segment
- Optional Description: Enter a description for the site
Firewall-based assignment- Site Name: Enter a name for the site
- Optional Site Address: Enter an address to help you identify the geographical or network logical location of the site
- Optional Site Group: Choose an existing site group to assign the site to
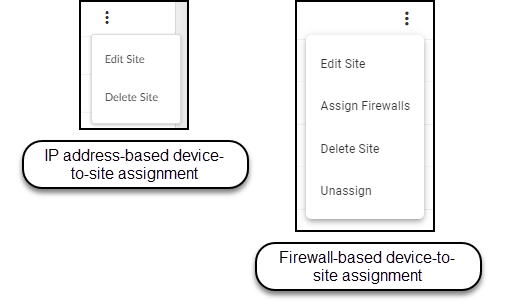
Save your new site.![]() Edit your site or delete your site if you no longer need it.To edit or delete a site, click the three vertical dots at the far right of a site row and then click one of the actions that appear. When assigning devices to sites based on firewalls, there are two additional options. You can assign one or more firewalls to a site or unassign a site from a group.
Edit your site or delete your site if you no longer need it.To edit or delete a site, click the three vertical dots at the far right of a site row and then click one of the actions that appear. When assigning devices to sites based on firewalls, there are two additional options. You can assign one or more firewalls to a site or unassign a site from a group.![]() Before you can delete a site, you must first remove all firewalls from it or reassign them to different sites.
Before you can delete a site, you must first remove all firewalls from it or reassign them to different sites.Add Groups to the Tree and Add Sites to Groups
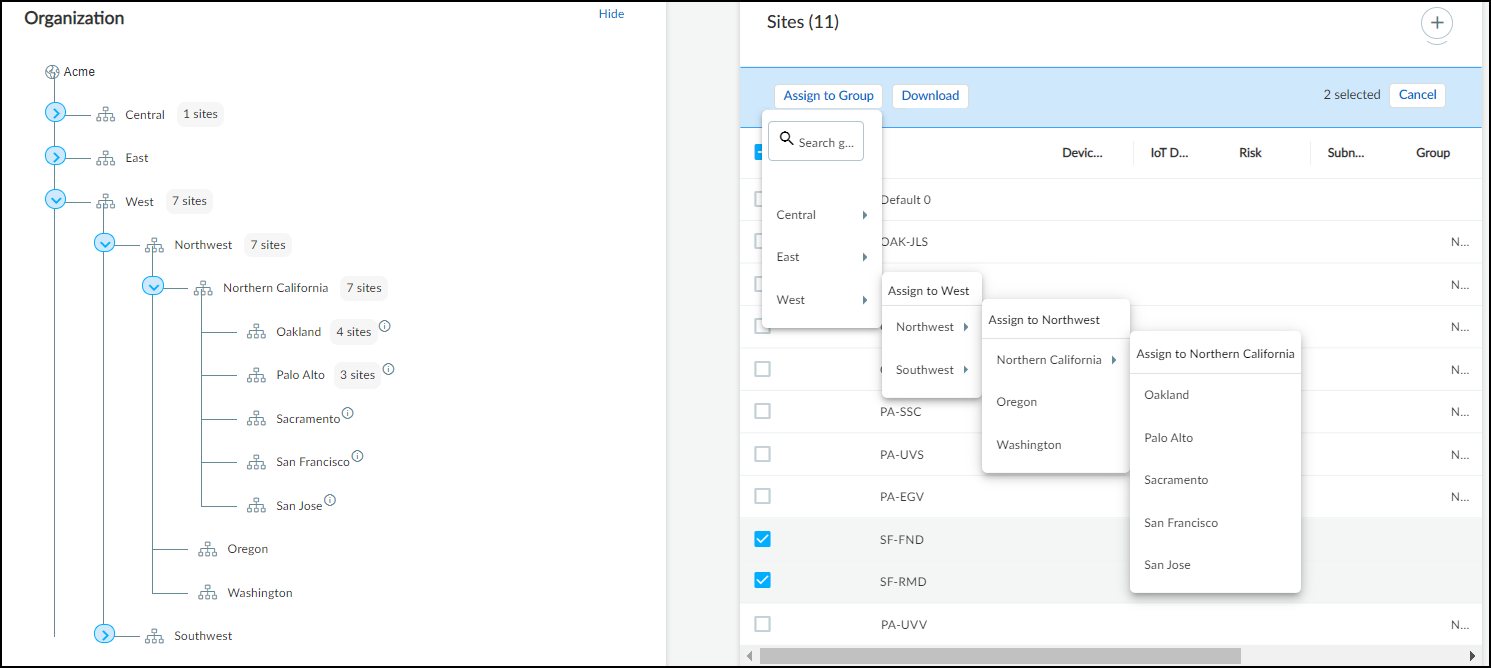
Add Groups to the Tree and Add Sites to Groups There can be five levels in a group hierarchy. The root node forms the top-level group (“Acme” in the examples here) and is the group to which all sites belong by default. The top-level group is the name of the tenant account and can’t be removed, but it can be renamed. All other groups below the root are owner-defined.The global filter has priority over page-level filters. When creating the tree structure, set the global filter at the top of the page to All Sites. If it’s set to anything else, the Organization panel will keep collapsing to show only the site or sites that are selected in the global filter.Once you have a group hierarchy set up, you can assign sites to groups as a bulk action, as an individual assignment, or as a combined create and assign action.- Add a group to the organization by hovering over an existing group and then clicking the Add group icon.
![]() Enter a name for the group.Optional Continue adding groups and subgroups to reflect the structure of your organization.After adding the groups you need, add sites to them.
Enter a name for the group.Optional Continue adding groups and subgroups to reflect the structure of your organization.After adding the groups you need, add sites to them.- Multiple sites selection Select the check box for one or more sites in the Sites panel, click Assign to Group, and then choose the group to assign them to.You can search for a group in the Search groups field at the top of the Assign to Group drop-down.You can also use these steps to reassign sites from one group to another. When you select a new group for a site, the site is removed from the old group.
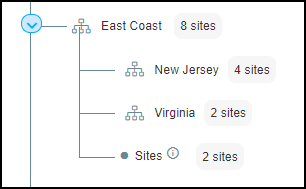
![]() When you assign a site to a group that also has subgroups, a node labeled Sites appears in the tree under its assigned group at the same level as the subgroups. For example, the group named East Coast has two subgroups — New Jersey and Virginia — and it also has a node called Sites for two sites assigned to the East Coast group.
When you assign a site to a group that also has subgroups, a node labeled Sites appears in the tree under its assigned group at the same level as the subgroups. For example, the group named East Coast has two subgroups — New Jersey and Virginia — and it also has a node called Sites for two sites assigned to the East Coast group.![]() Single site selection Assign a single site to a group by editing the site.
Single site selection Assign a single site to a group by editing the site.- Select the three-dot menu at the far-right of a site's row in the Sites panel.
- Select Edit Site to bring up the Edit Site dialog.
- Assign or edit the Site Group (Optional) field for the site.
- Save your changes.
Continue assigning sites to the appropriate groups.Optional Add new sites to groups by selecting a Site Group option when you create a new site.![]()
Delete Groups
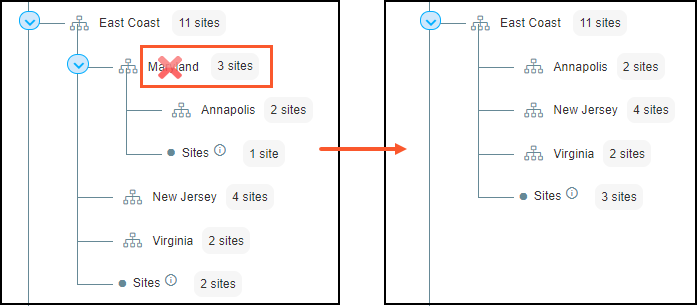
Delete Groups - Optional Reassign or remove all sites and child groups assigned to the site before deleting it.If you delete a group, Device Security reassigns all its sites and child groups to its parent group. For instance, look at what happens when the Maryland group is deleted. The site that belonged to Maryland now belongs to East Coast, and its child group Annapolis becomes a child group of East Coast.
![]() Hover over the group that you want to delete and then select the three-dot menu to view management actions.Select Delete Group.Verify that the site no longer appears in the organization hierarchy, and that all children groups and sites have been properly reassigned.
Hover over the group that you want to delete and then select the three-dot menu to view management actions.Select Delete Group.Verify that the site no longer appears in the organization hierarchy, and that all children groups and sites have been properly reassigned.Use Groups and Sites to Filter Data
Use Groups and Sites to Filter DataYou can use the tree organizational structure to filter what to display on the Sites page and on the Devices page. Additionally, you can use sites and groups to define the scope of reports.- From AssetsAsset Overview, use the sites global filter to select which sites' devices to display on the page.
![]() Navigate to Logs & ReportsReports, click +, and select the type of report that you want to create with a site filter.
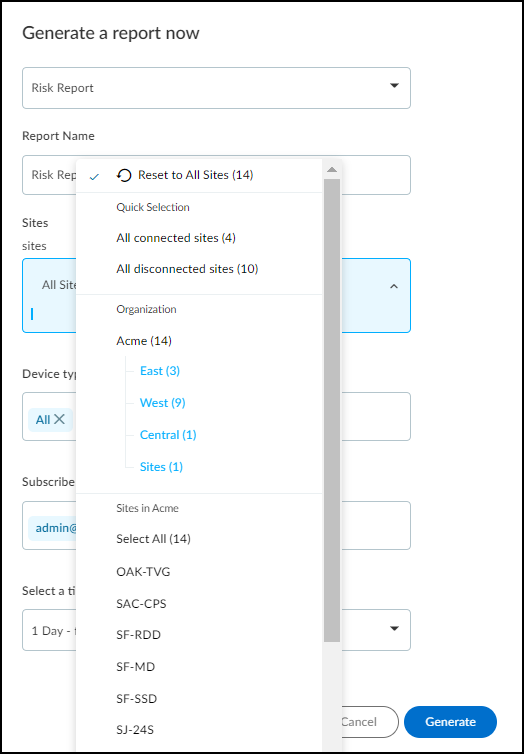
Navigate to Logs & ReportsReports, click +, and select the type of report that you want to create with a site filter.- Configure the report, and under Sites select the sites you want to filter for in your report.
![]() Generate or Schedule your report.Scheduled reports To verify that your report captures the correct site filter, find the card for your report and click Generate Now to generate a report to review on-demand.
Generate or Schedule your report.Scheduled reports To verify that your report captures the correct site filter, find the card for your report and click Generate Now to generate a report to review on-demand.
(Legacy) IoT Security
Create and manage site and organize them into groups in the (Legacy) IoT Security portal.Log in as a user with owner privileges and select NetworksNetworks and SitesSites. There you can view, add, edit, and delete sites and site groups with devices under Device Security protection.Add a Site
Add a Site - At the top of the Sites section, click + to open the Create Site dialog.There are different settings based on the device-to-site assignment method that’s in use.Configure your site.IP address-based assignment
- Site Name: Enter a name for the site
- Optional Site Address: Enter an address to help you identify the geographical or network logical location of the site
- Optional IP Prefix: Choose a nonshared IP address block
- Optional Network Segment: Choose a previously defined network segment
- Optional Description: Enter a description for the site
Firewall-based assignment- Site Name: Enter a name for the site
- Optional Site Address: Enter an address to help you identify the geographical or network logical location of the site
- Optional Site Group: Choose an existing site group to assign the site to
Save your new site.![]() Edit your site or delete your site if you no longer need it.To edit or delete a site, click the three vertical dots at the far right of a site row and then click one of the actions that appear. When assigning devices to sites based on firewalls, there are two additional options. You can assign one or more firewalls to a site or unassign a site from a group.
Edit your site or delete your site if you no longer need it.To edit or delete a site, click the three vertical dots at the far right of a site row and then click one of the actions that appear. When assigning devices to sites based on firewalls, there are two additional options. You can assign one or more firewalls to a site or unassign a site from a group.![]() Before you can delete a site, you must first remove all firewalls from it or reassign them to different sites.
Before you can delete a site, you must first remove all firewalls from it or reassign them to different sites.Add Groups to the Tree and Add Sites to Groups
Add Groups to the Tree and Add Sites to Groups There can be five levels in a group hierarchy. The root node forms the top-level group (“Acme” in the examples here) and is the group to which all sites belong by default. The top-level group is the name of the tenant account and can’t be removed, but it can be renamed. All other groups below the root are owner-defined.The global filter has priority over page-level filters. When creating the tree structure, set the global filter at the top of the page to All Sites. If it’s set to anything else, the Organization panel will keep collapsing to show only the site or sites that are selected in the global filter.Once you have a group hierarchy set up, you can assign sites to groups as a bulk action, as an individual assignment, or as a combined create and assign action.- Add a group to the organization by hovering over an existing group and then clicking the Add group icon.
![]() Enter a name for the group.Optional Continue adding groups and subgroups to reflect the structure of your organization.After adding the groups you need, add sites to them.
Enter a name for the group.Optional Continue adding groups and subgroups to reflect the structure of your organization.After adding the groups you need, add sites to them.- Multiple sites selection Select the check box for one or more sites in the Sites panel, click Assign to Group, and then choose the group to assign them to.You can search for a group in the Search groups field at the top of the Assign to Group drop-down.You can also use these steps to reassign sites from one group to another. When you select a new group for a site, the site is removed from the old group.
![]() When you assign a site to a group that also has subgroups, a node labeled Sites appears in the tree under its assigned group at the same level as the subgroups. For example, the group named East Coast has two subgroups — New Jersey and Virginia — and it also has a node called Sites for two sites assigned to the East Coast group.
When you assign a site to a group that also has subgroups, a node labeled Sites appears in the tree under its assigned group at the same level as the subgroups. For example, the group named East Coast has two subgroups — New Jersey and Virginia — and it also has a node called Sites for two sites assigned to the East Coast group.![]() Single site selection Assign a single site to a group by editing the site.
Single site selection Assign a single site to a group by editing the site.- Select the three-dot menu at the far-right of a site's row in the Sites panel.
- Select Edit Site to bring up the Edit Site dialog.
- Assign or edit the Site Group (Optional) field for the site.
- Save your changes.
Continue assigning sites to the appropriate groups.Optional Add new sites to groups by selecting a Site Group option when you create a new site.![]()
Delete Groups
Delete Groups - Optional Reassign or remove all sites and child groups assigned to the site before deleting it.If you delete a group, Device Security reassigns all its sites and child groups to its parent group. For instance, look at what happens when the Maryland group is deleted. The site that belonged to Maryland now belongs to East Coast, and its child group Annapolis becomes a child group of East Coast.
![]() Hover over the group that you want to delete and then select the three-dot menu to view management actions.Select Delete Group.Verify that the site no longer appears in the organization hierarchy, and that all children groups and sites have been properly reassigned.
Hover over the group that you want to delete and then select the three-dot menu to view management actions.Select Delete Group.Verify that the site no longer appears in the organization hierarchy, and that all children groups and sites have been properly reassigned.Use Groups and Sites to Filter Data
Use Groups and Sites to Filter DataYou can use the tree organizational structure to filter what to display on the Sites page and on the Devices page. Additionally, you can use sites and groups to define the scope of reports.- From NetworksNetworks and SitesSites, filter the Sites panel by selecting a group name in the Organization panel.To remove the site filter, click the X next to the site name chip at the top of the Sites table.From AssetsDevices, use the sites global filter to select which sites' devices to display on the page.
![]() Navigate to Logs & ReportsReports, click +, and select the type of report that you want to create with a site filter.
Navigate to Logs & ReportsReports, click +, and select the type of report that you want to create with a site filter.- Configure the report, and under Sites select the sites you want to filter for in your report.
![]() Generate or Schedule your report.Scheduled reports To verify that your report captures the correct site filter, find the card for your report and click Generate Now to generate a report to review on-demand.
Generate or Schedule your report.Scheduled reports To verify that your report captures the correct site filter, find the card for your report and click Generate Now to generate a report to review on-demand.Control Access by Sites and Site Groups
Control Access by Site and Site GroupsWhen logged in as a user with owner privileges, you can use groups to control which sites you allow other users to access.By default, all users have access to all groups and sites. After a user with owner privileges gives other users access to a limited subset of sites and site groups, that’s all they can access. If you delete those sites and site groups, these users won’t return to having default access to everything. Instead, they won’t be able to access anything; that is, until they’re given access to something else. On the other hand, users with owner privileges always have access to all groups and sites in their account.- Navigate to AdministrationUser Accounts and select the account to modify from the User Accounts table.On the User Detail page, open the User Role & AccessSites drop down, and select which sites and site groups the user can access.Save your changes.

