What’s New in Panorama Plugin for VMware NSX 2.0.4
Table of Contents
Expand all | Collapse all
-
-
-
-
- Features Introduced in Zero Touch Provisioning 2.0
- Known Issues in the Zero Touch Provisioning 2.0.4 Release
- Known Issues in the Zero Touch Provisioning 2.0.3 Release
- Known Issues in the Zero Touch Provisioning 2.0.2 Release
- Known Issues in the Zero Touch Provisioning 2.0.1 Release
- Known Issues in the Zero Touch Provisioning 2.0.0 Release
- Limitations
-
-
What’s New in Panorama Plugin for VMware NSX 2.0.4
The Panorama plugin for VMware NSX 2.0.4 introduces
the following:
Automated Full Dynamic Address Group Sync
The Automated Full Dynamic Address Group (DAG)
Sync is a periodic, full synchronization between Panorama and NSX
Manager. This sync is equivalent to executing a Synchronize
Dynamic Objects. By default, the Automated Full DAG
Sync is disabled and the value is set to zero (0). To enable the
Automated Full DAG Sync, set the interval between one hour and 72
hours. Setting a value of zero hours disables the Automated Full
DAG sync. You must configure or disable the Automated Full DAG Sync
from the Panorama CLI using the following command.
If you
have to two Panorama instances in an HA pair, set the Automated
Full DAG Sync interval on the primary Panorama first and then set
the same interval value on the secondary Panorama.
- Log in to the Panorama CLI.Execute the following command.request plugins vmware_nsx dag-sync-interval interval <interval-in-hours>You can view the configured value with the following show command.show plugins vmware_nsx dag-sync-interval
Upgrade Consideration for VMware NSX Plugin 2.0.4
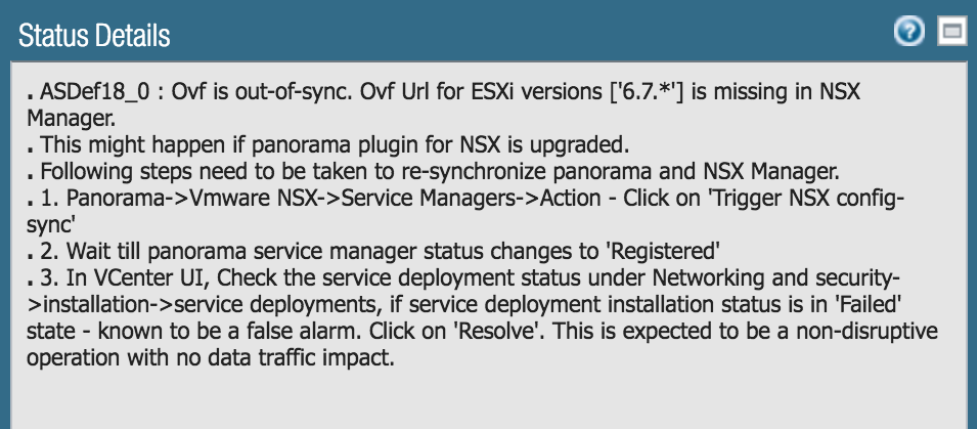
After installing VMware NSX plugin 2.0.4, when Panorama and pushes an OVF file to NSX Manager, the Service Manager status on Panorama goes Out of Sync. The VMware NSX plugin 2.0.4 automatically adds support for ESXi 6.7 to each of your service definitions. However, this causes a mismatch between the plugin and your existing service definitions and requires a resolve to complete the update.Complete the following procedure to synchronize Panorama and NSX Manager.- Log in to the Panorama web interface.Select PanoramaVMware NSXService Managers and check the status of your NSX Manager(s). Clicking on Out of Sync to view the details shows the following message.
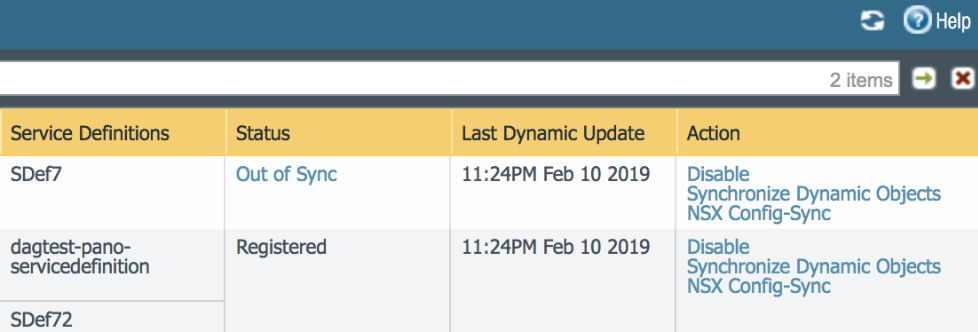
![]() Click NSX Config-Sync for the service manager that is Out of Sync with NSX Manager.
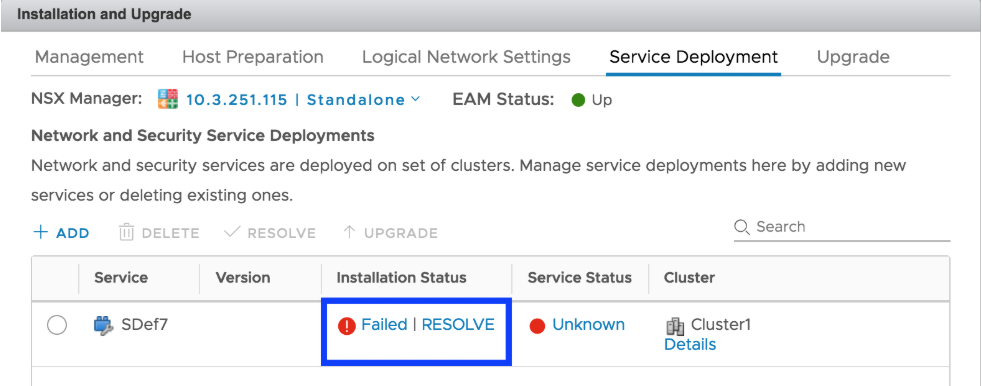
Click NSX Config-Sync for the service manager that is Out of Sync with NSX Manager.![]() Wait for the service manager status to become Registered.Log in to the vCenter web interface.Select Networking & SecurityInstallationService Deployments.Click Resolve under Installation Status to remove the failed status. This action should be non-disruptive and not disrupt traffic. For questions, consult VMware.
Wait for the service manager status to become Registered.Log in to the vCenter web interface.Select Networking & SecurityInstallationService Deployments.Click Resolve under Installation Status to remove the failed status. This action should be non-disruptive and not disrupt traffic. For questions, consult VMware.![]()