Advanced WildFire Powered by Precision AI™
Enable Advanced WildFire Inline Cloud Analysis
Table of Contents
Enable Advanced WildFire Inline Cloud Analysis
Inline Cloud Analysis for Advanced WildFire provides real-time advanced malware
protection by leveraging the analysis capabilities of the Advanced WildFire Cloud.
| Where Can I Use This? | What Do I Need? |
|---|---|
|
|
Palo Alto Networks Advanced WildFire operates a series of cloud-based ML
detection engines that provide inline analysis of PE (portable executable) files
traversing your network to detect and prevent advanced malware in real-time. As with
other malicious content that WildFire detects, threats detected by Advanced WildFire
Inline Cloud Analysis generate a signature that is then disseminated to customers
through an update package, providing a future defense for all Palo Alto Networks
customers.
The cloud-based engines enable the detection of never-before-seen malware
(e.g., a Palo Alto Networks zero-day - malware previously unseen in the wild or by
Palo Alto Networks) and block it from entering your environment. Advanced WildFire
Inline Cloud Analysis uses a lightweight forwarding mechanism on the firewall to
minimize performance impact. The cloud-based ML models are updated seamlessly, to
address the ever-changing threat landscape without requiring content updates or
feature release support.
Because this feature functions by performing real-time queries against the Advanced
WildFire cloud service, it requires a persistent, active cloud connection to analyze
and mitigate threats effectively. Without a continuous connection to the cloud
service, the system cannot perform the live lookups necessary to identify and
prevent advanced malware in real-time.
When the Advanced WildFire license is enabled, the firewall performs PAN-DB URL
categorization lookups as part of its internal processing, independent of any
URL Filtering license or explicit cloud inline configuration. This is
facilitated by the Cloud Content FQDN, which is enabled by default to connect to
hawkeye.services-edge.paloaltonetworks.com and then resolve to the closest cloud
services server. This is configured from:
- NGFW: DeviceSetupContent-IDCloud Content Settings
- Strata Cloud Manager: ConfigurationNGFW and Prisma AccessDeviceContent-IDDeviceCloud Content Settings
Advanced WildFire Inline Cloud Analysis is enabled and configured through
the WildFire Analysis profile and requires PAN-OS 11.1 or later with an active
Advanced WildFire license.
- Install an updated firewall device certificate used to authenticate to the Advanced WildFire cloud analysis service. Repeat for all firewalls enabled for inline cloud analysis.This step is not necessary if you already installed the current version of the device certificate on your firewall.Configure the Content Cloud FQDN Settings.Log in to the PAN-OS web interface.To enable Advanced WildFire Inline Cloud Analysis, you must have an active Advanced WildFire subscription. For more information, refer to: Licensing, Registration, and Activation.To verify subscriptions for which you have currently-active licenses, select DeviceLicenses and verify that the appropriate licenses are available and have not expired.
![]() If your current WildFire license has expired and you are installing an Advanced WildFire license, you must first remove the WildFire license from the NGFW before installing the Advanced WildFire license.Update or create a new WildFire Analysis Security profile to enable Advanced WildFire Inline Cloud Analysis.
If your current WildFire license has expired and you are installing an Advanced WildFire license, you must first remove the WildFire license from the NGFW before installing the Advanced WildFire license.Update or create a new WildFire Analysis Security profile to enable Advanced WildFire Inline Cloud Analysis.- Select an existing WildFire Analysis Profile or Add a new one (ObjectsSecurity ProfilesWildFire Analysis).
- Select your WildFire analysis profile and then go to Inline Cloud Analysis and Enable cloud inline analysis.
![]()
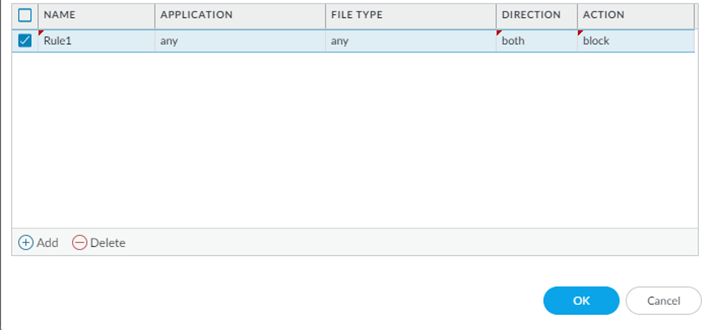
- Specify a rule defining an action to take when Advanced WildFire Inline Cloud Analysis detects advanced malware.
![]()
- Name—Enter a descriptive Name for any rules you add to the profile (up to 31 characters).
- Application—Add application traffic to match against for which the rules defining the Inline Cloud ML actions are governed.
- File Type—Select a File Type to be analyzed at the defined
analysis destination for the rule.Only PE (portable executable) are supported at this time.
- Direction—Apply the rule to traffic depending on the transmission Direction. You can apply the rule to download traffic.
- Action—Configure the action to take when a threat is detected
using Advanced WildFire Inline Cloud Analysis. You can
allow the application traffic to
continue to the destination or block
traffic from either a source or a source-destination.Palo Alto Networks recommends setting the action to block for optimal security.
- Click OK to exit the WildFire Analysis Profile configuration dialog.
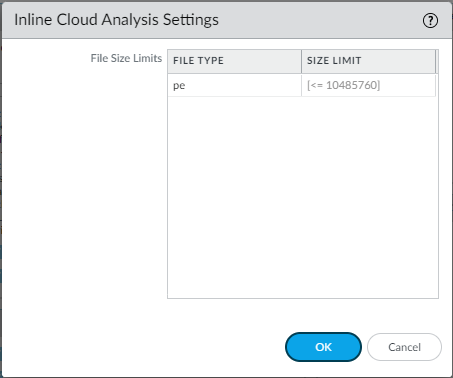
Review the maximum file size that can be forwarded for analysis using Advanced WildFire Inline Cloud Analysis.Advanced WildFire Inline Cloud Analysis provides a fast WildFire verdict, however, a full report for a malicious sample is only available after the sample undergoes full dynamic analysis, which can take up to 30 minutes.![]()
- Select DeviceSetupWildFireInline Cloud Analysis Settings and review the file size limits.
- Click OK to confirm your changes.
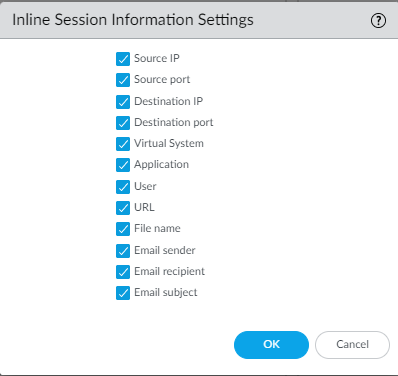
Specify the network session information that the firewall forwards about a given sample. Palo Alto Networks uses session information to learn more about the context of the suspicious network event, indicators of compromise related to the malware, affected hosts and clients, and applications used to deliver the malware. These options are enabled by default.![]()
- Select DeviceSetupWildFireInline Session Information Settings and select or clear the options as necessary.
- Source IP—Forward the source IP address that sent the unknown file.
- Source Port—Forward the source port that sent the unknown file.
- Destination IP—Forward the destination IP address for the unknown file.
- Destination Port—Forward the destination port for the unknown file.
- Virtual System—Forward the virtual system that detected the unknown file.
- Application—Forward the user application that transmitted the unknown file.
- User—Forward the targeted user.
- URL—Forward the URL associated with the unknown file.
- Filename—Forward the name of the unknown file.
- Email sender—Forward the sender of an unknown email link (the name of the email sender also appears in WildFire logs and reports).
- Email recipient—Forward the recipient of an unknown email link (the name of the email recipient also appears in WildFire logs and reports).
- Email subject—Forward the subject of an unknown email link (the email subject also appears in WildFire logs and reports).
- Click OK to confirm your changes.
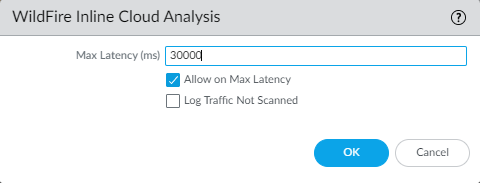
Configure the timeout latency and action to take when the request exceeds the max latency.![]()
- Specify the action to take when latency limits are reached for Advanced WildFire Inline Cloud Analysis requests:
- Max Latency (ms)—Specify the maximum acceptable processing time, in seconds, for Advanced WildFire Inline Cloud Analysis to return a result.
- Allow on Max Latency—Enables the firewall to take the action of allow, when the maximum latency is reached. De-selecting this option sets the firewall action to block.
- Log Traffic Not Scanned— Enables the firewall to log Advanced WildFire Inline Cloud Analysis requests that exhibit the presence of advanced malware, but have not been processed by the Advanced WildFire cloud.
- Click OK to confirm your changes.
(Required when the firewall is deployed with an explicit proxy server) Configure the proxy server used to access the servers that facilitate requests generated by all configured inline cloud analysis features. A single proxy server can be specified and applies to all Palo Alto Networks update services, including all configured inline cloud and logging services.- (PAN-OS 11.2.3 and later) Configure the proxy server through PAN-OS.
- Select Device Setup Services and edit the Services details.
- Specify the Proxy Server settings and Enable proxy for Inline Cloud Services. You can provide either an IP address or FQDN in the Server field.The proxy server password must contain a minimum of seven characters.
![]()
- Click OK.
(PAN-OS 11.1.5 and later) Configure the proxy server through the firewall CLI.- Configure the base proxy server settings using the following CLI commands:
set deviceconfig system secure-proxy-server <FQDN_or_IP>
set deviceconfig system secure-proxy-port <1-65535>
set deviceconfig system secure-proxy-user <value>
set deviceconfig system secure-proxy-password <value>
The proxy server password must contain a minimum of seven characters. - Enable the proxy server to send requests to the inline cloud service servers using the following CLI command:
debug dataplane mica set inline-cloud-proxy enable
- View the current operational status of proxy support for inline cloud services using the following CLI command:
debug dataplane mica show inline-cloud-proxy
For example:debug dataplane mica show inline-cloud-proxy Proxy for Advanced Services is Disabled
(Recommended) Configure the firewall to disable the client from fetching part of a file and subsequently starting a new session to fetch the rest of a file after the firewall terminates the original session due to detected malicious activity. This occurs when a web browser implements the HTTP Range option. While enabling Allow HTTP partial response provides maximum availability, it can also increase the risk of a successful cyberattack. Palo Alto Networks recommends disabling Allow HTTP partial response for maximum security.Allow HTTP partial response is a global setting and affects HTTP-based data transfers which use the RANGE header, which may cause service anomalies for certain applications. After you disable Allow HTTP partial response, validate the operation of your business-critical applications.- Select DeviceSetupContent-IDContent-ID Settings.
- De-select Allow HTTP partial response and click OK.
Commit your changes.


