Advanced WildFire Powered by Precision AI™
Set Up Alerts for Malware
Table of Contents
Set Up Alerts for Malware
| Where Can I Use This? | What Do I Need? |
|---|---|
|
|
You can configure a Palo Alto Networks firewall
to send an alert when WildFire identifies a malicious or phishing
sample. You can configure alerts for benign and grayware files as
well, but not for benign and grayware email links. This example
describes how to configure an email alert; however, you could also
configure log forwarding to set
up alerts to be delivered as syslog messages, SNMP traps, or Panorama alerts.
- Configure an email server profile.
- Select DeviceServer ProfilesEmail.Click Add and then enter a Name for the profile. For example, WildFire-Email-Profile.(Optional) Select the virtual system to which this profile applies from the Location drop-down.Click Add to add a new email server entry and enter the information required to connect to the Simple Mail Transport Protocol (SMTP) server and send email (up to four email servers can be added to the profile):
- Server—Name to identify the mail server (1-31 characters). This field is just a label and does not have to be the host name of an existing SMTP server.
- Display Name—The name to show in the From field of the email.
- From—The email address where notification emails are sent from.
- To—The email address to which notification emails are sent.
- Additional Recipient(s)—Enter an email address to send notifications to a second recipient.
- Gateway—The IP address or host name of the SMTP gateway to use to send the emails.
Click OK to save the server profile.Click Commit to save the changes to the running configuration.Test the email server profile.- Select MonitorPDF ReportsEmail Scheduler.Click Add and select the new email profile from the Email Profile drop-down.Click the Send test email button and a test email should be sent to the recipients defined in the email profile.Configure a log forwarding profile to enable WildFire logs to be forwarded to Panorama, an email account, SNMP, a syslog server, and as HTTP requests.In this example you will set up email logs for when a sample is determined to be malicious. You can also enable Benign and Grayware logs to be forwarded, which will produce more activity if you are testing.The firewall does not forward WildFire logs for blocked files to an email account.
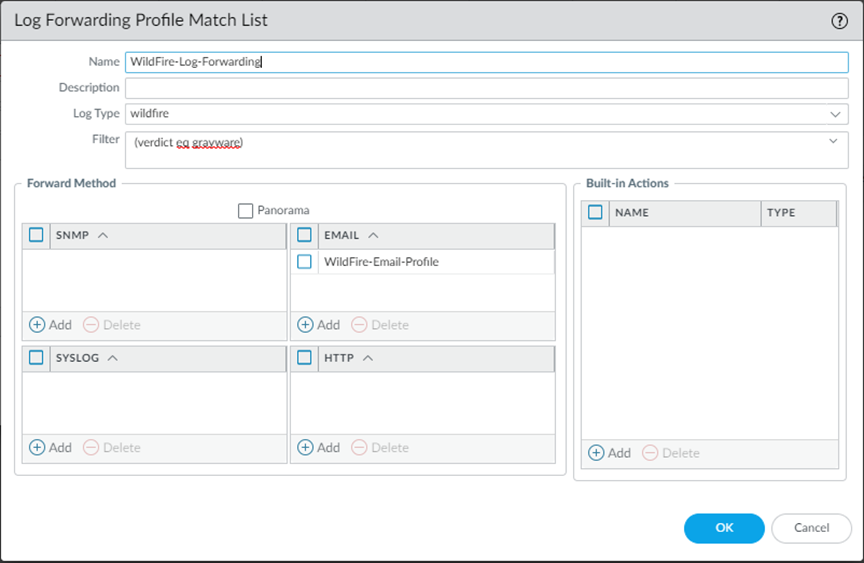
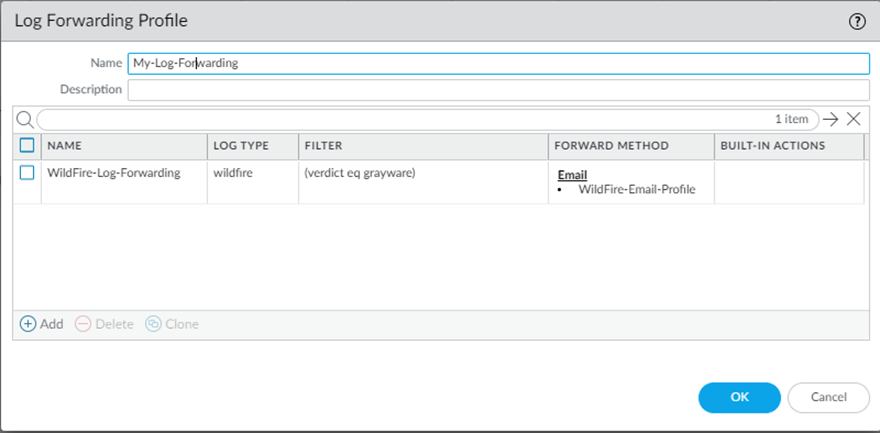
- Select ObjectsLog Forwarding.Add and name the profile, for example, WildFire-Log-Forwarding. Optionally, you can add a Description of the log forwarding profile.Add to configure forwarding methods.
![]()
- Provide a name for the Log Fowarding Profile Match List.
- Select the WildFire Log Type.
- Filter the logs using (verdict eq malicious) query.
- Under the Forward Method options, choose the Email profile that was created in step 1 (in this case, WildFire-Email-Profile), and click OK to save the match list updates.
Click OK again to save the Log Forwarding Profile updates.![]() Add the log forwarding profile to a security policy being used for WildFire forwarding (with a WildFire Analysis profile attached).The WildFire Analysis profile defines the traffic that the firewall forwards for Advanced WildFire analysis. To set up a WildFire analysis profile and attach it to a security policy rule, see Forward Files for Advanced WildFire Analysis.
Add the log forwarding profile to a security policy being used for WildFire forwarding (with a WildFire Analysis profile attached).The WildFire Analysis profile defines the traffic that the firewall forwards for Advanced WildFire analysis. To set up a WildFire analysis profile and attach it to a security policy rule, see Forward Files for Advanced WildFire Analysis.- Select PoliciesSecurity and click on the policy that is used for WildFire forwarding.In the Actions tab Log Setting section, select the Log Forwarding profile you configured.Click OK to save the changes and then Commit the configuration.


