Download PDF
Cloud NGFW for AWS
Use Panorama for Cloud NGFW Policy Management
Table of Contents
Expand All
|
Collapse All
Cloud NGFW for AWS Docs
Use Panorama for Cloud NGFW Policy Management
Manage Cloud NGFW with Panorama.
| Where Can I Use This? | What Do I Need? |
|---|---|
|
|
After linking your Cloud NGFW tenant to the Panorama virtual appliance you can start
using the integration for policy management tasks, such as adding device groups and
applying policies to the device group for the Cloud NGFW tenant using the Panorama
console.
When you use the Panorama console to configure the Cloud NGFW, the browser caches
local information, like the cloud device group, template stack and region, so that
as you switch between Panorama tasks, cached Cloud NGFW information is displayed in
the Panorama console.
When you select a tenant from the Cloud Device Groups node and navigate to
another configuration option in Panorama, returning to the Resources node
retains the tenant view you previously selected. For example, selecting a single
tenant in a region displays the cloud device groups configured for that tenant.
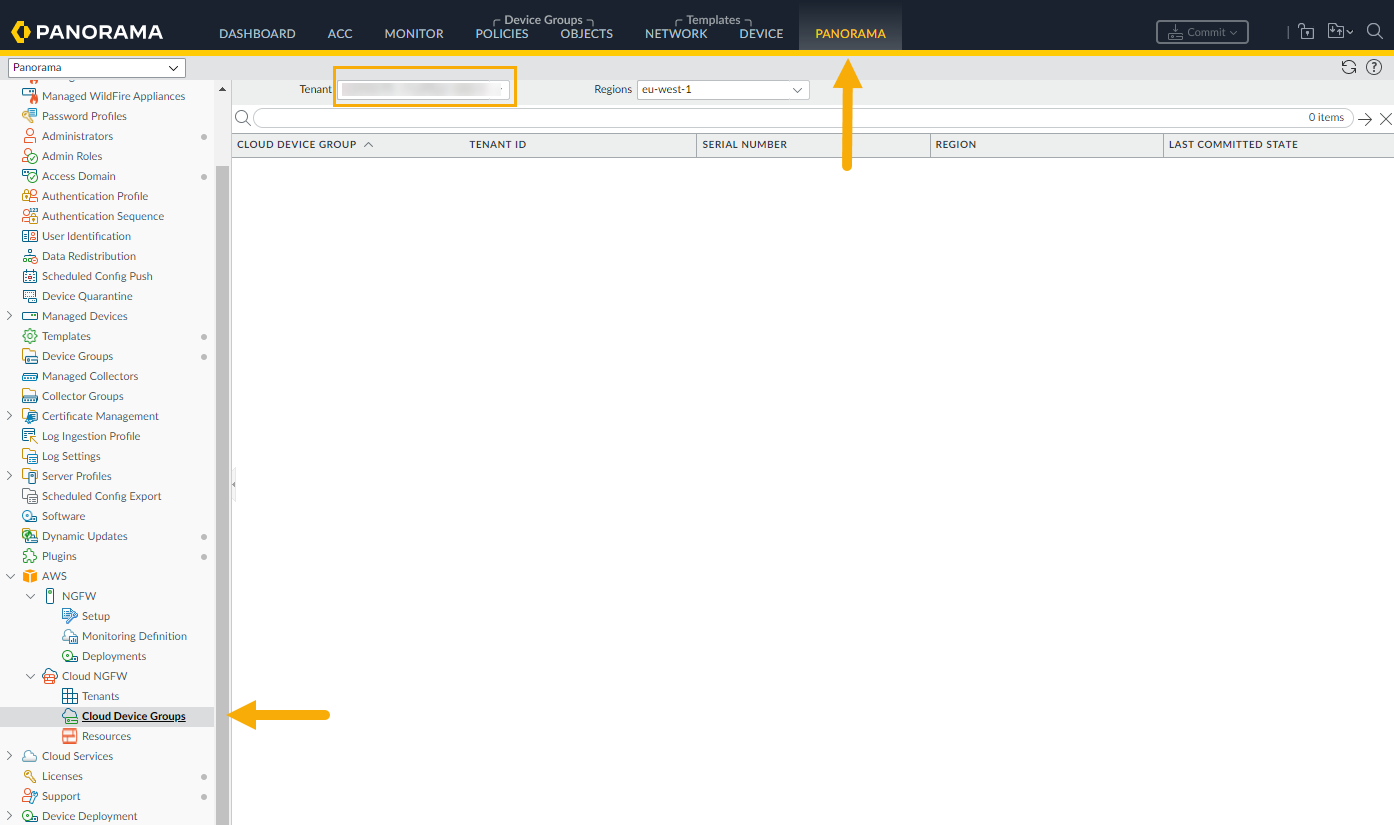
When you navigate to another area in the Panorama console, then return to Cloud
NGFW > Cloud Device Groups, the console displays the single tenant you
previously selected. For example, after displaying the cloud device groups for a
tenant, select AWS > Setup.
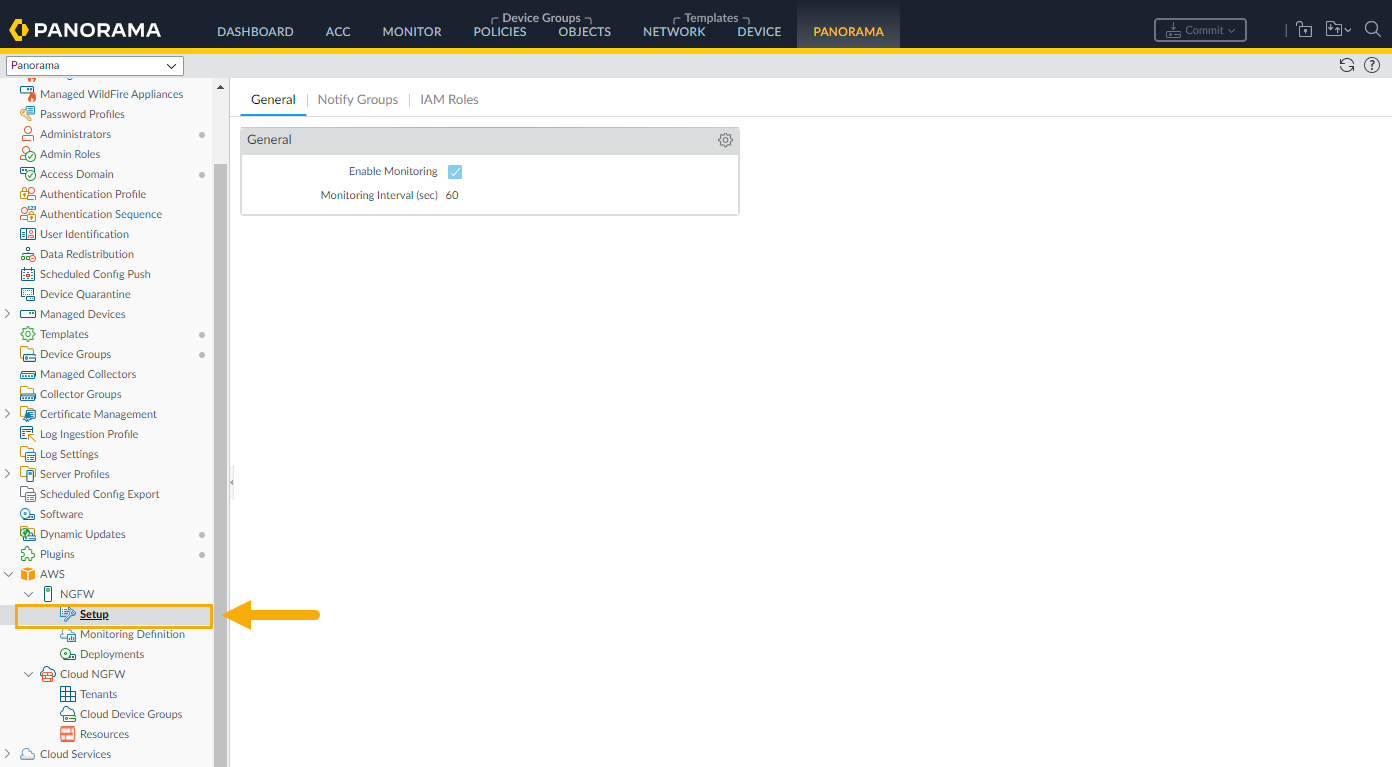
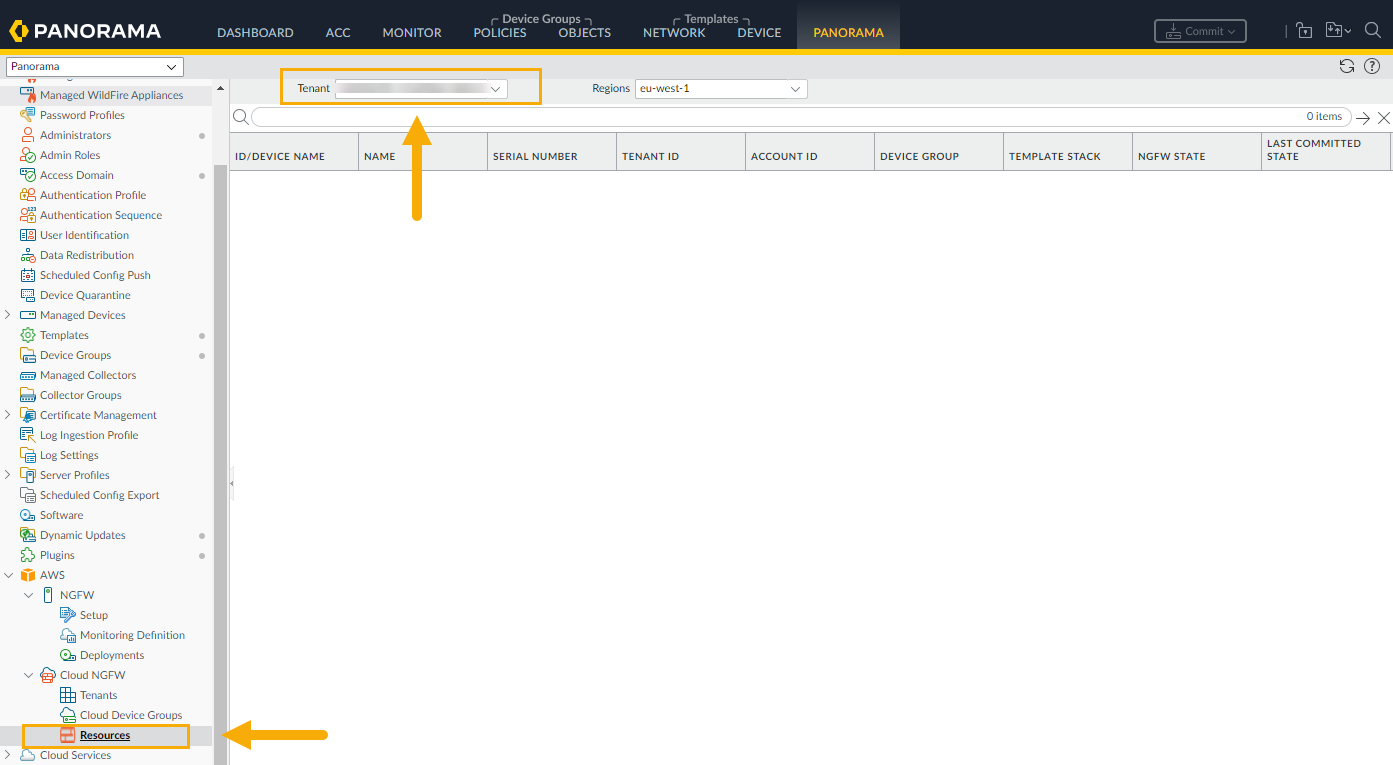
When you return to the Cloud NGFW > Resources screen, the Panorama console
remembers the previously selected tenant rather than displaying all the tenants
associated with the Cloud NGFW resource.
Refresh the browser to dynamically update the
display.
Panorama integration displays only those configuration options available to the Cloud
NGFW resource. For example, to display policy options available to the Cloud NGFW
resource, select Policies. The Panorama console only displays policies
available to the Cloud NGFW cloud device group.

The device group name is prefixed with
cngfw-aws.
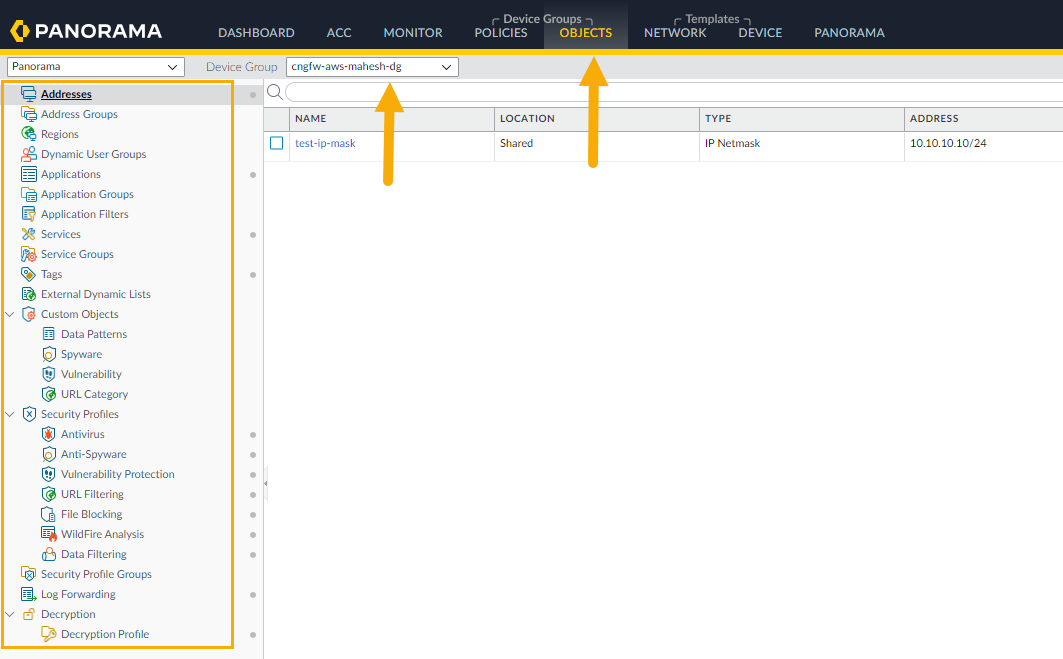
To display device group objects supported by the Cloud NGFW resource, select
Objects. Only those objects supported by Cloud NGFW appear in the
Panorama console.
To display templates supported by the Cloud NGFW resource, select Network.
Only those cloud templates supported by the Cloud NGFW appear.

Rulestack considerations
When you provision a Cloud NGFW resource with a local rulestack, you cannot associate
it with a cloud device group in Panorama; the firewall appears greyed out in the
Panorama console. To resolve this issue, you can disassociate the local rulestack
using the Cloud NGFW console, or, you can provision a new firewall resource without
a local rulestack and associate it with a cloud device group in Panorama.
Alternately, use a global rulestack.
For firewalls created using the AWS Firewall Manager Service (FMS), the
rulestack cannot be deselected in the Panorama console. Select a Panorama pushed
global rulestack from the FMS console. This process removes the associated rulestack
and updates the firewall with a Panorama pushed global rulestack. For more
information see the AWS FMS documentation.
Add Cloud Device Group
With Panorama, you group firewalls in your network into logical units called
device groups. A device group enables grouping based on
network segmentation, geographic location, organizational function, or any other
common aspect of firewalls requiring similar policy configurations.
Using device groups, you can configure policy rules and the objects they reference.
Organize device groups hierarchically, with shared rules and objects at the top, and
device group-specific rules and objects at subsequent levels. This enables you to
create a hierarchy of rules that enforce how firewalls handle traffic.
See Manage Device Groups for more
information.
To add a cloud device group using the Panorama console:
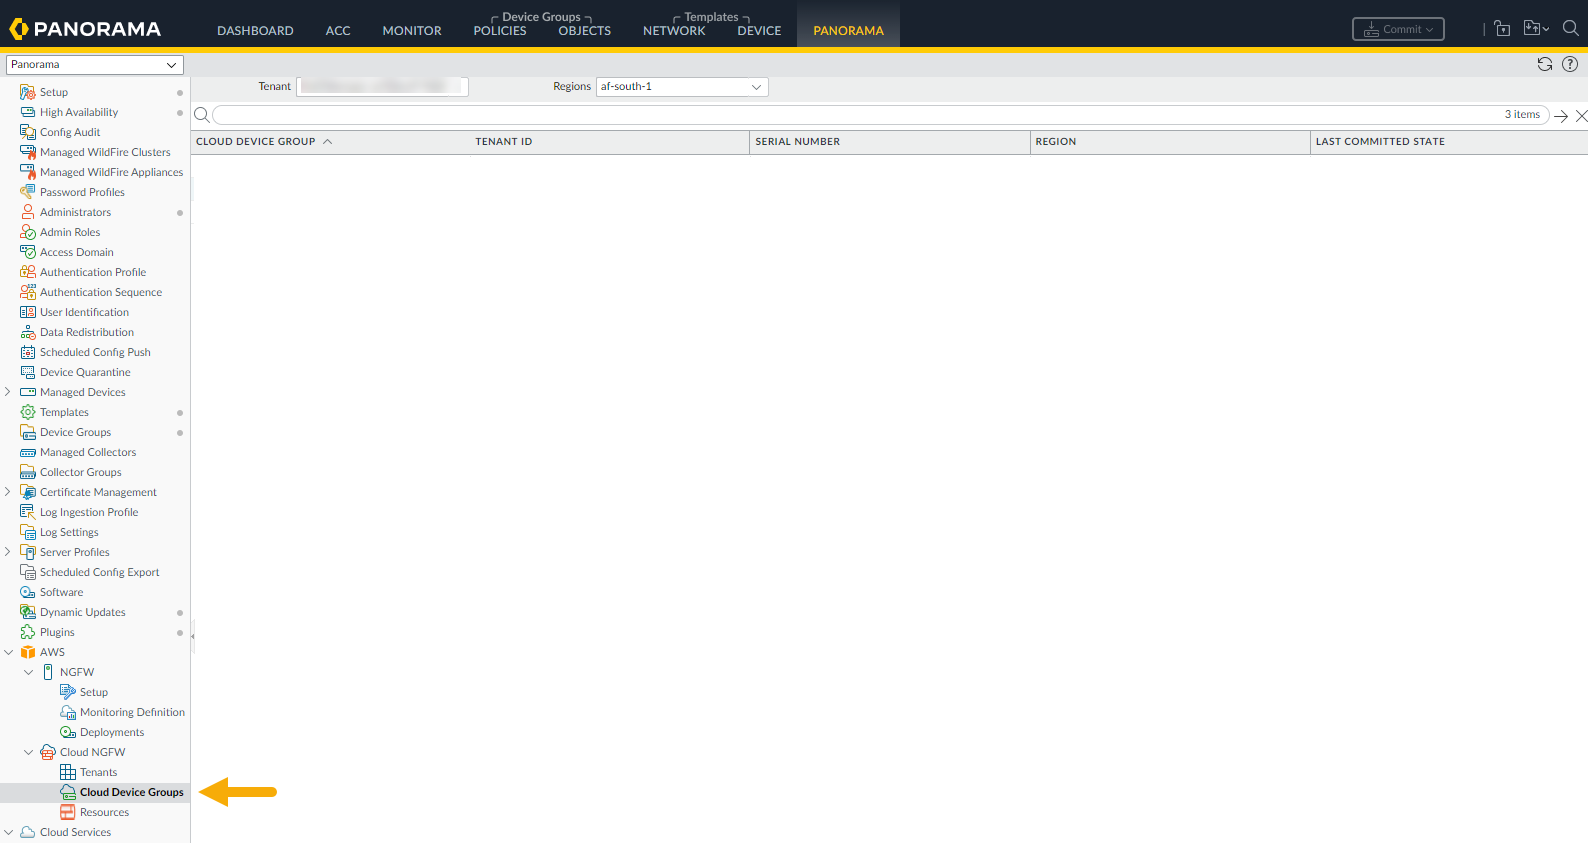
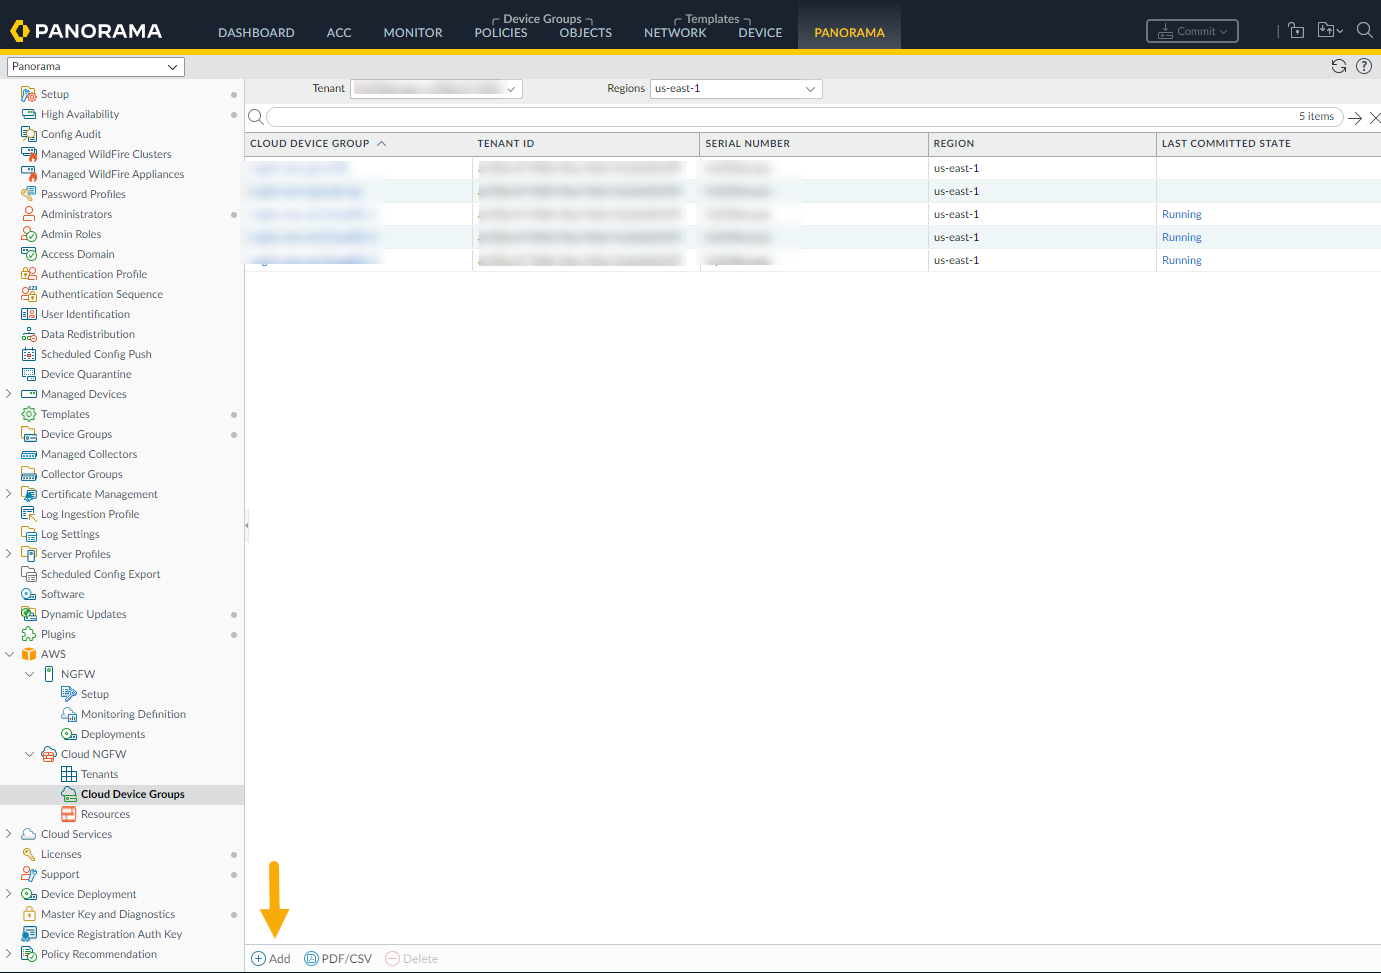
- In the AWS plugin, select Cloud Device Groups. The Cloud Device Group table is empty when you first select it. Previously created cloud device groups appear if they were established for the Cloud NGFW tenant using AWS.
![]() Click Add in the lower left corner.
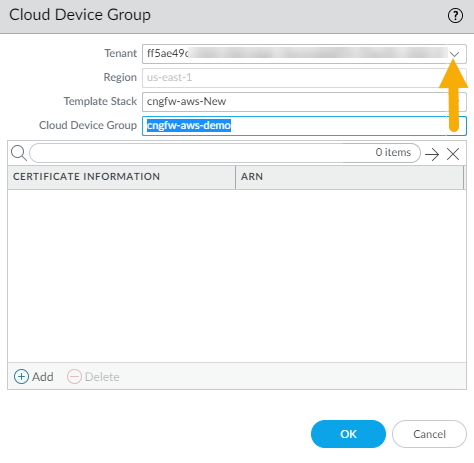
Click Add in the lower left corner.![]() In the Cloud Device Group screen, use the drop-down menu to select the Tenant you want to use.
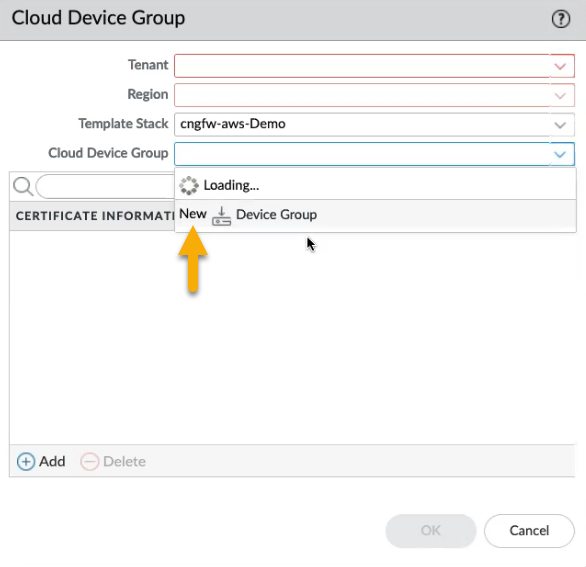
In the Cloud Device Group screen, use the drop-down menu to select the Tenant you want to use.![]() The Region is automatically populated with the region where the tenant resides.Create a new Template Stack, or use the drop-down menu to select an existing template stack.Select the Cloud Device Group drop-down menu and click New:
The Region is automatically populated with the region where the tenant resides.Create a new Template Stack, or use the drop-down menu to select an existing template stack.Select the Cloud Device Group drop-down menu and click New:![]() Enter a Device Group Name for the device group, and click Create.Click OK to apply the cloud device group to the tenant.You can associate a Panorama native certificate, or specify an ARN mapping. After adding a certificate to Cloud NGFW for AWS, enter the name of the certificate and alternately specify ARN mapping.Commit the change.
Enter a Device Group Name for the device group, and click Create.Click OK to apply the cloud device group to the tenant.You can associate a Panorama native certificate, or specify an ARN mapping. After adding a certificate to Cloud NGFW for AWS, enter the name of the certificate and alternately specify ARN mapping.Commit the change.Delete a Cloud Device Group from a Resource
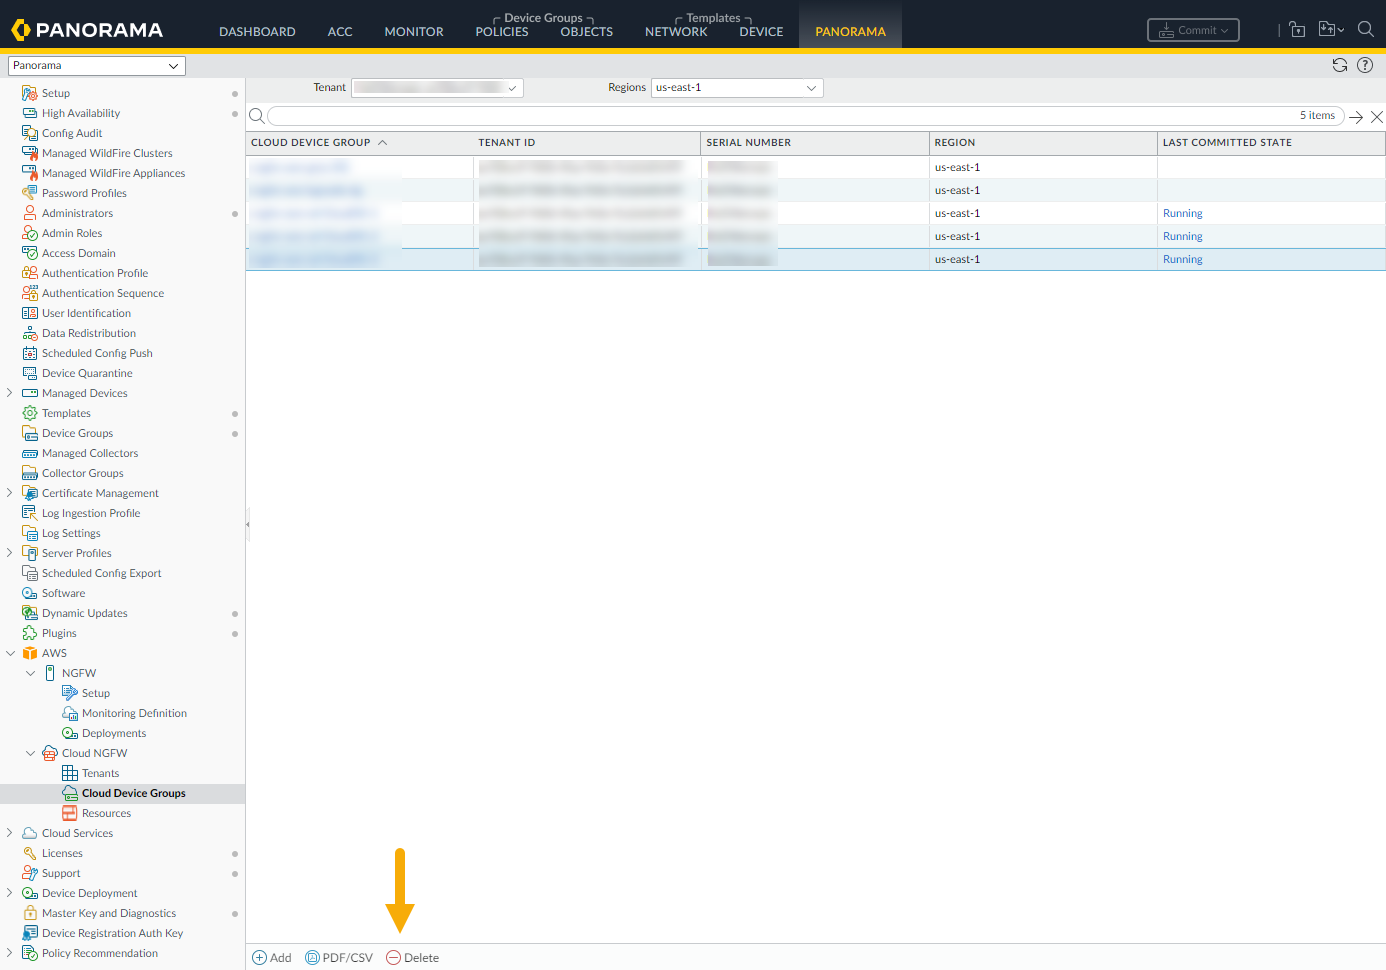
Use the Panorama console to delete a cloud device group. You can only delete a cloud device group if there are no firewalls attached to it.To delete a cloud device group using the Panorama console:- In Panorama, select Cloud Device Groups.Select the Cloud Device Group you want to remove.In the lower portion of the Panorama console, click Delete.
![]() Click Yes to confirm the deletion.Commit the change.
Click Yes to confirm the deletion.Commit the change.Associate a Cloud Device Group to a Resource
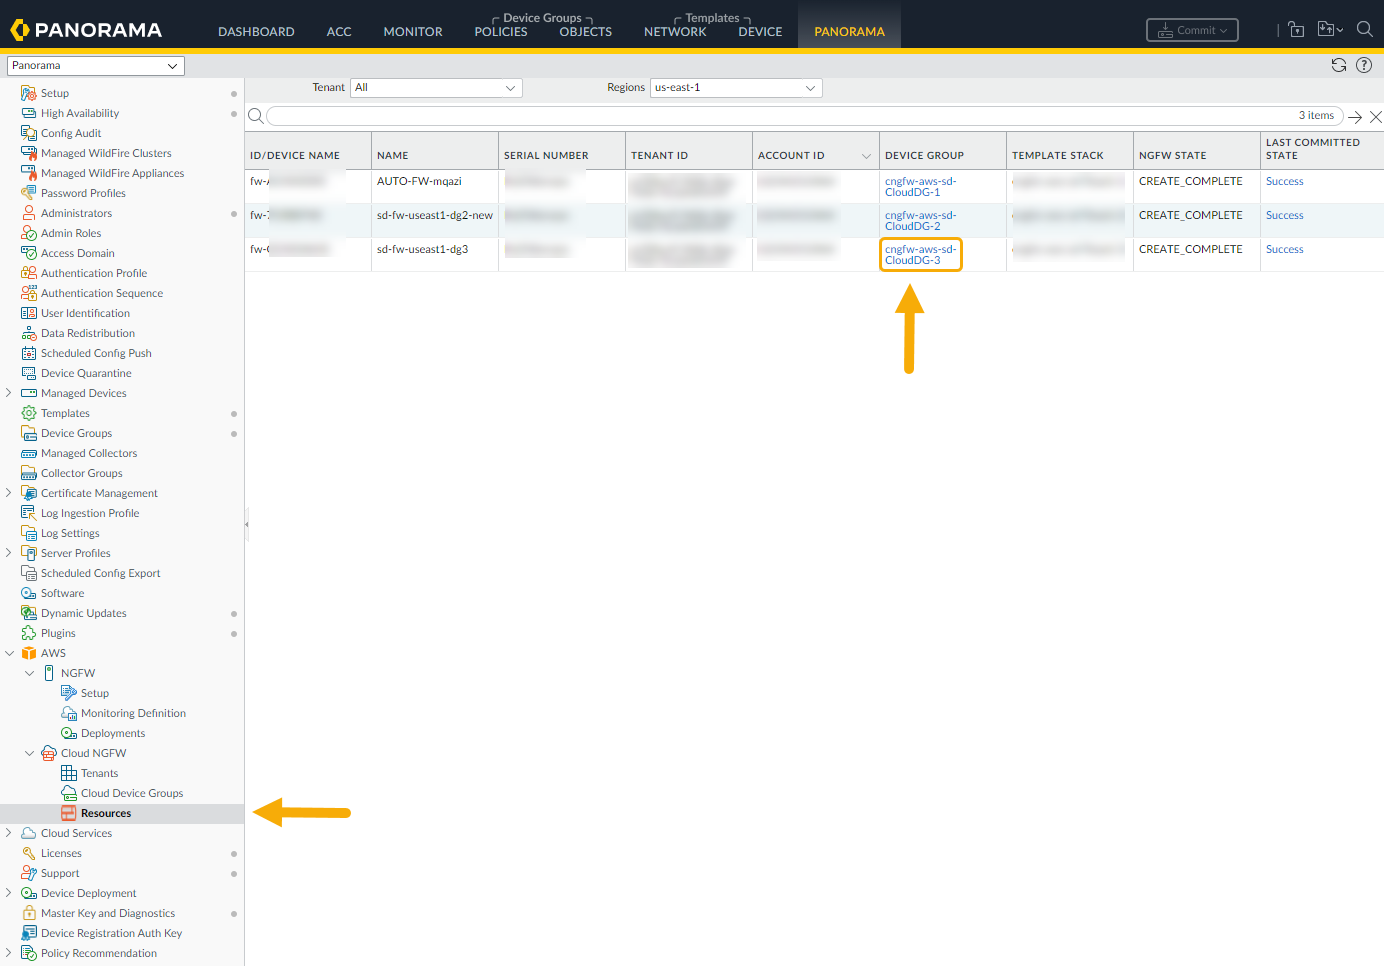
Use the Panorama console to associate a cloud device group to a Cloud NGFW resource. You can push a cloud device group without associating it with a resource, however, you must associate the cloud device group if you want the resource to use the cloud device group configurationTo associate a cloud device group to a Cloud NGFW resource using the Panorama console:- In Panorama, select Resources.Select the Device Group.
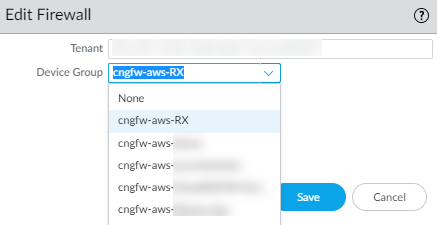
![]() In the Edit Firewall screen, use the drop-down menu to select the cloud device group you want to associate with the Cloud NGFW resource.
In the Edit Firewall screen, use the drop-down menu to select the cloud device group you want to associate with the Cloud NGFW resource.![]() Click Save.Commit the changes.Push the change to your device.
Click Save.Commit the changes.Push the change to your device.Disassociate a Cloud Device Group from a Resource
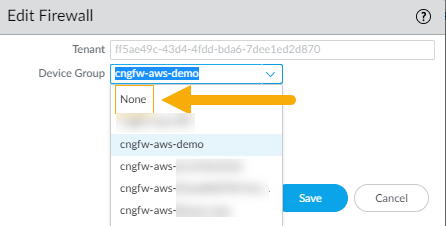
To disassociate a Cloud Device Group from a Cloud NGFW resource using the Panorama console:- In Panorama, select Resources.Select the Device Group of the NGFW resource.In the Edit Firewall screen, select None from the Device Group drop-down. Click Save.
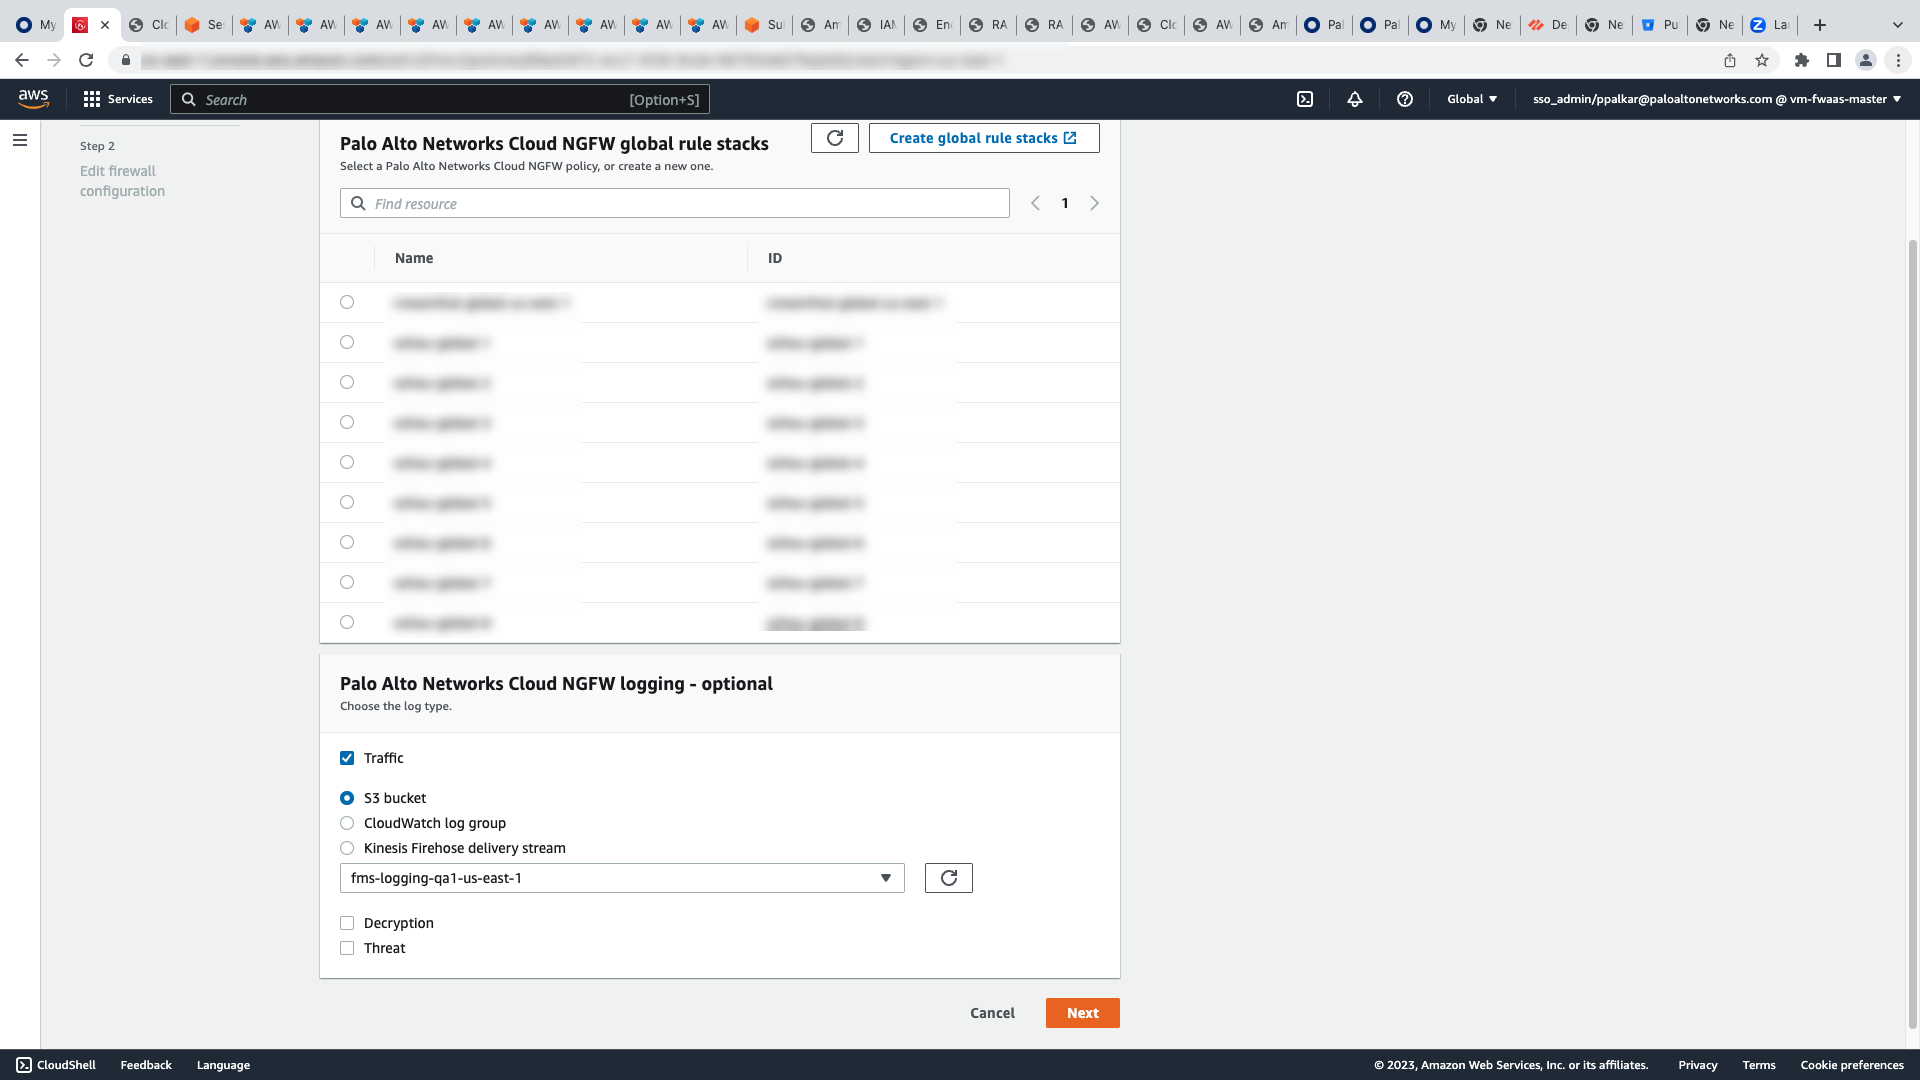
![]()
Apply Policy
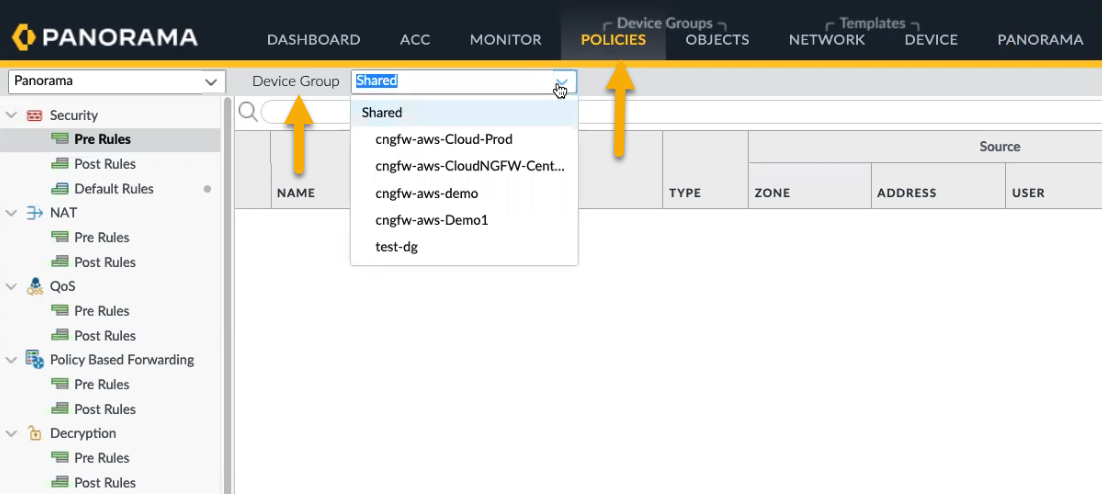
Cloud Device Groups on Panorama allow you to centrally manage firewall policies. You create policies on Panorama either as Pre Rules or Post Rules; Pre Rules and Post Rules allow you to create a layered approach for implementing policy. For more information, see Defining Policies on Panorama.A policy created on Panorama creates a global rulestack. A firewall cannot have rules generated on Panorama and rules generated on the tenant; rules must be created in either Cloud NGFW or Panorama.To configure policies for the cloud device group in Panorama:- Select Policies.In the Device Group section, use the drop-down menu to select the Cloud Device Group previously created. When you create a device group for Cloud NGFW, the name begins with cngfw. For example, cngfw-aws-demo.
![]() In the lower left portion of the console, click Add.In the Security Policy Rule screen, configure elements of the policy you want to apply to the device group:
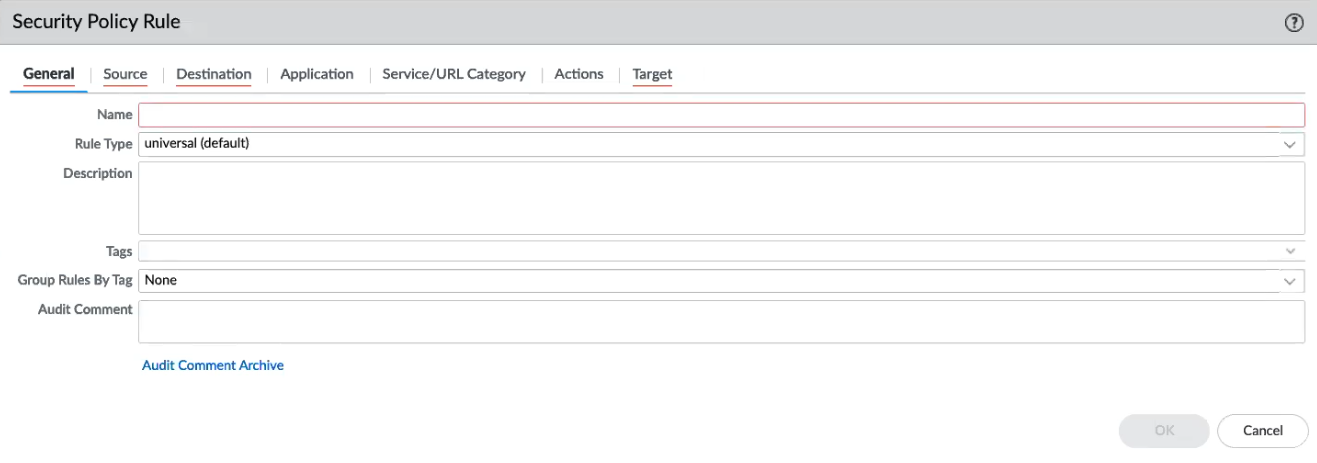
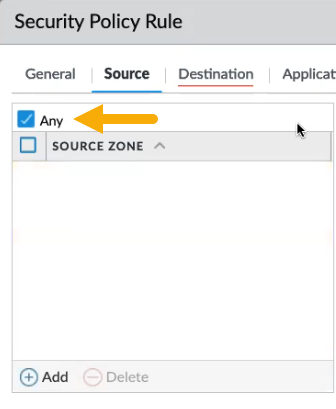
In the lower left portion of the console, click Add.In the Security Policy Rule screen, configure elements of the policy you want to apply to the device group:![]() In the General tab, include a name for the policy.Configure a Source policy. Source policy defines source zone or source address from which the traffic originates. For Source Zone, click Any. You cannot add a specific source address.
In the General tab, include a name for the policy.Configure a Source policy. Source policy defines source zone or source address from which the traffic originates. For Source Zone, click Any. You cannot add a specific source address.![]()
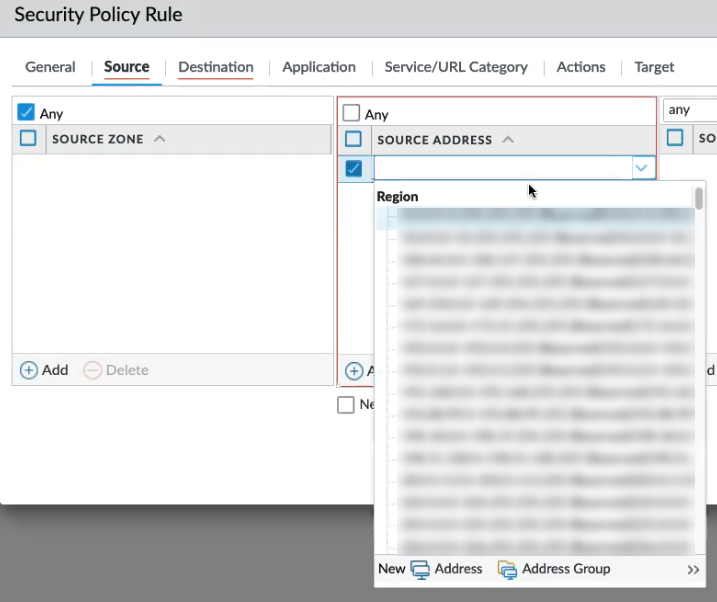
- Continue applying Source policies by including the Source Address. Click Any, or use the drop-down menu to select an existing address, or, use options to add a new address or address group.
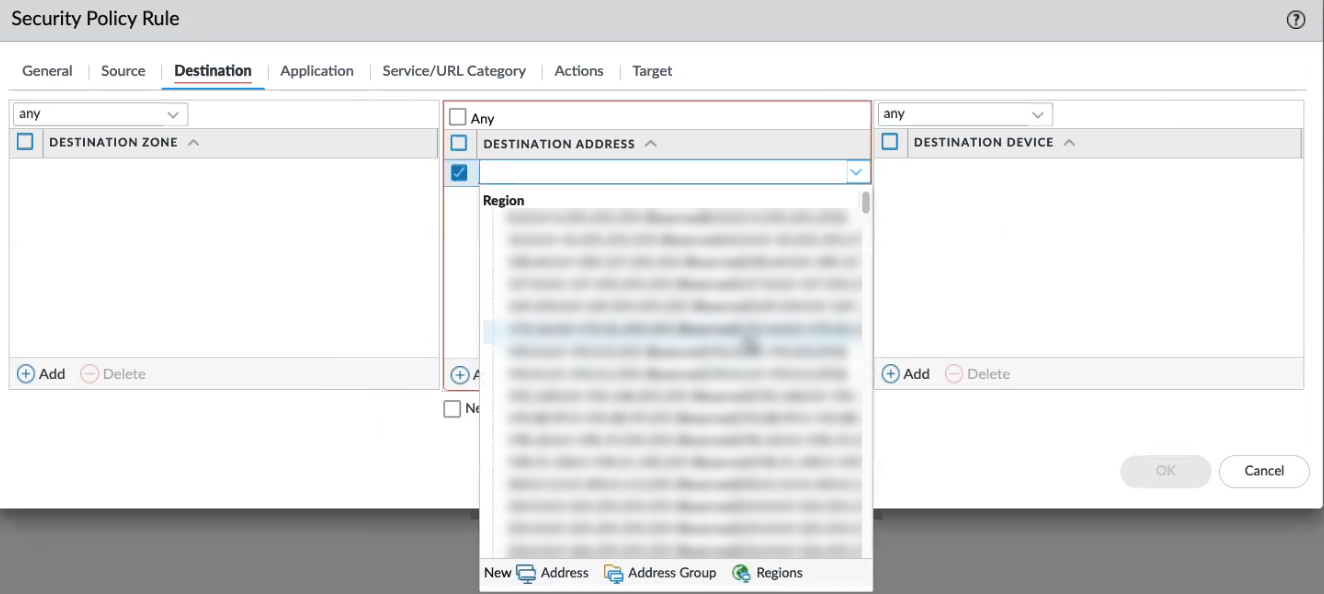
![]() For Source User and Source Device policy, click Any. Cloud NGFW does not support specifying specific source users or source devicesDestination policy defines the destination zone or destination address for the traffic. Use the drop-down menu to select an existing address, or, use options to add a new address or address group. The Destination policy includes fields for the zone, address, and device.
For Source User and Source Device policy, click Any. Cloud NGFW does not support specifying specific source users or source devicesDestination policy defines the destination zone or destination address for the traffic. Use the drop-down menu to select an existing address, or, use options to add a new address or address group. The Destination policy includes fields for the zone, address, and device.- For the Destination Zone, click Any. Cloud NGFW does not support adding individual destination zones.For the Destination Address, click Any, or, use the drop-down menu to select an existing zone. Click New to add a new address, address group, or region.For the Destination Device, click Any. Cloud NGFW does not support adding individual destination devices.
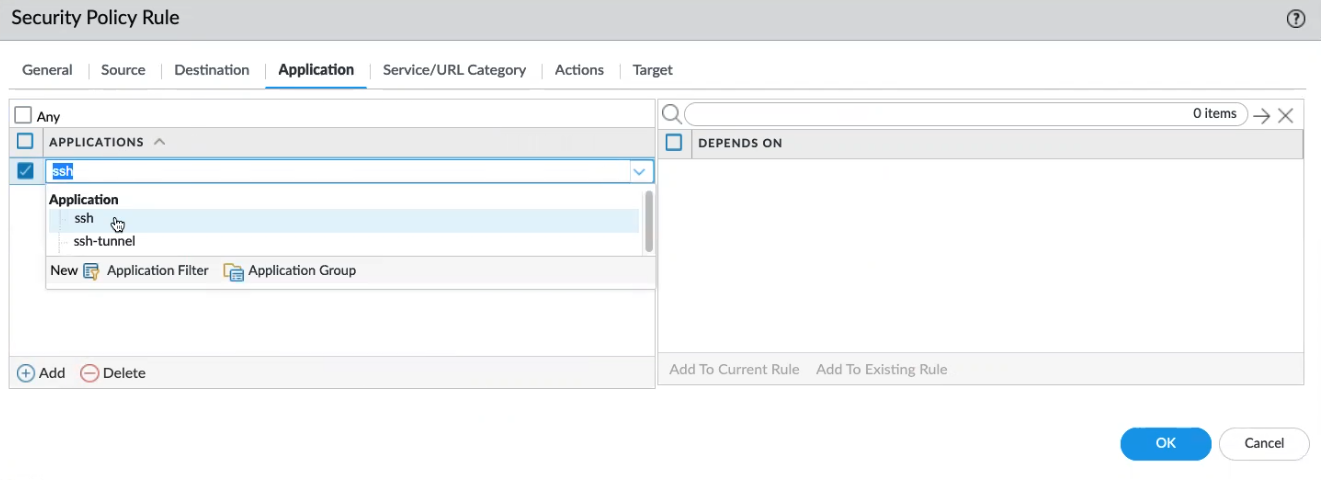
![]() Configure Application policy to have the policy action occur based on an application or application group. An administrator can also use an existing App-ID™ signature and customize it to detect proprietary applications or to detect specific attributes of an existing application. Custom applications are defined in ObjectsApplications.
Configure Application policy to have the policy action occur based on an application or application group. An administrator can also use an existing App-ID™ signature and customize it to detect proprietary applications or to detect specific attributes of an existing application. Custom applications are defined in ObjectsApplications.- In the Application screen, click Any, or specify a specific application, like SSH. Click Add to include a new application policy:
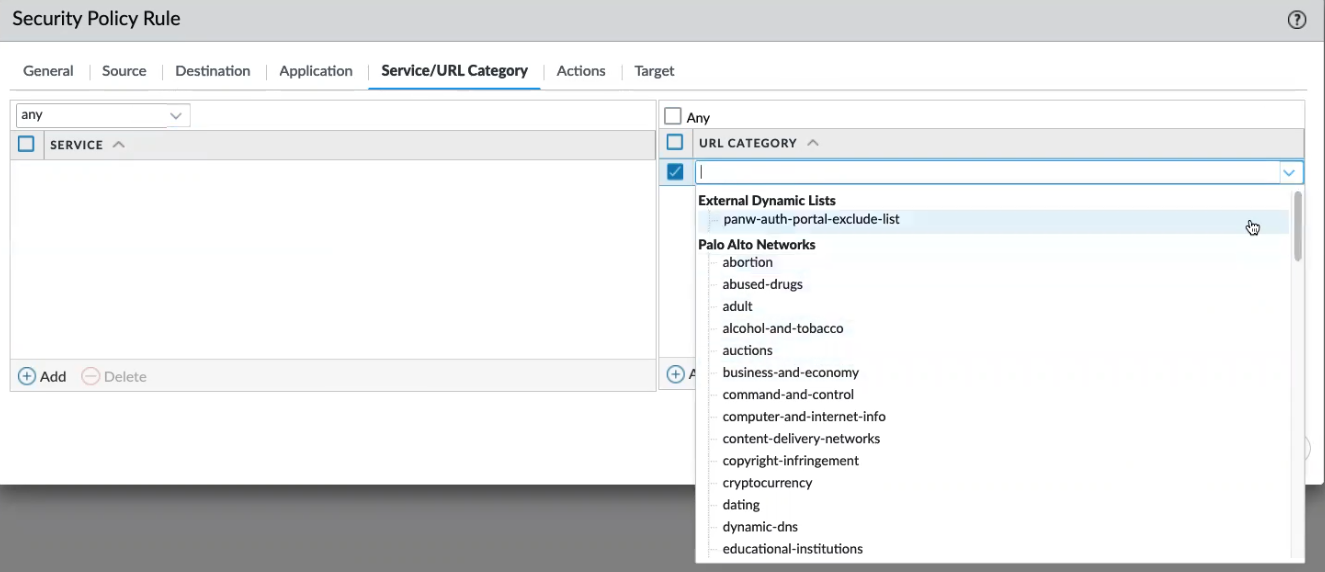
![]() Configure Service/URL Category policies for the firewall to specify a specific TCP and/or UDP port number or a URL category as match criteria in the policy. Specify Service level policies or URL Category policies by selecting Any, or, use the drop-down options to individually select policy elements you want to apply. Click Add to create new policies for Service or URL/Category.
Configure Service/URL Category policies for the firewall to specify a specific TCP and/or UDP port number or a URL category as match criteria in the policy. Specify Service level policies or URL Category policies by selecting Any, or, use the drop-down options to individually select policy elements you want to apply. Click Add to create new policies for Service or URL/Category.![]() Configure an Actions policy to determine the action taken based on traffic that matches the defined policy attributes.
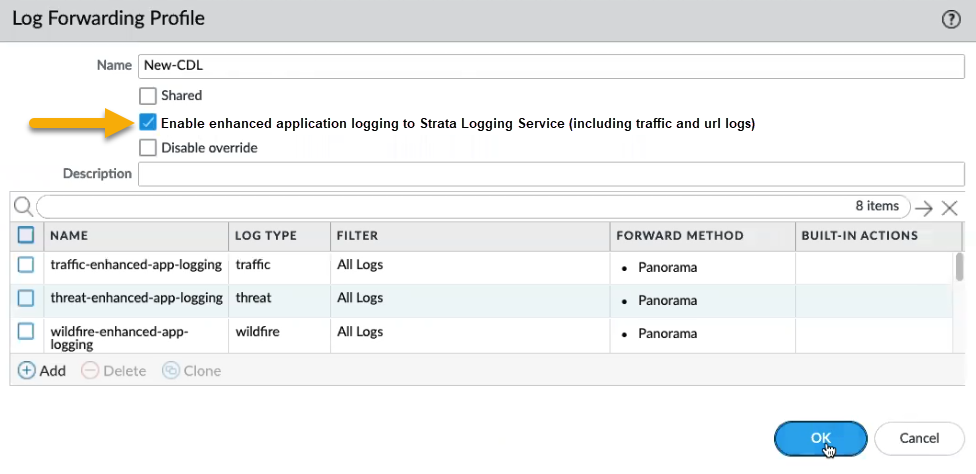
Configure an Actions policy to determine the action taken based on traffic that matches the defined policy attributes.- In the Actions screen, select the action to take (for example, allow or deny), determine the Profile Setting, configure the Log Setting and other settings.For information about using Panorama logs, see Centralized Logging and Reporting and View logsYou can optionally forward logs to Strata Logging Service using the Security Policy Rule screen. In the Log Setting field, select the Log Forwarding drop-down and click New Profile. In the Log Forwarding Profile, enter a name for the log and select Enable enhanced application logging to Strata Logging Service (including traffic and url logs).Click OK.
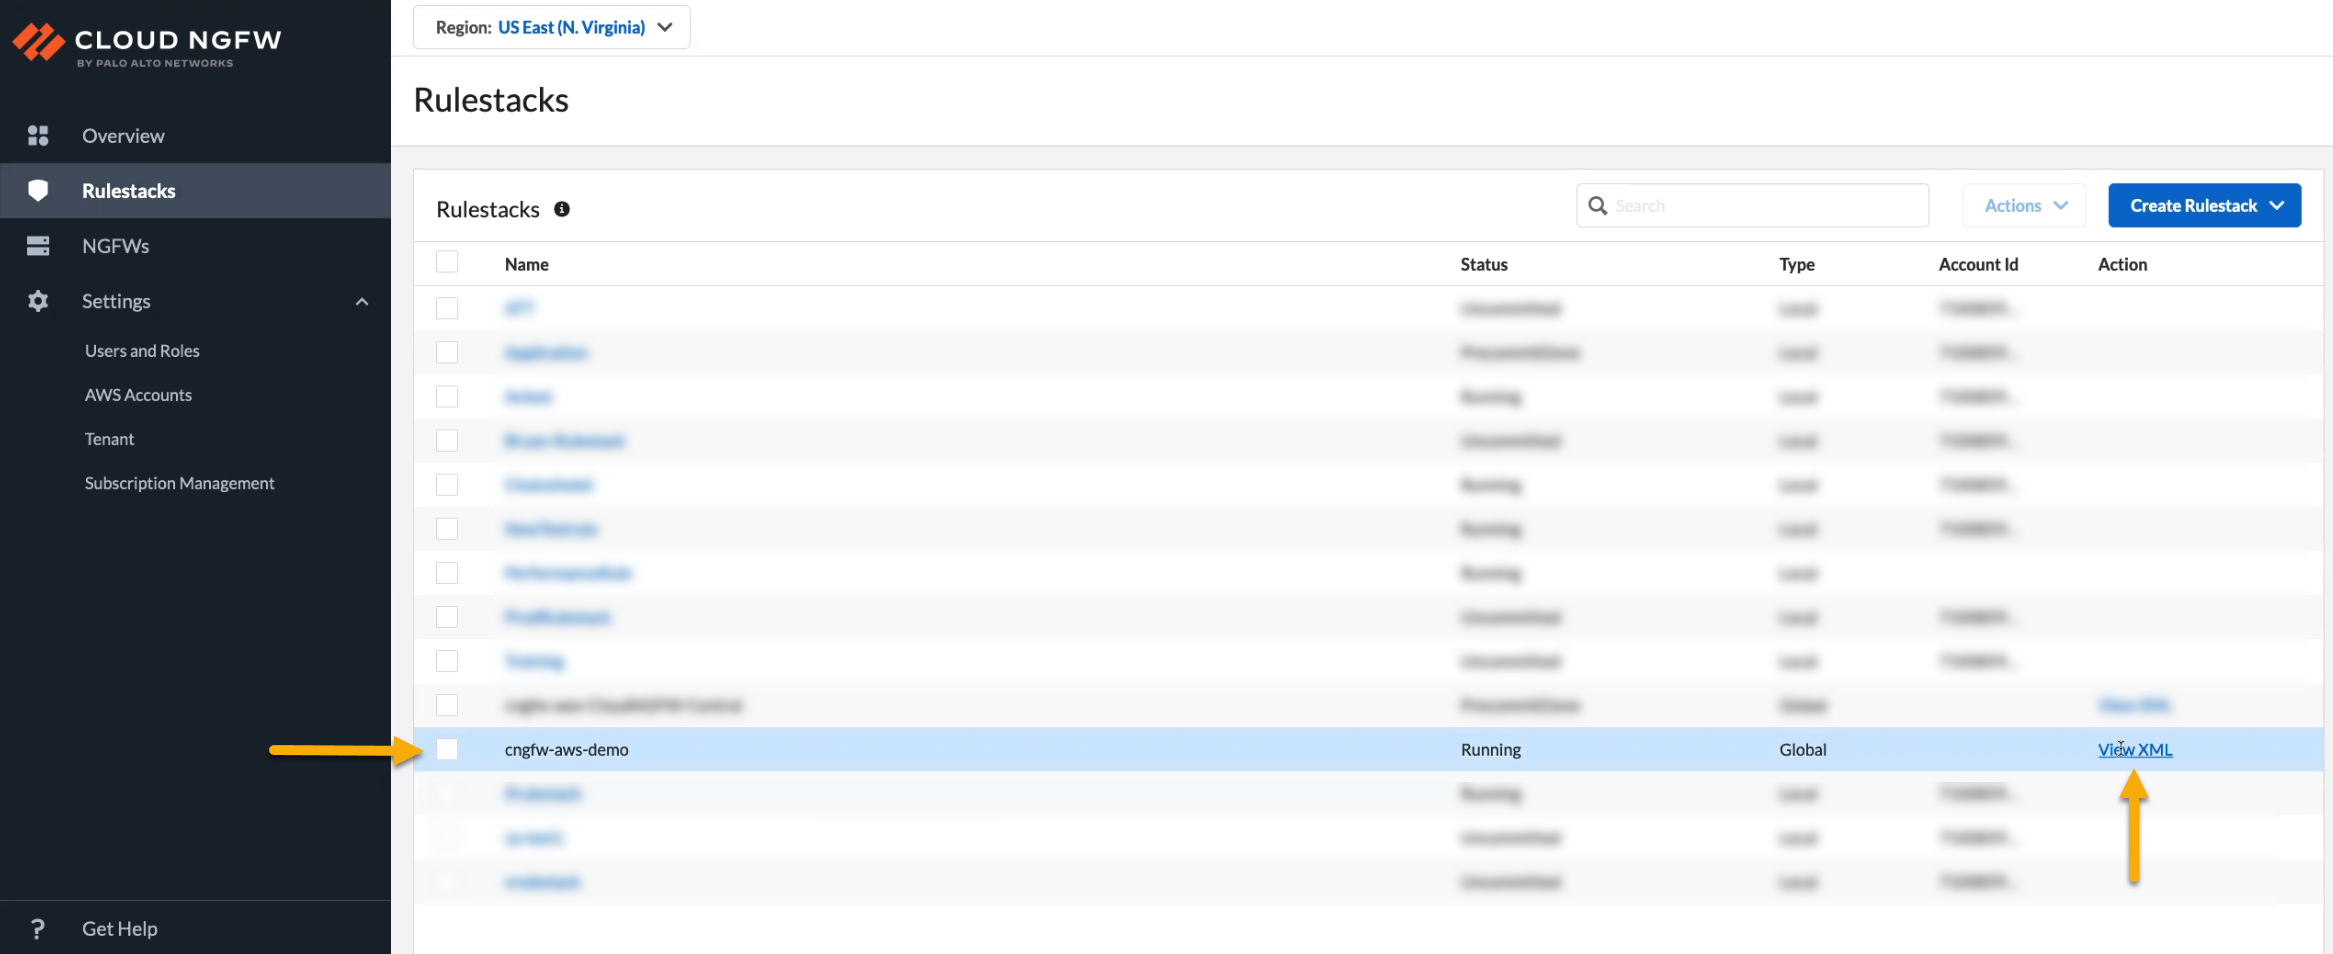
![]() For more information about Strata Logging Service, see Explore Logs.Return to the Cloud NGFW console to view rules created in Panorama. Click View XML to display information about the rules pushed from Panorama to the global rulestack applied to the cloud device group:
For more information about Strata Logging Service, see Explore Logs.Return to the Cloud NGFW console to view rules created in Panorama. Click View XML to display information about the rules pushed from Panorama to the global rulestack applied to the cloud device group:![]() The rulestack is now associated with the policies applied to the Cloud Device Group created in Panorama:
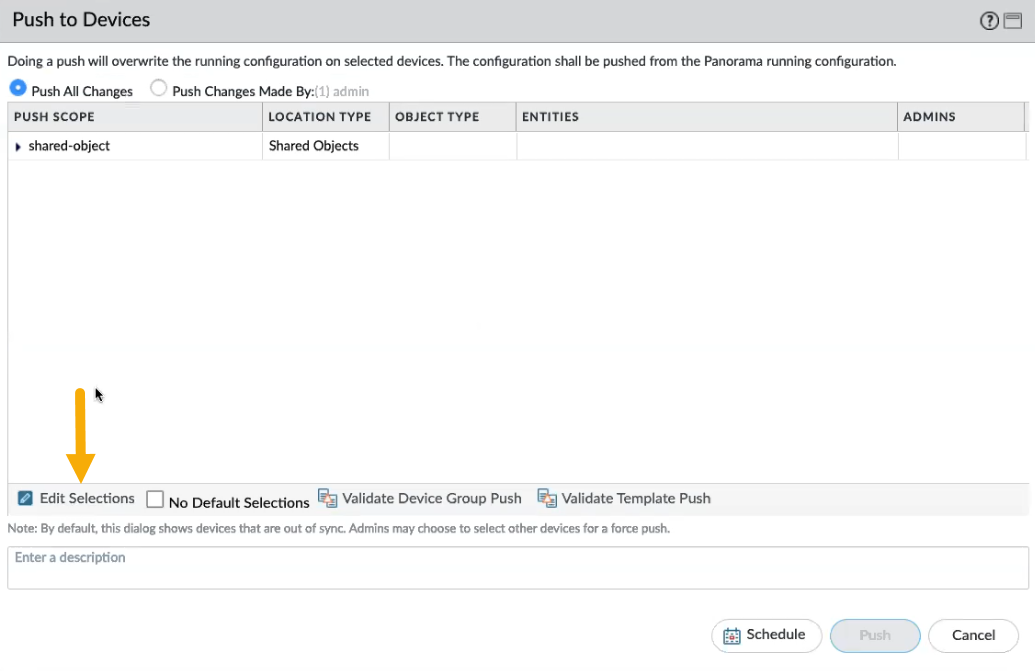
The rulestack is now associated with the policies applied to the Cloud Device Group created in Panorama:![]() After applying policies to the cloud device group for the Cloud NGFW tenant, push the changes in the Panorama console.In the Push to Devices screen, click Edit Selections.
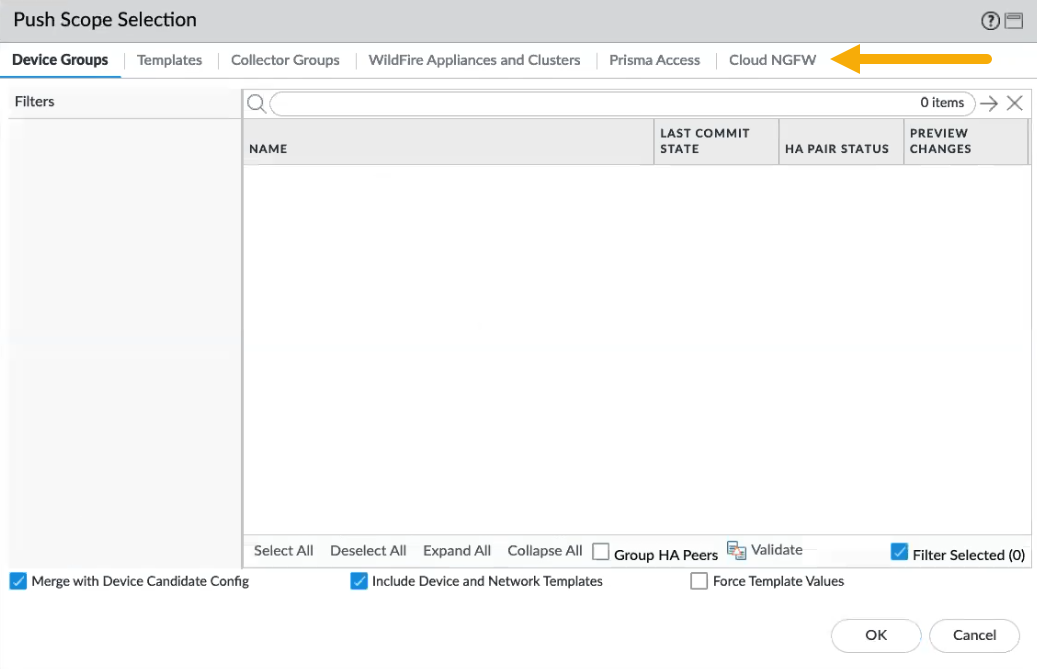
After applying policies to the cloud device group for the Cloud NGFW tenant, push the changes in the Panorama console.In the Push to Devices screen, click Edit Selections.![]() In the Push Scope Selection screen, click Cloud NGFW. The Cloud NGFW node was added to the Push Scope Selection screen to facilitate Cloud NGFW and Panorama integration.
In the Push Scope Selection screen, click Cloud NGFW. The Cloud NGFW node was added to the Push Scope Selection screen to facilitate Cloud NGFW and Panorama integration.![]() Select the cloud device groups you want to push to the resources, and click OK, then click Push.
Select the cloud device groups you want to push to the resources, and click OK, then click Push.Use a Device Group Pushed from Panorama
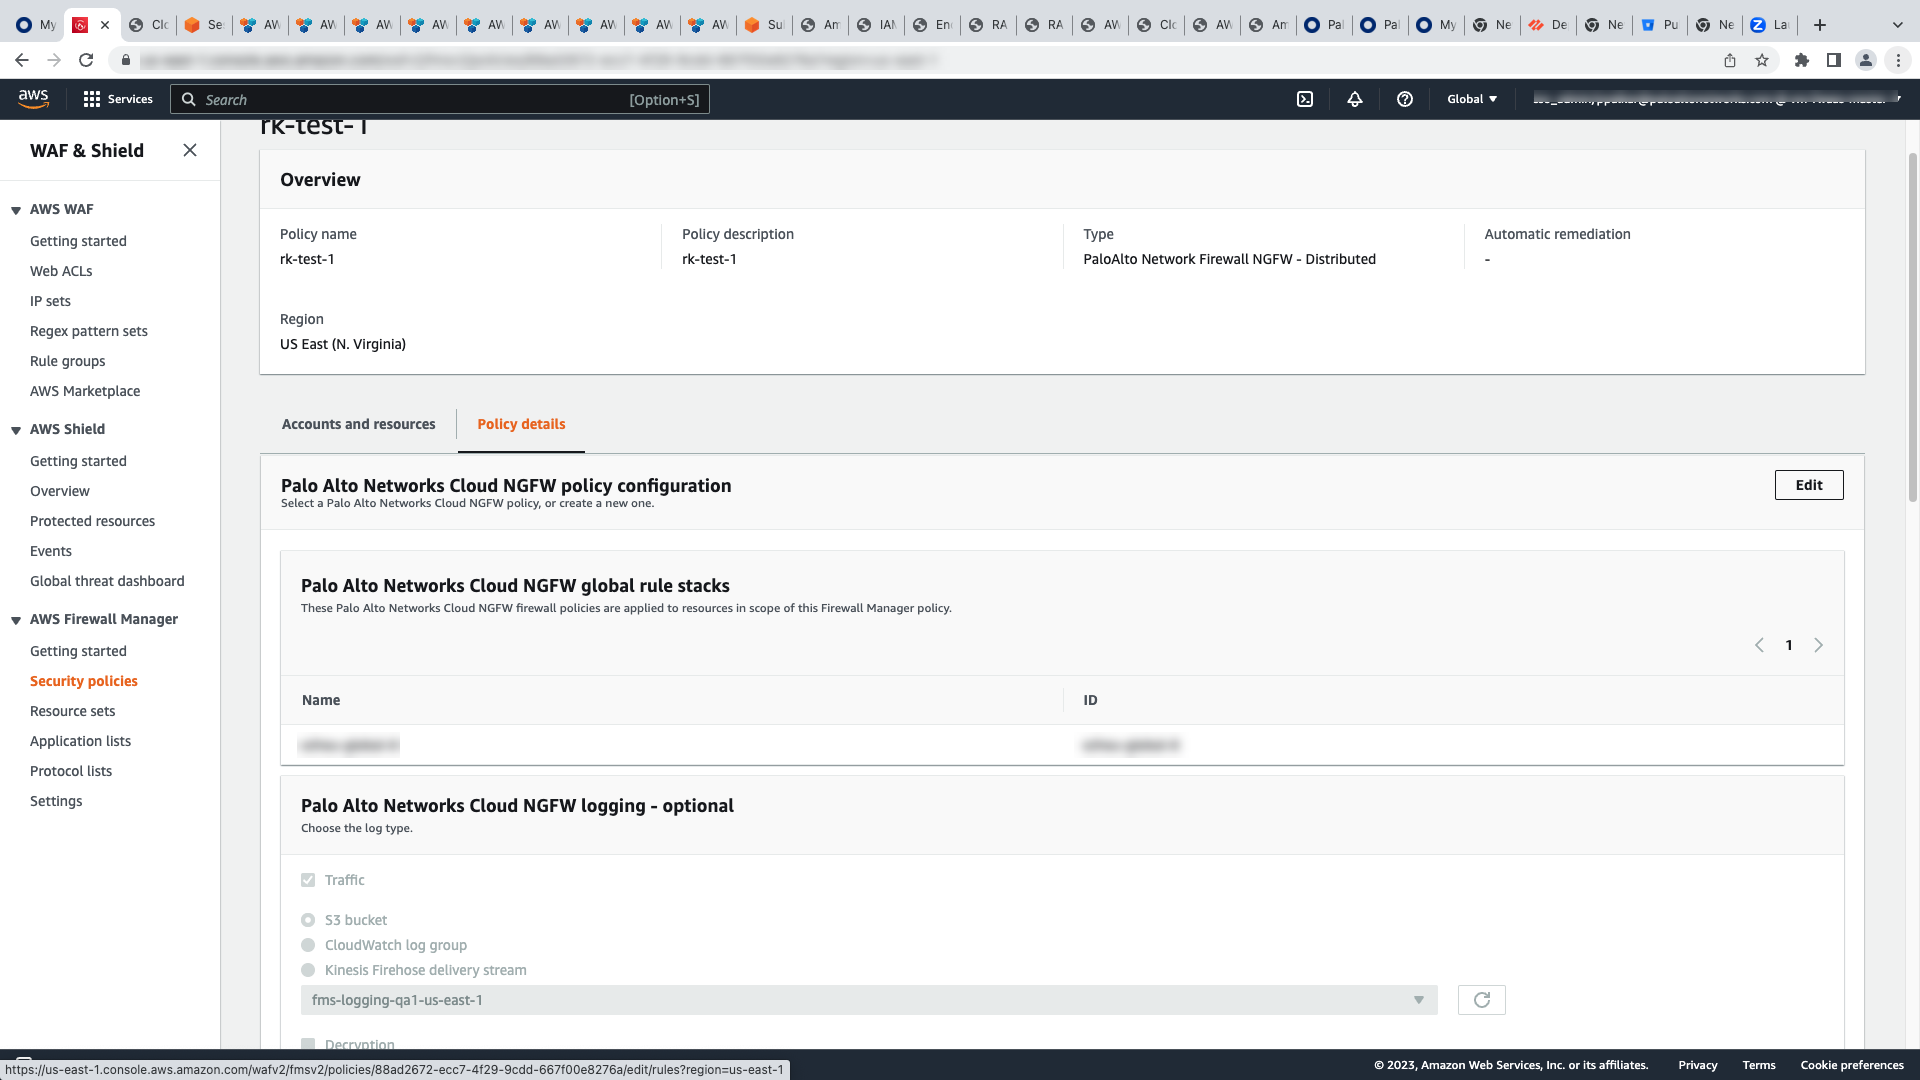
The information in this section is provided for users who use the AWS Firewall Manager Service (FMS) to configure device groups pushed from Panorama.If you are using FMS, you will not be able to associate a cloud device group with the Cloud NGFW from Panorama; this option is grayed out in the Panorama console. Use the FMS AWS console to create this association.- Link a tenant to Panorama.Create a cloud device group and push it to the Cloud NGFW. This procedure is the same for users who are not using FMS.Navigate to the FMS AWS console and edit the policy.
![]() Select the global rulestack that was pushed from Panorama.
Select the global rulestack that was pushed from Panorama.![]() Save your changes.
Save your changes.Use Multiple Panorama with your Cloud NGFW Resource
To use multiple Panorama with the same Cloud NGFW resource- Log into the Cloud NGFW console.Select Integrations. The Integrations page displays information about the currently linked Panorama. If a Panorama is not currently linked to a Cloud NGFW tenant this page is empty.In the Panoramas page, click Add Panorama.In the Add Panorama window, enter a Link Name. Select the Primary Panorama Serial Number from the drop-down menu.The Add Panorama window displays icons next to each Panorama that is accessible to your Cloud NGFW tenant. These icons indicate if the Panorama license is linked to Strata Logging Service. For more information, see Link the Cloud NGFW to Palo Alto Networks Management.Select the secondary Panorama serial number for the HA pair.Click Continue.A Notification appears indicating that the linking process is complete. Click Confirm.The Integrations page now displays the Panorama linked to the Cloud NGFW tenant. Click the Link ID to display information, or to alter the name of the link. Click Save if you alter the name of the link.In the Cloud NGFW console, select NGFWs to display deployed firewalls.In the upper left portion of the Cloud NGFW console, use the drop-down to select the Region where the firewall resides.Select the firewall you want to manage with Panorama.Click the Firewall Settings tab.Scroll down to the Policy Management section, and select Panorama.Use the drop-down menu to select the Linked Panorama.Click Save.Repeat steps 8-13 to manage another Panorama to another NGFW tenant.Click Integrations to link another Panorama.In the Panoramas page, click Add Panorama.In the Add Panorama window, enter a new Link Name. Select the Primary Panorama Serial Number from the drop-down menu.Select the secondary Panorama serial number for the HA pair.Click Continue.A Notification appears indicating that the linking process is complete. Click Confirm.When you link multiple Panorama to a Cloud NGFW tenant, no rulestacks are associated with it. When you use Panorama to push Cloud Device Groups to the firewall, the Rulestacks section in the NGFWs page changes to reflect the policy management associated with the NGFW.A Notification appears indicating that the linking process is complete. Click Confirm.

