Download PDF
Cloud NGFW for AWS
Configure Tag-based Policies
Table of Contents
Expand All
|
Collapse All
Cloud NGFW for AWS Docs
Configure Tag-based Policies
Automatically update the Security policy on your Palo Alto Networks Cloud NGFW
resources using tag-based policy rules.
| Where Can I Use This? | What Do I Need? |
|---|---|
|
|
You can automatically update the Security policy on your Palo Alto Networks
Cloud NGFW resources so that you can secure traffic to these AWS assets as you
deploy or terminate AWS assets (such as EC2 instances) in the AWS public cloud.
To enable this capability from Panorama, you must configure the Panorama
AWS plugin to fetch IP/Tags that your Cloud NGFW tenant harvests from the AWS
account you added. Then use the AWS Panorama plugin to push these tags to the Cloud
NGFW resources by configuring the monitoring definition and Notify them to the
corresponding Device Groups corresponding to these Palo Alto Networks firewalls.
You can then create a Panorama Dynamic Address Group objects in those
Device Groups using AWS resource tags. When you reference these tags in Dynamic
Address Groups and match against them in Security policy rules, you can consistently
enforce the policy across all assets deployed within your AWS accounts.

Prerequisites
To enable tag-based policy rules for Cloud NGFW for AWS resources, the following are
the minimum system requirements:
- Install AWS plugin 5.1.0 version or above on your Panorama. For more information, see Install or Upgrade the AWS Plugin.
- Using Cloud NGFW console to add AWS accounts to a Cloud NGFW tenant and harvest tags from them.
- Use the Panorama plugin to query tags and add them to the Panorama device groups.
- Configure Dynamic Address Groups (DAG) objects with tags in device groups.
Key Concepts
|
Term
|
Definition
|
|---|---|
|
Cloud Asset Tags
|
AWS tags configured on AWS resources.
|
|
VPC Group
|
A set of AWS VPCs from one or more AWS accounts.
|
|
Monitoring Definition
|
Associates a VPC Group with a notify group.
|
|
Notify Group
|
You can group together a set of Panorama Device Groups
that require the same set of tags.
|
To enable tag-based policy rules for Cloud NGFW for AWS resources, you must
prepare your Panorama appliance for this integration by installing the AWS plugin
5.1.0 version or above. Using the Cloud NGFW console, add your AWS accounts and
harvest tags from the AWS resources. Then use the Panorama plugin to query tags
periodically from your Cloud NGFW tenant and add it to the Panorama device groups to
manage Dynamic Address Group objects and rules.
To enable Cloud NGFW tag-based policy rules in your Panorama appliance:
Add AWS Accounts to Cloud NGFW Tenant and Harvest Tags from Them
Onboard your AWS account on to your Cloud NGFW tenant. For more
information, see Getting started with an AWS Member
account.
If you have already onboarded your AWS account on Cloud NGFW tenant,
you can directly get started with tag harvesting.
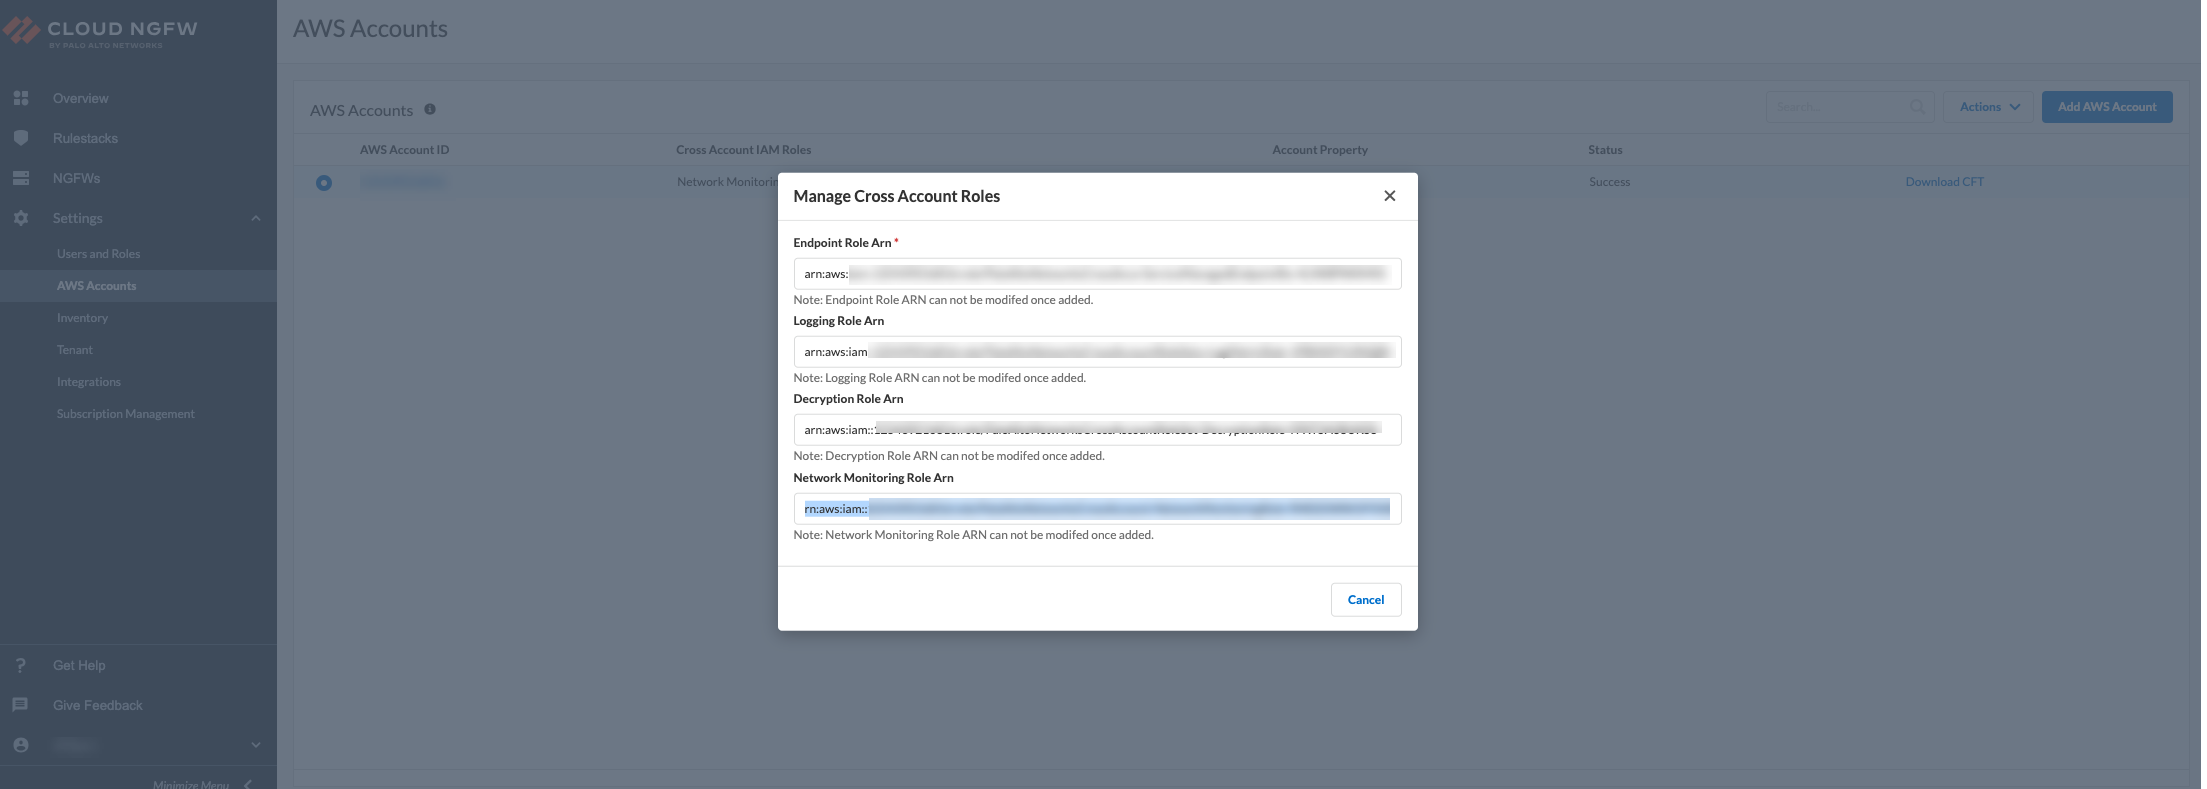
The existing CloudFormation template (CFT) of your onboarded AWS
account must have Network MonitoringRole Arn role added to it.
The Network Monitoring role provides visibility to the network performance
connecting AWS hosted applications. For more information, see Manually add a CloudFormation
template.
Enable Monitoring
In the Cloud NGFW console, you can enable the discovery of AWS resource
tags for the desired regions. Cloud NGFW will periodically collect these tags of
your AWS resources (For example: EC2, SG, and LB) in different AWS accounts and
register the information to your Cloud NGFW tenant. Cloud NGFW displays the
resource tags on resources organized by the VPCs in each AWS account.
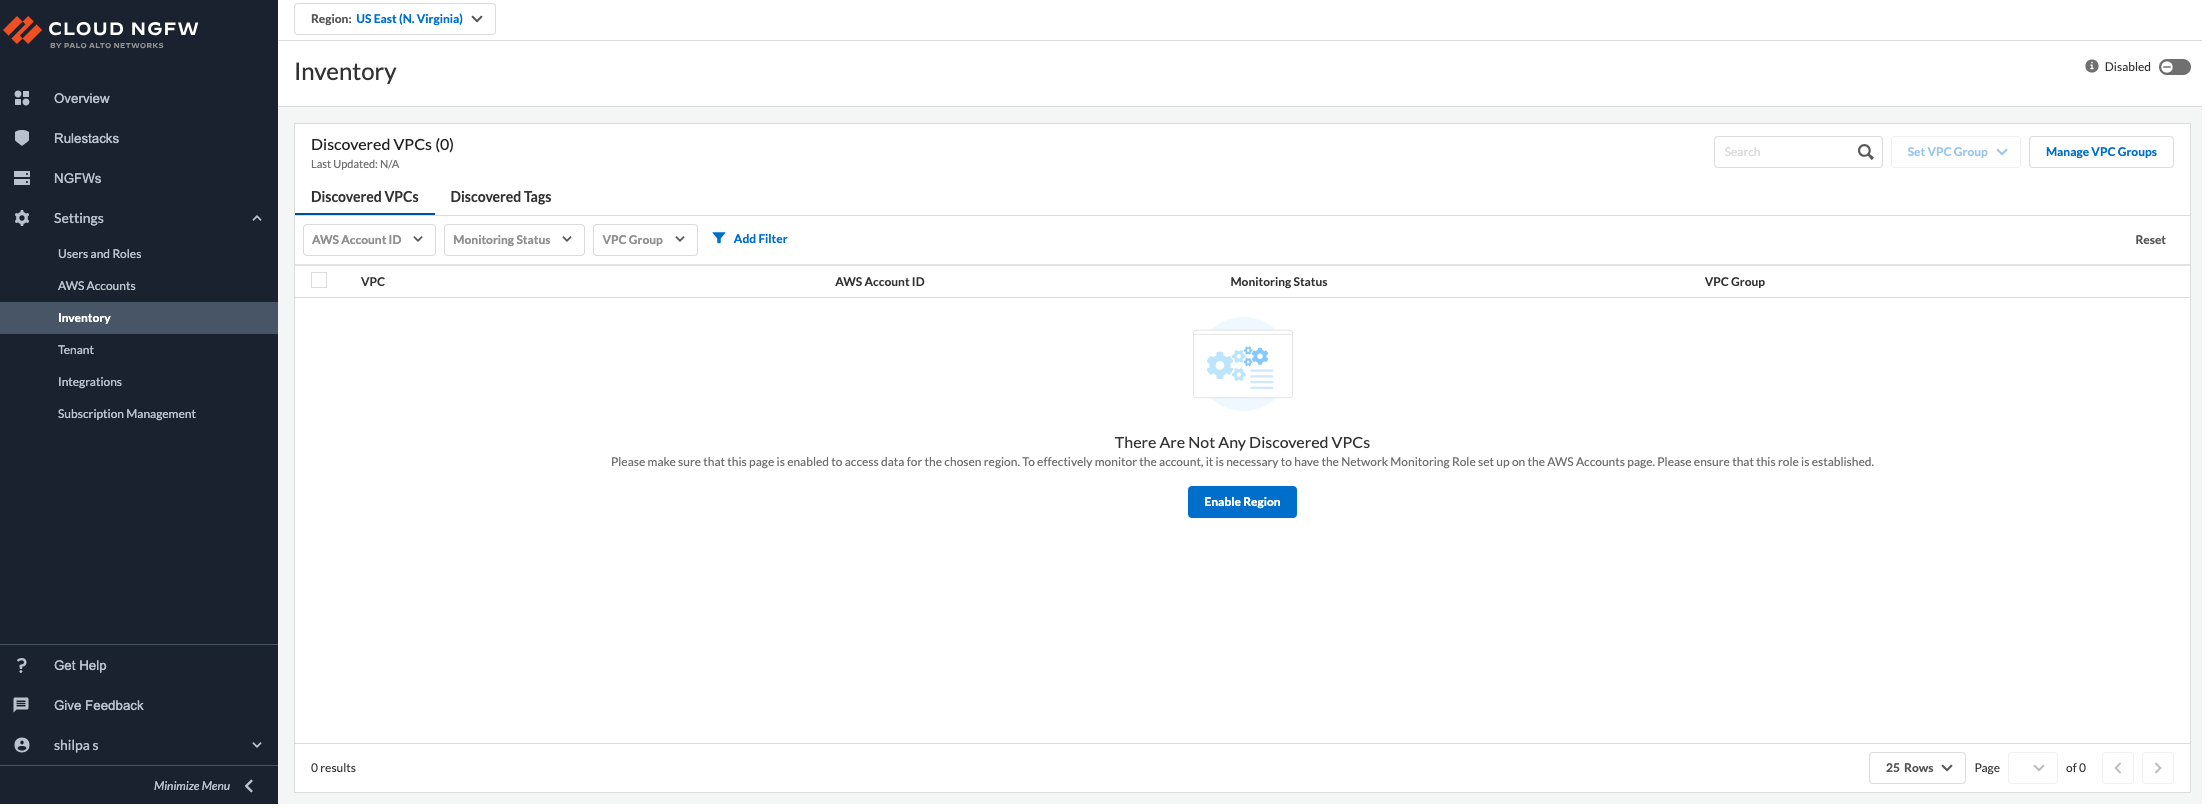
For this purpose, you must enable monitoring in the
Inventory page to access data for each AWS region, to
trigger the tags discovery.
The Enable Region button under the
Discovered VPCs tab appears only when you onboard
your AWS account for the first time. Select Region from
the drop-down and click Enable Region to enable tag
monitoring.
Alternatively, you can also select a Region from
the drop-down and click the Enable toggle to enable tag
monitoring.
View the Harvested Tags in the Cloud NGFW Console
You can see the total number of discovered tags in the Inventory
Page under the Discovered Tags tab.

Click the Tag Name to list the IPs associated with
each tag.

Click Check Associated Tags to list the
different tags associated with the IP address.
In the NGFW console, the tag character limit is 127 for any
AWS resource type (key or value combined). The tags having a key and
value greater than 127 are not added to the
DiscoveredTags list. For more information, see
Tag Restrictions.
If you don't have the Inventory admin permission, you can't
Set VPC group or Create New
VPC group.
Use the Panorama Plugin to Query Tags and Add Them to the Panorama Device Groups
Use the Panorama AWS plugin to perform the following:
- Create and manage VPC Groups.Add tags to Device Groups using monitoring definitions and notify groups.Install and configure the AWS plugin 5.1.0 plugin (or later) on Panorama to query AWS asset tags collected in the Cloud NGFW tenants and add them to the Cloud Device Groups.
Create and Manage VPC Groups
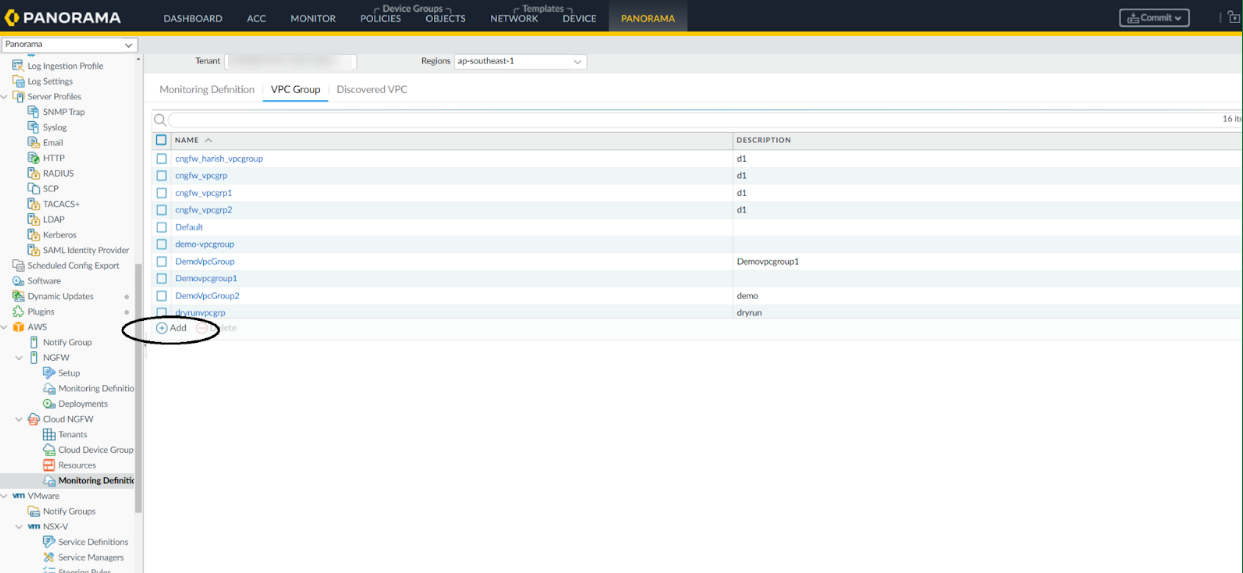
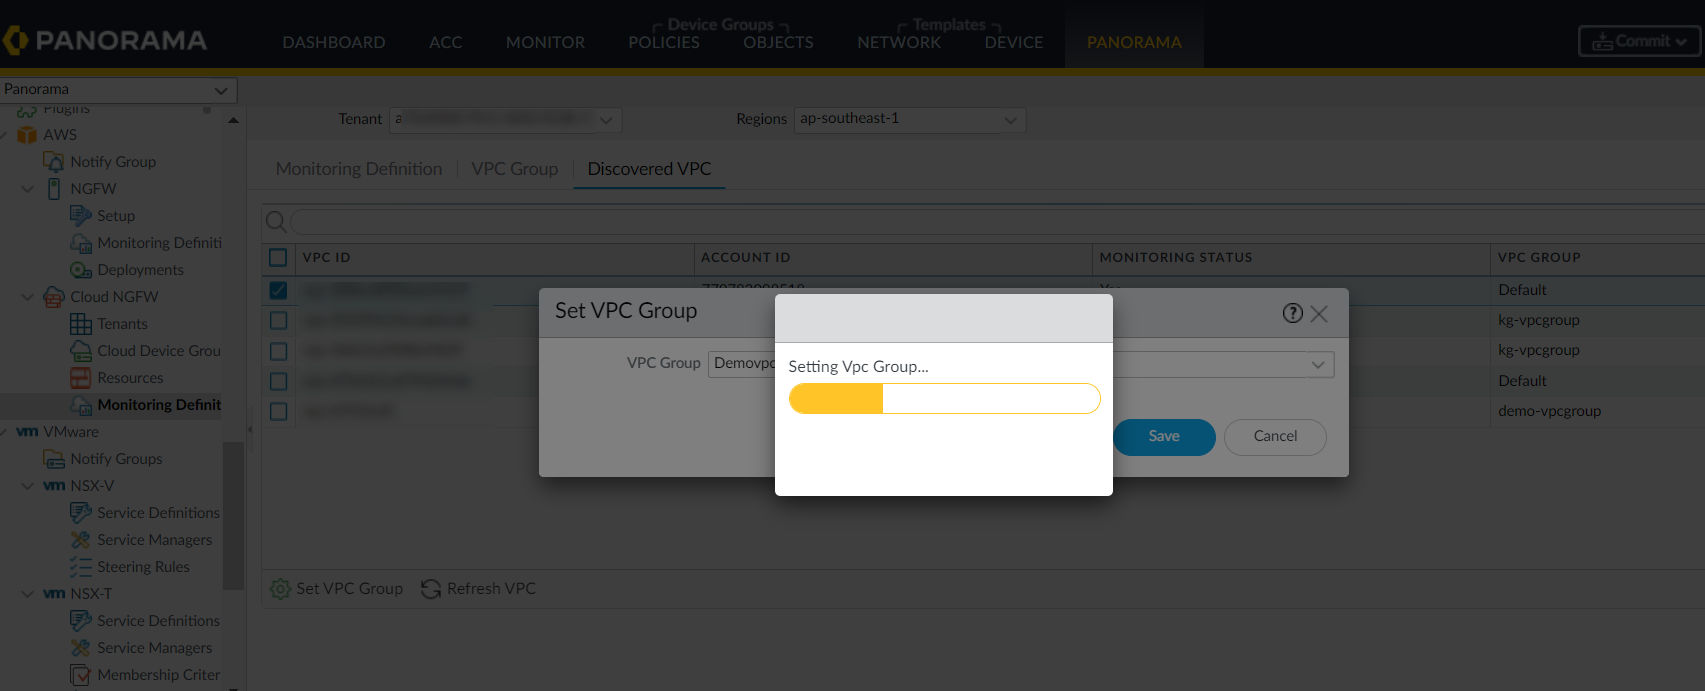
When you enable monitoring, a Default VPC Group is created automatically. You can't delete the Default VPC group. A newly discovered VPC is always put into the Default VPC group. If you want, you can then move it into a different VPC group.The scope of a VPC group created in a region is applicable for that region only. For example, VPC group A created in Region X isn't accessible in Region Y.Alternatively, you can create new VPC groups and move these VPCs to other VPC groups using the steps below:If you wish to create a new non-Default VPC group on Panorama, follow the steps covered in the procedure below:- In the Panorama Console, go to the Panorama tab, and then click AWS.Select Tenant and Region.Go to AWS > Cloud NGFW > Monitoring Definition > VPC Group > Add.
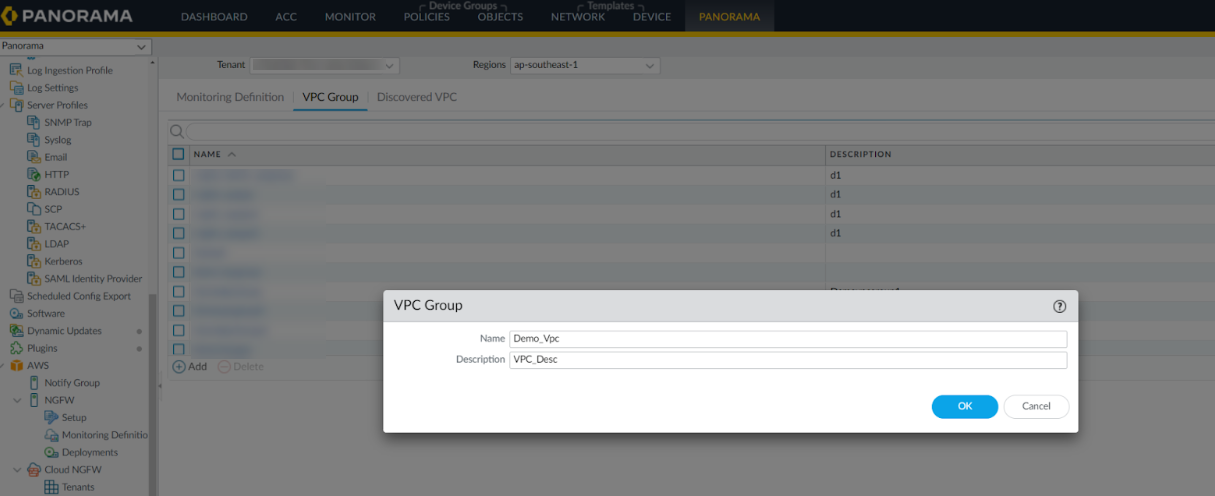
![]() Enter VPC Group Name and Description.
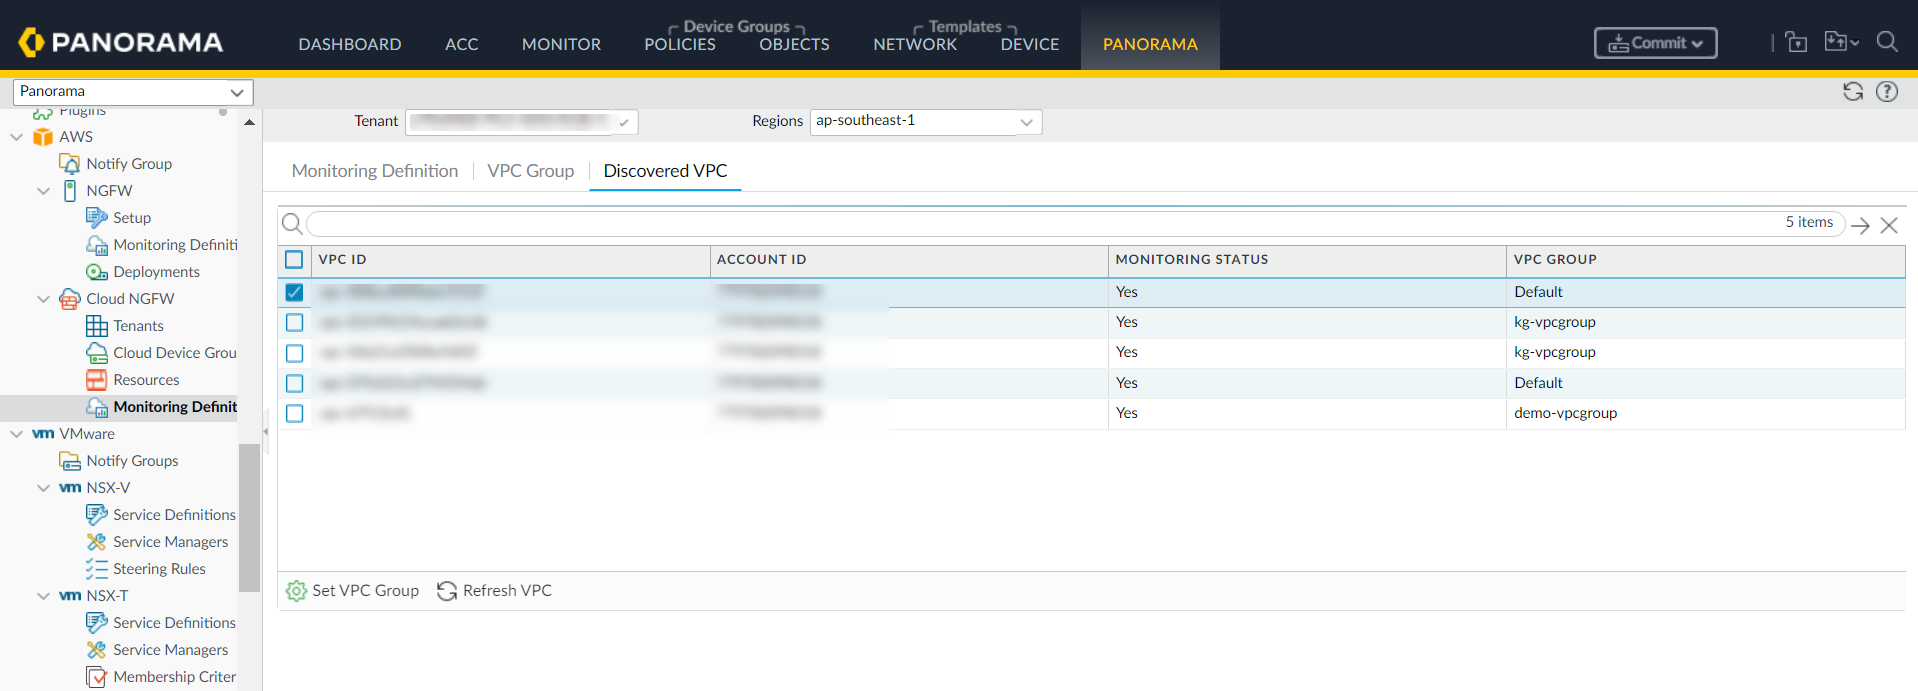
Enter VPC Group Name and Description.![]() Click OK.Go to AWS > Cloud NGFW > Monitoring Definition > Discovered VPC.
Click OK.Go to AWS > Cloud NGFW > Monitoring Definition > Discovered VPC.![]()
- You can't map a VPC Group to more than eight Device Groups. Configure monitoring definitions with VPC Groups such that a given VPC Group has only eight Device Groups mapped (via notify groups ) for better performance.
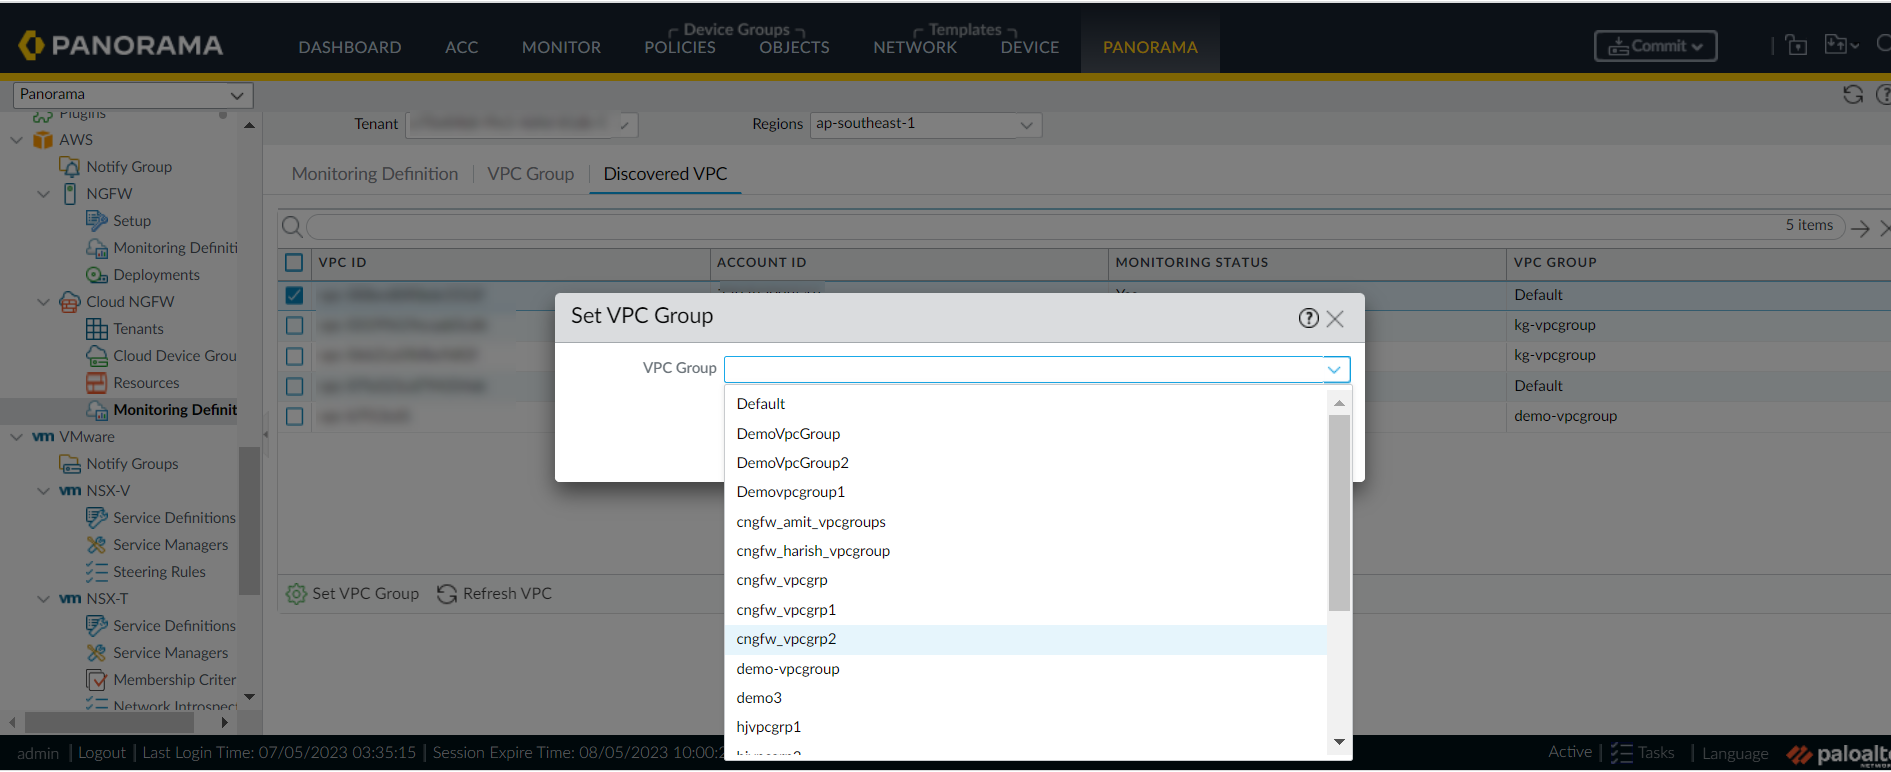
- The Default VPC Group is created automatically. You can't delete the Default VPC group. A newly discovered VPC is always put into the Default VPC group. If required, VPCs can be moved under a different VPC group.
Click Set VPC Group.Select VPC Group.![]() Click Save.
Click Save.![]()
Add Tags to Device Groups Using Monitoring Definitions and Device Groups
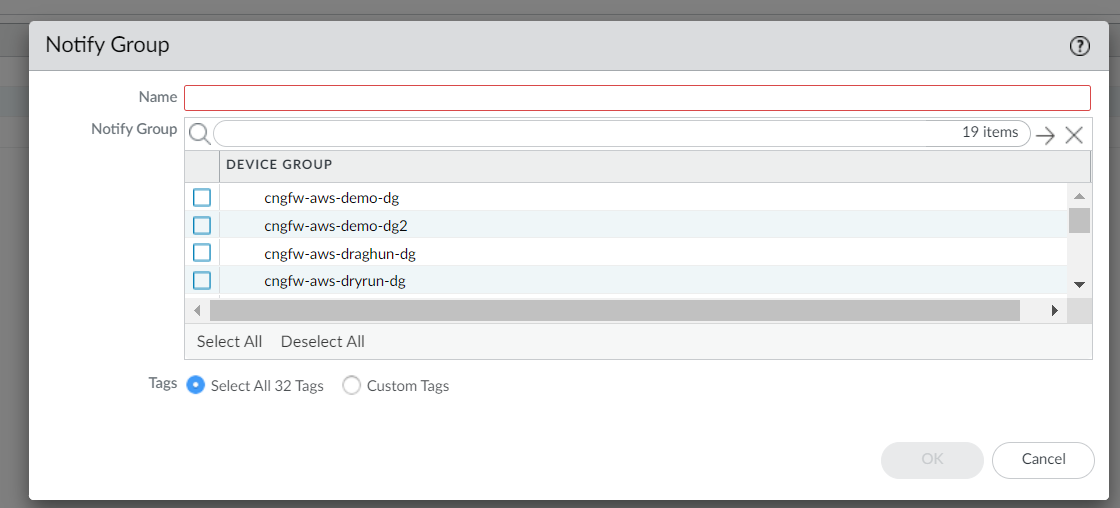
To push tags learned from Cloud NGFW tenant to the Cloud NGFW resources, ensure that you configure the Notify Groups and Monitoring definitions to the corresponding Device Groups corresponding to these Palo Alto Networks firewalls. You can then view the AWS account tags harvested from Cloud NGFW tenant in Panorama.Create a Notify Group for your cloud device group following the steps below:- In the Panorama Plugin Console, go to AWS > Notify Group.Add.
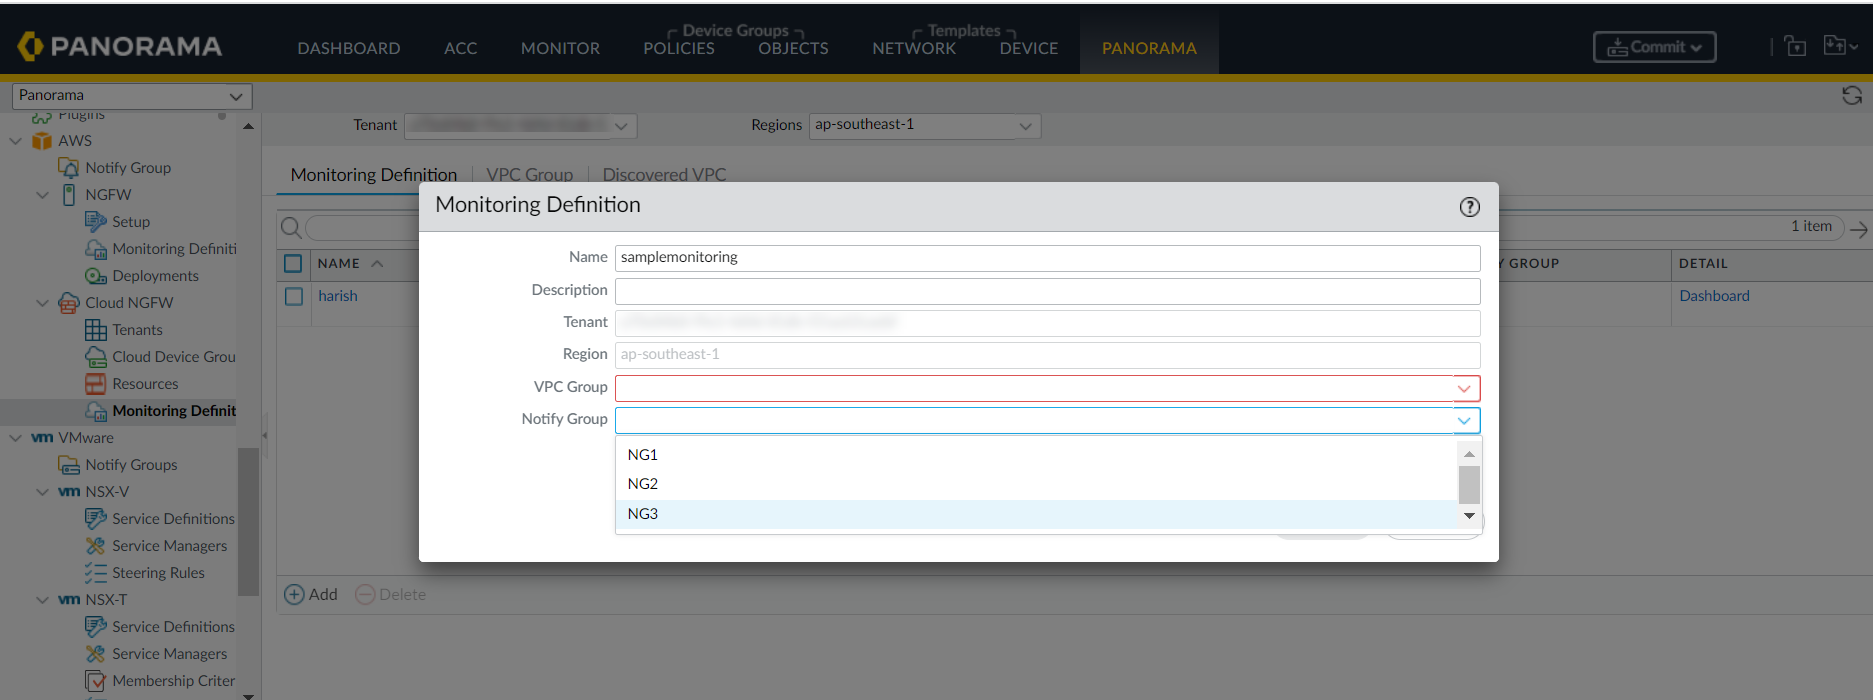
![]() Enter Name.Select the Device Group and Tags.Click Ok.Create a cloud monitoring definition associating the required VPC group and Notify group for tags learned from Cloud NGFW:In Panorama, go to AWS > Cloud NGFW > Monitoring Definition.
Enter Name.Select the Device Group and Tags.Click Ok.Create a cloud monitoring definition associating the required VPC group and Notify group for tags learned from Cloud NGFW:In Panorama, go to AWS > Cloud NGFW > Monitoring Definition.![]() Click Add.Enter your Name and Description.Select the required VPC Group from the VPC Group drop-down menu.Select the required notify group from the Notify Group drop-down menu.
Click Add.Enter your Name and Description.Select the required VPC Group from the VPC Group drop-down menu.Select the required notify group from the Notify Group drop-down menu.![]() Click OK.Commit and Push your changes on Panorama.Select a Monitoring Definition and click Dashboard to view the tags harvested from Cloud NGFW tenant.
Click OK.Commit and Push your changes on Panorama.Select a Monitoring Definition and click Dashboard to view the tags harvested from Cloud NGFW tenant.![]() You can now view the tags harvested in Cloud NGFW tenant:
You can now view the tags harvested in Cloud NGFW tenant:![]()
Configure Dynamic Address Group (Dynamic Address Group) Objects with Tags in Device Groups
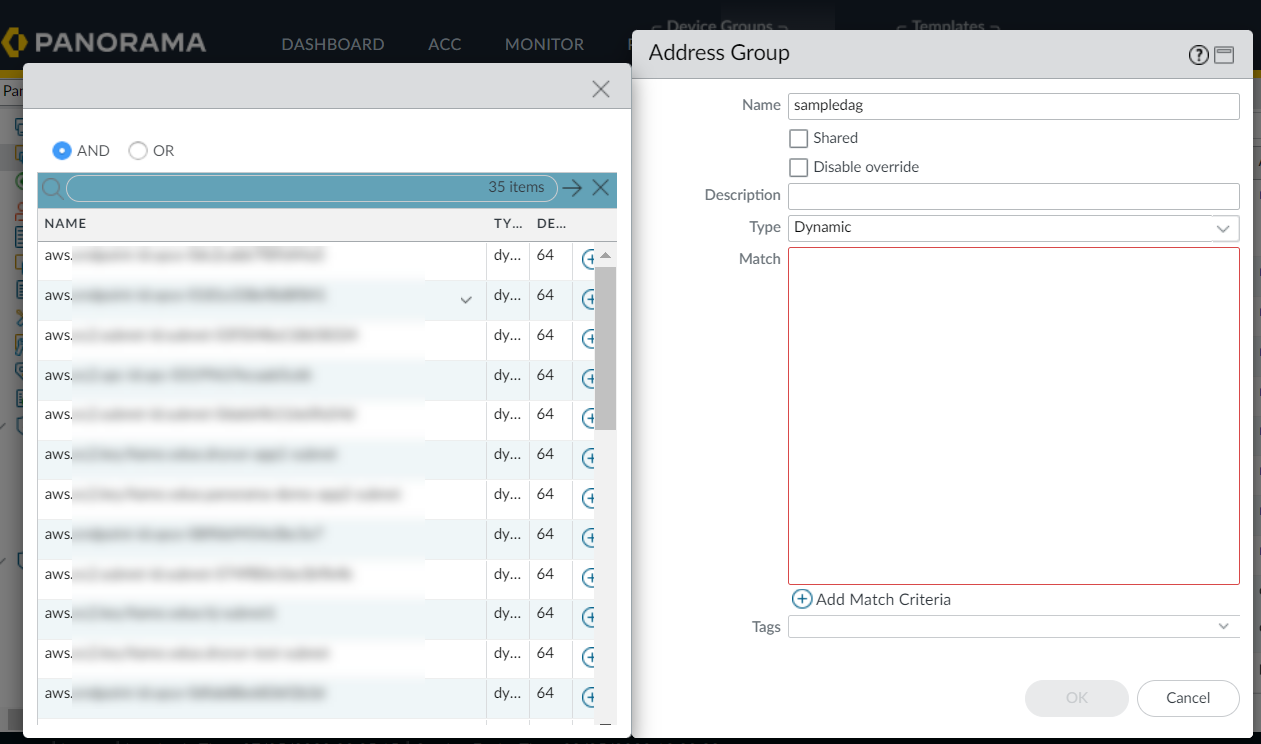
You can create Dynamic Address Groups with harvested Cloud NGFW tags for your cloud device group. For more information, see Create Dynamic Address Groups.Following are the steps to add match criteria for your dynamic address groups:- In the Panorama, select the Objects tab.On the left pane, go to Address Groups.Click Add.Enter the Name of your address group and select Type Dynamic.Click Add match Criteria.
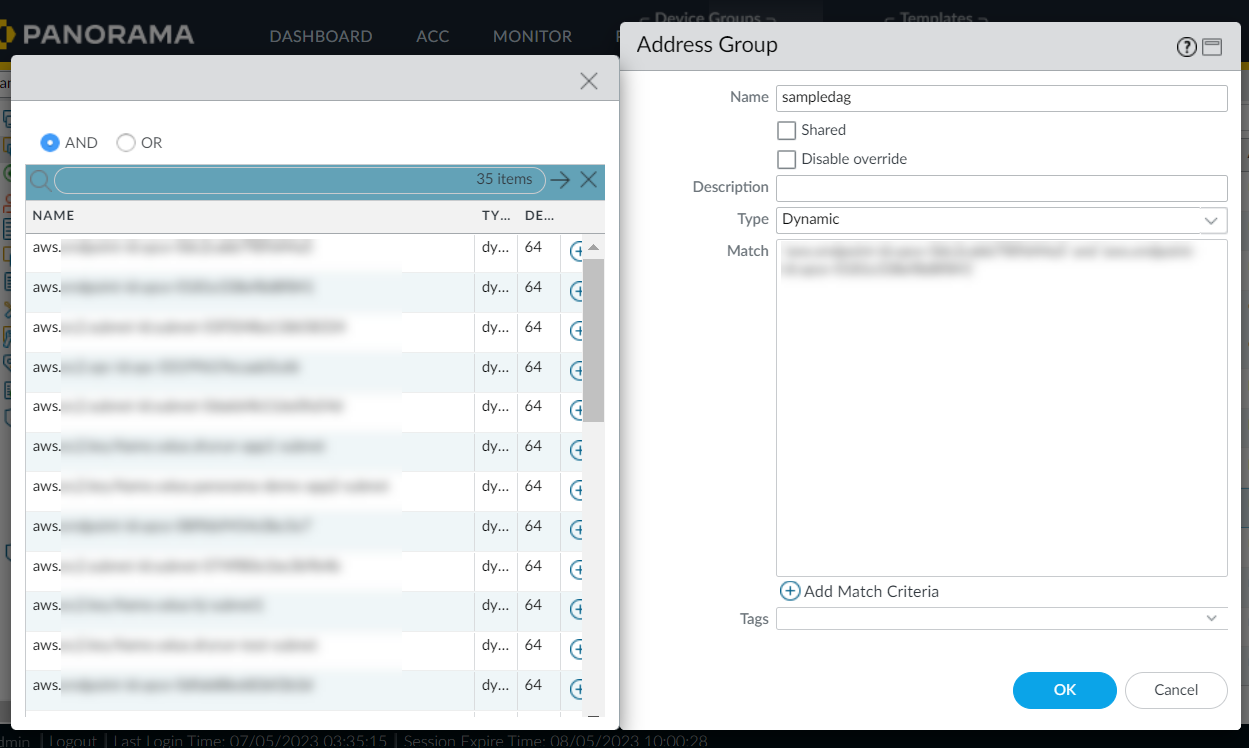
![]() You can now create Dynamic Address Group policy rules referencing above created DAGs for cloud device groups.You can add tags from different regions on your Dynamic Address Group object. To use tags from different regions, you must create a cloud device group of the same name in other regions. Also, you must create a monitoring definition in other regions mapping the notify group to the VPC Group of that region. For more information, see Cross-Region Tag Based Policies.The following is an example of how DAGs are created using the AND operator:
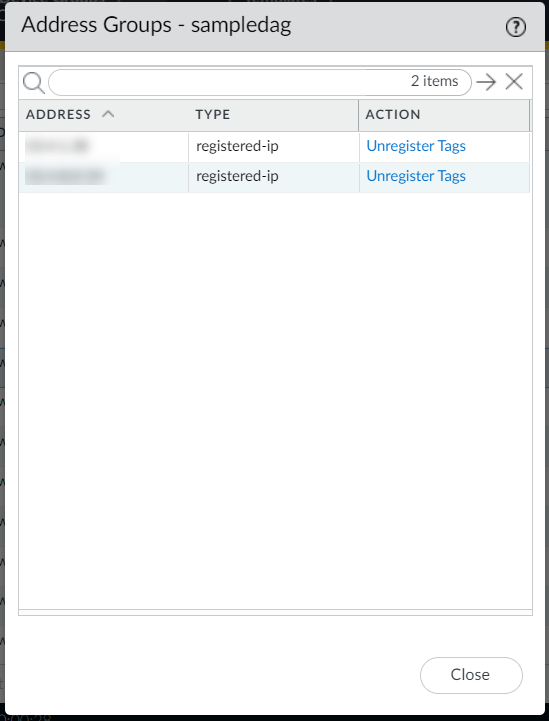
You can now create Dynamic Address Group policy rules referencing above created DAGs for cloud device groups.You can add tags from different regions on your Dynamic Address Group object. To use tags from different regions, you must create a cloud device group of the same name in other regions. Also, you must create a monitoring definition in other regions mapping the notify group to the VPC Group of that region. For more information, see Cross-Region Tag Based Policies.The following is an example of how DAGs are created using the AND operator:![]() The address group displays the list of addresses that match with both matching criteria:
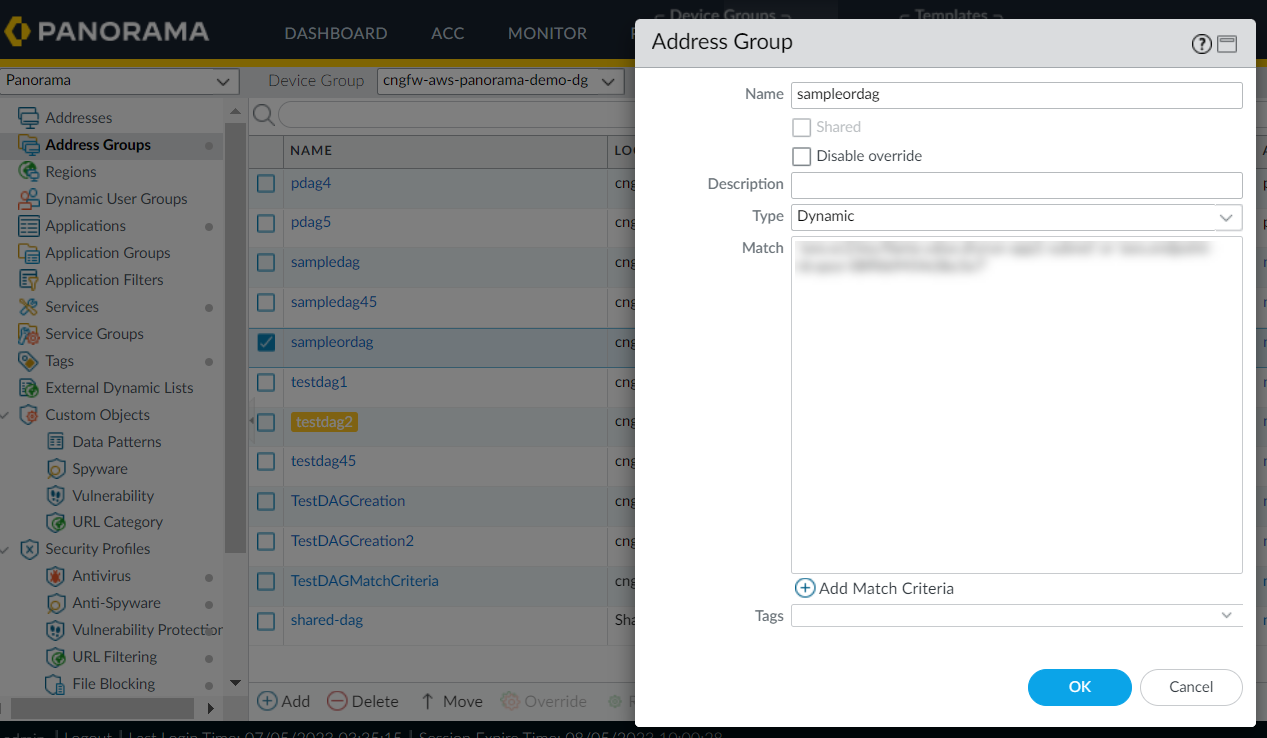
The address group displays the list of addresses that match with both matching criteria:![]() The following is an example of how DAGs are created using the OR operator:
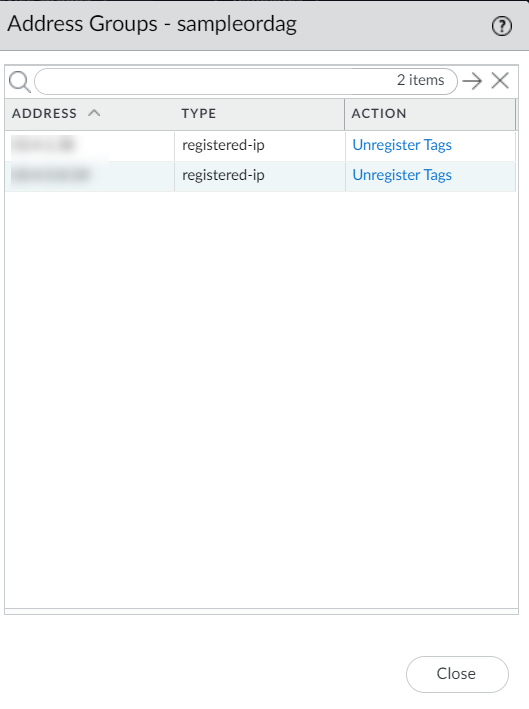
The following is an example of how DAGs are created using the OR operator:![]() The address group displays the list of addresses that match with any one of the given matching criteria:
The address group displays the list of addresses that match with any one of the given matching criteria:![]() Use the following steps to create Dynamic Address policy rules referencing DAGs for cloud device groups:In the Panorama Console, go to the Policies tab.Go to Security > Pre/Post/Default Rules.
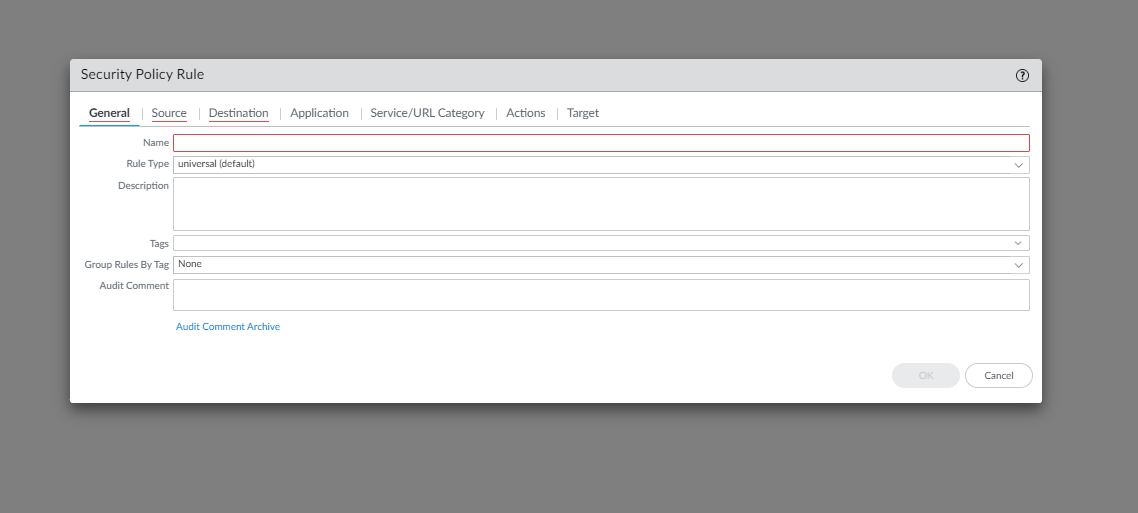
Use the following steps to create Dynamic Address policy rules referencing DAGs for cloud device groups:In the Panorama Console, go to the Policies tab.Go to Security > Pre/Post/Default Rules.![]() Click Add.In the Security policy rule dialog box, enter a Name for the Security policy rule.
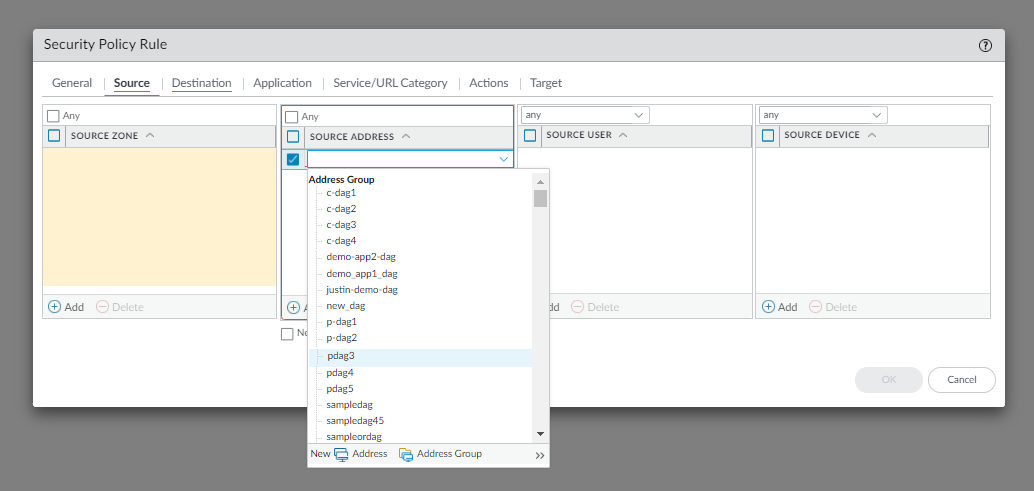
Click Add.In the Security policy rule dialog box, enter a Name for the Security policy rule.![]() In the Source tab, select the Dynamic Address Group for the Source Address field and click Add.
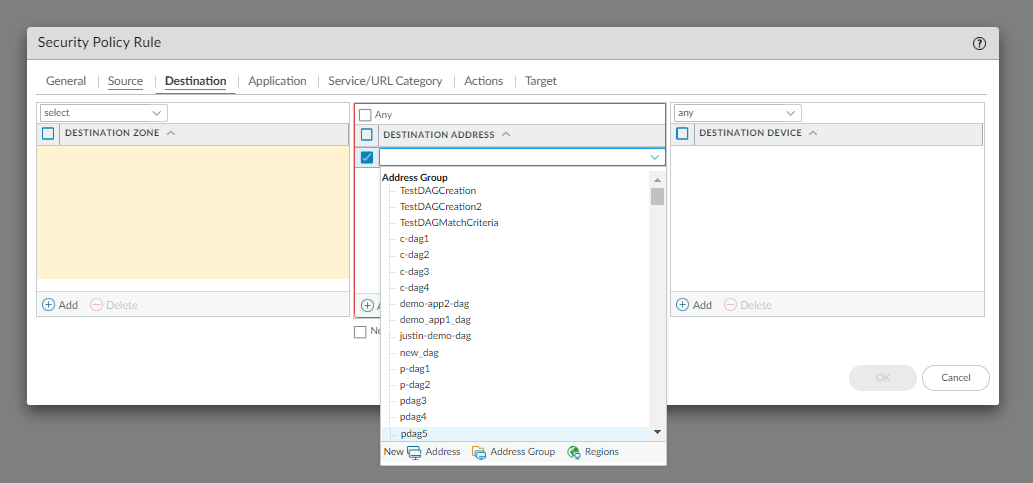
In the Source tab, select the Dynamic Address Group for the Source Address field and click Add.![]() In the Destination tab, select the Dynamic Address Group for the Destination Address field and click Add.
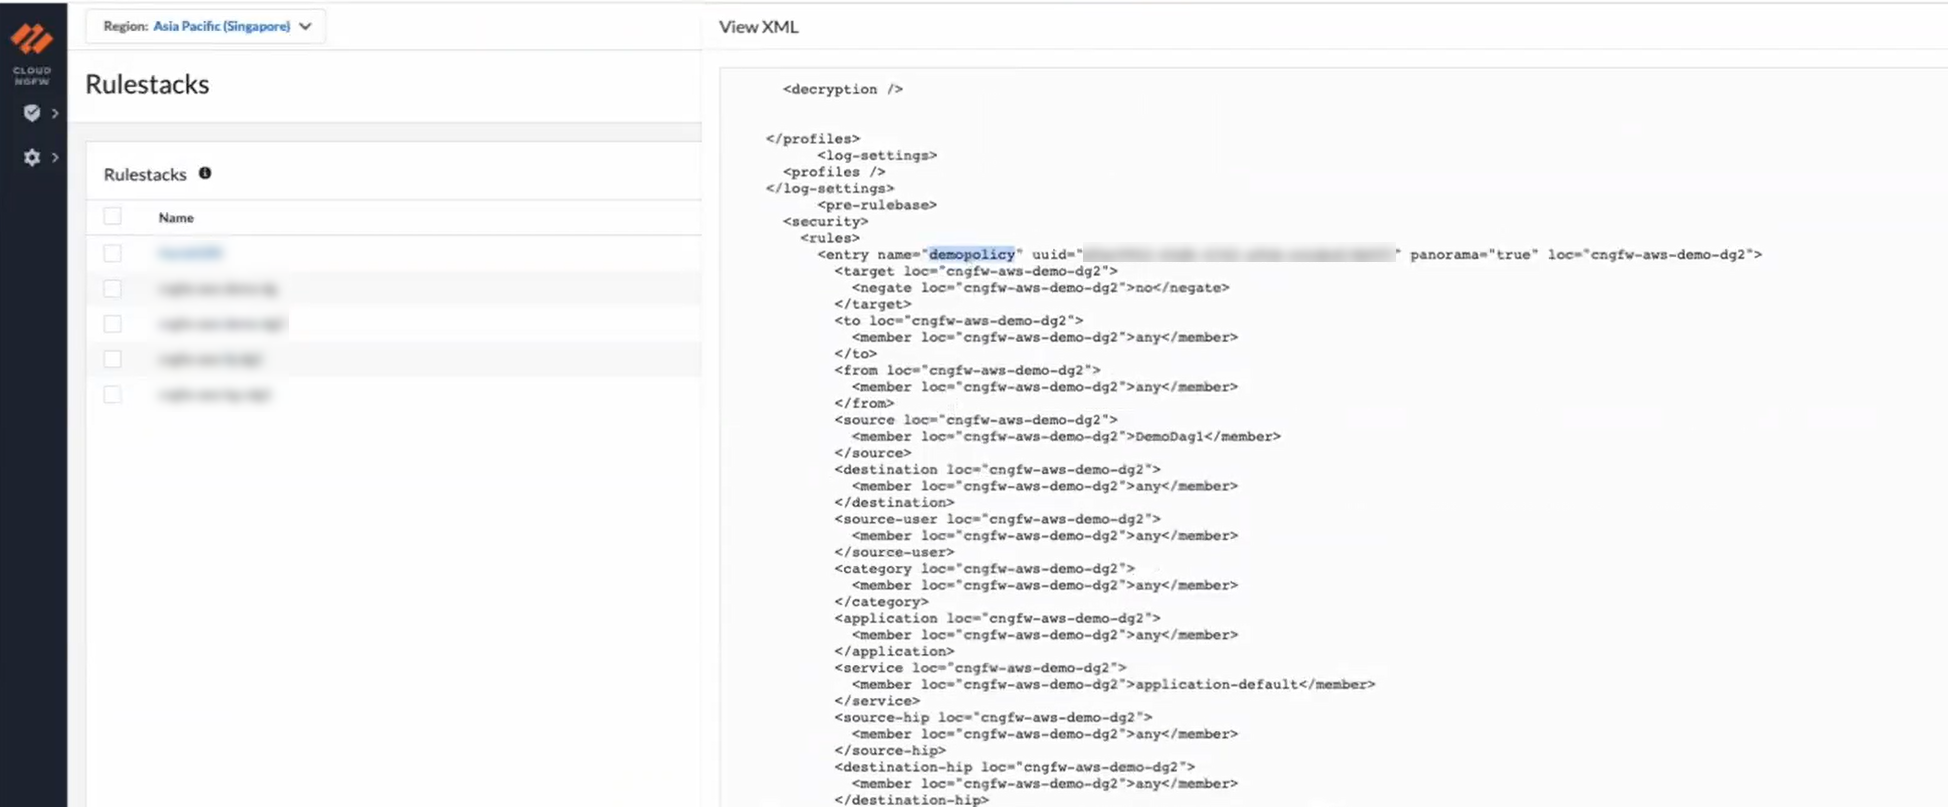
In the Destination tab, select the Dynamic Address Group for the Destination Address field and click Add.![]() Click OK.Commit and Push your changes to the Cloud NGFW device group.For more information on Commit and Push the configuration changes to the firewalls, see Preview, Validate, or Commit Configuration Changes.Return to the Cloud NGFW console to verify an XML file containing dynamic address policy rules pushed from Panorama to the respective cloud device group. ClickView XML to display information on newly added dynamic address policy rules to the cloud device group.
Click OK.Commit and Push your changes to the Cloud NGFW device group.For more information on Commit and Push the configuration changes to the firewalls, see Preview, Validate, or Commit Configuration Changes.Return to the Cloud NGFW console to verify an XML file containing dynamic address policy rules pushed from Panorama to the respective cloud device group. ClickView XML to display information on newly added dynamic address policy rules to the cloud device group.![]() Add a new subnet to the client account. For more information, see Create Subnet on AWS console.
Add a new subnet to the client account. For more information, see Create Subnet on AWS console.Cross-Region Tag-Based Policies
You can populate tags from two different regions to your cloud device groups.![]() For example:Region X and Region Y are your desired regions to enable the discovery of AWS resource tags. If a CNGFW resource is present in region X that needs to learn the tags from Region Y, and then use it for the cloud device group in region X, perform the following steps:
For example:Region X and Region Y are your desired regions to enable the discovery of AWS resource tags. If a CNGFW resource is present in region X that needs to learn the tags from Region Y, and then use it for the cloud device group in region X, perform the following steps:- Add AWS Accounts to Cloud NGFW Tenant and Harvest Tags from them.Use the Panorama plugin to Query Tags and Add them to the Panorama Device Groups.Configure Dynamic Address Group (Dynamic Address Group) objects with Tags in Device Groups.You will be able to see only the Region X tags available for configuring your Dynamic Address Group objects.In Region Y, create the cloud device group of the same name as in Region X. Commit and Push your changes on Panorama. If required, create a VPC group and assign appropriate VPCs or use the default VPC group in Region Y.Create a monitoring Definition in Region Y, and then select the VPC group and notify group (where the Cloud device group is already mapped).Configure Dynamic Address Group (Dynamic Address Group) objects with Tags in Device Groups. You can now see that both Region X and Region Y tags are available for configuring your Dynamic Address Group objects.Commit the configuration in Panorama.In the Cloud Device Group, you can now see the tags from Region Y to configure, and you can create a Dynamic Address Group.

