Deploy the VM-Series Firewall from the Azure Marketplace (Solution Template)
Table of Contents
11.0 (EoL)
Expand all | Collapse all
-
- VM-Series Deployments
- VM-Series in High Availability
- IPv6 Support on Public Cloud
- Enable Jumbo Frames on the VM-Series Firewall
- Hypervisor Assigned MAC Addresses
- Custom PAN-OS Metrics Published for Monitoring
- Interface Used for Accessing External Services on the VM-Series Firewall
- PacketMMAP and DPDK Driver Support
- Enable NUMA Performance Optimization on the VM-Series
- Enable ZRAM on the VM-Series Firewall
-
- VM-Series Firewall Licensing
- Create a Support Account
- Serial Number and CPU ID Format for the VM-Series Firewall
- Use Panorama-Based Software Firewall License Management
-
- Maximum Limits Based on Tier and Memory
- Activate Credits
- Create a Deployment Profile
- Activate the Deployment Profile
- Manage a Deployment Profile
- Register the VM-Series Firewall (Software NGFW Credits)
- Provision Panorama
- Migrate Panorama to a Software NGFW License
- Transfer Credits
- Renew Your Software NGFW Credits
- Deactivate License (Software NGFW Credits)
- Delicense Ungracefully Terminated Firewalls
- Set the Number of Licensed vCPUs
- Customize Dataplane Cores
- Migrate a Firewall to a Flexible VM-Series License
-
- Generate Your OAuth Client Credentials
- Manage Deployment Profiles Using the Licensing API
- Create a Deployment Profile Using the Licensing API
- Update a Deployment Profile Using the Licensing API
- Get Serial Numbers Associated with an Authcode Using the API
- Deactivate a VM-Series Firewall Using the API
- What Happens When Licenses Expire?
-
- Supported Deployments on VMware vSphere Hypervisor (ESXi)
-
- Plan the Interfaces for the VM-Series for ESXi
- Provision the VM-Series Firewall on an ESXi Server
- Perform Initial Configuration on the VM-Series on ESXi
- Add Additional Disk Space to the VM-Series Firewall
- Use VMware Tools on the VM-Series Firewall on ESXi and vCloud Air
- Use vMotion to Move the VM-Series Firewall Between Hosts
- Use the VM-Series CLI to Swap the Management Interface on ESXi
-
-
- Supported Deployments of the VM-Series Firewall on VMware NSX-T (North-South)
- Components of the VM-Series Firewall on NSX-T (North-South)
-
- Install the Panorama Plugin for VMware NSX
- Enable Communication Between NSX-T Manager and Panorama
- Create Template Stacks and Device Groups on Panorama
- Configure the Service Definition on Panorama
- Deploy the VM-Series Firewall
- Direct Traffic to the VM-Series Firewall
- Apply Security Policy to the VM-Series Firewall on NSX-T
- Use vMotion to Move the VM-Series Firewall Between Hosts
- Extend Security Policy from NSX-V to NSX-T
-
- Components of the VM-Series Firewall on NSX-T (East-West)
- VM-Series Firewall on NSX-T (East-West) Integration
- Supported Deployments of the VM-Series Firewall on VMware NSX-T (East-West)
-
- Install the Panorama Plugin for VMware NSX
- Enable Communication Between NSX-T Manager and Panorama
- Create Template Stacks and Device Groups on Panorama
- Configure the Service Definition on Panorama
- Launch the VM-Series Firewall on NSX-T (East-West)
- Add a Service Chain
- Direct Traffic to the VM-Series Firewall
- Apply Security Policies to the VM-Series Firewall on NSX-T (East-West)
- Use vMotion to Move the VM-Series Firewall Between Hosts
-
- Install the Panorama Plugin for VMware NSX
- Enable Communication Between NSX-T Manager and Panorama
- Create Template Stacks and Device Groups on Panorama
- Configure the Service Definition on Panorama
- Launch the VM-Series Firewall on NSX-T (East-West)
- Create Dynamic Address Groups
- Create Dynamic Address Group Membership Criteria
- Generate Steering Policy
- Generate Steering Rules
- Delete a Service Definition from Panorama
- Migrate from VM-Series on NSX-T Operation to Security Centric Deployment
- Extend Security Policy from NSX-V to NSX-T
- Use In-Place Migration to Move Your VM-Series from NSX-V to NSX-T
-
-
- Deployments Supported on AWS
-
- Planning Worksheet for the VM-Series in the AWS VPC
- Launch the VM-Series Firewall on AWS
- Launch the VM-Series Firewall on AWS Outpost
- Create a Custom Amazon Machine Image (AMI)
- Encrypt EBS Volume for the VM-Series Firewall on AWS
- Use the VM-Series Firewall CLI to Swap the Management Interface
- Enable CloudWatch Monitoring on the VM-Series Firewall
- VM-Series Firewall Startup and Health Logs on AWS
- Simplified Onboarding of VM-Series Firewall on AWS
-
- Use AWS Secrets Manager to Store VM-Series Certificates
- AWS Shared VPC Monitoring
- Use Case: Secure the EC2 Instances in the AWS Cloud
- Use Case: Use Dynamic Address Groups to Secure New EC2 Instances within the VPC
-
- Intelligent Traffic Offload
- Software Cut-through Based Offload
-
- Deployments Supported on Azure
- Deploy the VM-Series Firewall from the Azure Marketplace (Solution Template)
- Deploy the VM-Series Firewall from the Azure China Marketplace (Solution Template)
- Deploy the VM-Series with the Azure Gateway Load Balancer
- Create a Custom VM-Series Image for Azure
- Deploy the VM-Series Firewall on Azure Stack
- Deploy the VM-Series Firewall on Azure Stack HCI
- Enable Azure Application Insights on the VM-Series Firewall
- Set up Active/Passive HA on Azure
- Use Azure Key Vault to Store VM-Series Certificates
- Use the ARM Template to Deploy the VM-Series Firewall
-
- About the VM-Series Firewall on Google Cloud Platform
- Supported Deployments on Google Cloud Platform
- Create a Custom VM-Series Firewall Image for Google Cloud Platform
- Prepare to Set Up VM-Series Firewalls on Google Public Cloud
-
- Deploy the VM-Series Firewall from Google Cloud Platform Marketplace
- Management Interface Swap for Google Cloud Platform Load Balancing
- Use the VM-Series Firewall CLI to Swap the Management Interface
- Enable Google Stackdriver Monitoring on the VM Series Firewall
- Enable VM Monitoring to Track VM Changes on Google Cloud Platform (GCP)
- Use Dynamic Address Groups to Secure Instances Within the VPC
- Use Custom Templates or the gcloud CLI to Deploy the VM-Series Firewall
-
- Prepare Your ACI Environment for Integration
-
-
- Create a Virtual Router and Security Zone
- Configure the Network Interfaces
- Configure a Static Default Route
- Create Address Objects for the EPGs
- Create Security Policy Rules
- Create a VLAN Pool and Domain
- Configure an Interface Policy for LLDP and LACP for East-West Traffic
- Establish the Connection Between the Firewall and ACI Fabric
- Create a VRF and Bridge Domain
- Create an L4-L7 Device
- Create a Policy-Based Redirect
- Create and Apply a Service Graph Template
-
- Create a VLAN Pool and External Routed Domain
- Configure an Interface Policy for LLDP and LACP for North-South Traffic
- Create an External Routed Network
- Configure Subnets to Advertise to the External Firewall
- Create an Outbound Contract
- Create an Inbound Web Contract
- Apply Outbound and Inbound Contracts to the EPGs
- Create a Virtual Router and Security Zone for North-South Traffic
- Configure the Network Interfaces
- Configure Route Redistribution and OSPF
- Configure NAT for External Connections
-
-
- Choose a Bootstrap Method
- VM-Series Firewall Bootstrap Workflow
- Bootstrap Package
- Bootstrap Configuration Files
- Generate the VM Auth Key on Panorama
- Create the bootstrap.xml File
- Prepare the Licenses for Bootstrapping
- Prepare the Bootstrap Package
- Bootstrap the VM-Series Firewall on AWS
- Bootstrap the VM-Series Firewall on Azure
- Bootstrap the VM-Series Firewall on Azure Stack HCI
- Bootstrap the VM-Series Firewall on Google Cloud Platform
- Verify Bootstrap Completion
- Bootstrap Errors
End-of-Life (EoL)
Deploy the VM-Series Firewall from the Azure Marketplace (Solution Template)
You can now deploy VM Series Solution templates on Azure Marketplace in a topology
and do not need to restrict yourself to single firewall deployments. You will need
to deploy the resources in an empty resource group and can specify a tag that will
be applied to all resources created by the template.
Palo Alto Networks now supports the following types of deployments with BYOL or PAYG
licensing:
- Single VM-Series firewall
- Single firewall two arm
- Single firewall one arm
- High resiliency with load balancers (LB)
- Common firewall set with LB
- Dedicated inbound firewall set with Public LB
- Dedicated outbound and east-west firewall set with ILB
- Dedicated inbound and outbound firewalls sets with public LB and ILB
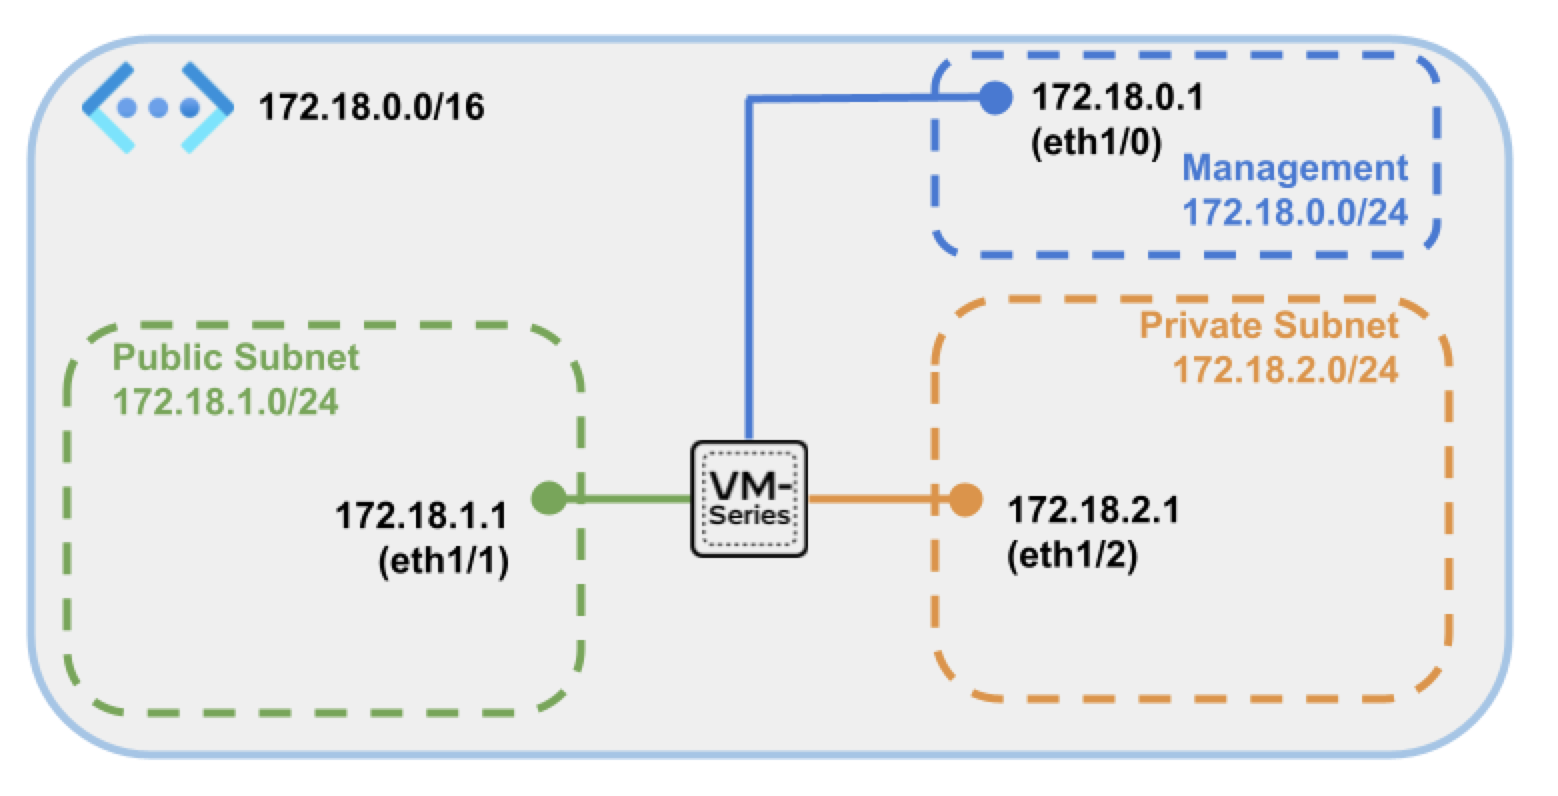
Single VM-Series Firewall
For simple architectures with predictable throughput requirements, you can deploy a
single next generation firewall along with basic networking components such as VNet,
and management, private and public (only for two arm deployment) subnets.
High Resiliency with Load Balancers
Using high resiliency with LB, you can deploy a set of 2-4 firewalls with load
balancing to support production grade resiliency for different traffic
scenarios.
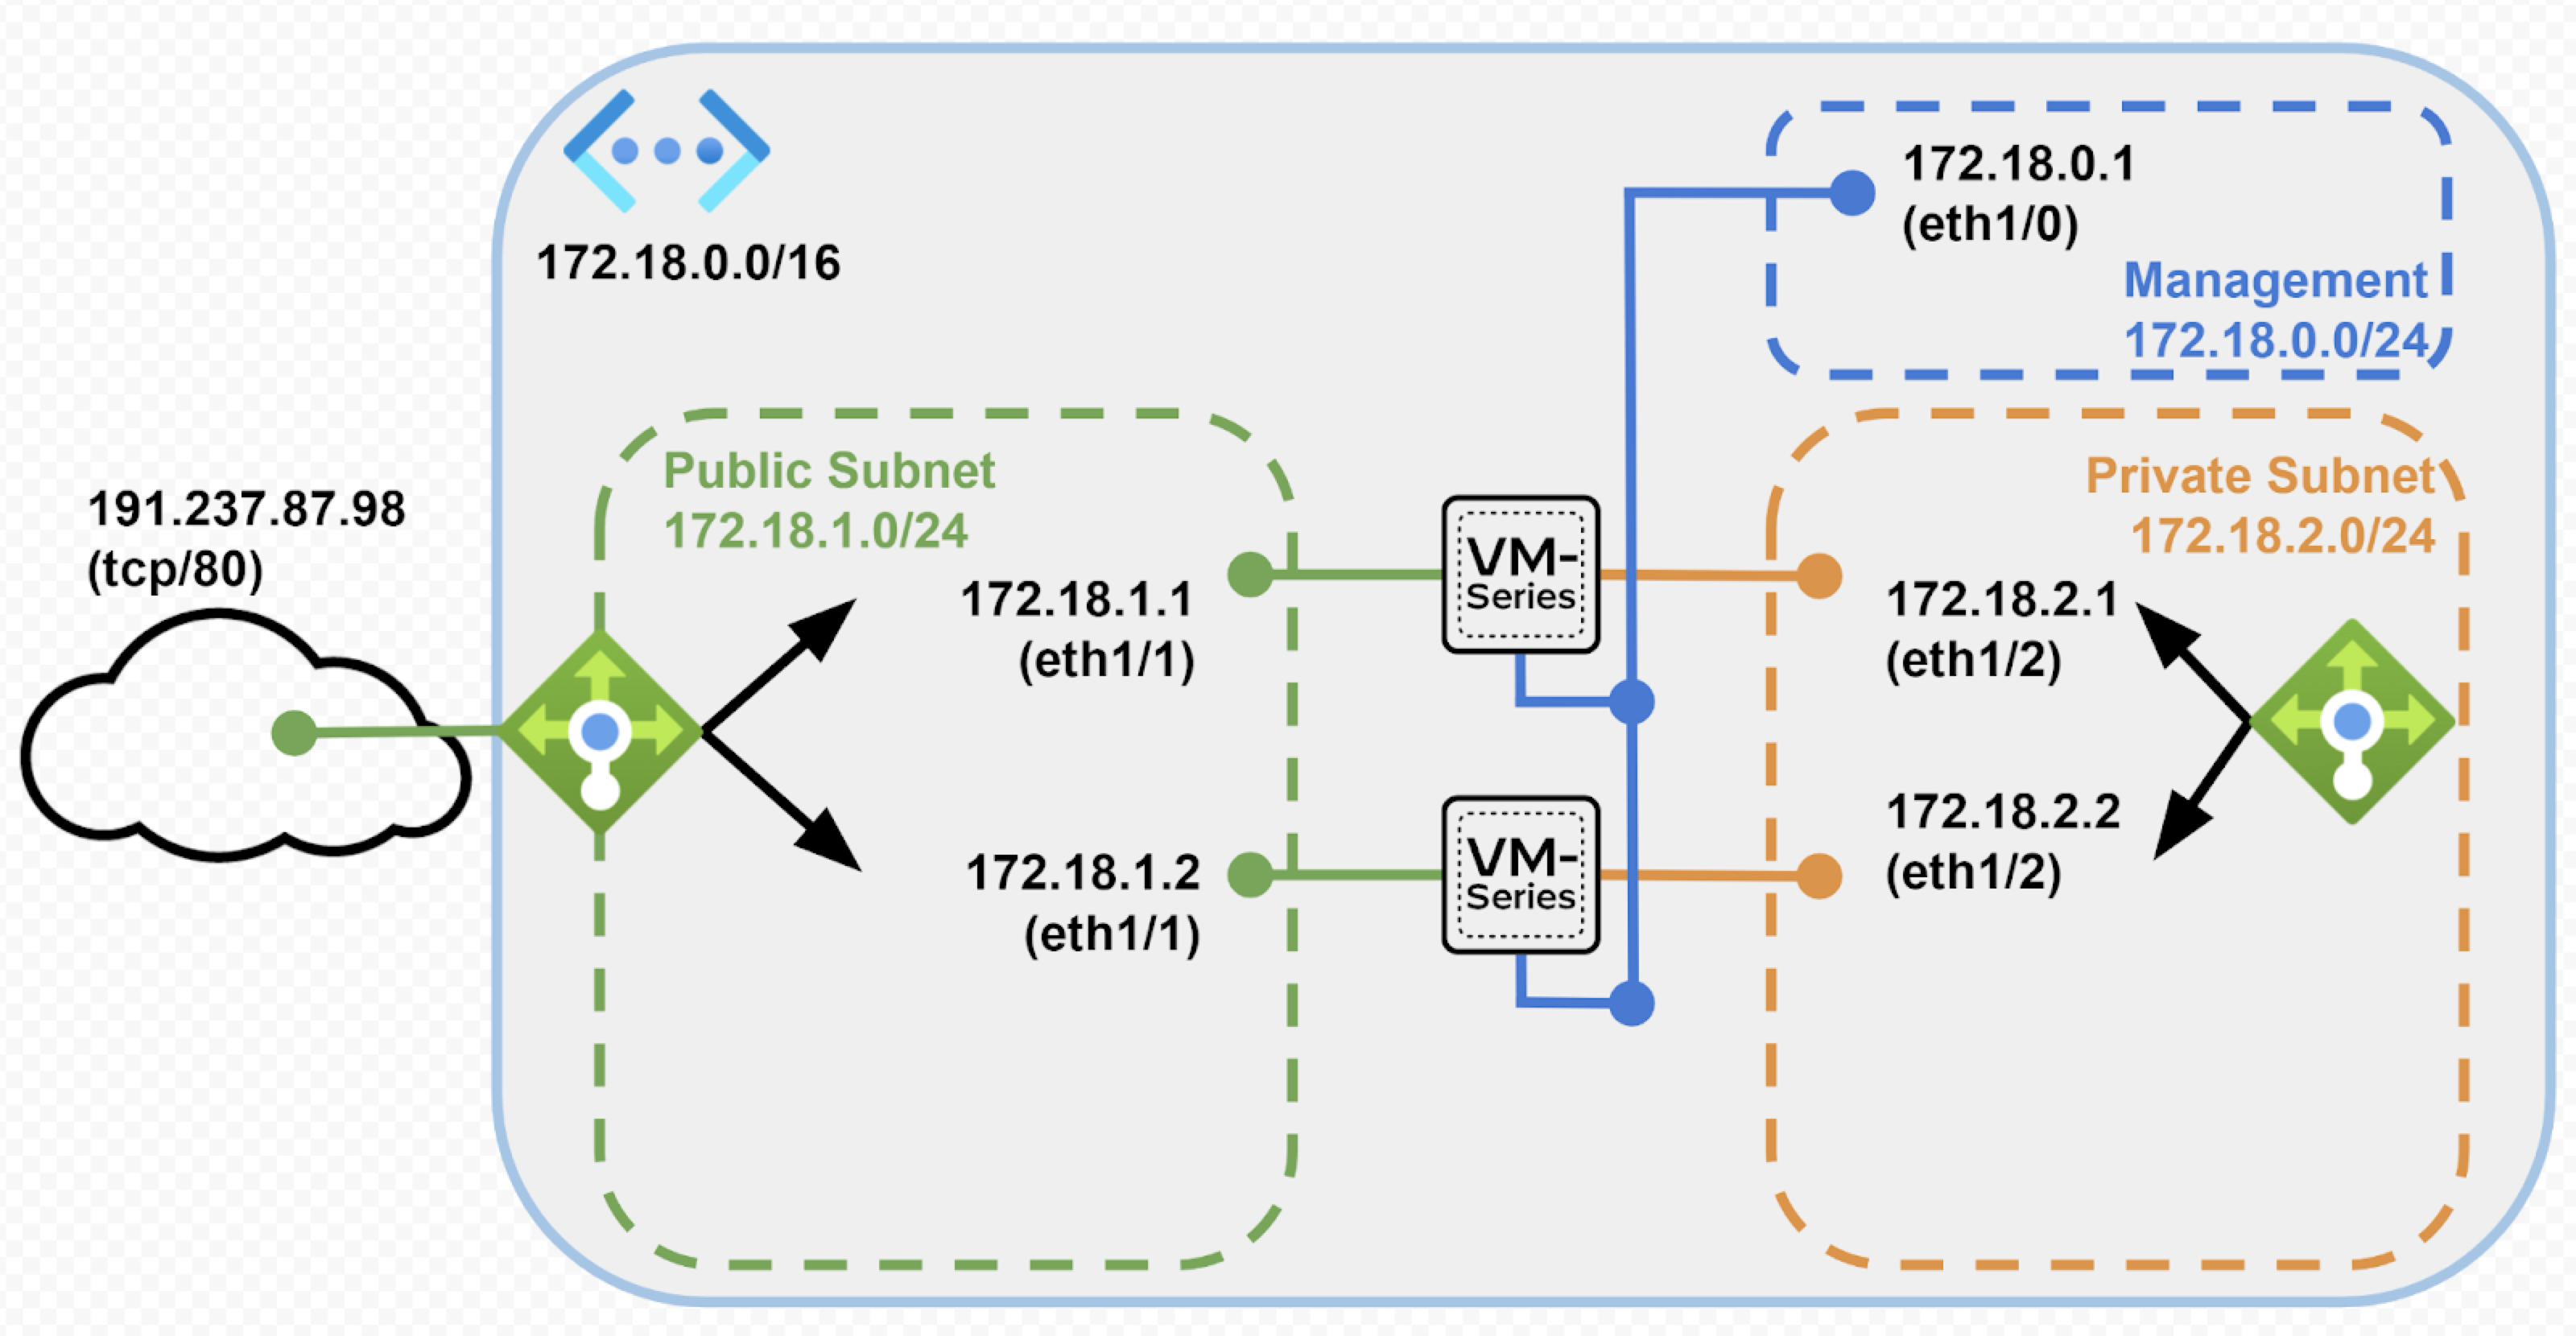
Common Firewall set with Load Balancers
Using this deployment architecture you can deploy:
- 1 VNet and 3 subnets– management, private and public
- 1 internal and 1 public load balancer
- 2 VM-Series next generation firewalls
This architecture is suitable for small deployments and proofs-of-concept and has a
set of 2 firewalls sandwiched between an internal and public load balancers with
both inbound and outbound traffic passing through both firewalls. The set of
firewalls is a shared resource and has limited scaleable options.
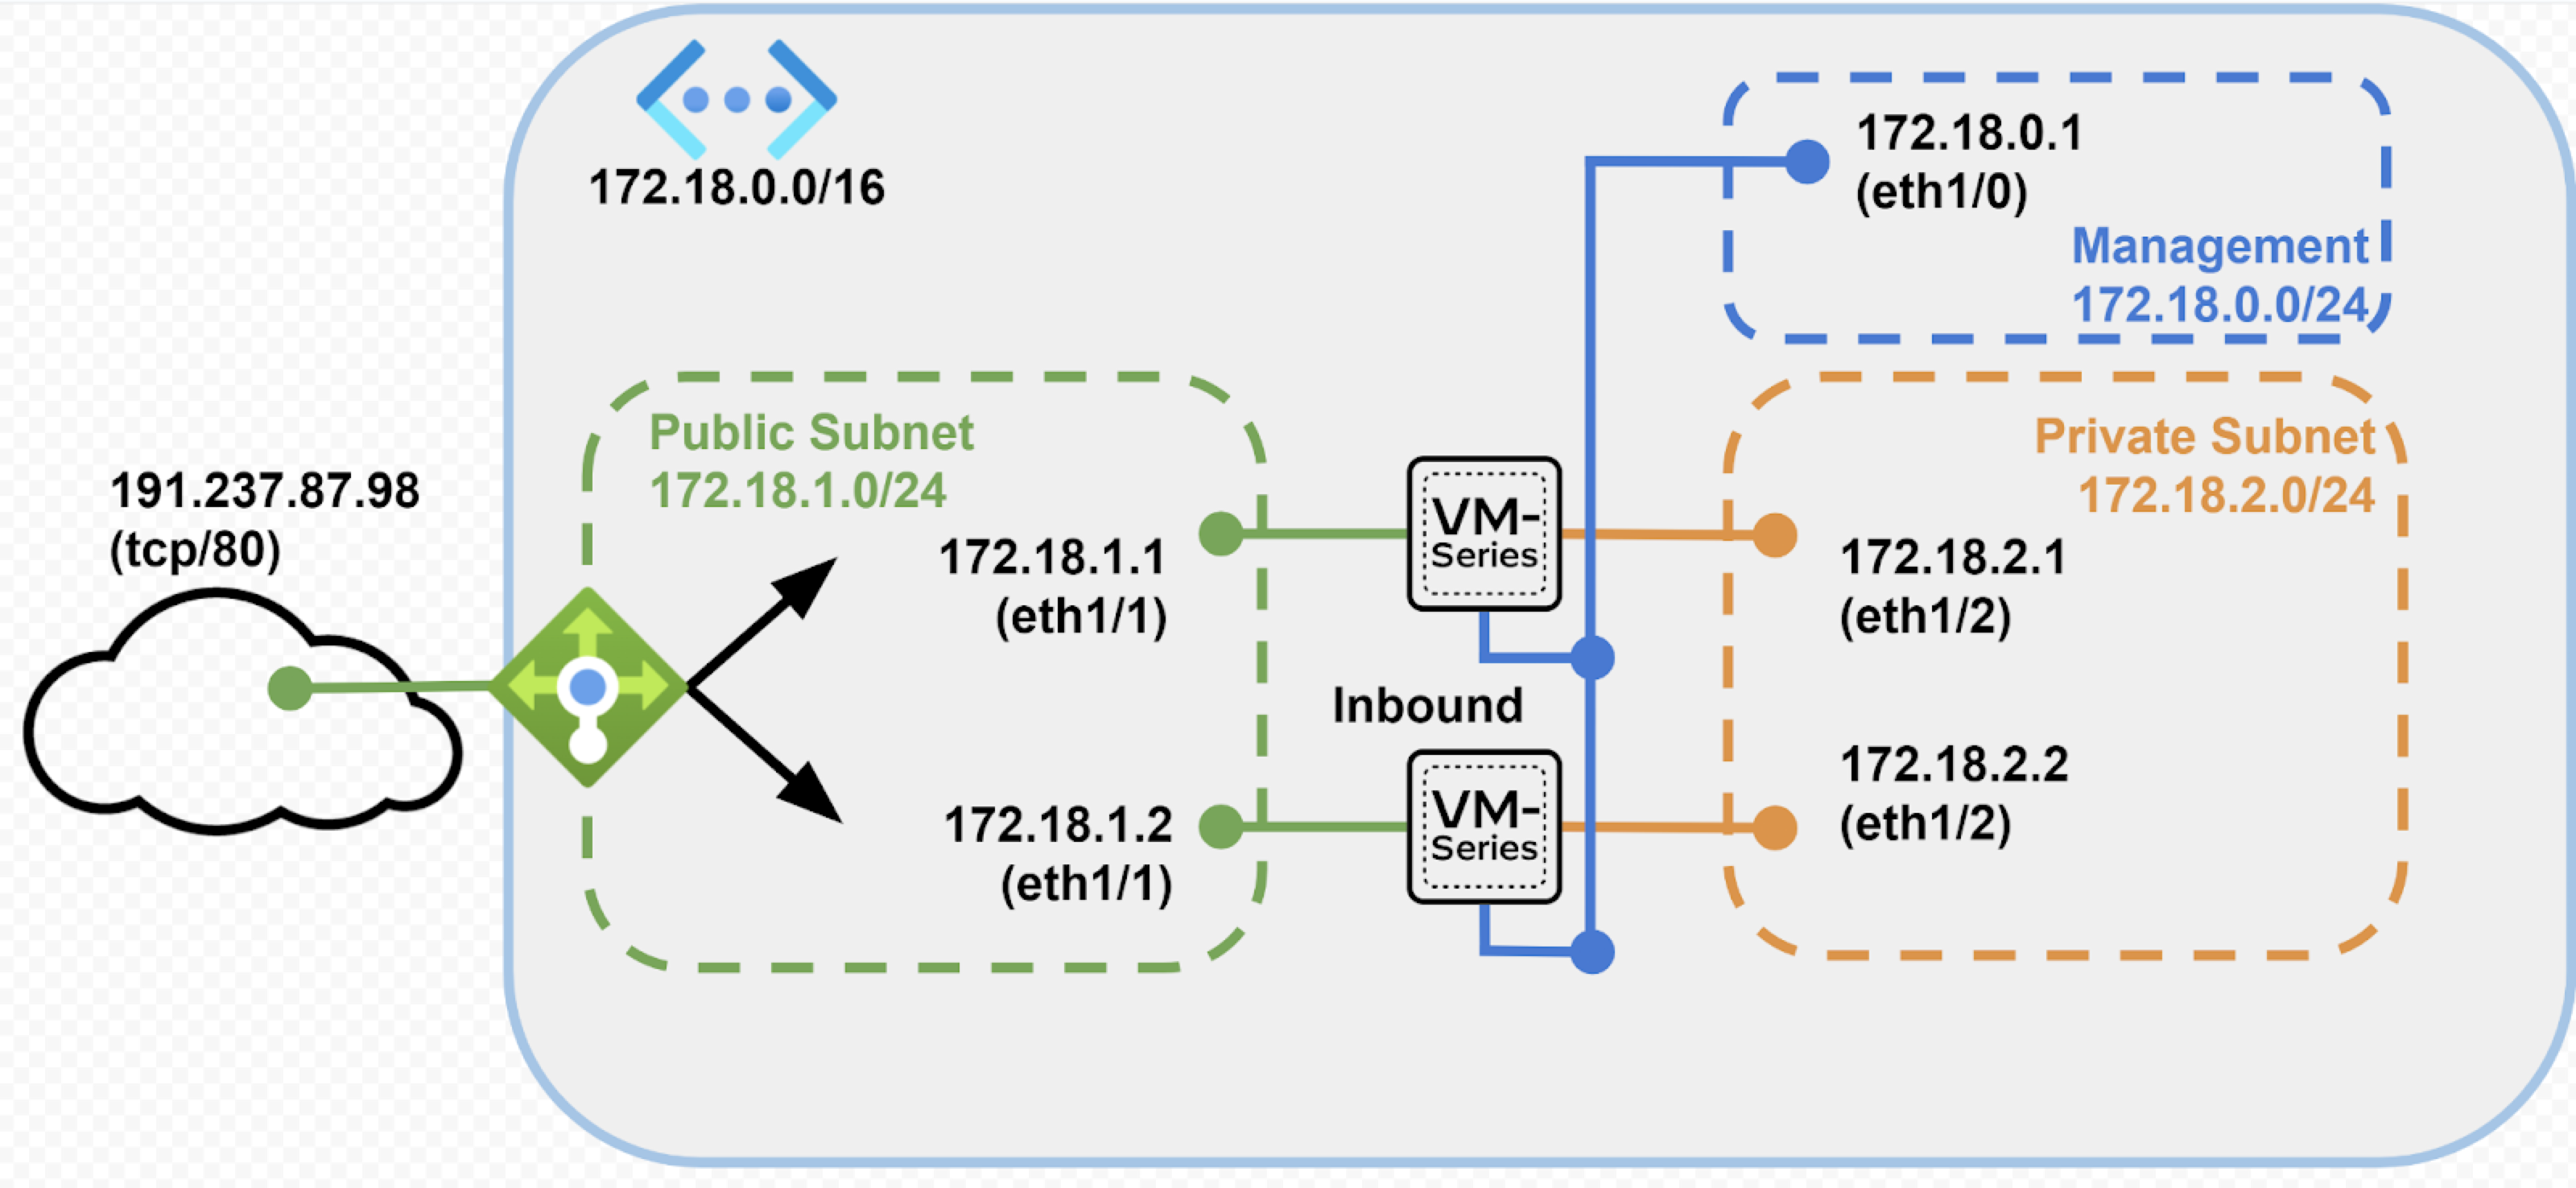
Dedicated Inbound Firewall set with ILB
Using this deployment architecture you can deploy:
- 1 VNet and 3 subnets– management, private and public
- 1 public load balancer
- 2 VM-Series next generation firewalls
This architecture is suitable for production deployments and supports two firewalls
behind a public load balancer with only inbound traffic flowing through both
firewalls. This architecture offers increased scale and operational resiliency and
reduces the chances of high bandwidth use from the inbound access traffic.
Dedicated Outbound and East-West Firewall set w/ ILB
Using this deployment architecture you can deploy:
- 1 VNet and 3 subnets: management, private and public
- 1 internal load balancer
- 2 VM-Series next generation firewalls
Dedicated outbound and east-west architecture places a set of 2 firewalls in front of
an internal load balancer with only outbound traffic flowing through both firewalls.
The model separates outbound, east-west, and backhaul traffic flows through a common
firewall set, allowing for greater scaling of outbound traffic loads. Palo Alto
Networks recommends this model for your production deployments.

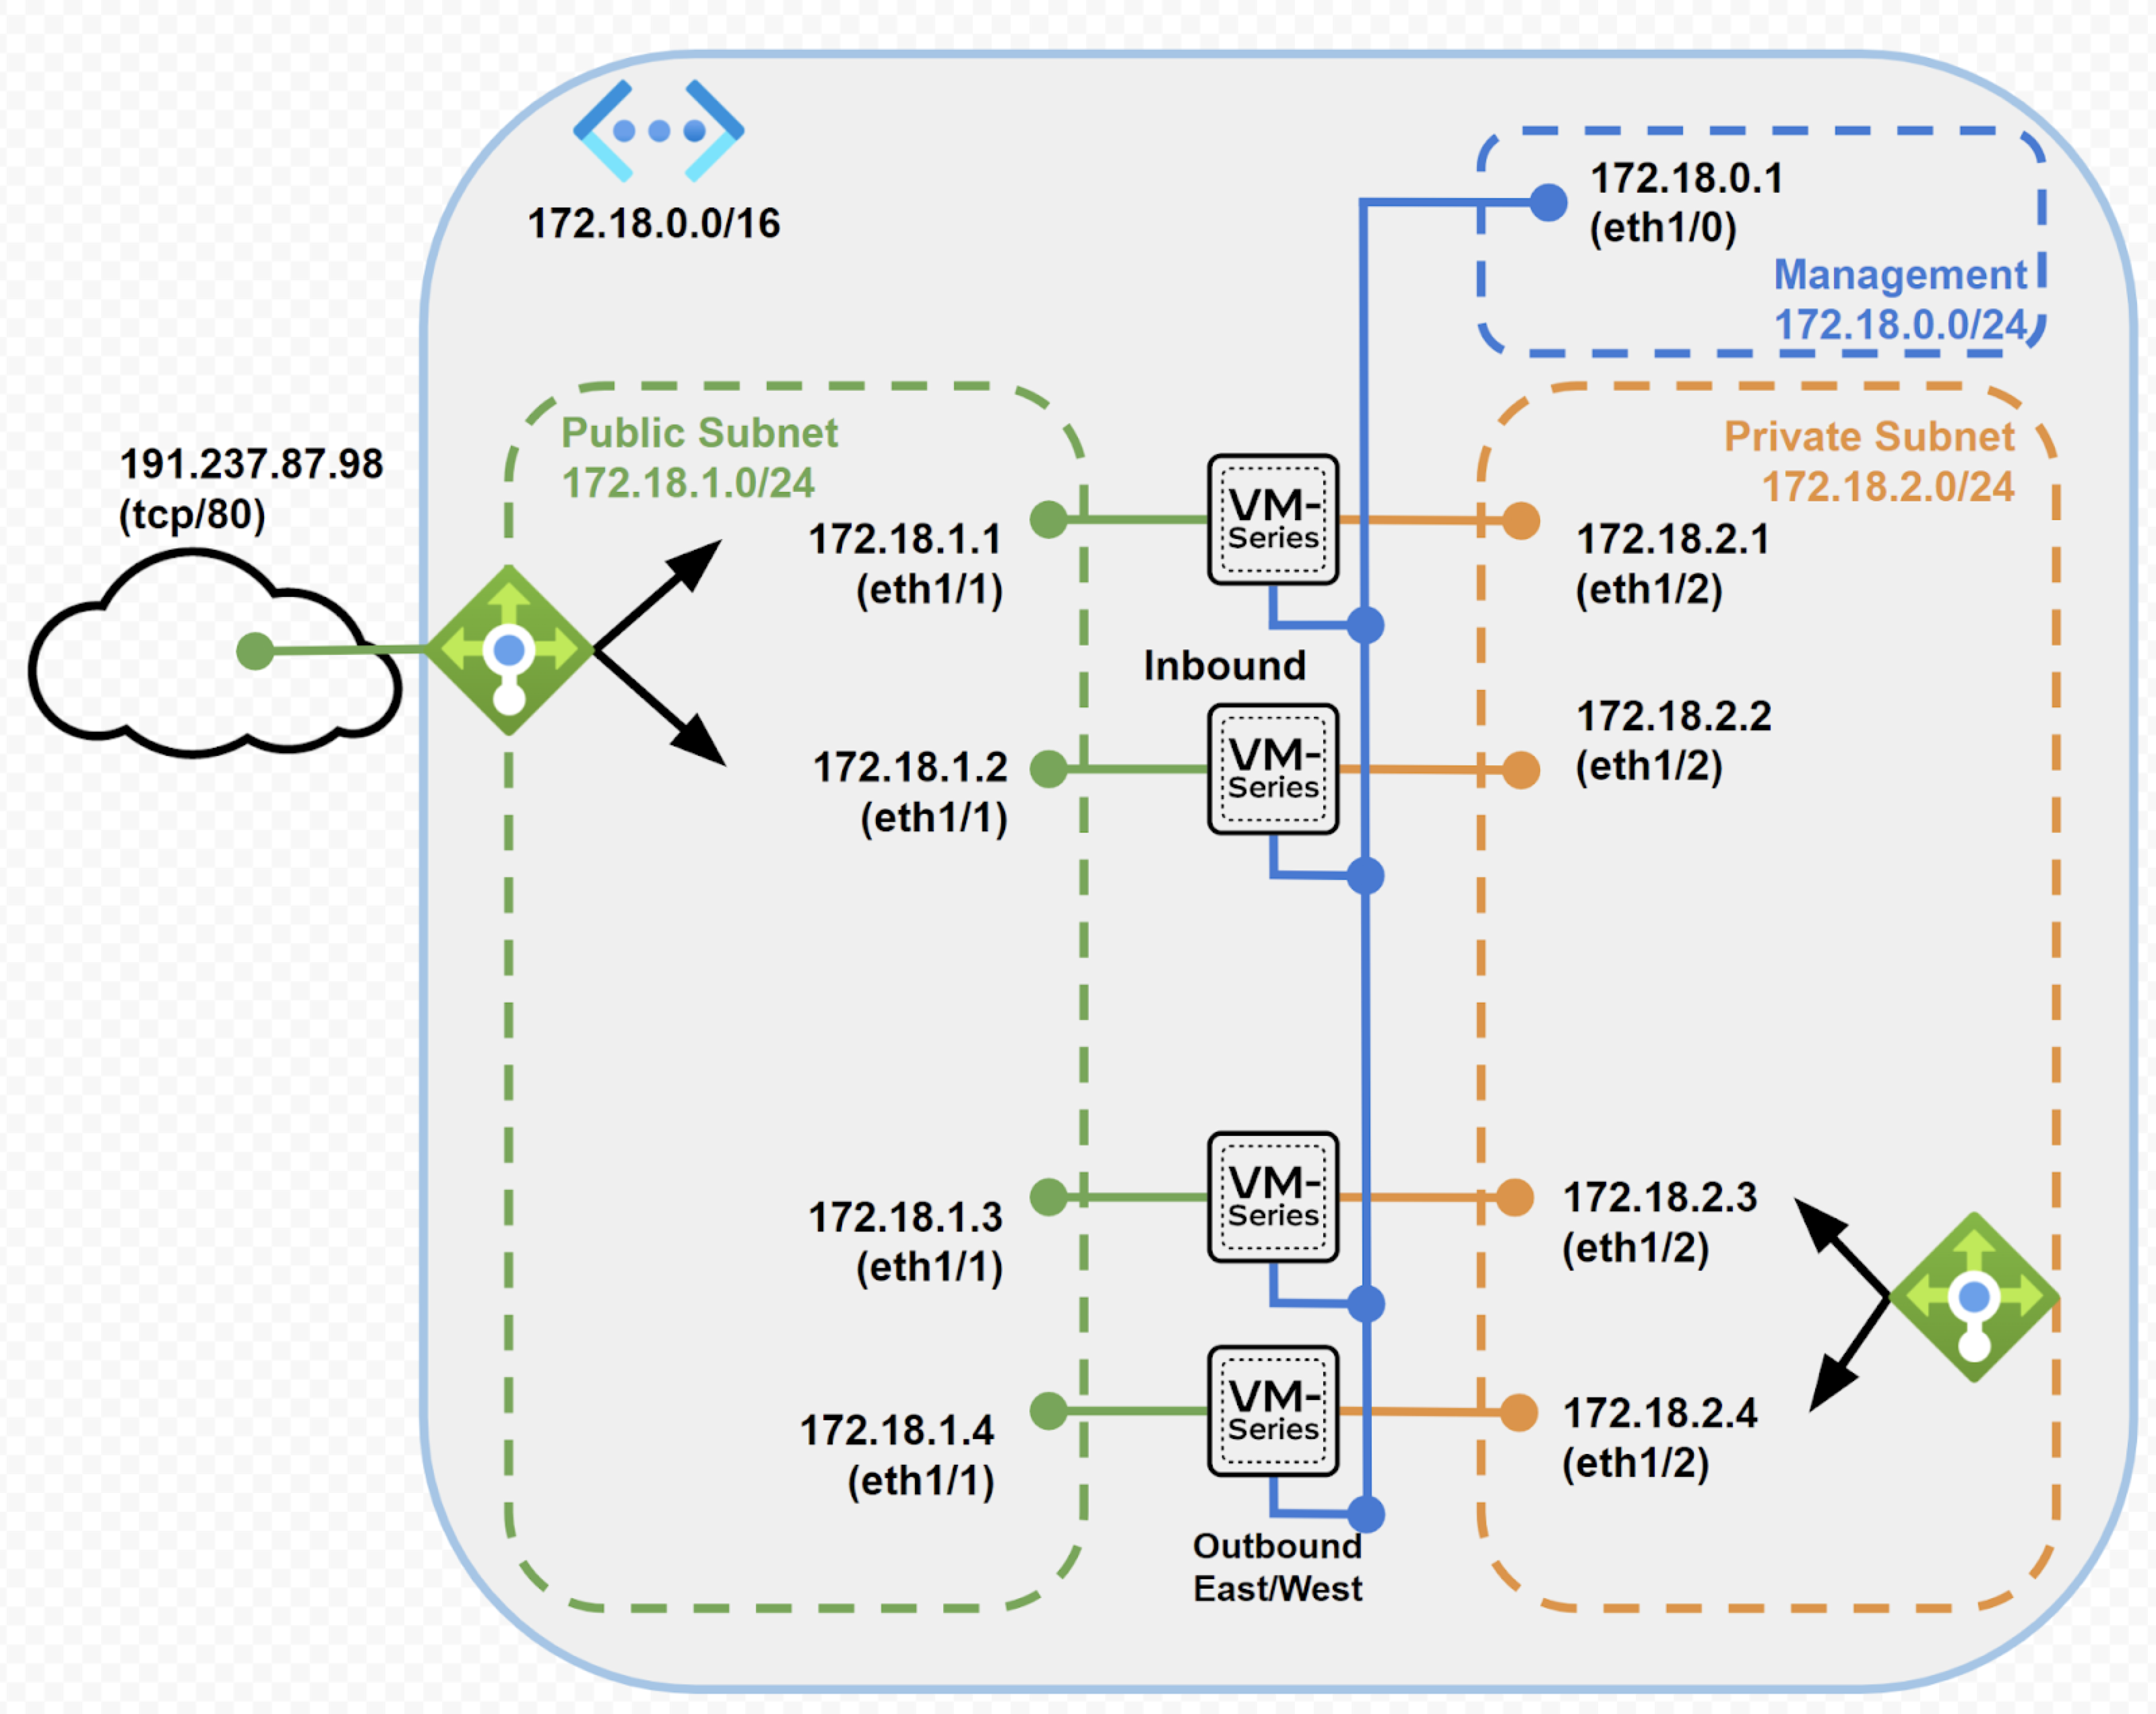
Dedicated Inbound, Outbound and Eas-West Firewalls sets w/ Public LB and
ILB
Using this deployment architecture you can deploy:
- 1 VNet and 3 subnets: management, private and public
- 1 internal load balancer
- 4 VM-series next generation firewalls
Dedicated inbound, outbound and east-west architecture deploys a set of 4 firewalls,
2 of which are fronted by a public load balancer for inbound flows and the other 2
are fronted by internal load balancer, for outbound and east-west flows. This
architecture combines the benefits of all the above architectures in a single
template.
Deploy the Azure Solution Template for Single VM-Series Firewall
The following instructions describe how to deploy the solution template for the
VM-Series firewall that is available in the Azure® Marketplace and the Azure
Government Marketplace. To use the customizable Azure Resource Manager (ARM)
templates available in the GitHub repository, see Use the ARM
Template to Deploy the VM-Series Firewall.
- Set up an Azure account.
- If you don’t have one already, create a Microsoft® account.Log in to the Azure portal (https://portal.azure.com or https://portal.azure.us) using your Microsoft account credentials.If you are using a trial subscription, you may need to open a support request (Help + SupportNew Support Request) to increase the quota of allocated VM cores.Find the VM-Series solution template in the Azure Marketplace, click Create a resource and Select VM-Series Next Generation Firewall from Palo Alto.
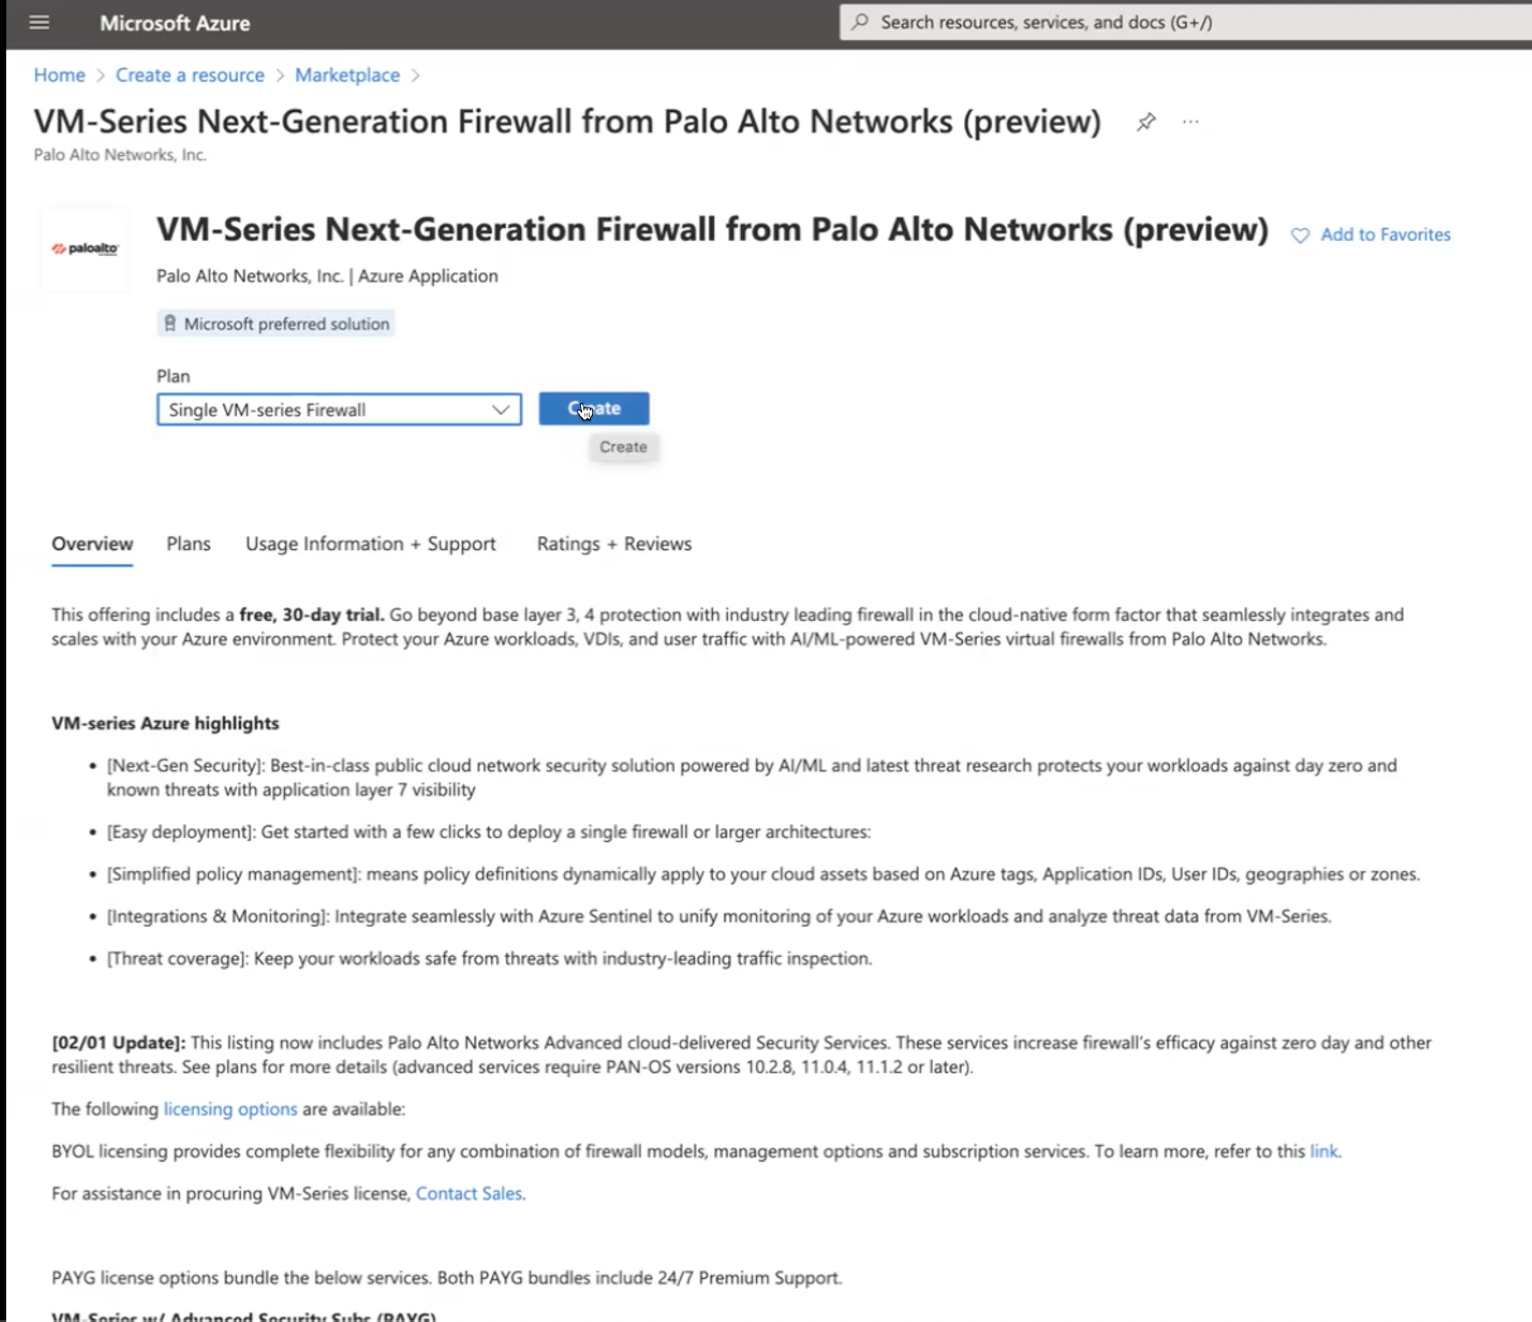
- Select MarketplaceVirtual Machines.Search for Palo Alto Networks® and a list of offerings for the VM-Series firewall will display. For the differences in the BYOL (bring your own license) and PAYG (pay as you go) models, see VM-Series Firewall Licenses for Public Clouds.Select the VM-Series Next-Gen Single Firewall to Create a new VM-Series firewall.Deploy the firewall.
![]()
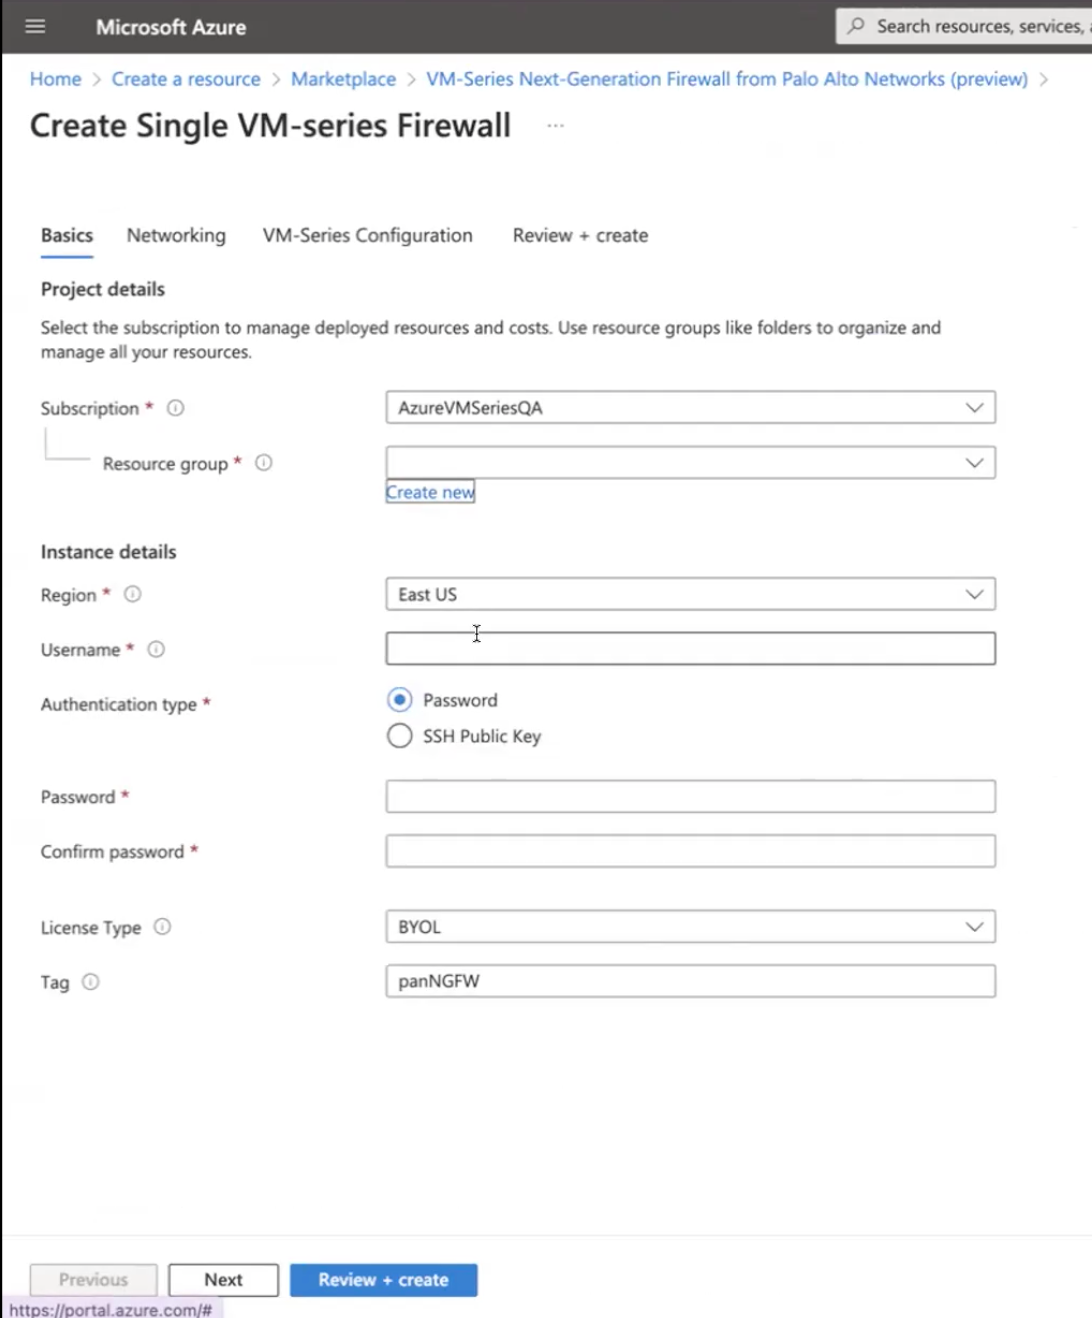
- Configure basic settings for the firewall.
- Select your Azure Subscription.
- Create a new resource group or select an existing resource group that is empty. The resource group will hold all the resources associated with the VM-Series firewall for this deployment.Azure has removed the option to select an existing resource group for Marketplace solutions that enable multiple network interface controllers (NICs). To deploy the firewall into an existing resource group, use the ARM template in the GitHub Repository or use your own custom ARM template.
- Select the Azure Region in which you are deploying the firewall.
- Enter a Username for the firewall administrator.
- Select the Authentication type—Password or SSH Public Key.You must enable SSH key authentication if you plan to use the firewall in FIPS-CC operational mode. Although you can deploy the VM-Series firewall using a username and password, you will be unable to authenticate using the username and password after changing the operational mode to FIPS-CC. After resetting to FIPS-CC mode, you must use the SSH key to log in and can then configure a username and password that you can use for subsequently logging in to the firewall web interface. For details on creating the SSH key, refer to the Azure documentation.
- Enter a Password (up to 31 characters) or copy and paste an SSH public key for securing administrative access to the firewall.
- Confirm the password.
- Select the License Type.
- Enter the Deployment Tag that you specified while creating the resource group.
- Click Next.
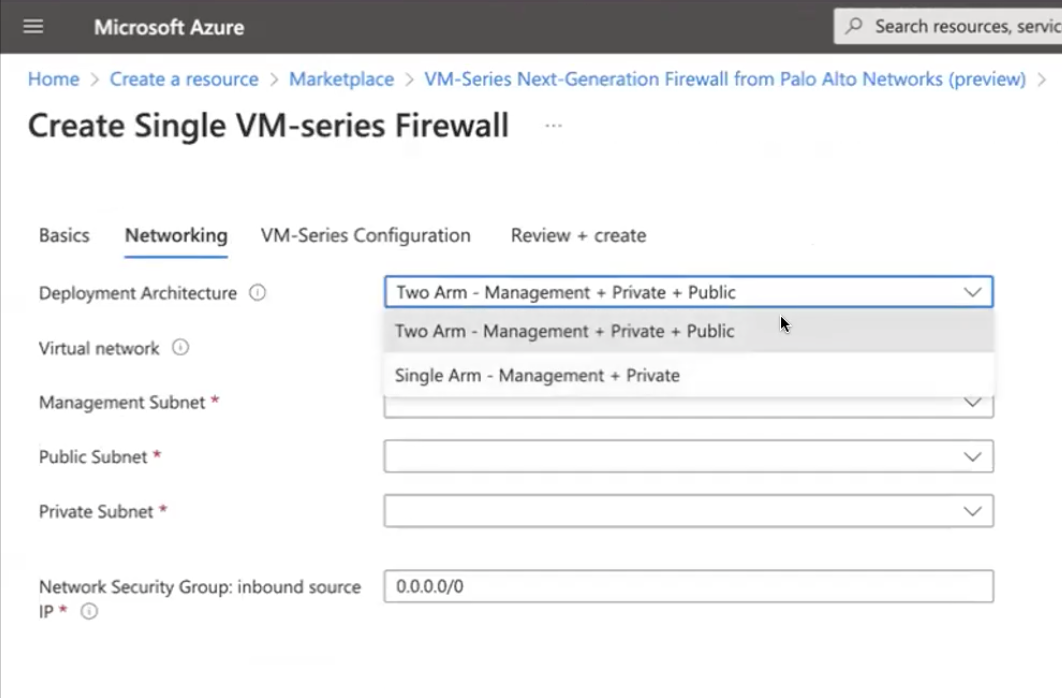
![]() Configure networking.
Configure networking.- Configure the subnets for the network interfaces--You may choose either a single arm configuration with management and trust subnets, or two arm configuration with management, trust and untrust subnets.
![]() A new Azure Virtual Network (VNet) is automatically preconfigured.If you use the default subnets, you must review the configuration. If you use an existing VNet, you must have set up three subnets: one each for the management,trust, and untrust interfaces. If you create a new VNet, verify or change the prefixes for each subnet.
A new Azure Virtual Network (VNet) is automatically preconfigured.If you use the default subnets, you must review the configuration. If you use an existing VNet, you must have set up three subnets: one each for the management,trust, and untrust interfaces. If you create a new VNet, verify or change the prefixes for each subnet. - Enter the source IP address or IP range (include the CIDR block) that can access the VNet. Network Security Group: inbound source IP allows you to restrict inbound access to the Azure VNet.Restrict access to the firewall. Make sure to supply a CIDR block that corresponds to your dedicated management IP addresses or network. Do not make the allowed source network range larger than necessary and never configure the allowed source as 0.0.0.0/0. Verify your IP address before you configure it on the template to make sure that you do not lock yourself out.
- Click Next.
Define management access to the firewall.- Use the default variable ((new) fwMgmtPublicIP)) to assign a Public IP address to the management interface (eth0) of the firewall.Azure accelerated networking is not supported on the management interface.
- Enter a prefix to access the firewall using a DNS name. You must combine the prefix you enter with the suffix displayed on screen to access the web interface of the firewall. For example: <yourname><your-region>.cloudapp.azure.com
- Select latest VM-Series Version.
- Enter a display name to identify the VM-Series firewall within the resource group.
Add the information to configure the firewall at launch. Select the VM-Series Version, Virtual machine size, and Availability Option.- Select yes if you wish to Enable Bootstrap. See Bootstrap the VM-Series Firewall on Azure. Select one of the following two options under Use Bootstrap File:
- Provide Bootstrap File
- Provide Bootstrap Parameters - Add additional information related to primary Panorama, secondary Panorama, DG, template stack, and so on.
- Enter the Storage Account Name that holds the Bootstrap Package.
- Enter the Storage Account Access Key. This firewall needs this access key to authenticate to the storage account and access the files stored within.
- Add the File share name to which you have uploaded the files required for bootstrapping the firewall. The storage account must be in the same region in which you are deploying the firewall and it must have the correct folder structure for bootstrapping.
- Select the Azure virtual machine tier and size to meet your needs. Use the Change size link to view supported instance types, and to review the Minimum System Requirements for the VM-Series on Azure.
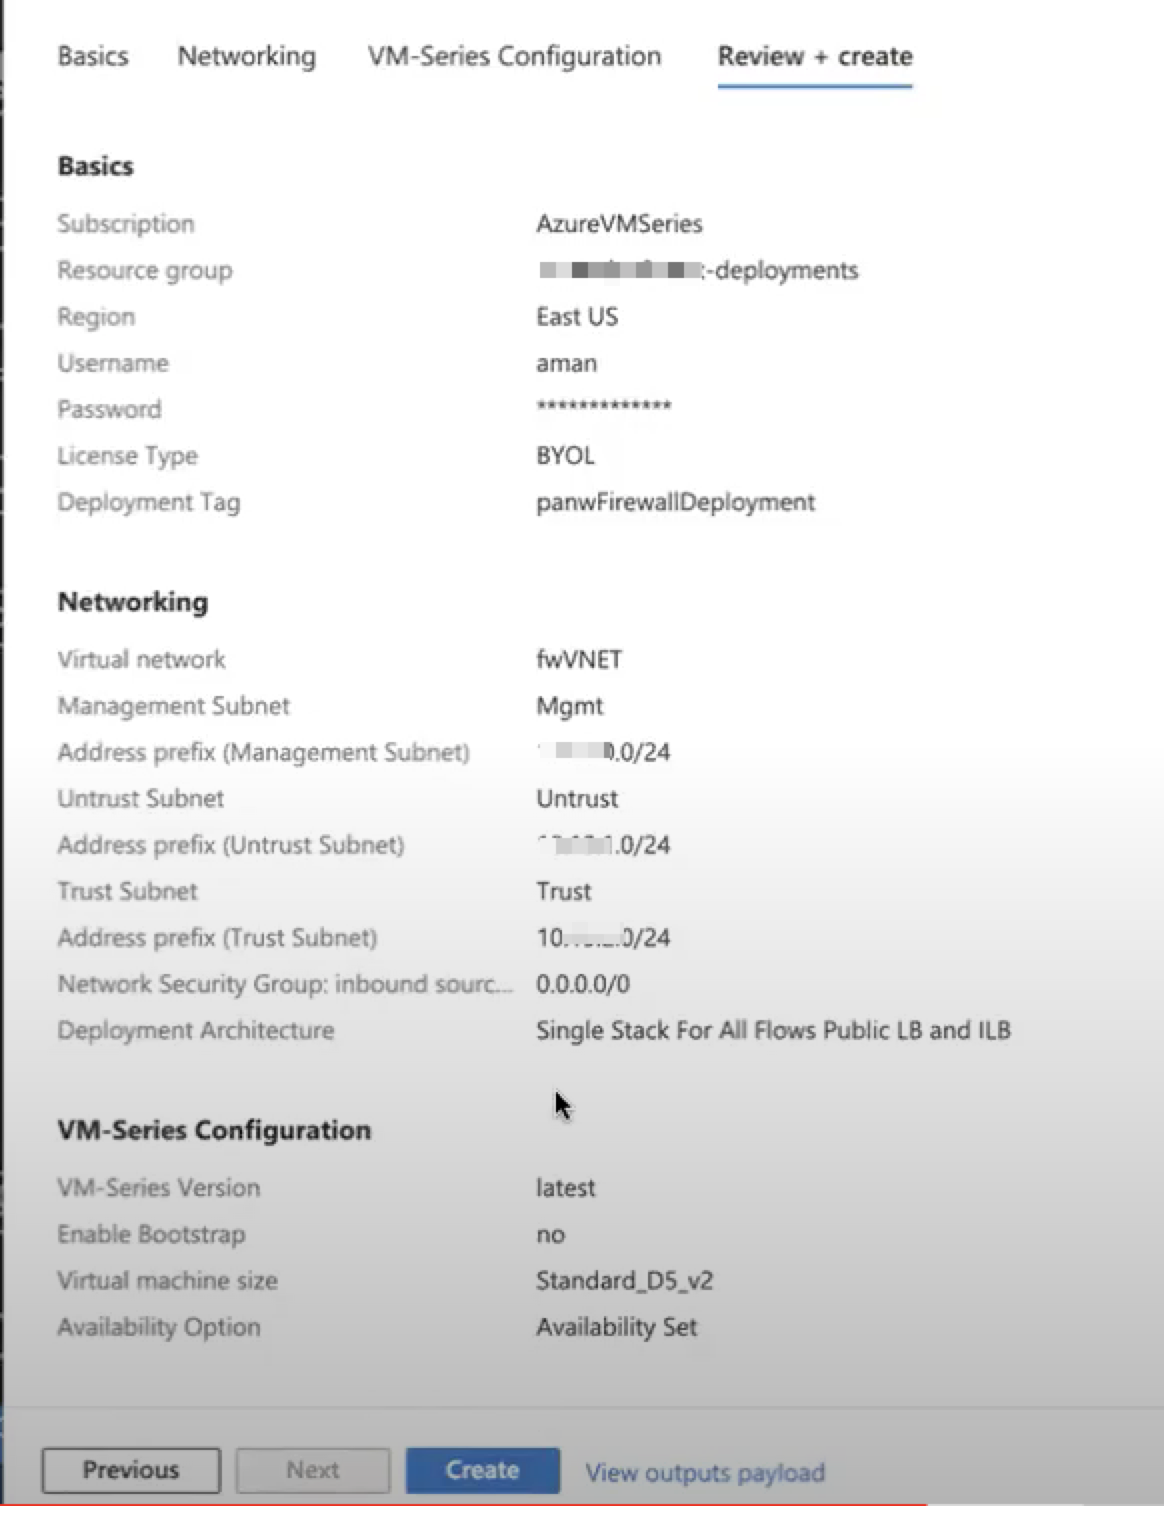
Review the summary, and OK. Then accept the terms of use and privacy policy, and Create to launch the firewall.![]() Verify that you have successfully deployed the VM-Series firewall.
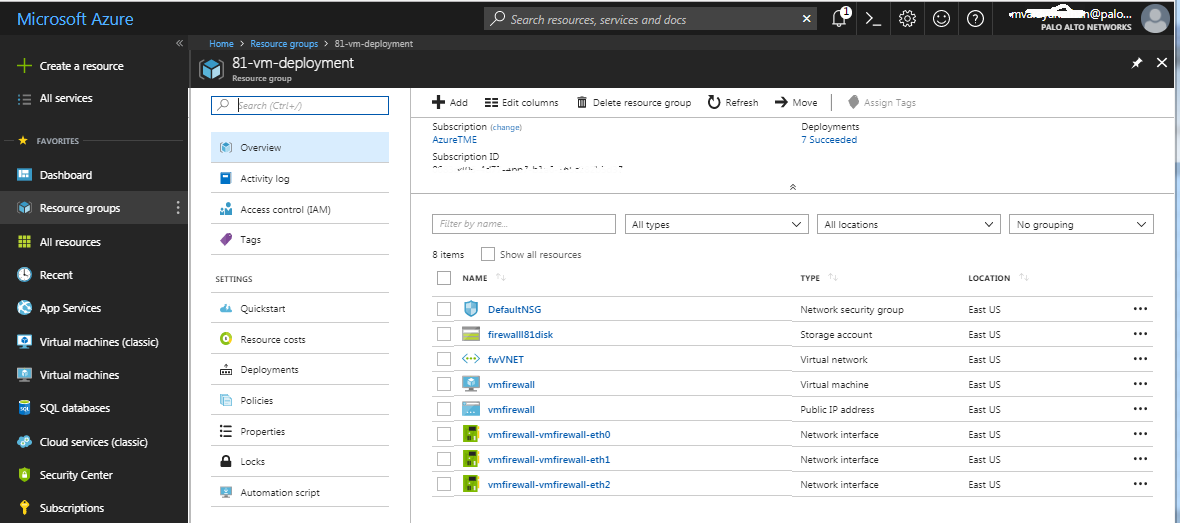
Verify that you have successfully deployed the VM-Series firewall.- Select DashboardResource Groups and select the resource group.
- Select your resource group and see the Overview for detailed status on which resources are deployed successfully.
![]()
Attach a public IP address for the untrust interface of the VM-Series firewall. When you create a new public IP address, you get one from the block of IP addresses that Microsoft owns, so you can’t choose a specific one. The maximum number of public IP addresses you can assign to an interface is based on your Azure subscription.- On the Azure portal, select the network interface for which you want to add a public IP address (such as the eth1 interface).Select IP ConfigurationsAdd and, for Public IP address, select Enabled. Create a new public IP address or select one that you have available.Verify that you can view the secondary IP address associated with the interface.
![]() When you attach a secondary IP address to a network interface, the VM-Series firewall does not automatically acquire the private IP address assigned to the interface. You will need to manually configure the private IP address using the VM-Series firewall web interface. See Configure the dataplane network interfaces as Layer 3 interfaces on the firewall.Log in to the web interface of the firewall.
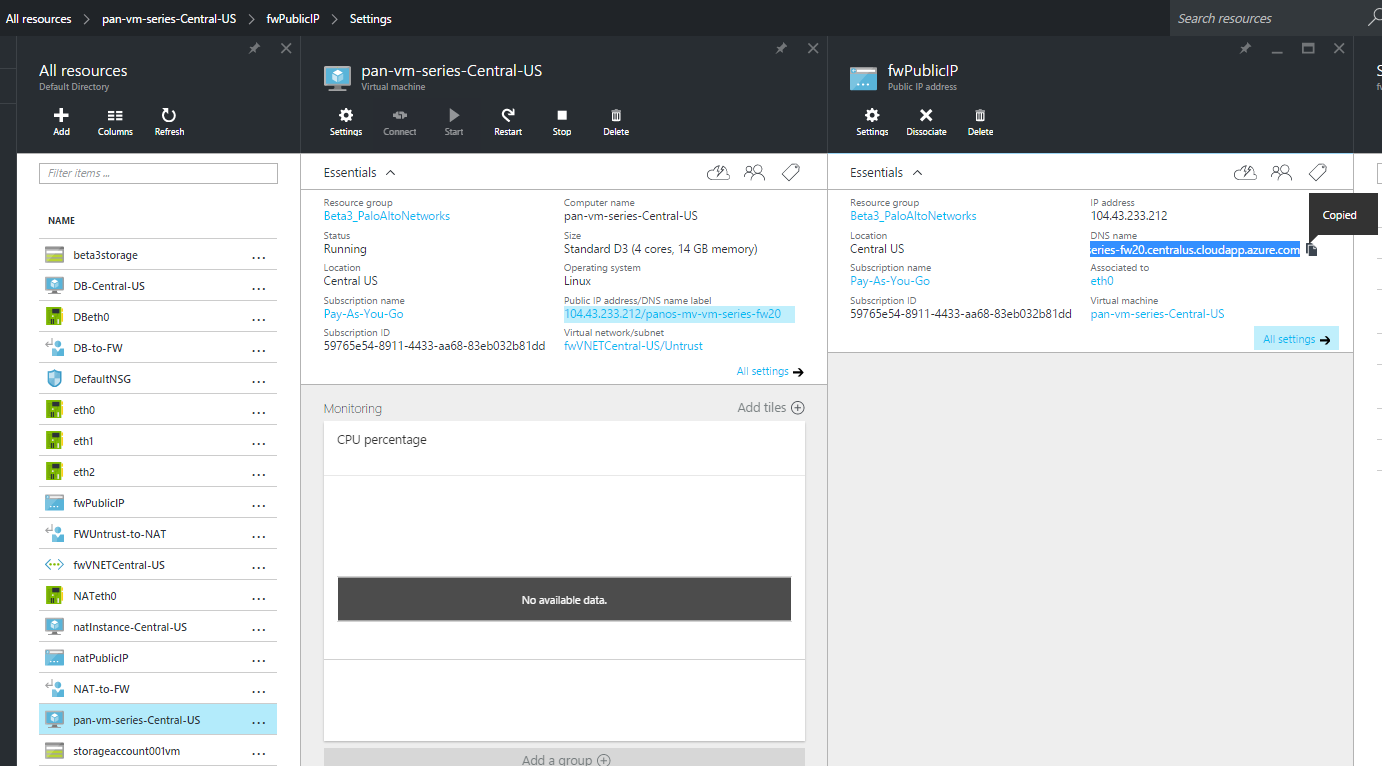
When you attach a secondary IP address to a network interface, the VM-Series firewall does not automatically acquire the private IP address assigned to the interface. You will need to manually configure the private IP address using the VM-Series firewall web interface. See Configure the dataplane network interfaces as Layer 3 interfaces on the firewall.Log in to the web interface of the firewall.- On the Azure portal, in All Resources, select the VM-Series firewall and view the full DNS name for the firewall.
![]()
- Using a secure (https) connection from your web browser, log in to the DNS name for the firewall.Enter the usernamepassword that you defined in the parameters file. You will see a certificate warning but that is OK—continue to the web page.Activate the licenses on the VM-Series firewall.For the BYOL version
- Create a Support Account.Register the VM-Series Firewall (with auth code).On the firewall web interface, select DeviceLicenses and select Activate feature using authentication code.Enter the capacity authentication code (auth-code) that you registered on the support portal. The firewall will connect to the update server (updates.paloaltonetworks.com), and download the license and reboot automatically.Log back in to the web interface and confirm the following on the Dashboard:
- A valid serial number displays in Serial#.If the term Unknown displays, it means the firewall is not licensed. To view traffic logs on the firewall, you must install a valid capacity license.
- The VM Mode displays as Microsoft Azure.
For the PAYG version- Create a Support Account.Register the Usage-Based Model of the VM-Series Firewall for Public Clouds (no auth code).Configure the dataplane network interfaces as Layer 3 interfaces on the firewall.If you are hosting multiple websites or services with different IP addresses and SSL certificates on a single server, you might need to configure more than one IP address on the VM-Series firewall interfaces.
- Select NetworkInterfacesEthernet.Click ethernet 1/1 and configure as follows:
- Set Interface Type to Layer3 (default).
- On the Config tab, assign the interface to the default router.
- Also on the Config tab, expand the Security Zone drop-down and select New Zone. Define a new zone called UnTrust, and then click OK.
- On the IPv4 tab, select DHCP Client if you plan to assign only one IP address on the interface—the firewall will automatically acquire the private IP address assigned in the ARM template. If you plan to assign more than one IP address, select Static and manually enter the primary and secondary IP addresses assigned to the interface on the Azure portal.
- Disable (clear) the Automatically create default route to default gateway provided by server to ensure that traffic handled by this interface does not flow directly to the default gateway in the VNet.
Click ethernet 1/2 and configure as follows:- Set Interface Type to Layer3 (default).
- Set Security Zone to Trust.
- Set IP address DHCP Client or Static.
- Disable (clear) the Automatically create default route to default gateway provided by serverto ensure that traffic handled by this interface does not flow directly to the default gateway in the VNet.
Commit your changes and verify that the link state for the interfaces is up.Add a static route on the virtual router of the VM-Series firewall for any networks that the firewall needs to route.For example, to add a default route to the destination subnets for the servers that the firewall secures:- Select NetworkVirtual Routerdefault
- Select Static RoutesIPv4, and add the next hop IP address for the destination servers. You can set x.x.x.1 as the next hop IP address for all traffic (destined to 0.0.0.0/0 from interface ethernet1/1).
Configure the firewall for your specific deployment.- Gateway—Deploy a third-party load balancer in front of the UnTrust zone.
- Hybrid and Inter-VNet—Deploy an Azure VPN Gateway or a NAT virtual machine in front the UnTrust zone.
- Inter-Subnet—On the VM-Series firewall, add an intrazone Security policy rule to allow traffic based on the subnets attached to the Trust interface.
- GlobalProtect™—Deploy a NAT virtual machine in front of the UnTrust zone.
Direct traffic to the VM-Series firewall.- To ensure that the VM-Series firewall secures all traffic within the Azure resource group, configure static routes on the firewall.Configure user defined routes to direct all traffic through the interfaces on the VM-Series firewall. Refer to the Azure documentation on UDRs for details.The user defined routes on the internal subnets must send all traffic through the Trust interface. The user defined routes on the UnTrust side direct all traffic from the Internet through the UnTrust interface on the VM-Series firewall. The traffic from the Internet may be coming from an Azure Application Gateway or Azure Load Balancer, or through the Azure VPN Gateway in the case of a hybrid deployment that connects your on-premise network with the Azure cloud.To publish PAN-OS® metrics to Azure Application Insights, see Enable Azure Application Insights on the VM-Series Firewall.
Deploy the Azure Solution Template for High Resiliency VM-Series Firewall With Load Balancers
- Set up an Azure account.
- If you don’t have one already, create a Microsoft® account.Log in to the Azure portal (https://portal.azure.com or https://portal.azure.us) using your Microsoft account credentials.If you are using a trial subscription, you may need to open a support request (Help + SupportNew Support Request) to increase the quota of allocated VM cores.Find the VM-Series solution template in the Azure Marketplace, click Create a resource and Select VM-Series Next Generation Firewall from Palo Alto.
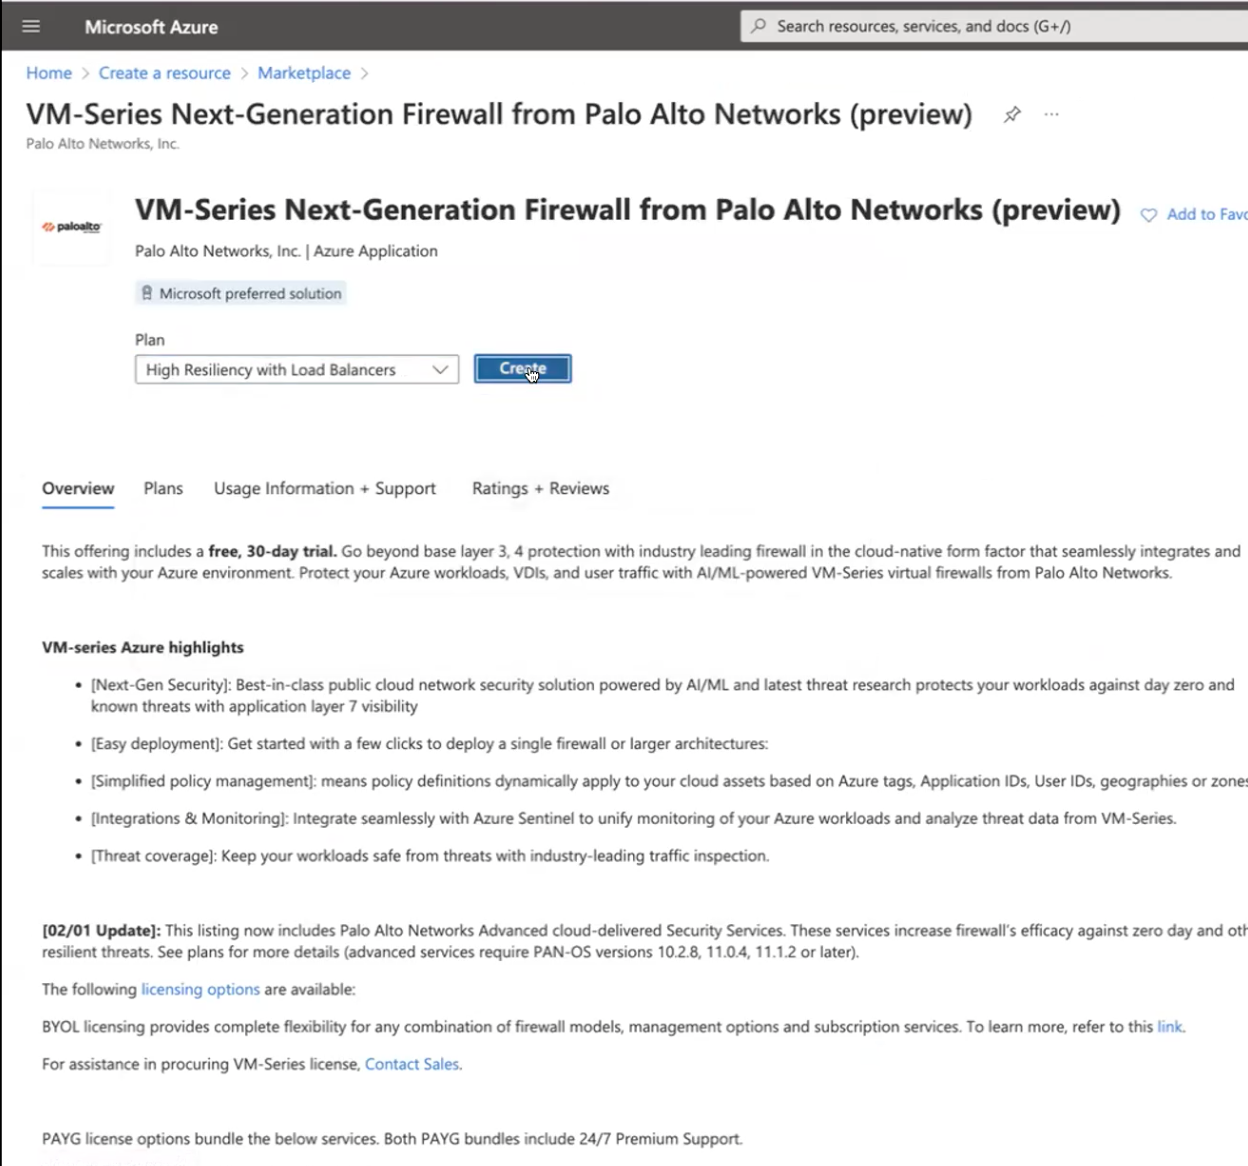
- Select MarketplaceVirtual Machines.Search for Palo Alto Networks® and a list of offerings for the VM-Series firewall will display. For the differences in the BYOL (bring your own license) and PAYG (pay as you go) models, see VM-Series Firewall Licenses for Public Clouds.Select High Resiliency with Load Balancers to Create a new VM-Series firewall.Deploy the firewall.
![]()
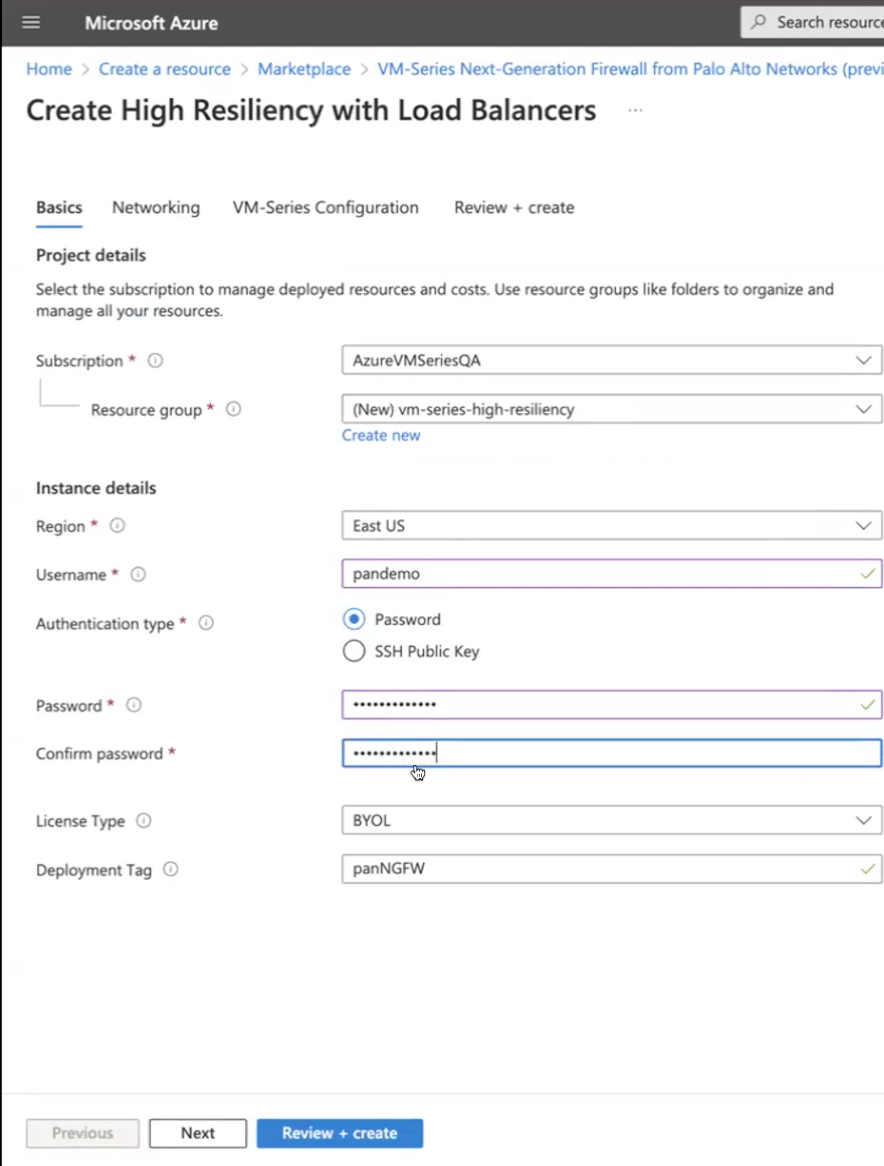
- Configure basic settings for the firewall.
- Select your Azure Subscription.
- Create a new resource group or select an existing resource group that is empty. The resource group will hold all the resources associated with the VM-Series firewall for this deployment.Azure has removed the option to select an existing resource group for Marketplace solutions that enable multiple network interface controllers (NICs). To deploy the firewall into an existing resource group, use the ARM template in the GitHub Repository or use your own custom ARM template.
- Select the Azure Region in which you are deploying the firewall.
- Enter a Username for the firewall administrator.
- Select the Authentication type—Password or SSH Public Key.You must enable SSH key authentication if you plan to use the firewall in FIPS-CC operational mode. Although you can deploy the VM-Series firewall using a username and password, you will be unable to authenticate using the username and password after changing the operational mode to FIPS-CC. After resetting to FIPS-CC mode, you must use the SSH key to log in and can then configure a username and password that you can use for subsequently logging in to the firewall web interface. For details on creating the SSH key, refer to the Azure documentation.
- Enter a Password (up to 31 characters) or copy and paste an SSH public key for securing administrative access to the firewall.
- Confirm the password.
- Select the License Type.
- Enter the Deployment Tag that you specified while creating the resource group.
- Click Next.
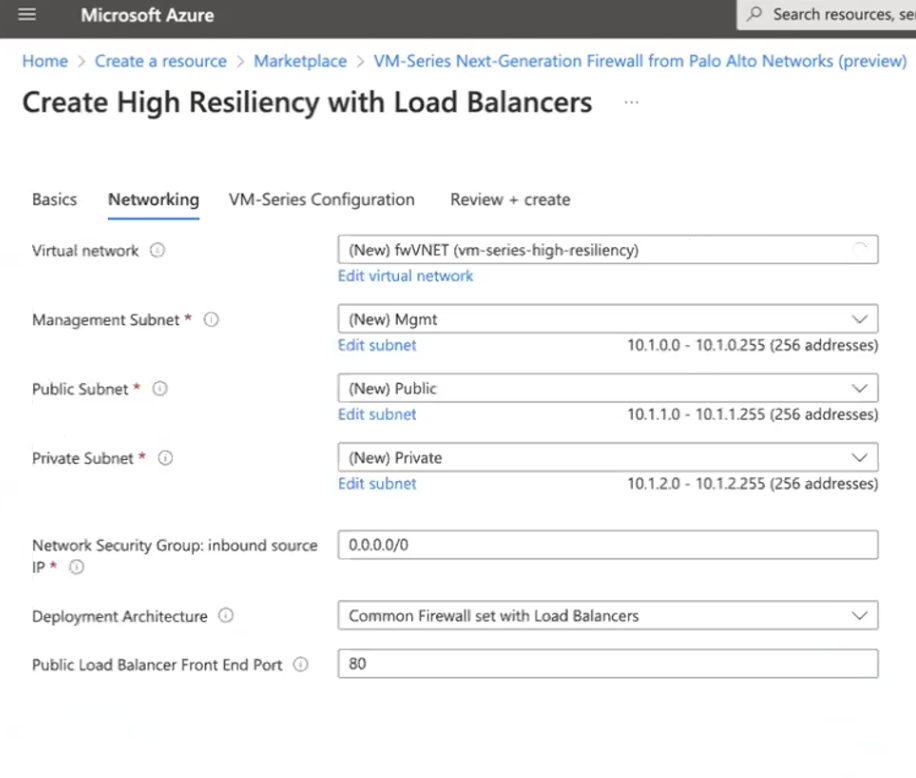
![]() Configure networking.A new Azure Virtual Network (VNet) is automatically preconfigured.
Configure networking.A new Azure Virtual Network (VNet) is automatically preconfigured.- Configure the subnets for the network interfaces.If you use the default subnets, you must review the configuration. If you use an existing VNet, you must have set up three subnets: one each for the management,trust, and untrust interfaces. If you create a new VNet, verify or change the prefixes for each subnet.
- Enter the source IP address or IP range (include the CIDR block) that can access the VNet. Network Security Group: inbound source IP allows you to restrict inbound access to the Azure VNet.Restrict access to the firewall. Make sure to supply a CIDR block that corresponds to your dedicated management IP addresses or network. Do not make the allowed source network range larger than necessary and never configure the allowed source as 0.0.0.0/0. Verify your IP address before you configure it on the template to make sure that you do not lock yourself out.
![]()
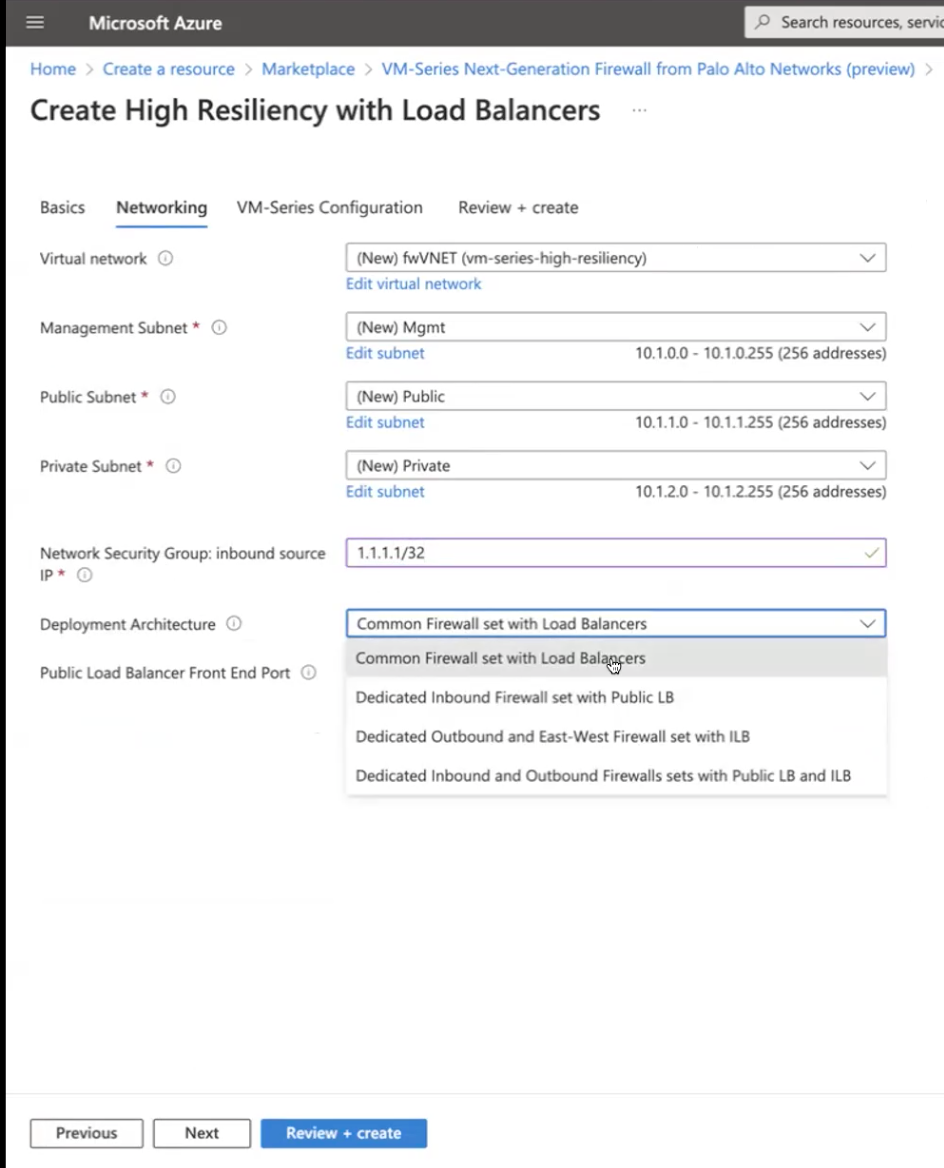
- Select the Deployment Architecture and enter the Public Load
Balancer Front End Port number (not applicable for dedicated
outbound).
![]()
- Click Next.
Define management access to the firewall.- Use the default variable ((new) fwMgmtPublicIP)) to assign a Public IP address to the management interface (eth0) of the firewall.Azure accelerated networking is not supported on the management interface.
- Enter a prefix to access the firewall using a DNS name. You must combine the prefix you enter with the suffix displayed on screen to access the web interface of the firewall. For example: <yourname><your-region>.cloudapp.azure.com
- Select latest VM-Series Version.
- Enter a display name to identify the VM-Series firewall within the resource group.
Add the information to configure the firewall at launch. Select the VM-Series Version, Virtual machine size, and Availability Option.- Select yes if you wish to Enable Bootstrap. See Bootstrap the VM-Series Firewall on Azure. Select one of the following two options under Use Bootstrap File:
- Provide Bootstrap File
- Provide Bootstrap Parameters - Add additional information related to primary Panorama, secondary Panorama, DG, template stack, and so on.
- Enter the Storage Account Name that holds the Bootstrap Package.
- Enter the Storage Account Access Key. This firewall needs this access key to authenticate to the storage account and access the files stored within.
- Add the File share name to which you have uploaded the files required for bootstrapping the firewall. The storage account must be in the same region in which you are deploying the firewall and it must have the correct folder structure for bootstrapping.
- Select the Azure virtual machine tier and size to meet your needs. Use the Change size link to view supported instance types, and to review the Minimum System Requirements for the VM-Series on Azure.
Review the summary, and OK. Then accept the terms of use and privacy policy, and Create to launch the firewall.![]() Verify that you have successfully deployed the VM-Series firewall using the steps described in Deploy the Azure Solution Template for Single VM-Series Firewall.The following is a sample interface and zone definitions of the VM Series Firewall high resiliency with LB
Verify that you have successfully deployed the VM-Series firewall using the steps described in Deploy the Azure Solution Template for Single VM-Series Firewall.The following is a sample interface and zone definitions of the VM Series Firewall high resiliency with LB- Setting up the first Ethernet interface as a Layer 3 interface with DHCP client configuration, and specifying not to create a default route automatically.set network interface ethernet ethernet1/1 layer3 dhcp-client create-default-route noSetting up the second Ethernet interface similarly as a Layer 3 interface with DHCP client, and not creating a default route.set network interface ethernet ethernet1/2 layer3 dhcp-client create-default-route noCreating a zone named public and assigning Ethernet1/1 to this zone. This interface will handle traffic considered as public.set zone public network layer3 ethernet1/1Creating another zone named private and assigning Ethernet1/2 to this zone, intended for private internal traffic.set zone private network layer3 ethernet1/2Configuring a virtual router named 'Private-VR' and assigning Ethernet1/2 to this virtual router.set network virtual-router Private-VR interface ethernet1/2Similarly, configuring another virtual router 'Public-VR' and assigning Ethernet1/1 to it.set network virtual-routing-table Public-VR interface ethernet1/1Defining a static route in the Private-VR to reach the Internet via the Public-VR.set network virtual-router Private-VR routing-table ip static-route Internet nexthop next-vr Public-VRSetting the destination for internet traffic to all IPs (0.0.0.0/0) in the Private-VR.set network virtual-router Private-VR routing-table ip static-route Internet destination 0.0.0.0/0Adding specific routes for Azure Load Balancer health probes through a specific IP and interface.set network virtual-router Private-VR routing-table ip static-route AzureLBHealthProbe nexthop ip-address <private-subnet-gateway> set network virtual-router Private-VR routing-table ip static-route AzureLBHealthProbe interface ethernet1/2 set network virtual-router Private-VR routing-table ip static-route AzureLBHealthProbe destination 168.63.129.16/32Defining a route to a virtual network through a specified interface and IP address.set network virtual-router Private-VR routing-table ip static-route tovnet nexthop ip-address 10.2.2.1 set network virtual-router Private-VR routing-table ip static-route tovnet interface ethernet1/2 set network virtual-router Private-VR routing-table ip static-route tovnet destination 10.1.0.0/16Setting up routes in Public-VR to forward all internet-bound traffic through a specified IP.set network virtual-router Public-VR routing-table ip static-route Internet nexthop ip-address 10.2.1.1 set network virtual-router Public-VR routing-table ip static-route Internet interface ethernet1/1 set network virtual-router Public-VR routing-table ip static-route Internet destination 0.0.0.0/0Defining routes in Public-VR for traffic destined to private IP ranges to be routed to Private-VR.set network virtual-router Public-VR routing-table ip static-route rfc1918-1 nexthop next-vr Private-VR set network virtual-router Public-VR routing-table ip static-route rfc1918-1 destination 10.0.0.0/8 set network virtual-router Public-VR routing-table ip static-route rfc1918-2 nexthop next-vr Private-VR set network virtual-router Public-VR routing-table ip static-route rfc1918-2 destination 172.16.0.0/12 set network virtual-router Public-VR routing-table ip static-route rfc1911-3 nexthop next-vr Private-VR

