Cloud NGFW for Azure
Integrate Single Sign-On
Table of Contents
Expand All
|
Collapse All
Cloud NGFW for Azure Docs
Integrate Single Sign-On
Integrate your organization’s SSO login flow with your Palo Alto Networks Customer
Support Portal account for your Azure Cloud NGFW subscription.
| Where Can I Use This? | What Do I Need? |
|---|---|
|
|
You can integrate your organization’s SSO login flow with your Palo Alto Networks
Support Portal account for your Azure Cloud NGFW
subscription.
Enable Third-Party Identity Provider (IdP)
Enabling a third-party identity provider (IdP) in the Customer Support Portal
allows you to log into the Palo Alto Networks Customer Support Portal using your
own corporate login credentials. Because you set up IdP at the domain level,
members within the domain can log into multiple support accounts using corporate
SSO login credentials. However, domain administrator accounts must
continue to use Palo Alto Networks login credentials.
To enable third party IdP for your domain:
- You must have the domain administrator role in the Customer Support Portal to configure third-party IdP access for your account.
- You must have administrator access on the identity provider to update the SSO configuration details provided by Palo Alto Networks.
- You need one nondomain administrator account for verification.
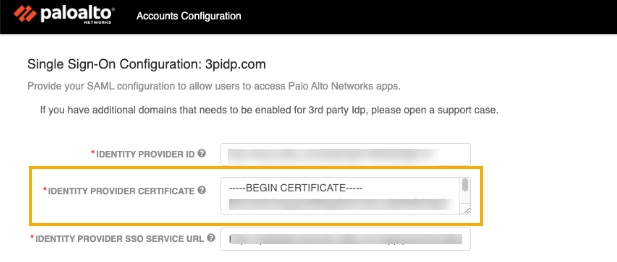
- Log into the Azure Portal and search for Active Directory.In Active Directory, select Enterprise Application and select New Application.Enter the name for your SSO application (for example, panorama-sso) and click Create.In the Create your own application window, select Integrate any other application you don't find in the gallery (Non-gallery).Click Create.In the Manage section, click Single sign-on.Select the SAML single sign-on method. The SAML-based sign-on page contains information you need to link your new SSO enterprise application to your Palo Alto Networks support account.In the SAML-based sign-on page, scroll down to locate URLs in the Set up [your SSO application name] section. Copy the Azure AD Identifier .Log in to the Customer Support Portal.In the Customer Support Portal, select Account Management > Account Details.In the SSO section, click View Single Sign-On settings for your domain.In Accounts Configuration, paste the copied Azure AD identifier from step 8 into the Identifier Provider ID field.
![]() Return to the SAML-based Sign-on screen in the Azure portal. Scroll down to locate URLs in the Set up [your SSO application name] section. Copy the Login URL.Return to the Accounts Configuration page in the Customer Support Portal. Paste the copied Login URL (from the previous step) into the Identity Provider SSO Service URL field.
Return to the SAML-based Sign-on screen in the Azure portal. Scroll down to locate URLs in the Set up [your SSO application name] section. Copy the Login URL.Return to the Accounts Configuration page in the Customer Support Portal. Paste the copied Login URL (from the previous step) into the Identity Provider SSO Service URL field.![]() Use the same Identity Provider SSO Service URL address for the Identity Provider Destination URL field.Return to the SAML-based Sign-on screen in the Azure portal. Scroll down to locate the SAML Certificates section.In the SAML Certificates section, download the Certificate (Base64).Return to the Account Management > Account Details page in the Customer Support Portal. Paste the downloaded certificate (from the previous step) into the Identity Provider Certificate field.
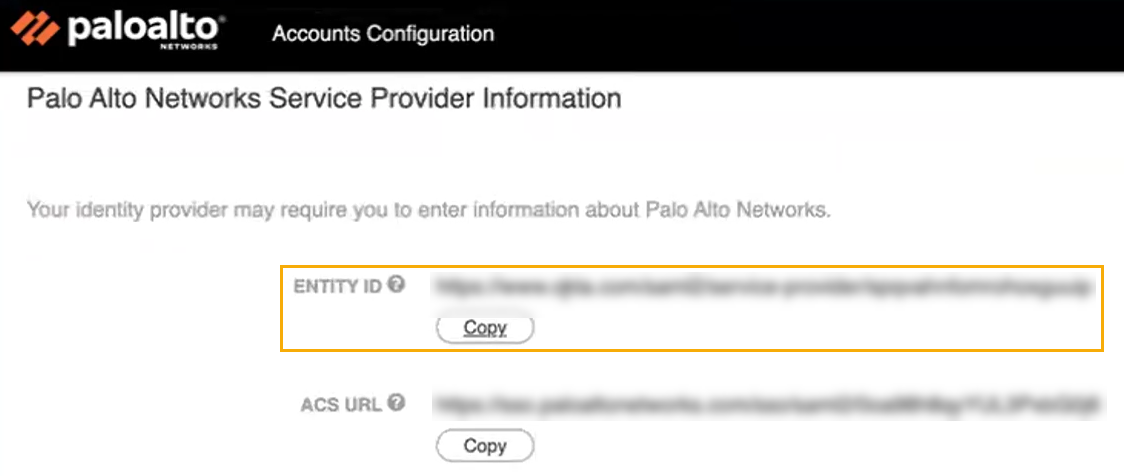
Use the same Identity Provider SSO Service URL address for the Identity Provider Destination URL field.Return to the SAML-based Sign-on screen in the Azure portal. Scroll down to locate the SAML Certificates section.In the SAML Certificates section, download the Certificate (Base64).Return to the Account Management > Account Details page in the Customer Support Portal. Paste the downloaded certificate (from the previous step) into the Identity Provider Certificate field.![]() The Accounts Configuration page changes to display Palo Alto Service Provider Information. Copy the Entity ID URL.
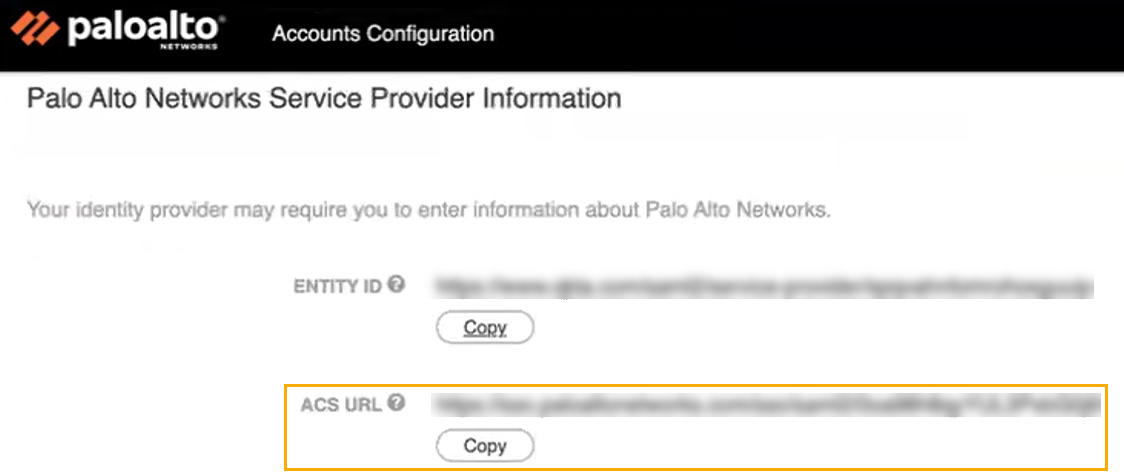
The Accounts Configuration page changes to display Palo Alto Service Provider Information. Copy the Entity ID URL.![]() Return to the SAML-based Sign-on screen in the Azure portal.In the Basic SAML Configuration screen, click Edit.In the Identifier (Entity ID) field, click Add Identifier.Paste the Palo Alto Networks Entity ID (from step 21) into the Identifier field.Return to the Account Management > Account Details page in the Customer Support Portal. Copy the ACS URL.
Return to the SAML-based Sign-on screen in the Azure portal.In the Basic SAML Configuration screen, click Edit.In the Identifier (Entity ID) field, click Add Identifier.Paste the Palo Alto Networks Entity ID (from step 21) into the Identifier field.Return to the Account Management > Account Details page in the Customer Support Portal. Copy the ACS URL.![]() Return to the SAML-based Sign-on screen in the Azure portal.In the Basic SAML Configuration screen, click Edit.Enter the ACS URL (copied from step 24) into the Reply URL (Assertion Consumer Service URL).Return to the Support Portal Accounts Configuration page. Use the toggle button to Enable Identity Provider.Click Save.Return to the Azure Portal. In the Manage section of your SSO application, click Users, and groups.Use the Add user/group option to enable use of SSO login for each specified user.
Return to the SAML-based Sign-on screen in the Azure portal.In the Basic SAML Configuration screen, click Edit.Enter the ACS URL (copied from step 24) into the Reply URL (Assertion Consumer Service URL).Return to the Support Portal Accounts Configuration page. Use the toggle button to Enable Identity Provider.Click Save.Return to the Azure Portal. In the Manage section of your SSO application, click Users, and groups.Use the Add user/group option to enable use of SSO login for each specified user.Verify SSO Login
After enabling the identity provider, all users (except domain administrators) are forced to login using SSO. To verify that the SSO login is set up properly:- Provide an email address on the login page. Don’t use domain administrator login credentials.
- Verify that you’re redirected to the IdP login page for authentication.
- After authentication, the Palo Alto Networks Customer Support Portal page appears.
Integrate SSO with the Customer Support Portal for a Nondomain User Using Azure Marketplace
To integrate a user with a Customer Support Portal account using Azure Marketplace:- Log in to your Azure account.In Azure Services, select Cloud NGFWs by Palo Alto Networks.Select the firewall that you want to integrate with your Customer Support Portal account.In the Support + troubleshooting section, click New Support Request. The Palo Alto Networks Support screen appears, displaying the Tenant ID and the Product serial number.Click Register User account and create a case at Customer Support Portal.On the Create New Account / Use Existing Account page, enter your email address and complete the authentication steps, then click Next.In the Device Registration section, select the Cloud Marketplace subscription from the drop-down menu. For example, Azure Cloud NGFW.Enter the Tenant ID and Serial Number for your Azure Marketplace subscription. You can copy this information from the Palo Alto Networks Support page from step 4. Click Next.Enter the Authentication code that was sent to your email address. Click Next.After authenticating using SSO, the Customer Support Portal login page appears. Enter your email address and click Next.
Integrate SSO with Customer Support Portal for a Domain User Using Azure Marketplace
To integrate a domain user with a Support Portal account using Azure Marketplace, you’ll need your Palo Alto Networks login credentials:- Log in to your Azure account using domain user credentials.In Azure Services, select Cloud NGFWs by Palo Alto Networks.Select the firewall that you want to integrate with your Customer Support Portal account.In the Support + troubleshooting section, click New Support Request. The Palo Alto Networks Support screen appears, displaying the Tenant ID and the Product serial numberClick Register User account and create a case at Customer Support Portal.On the Create New Account / Use Existing Account page, enter your email address and complete the authentication steps, then click Next.In the Device Registration section, select the Cloud Marketplace subscription from the drop-down menu. For example, Azure Cloud NGFW.Enter the Tenant ID and Serial Number for your Azure Marketplace subscription. You can copy this information from the Palo Alto Networks Support page from step 4. Click Next.Enter the Authentication code that was sent to your email address. Click Next.After authenticating using SSO, the Customer Support Portal login page appears. Enter your email address and click Next.


