Download PDF
Cloud NGFW for Azure
Cloud NGFW for Azure Virtual WAN
Table of Contents
Expand All
|
Collapse All
Cloud NGFW for Azure Docs
Cloud NGFW for Azure Virtual WAN
Learn about Cloud NGFW deployments in Azure Virtual WAN.
| Where Can I Use This? | What Do I Need? |
|---|---|
|
|
Cloud NGFW for Azure supports a centralized vWAN deployment model. With this
model:
- a centralized vWAN Cloud NGFW is deployed for securing traffic in multiple spoke VNets connected to the Azure Virtual WAN.
- the vWAN hub is pre-created to allow for integration with the Cloud NGFW.
- the Cloud NGFW seemlessly integrates into the vWAN hub.
- routing intent is used to redirect traffic to the Cloud NGFW for inspection.
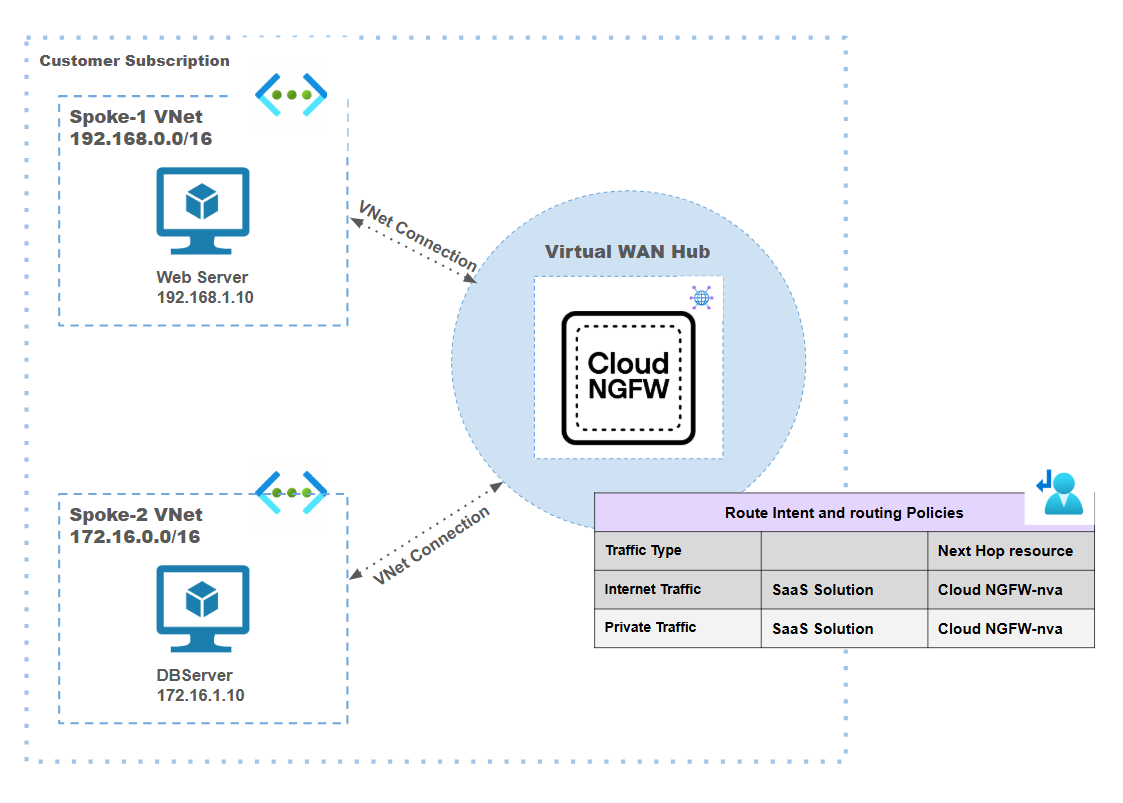
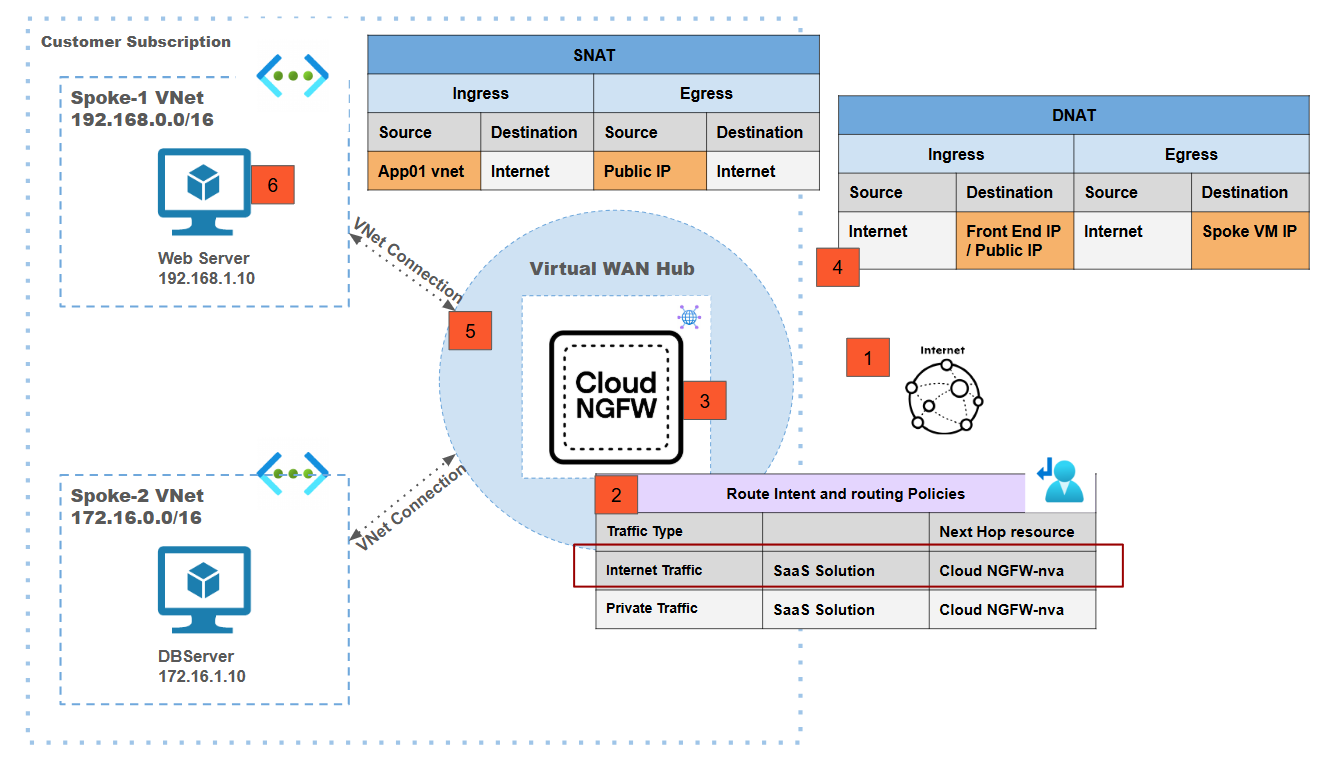
Centralized vWAN Deployment Model: Internet Egress Traffic Inspection

In this deployment model:
- Traffic from a the spoke1 VNet workload VM is destined for the internet.Traffic destined to the internet from the spoke-1 web server VM is forwarded to the vWAN hub using the VNet connection.Routing intent on the vWAN hub is used to redirect traffic from the vWAN hub to the Cloud NGFW.Routing intent is enabled for internet traffic with the Cloud NGFW as a next hop to redirect internet egress traffic to the Cloud NGFW for inspection.Post inspection source NAT is performed on the Cloud NGFW using the public IP address associated with the Cloud NGFW.Traffic is now sent out onto the internet.
Centralized vWAN Deployment Model: Internet Ingress Traffic Inspection
![]() In this deployment model:
In this deployment model:- Traffic from the internet lands on the front-end or public IP address of the Cloud NGFW.Using routing intent, the traffic is redirected to the Cloud NGFW by the vWAN hub.The Cloud NGFW performs destination NAT where the destination of the packet is changed from public IP address to the actual spoke VM IP address.After inspecting the traffic, the Cloud NGFW performs source NAT using the private IP address subnet (which is automatically extracted from the vWAN Hub VNet).Traffic is now sent to the actual destination (spoke VM) with the source IP address as one of the IP addresses from within the vWAN Hub VNet and the destination IP address as the spoke VM IP.
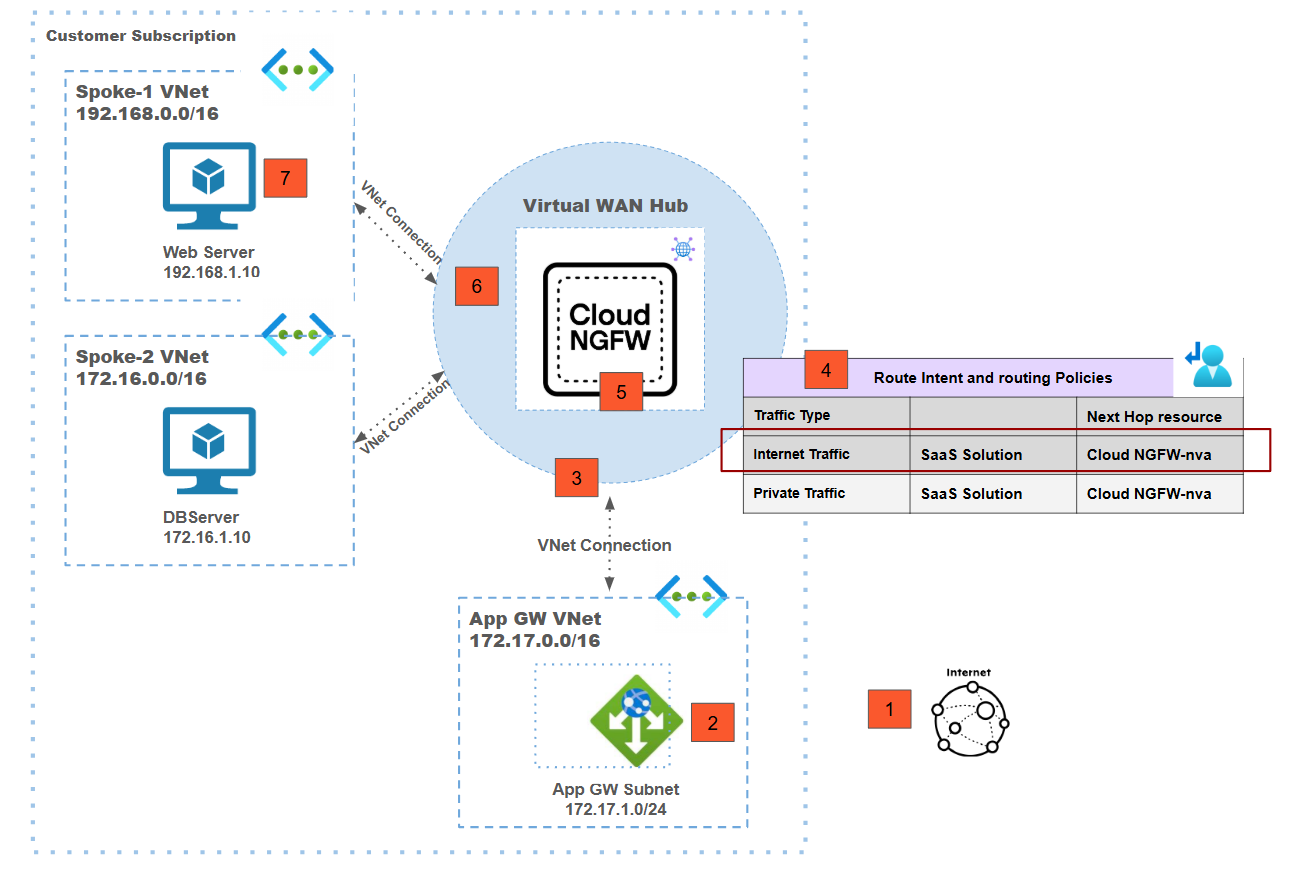
Centralized vWAN Deployment Model: Internet Ingress via Application Gateway
![]() In this deployment model:
In this deployment model:- To access backend applications, internet users access the frontend IP address of the Application Gateway. The packet will first land on the frontend IP.The backend pool of the Application Gateway is a web server IP address that's part of application/spoke VNet.The application VNet and Application Gateway VNet are connected to Azure Virtual WAN and hence they can talk to each other through the vWAN hub.The Application Gateway sends the packet to vWAN hub after performing source and destination NAT; the destination will be the actual backend application IP address(192.168.1.10).Because of routing intent, the vWAN hub forwards the traffic to the Cloud NGFW for inspection.Post inspection, the vWAN sends the packet to actual backend application that's part of spoke VNet that's connected to the Azure Virtual WAN.
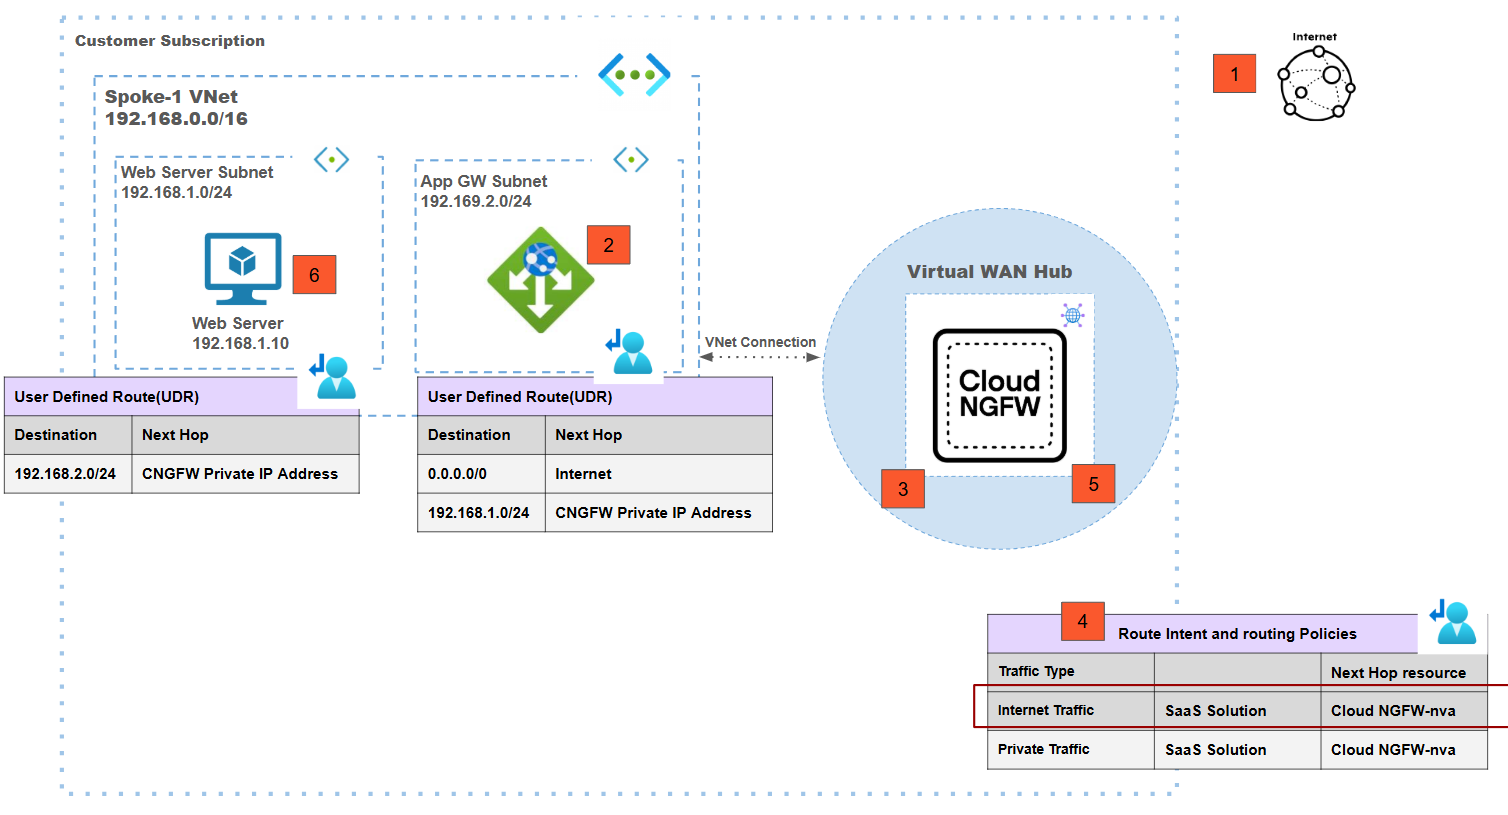
Centralized vWAN Deployment Model: Internet Ingress via Application Gateway Subnet
![]() In this deployment model:
In this deployment model:- To access backend applications, internet users access the frontend IP address of the Application Gateway.The backend pool of the Application Gateway is a web server IP address that's part of the same VNet.Using the UDRs associated with the Application Gateway subnet, the gateway sends the packet to vWAN hub after performing source and destination NAT. The source of the packet will be one of the IP addresses of the Application Gateway subnet and the destination will be the actual backend application IP address.Because of routing intent, the vWAN hub forwards the traffic to the Cloud NGFW for inspection.Post inspection, the packet is sent back to vWAN hub by the Cloud NGFW.The vWAN hub sends the packet to actual backend application that is part of spoke VNet that's connected to the Azure Virtual WAN.
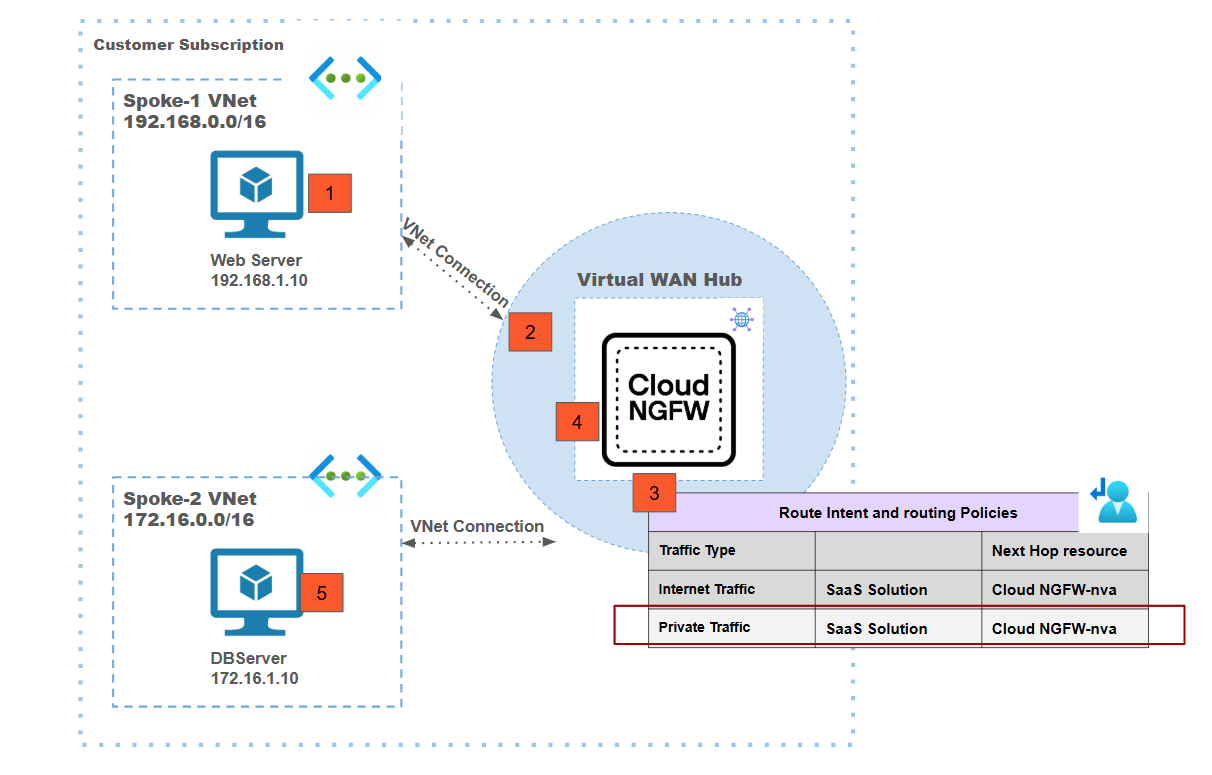
Centralized vWAN Deployment Model: East-West Traffic Inspection
![]() In this deployment model:
In this deployment model:- Traffic from a the spoke-1 VNet workload VM is destined to the spoke-2 VNet workload VM.Traffic from the spoke-1 VM is forwarded to the Azure Virtual WAN hub based on the VNet connection.Routing intent enabled for private traffic is used to redirect traffic from the vWAN hub to the Cloud NGFW.The Cloud NGFW inspects the traffic based on the defined security policies.Post inspection, the Cloud NGFW is going to forward the traffic to the vWAN hub which in turn sends the traffic to spoke 2 VM.There is no Source NAT performed on east-west traffic
Centralized vWAN Deployment Model: East-West Traffic Inspection - On Prem to Cloud
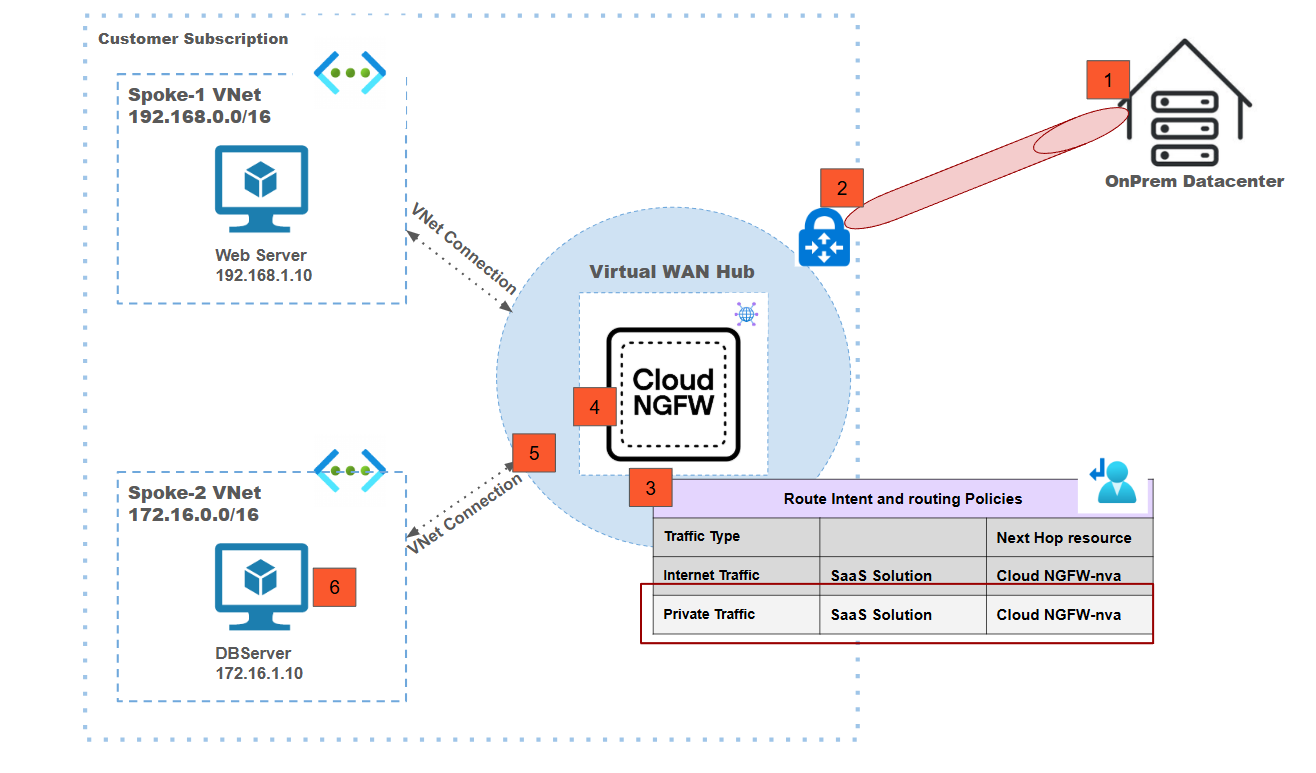
![]() In this deployment model:
In this deployment model:- Traffic from the on-prem data center is destined to the spoke-2 VNet workload VM.This traffic is considered as east-west traffic.Traffic from the on-prem data center is forwarded to the Azure Virtual WAN hub using the VPN tunnel from the on-prem to Azure vWAN.Routing intent enabled for private traffic is used to redirect traffic from the vWAN hub to the Cloud NGFW.The Cloud NGFW inspects the traffic based on the defined security policies.Post inspection, the Cloud NGFW forwards the traffic to vWAN hub which in turn sends the traffic to spoke2 VM.There is no Source NAT performed on east-west traffic
Centralized vWAN Deployment Model: East-West vWAN Multi-Hub Traffic Inspection
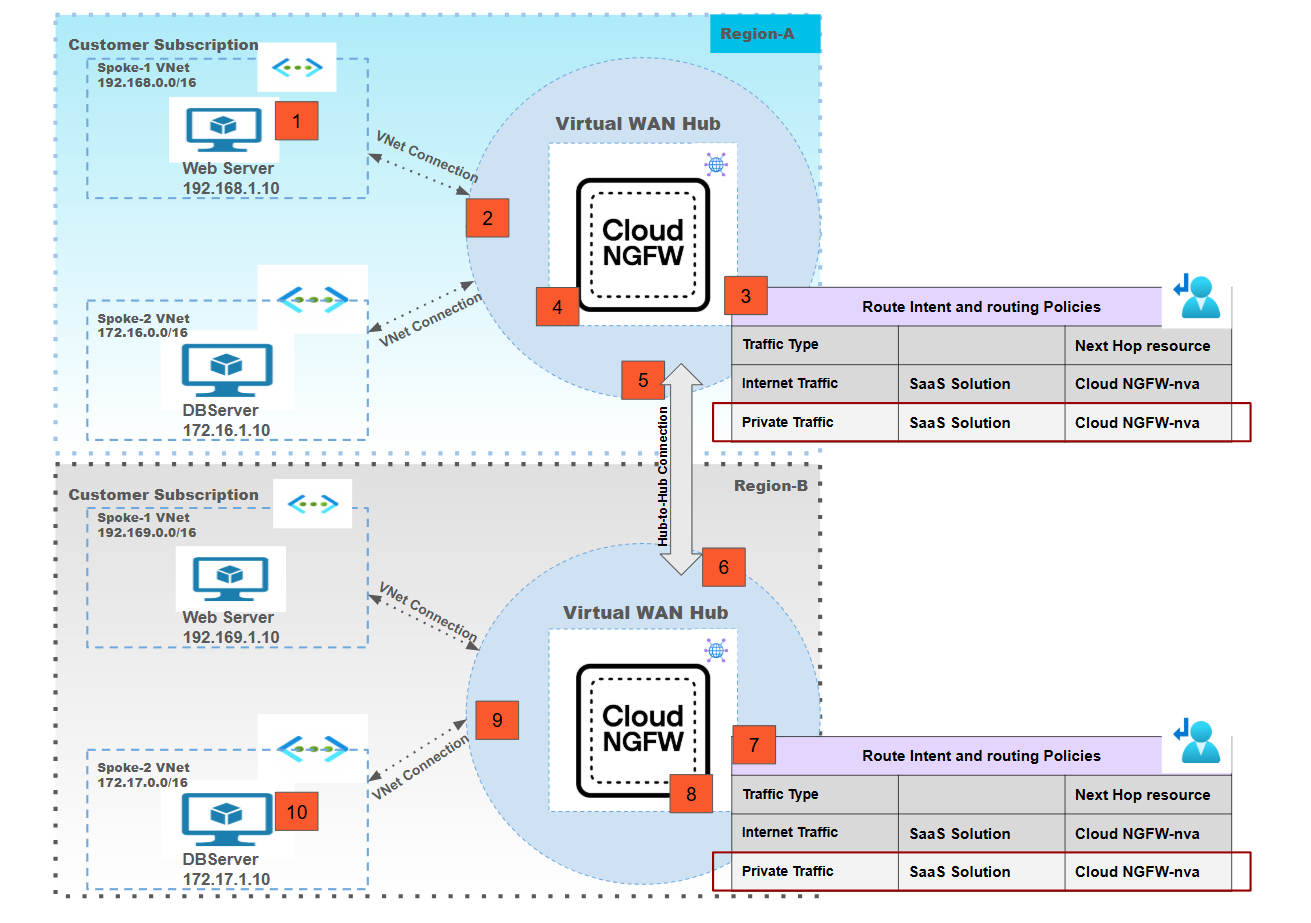
![]() In this deployment model:
In this deployment model:- Traffic from a spoke-1 Webserver connected to the vWAN hub-1 is destined to the spoke-2 DB server connected to the vWAN hub-2.Traffic from Webserver-1 arrives at the vWAN hub-1 because of the VNet connection.Routing intent configured for private traffic in hub-1 redirects traffic to the Cloud NGFW for inspection.Post inspection, traffic is sent back to vWAN hub-1.Since the destination of the traffic is connected to vWAN hub-2, using the hub-to-hub connectivity the traffic is forwarded to vWAN hub-2.Traffic is received at vWAN hub-2.Routing intent sends the traffic to the Cloud NGFW connected to hub-2 for inspection.Post inspection, the traffic is sent back to hub-2.Using the VNet connection, the vWAN forwards the traffic to the VM in spoke-2 which is the actual destination.

