Cloud NGFW for Azure
Enable Data Redistribution on Cloud NGFW for Azure
Table of Contents
Expand All
|
Collapse All
Cloud NGFW for Azure Docs
Enable Data Redistribution on Cloud NGFW for Azure
Learn how to enable User-ID on the Cloud NGFW for Azure.
Cloud NGFW protects your Azure vNet and Azure virtual WAN traffic with
advanced user awareness. The user identity, as opposed to an IP address, is an
integral component of an effective security infrastructure. Knowing who is accessing
each of the applications on your network, and who may have transmitted a threat or
is transferring files, can strengthen security policies and reduce incident response
times. User-ID™, a standard feature on the Palo Alto Networks firewalls, enables you
to leverage user information stored in a wide range of repositories. To learn more
about User-ID concepts, User-ID overview.
To enforce policy from User-ID or Groups:
- Firewall must be able to map the IP addresses to the user names.
- User-ID provides various mechanisms for collecting the user mapping information. To learn more, see User-ID Concepts.
If the mapping methods are unable to capture the mapping, then you can configure the
Authentication Policy to redirect users to an Authentication portal login. Users can
provide credentials which will be checked against the identity provider and enforce
access accordingly. Learn more about authentication policy.
To enable a Users—and group-based policy, the firewall requires a list of all
available users and their corresponding group memberships.
You can enable User-ID on Cloud NGFW for Azure using the following
methods:
Enable User-ID with PAN-OS Integrated Agent
- Active Directory (AD) environment with users and groups.
- Cloud NGFW for Azure deployed and managed via Panorama.
- Dedicated Service account with Remote Management User and CIMV2 privileges.
- Windows server configured for WinRM over HTTPS with Basic Authentication. For more information, see Configure server monitoring using WinRM.
- Security policies on Cloud NGFW to allow communication to active directory or LDAP servers.
- Import Root Certificate.
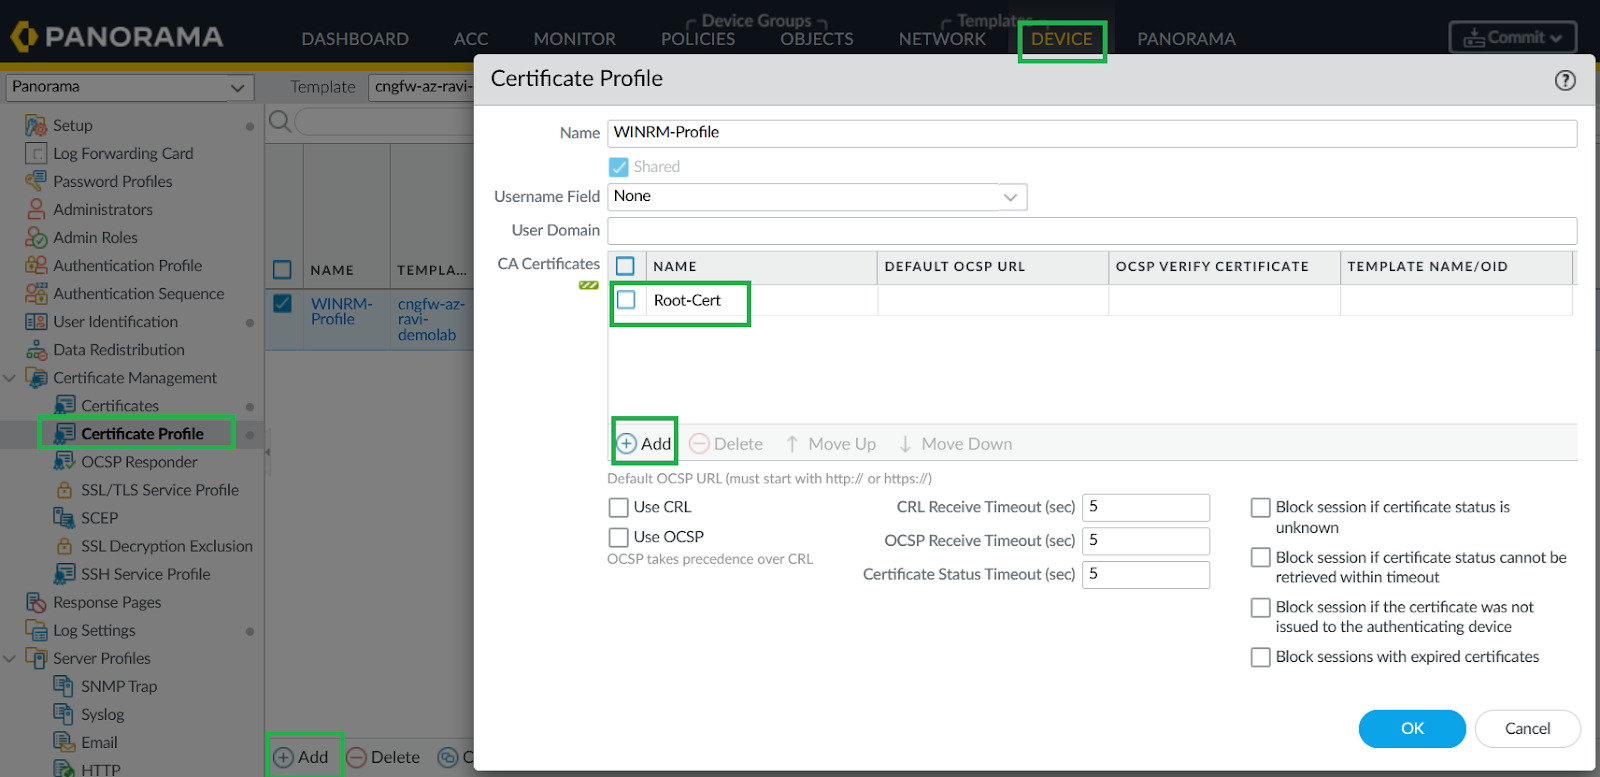
![]() In Panorama, go to Device > Certificate Management > Certificates, import the root certificate.Add Certificate Profile.
In Panorama, go to Device > Certificate Management > Certificates, import the root certificate.Add Certificate Profile.- In Panorama, go to Device > Certificate Management > Certificates.Create a profile using the imported certificate.
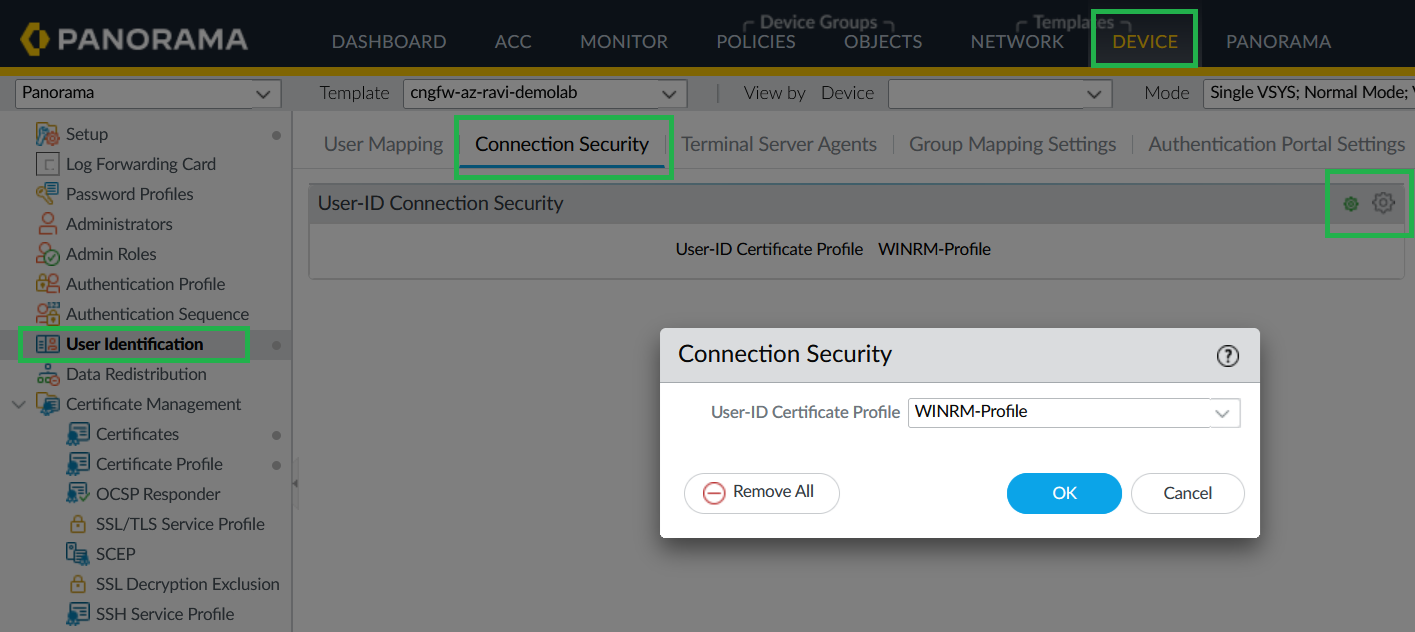
![]() Add Certificate Profile to User-ID Connection Security.
Add Certificate Profile to User-ID Connection Security.- In Panorama, go to Device > User Identification > User Mapping.Edit User-ID Connection Security and assign the certificate profile.
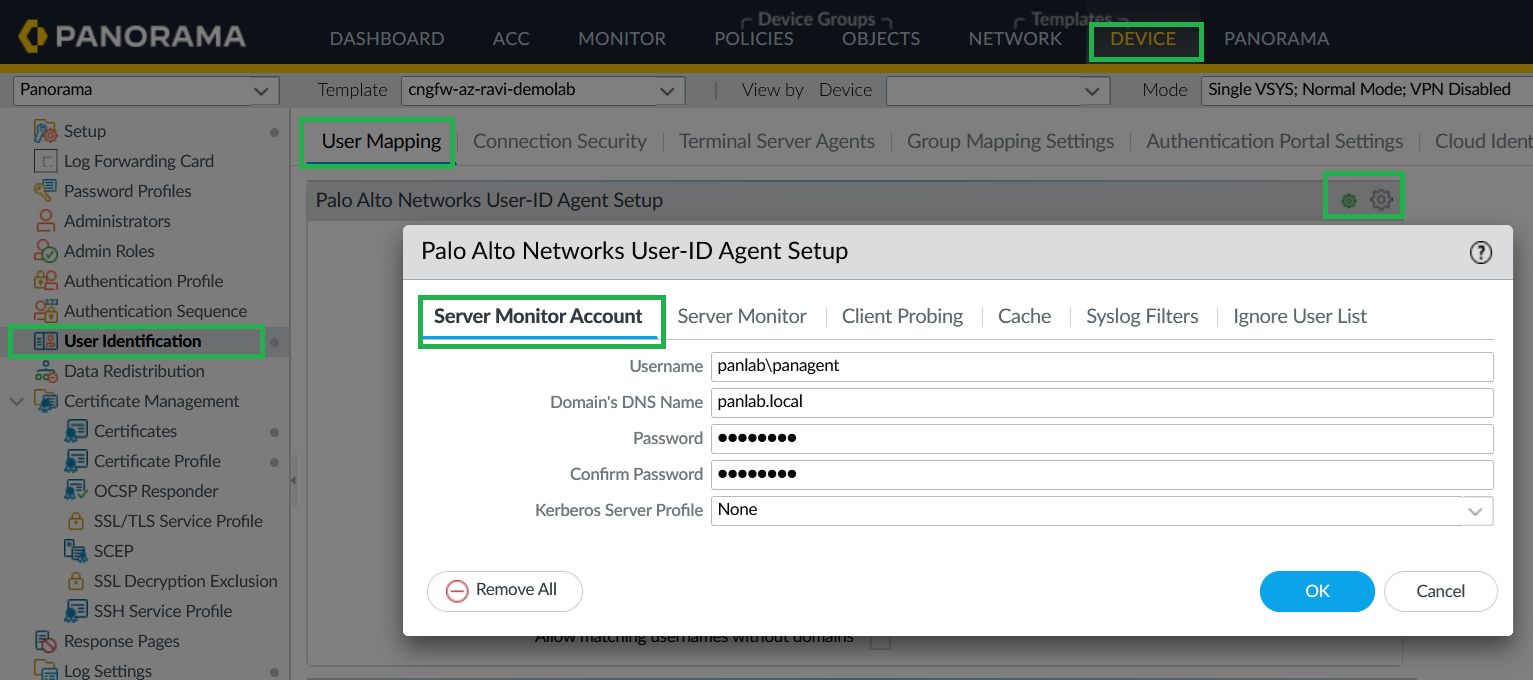
![]() Configure Server Monitor Account.
Configure Server Monitor Account.- In Panorama, go to Device > User Identification > User Mapping.Provide the service account username/password for active directory.
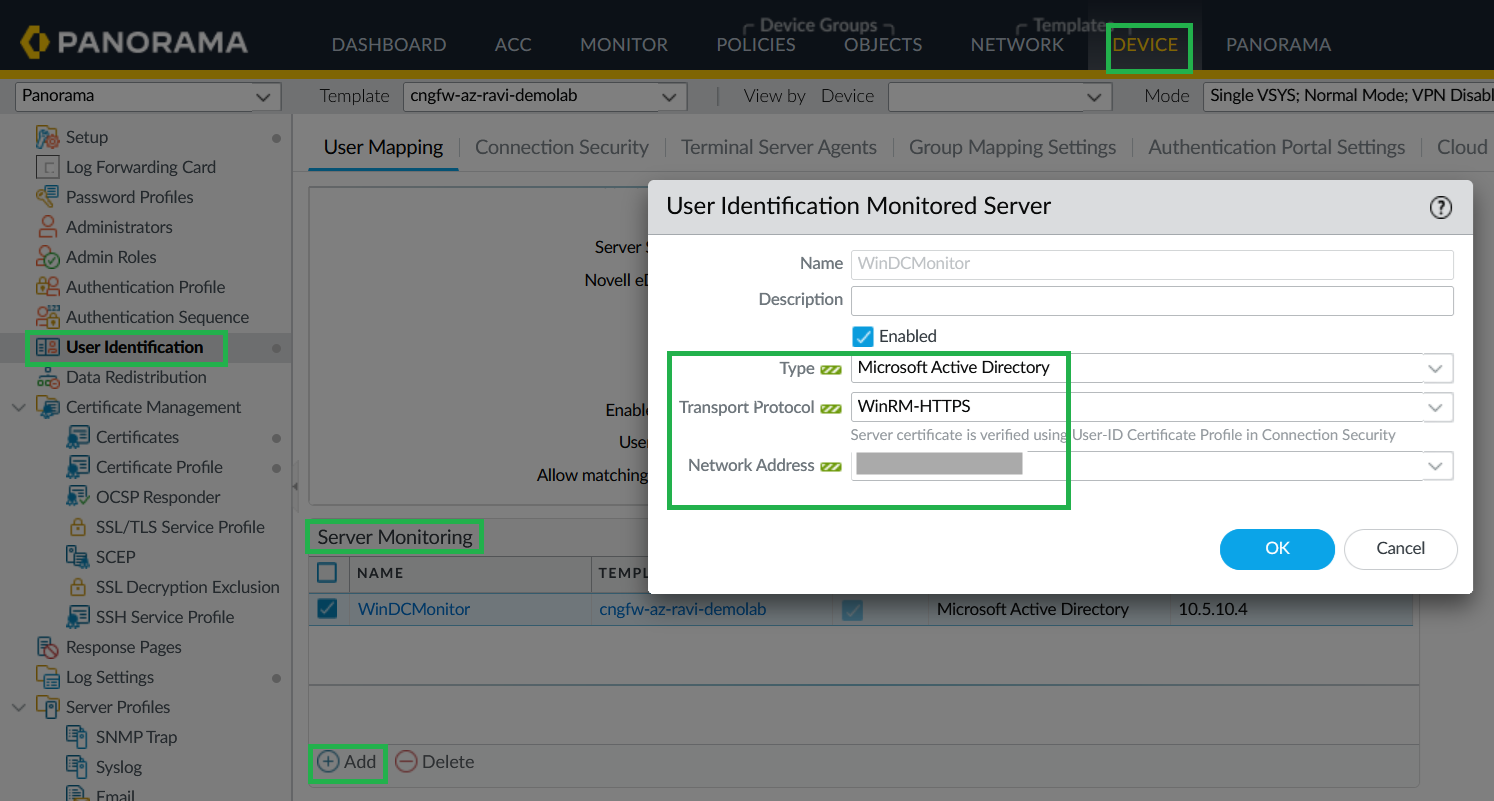
![]() Configure Server Monitoring (WinRM-HTTPS).
Configure Server Monitoring (WinRM-HTTPS).- In Panorama, go to Device > User Identification > User Mapping > Server Monitoring.Select Microsoft Active Directory as type, WinRM-HTTPS as transport protocol, and Network Address as your Windows server address where you have an active directory configured.
![]() The Cloud NGFW for Azure supports IP-to-user mapping using the Windows User-ID agent or Terminal Server Agent.Enable User-ID on Cloud NGFW Interfaces.As a best practice, always specify which networks to include and exclude from User-ID. This allows you to ensure that only your trusted assets are probed and that unwanted user mappings are not created unexpectedly.
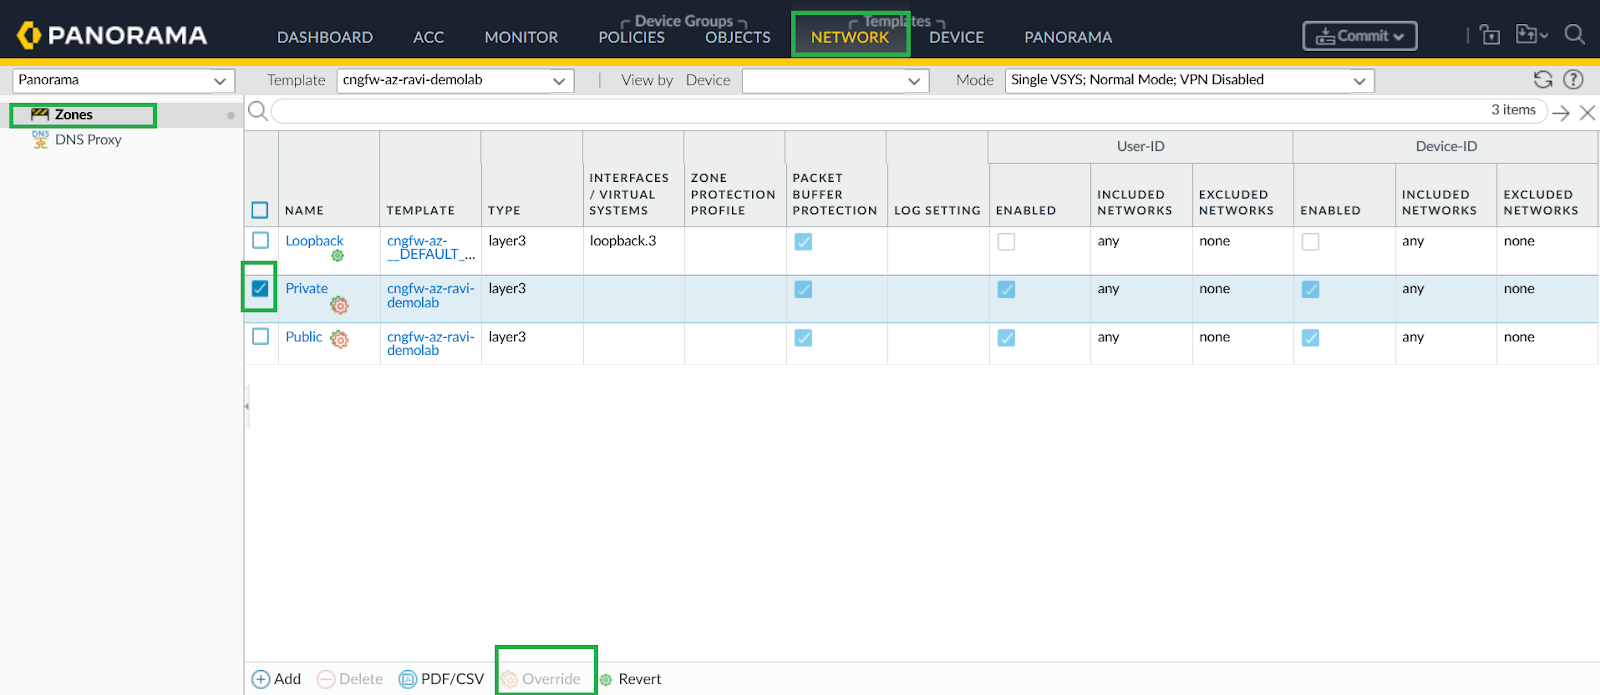
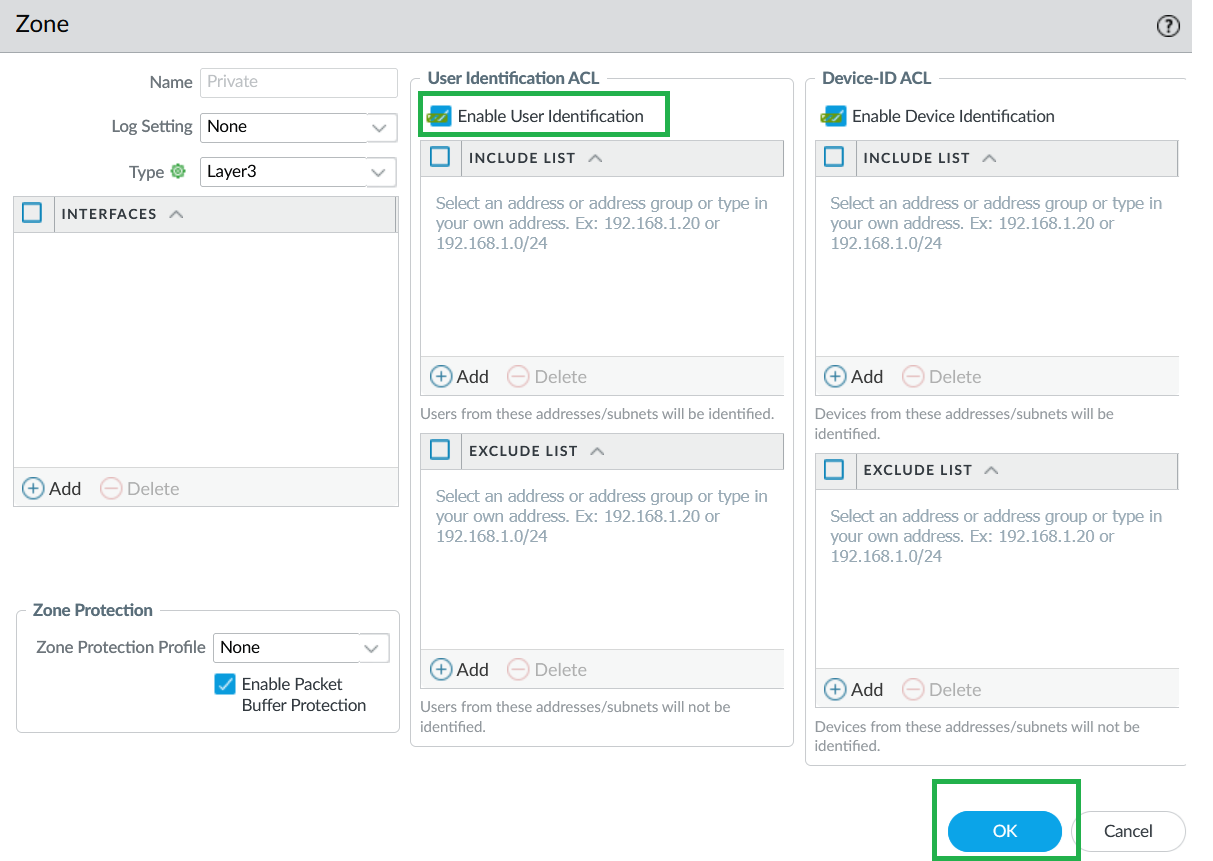
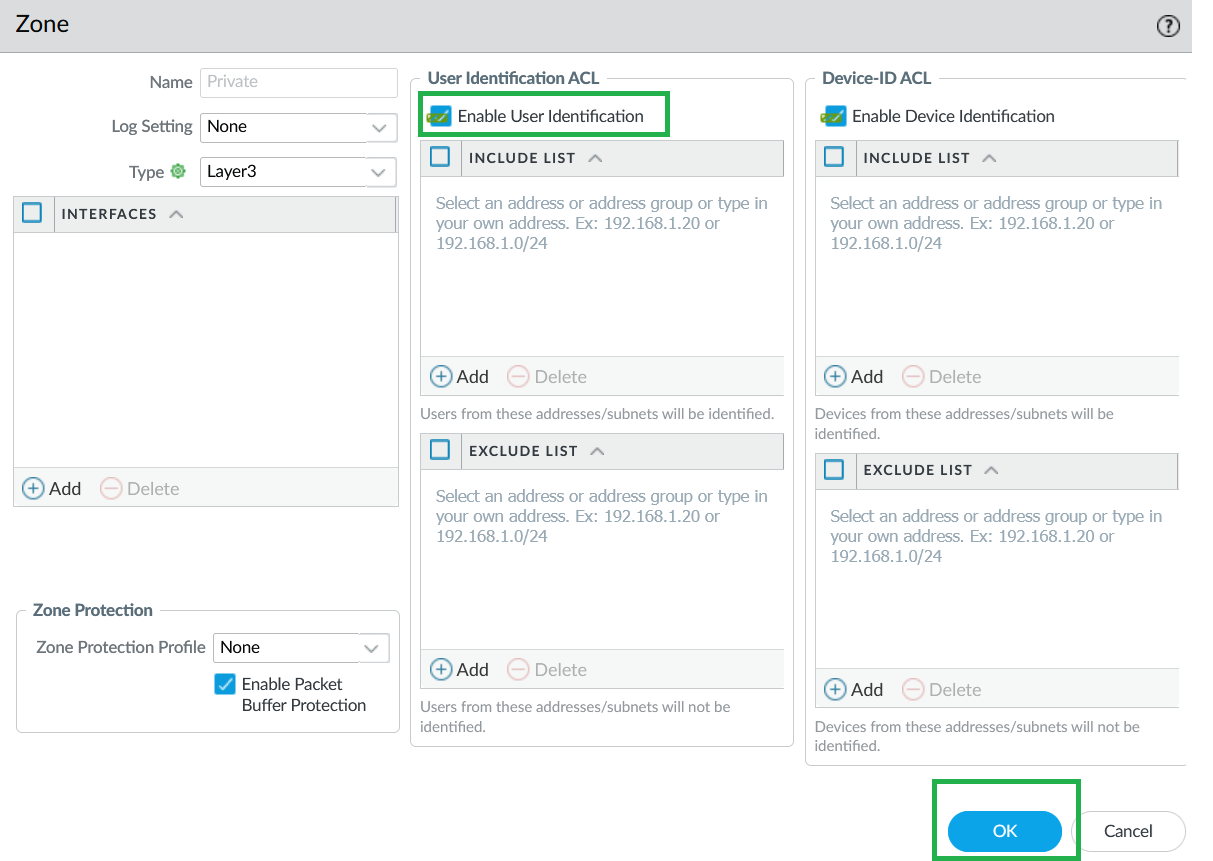
The Cloud NGFW for Azure supports IP-to-user mapping using the Windows User-ID agent or Terminal Server Agent.Enable User-ID on Cloud NGFW Interfaces.As a best practice, always specify which networks to include and exclude from User-ID. This allows you to ensure that only your trusted assets are probed and that unwanted user mappings are not created unexpectedly.- Select Network > Zones and select Zone where you're configuring User-ID.Add your networks to Include and Exclude lists as needed.Click OK.
![]() On your Cloud NGFW device group, enable User-ID for both Private and Public zones.
On your Cloud NGFW device group, enable User-ID for both Private and Public zones.![]() Configure Service Route to LDAP Server.
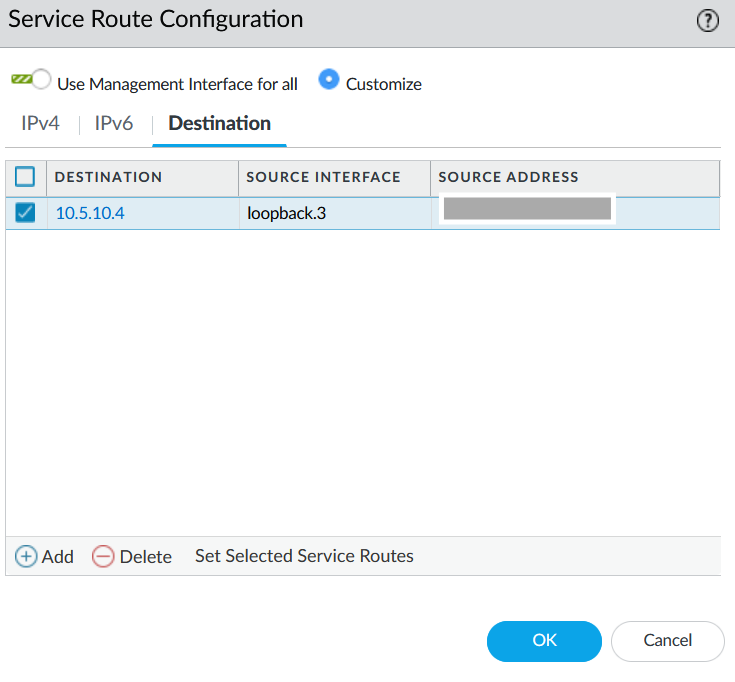
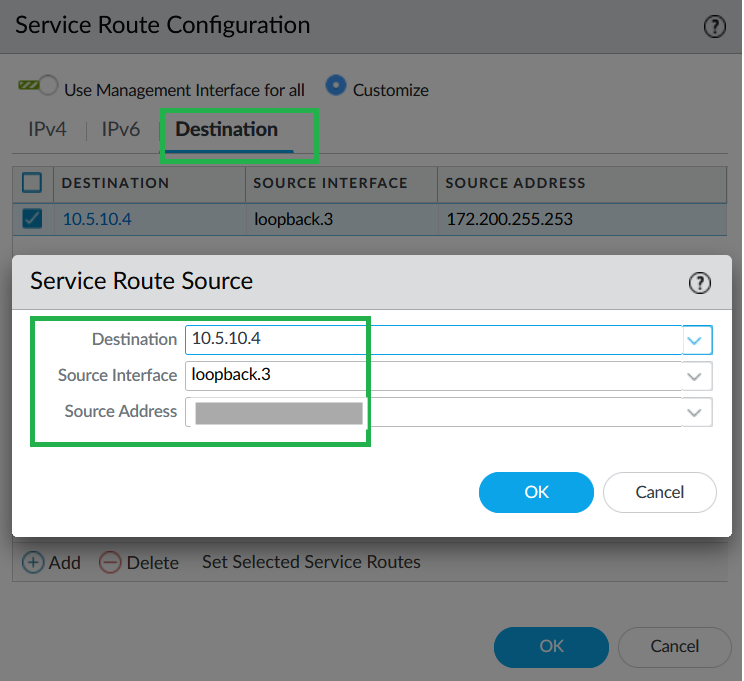
Configure Service Route to LDAP Server.- In Panorama, go to Device > Setup > Services > Service Route Configuration.
![]() Select LDAP as Service, loopback.3 as Source interface, and active directory IP address as Source address.
Select LDAP as Service, loopback.3 as Source interface, and active directory IP address as Source address.![]() Commit your changes.
Commit your changes.![]() Configure LDAP Server Profile.
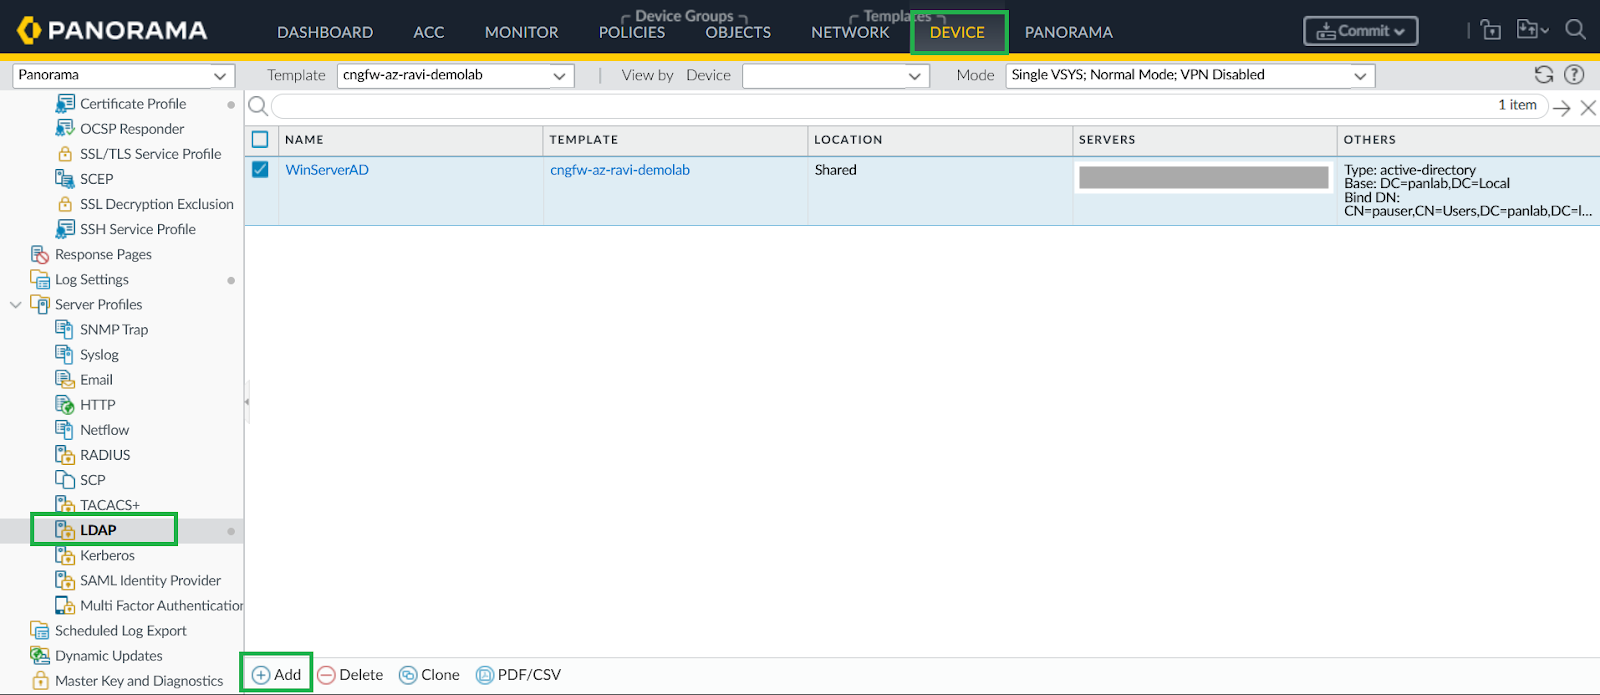
Configure LDAP Server Profile.- In Panorama, go to Device > Server Profiles > LDAP, add LDAP profile.
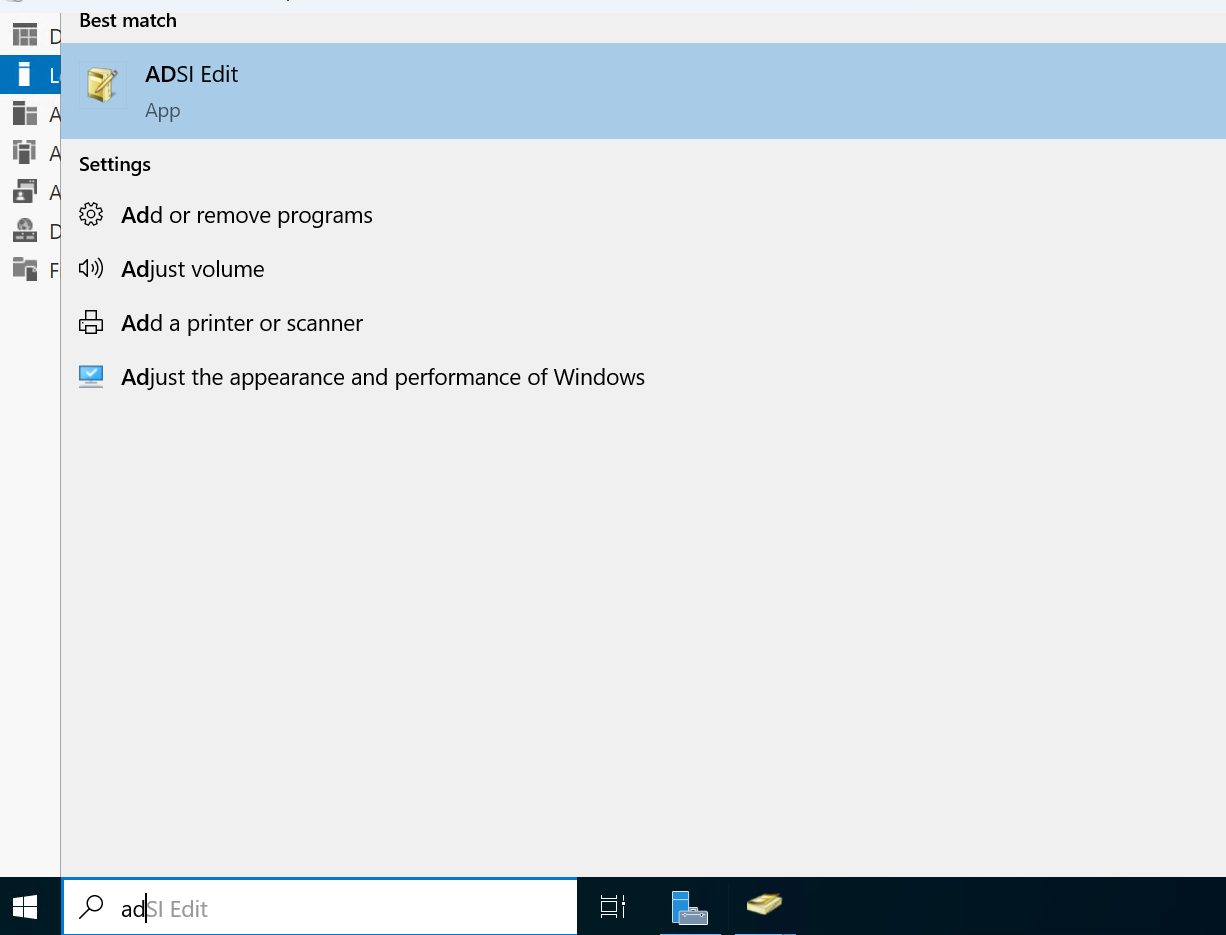
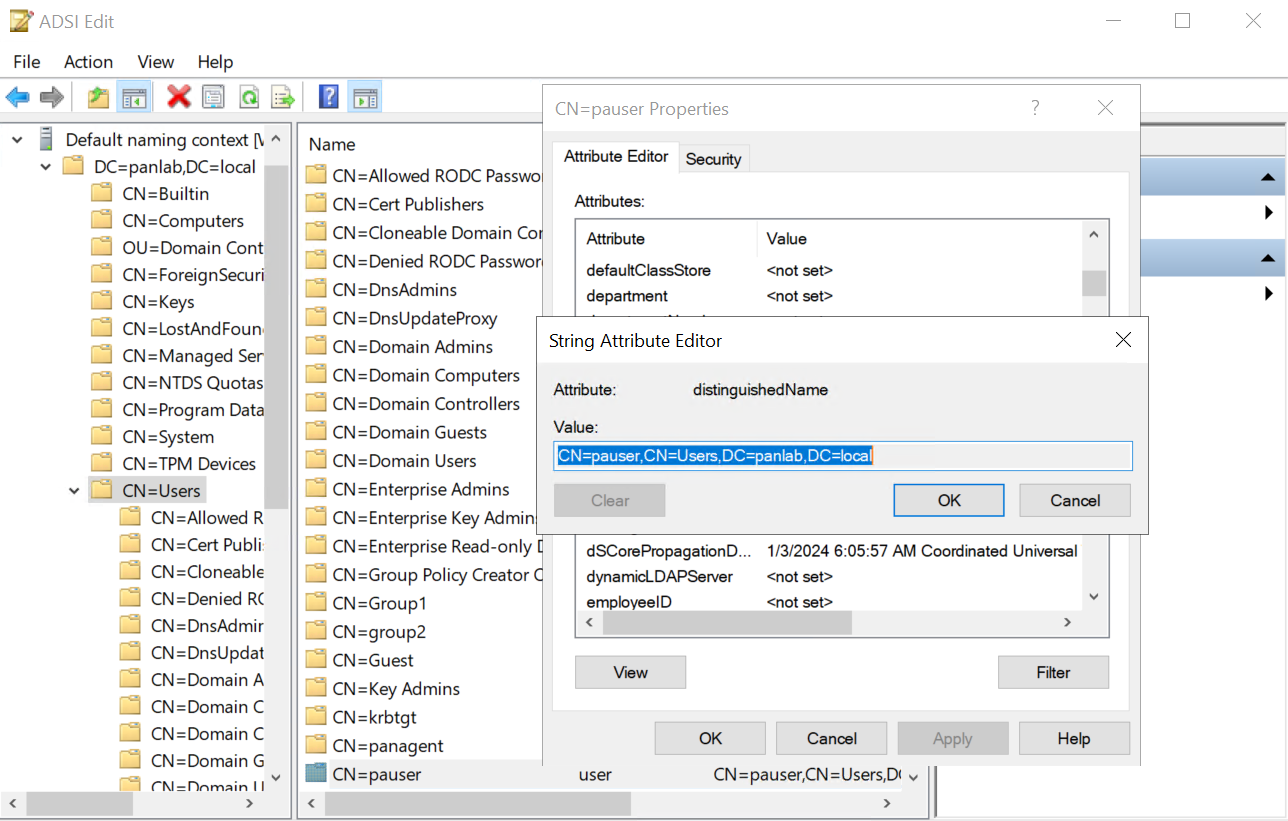
![]() Use Base DN and Bind DN from AD (get via ADSI Edit).
Use Base DN and Bind DN from AD (get via ADSI Edit).![]() Provide Bind DN password.
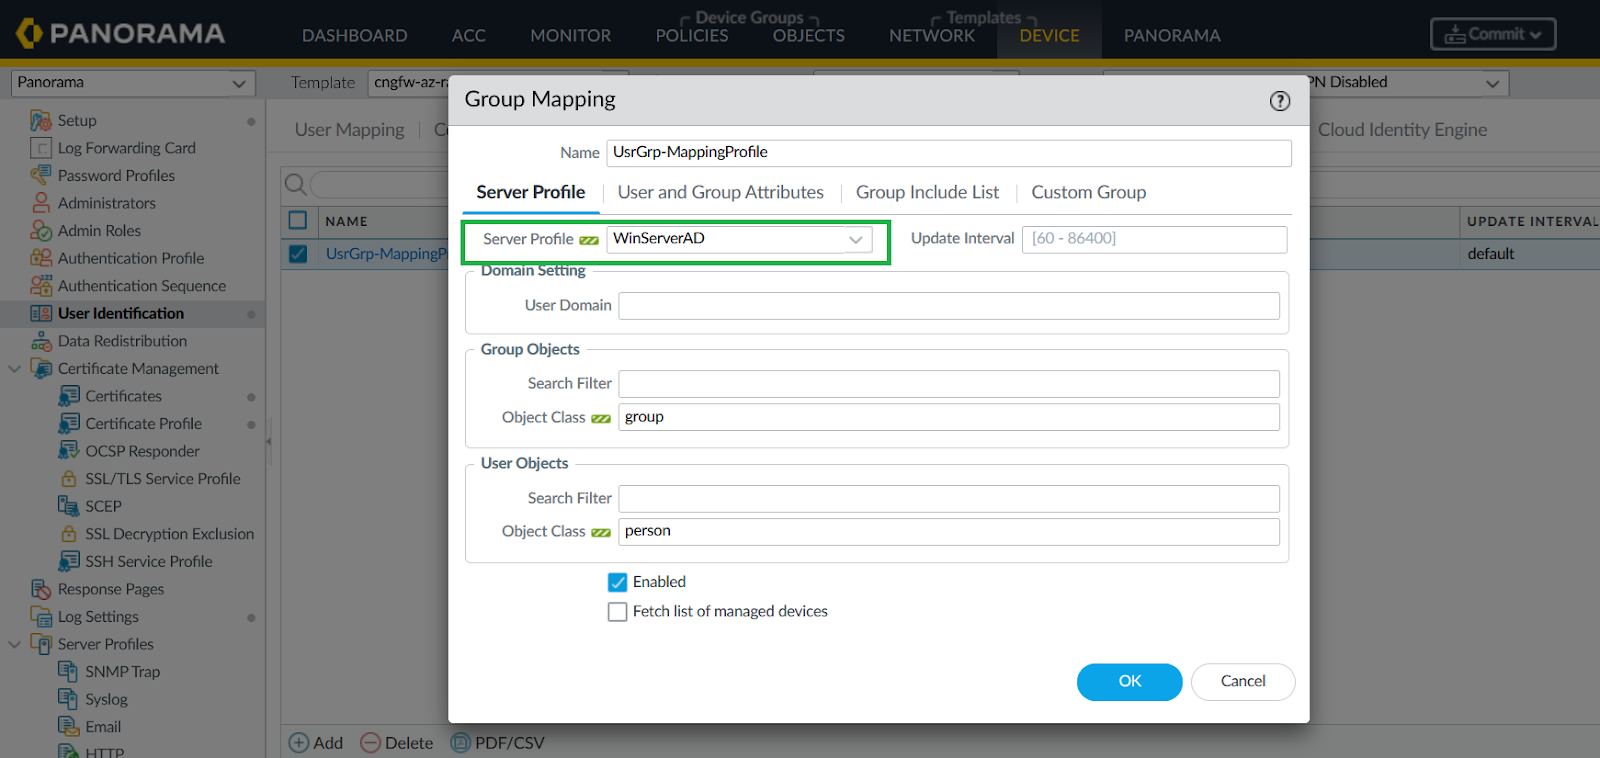
Provide Bind DN password.![]() Configure Group Mapping.
Configure Group Mapping.- In Panorama, go to Device > User Identification > Group Mapping.Add using the created LDAP profile.
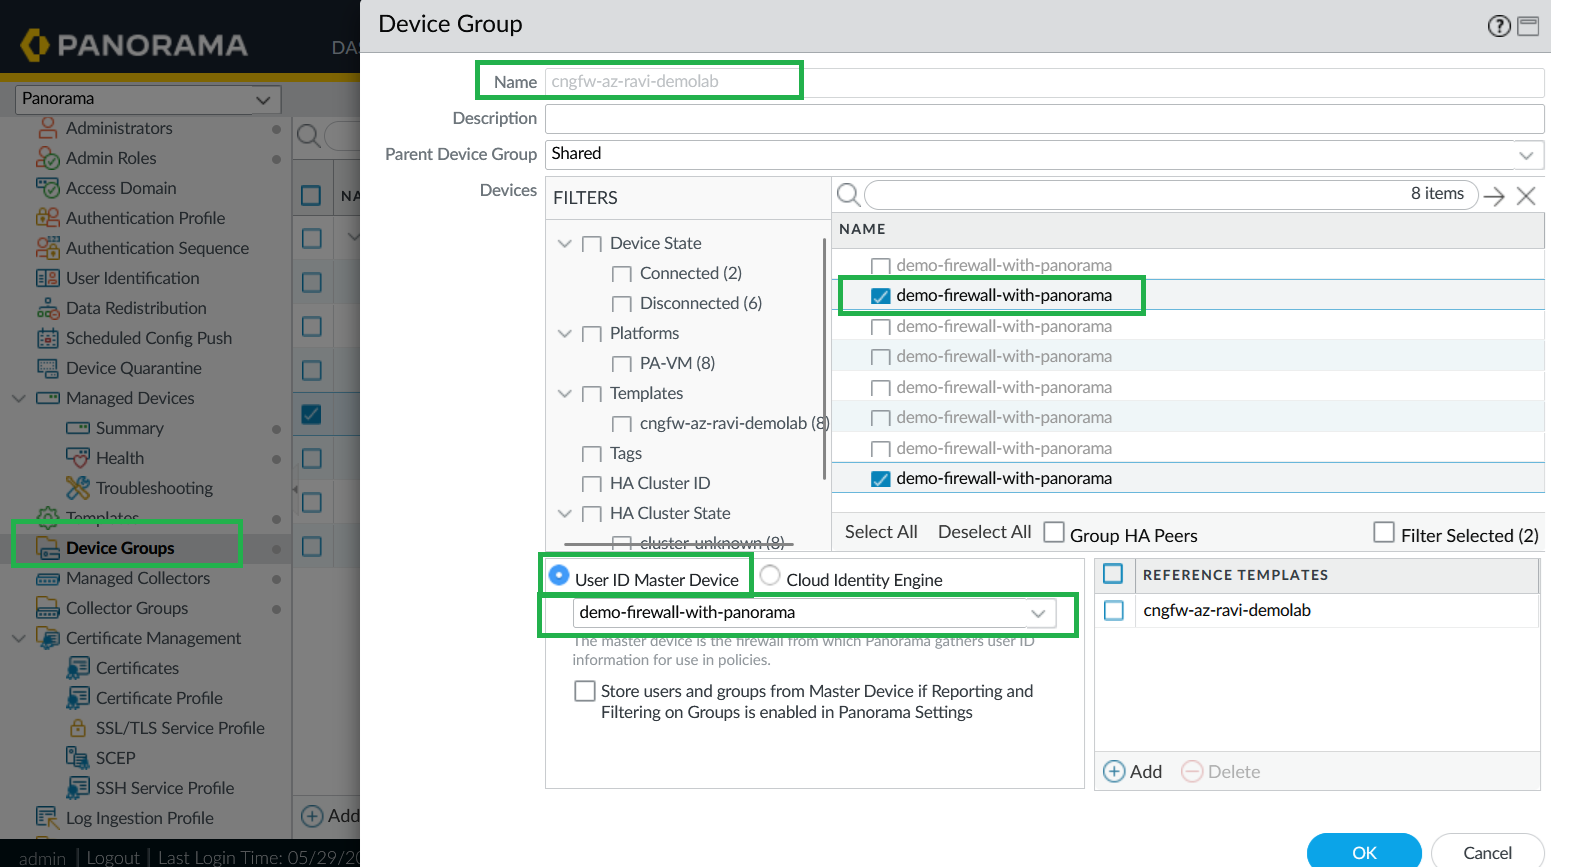
![]() For more information, see Configure User Mappings Using the Windows User-ID Agent and Configure User Mappings for Terminal Server UsersConfigure User-ID Master Device.In the Cloud NGFW device group, select the User-ID Master Device (choose one backend instance).
For more information, see Configure User Mappings Using the Windows User-ID Agent and Configure User Mappings for Terminal Server UsersConfigure User-ID Master Device.In the Cloud NGFW device group, select the User-ID Master Device (choose one backend instance).![]() Commit your changes.
Commit your changes.Enable User-ID with Windows-based User-ID Agent
Prerequisites: - Active Directory (AD) environment with users and groups.
- Cloud NGFW for Azure deployed and managed via Panorama.
- Dedicated Service account with Remote Management User and CIMV2 privileges.
- Windows-based User-ID agent installed and configured.
- Security Policy on Cloud NGFW to allow communication with LDAP/Windows server with Active directory.
- Enable User-ID on Cloud NGFW Interfaces.
- In Panorama, go to Network > Zones and select the Zone where you're configuring User-ID.Add your networks to Include and Exclude lists as needed.Click OK.
![]() On your Cloud NGFW device group, enable User-ID for both Private and Public zones.
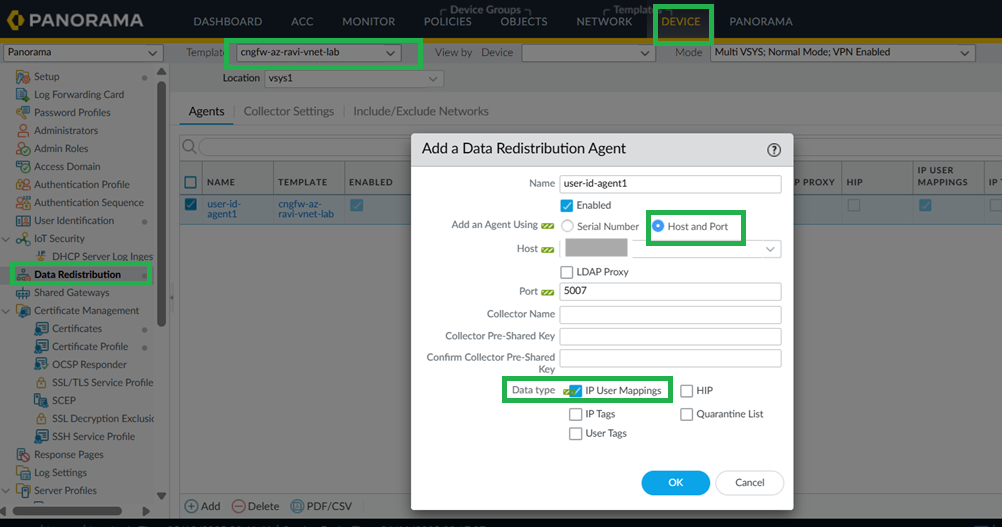
On your Cloud NGFW device group, enable User-ID for both Private and Public zones.![]() Configure User-ID Agent as Data Redistribution Agent.In Panorama, go to Device > Data distribution. Configure your User-ID Agent as data redistribution agent.
Configure User-ID Agent as Data Redistribution Agent.In Panorama, go to Device > Data distribution. Configure your User-ID Agent as data redistribution agent.![]() Configure Service Route for User-ID Agent.
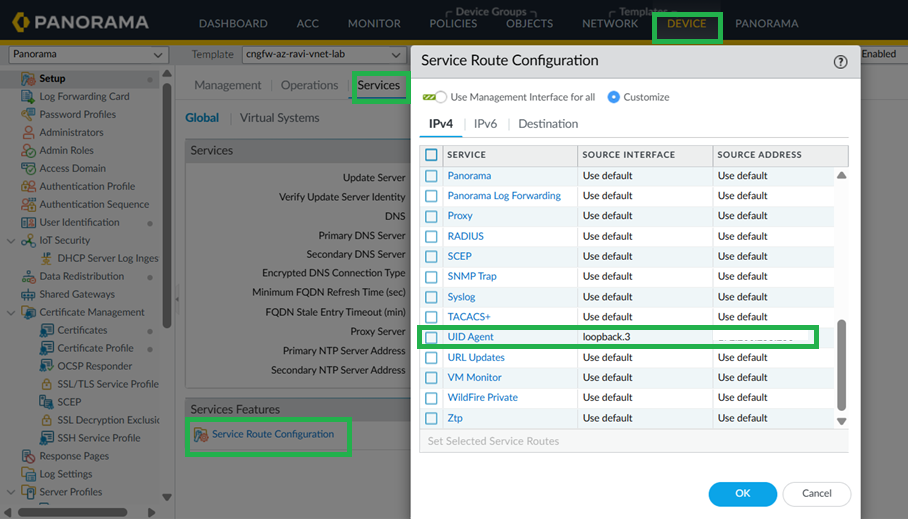
Configure Service Route for User-ID Agent.- Go to Setup > Services > Service Route Configuration.
![]() Configure with source interface as loopback.3.Add Firewall policy to allow communication towards User-ID Agent windows server.Verify User-ID Agent Configuration.
Configure with source interface as loopback.3.Add Firewall policy to allow communication towards User-ID Agent windows server.Verify User-ID Agent Configuration.- On the Windows server, click Edit to open User-ID Agent.
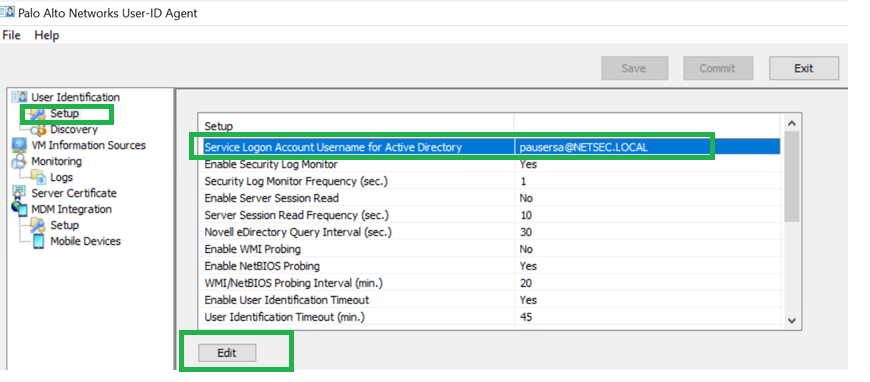
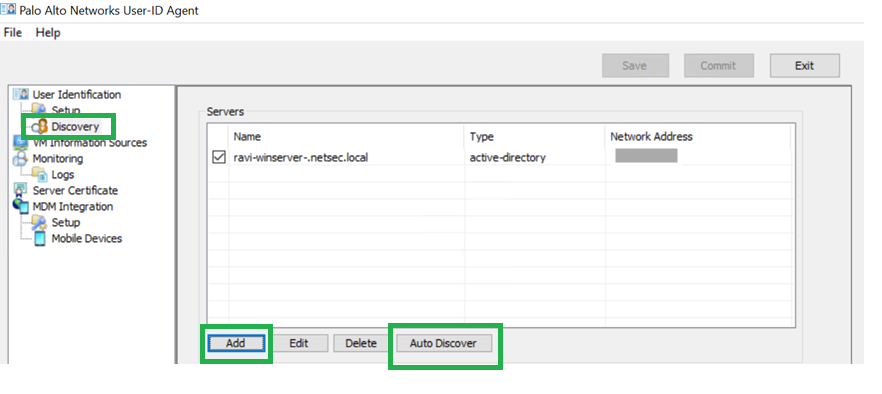
![]() Add service account username and password.Ensure that you have the appropriate User-ID service port (5007 by default) configured.Configure the discovery of your active directory domain (Auto-Discover if on the same server). If you have an active directory within the same server where you have User-ID Agent installed, you can use the Auto Discover option.
Add service account username and password.Ensure that you have the appropriate User-ID service port (5007 by default) configured.Configure the discovery of your active directory domain (Auto-Discover if on the same server). If you have an active directory within the same server where you have User-ID Agent installed, you can use the Auto Discover option.![]() Commit your changes.
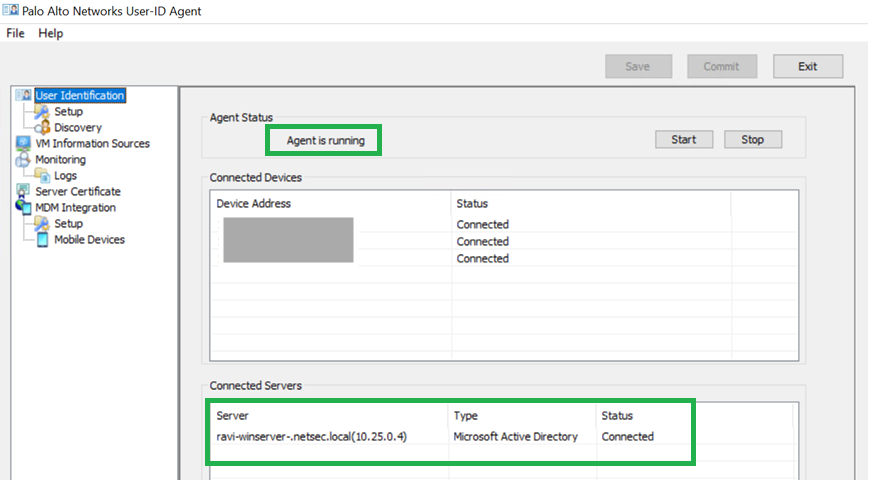
Commit your changes.![]() You will be able to see the Agent status as running and the connected servers. Ensure that you disable Windows firewall on this windows server to allow communication from CNGFW to this UID Agent.Configure LDAP Server Profile.Configure Group Mapping.Enable User-ID Master device.Commit your changes.
You will be able to see the Agent status as running and the connected servers. Ensure that you disable Windows firewall on this windows server to allow communication from CNGFW to this UID Agent.Configure LDAP Server Profile.Configure Group Mapping.Enable User-ID Master device.Commit your changes.Enable User-ID with Cloud Identity Engine (CIE)
Prerequisites: - Active Directory (AD) environment with users and groups.
- Cloud NGFW for Azure deployed and managed via Panorama.
- Security Policy on Cloud NGFW to allow communication with LDAP/Windows server with Active directory.
- CIE deployed and connected to your active directory environment.
- Deploy Cloud Identity Engine.For more information, see installing, deploying CIE, and authenticating CIE documentation. After a successful authentication of Agent with Cloud Identity Engine, the agent status will be online on Cloud Identity Engine
![]() Configure Cloud Identity Engine on Panorama and group mapping.CIE for User-ID on firewalls, in Panorama, go to Device > User Redistribution, and add a CIE instance
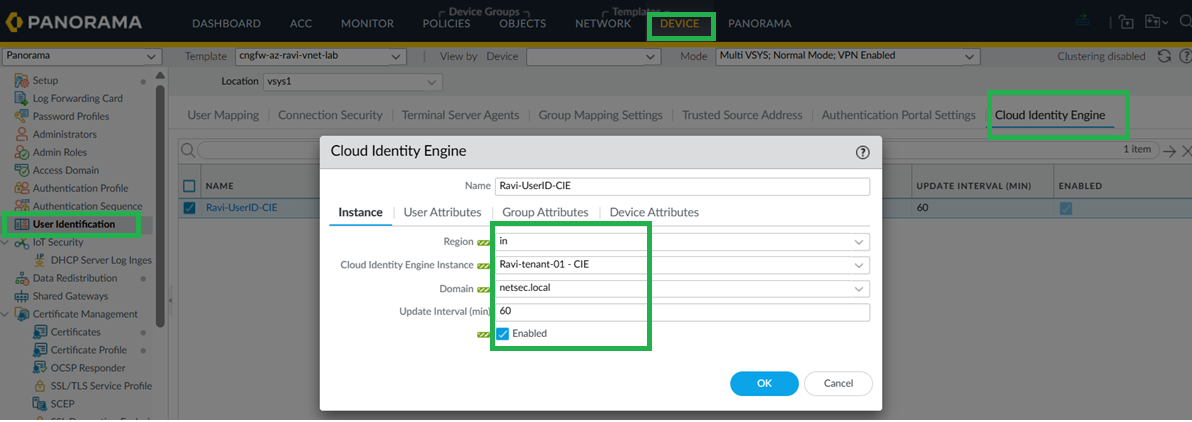
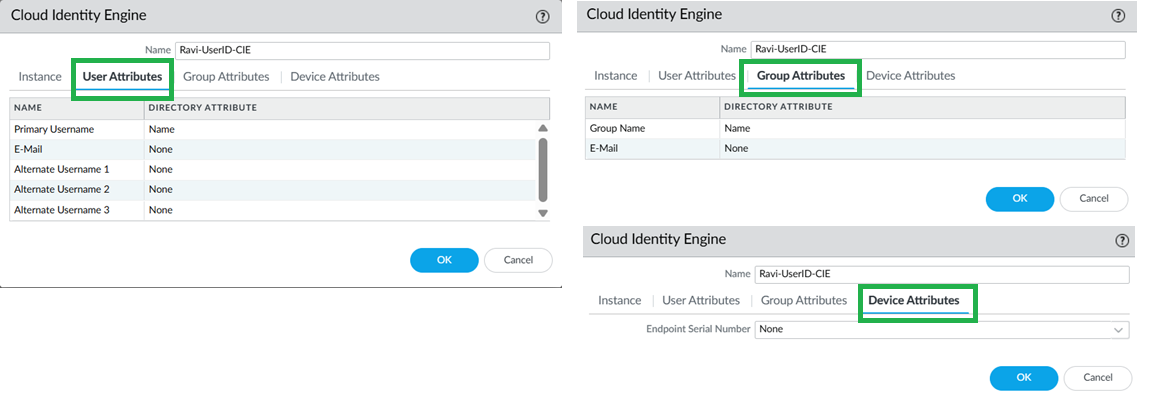
Configure Cloud Identity Engine on Panorama and group mapping.CIE for User-ID on firewalls, in Panorama, go to Device > User Redistribution, and add a CIE instance![]() For Panorama to learn Group mappings through CIE, configure CIE on the Panorama tab as shown below.
For Panorama to learn Group mappings through CIE, configure CIE on the Panorama tab as shown below.![]() The Panorama will now learn these new Group Mappings.
The Panorama will now learn these new Group Mappings.![]() Configure Group Mapping.
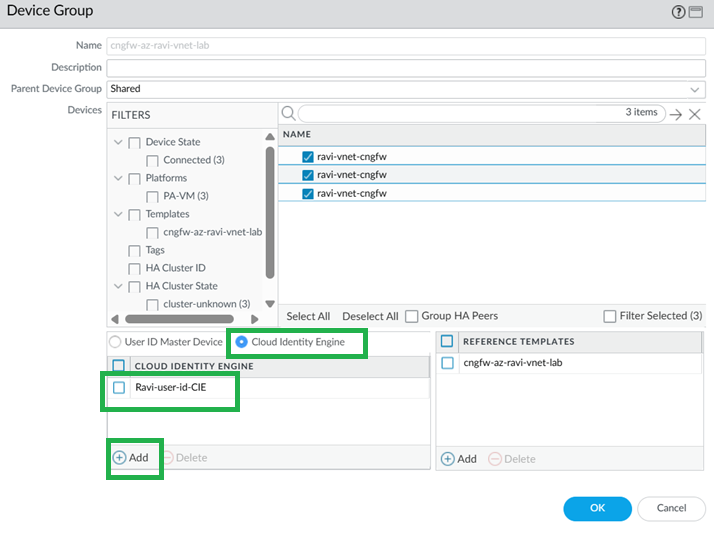
Configure Group Mapping.- For User-ID on firewalls, go to Device > User Redistribution.To configure on Panorama, go to Cloud Identity Engine tabEnable & Add CIE in Device Group.In the Cloud NGFW device group, enable and add the CIE instance.
![]() Enable and add Cloud Identity Engine.
Enable and add Cloud Identity Engine.![]()
Enable User-ID Redistribution with Panorama
Prerequisites: - Active Directory (AD) environment with users and groups.
- Cloud NGFW for Azure deployed and managed via Panorama.
- Dedicated Service account with Remote Management User and CIMV2 privileges.
- Windows-based User-ID agent installed and configured.
- Security Policy on Cloud NGFW to allow communication with LDAP/Windows server with Active directory.
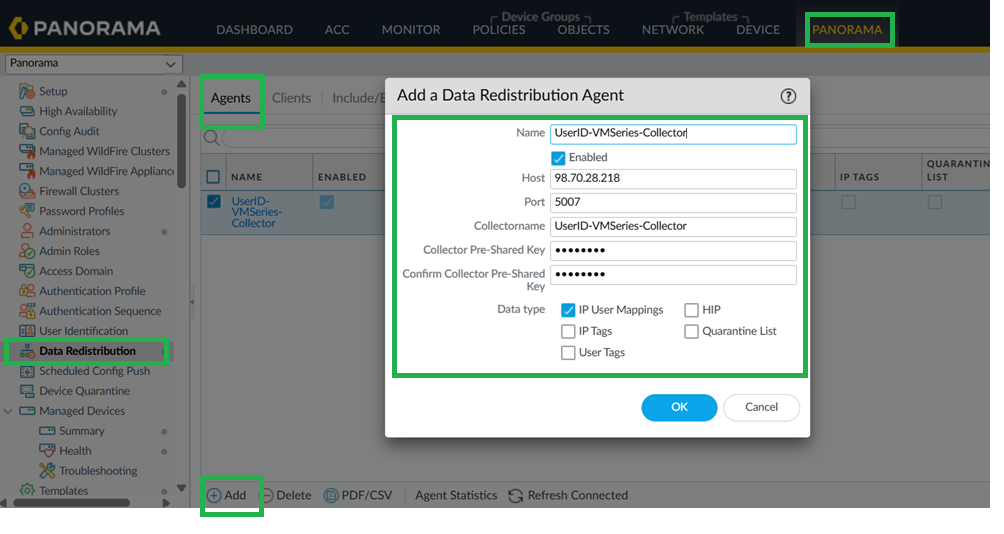
- Configure User-ID Redistribution Agent on Panorama.In Panorama, go to Data Redistribution > Add.In Add a Redistribution agent window, configure VM Seriesas the User-ID redistribution Agent on panorama.
![]() Configure User-ID Redistribution Agent on Cloud NGFW Device Group.In Panorama, go to Device > Data Redistribution, and add a Data Redistribution Agent.
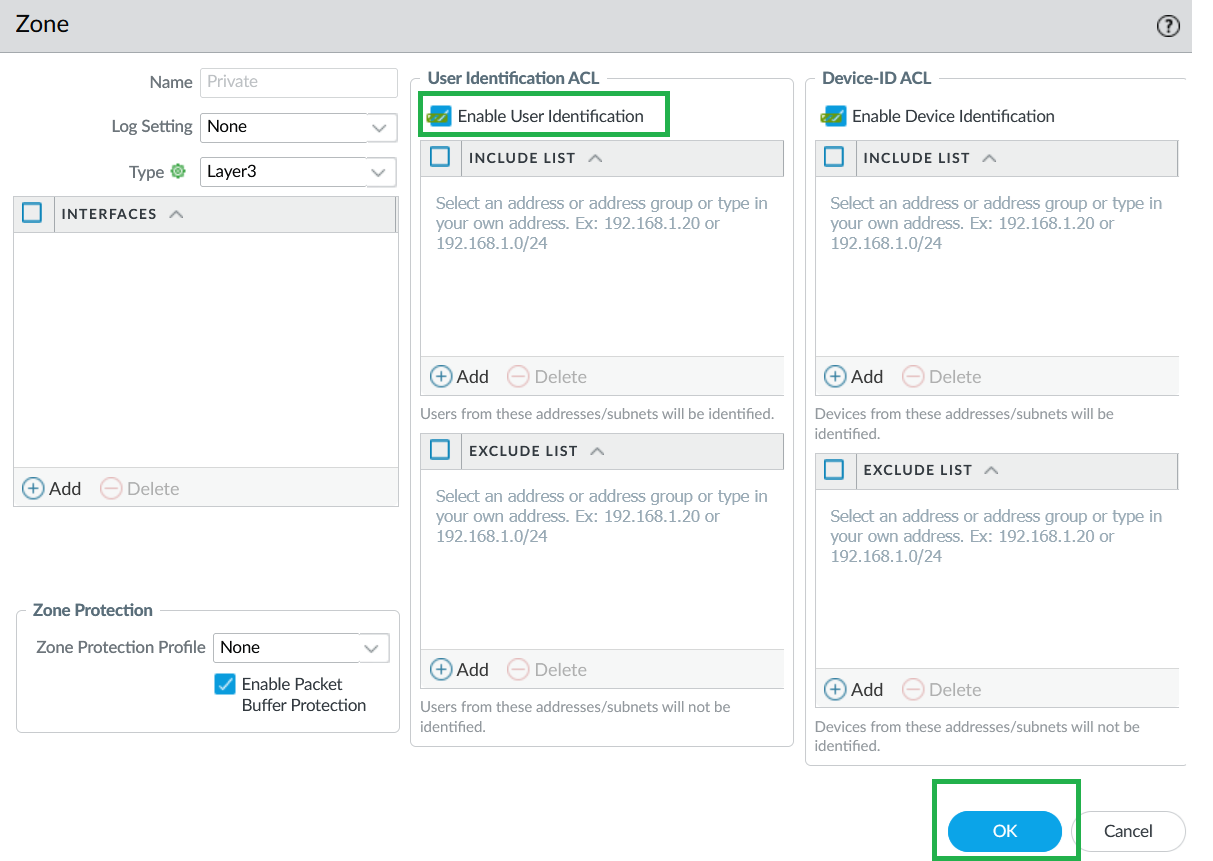
Configure User-ID Redistribution Agent on Cloud NGFW Device Group.In Panorama, go to Device > Data Redistribution, and add a Data Redistribution Agent.![]() Enable User-ID on Cloud NGFW on Cloud NGFW network interfaces.You can override Private and Public zones and enable User-ID.
Enable User-ID on Cloud NGFW on Cloud NGFW network interfaces.You can override Private and Public zones and enable User-ID.![]()
![]() Commit the configuration and verify Data Redistribution from panorama.On Panorama commit and push the configuration.
Commit the configuration and verify Data Redistribution from panorama.On Panorama commit and push the configuration.![]() Check for Cloud NGFW managed devices and take a note of the serial numbers.
Check for Cloud NGFW managed devices and take a note of the serial numbers.![]() Configure LDAP Server Profile.Configure Group Mapping.Enable User-ID Master device.Commit your changes.
Configure LDAP Server Profile.Configure Group Mapping.Enable User-ID Master device.Commit your changes.Define Firewall Policies Based on User Groups
In Panorama, go to Policies > Security.![]() Create rules using the Source User field to define access based on active directory user groups. You can now monitor the traffic based on usernames instead of just IP addresses.
Create rules using the Source User field to define access based on active directory user groups. You can now monitor the traffic based on usernames instead of just IP addresses.![]()
Limitations
- Cloud NGFW can act as a redistribution Client, but not as a redistribution agent.
- Authentication and Authorization policy is not supported.
- The XML-API method for User-ID mapping is not supported.


