Cloud NGFW for Azure
Link to Panorama Policy Management
Table of Contents
Expand All
|
Collapse All
Cloud NGFW for Azure Docs
Link to Panorama Policy Management
Learn how to link Cloud NGFW for Azure to Panorama for policy management.
| Where Can I Use This? | What Do I Need? |
|---|---|
|
|
To link your Cloud NGFW resource to Panorama for policy management:
- Prepare your environment.
- Create a Cloud Device Group.
- Generate a registration string.After completing these steps you can start using Panorama for policy management.
Create a Cloud Device Group
After preparing your environment for integration, you can link your Cloud NGFW to
the Panorama virtual appliance and start using policy management. You start by
creating a Cloud Device Group.
With Panorama, you group firewalls in your network into logical units called
device groups. A device group enables grouping based on
network segmentation, geographic location, organizational function, or any other
common aspect of firewalls requiring similar policy configurations.
Using device groups, you can configure policy rules and the objects they
reference. Organize device groups hierarchically, with shared rules and objects
at the top, and device group-specific rules and objects at subsequent levels.
This enables you to create a hierarchy of rules that enforce how firewalls
handle traffic.
See Manage Device Groups for more
information.
To add a cloud device group and template stack using the Panorama console:
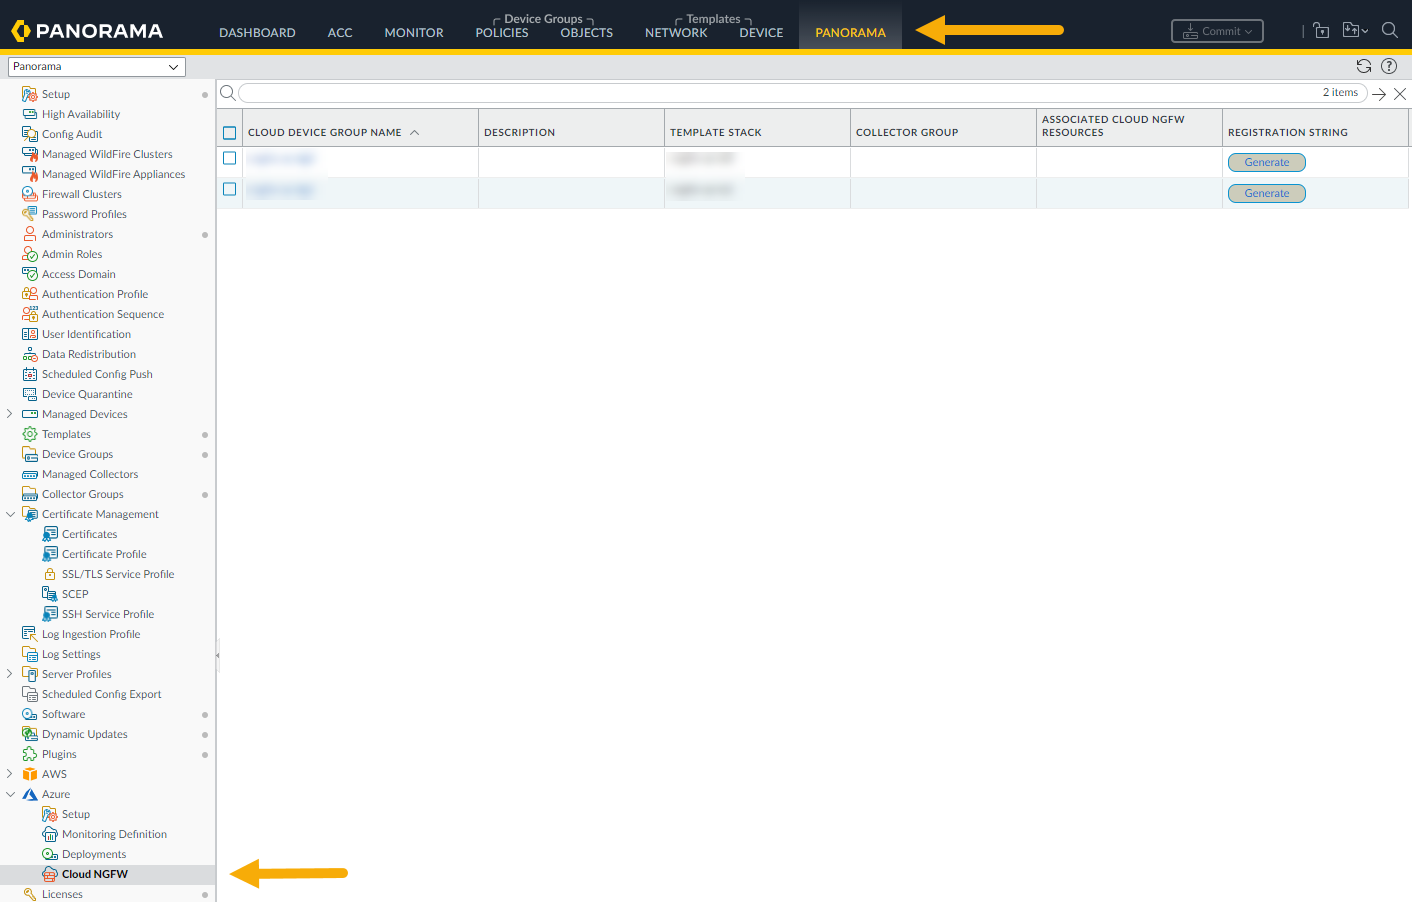
- In the Panorama console, select Panorama.In the navigation tree, select the Azure plugin.Expand the Azure plugin to display configuration options. Select Cloud NGFW to display the Cloud Device Group screen. If the Cloud NGFW option does not appear, verify that you have installed the Azure plugin successfully; select PanoramaPlugins to display the list of installed plugins.
![]() In the lower left portion of the Panorama console, click Add to create a new Cloud Device Group.In the Cloud Device Group screen:
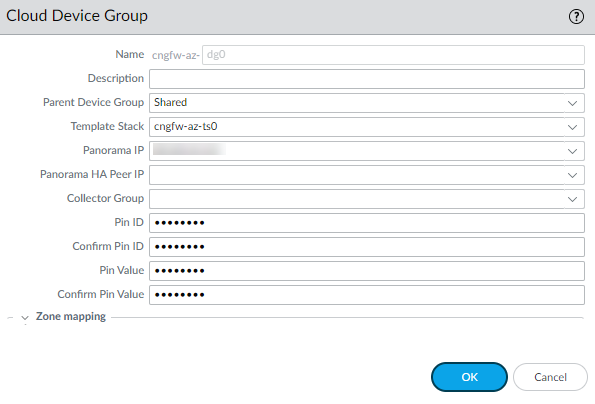
In the lower left portion of the Panorama console, click Add to create a new Cloud Device Group.In the Cloud Device Group screen:![]()
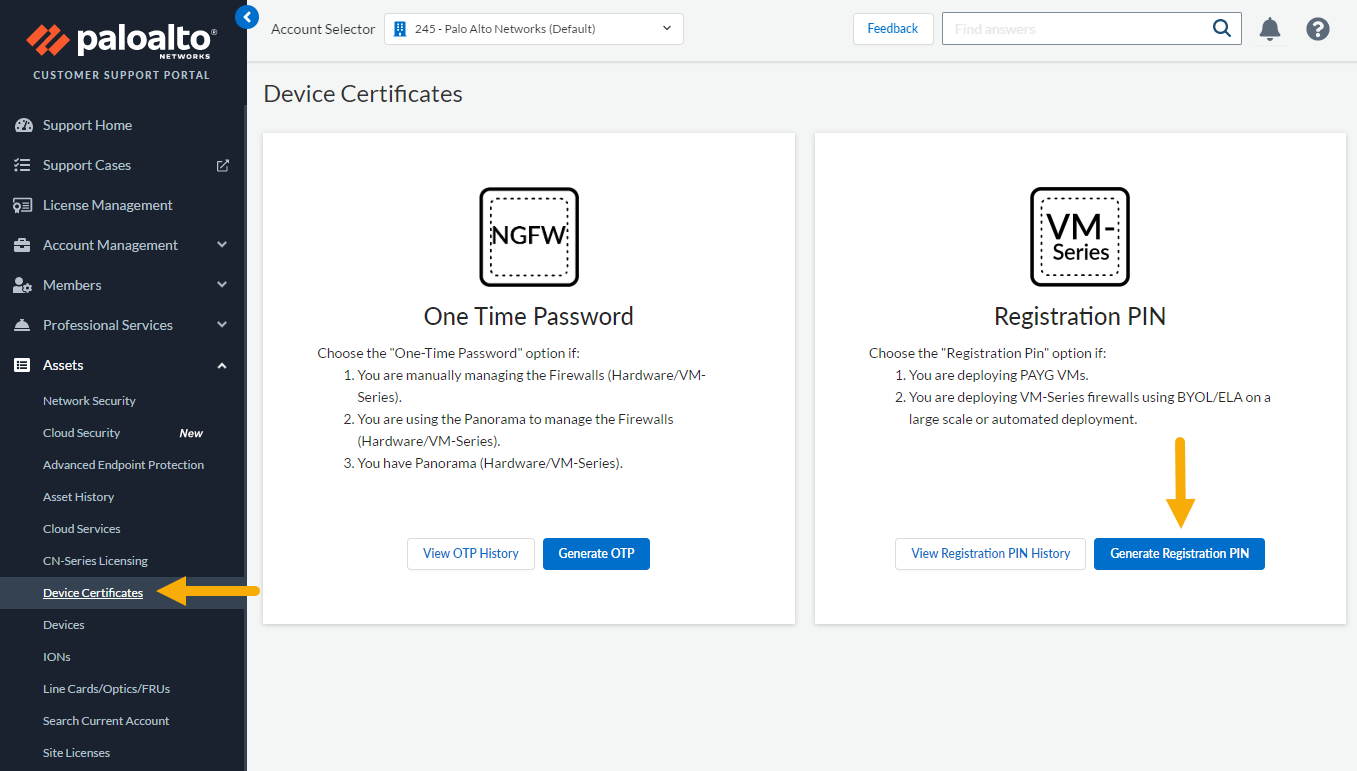
- Enter a unique Name for the cloud device group.Enter a Description.Use the drop-down menu to select the Parent Device Group. By default, this value is shared.Select the Template Stack from the drop-down menu. Or, click Add to create a new one. You cannot change the template stack name after deploying the Cloud NGFW.Select the Panorama IP address used by the deployment. The drop-down menu allows you to select either the private or public IP address.Optionally select the Panorama HA Peer IP address.Optionally use the drop-down menu to select the Collector Group.Provide the PIN ID. This value is provided by the Customer Support Portal.To retrieve the PIN, you need a Palo Alto Networks Customer Support Portal (CSP) account.The PIN ID should have an expiration of one year. This is optional if you have already registered the Cloud NGFW serial number. If it is not already registered, register your Cloud NGFW using the serial number in for the same CSP account where you registered your Panorama virtual appliance.To retrieve the PIN ID and PIN Value, log into the Customer Support Portal as a registered user.On the Customer Support Portal page, select AssestsDevice Certificates.On the Device Certificate page, select Generate Registration PIN for the VM-Series firewall.
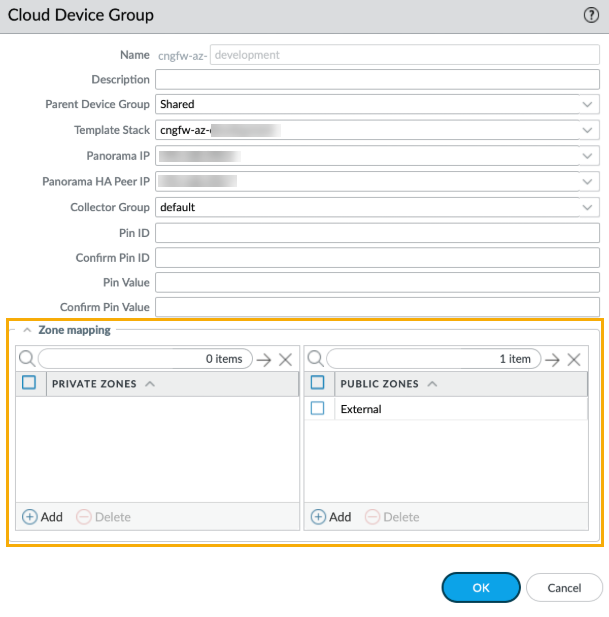
![]() Copy the newly created registration IDs, and paste it into the PIN ID and PIN Value field in the Cloud Device Group screen.Confirm the PIN ID and PIN Value.Alternatively, you can add Cloud Device Groups to the device-group hierarchy you manage in your Panorama to inherit the device group rules and objects. If inherited rules reference zones, these zones can be mapped to the zones applicable to Cloud NGFW — Public and Private, in the Azure Plugin > Cloud NGFW > Cloud Device Group. Consider that only inherited zones from the parent device group can be used; applicable zones are populated (and matched) to either private or public zones only. The Cloud NGFW resource does not see the original zone; only the private or public zone pushed from Panorama are visible.
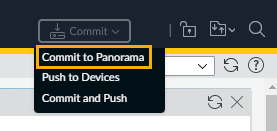
Copy the newly created registration IDs, and paste it into the PIN ID and PIN Value field in the Cloud Device Group screen.Confirm the PIN ID and PIN Value.Alternatively, you can add Cloud Device Groups to the device-group hierarchy you manage in your Panorama to inherit the device group rules and objects. If inherited rules reference zones, these zones can be mapped to the zones applicable to Cloud NGFW — Public and Private, in the Azure Plugin > Cloud NGFW > Cloud Device Group. Consider that only inherited zones from the parent device group can be used; applicable zones are populated (and matched) to either private or public zones only. The Cloud NGFW resource does not see the original zone; only the private or public zone pushed from Panorama are visible.![]() Source policy defines the source zone or source address from which the traffic originates. For Source Zone, you can select Private, Public, or Loopback. If you are configuring the destination zone, select Private, Public or Loopback, depending on your destination.Click OK.Commit your change in the Panorama console to create the cloud device group. Next, Generate the registration string to create the Cloud NGFW resource and deploy in Azure.
Source policy defines the source zone or source address from which the traffic originates. For Source Zone, you can select Private, Public, or Loopback. If you are configuring the destination zone, select Private, Public or Loopback, depending on your destination.Click OK.Commit your change in the Panorama console to create the cloud device group. Next, Generate the registration string to create the Cloud NGFW resource and deploy in Azure.![]() In some cases, you may experience a validation error when configuring a Cloud Device Group. To resolve this issue, ensure that the Azure Plugin for Panorama is properly installed using administrator credentials. For HA environments, install the plugin on the secondary node, then install the plugin on the primary node.
In some cases, you may experience a validation error when configuring a Cloud Device Group. To resolve this issue, ensure that the Azure Plugin for Panorama is properly installed using administrator credentials. For HA environments, install the plugin on the secondary node, then install the plugin on the primary node.Generate the registration string to create the Cloud NGFW and deploy in Azure
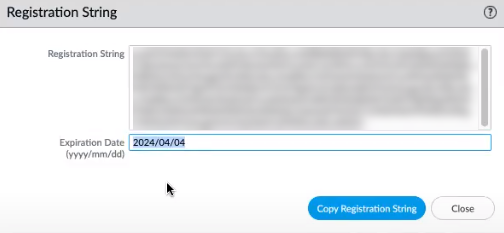
After you commit the change to create the cloud device group, you can generate the registration string. This string is used to create and deploy the Cloud NGFW in Azure.To retrieve the PIN:- In the Panorama console, locate the Cloud Device Group you created in the previous section.In the Registration String field, click Generate.
![]() Select Copy Registration String.
Select Copy Registration String.![]() After copying the registration string, access Azure Marketplace to create a Cloud NGFW resource.In Azure Marketplace, select Cloud NGFWs.
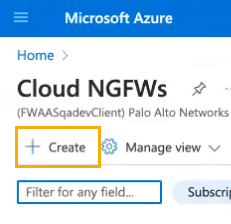
After copying the registration string, access Azure Marketplace to create a Cloud NGFW resource.In Azure Marketplace, select Cloud NGFWs.![]() Click + Create to create a new Cloud NGFW resource.
Click + Create to create a new Cloud NGFW resource.![]() Follow the setup instructions to Create Palo Alto Networks Cloud NGFW.
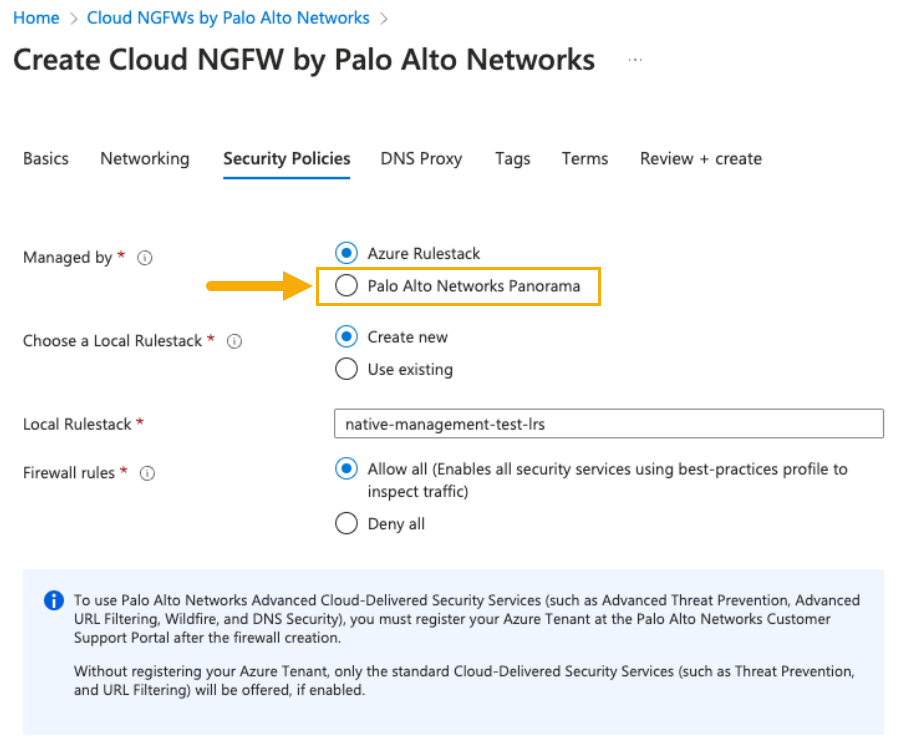
Follow the setup instructions to Create Palo Alto Networks Cloud NGFW.- Configure Basic information.Configure Networking.Configure Security Policies. In the Manged by section, select Palo Alto Networks Panorama.
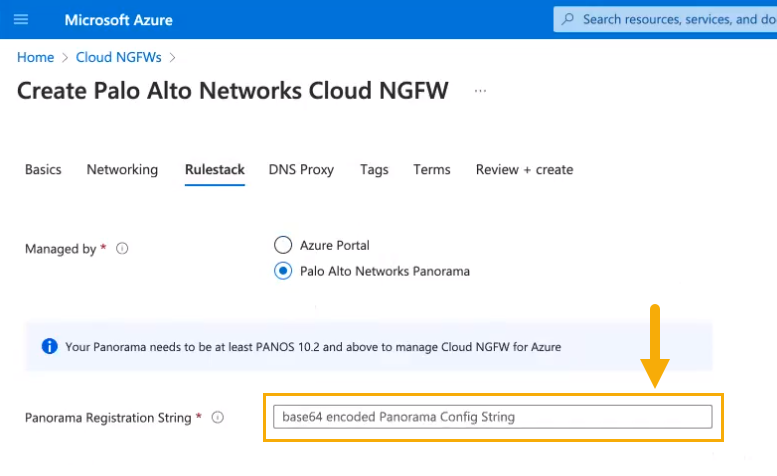
![]() After selecting Managed by Palo Alto Networks Panorama, the Security Policies page changes to include the Panorama Registration String field. Enter the registration string you copied in Step 3 above.
After selecting Managed by Palo Alto Networks Panorama, the Security Policies page changes to include the Panorama Registration String field. Enter the registration string you copied in Step 3 above.![]() Continue creating the Cloud NGFW resource by specifying information for DNS Proxy, Tags, and Terms. Review your configuration, then click Create.Creating a Cloud NGFW resource may take approximately 10-15 minutes.The Panorama console is now linked to the Cloud NGFW resource.
Continue creating the Cloud NGFW resource by specifying information for DNS Proxy, Tags, and Terms. Review your configuration, then click Create.Creating a Cloud NGFW resource may take approximately 10-15 minutes.The Panorama console is now linked to the Cloud NGFW resource.

