Strata Cloud Manager
Onboard to Strata Cloud Manager
Table of Contents
Onboard to Strata Cloud Manager
Learn about onboarding Prisma Access and Palo Alto Networks NGFWs to Strata Cloud
Manager.
Onboarding is the process of integrating your existing NGFWs and Prisma Access into
Strata Cloud Manager for management, visibility, or both. You can manage NGFWs directly
through Strata Cloud Manager along with Prisma Access deployments, or connect your
Panorama instance to Strata Cloud Manager to gain visibility.
After you've activated Strata Cloud Manager Essentials or
Pro and met the prerequisites, here's how to start
onboarding your NGFWs and Prisma Access to Strata Cloud Manager.
Onboard NGFWs, ZTP NGFWs, and VM-Series to Strata Cloud Manager
Procedures for onboarding NGFWs to Strata Cloud Manager.
| Where Can I Use This? | What Do I Need? |
|---|---|
| One of these: |
You can onboard your NGFW to Strata Cloud Manager to manage and gain
insights. If you already have NGFWs managed by Panorama, you can connect Strata
Cloud Manager to your Panorama using the Panorama CloudConnector Plugin for
visibility and monitoring.
To get started managing your NGFWs with Strata Cloud Manager, follow the initial
onboarding steps below:
- Start by integrating the firewall into your network, segmenting your network into zones, setting up a basic security policy, assessing network traffic, and reviewing the best practices.
- The prerequisites include minimum PAN-OS versions supported, supported NGFW models, ports, licenses, and other hard-stop requirements for using your NGFWs with Strata Cloud Manager.
- If you are simply utilizing Strata Cloud Manager for the advanced monitoring and visibility features that will benefit your PAN-OS or Panorama managed firewalls, you can stop here.
- Onboard your NGFWs to Strata Cloud Manager.
- After you successfully onboard your NGFWs to Strata Cloud Manager, you have the option to configure and specify the general firewall management settings. The general settings include the following: domain name, login banner, certificates, time zones, locales, coordinates, and tunnel acceleration.
- Define the general and VPN session settings, and as well the session timeout settings, for your firewall.
- The local configuration management feature eliminates the need for context switching from central management to individual firewalls for managing local configurations.After you complete these steps, you can start managing your NGFWs with Strata Cloud Manager.
To onboard NGFWs using Zero Touch Provisioning (ZTP), click
here.
Onboard NGFWs
Workflow for onboarding NGFWs to Strata Cloud Manager.
Learn about device labels, onboarding rules, and onboarding NGFWs to Strata Cloud
Manager.
Create a Device Label or Device Label Group
Device labels in Strata Cloud Manager provide a powerful and flexible
way to automate and streamline NGFW onboarding and management processes. You can
use labels to group devices based on common characteristics, enabling more
efficient configuration and software update management. This feature
enhances:
- Zero Touch Provisioning (ZTP) - by allowing you to assign labels during bootstrap, facilitating automated provisioning and near-zero touch onboarding of devices.
- Standard Device Onboarding - by enabling you to create label-based onboarding rules, ensuring the correct configuration is applied to the right NGFWs.
- Software Updates - by simplifying the process of managing multiple devices across distributed environments and being able to group NGFWs by software version.
By implementing device labels, you can reduce manual coordination,
minimize human errors, and accelerate remote site onboarding. To start managing
your devices using Device Labels, go to , set the Configuration Scope to the
Firewall or Firewall Folder, .
Create a Device Label
- Log in to Strata Cloud Manager.Select , set the Configuration Scope to the Firewall or Firewall Folder, .Add Label.
- Enter a descriptive Name.Select a Label Group.Save the Label.
Create a Device Label Group
- Log in to Strata Cloud Manager.Select , set the Configuration Scope to the Firewall or Firewall Folder, .Add Label Group.
- Enter a descriptive Name.Enable exposure to any combination of the following: ZTP, Device Onboarding, NGFW Software updates.Save the Label Group.
Create a Device Onboarding Rule
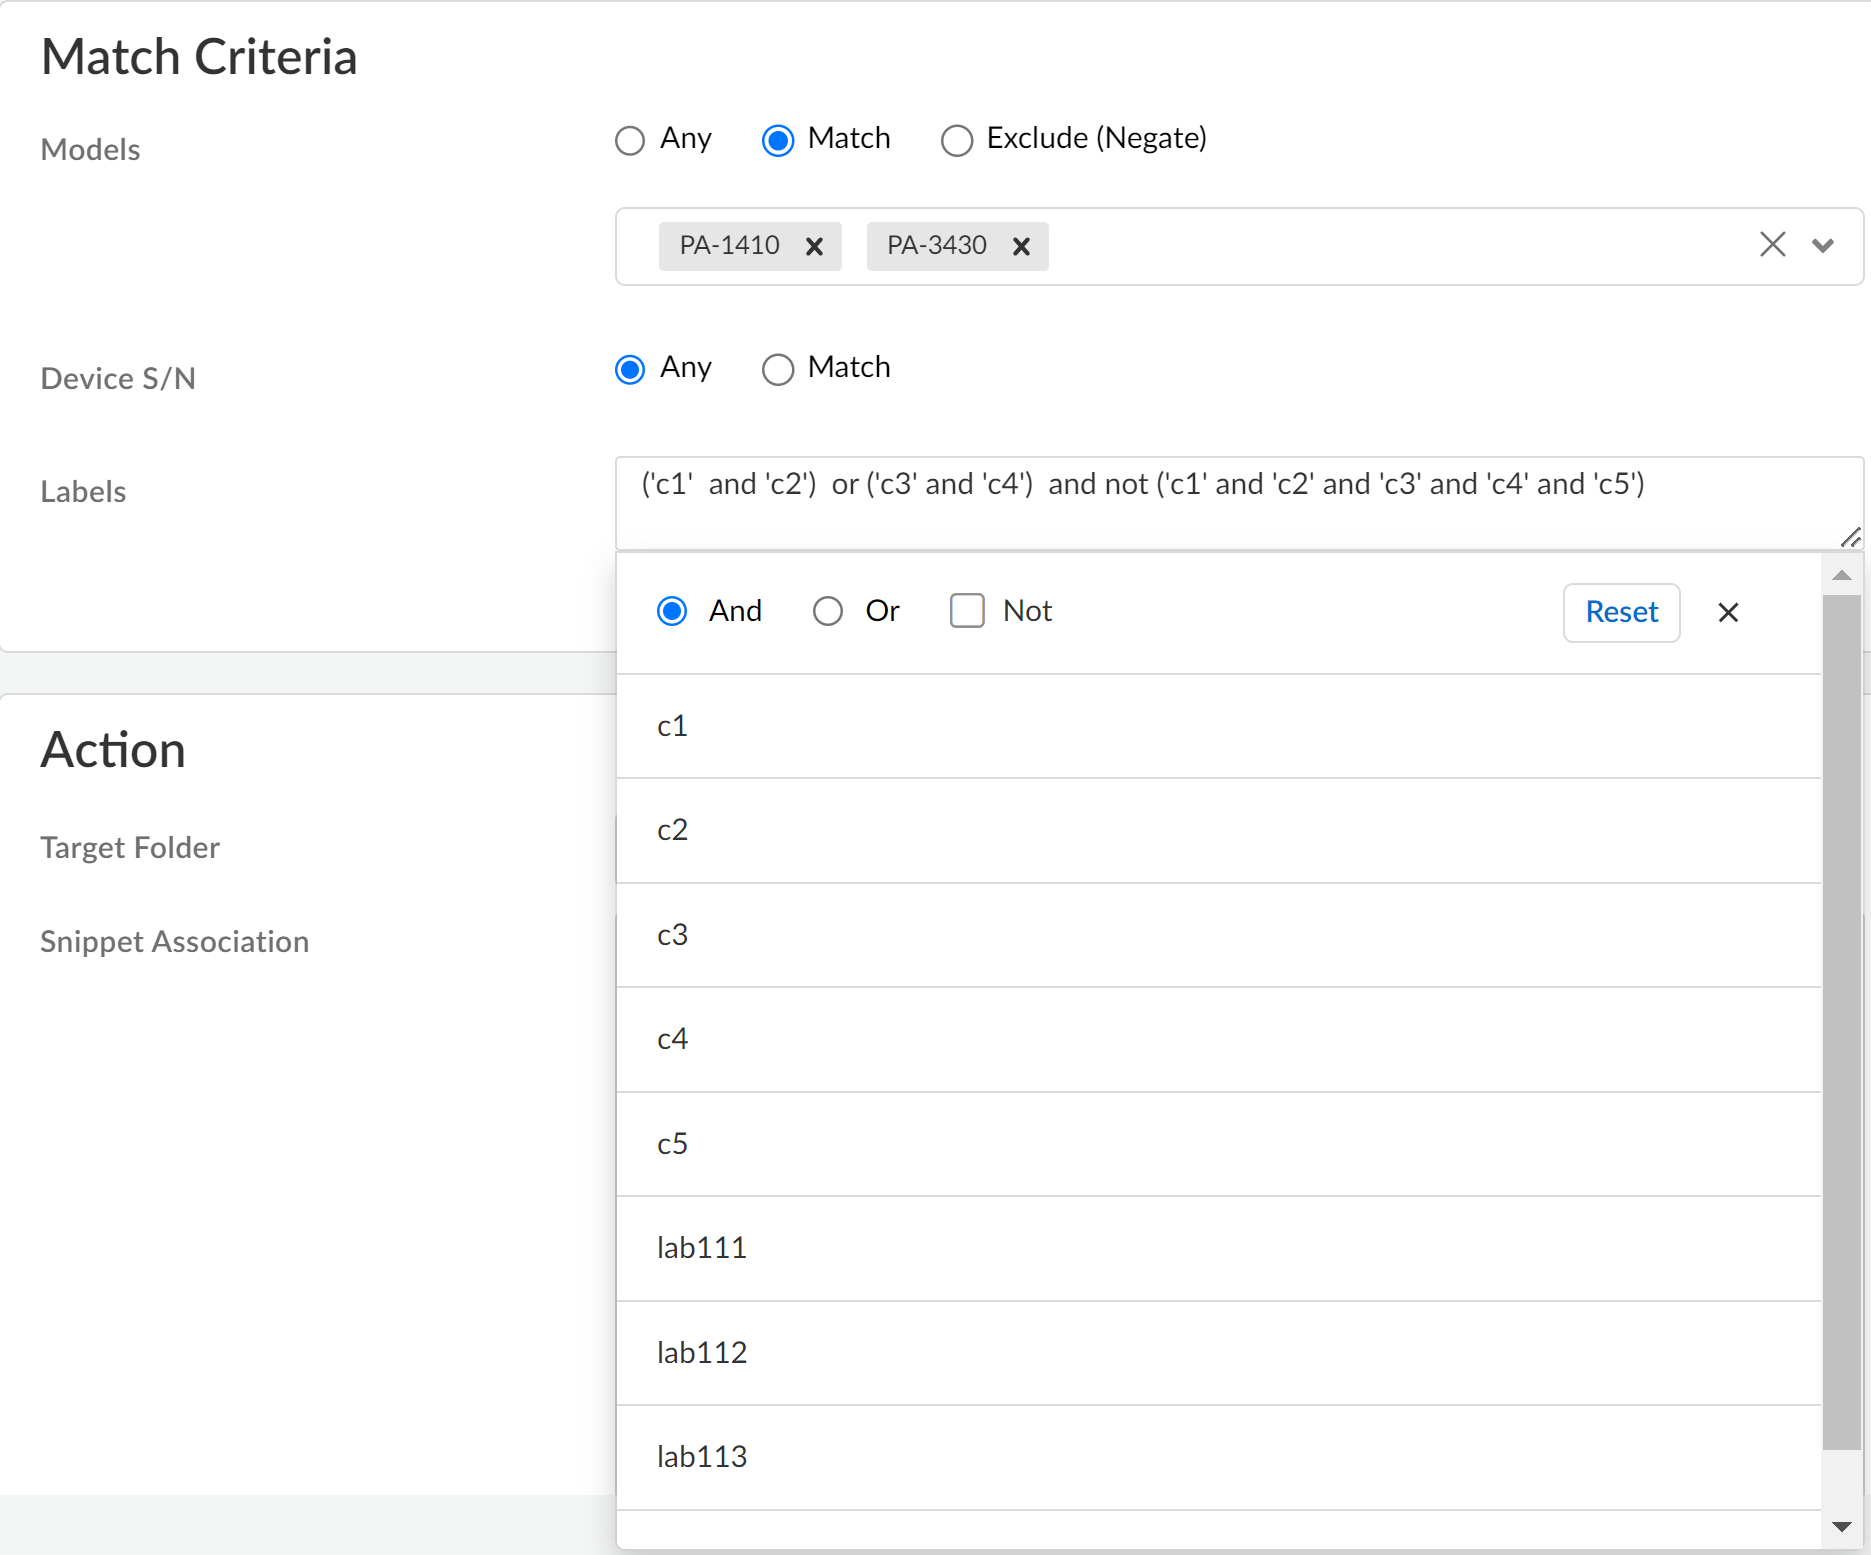
Use a device onboarding rule to automate parts of the Palo Alto Networks Next Generation Firewall (NGFW) onboarding to Strata Cloud Manager whether you're manually onboarding Palo Alto Networks NGFW or onboarding using Zero Touch Provisioning (ZTP). This allows you to associate the firewall with a folder and push a configuration when the firewall first connects to Strata Cloud Manager. Device onboarding rules are designed to simplify and greatly reduce the time spent onboarding new Palo Alto Networks NGFW at scale and ensure the correct configuration is applied to newly onboarded Palo Alto Networks NGFW. You can create multiple device onboarding rules to define different match criteria that apply to different Palo Alto Networks NGFW.To onboard VM-series funded by software NGFW credits, see Create a Deployment Profile.The Match Criteria, Action, VPN Onboarding, and User Context Onboarding configurations are optional and can be configured as needed. If no Match Criteria is specified then the device onboarding rule applies to Any Palo Alto Networks NGFW model and serial number. The Palo Alto Networks NGFW must match all Match Criteria defined in the rule for Strata Cloud Manager to take the configured Action or push the VPN Onboarding and User Context Onboarding configurations.For example, you don't configure the Match Criteria and configure only the Target Folder in the rule Action. Additionally, you don't configure VPN Onboarding and User Context Onboarding. In this example Strata Cloud Manager applies the rule to all Palo Alto Networks NGFW onboarded to Strata Cloud Manager and only adds them to the Target Folder. Another example is that you specify Palo Alto Networks NGFW models and serial numbers in the Match Criteria but you don't configure the rule Action at all. Additionally, you configure VPN Onboarding and User Context Onboarding. In this example Strata Cloud Manager pushes the VPN Onboarding and User Context Onboarding configurations to only the Palo Alto Networks NGFW models and serial numbers that match the Match Criteria.- Log in to Strata Cloud Manager.Select , set the Configuration Scope to the Firewall or Firewall Folder, .Add Rule.Configure the General device onboarding rule settings.
- The device onboarding rule is Enabled by default. Toggle the Enable setting to disable the onboarding rule after you Save.Enter a descriptive Name for the onboarding rule.(Optional) Enter a Description for the onboarding rule.Define the onboarding rule Match Criteria.The match criteria define to which Palo Alto Networks NGFW the device onboarding rule applies.
- Specify which Palo Alto Networks NGFW Models.
- Any—Applies to all Palo Alto Networks NGFW onboarded to Strata Cloud Manager.
- Match—Inclusive condition that applies to the Palo Alto Networks NGFW models added to the match list. You can select one or multiple different Palo Alto Networks NGFW models.For example, if you add PA-1410 and PA-3260, then the onboarding rule Action applies only to those Palo Alto Networks NGFW.
- Exclude (Negate)—Exclusive condition that applies to all Palo Alto Networks NGFW models not added to the exclude match list.For example, if you add PA-1410 and PA-3260, then the onboarding rule Action applies to all Palo Alto Networks NGFW models except for those added to the exclude list.
Specify the Device S/N.This compliments the Models match criteria by allowing you to identify specific serial numbers of Palo Alto Networks NGFW Models that the onboarding rule applies to.- Any—Applies to all Palo Alto Networks NGFW serial numbers.
- Match—Enter a regular expression (regex) to identify Palo Alto Networks NGFW serial numbers.
Specify Labels applied to Palo Alto Networks NGFW during onboarding that the onboarding rule applies to.You can use And, Or, and Not operators to write a logical expression of labels to match. You can use parentheses (()) to group sets of labels and logical operators when writing your regular expression.![]() Define the onboarding rule Action.
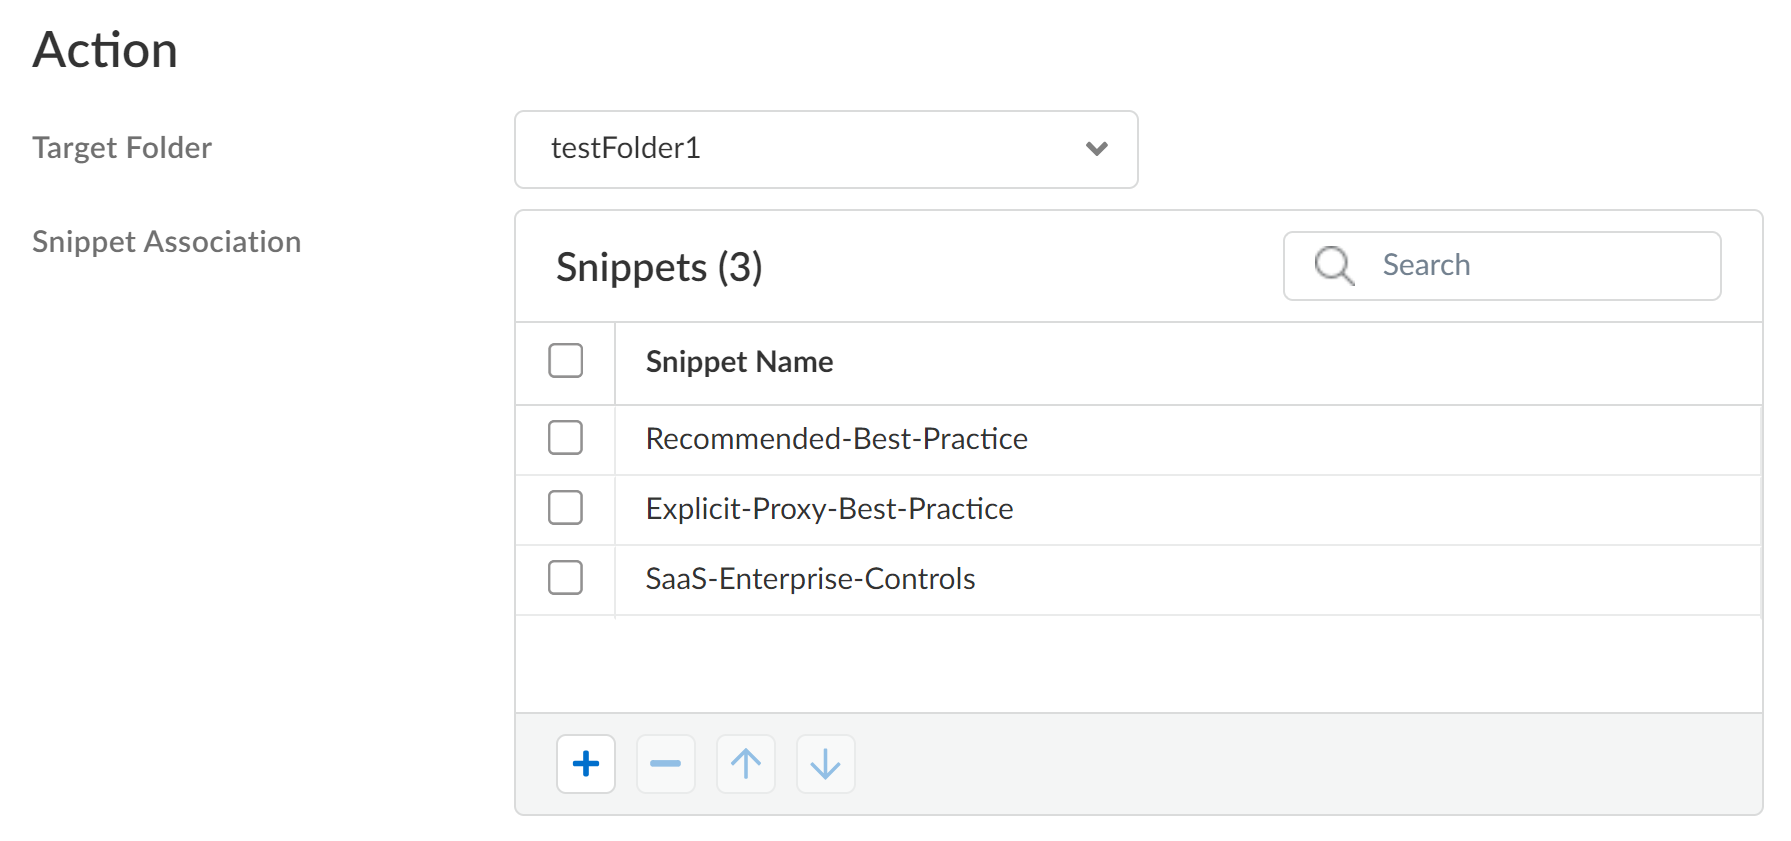
Define the onboarding rule Action.- Select the Target Folder the firewall is added to if it matches the device onboarding rule.If no Target Folder is specified, then the firewall is added to the default All Firewalls folder.(VM-Series, funded with Software NGFW Credits) You can configure the dgname field in the init.cfg.txt bootstrap parameters to add the VM-Series firewall to a target folder. In this case, Strata Cloud Manager prioritizes adding the VM-Series firewall to the target folder configured in the init.cfg.txt file over the one configured in the device onboarding rule.For Snippet Association, apply snippet configuration to the onboarded firewall after it successfully connects to Strata Cloud Manager.Snippets are a tool used to standardize a common base configuration for a set of firewalls or deployments. This allows you to quickly onboard a new firewall with a known good configuration and reduces the time required to onboard a new firewall.
![]() Enable VPN Onboarding if you have configured Auto VPN for secure hub-and-spoke connectivity between Strata Cloud Manager and your managed firewalls.If enabled, select the VPN Cluster to add the firewall to. This determines the gateway devices and automatically creates secure connections between the configured gateway and the newly onboarded firewall.Click Configure to configure the Palo Alto Networks NGFW as a hub or branch firewall.
Enable VPN Onboarding if you have configured Auto VPN for secure hub-and-spoke connectivity between Strata Cloud Manager and your managed firewalls.If enabled, select the VPN Cluster to add the firewall to. This determines the gateway devices and automatically creates secure connections between the configured gateway and the newly onboarded firewall.Click Configure to configure the Palo Alto Networks NGFW as a hub or branch firewall.![]() Enable User Context Onboarding to configure the user and tag mappings required for User Context for Cloud Identity Engine (CIE).User Context provides simplified granular control over the data that is shared across your security devices. It provides your administrators the flexibility to specify the data types each device sends and receives.If enabled, you must configure the Segments to Contribute Data To to customize the segment mappings the firewall sends to CIE and the Segments to Receive Data From to customize how CIE provides segment mappings to the firewall.
Enable User Context Onboarding to configure the user and tag mappings required for User Context for Cloud Identity Engine (CIE).User Context provides simplified granular control over the data that is shared across your security devices. It provides your administrators the flexibility to specify the data types each device sends and receives.If enabled, you must configure the Segments to Contribute Data To to customize the segment mappings the firewall sends to CIE and the Segments to Receive Data From to customize how CIE provides segment mappings to the firewall.![]() Save.In Device Onboarding, review your newly configured onboarding rule and verify it's Enabled.Device onboarding rules are processed in a top-down priority. Strata Cloud Manager evaluates each onboarding rule Match Criteria starting with the rule highest in the rule hierarchy until the Palo Alto Networks NGFW meets all Match Criteria. Strata Cloud Manager then takes the Action specified in the matching rule. In the event two rules in the device onboarding rule hierarchy apply to the same firewall, Strata Cloud Manager takes the Action configured in the device onboarding rule higher up in the rule hierarchy.Onboard your Palo Alto Networks NGFW manually or using ZTP.
Save.In Device Onboarding, review your newly configured onboarding rule and verify it's Enabled.Device onboarding rules are processed in a top-down priority. Strata Cloud Manager evaluates each onboarding rule Match Criteria starting with the rule highest in the rule hierarchy until the Palo Alto Networks NGFW meets all Match Criteria. Strata Cloud Manager then takes the Action specified in the matching rule. In the event two rules in the device onboarding rule hierarchy apply to the same firewall, Strata Cloud Manager takes the Action configured in the device onboarding rule higher up in the rule hierarchy.Onboard your Palo Alto Networks NGFW manually or using ZTP.Onboard a NGFW to Strata Cloud Manager
To onboard VM-series funded by software NGFW credits, see Create a Deployment Profile.After you activate Strata Cloud Manager, you can begin to onboard Palo Alto Networks firewalls to it. Onboarding to Strata Cloud Manager is supported for firewalls running PAN-OS 10.2.3 and later releases.Strata Cloud Manager is available, featuring two licensing tiers: Strata Cloud Manager Essentials and Strata Cloud Manager Pro. This unified structure streamlines the deployment of network security offerings, including AIOps for NGFW, Autonomous Digital Experience Management (ADEM), cloud management functionality, and Strata Logging Service.If you were using Strata Cloud Manager before the introduction of these new licensing tiers, your existing license for AIOps for NGFW Premium remains supported. You can continue to amend, extend, renew, or activate without any changes.There are four components involved in firewall onboarding:- The tenant — Created when you activate a product license on your Customer Support Portal (CSP) account. You add firewalls to your tenant to associate them with Strata Cloud Manager.
- The firewall — The Palo Alto Networks firewall that you intend to use with Strata Cloud Manager.You can only onboard a firewall not already associated with Strata Logging Service. If a firewall is already associated with Strata Logging Service, it’s ineligible for Strata Cloud Manager and isn't displayed.
- AIOps for NGFW Premium, Strata Cloud Manager Essentials, or Strata Cloud Manager Pro— One of the licenses required for cloud management of firewalls.
- Strata Cloud Manager — The app you will be associating with the firewall to manage its configuration from the cloud.
- Review the prerequisites to onboard your NGFW toStrata Cloud Manager.Activate the Strata Logging Service license.Skip this step if you already activated the Prisma Access (Managed by Strata Cloud Manager) license on the same tenant you are activating AIOps for NGFW Premium license.Activate Strata Cloud Manager.
- Activate Strata Cloud Manager Essentials: The free tier that offers configuration management, network security lifecycle management, and can also provide visibility if you have a paid license of Strata Logging Service.
- Activate Strata Cloud Manager Pro: This tier provides advanced features plus all the Strata Cloud Manager Essentials features. When you activate Strata Cloud Manager Pro, it also includes access to the Strata Logging Service, which comes with one year of log retention and unlimited storage.
If you were using Strata Cloud Manager before the introduction of these new licensing tiers, your existing AIOps for NGFW Premium license remains supported. You need to activate Strata Cloud Manager using the AIOps for NGFW Premium license.Skip this step if you already activated Strata Cloud Manager.(Optional) Activate the Cloud Identity Engine license.Activate Cloud Identity Engine (CIE) if you plan to use user-based authentication policy rules. CIE activation is not required for initial onboarding and can be activated at a later time as needed.Register the firewall with the Palo Alto Networks Customer Support Portal (CSP) and activate licenses.- Log in to the firewall web interface and find the Serial # under the General Information widget in the Dashboard.Register the firewall.Activate the Support license on the firewall.Install the device certificate on the firewall.This is required to successfully authenticate the firewall with the Palo Alto Networks CSP and use Strata Cloud Manager.Configure the firewall Panorama Settings required to connect to Strata Cloud Manager.
- Log in to the firewall web interface.Configure the firewall DNS and NTP servers.This is required to successfully connect the firewall to Strata Cloud Manager and install software and content updates.
- Select and edit the Services.
- Select Servers and configure the Primary DNS Server and Secondary DNS Server.
- Select NTP and configure the Primary and Secondary NTP Server Address.
- Click OK.
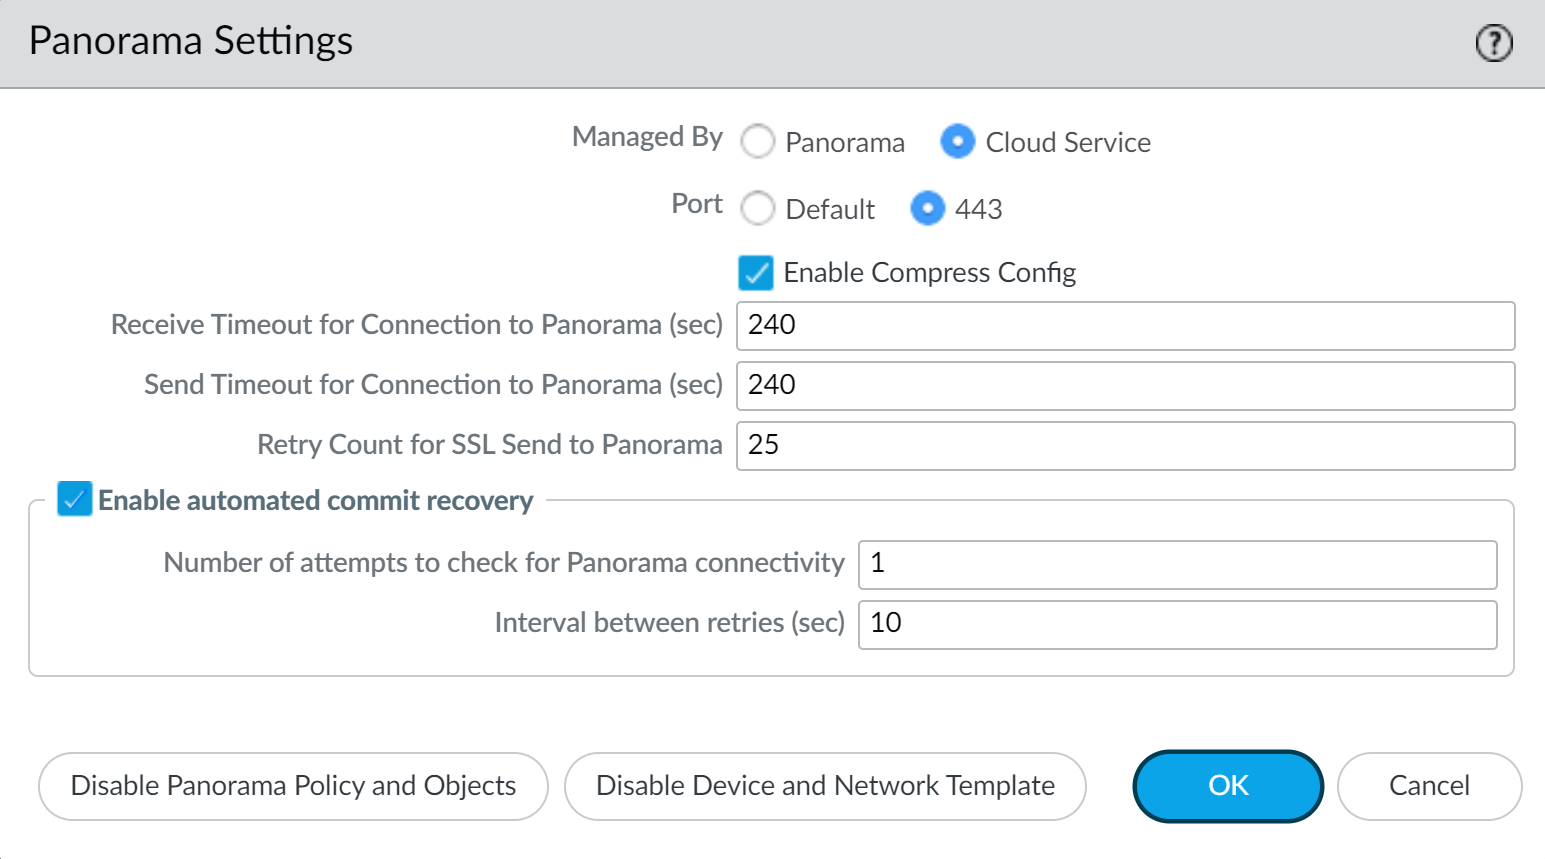
Configure the Panorama Settings.- Select and edit the Panorama Settings.
- Select Managed By Cloud Service.
- (NGFW (Managed by Strata Cloud Manager) Running PAN-OS 11.2 and later) Select the Port used for connectivity between the NGFW (Managed by Strata Cloud Manager) and Strata Cloud Manager.
- Default—The default TCP port 3978. This port is dedicated for communication between the NGFW (Managed by Strata Cloud Manager) and Strata Cloud Manager.
- 443—TCP port 443 is the standard port used for HTTP traffic encrypted with SSL. Using port 443 for NGFW (Managed by Strata Cloud Manager) and Strata Cloud Manager communication greatly simplifies network configuration management for both administrators and end users.Additionally, using port 443 reduces your network attack surface by reducing the number of open ports on your network.
- (Optional for (NGFW (Managed by Strata Cloud Manager) Running PAN-OS 11.2 and later) Check Enable Compress Config to compress the size of the configuration file exchanged between the NGFW (Managed by Strata Cloud Manager) and Strata Cloud Manager, and vice versa, to increase file transfer times.Enabling this setting does not cause load or delay in firewall processing or increase commit operation times.
- Click OK.
![]() Commit.(Optional) Create a Device Onboarding Rule to associate the firewall with a folder and push a configuration when the firewall first connects to Strata Cloud Manager.Associate a firewall with your Palo Alto Networks Customer Support Portal (CSP) account.
Commit.(Optional) Create a Device Onboarding Rule to associate the firewall with a folder and push a configuration when the firewall first connects to Strata Cloud Manager.Associate a firewall with your Palo Alto Networks Customer Support Portal (CSP) account.- Log in to Strata Cloud Manager.In the bottom-left corner of the window, select the icon for your tenant and select .
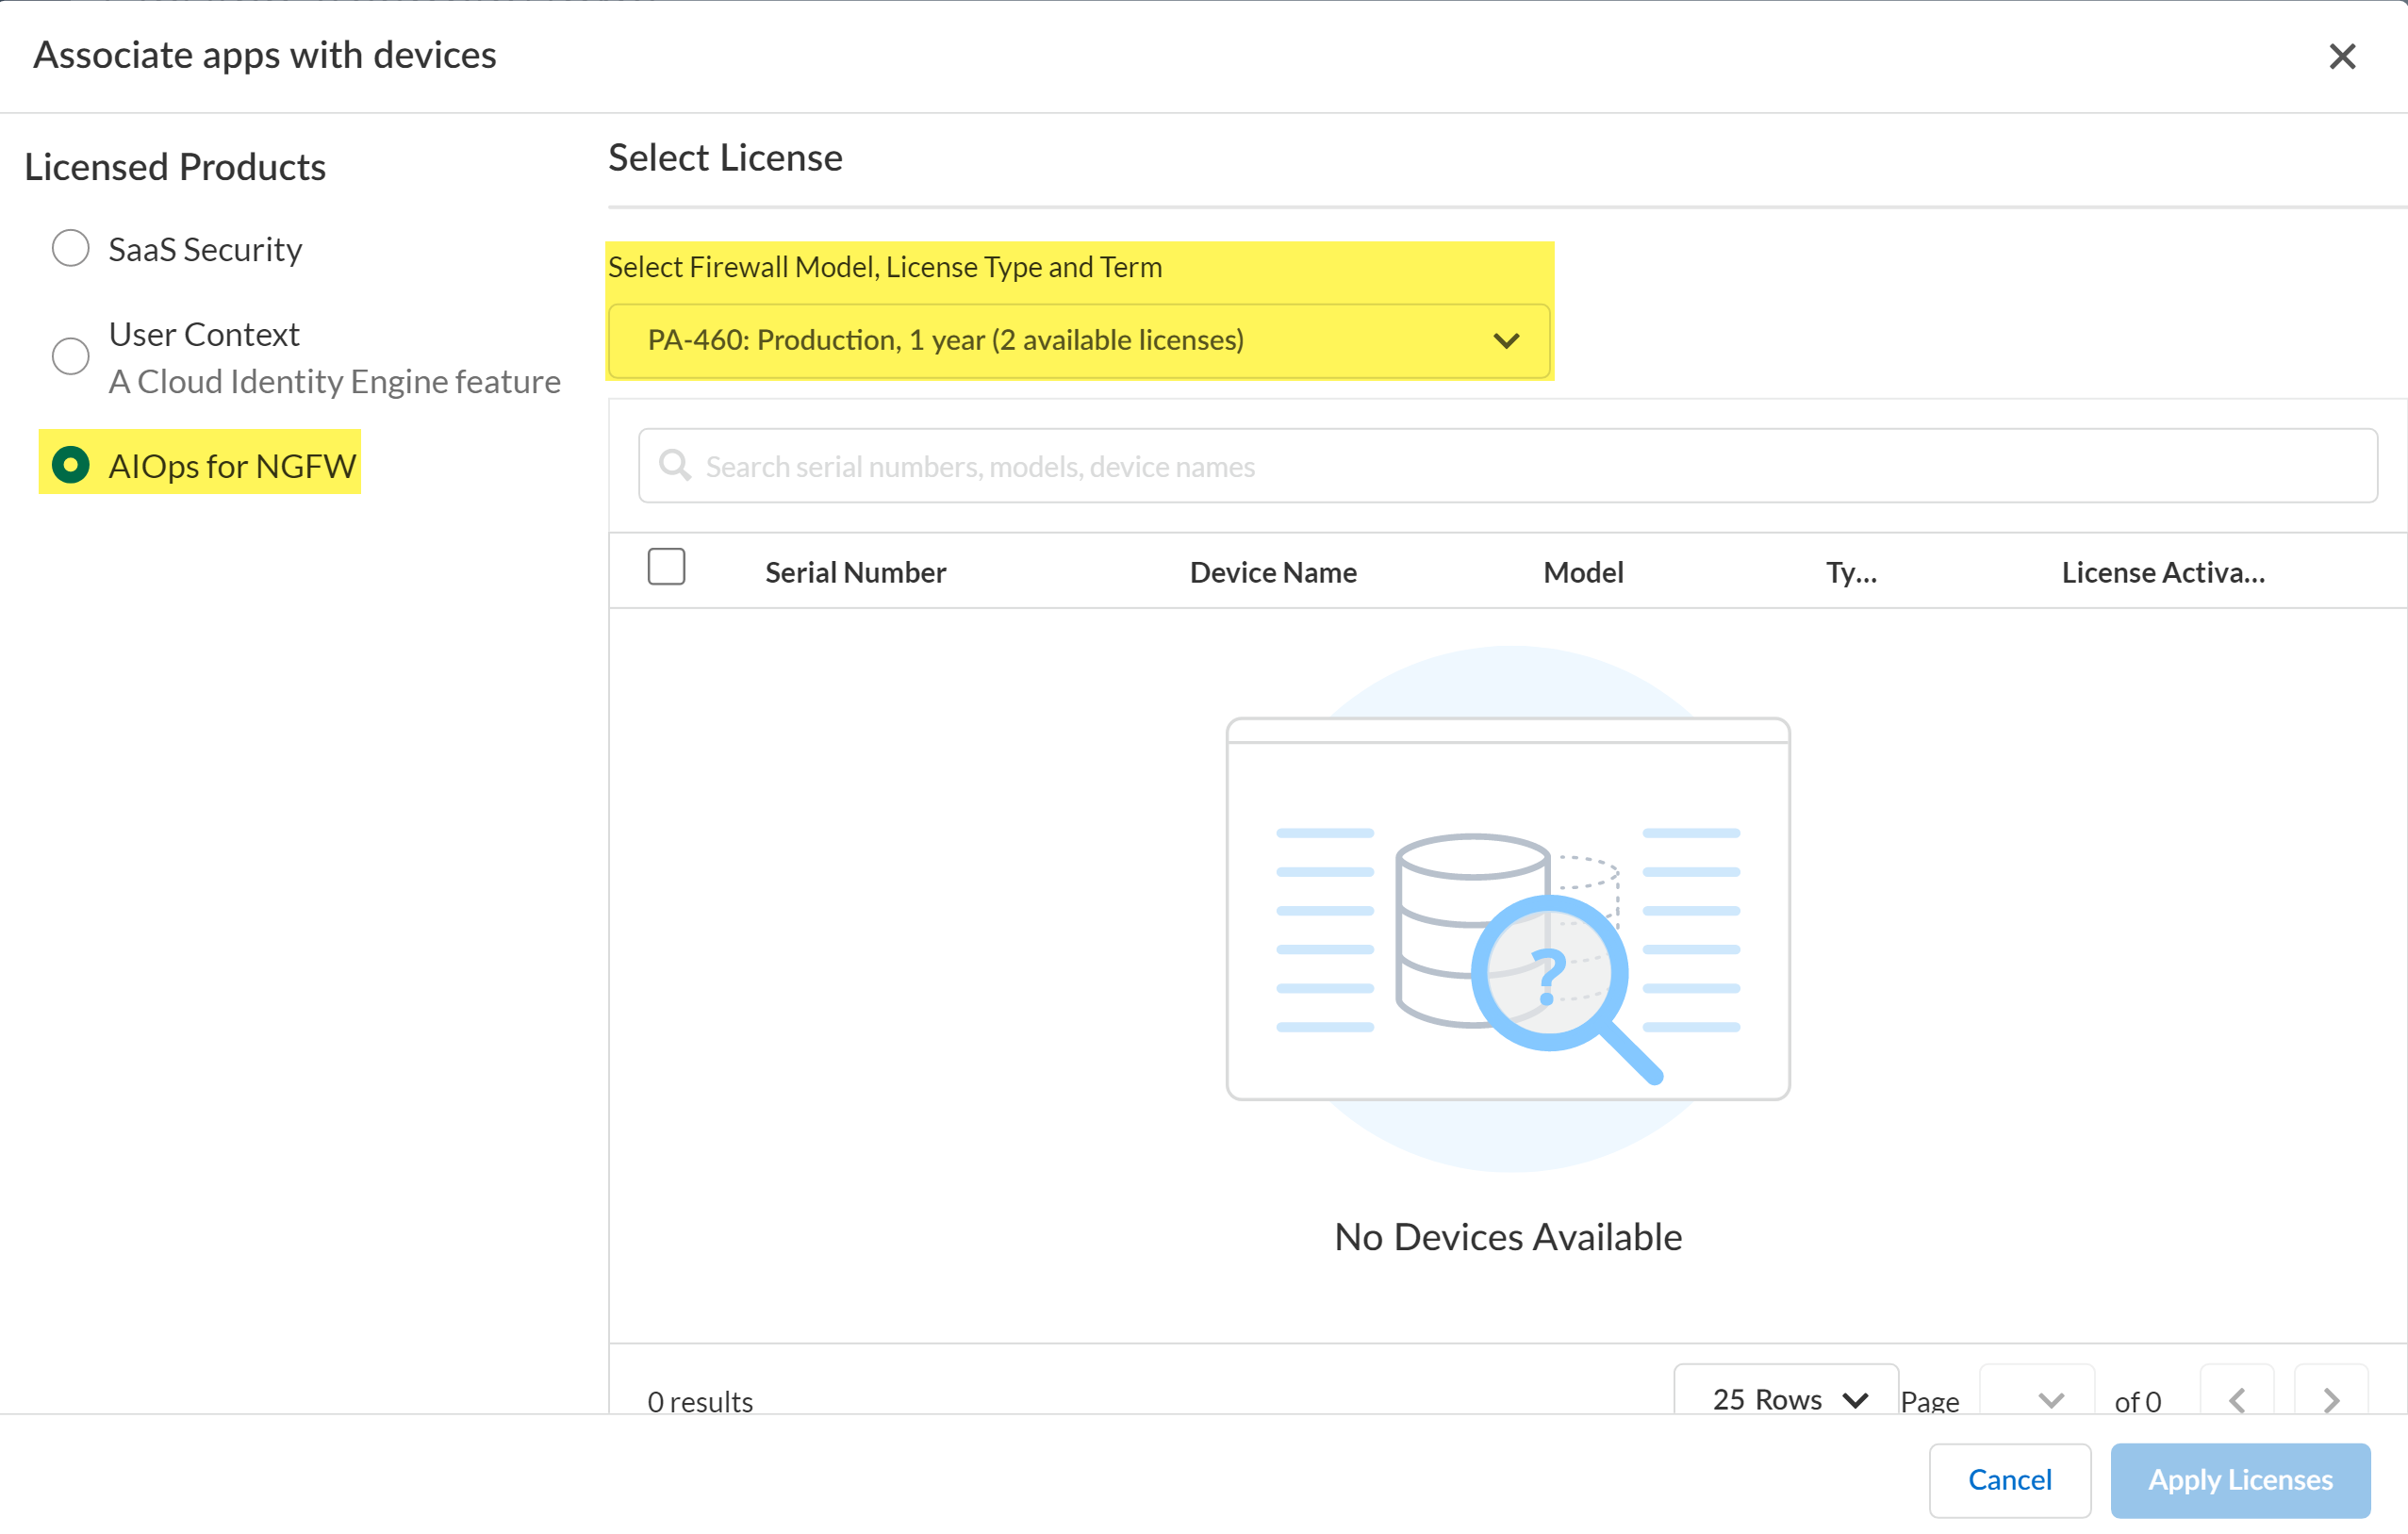
![]() .Select one or more firewalls you want to onboard with your CSP account.You can use the firewall serial number you gathered in the previous step to search for a specific firewall.Save.(Optional) If you are activating AIOps for NGFW Premium license or Strata Cloud Manager Pro, you need to associate the firewall with Strata Cloud Manager.
.Select one or more firewalls you want to onboard with your CSP account.You can use the firewall serial number you gathered in the previous step to search for a specific firewall.Save.(Optional) If you are activating AIOps for NGFW Premium license or Strata Cloud Manager Pro, you need to associate the firewall with Strata Cloud Manager.- In Device Associations, select the firewall you added and Associate Products.For the Licensed Products, select Strata Cloud Manager or AIOps for NGFW.From the Select Firewall Model, License Type, and Term drop-down, select the firewall and support license to apply to the firewall.The model for the firewall license must match the firewall model you are onboarding to Strata Cloud Manager.Apply Licenses.
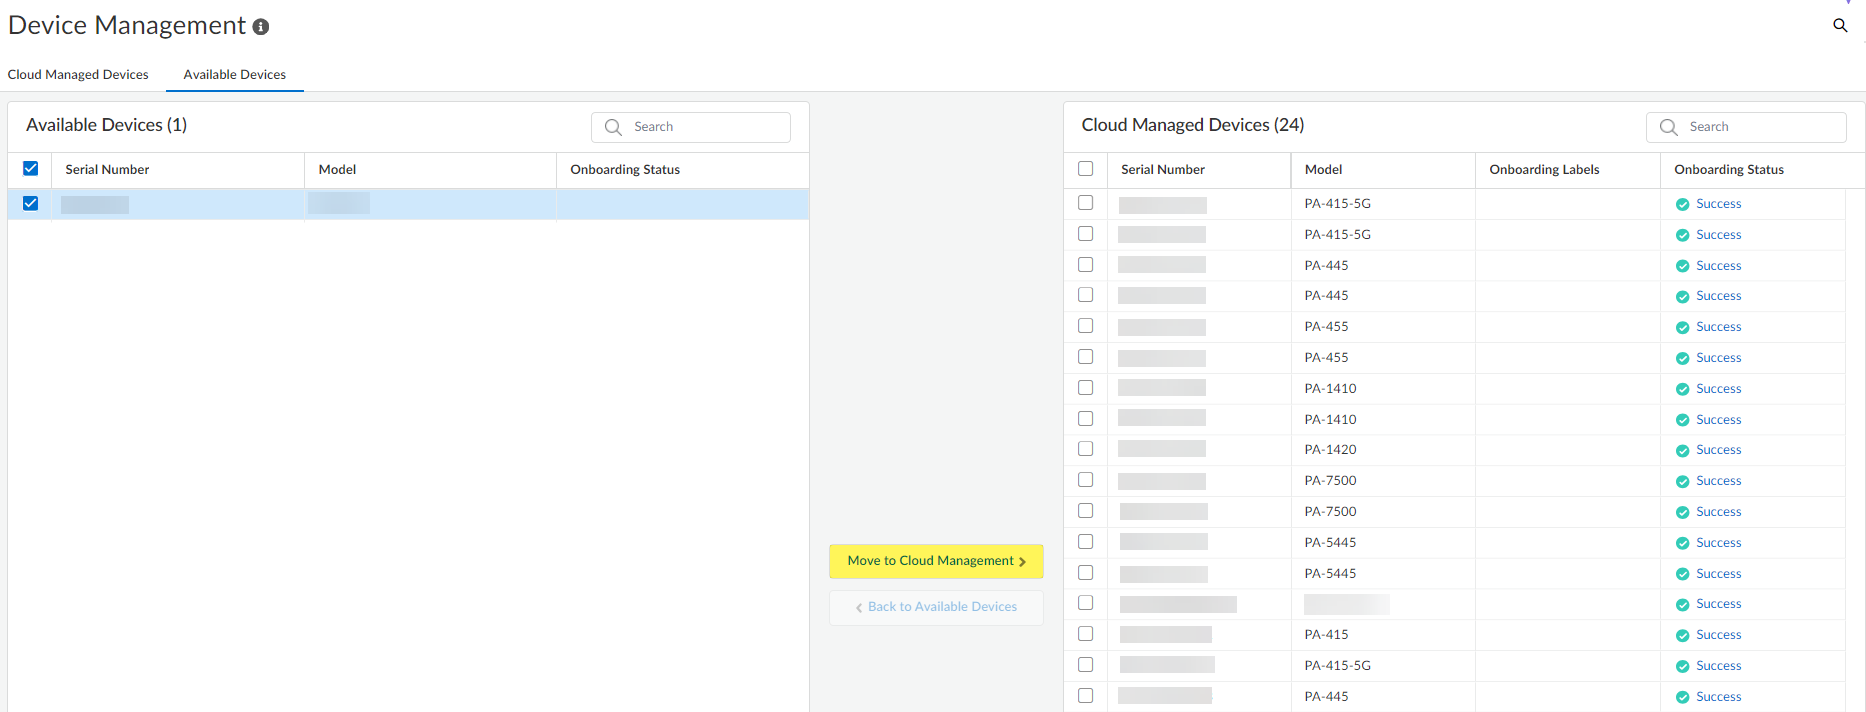
![]() In the Device Associations page, verify the Associated Products for the onboarded firewall display AIOps for NGFW and Strata Logging Service.Add the available device to Strata Cloud Manager.
In the Device Associations page, verify the Associated Products for the onboarded firewall display AIOps for NGFW and Strata Logging Service.Add the available device to Strata Cloud Manager.- Select .In the Available Devices select the firewall you just added.Move to Cloud Management.You are prompted to confirm the number of selected firewalls. Click Move to Cloud Management to continue.
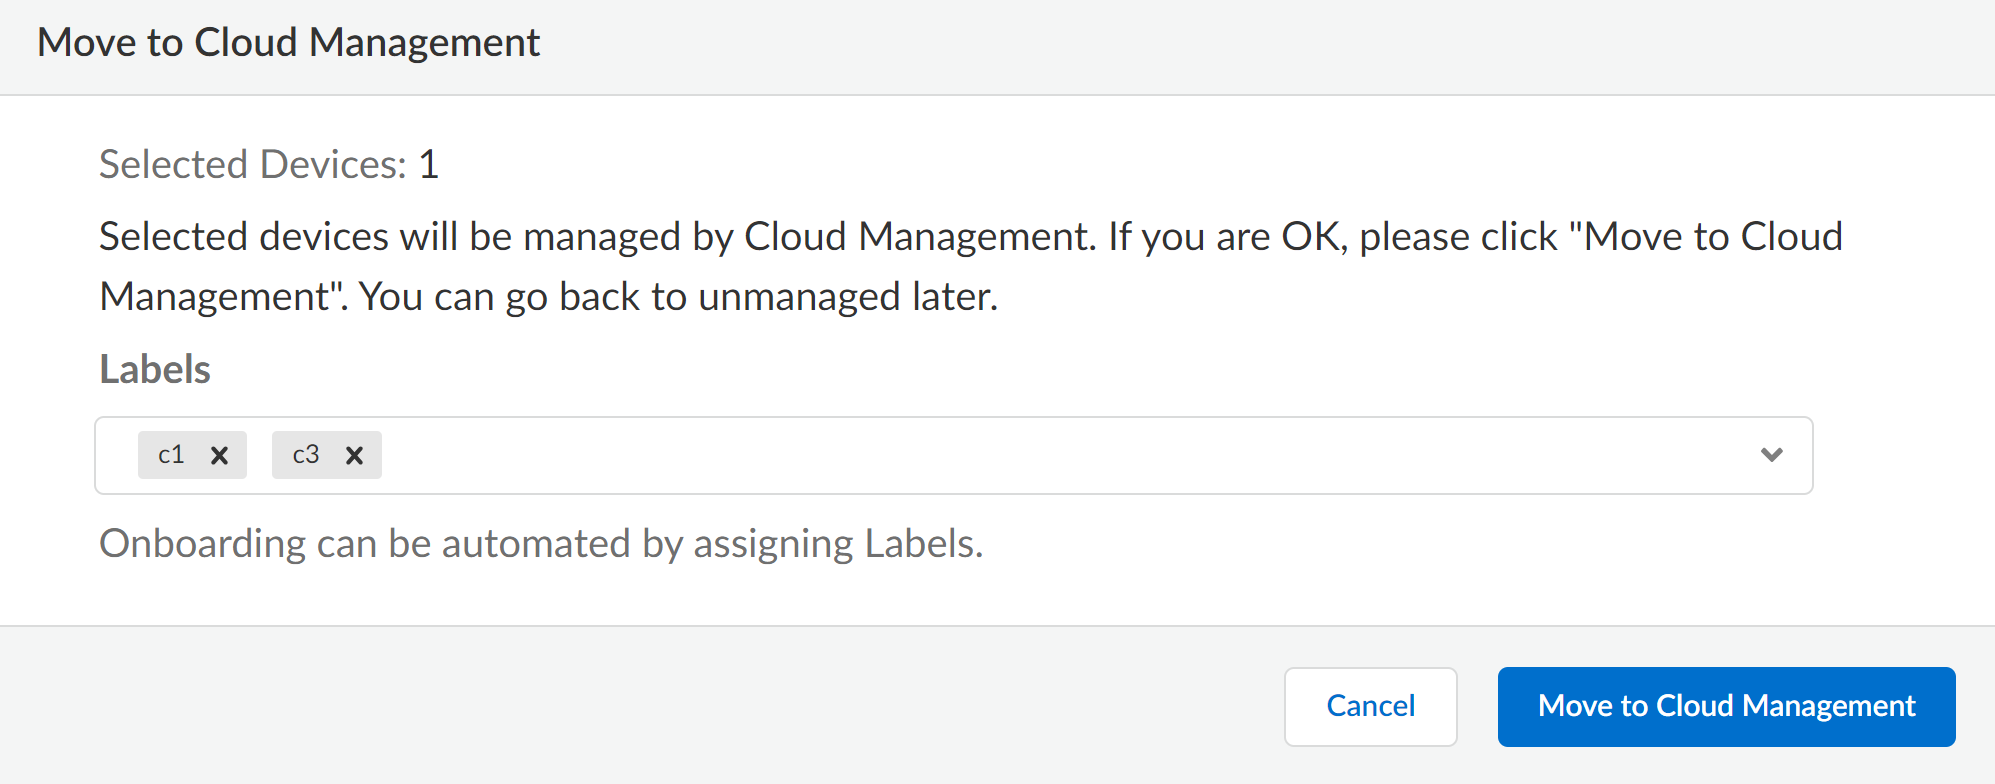
![]() (Optional) Apply Labels to the onboarded firewall.You can select an existing label or create a new label by typing the label you want to create.Click Move to Cloud to continue adding the firewall to Strata Cloud Manager.
(Optional) Apply Labels to the onboarded firewall.You can select an existing label or create a new label by typing the label you want to create.Click Move to Cloud to continue adding the firewall to Strata Cloud Manager.![]() Confirm that the selected firewall is now listed in the list of Cloud Managed Devices and that the Onboarding Status shows Success.Verify that the firewall successfully onboarded to Strata Cloud Manager.Two configuration pushes occur by default to the firewall after successful onboarding to Strata Cloud Manager. The first push from Strata Cloud Manager automatically enables the Advanced Routing Engine and restarts the firewall. The second pushes the configuration from Strata Cloud Manager to the firewall.If the Advanced Routing Engine is not automatically enabled as part of the onboarding process to Strata Cloud Manager, you need to manually enable Advanced Routing on the firewall.
Confirm that the selected firewall is now listed in the list of Cloud Managed Devices and that the Onboarding Status shows Success.Verify that the firewall successfully onboarded to Strata Cloud Manager.Two configuration pushes occur by default to the firewall after successful onboarding to Strata Cloud Manager. The first push from Strata Cloud Manager automatically enables the Advanced Routing Engine and restarts the firewall. The second pushes the configuration from Strata Cloud Manager to the firewall.If the Advanced Routing Engine is not automatically enabled as part of the onboarding process to Strata Cloud Manager, you need to manually enable Advanced Routing on the firewall.- Select .You should see the serial number for the firewall that you just added, but you won’t see any additional device information for it yet.Log in to the firewall CLI and verify the firewall successfully connected to Strata Cloud Manager.After you connect the firewall to Strata Cloud Manager, it’s automatically converted to logical router mode, restarted, and Strata Cloud Manager pushes the default configuration to the firewall.For this to work, make sure:
- You’ve installed the device certificate on the firewall.
- The firewall meets the prerequisites for Strata Cloud Manager.
- You’ve resolved variables. If variables aren’t resolved, Strata Cloud Manager will fail to push the default configuration to the firewall.
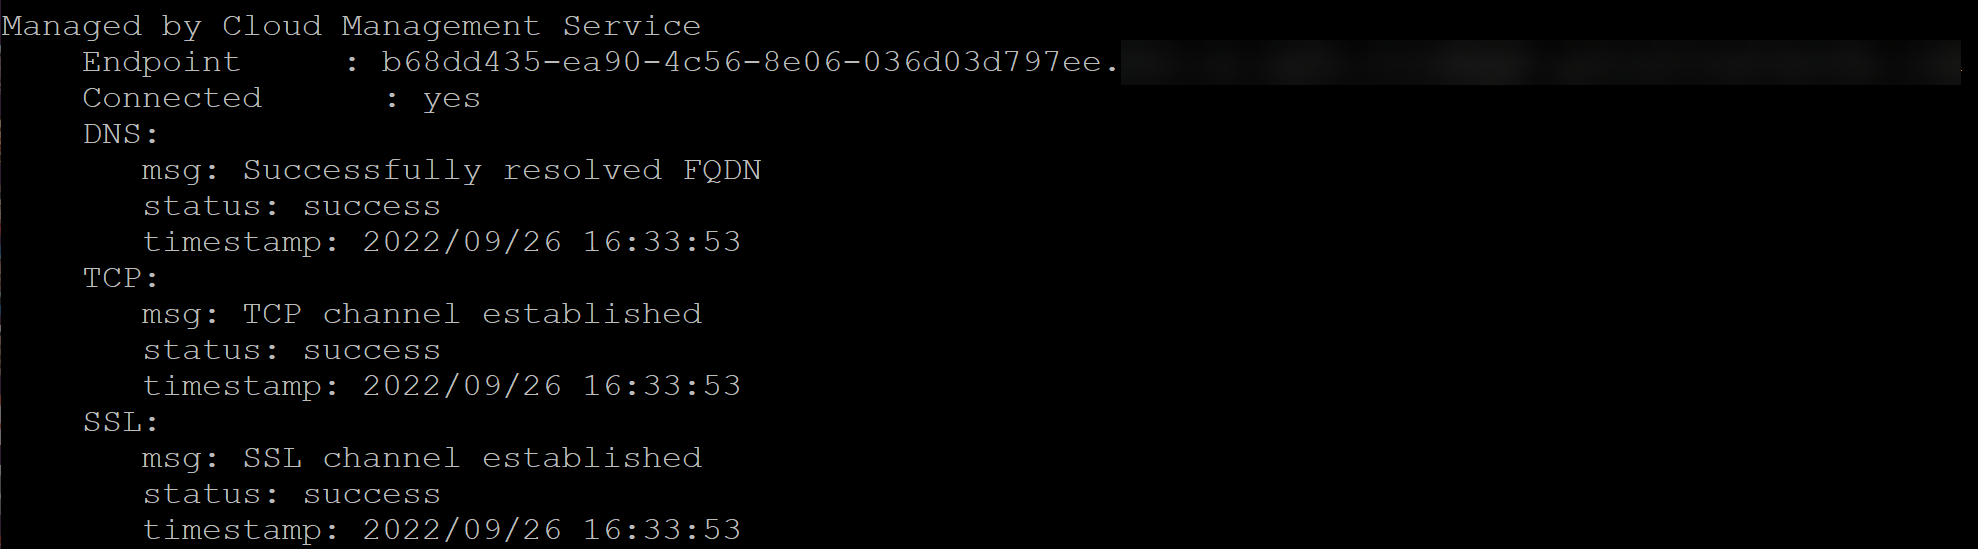
admin> show cloud-management-status![]() Verify the firewall successfully connected to a Strata Cloud Manager Endpoint and that the Connected status displays Yes.Once the firewall is Connected, the firewall automatically converts to logical router mode and restarts, and Strata Cloud Manager pushes the default configuration to the firewall.Return to Strata Cloud Manager and select and verify that the details for the firewall appear, such as serial number, model, type, and IP address.By default, newly onboarded firewalls are added to the All Firewalls folder.Create and associate your firewall with a folder.Folders are used to logically group your firewalls for simplified configuration management. Skip this step if you created a device onboarding rule to automatically move the firewall to a target folder.(HA only) Both firewalls must be in the same folder to configure HA. If you need to configure your firewalls in a high availability (HA) configuration, be sure to plan your folder structure accordingly and move both firewalls to the same folder before you configure HA.Additionally, firewalls in an HA configuration can't be moved to a new folder. To move them, you must first break the HA configuration, move both firewalls to the new folder, and then reconfigure HA.
Verify the firewall successfully connected to a Strata Cloud Manager Endpoint and that the Connected status displays Yes.Once the firewall is Connected, the firewall automatically converts to logical router mode and restarts, and Strata Cloud Manager pushes the default configuration to the firewall.Return to Strata Cloud Manager and select and verify that the details for the firewall appear, such as serial number, model, type, and IP address.By default, newly onboarded firewalls are added to the All Firewalls folder.Create and associate your firewall with a folder.Folders are used to logically group your firewalls for simplified configuration management. Skip this step if you created a device onboarding rule to automatically move the firewall to a target folder.(HA only) Both firewalls must be in the same folder to configure HA. If you need to configure your firewalls in a high availability (HA) configuration, be sure to plan your folder structure accordingly and move both firewalls to the same folder before you configure HA.Additionally, firewalls in an HA configuration can't be moved to a new folder. To move them, you must first break the HA configuration, move both firewalls to the new folder, and then reconfigure HA.- Select and Add Folder to create a new folder.Locate the newly added firewall that is associated with the All Firewalls by default.In the Action column, Move the firewall to the folder you created.(Optional) Modify the displayed firewall name.By default, firewalls onboarded to Strata Cloud Manager display the firewall serial number as the displayed firewall name throughout Strata Cloud Manager. Rename the displayed firewall from the serial number to a more user-friendly name to make it easier to identify.
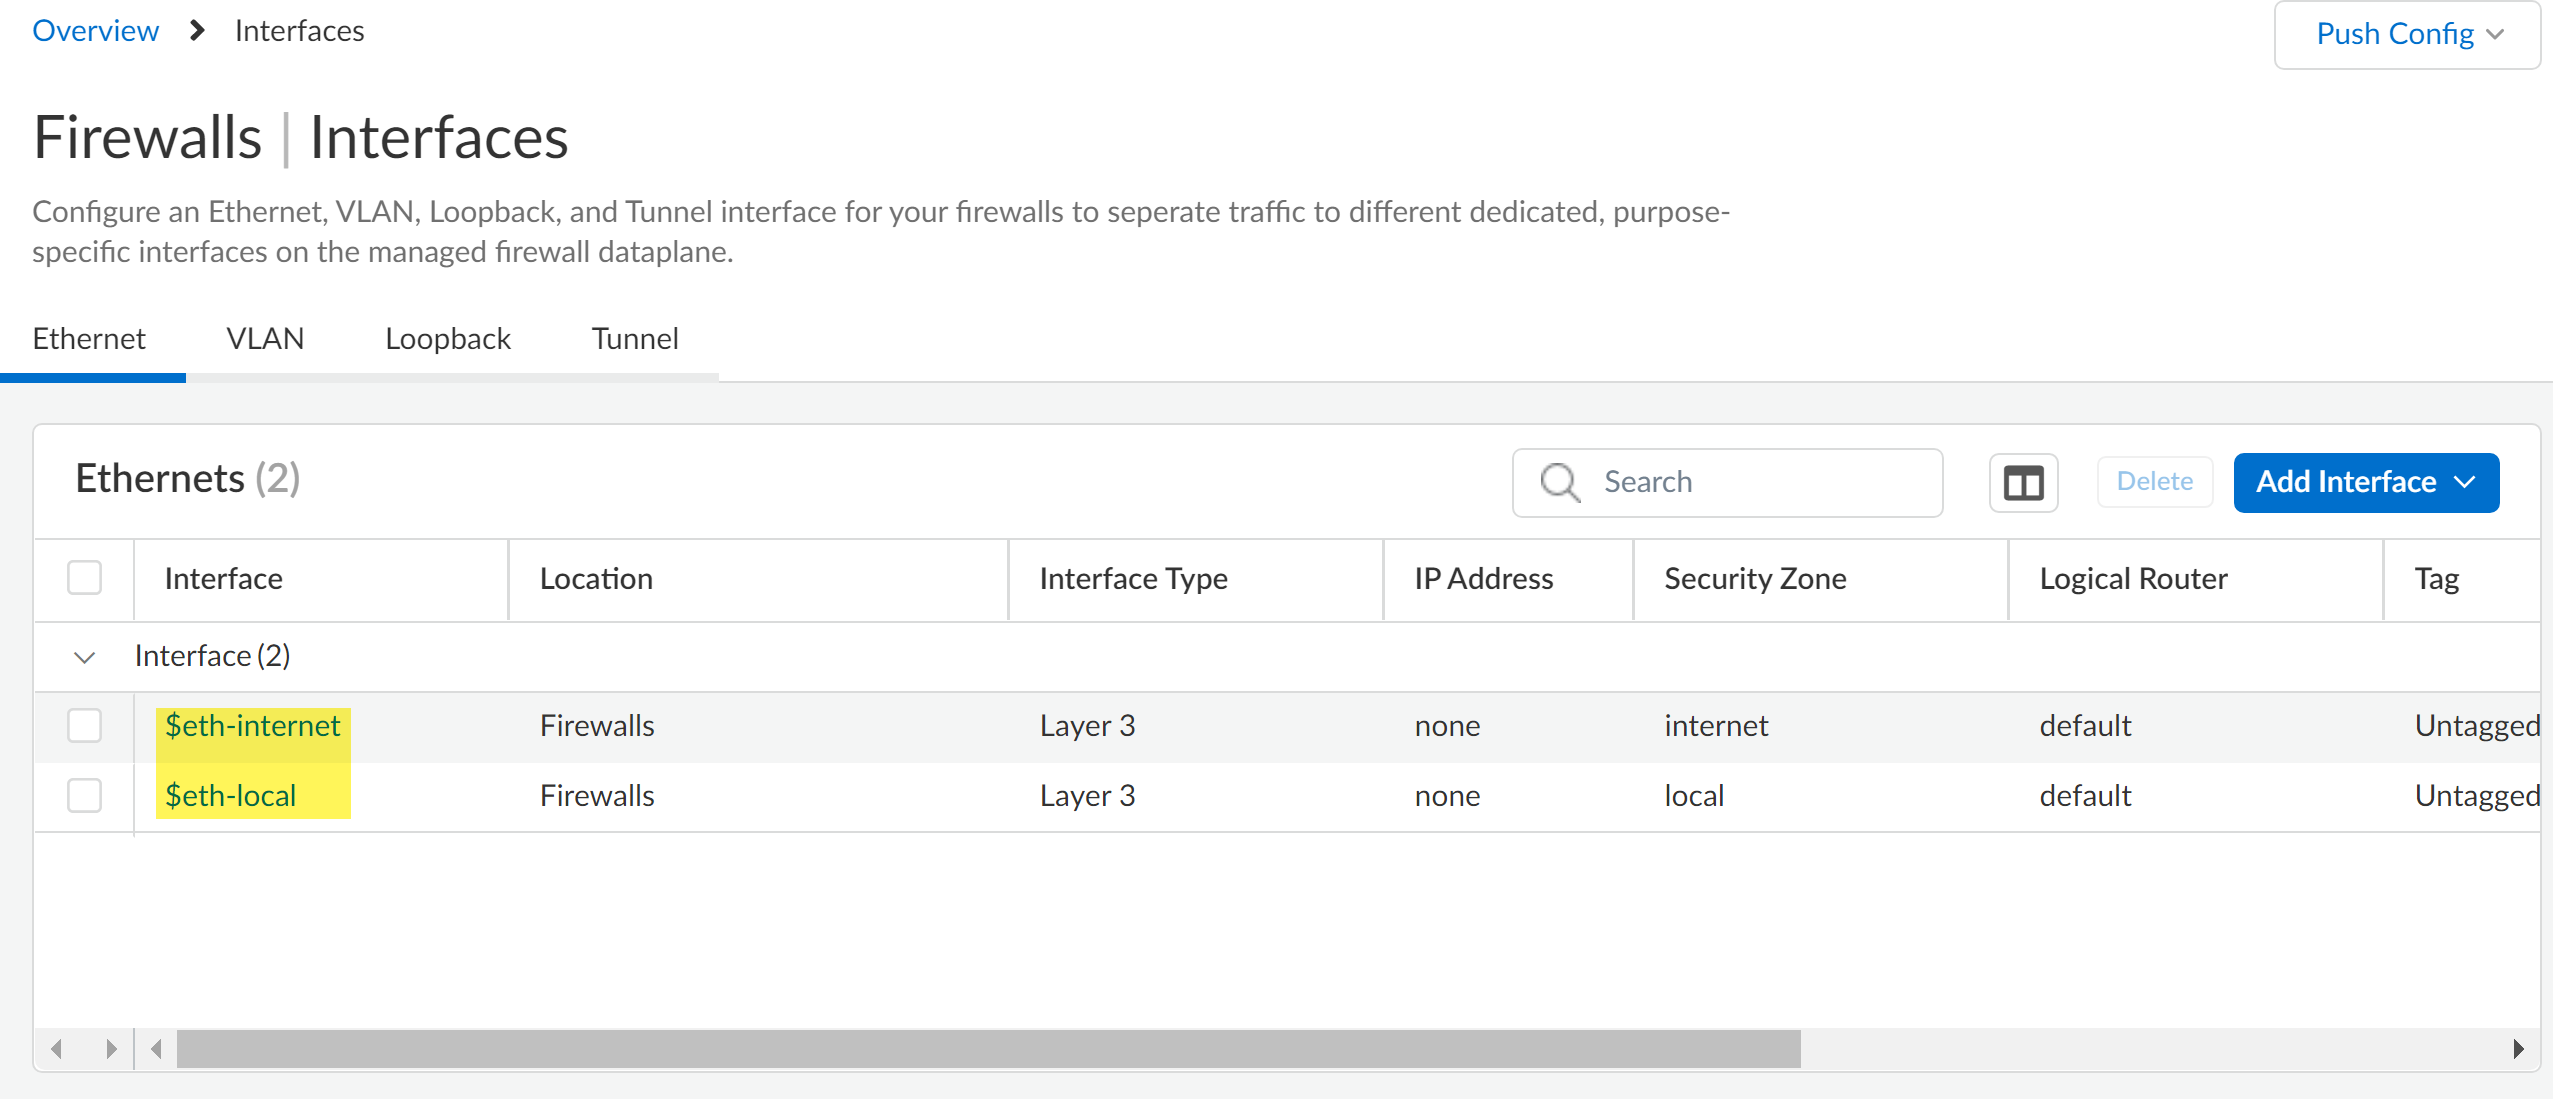
- Select and locate the firewall you onboarded.In the Actions column, expand the Actions menu and Edit.Enter a new Display Name for the firewall.Save.Review the predefined interface and logical router configurations.The predefined interfaces and logical router configuration are required to successfully push configuration changes to managed firewalls after they’re successfully added to Strata Cloud Manager.
- $eth-internet (eth1/3)—Ethernet interface for outbound internet connections. Associated with the default logical router configuration.
- $eth-local (eth1/4)—Ethernet interface for local network connections. Associated with the default router configuration.
The predefined interface and logical router configuration are associated with the default All Firewalls folder and are inherited by all other folders you create. You might reassign the $eth-internet and $eth-local interfaces for a newly created folder or for the individual firewall as needed.- Select and verify that $eth-internet and $eth-local are displayed.To reassign the interface, click the interface name to select a new Default Interface Assignment and Save.
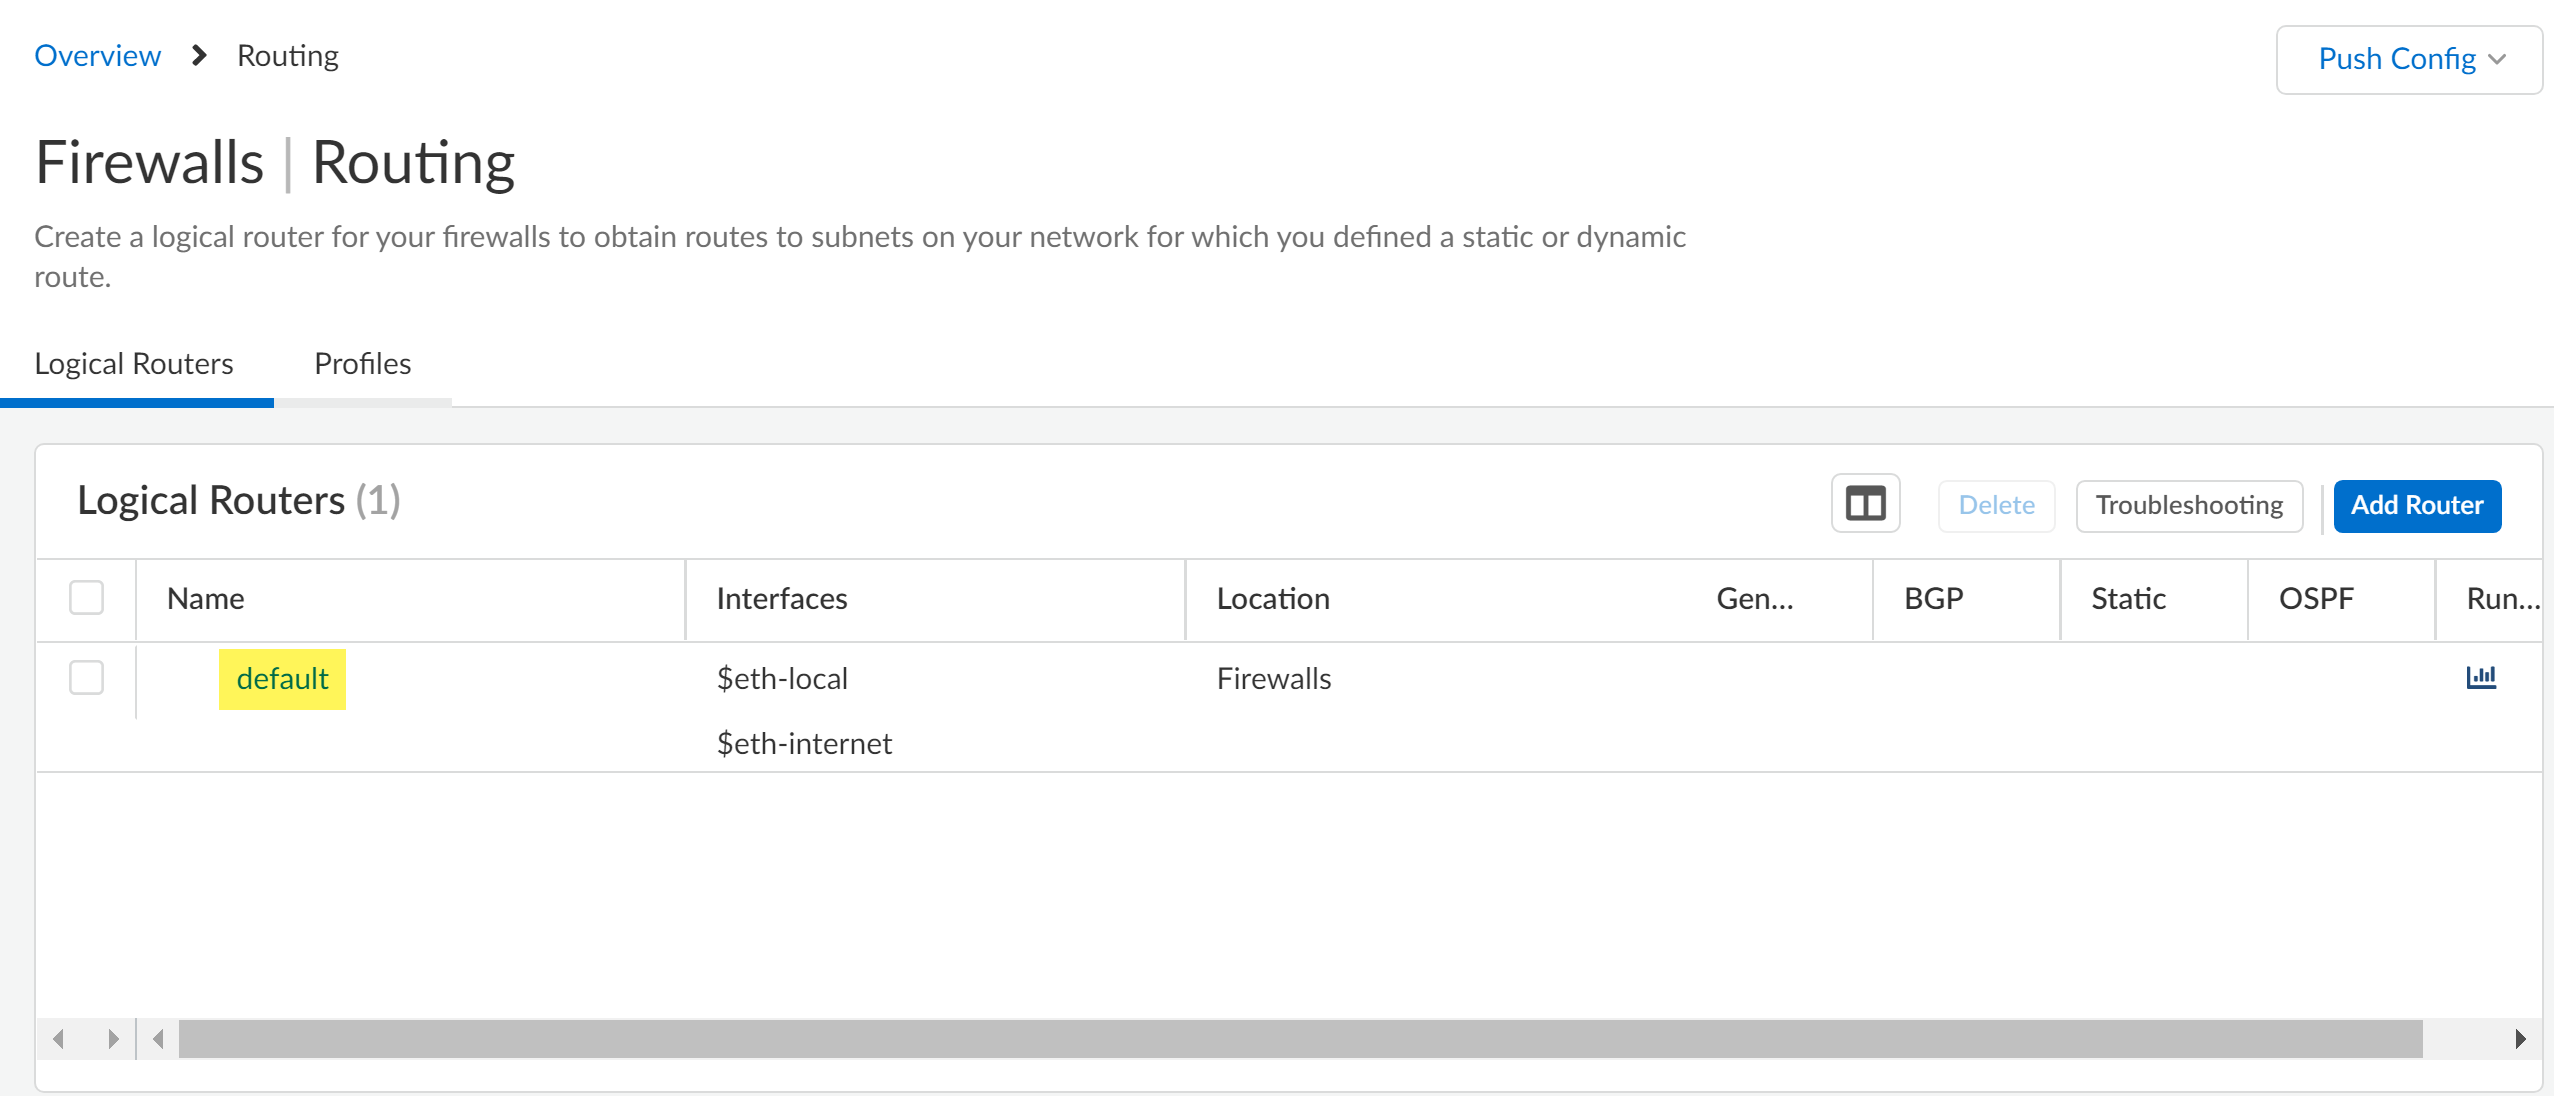
![]() Select and verify the default logical router is displayed.
Select and verify the default logical router is displayed.![]() Push Config to push your configuration changes.Select and to verify that your configuration push was successful.Finally, check the Strata Cloud Manager Command Center and confirm that your firewall appears in the Summary view.
Push Config to push your configuration changes.Select and to verify that your configuration push was successful.Finally, check the Strata Cloud Manager Command Center and confirm that your firewall appears in the Summary view.
Onboard VM-Series
Information for onboarding VM-Series NGFWs to Strata Cloud Manager.To onboard VM-series funded by software NGFW credits, see Create a Deployment Profile.
Onboard Prisma Access to Strata Cloud Manager
Learn about how to onboard Prisma Access to Strata Cloud Manager.Where Can I Use This? What Do I Need? - Prisma Access
One of these: Strata Cloud Manager provides comprehensive visibility and insights into all Prisma Access deployments, whether managed by Strata Cloud Manager or Panorama. Additionally, you have the option to use Strata Cloud Manager as the management interface for Prisma Access if needed.During Prisma Access activation, you can choose either Strata Cloud Manager or Panorama as the management interface. If Panorama currently manages your Prisma Access deployment, you can migrate the configuration to Strata Cloud Manager for management. However, after migrating, you cannot switch back to Panorama.Onboard Prisma Access for Visibility
Before you begin, confirm that your Prisma Access deployment meets the prerequisites for visibility and monitoring in Strata Cloud Manager.To use Strata Cloud Manager for visibility and monitoring, you just need to log into Strata Cloud manager and choose the appropriate Prisma Access tenant. Once you select the correct tenant, you can see Prisma Access data in Command Center, Dashboards and Activity Insights.- Access Strata Cloud Manager - You can access Strata Cloud Manager from the Palo Alto Networks hub, or you can access it directly at stratacloudmanager.paloaltonetworks.com.
- Verify or switch tenant - Go to the bottom of the navigation menu and check your tenant details. If the tenant name is incorrect, use the search option to find and switch to the correct tenant.
Onboard Prisma Access for Configuration Management
- New Prisma Access Deployment - If you have chosen Strata Cloud Manager as the management interface during Prisma Access activation, you need to begin by configuring your Prisma Access features in Strata Cloud Manager after activation.
- Migration from Panorama - If your Prisma Access deployment is managed
by Panorama, you can migrate the configuration from Panorama to Strata Clod
Manager. Once you migrate to Strata Cloud Manager, you cannot switch back to
Panorama.Before you migrate Prisma Access to Strata Cloud Manager, review the prerequisites to confirm that your existing deployment meets all necessary requirements.Palo Alto Networks offers an in-product workflow to migrate your existing Prisma Access Deployment managed by Panorama to Strata Cloud Manager.